
-
-a -
--all -
Automatically stage files that have
been modified and deleted, but new files you have not
told Git about are not affected. -
-p -
--patch -
Use the interactive patch selection interface to choose
which changes to commit. See git-add[1] for
details. -
-C <commit> -
--reuse-message=<commit> -
Take an existing <commit> object, and reuse the log message
and the authorship information (including the timestamp)
when creating the commit. -
-c <commit> -
--reedit-message=<commit> -
Like
-C, but with-cthe editor is invoked, so that
the user can further edit the commit message. -
--fixup=[(amend|reword):]<commit> -
Create a new commit which «fixes up» <commit> when applied with
git rebase --autosquash. Plain--fixup=<commit>creates a
«fixup!» commit which changes the content of <commit> but leaves
its log message untouched.--fixup=amend:<commit>is similar but
creates an «amend!» commit which also replaces the log message of
<commit> with the log message of the «amend!» commit.
--fixup=reword:<commit>creates an «amend!» commit which
replaces the log message of <commit> with its own log message
but makes no changes to the content of <commit>.The commit created by plain
--fixup=<commit>has a title
composed of «fixup!» followed by the title of <commit>,
and is recognized specially bygit rebase --autosquash. The-m
option may be used to supplement the log message of the created
commit, but the additional commentary will be thrown away once the
«fixup!» commit is squashed into <commit> by
git rebase --autosquash.The commit created by
--fixup=amend:<commit>is similar but its
title is instead prefixed with «amend!». The log message of
<commit> is copied into the log message of the «amend!» commit and
opened in an editor so it can be refined. Whengit rebasesquashes the «amend!» commit into <commit>, the
--autosquash
log message of <commit> is replaced by the refined log message
from the «amend!» commit. It is an error for the «amend!» commit’s
log message to be empty unless--allow-empty-messageis
specified.--fixup=reword:<commit>is shorthand for--fixup=amend:<commit>. It creates an «amend!» commit with only a log message
--only
(ignoring any changes staged in the index). When squashed bygit, it replaces the log message of <commit>
rebase --autosquash
without making any other changes.Neither «fixup!» nor «amend!» commits change authorship of
<commit> when applied bygit rebase --autosquash.
See git-rebase[1] for details. -
--squash=<commit> -
Construct a commit message for use with
git rebase --autosquash.
The commit message title is taken from the specified
commit with a prefix of «squash! «. Can be used with additional
commit message options (-m/-c/-C/-F). See
git-rebase[1] for details. -
When used with
-C/-c/--amendoptions, or when committing after a
conflicting cherry-pick, declare that the authorship of the
resulting commit now belongs to the committer. This also renews
the author timestamp. -
--short -
When doing a dry-run, give the output in the short-format. See
git-status[1] for details. Implies--dry-run. -
--branch -
Show the branch and tracking info even in short-format.
-
--porcelain -
When doing a dry-run, give the output in a porcelain-ready
format. See git-status[1] for details. Implies
--dry-run. -
--long -
When doing a dry-run, give the output in the long-format.
Implies--dry-run. -
-z -
--null -
When showing
shortorporcelainstatus output, print the
filename verbatim and terminate the entries with NUL, instead of LF.
If no format is given, implies the--porcelainoutput format.
Without the-zoption, filenames with «unusual» characters are
quoted as explained for the configuration variablecore.quotePath
(see git-config[1]). -
-F <file> -
--file=<file> -
Take the commit message from <file>. Use — to
read the message from the standard input. -
--author=<author> -
Override the commit author. Specify an explicit author using the
standardA U Thor <author@example.com>format. Otherwise <author>
is assumed to be a pattern and is used to search for an existing
commit by that author (i.e.git rev-list --all -i --author=<author>);
the commit author is then copied from the first such commit found. -
--date=<date> -
Override the author date used in the commit.
-
-m <msg> -
--message=<msg> -
Use <msg> as the commit message.
If multiple-moptions are given, their values are
concatenated as separate paragraphs.The
-moption is mutually exclusive with-c,-C, and-F. -
-t <file> -
--template=<file> -
When editing the commit message, start the editor with the
contents in <file>. Thecommit.templateconfiguration
variable is often used to give this option implicitly to the
command. This mechanism can be used by projects that want to
guide participants with some hints on what to write in the message
in what order. If the user exits the editor without editing the
message, the commit is aborted. This has no effect when a message
is given by other means, e.g. with the-mor-Foptions. -
-s -
--signoff -
--no-signoff -
Add a
Signed-off-bytrailer by the committer at the end of the commit
log message. The meaning of a signoff depends on the project
to which you’re committing. For example, it may certify that
the committer has the rights to submit the work under the
project’s license or agrees to some contributor representation,
such as a Developer Certificate of Origin.
(See https://developercertificate.org for the one used by the
Linux kernel and Git projects.) Consult the documentation or
leadership of the project to which you’re contributing to
understand how the signoffs are used in that project.The
--no-signoffoption can be used to countermand an earlier--signoff
option on the command line. -
--trailer <token>[(=|:)<value>] -
Specify a (<token>, <value>) pair that should be applied as a
trailer. (e.g.git commit --trailer "Signed-off-by:C O Mitter \will add the
<committer@example.com>" --trailer "Helped-by:C O Mitter \
<committer@example.com>"Signed-off-bytrailer
and theHelped-bytrailer to the commit message.)
Thetrailer.*configuration variables
(git-interpret-trailers[1]) can be used to define if
a duplicated trailer is omitted, where in the run of trailers
each trailer would appear, and other details. -
-n -
--[no-]verify -
Bypass the
pre-commitandcommit-msghooks.
See also githooks[5]. -
--allow-empty -
Usually recording a commit that has the exact same tree as its
sole parent commit is a mistake, and the command prevents you
from making such a commit. This option bypasses the safety, and
is primarily for use by foreign SCM interface scripts. -
--allow-empty-message -
Create a commit with an empty commit message without using plumbing
commands like git-commit-tree[1]. Like--allow-empty, this
command is primarily for use by foreign SCM interface scripts. -
--cleanup=<mode> -
Determine how the supplied commit message should be
cleaned up before committing. The <mode> can bestrip,
whitespace,verbatim,scissorsordefault.-
strip -
Strip leading and trailing empty lines, trailing whitespace,
commentary and collapse consecutive empty lines. -
whitespace -
Same as
stripexcept #commentary is not removed. -
verbatim -
Do not change the message at all.
-
scissors -
Same as
whitespaceexcept that everything from (and including)
the line found below is truncated, if the message is to be edited.
«#» can be customized withcore.commentChar.# ------------------------ >8 ------------------------
-
default -
Same as
stripif the message is to be edited.
Otherwisewhitespace.
The default can be changed by the
commit.cleanupconfiguration
variable (see git-config[1]). -
-
-e -
--edit -
Let the user further edit the message taken from <file>
with-F <file>, command line with-m <message>, and
from <commit> with-C <commit>. -
--no-edit -
Use the selected commit message without launching an editor.
For example,git commit --amend --no-editamends a commit
without changing its commit message. -
--amend -
Replace the tip of the current branch by creating a new
commit. The recorded tree is prepared as usual (including
the effect of the-iand-ooptions and explicit
pathspec), and the message from the original commit is used
as the starting point, instead of an empty message, when no
other message is specified from the command line via options
such as-m,-F,-c, etc. The new commit has the same
parents and author as the current one (the--reset-author
option can countermand this).It is a rough equivalent for:
	$ git reset --soft HEAD^
	$ ... do something else to come up with the right tree ...
	$ git commit -c ORIG_HEAD
but can be used to amend a merge commit.
You should understand the implications of rewriting history if you
amend a commit that has already been published. (See the «RECOVERING
FROM UPSTREAM REBASE» section in git-rebase[1].) -
--no-post-rewrite -
Bypass the
post-rewritehook. -
-i -
--include -
Before making a commit out of staged contents so far,
stage the contents of paths given on the command line
as well. This is usually not what you want unless you
are concluding a conflicted merge. -
-o -
--only -
Make a commit by taking the updated working tree contents
of the paths specified on the
command line, disregarding any contents that have been
staged for other paths. This is the default mode of operation of
git commitif any paths are given on the command line,
in which case this option can be omitted.
If this option is specified together with--amend, then
no paths need to be specified, which can be used to amend
the last commit without committing changes that have
already been staged. If used together with--allow-empty
paths are also not required, and an empty commit will be created. -
--pathspec-from-file=<file> -
Pass pathspec in <file> instead of commandline args. If
<file> is exactly-then standard input is used. Pathspec
elements are separated by LF or CR/LF. Pathspec elements can be
quoted as explained for the configuration variablecore.quotePath
(see git-config[1]). See also--pathspec-file-nuland
global--literal-pathspecs. -
--pathspec-file-nul -
Only meaningful with
--pathspec-from-file. Pathspec elements are
separated with NUL character and all other characters are taken
literally (including newlines and quotes). -
-u[<mode>] -
--untracked-files[=<mode>] -
Show untracked files.
The <mode> parameter is optional (defaults to
all), and is used to
specify the handling of untracked files; when-uis not used, the
default isnormal, i.e. show untracked files and directories.The possible options are:
-
no -
Show no untracked files
-
normal -
Shows untracked files and directories
-
all -
Also shows individual files in untracked directories.
All usual spellings for Boolean value
trueare taken asnormal
andfalseasno.
The default can be changed using thestatus.showUntrackedFiles
configuration variable documented in git-config[1]. -
-
-v -
--verbose -
Show unified diff between the
HEADcommit and what
would be committed at the bottom of the commit message
template to help the user describe the commit by reminding
what changes the commit has.
Note that this diff output doesn’t have its
lines prefixed with#. This diff will not be a part
of the commit message. See thecommit.verboseconfiguration
variable in git-config[1].If specified twice, show in addition the unified diff between
what would be committed and the worktree files, i.e. the unstaged
changes to tracked files. -
-q -
--quiet -
Suppress commit summary message.
-
--dry-run -
Do not create a commit, but show a list of paths that are
to be committed, paths with local changes that will be left
uncommitted and paths that are untracked. -
--status -
Include the output of git-status[1] in the commit
message template when using an editor to prepare the commit
message. Defaults to on, but can be used to override
configuration variablecommit.status. -
--no-status -
Do not include the output of git-status[1] in the
commit message template when using an editor to prepare the
default commit message. -
-S[<key-id>] -
--gpg-sign[=<key-id>] -
--no-gpg-sign -
GPG-sign commits. The <key-id> is optional and
defaults to the committer identity; if specified, it must be
stuck to the option without a space.--no-gpg-signis useful to
countermand bothcommit.gpgSignconfiguration variable, and
earlier--gpg-sign. -
-- -
Do not interpret any more arguments as options.
-
<pathspec>... -
When <pathspec> is given on the command line, commit the contents of
the files that match the pathspec without recording the changes
already added to the index. The contents of these files are also
staged for the next commit on top of what have been staged before.For more details, see the pathspec entry in gitglossary[7].
git commit creates a commit, which is like a snapshot of your repository. These commits are snapshots of your entire repository at specific times. You should make new commits often, based around logical units of change. Over time, commits should tell a story of the history of your repository and how it came to be the way that it currently is. Commits include lots of metadata in addition to the contents and message, like the author, timestamp, and more.
How Git Commit Works
Commits are the building blocks of «save points» within Git’s version control.
git commit -m "update the README.md with link to contributing guide"
Commits shape history
By using commits, you’re able to craft history intentionally and safely. You can make commits to different branches, and specify exactly what changes you want to include. Commits are created on the branch that you’ve currently checked out to (wherever HEAD is pointing) so it’s always a good idea to run git status before making a commit, to check that you’re checked out to the branch that you intend to be. Before you commit, you will need to stage any new changes that you’d like to include in the commit using git add [file].
Commits are lightweight SHA hashes, objects within Git. As long as you’re working with text files, you won’t need to worry about how many files you have, how big they are, or how many commits you make. Git can handle it!
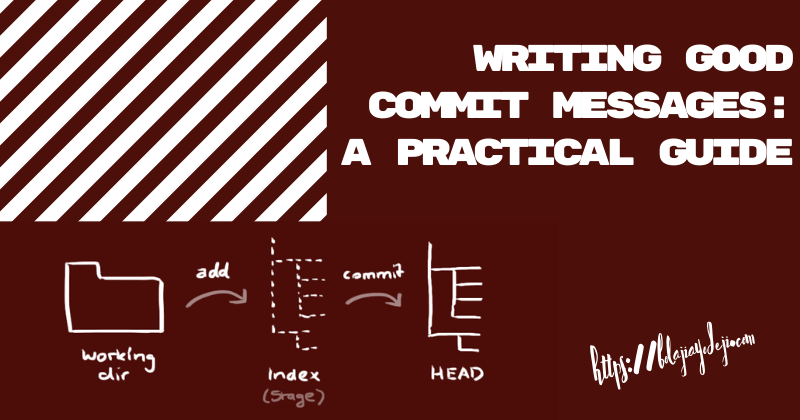
Committing in two phases
Commits have two phases to help you craft commits properly. Commits should be logical, atomic units of change that represent a specific idea. But, not all humans work that way. You may get carried away and end up solving two or three problems before you remember to commit! That’s OK – Git can handle that. Once you’re ready to craft your commits, you’ll use git add <FILENAME> to specify the files that you’d like to «stage» for commit. Without adding any files, the command git commit won’t work. Git only looks to the staging area to find out what to commit. Staging, or adding, files, is possible through the command line, and also possible with most Git interfaces like GitHub Desktop by selecting the lines or files that you’d like to stage.
You can also use a handy command, git add -p, to walk through the changes and separate them, even if they’re in the same file.
How to Use Git Commit
Common usages and options for Git Commit
git commit: This starts the commit process, but since it doesn’t include a-mflag for the message, your default text editor will be opened for you to create the commit message. If you haven’t configured anything, there’s a good chance this will be VI or Vim. (To get out, press Esc, then:wq, and then Enter. :wink:)git commit -m "descriptive commit message": This starts the commit process, and allows you to include the commit message at the same time.git commit -am "descriptive commit message": In addition to including the commit message, this option allows you to skip the staging phase. The addition of-awill automatically stage any files that are already being tracked by Git (changes to files that you’ve committed before).git commit --amend: Replaces the most recent commit with a new commit. (More on this later!)
To see all of the possible options you have with git commit, check out Git’s documentation.
How to Undo Commits in Git
Sometimes, you may need to change history. You may need to undo a commit. If you find yourself in this situation, there are a few very important things to remember:
- If you are «undoing» a commit that exists on the remote, you could create big problems for your collaborators
- Undoing a commit on work that you only have locally is much safer
What can go wrong while changing history?
Changing history for collaborators can be problematic in a few ways. Imagine – You and another collaborator have the same repository, with the same history. But, they make a change that deletes the most recent commit. They continue new commits from the commit directly before that. Meanwhile, you keep working with the commit that the collaborator tried to delete. When they push, they’ll have to ‘force push’, which should show to them that they’re changing history. What do you think will happen when you try to push?
In dramatic cases, Git may decide that the histories are too different and the projects are no longer related. This is uncommon, but a big problem.
The most common result is that your git push would return the «deleted» commit to a shared history. (First, you would git pull if you were working on the same branch, and then merge, but the results would be the same.) This means that whatever was so important to delete is now back in the repository. A password, token, or large binary file may return without ever alerting you.
git revert
git revert is the safest way to change history with Git. Instead of deleting existing commits, git revert looks at the changes introduced in a specific commit, then applies the inverse of those changes in a new commit. It functions as an «undo commit» command, without sacrificing the integrity of your repository’s history. git revert is always the recommended way to change history when it’s possible.
git reset
Sometimes, a commit includes sensitive information that actually needs to be deleted. git reset is a very powerful command that may cause you to lose work. By resetting, you move the HEAD pointer and the branch pointer to another point in time – maybe making it seem like the commits in between never happened! Before using git reset:
- Make sure to talk with your team about any shared commits
- Research the three types of reset to see which is right for you (—soft, —mixed, —hard)
- Commit any work that you don’t want to be lost intentionally – work that is committed can be gotten back, but uncommitted work cannot
git reflog
If you’re changing history and undoing commits, you should know about git reflog. If you get into trouble, the reflog could get you out of trouble. The reflog is a log of every commit that HEAD has pointed to. So, for example, if you use git reset and unintentionally lose commits, you can find and access them with git reflog.
Updating Commits With Git Commit Amend
While git commit --amend does change history, it only changes the most recent commit on your current branch. This can be an extremely useful command for commits that:
- Haven’t been pushed to the remote yet
- Have a spelling error in the commit message
- Don’t contain the changes that you’d like to contain
Examples of Git Commit
Once you’ve staged the files that you want to include in your commit, you’re ready. Whether you commit in a tool like GitHub Desktop, or through your command line, the commit message is important. Commit messages should be short and descriptive of your change. If you are looking through your repository’s history, you’ll be guided by the commit messages, so they should tell a story. Commits in the command line can include the message with the following format:
git commit -m "git commit message example"
Commit messages should be present tense and directive, like the following examples:
git commit -m "create file structure for Git guides"git commit -m "translate Git cheat sheet into German"git commit -m "update broken URL to Git resources"
If you’d like to include more context in your commit messages, you can also include an extended commit message.
Related commands
git add [file]: Snapshots the file in preparation for versioning, adding it to the staging area.git status: Always a good idea, this command shows you what branch you’re on, what files are in the working or staging directory, and any other important information.git push: Uploads all local branch commits to the remote.git log: Browse and inspect the evolution of project files.
Contribute to this article on GitHub.
Get started with git and GitHub
Review code, manage projects, and build software alongside 40 million developers.
Sign up for GitHub
Sign in
В этой статье мы собрали команды Git для самых разных задач: от настройки локального репозитория до работы с ветками и взаимодействия с GitHub.
Если вы владеете Git, то можете сразу перейти в нужный раздел по ссылке. Новичкам мы рекомендуем читать последовательно: изучить основные Git-команды и попрактиковаться, посмотрев запись вебинара, ссылка на которую будет в конце статьи.
Содержание
- Установка и настройка
- Установка
- Настройка
- Создание репозитория
- Рабочий процесс
- git add: добавление файлов в индекс
- git status: проверка статуса репозитория
- git commit: добавление файлов в репозиторий
- git log: просмотр журнала коммитов
- git show: просмотр коммита
- git diff: просмотр изменений до коммита
- git difftool: запуск внешнего инструмента сравнения файлов
- git restore: отмена изменений
- git rm: удаление файлов из индекса
- git reset: откат коммита
- Ветвление
- git branch <branch_name>: создание новой ветки
- git branch: просмотр веток
- git checkout: переключение между ветками
- git merge: слияние репозиториев
- git branch -d <branch_name>: удаление ветки
- Удалённый репозиторий
- git remote add origin url: привязка локального и удалённого репозитория
- git remote: просмотр удалённых репозиториев
- git remote — v: просмотр удалённых URL-адресов
- git push: отправка изменений в удалённый репозиторий
- git pull: получение изменений из удалённого репозитория
- Практика по основным командам Git

Эксперт
Senior Java-разработчик в компании CDEK.
Эксперт Skillbox, в прошлом работал над программой курса по Java, был программным директором.
Git не входит в стандартный набор программ Windows и macOS. В Linux он встречается, однако не во всех дистрибутивах. Чтобы проверить его наличие, введите в «Терминале» команду:
git --version
Если Git установлен, вы увидете номер доступной версии. В противном случае вы увидете сообщение Unsupported command: git. Значит, утилиту нужно будет установить и настроить.
Git можно установить разными способами, и для каждой операционной системы свой порядок действий. На своё усмотрение выберите способ и приступайте.
Windows. Скачайте установщик с git-scm.com. На сайте есть три версии:
- стандартная 32-разрядная версия с последней сборкой;
- автономная версия для установки Git без подключения к интернету;
- портативный установщик для загрузки на флешку.
Во время установки следуйте предложенным шагам и оставляйте настройки по умолчанию. Убедитесь, что у вас отмечены следующие пункты:
- ✔️ Use Git Bash as default shell — выберите программу Git Bash;
- ✔️ Integrate Git with the Windows Shell — согласитесь работать с Git через командную строку.
Также Git на Windows можно установить через менеджер пакетов winget от Microsoft. Для этого откройте оболочку PowerShell и введите команду:
winget install --id Git.Git -e --source winget
macOS. В программе «Терминал» установите менеджер пакетов Homebrew:
/bin/bash -c "$(curl -fsSL https://raw.githubusercontent.com/Homebrew/install/HEAD/install.sh)"
После этого выполните команду:
$ brew install git
Другие способы установки Git на macOS описаны на сайте git-scm.com.
Linux. Перейдите на git-scm.com и скопируйте в «Терминал» команду для менеджера пакетов вашего Linux-дистрибутива. Вот некоторые варианты:
# Для Debian/Ubuntu
apt-get install git

# Для Fedora
yum install git

# Для OpenSUSE
zypper install git
Если у вас macOS или Linux, то после установки Git запустите «Терминал». Если Windows — Git Bash. В этих программах мы будем выполнять все команды.
В командной строке укажите имя и почту — это данные, по которым с вами могут связаться другие разработчики для обсуждения коммитов. То есть каждый ваш коммит будет подписан введённым ником и email-адресом.
Имя и фамилию нужно писать латиницей, через пробел, в кавычках:
git config --global user.name "Name Surname"
Почту записываем в кавычках:
git config --global user.email "your@email"
Опционально можно настроить автоматическую поддержку цветов. Эта опция сделает так, чтобы разные типы файлов различались цветами в репозитории:
git config --global color.ui auto
Осталось убедиться, что данные добавлены и корректно отображаются:
git config --list
В ответ на запрос командная строка выведет настройки вашего профиля.
Переместитесь в папку с проектом и подключите Git:
git init
После исполнения команды появится сообщение об инициализации репозитория. Оно означает, что Git начал отслеживать файлы проекта и будет записывать изменения в скрытую папку .git. Если вам понадобится инициализировать новый репозиторий — повторите процедуру. На одном компьютере Git может одновременно управлять неограниченным количеством репозиториев.
В командной строке удобно не только работать с Git, но и перемещаться по проекту. Вот список базовых команд, которые могут пригодиться:
- pwd — просмотр вашего текущего местоположения;
- ls — список папок и файлов в текущей директории, где была выполнена команда;
- ls -a — список открытых и скрытых папок и файлов в текущей директории, где была выполнена команда;
- cd ~ — переход в домашнюю директорию текущего пользователя;
- cd .. — переход на один уровень вверх в иерархии файловой системы;
- cd folder_name — переход в выбранную папку;
- mkdir folder_name — создать папку с указанным именем.
При работе с Git вы будете добавлять файлы в индекс, проверять статус репозитория, создавать коммиты, смотреть историю и откатывать изменения.
Если вы создадите в проекте файл, то Git его посчитает неотслеживаемым (untracked). Такие файлы нельзя перенести в репозиторий без подготовки к сохранению. За подготовку отвечает индекс — промежуточная зона перед репозиторием. Перенести файлы в индекс можно с помощью команды git add.
В индекс можно добавить один файл, несколько или все сразу. После попадания в индекс файлы становятся подготовленными к коммиту (staged):
# Добавляем в индекс один файл
git add file_name
# Добавляем в индекс несколько файлов
git add file_name_1 file_name_2 file_name_3
# Добавляем в индекс все изменённые файлы
git add .
У команды git add есть ещё множество вариаций. Например, git add *.js перенесёт в индекс все файлы из текущей папки с расширением .js. Чтобы получить подробную документацию о какой-то команде — вызывайте справку:
git help command_name
Команда git status даёт представление о текущем состоянии репозитория. Она показывает, какие неотслеживаемые файлы попали в проект, какие файлы находятся в индексе и какие сохранённые файлы вы изменили в репозитории.
$ git status   # Запрашиваем текущее состояние репозитория
# Видим файлы, которые находятся в индексе и подготовлены для коммита
Changes to be committed:
  (use "git restore --staged <file>..." to unstage)
        modified:   index.html
        modified:   styles.css
# Видим неотслеживаемые файлы, которые только попали в проект
Untracked files:
  (use "git add <file>..." to include in what will be committed)
        script.js   # Файл script.js не отслеживается Git
# Видим изменённые файлы репозитория, которые ещё не добавлены в индекс
Changes not staged for commit:
  (use "git add <file>..." to update what will be committed)
  (use "git restore <file>..." to discard changes in working directory)
        README.md   # Файл README.md был изменён, но не добавлен в индекс
Когда все файлы подготовлены к сохранению, их можно перенести из индекса в репозиторий. Для этого нужна команда git commit с опцией -m и сообщением коммита. Сообщение пишется в кавычках и обычно латиницей:
git commit -m "Commit message"
Сообщения обязательны — по ним разработчики ориентируются в проекте. Есть даже специальный документ — «Соглашение о коммитах». В нём разработчики договорились, как правильно добавлять комментарии. Суть в том, чтобы из сообщения коммита было понятно, какие изменения произошли. Вот примеры:
❌ Добавил свой первый коммит.
✅ Исправил баг №ХХХХХ.
❌ Работал над файлом index.html.
✅ Сверстал header для главной страницы.
Если убрать опцию -m, то после нажатия Enter вы попадёте в текстовый редактор. Там вам нужно будет написать сообщение, сохранить его и выйти. А в Vim это нереально ?
Бывает так: вы закоммитили файл и затем снова его изменяете. В этом случае можно делать новый коммит, минуя индекс. Для этого необходима опция -a:
git commit -am "Commit message"
Другая частая ситуация: вы торопились и ошиблись в сообщении коммита. Можно ввести опцию —amend и перезаписать сообщение последнего коммита:
git commit --amend -m "New commit message"
Команда git log показывает историю коммитов в обратном хронологическом порядке. Вы можете посмотреть хеш, сообщение, дату и ник автора коммита.
$ git log   # Запрос на просмотр журнала коммитов

# Информация о третьем сделанном коммите
commit 3f6f9e1f58e30e0d3a0d0ab764c0b30a5b621d4a   # Хеш первого коммита
Author: John Doe <johndoe@example.com>   # Автор первого коммита
Date:   Thu Apr 21 10:26:52 2024 +0300   # Дата первого коммита
    Update README.md   # Сообщение первого коммита

# Информация о втором сделанном коммите
commit acd1e81729dc2ee2dc107ba345fa1ab7e6cfbff9
Author: Jane Smith <janesmith@example.com>
Date:   Wed Apr 20 16:45:39 2024 +0300
    Add new feature

# Информация о первом сделанном коммите
commit 7df1e8c33b0a617b3a72c785a67e45d0d932a180
Author: John Doe <johndoe@example.com>
Date:   Mon Apr 18 09:12:21 2024 +0300
    Initial commit
У команды git log множество опций, от которых будет зависеть отображение журнала. Например, можно в одну строку расположить информацию о каждом коммите. Для этого придётся убрать дату, ник автора и сократить размер хеша:
$ git log --oneline   # Запрос на вывод истории коммитов в одну строку
3f6f9e1 Update README.md
acd1e81 Add new feature
7df1e8c Initial commit
Команда git show выводит информацию об одном коммите. Сообщение делится на два блока: часть с метаданными и список изменений, внесённых в коммит.
$ git show abc12345  # Запрос на просмотр коммита с хешем abc12345

# Метаданные
commit abc12345  # Хеш коммита
Author: John Doe <johndoe@example.com>  # Автор коммита
Date:   Thu Apr 21 10:26:52 2024 +0300  # Дата и время коммита
    Update README.md  # Сообщение коммита

# Список изменений в файле README.md
diff --git a/README.md b/README.md
index abcdef1..1234567 100644
--- a/README.md
+++ b/README.md
@@ -1,3 +1,3 @@
-# My Project  # Старое содержимое строки
+# My Awesome Project  # Новое содержимое строки
Если ввести git show без хеша, то выведется содержимое последнего коммита.
Команда git diff показывает разницу между последним коммитом и текущим состоянием репозитория. То есть последний коммит сравнивается со всеми неотслеживаемыми файлами, которые ещё не переведены в индекс.
Можно добавить имя файла и сравнить его содержимое с последним коммитом.
Ещё вариант: вместо имени файла можно использовать хеш коммита. Также можно добавить опцию —staged и сравнить версию кода после последнего коммита с отслеживаемым состоянием репозитория — со всеми файлами, которые находятся в индексе.
# Смотрим разницу между последним коммитом и текущим состоянием репозитория
git diff

# Разница между последним коммитом и текущим состоянием файла
git diff file_name

# Разница между последним коммитом и коммитом с указанным хешем
git diff commit_hash

# Разница между последним коммитом и отслеживаемым состоянием репозитория
git diff --staged
Команда git difftool работает по принципу команды git diff — сравнивает файлы и находит в них различия. Только git diff отображает результат в текстовом виде, а git difftool в графическом: команда запускает внешние программы с визуальными инструментами сравнения файлов. Если хотите попробовать — установите Beyond Compare, vimdiff, Meld или другое похожее приложение. После прочтите документацию по git difftool и попрактикуйтесь отображать данные.
Команда git restore возвращает файл к состоянию последнего коммита. Она отменяет все изменения, если файл не перенесён в индекс. Если файл попал в индекс, то вместе с названием команды нужно использовать опцию —staged.
# Вернуть неотслеживаемый файл к состоянию последнего коммита
git restore file_name

# Вернуть все файлы из индекса к состоянию последнего коммита
git restore --staged

# Вернуть указанный файл из индекса к состоянию последнего коммита
git restore --staged file_name
Команда git rm позволяет удалить файл, который по ошибке попал в индекс. После выполнения команды файл пропадёт из индекса и из папки на вашем компьютере, в которой хранится проект. Если вы хотите удалить файл только из индекса, то команду git rm нужно использовать вместе с опцией —cached.
# Удалить файл из индекса и рабочей директории
git rm file_name

# Удалить файл из индекса и оставить в папке на компьютере
git rm --cached file_name
Команда git reset позволяет отменить любое количество сделанных коммитов и вернуть проект к какому-то состоянию в прошлом. Команду нужно выполнять с осторожностью, поскольку она может навсегда переписать историю проекта.
На выбор можно использовать три режима: —soft, —mixed и —hard.
В режиме —soft проект откатывается к указанному коммиту и переводит все последующие коммиты в индекс. Вы можете сразу сделать новый коммит и перезаписать историю проекта, оставив исходные файлы без изменений.
В режиме —mixed откаченные файлы попадают в неотслеживаемую зону. Вы можете эти файлы изменить, удалить или вернуть обратно в индекс.
В режиме —hard проект откатывается к указанному коммиту и удаляет все последующие коммиты без возможности их восстановления.
# Откатываемся и переводим последующие коммиты в индекс
git reset --soft commit_hash

# Откатываемся и переводим последующие коммиты в неотслеживаемую зону
git reset --mixed commit_hash

# Откатываемся и удаляем все последующие коммиты
git reset --hard commit_hash
Перед выполнением git reset мы рекомендуем всегда делать резервную копию проекта, на случай непредвиденного удаления файлов.
Вся разработка в Git происходит в ветках. Они сохраняют коммиты и организуют их в цепочку: перемещаясь по ветке от одного коммита к другому можно отследить изменения в проекте. При работе с ветками вы будете часто их создавать, просматривать, переименовывать, переключать, объединять и удалять.
После первого коммита Git автоматически создаёт первую ветку. Обычно в ней хранят стабильную версию проекта для пользователей продукта. Под остальные задачи разработчики создают отдельные ветки с помощью команды git branch:
git branch branch_name
По названию ветки должно быть понятно, что в ней происходит. Например, если в названии упоминается слово bugfix, то ветка предназначена для исправления ошибок. Слово feature указывает на разработку какой-то функции. А вот случайное название test10.24 не значит ничего, и таких названий лучше избегать.
Ветку с неудачным названием можно переименовать:
git branch -m old_branch_name new_branch_name

# old_branch_name — старое имя ветки
# new_branch_name — новое имя ветки
Команда git branch позволяет получить список всех доступных веток в проекте. Также она проставляет символ звёздочки слева от текущей активной ветки:
# Запрашиваем список всех доступных веток
git branch

# Результат вывода
  bugfix/fix-bug
  * maine
  feature/new-feature
Команда git checkout позволяет переключиться с одной ветки на другую:
git checkout branch_name
Также можно одной командой создать новую ветку и сразу в неё перейти:
git checkout -b branch_name
У команды git checkout есть более современная альтернатива:
git switch branch_name
Команда git switch безопасней и больше подходит новичкам. Перед каждым переключением она автоматически проверяет рабочую директорию и не срабатывает, если переход на выбранную ветку может привести к потере данных.
Команда git merge позволяет добавить изменения из одной ветки в другую. Такой процесс называется слиянием, и он завершается появлением общего коммита для объединённых веток. По этому коммиту можно отследить историю каждой ветки.
# Переключаемся на основную ветку, которая будет принимать изменения
git checkout main_branch

# Сливаем изменения из второстепенной ветки в основную
git merge secondary_branch
После слияния второстепенная ветка больше не нужна и мы её можем удалить.
# Проверяем текущую ветку
git branch

# Результат вывода
  main_branch
  * secondary_branch

# Переключаемся на основную ветку
git checkout main_branch

# Удаляем второстепенную ветку
git branch -d secondary_branch
В предыдущих разделах мы использовали Git локально на компьютере. Теперь нам нужна удалённая версия репозитория, которой мы сможем поделиться с другими разработчиками или использовать в качестве резервного хранилища для проекта. Создать удалённый репозиторий можно на разных платформах, среди которых популярны сервисы GitHub и GitLab. Мы будем работать с GitHub.
Для работы с GitHub вам нужно зарегистрироваться и настроить SSH-ключи для безопасного соединения. После можно переходить к удалённому репозиторию.
С помощью командной строки переместитесь в папку с проектом на своём компьютере. Теперь вы можете выполнить команду git remote add, которая установит связь между вашим локальным и удалённым репозиторием на GitHub.
К команде нужно добавить два параметра: имя вашего удалённого репозитория и его адрес. Адрес вы найдёте на странице своего профиля во вкладке SSH.
# Перемещение в папку с проектом
cd путь/к/папке/с/проектом

# Привязка локального репозитория к удалённому на GitHub
git remote add origin git@github.com:ваш_профиль/ваш_репозиторий.git
Если вы часто взаимодействуете с GitHub, то с вашим локальным может быть связано множество удалённых репозиториев. Если ввести команду git remote, то можно посмотреть название этих репозиториев и отсортировать все ненужные.
# Запрашиваем список удалённых репозиториев, которые связаны с локальным
git remote

# Пример вывода: два удалённых репозитория связаны с нашим локальным
  origin
  upstream
Команда git remote показывает только названия удалённых репозиториев, которые связаны с вашим локальным. К команде можно добавить опцию -v и посмотреть удалённые URL-адреса. По URL-адресам будет видно, какие изменения вы делали.
# Запрос списка удалённых репозиториев с URL-адресами
git remote -v

# Пример вывода с URL-адресами
  origin  https://github.com/user/repo.git (fetch)
  origin  https://github.com/user/repo.git (push)
  upstream  https://github.com/otheruser/repo.git (fetch)
  upstream  https://github.com/otheruser/repo.git (push)
Команда git push загружает изменения из локального репозитория в удалённый.
Во время первой загрузки нужно использовать команду с опцией -u. Это свяжет локальную и удалённую ветки и синхронизирует их для последующих операций. Для второй и всех последующих загрузок опция -u для связанных веток не понадобится.
# Команда для первой загрузки изменений в удалённый репозиторий: текущая ветка будет связана с веткой main в удалённом репозитории origin
git push -u origin main

# Команда для второй и последующих загрузок изменений в удалённый репозиторий
git push
Команда git pull скачивает изменения из удалённого репозитория в локальный.
# Скачиваем изменения из удалённого репозитория и добавляем их в локальную ветку
git pull
Попрактиковаться можно вместе с экспертами Skillbox.
Даниил Пилипенко, CEO центра подбора IT-специалистов SymbioWay, провёл вебинар по работе с системой управления версиями Git и её основным командам: git status, git add, git commit, git log, git branch, git clone и другим.
To create a useful revision history, teams should first agree on a commit message convention to use. This also applies to personal projects.
Recently on Hashnode I asked, «Which commit message convention do you use at work?» and I got some amazing responses with users explaining the conventions they use at work and for their personal projects.
In this article, I’ll go over how to write good commit messages and why you should.
I published this article, along with many others, on my blog here.
Introduction to version control with Git
Version control software is an essential part of modern-day software developer practices.
By far, Git is the most widely used version control system in the world. It is a distributed and actively maintained open source project originally developed in 2005 by Linus Torvalds, the famous creator of the Linux operating system kernel.
New to Git? Check out the official getting started guide or this slide from a past talk I gave.
What is a commit message?
The commit command is used to save changes to a local repository after staging in Git. However, before you can save changes in Git, you have to tell Git which changes you want to save as you might have made tons of edits. A great way to do that is by adding a commit message to identify your changes.
Commit Options
- -m
This option sets the commit’s message.
git add static/admin/config.yml
git commit -m "Setup multiple roles for netlify-cms git gateway"
- -a or —all
This option automatically commits all (including new) tracked, modified or deleted files.
git commit -a -m "Add a new role for netlify-cms git gateway"
- —amend
This option rewrites the very last commit with any currently staged changes or a new commit message and should only be performed on commits that have not been pushed to a remote repository, yet.
git add .
git commit --amend -m "Update roles for netlify-cms git gateway"
Why should you write good commit messages?
You might say, «It’s just a personal project.» Yes, you work alone now, but what happens when you work with a team or contribute to open source?
A well-crafted Git commit message is the best way to communicate context about a change to other developers working on that project, and indeed, to your future self.
Have you ever tried running git log on one of your old projects to see the «weird» commit messages you have used since its inception? It can be hard to understand why you made some changes in the past, and you’ll wish you read this article earlier :).
Commit messages can adequately communicate why a change was made, and understanding that makes development and collaboration more efficient.
Before now, I only used git commit -m "Fix X to allow Y to use Z" on my personal projects with just a subject and no extra description. This is great for small and clear fixes like git commit -m "Fix typo in README.md, but in cases of more extensive changes, you would need to add some extra details.
Editor method
Run git commit without a message or option and it’ll open up your default text editor to write a commit message.
To configure your «default» editor:
git config --global core.editor nano
This would configure Git to use nano as your default editor. Replace «nano» with «emacs,» «vim,» or whatever your preference is.
In the opened editor, the first line is the subject (short description), leave a blank line after it, and everything else is the extended description (body).
<Summarize change(s) in around 50 characters or less>

<More detailed explanatory description of the change wrapped into about 72
characters>
Command Line method
git commit -m "Subject" -m "Description..."
The first -m option is the subject (short description), and the next is the extended description (body).
How to write good commit messages
There are several conventions used by different teams and developers to write good commit messages. I’ll only outline some general rules and tips for writing commit messages–you have to decide what convention you want to follow. And if you work for a company or contribute to open source, you have to adapt to their convention :).
For consistency, you can use one convention for work and another for personal projects as you might change jobs sometime, and the convention might also change.
Be sure to check out this thread for some amazing commit message conventions or add yours to help someone make a decision.
Here’s a great template of a good commit message originally written by Tim pope
Capitalized, short (50 chars or less) summary

More detailed explanatory text, if necessary.  Wrap it to about 72
characters or so.  In some contexts, the first line is treated as the
subject of an email and the rest of the text as the body.  The blank
line separating the summary from the body is critical (unless you omit
the body entirely); tools like rebase can get confused if you run the
two together.

Write your commit message in the imperative: "Fix bug" and not "Fixed bug"
or "Fixes bug."  This convention matches up with commit messages generated
by commands like git merge and git revert.

Further paragraphs come after blank lines.

- Bullet points are okay, too

- Typically a hyphen or asterisk is used for the bullet, followed by a
  single space, with blank lines in between, but conventions vary here

- Use a hanging indent

If you use an issue tracker, add a reference(s) to them at the bottom,
like so:

Resolves: #123
Looks great, right? Here’s how you can make yours great too:
- Specify the type of commit:
-
feat: The new feature you’re adding to a particular application
-
fix: A bug fix
-
style: Feature and updates related to styling
-
refactor: Refactoring a specific section of the codebase
-
test: Everything related to testing
-
docs: Everything related to documentation
-
chore: Regular code maintenance.[ You can also use emojis to represent commit types]
-
Separate the subject from the body with a blank line
-
Your commit message should not contain any whitespace errors
-
Remove unnecessary punctuation marks
-
Do not end the subject line with a period
-
Capitalize the subject line and each paragraph
-
Use the imperative mood in the subject line
-
Use the body to explain what changes you have made and why you made them.
-
Do not assume the reviewer understands what the original problem was, ensure you add it.
-
Do not think your code is self-explanatory
-
Follow the commit convention defined by your team
Conclusion
The most important part of a commit message is that it should be clear and meaningful. In the long run, writing good commit messages shows how much of a collaborator you are. The benefits of writing good commit messages are not only limited to your team, but indeed expand to yourself and future contributors.
Want to learn more about Git and become a professional «version controller»? Check out these excellent resources:
-
https://try.github.io/
-
https://git-scm.com/book/en/v2
-
https://www.git-tower.com/learn/
-
https://learngitbranching.js.org/
-
https://github.com/commitizen/cz-cli
Learn to code for free. freeCodeCamp’s open source curriculum has helped more than 40,000 people get jobs as developers. Get started
Время на прочтение9 мин
Количество просмотров500K

Git — самая популярная в мире распределённая система контроля версий. Линус Торвальдс, разработчик ядра ОС Linux, создал этот инструмент ещё в 2005 году, а сегодня Git активно поддерживается как проект с открытым исходным кодом. Огромное количество открытых и коммерческих проектов используют Git для контроля версий.
В данной статье перечисляются самые основные команды, которые следует знать разработчику, чтобы освоить управление репозиториями GitHub на высоком уровне. Ознакомиться с ними будет полезно как новичкам, так и опытным разработчикам.
30 основных команд, которые сделают из вас мастера Git
- Как задать имя пользователя и адрес электронной почты
- Кэширование учётных данных
- Инициализация репозитория
- Добавление отдельных файлов или всех файлов в область подготовленных файлов
- Проверка статуса репозитория
- Внесение изменений однострочным сообщением или через редактор
- Просмотр истории коммитов с изменениями
- Просмотр заданного коммита
- Просмотр изменений до коммита
- Удаление отслеживаемых файлов из текущего рабочего дерева
- Переименование файлов
- Отмена подготовленных и неподготовленных изменений
- Изменение последнего коммита
- Откат последнего коммита
- Откат заданного коммита
- Создание новой ветки и переход в неё
- Просмотр списка веток
- Удаление ветки
- Слияние двух веток
- Отображение журнала фиксации в виде графика для текущей или всех веток
- Прекращение слияния при конфликте
- Добавление удалённого репозитория
- Просмотр удалённых URL-адресов
- Получение дополнительных сведений об удалённом репозитории
- Отправка изменений в удалённый репозиторий
- Получение изменений из удалённого репозитория
- Слияние удалённого репозитория с локальным
- Отправка новой ветки в удалённый репозиторий
- Удаление удалённой ветки
- Использование перебазирования
1. Как задать имя пользователя и адрес электронной почты
Имя пользователя нужно, чтобы привязывать коммиты к вашему имени. Это не то же самое, что имя пользователя учётной записи GitHub, с помощью которого выполняется вход в профиль на GitHub. Задать или изменить имя пользователя можно с помощью команды git config. Новое имя будет автоматически отображаться в последующих коммитах, отправленных на GitHub через командную строку. Если хотите скрыть своё реальное имя, можно использовать в качестве имени пользователя Git произвольный набор символов.
git config --global user.name "Tara Routray"
Кроме того, командой git config можно изменять адрес электронной почты, привязанный к вашим коммитам Git. Новый адрес электронной почты будет автоматически отображаться во всех дальнейших коммитах, поданных на GitHub через командную строку.
git config --global user.email "dev@tararoutray.com"2. Кэширование учётных данных
Кэшировать учётные данные можно с помощью параметра config с флагом --global. Так вы избавитесь от необходимости вручную вводить имя пользователя и пароль при создании нового коммита.
git config --global credential.helper cache3. Инициализация репозитория
Создать пустой репозиторий Git или вновь инициализировать существующий можно параметром init. При инициализации он создаст скрытую папку. В ней содержатся все объекты и ссылки, которые Git использует и создаёт в истории работы над проектом.
git init4. Добавление отдельных файлов или всех файлов в область подготовленных файлов
Добавить отдельный файл в область подготовленных файлов можно параметром add с указанием имени файла. Просто замените somefile.js на актуальное имя.
git add somefile.js
Кроме того, можно добавить все файлы и папки в эту область, предоставив wildcard . вместо имени файла:
git add .5. Проверка статуса репозитория
Просмотреть статус нужного репозитория можно по ключевому слову status: его действие распространяется на подготовленные, неподготовленные и неотслеживаемые файлы.
git status6. Внесение изменений однострочным сообщением или через редактор
При создании коммита в репозитории можно добавить однострочное сообщение с помощью параметра commit с флагом -m. Само сообщение вводится непосредственно после флага, в кавычках.
git commit -m "Your short summary about the commit"Также можно открыть текстовый редактор в терминале для написания полного сообщения коммита. Оно может состоять из нескольких строк текста, в котором подробно характеризуются изменения, внесённые в репозиторий.
git commit7. Просмотр истории коммитов с изменениями
Просматривать изменения, внесённые в репозиторий, можно с помощью параметра log. Он отображает список последних коммитов в порядке выполнения. Кроме того, добавив флаг -p, вы можете подробно изучить изменения, внесённые в каждый файл.
git log -p8. Просмотр заданного коммита
Просмотреть полный список изменений, внесённых конкретным коммитом, можно с помощью параметра show, указав идентификатор или хеш коммита. Значение хеша уникально для каждого коммита, созданного в вашем репозитории.
git show 1af17e73721dbe0c40011b82ed4bb1a7dbe3ce29Также можно использовать сокращённый хеш.
git show 1af17e9. Просмотр изменений до коммита
Можно просматривать список изменений, внесённых в репозиторий, используя параметр diff. По умолчанию отображаются только изменения, не подготовленные для фиксации.
git diff
Для просмотра подготовленных изменений необходимо добавить флаг --staged.
git diff --stagedТакже можно указать имя файла как параметр и просмотреть изменения, внесённые только в этот файл.
git diff somefile.js10. Удаление отслеживаемых файлов из текущего рабочего дерева
Удалять файлы из текущего рабочего дерева можно с помощью параметра rm. При этом файлы удаляются и из индекса.
git rm dirname/somefile.jsМожно также использовать маски файлов (например *.js) для удаления всех файлов, соответствующих критерию.
git rm dirname/*.html11. Переименование файлов
Переименовать файл или папку можно параметром mv. Для него указывается источник source и назначение destination. Источник — реально существующий файл или папка, а назначение — существующая папка.
git mv dir1/somefile.js dir2При выполнении команды файл или папка, указанные как источник, будут перемещены в папку назначения. Индекс будет обновлён соответственно, но изменения нужно записать.
12. Отмена подготовленных и неподготовленных изменений
Восстановить файлы рабочего дерева, не подготовленные к коммиту, можно параметром checkout. Для проведения операции требуется указать путь к файлу. Если путь не указан, параметр git checkout изменит указатель HEAD, чтобы задать указанную ветку как текущую.
git checkout somefile.js
Восстановить подготовленный файл рабочего дерева можно параметром reset. Потребуется указать путь к файлу, чтобы убрать его из области подготовленных файлов. При этом не будет производиться откат никаких изменений или модификаций — однако файл перейдёт в категорию не подготовленных к коммиту.
git reset HEAD somefile.jsЕсли нужно выполнить это действие для всех подготовленных файлов, путь к ним указывать не надо.
git reset HEAD13. Изменение последнего коммита
Внести изменения в последний коммит можно параметром commit с флагом --amend. Например, вы записали изменения, внесённые в ряд файлов, и поняли, что допустили ошибку в сообщении коммита. В этом случае можете воспользоваться указанной командой, чтобы отредактировать сообщение предыдущего коммита, не изменяя его снимок.
git commit --amend -m "Updated message for the previous commit"
Также можно вносить изменения в файлы, отправленные ранее. Например, вы изменили несколько файлов в ряде папок и хотите их записать как единый снимок, но забыли добавить в коммит одну из папок. Чтобы исправить такую ошибку, достаточно подготовить для фиксации остальные файлы и папки и создать коммит с флагами --amend и --no-edit.
git add dir1
git commit

# Here you forgot to add dir2 to commit, you can execute the
following command to amend the other files and folders.

git add dir2
git commit --amend --no-edit
Флаг --no-edit позволит внести в коммит поправку без изменения сообщения коммита. В этом случае итоговый коммит заменит неполный, а выглядеть это будет так, как будто мы отправили изменения ко всем файлам в нужных папках как единый снимок.
Внимание! Не изменяйте публичные коммиты.
С помощью amend прекрасно исправляются локальные коммиты, а исправления можно передать в общий репозиторий. Однако изменять коммиты, уже доступные другим пользователям, не следует. Помните, что изменённые коммиты являются совершенно новыми, а предыдущий коммит уже не будет доступен в текущей ветке. Последствия будут такими же, как при отмене изменений публичного снимка.
14. Откат последнего коммита
Откатить последний коммит можно с помощью параметра revert. Создастся новый коммит, содержащий обратные преобразования относительно предыдущего, и добавится к истории текущей ветки.
git revert HEAD▍ Разница между revert и reset
Команда git revert отменяет изменения, записанные только одним коммитом. Она не откатывает проект к более раннему состоянию, удаляя все последующие коммиты, как это делает команда git reset.
У команды revert есть два крупных преимущества по сравнению с reset. Во-первых, она не меняет историю проекта и производит операцию, безопасную для коммитов. Во-вторых, её объектом выступает конкретный коммит, созданный в любой момент истории, а git reset всегда берёт за точку отсчёта текущий коммит. К примеру, если нужно отменить старый коммит с помощью git reset, придётся удалить все коммиты, поданные после целевого, а затем выполнить их повторно. Следовательно, команда git revert — гораздо более удобный и безопасный способ отмены изменений.
15. Откат заданного коммита
Откатить проект до заданного коммита можно с помощью параметра revert и идентификатора коммита. Создастся новый коммит — копия коммита с предоставленным идентификатором — и добавится к истории текущей ветки.
git revert 1af17e16. Создание новой ветки и переход в неё
Создать новую ветку можно с помощью параметра branch, указав имя ветки.
git branch new_branch_name
Но Git не переключится на неё автоматически. Для автоматического перехода нужно добавить флаг -b и параметр checkout.
git checkout -b new_branch_name17. Просмотр списка веток
Можно просматривать полный список веток, используя параметр branch. Команда отобразит все ветки, отметит текущую звёздочкой (*) и выделит её цветом.
git branch
Также можно вывести список удалённых веток с помощью флага -a.
git branch -a18. Удаление ветки
Удалить ветку можно параметром branch с добавлением флага -d и указанием имени ветки. Если вы завершили работу над веткой и объединили её с основной, можно её удалить без потери истории. Однако, если выполнить команду удаления до слияния — в результате появится сообщение об ошибке. Этот защитный механизм предотвращает потерю доступа к файлам.
git branch -d existing_branch_name
Для принудительного удаления ветки используется флаг -D с заглавной буквой. В этом случае ветка будет удалена независимо от текущего статуса, без предупреждений.
git branch -D existing_branch_nameВышеуказанные команды удаляют только локальную копию ветки. В удалённом репозитории она может сохраниться. Если хотите стереть удалённую ветку, выполните следующую команду:
git push origin --delete existing_branch_name19. Слияние двух веток
Объединить две ветки можно параметром merge с указанием имени ветки. Команда объединит указанную ветку с основной.
git merge existing_branch_name
Если надо выполнить коммит слияния, выполните команду git merge с флагом --no-ff.
git merge --no-ff existing_branch_nameУказанная команда объединит заданную ветку с основной и произведёт коммит слияния. Это необходимо для фиксации всех слияний в вашем репозитории.
20. Отображение журнала фиксации в виде графика для текущей или всех веток
Просмотреть историю коммитов в виде графика для текущей ветки можно с помощью параметра log и флагов --graph --oneline --decorate. Опция --graph выведет график в формате ASCII, отражающий структуру ветвления истории коммитов. В связке с флагами --oneline и --decorate, этот флаг упрощает понимание того, к какой ветке относится каждый коммит.
git log --graph --oneline --decorate
Для просмотра истории коммитов по всем веткам используется флаг --all.
git log --all --graph --oneline --decorate21. Прекращение слияния при конфликте
Прервать слияние в случае конфликта можно параметром merge с флагом --abort. Он позволяет остановить процесс слияния и вернуть состояние, с которого этот процесс был начат.
git merge --abort
Также при конфликте слияния можно использовать параметр reset, чтобы восстановить конфликтующие файлы до стабильного состояния.
git reset22. Добавление удалённого репозитория
Добавить удалённый репозиторий можно параметром remote add, указав shortname и url требуемого репозитория.
git remote add awesomeapp https://github.com/someurl..23. Просмотр удалённых URL-адресов
Просматривать удалённые URL-адреса можно параметром remote с флагом -v. Этот параметр отображает удалённые подключения к другим репозиториям.
git remote -v
Такая команда открывает доступ к интерфейсу управления удалёнными записями, которые хранятся в файле .git/config репозитория.
24. Получение дополнительных сведений об удалённом репозитории
Получить подробные сведения об удалённом репозитории можно с помощью параметра remote show с указанием имени репозитория — например, origin.
git remote show originЭта команда отображает список веток, связанных с удалённым репозиторием, а также рабочих станций, подключённых для получения и отправки файлов.
25. Отправка изменений в удалённый репозиторий
Отправлять изменения в удалённый репозиторий можно параметром push с указанием имени репозитория и ветки.
git push origin mainЭта команда передаёт локальные изменения в центральный репозиторий, где с ними могут ознакомиться другие участники проекта.
26. Получение изменений из удалённого репозитория
Для загрузки изменений из удалённого репозитория используется параметр pull. Он скачивает копию текущей ветки с указанного удалённого репозитория и объединяет её с локальной копией.
git pull
Также можно просмотреть подробные сведения о загруженных файлах с помощью флага --verbose.
git pull --verbose27. Слияние удалённого репозитория с локальным
Слияние удалённого репозитория с локальным выполняется параметром merge с указанием имени удалённого репозитория.
git merge origin28. Отправка новой ветки в удалённый репозиторий
Передать новую ветку в удалённый репозиторий можно параметром push с флагом -u, указав имя репозитория и имя ветки.
git push -u origin new_branch29. Удаление удалённой ветки
Чтобы избавиться от удалённой ветки, используйте параметр push с флагом --delete, указав имя удалённого репозитория и имя ветки.
git push --delete origin existing_branch30. Использование перебазирования
Для доступа к этой функции используйте параметр rebase с указанием имени ветки. Перебазирование — это процесс объединения или перемещения последовательности коммитов на новый родительский снимок.
git rebase branch_nameЭта команда изменит основу ветки с одного коммита на другой, как если бы вы начали ветку с другого коммита. В Git это достигается за счёт создания новых коммитов и применения их к указанному базовому коммиту. Необходимо понимать, что, хотя ветка и выглядит такой же, она состоит из совершенно новых коммитов.
▍ Спасибо за внимание!
Вы узнали 30 основных команд интерфейса командной строки Git. Теперь, при условии регулярной практики, у вас есть всё необходимое, чтобы достичь мастерства в управлении репозиториями GitHub.
