
Все способы:
- Технические особенности
- Этап 1: Подготовительный
- Этап 2: Перепрошивка
- Способ 2: Обновление из Windows
- Вопросы и ответы: 4
Несмотря на то, что интерфейс и функционал BIOS не претерпевал серьёзных изменений с момента первого выхода в свет (80-е года), в определённых случаях рекомендуется производить его обновление. В зависимости от материнской платы процесс может происходить по-разному.
Технические особенности
Для корректного обновления вам придётся скачать версию, которая актуальна именно для вашего компьютера. Рекомендуется на всякий случай скачать и текущую версию BIOS. Чтобы сделать обновление стандартным методом, никаких программ и утилит скачивать не нужно, так как всё необходимое уже встроено в систему.
Обновить BIOS можно и через операционную систему, но это не всегда безопасно и надёжно, поэтому делайте это на свой страх и риск.
Этап 1: Подготовительный
Сейчас вам нужно будет узнать основную информацию о текущей версии BIOS и материнской карте. Последняя понадобится для скачивания актуальной сборки от разработчика BIOS с их официального сайта. Все интересующие данные можно увидеть, используя стандартные средства Windows или программы от сторонних разработчиков, которые не интегрированы в ОС. Последнее может выиграть в плане более удобного интерфейса.
Чтобы быстро найти необходимые данные, вы можете использовать такую утилиту как AIDA64. Ее функционала для этого будет вполне достаточно, также программа отличается простым русифицированным интерфейсом. Однако она платная и по завершении демонстрационного периода вы не сможете её использовать без активации. Для просмотра сведений воспользуйтесь этими рекомендациями:
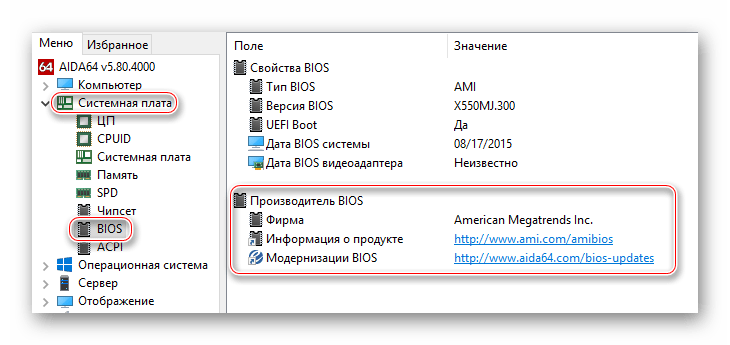
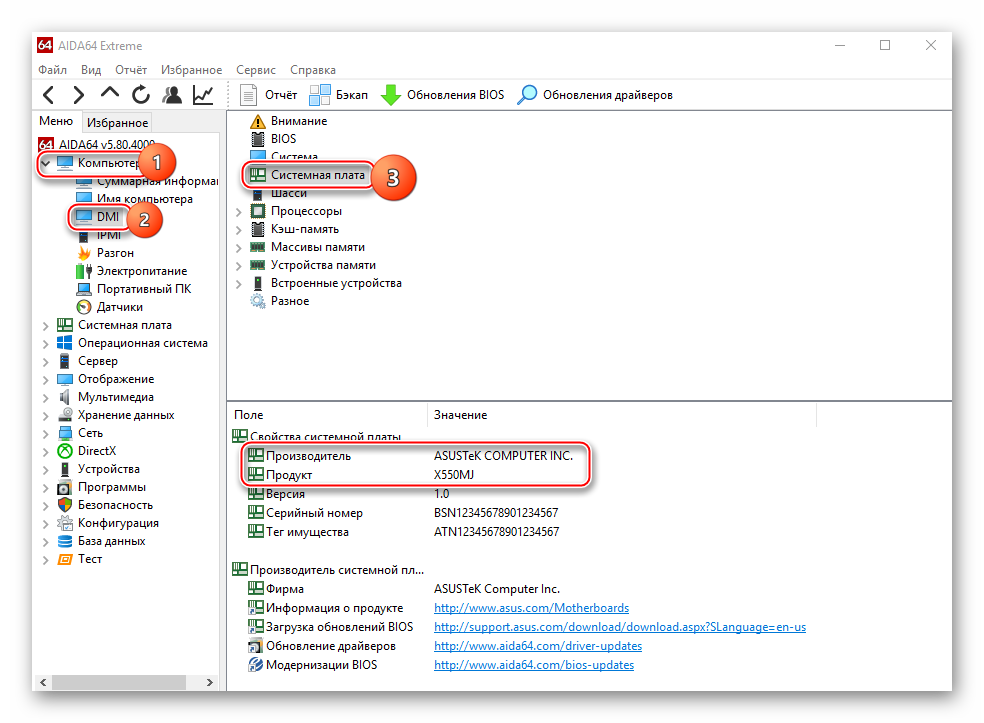
- Откройте AIDA64 и перейдите в пункт «Системная плата». Попасть туда можно при помощи иконки на главной странице или соответствующего пункта, что находится в меню слева.
- Таким же образом откройте вкладку «BIOS».
- Такие данные как версия BIOS, название компании-разработчика и дата актуальности версии вы можете просмотреть в разделах «Свойства BIOS» и «Производитель BIOS». Желательно запомнить или где-нибудь записать эту информацию.
- Вы также можете скачать актуальную версию BIOS (по мнению программы) с официального сайта разработчиков, воспользовавшись ссылкой напротив пункта «Обновления BIOS». В большинстве случаев там действительно оказывается самая новая и подходящая именно для вашего компьютера версия.
- Теперь вам нужно перейти в раздел «Системная плата» по аналогии со 2-м пунктом. Там найдите название вашей материнки в строке с названием «Системная плата». Оно понадобится, если вы решите искать и скачивать обновления самостоятельно с главного сайта Gigabyte.
В случае, если вы решили скачивать файлы обновления самостоятельно, а не по ссылке из АИДы, то используйте это небольшое руководство, чтобы загрузить корректно работающую версию:
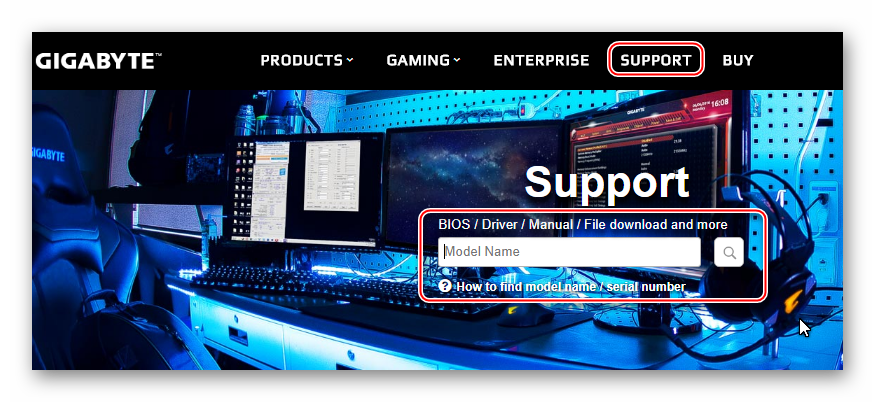
- На официальном сайте Gigabyte найдите главное (верхнее) меню и перейдите в пункт «Поддержка».
- На новой странице появится несколько полей. Вам нужно вбить модель вашей материнки в поле «Загрузить» и начать поиск.
- В результатах обратите внимание на вкладку BIOS. Скачайте оттуда прикреплённый архив.
- Если вы найдёте ещё архив с вашей текущей версией BIOS, то скачайте его тоже. Это позволит вам совершить откат в любой момент.

Если вы решили производить установку стандартным методом, то вам потребуется внешний носитель, например, флешка или CD/DVD-диск. Его нужно отформатировать в формат FAT32, после чего туда можно перенести файлы из архива с BIOS. При перемещении файлов обязательно обратите внимание на то, чтобы среди них присутствовали элементы с такими расширениями как ROM и BIO.
Этап 2: Перепрошивка
После завершения подготовительных работ можно переходить непосредственно к обновлению BIOS. Для этого необязательно вытаскивать флешку, поэтому приступайте к выполнению следующей пошаговой инструкции сразу после того, как файлы будут переброшены на носитель:
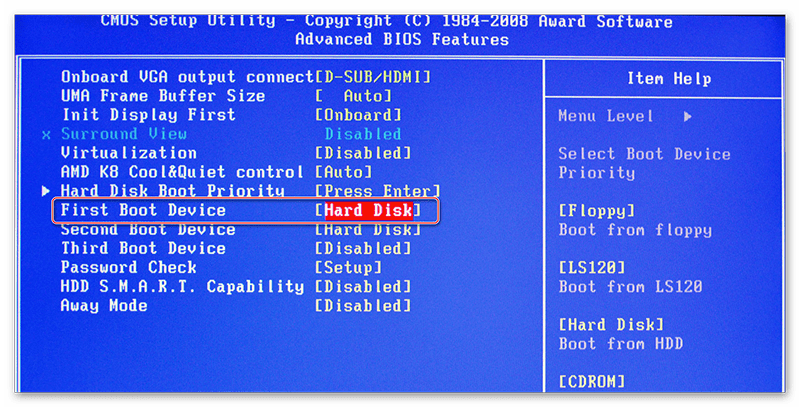
- Изначально рекомендуется поставить правильный приоритет загрузки компьютера, особенно, если вы выполняете эту процедуру с флешки. Для этого зайдите в BIOS.
- В интерфейсе БИОС вместо главного жёсткого диска выберите ваш носитель.
- Для сохранения изменений с последующей перезагрузкой компьютера используйте пункт в верхнем меню «Save & Exit» или горячую клавишу F10. Последняя не всегда срабатывает.
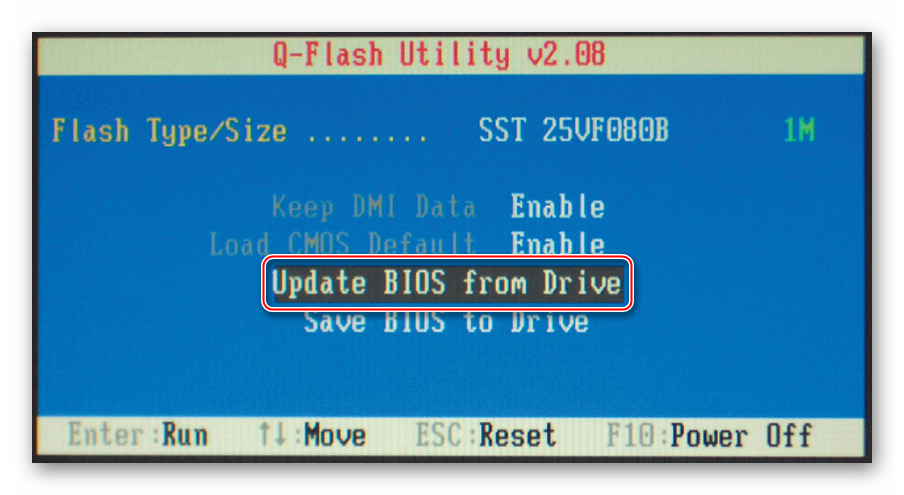
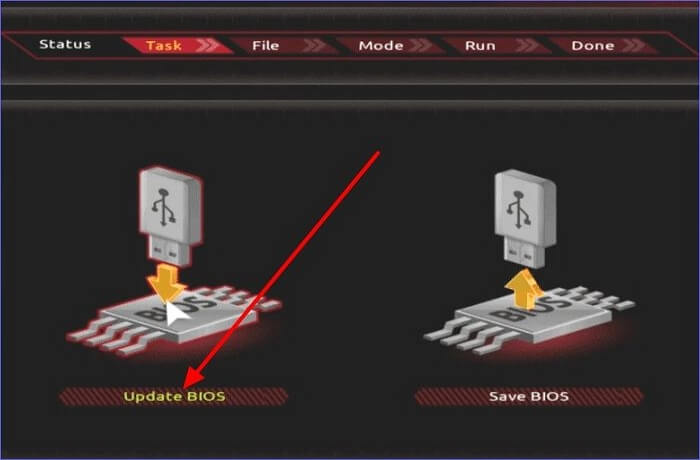
- Вместо загрузки операционной системы компьютер запустит флешку и предложит вам несколько вариантов действий с ней. Чтобы сделать обновление, используя пункт «Update BIOS from drive», следует помнить, что в зависимости от версии BIOS, которая установлена у вас на данный момент, название данного пункта может быть несколько другим, но смысл должен остаться примерно таким же.
- После перехода в этот раздел вас попросят выбрать версию, до которой вы бы хотели обновиться. Так как на флешке будет также и аварийная копия текущей версии (если вы её сделали и перебросили на носитель), то будьте внимательны на этом шаге и не перепутайте версии. После выбора должно начаться обновление, которое займёт не больше пары минут.
Урок: Устанавливаем загрузку компьютера с флешки
Иногда открывается строка ввода команд DOS. В этом случае вам потребуется вбить туда следующую команду:
IFLASH/PF _____.BIO
Где находятся нижние подчёркивания, нужно указать наименование файла с новой версией, который носит расширение BIO. Пример:
NEW-BIOS.BIO
Способ 2: Обновление из Windows
В материнских платах Gigabyte есть возможность сделать обновление при помощи стороннего программного обеспечения из интерфейса Windows. Для этого нужно скачать специальную утилиту @BIOS и (желательно) архив с актуальной версией. После можно перейти к выполнению пошаговой инструкции:
Скачать GIGABYTE @BIOS
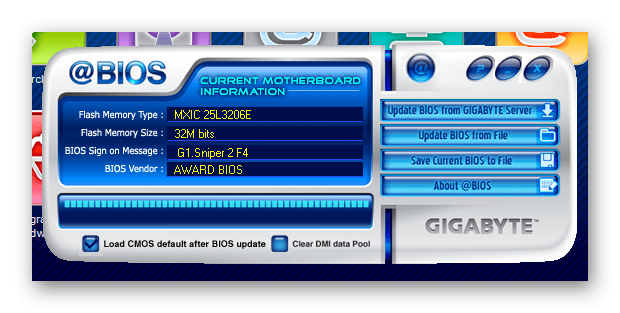
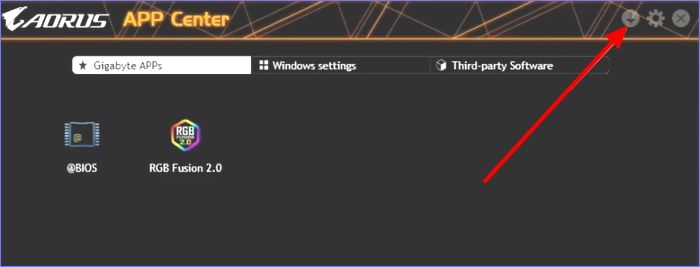
- Запустите программу. В интерфейсе есть всего 4 кнопки. Чтобы обновить BIOS нужно использовать только две.
- Если вы не хотите сильно заморачиваться, то используйте первую кнопку — «Update BIOS from GIGABYTE Server». Программа самостоятельно найдёт подходящее обновление и установит его. Однако если вы выберете данный шаг, то есть риск некорректной установки и работы прошивки в будущем.
- В качестве более безопасного аналога можно использовать кнопку «Update BIOS from file». В этом случае вам придётся указать программе скачанный вами файл с расширением BIO и дождаться завершения обновления.
- Весь процесс может занять до 15 минут, в ходе которых компьютер перезагрузится несколько раз.
Переустановку и обновление BIOS желательно делать исключительно через интерфейс DOS и встроенные утилиты в самом BIOS. Когда вы делаете данную процедуру через операционную систему, рискуете нарушить работоспособность компьютера в будущем, если вдруг во время обновления в системе случится какой-нибудь баг.
Наша группа в TelegramПолезные советы и помощь
Gigabyte is among the top motherboard brands. Its famous series include Aero, Aorus Gaming, Intel, GIGABYTE gaming, and AMD. Its chipset types include AMD X670 or B650, AMD B550 or X570, Intel Z790 or B769, AMD B450 or A320, etc. Are you conversant with how to update BIOS Gigabyte? EaseUS will tell you how to perform a Gigabyte BIOS update. Keep reading to learn how to update your Gigabyte BIOS.
Backup Data Before Updating Gigabyte BIOS
Updating Gigabyte BIOS is quite secure. However, it’s wise to back up your files to shield them from uncertainties. Data is a useful entity. It could have significant negative effects if lost. You can easily save and restore your data via EaseUS Todo Backup.
This free backup and recovery tool allows you to automatically back up your files to different places and retrieve them whenever needed. You can save your files to the network, cloud, or NAS, as well as to local or external storage. In addition, it allows you to create an ISO image of a USB and perform full, incremental, differential, and scheduled backups. Todo Backup allows you to retrieve files to their original location or a new one during recovery.
Some Key Features od EaseUS Todo Backup:
- App data backup and recovery to help you back up your APP data or favorite game save file on your PC.
- Backup and restore functions let you create a backup of your computer and recover them whenever needed.
- Perform a universal restore to help you install Windows after replacing the motherboard.
- Multi-path backup storage to store your backups in local drives, external drives, NAS, Security Zone, or Cloud.
- As the best file sync software for Windows to let you sync files between computers or external hard drives.
Ensure you download and install this software today for all your backup needs. You’ll only follow a few steps to start using this tool.
3 Ways to Flash BIOS on Gigabyte Motherboard
We’ve already learned the reasons for updating/flashing Gigabyte motherboard BIOS. You can flash gigabyte BIOS from Windows, USB, or the Gigabyte app center. This section will discuss the three methods as follows:
- Method 1. Update Gigabyte BIOS from Windows
- Method 2. Update Gigabyte BIOS from USB
- Method 3. Update Gigabyte BIOS Without USB
Method 1. Update Gigabyte BIOS from Windows
This technique entails formatting a USB drive to FAT32 before using it to update BIOS. You’ll need to visit the Gigabyte motherboard support page to look for the latest BIOS updates. Check the steps below:
Step 1. Insert a USB drive into your Windows PC. Ensure you format the USB to FAT32.
Step 2. Browse to the Gigabyte motherboard support website and enter your device model.
Step 3. Check for the available BIOS updates. Click on the download icon if you find updates.
Step 4. Extract the contents of download file to your formatted USB drive.
Step 5. Eject the USB and insert it into a computer you want to update its Gigabyte BIOS. Reboot the PC and press the relevant keys to enter BIOS settings.
Step 6. Click on the «Q-Flash» menu and select «Update BIOS.»
Step 7. Search for the BIOS update file. You can then click on it to launch the update process.
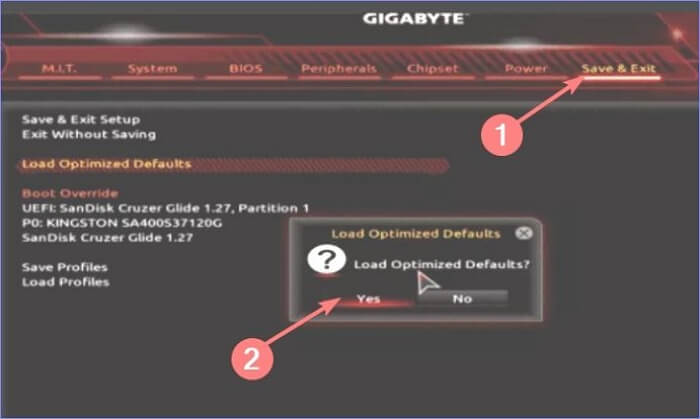
Step 8. Lastly, navigate to the «Save & Exit» tab and select «Yes» to load optimized defaults.
Share this article on your social media to help more people update Gigabyte motherboard BIOS!
Method 2. Update Gigabyte BIOS from USB
This method entails updating BIOS by inserting a FAT32 USB drive directly into the Gigabyte motherboard. You’ll then wait until BIOS finishes updating before ejecting the USB drive. Check these steps to update BIOS from USB:
Step 1. Format your USB drive to FAT32 and copy the BIOS update file you downloaded using the previous method.
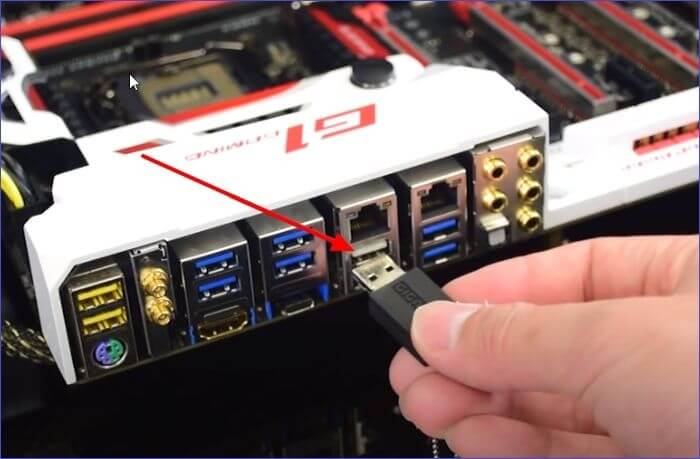
Step 2. Locate the white USB port of your Gigabyte motherboard and insert the FAT32 drive containing the BIOS update file.
Step 3. Turn on your motherboard. Once you see an LED light flickering, BIOS has started updating. Stay patient until the system completes the process.
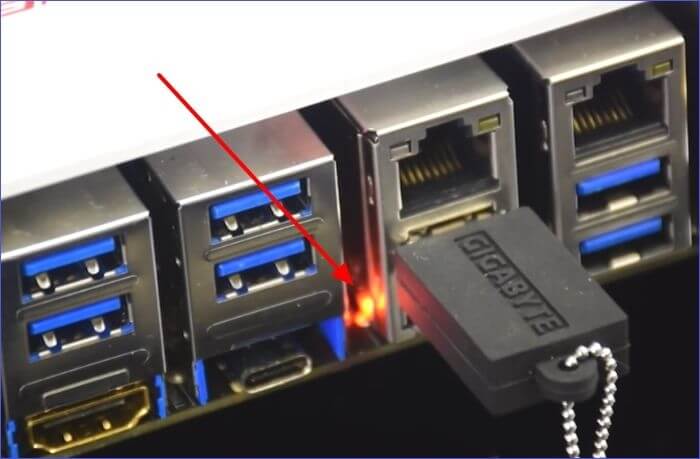
Step 4. When the light stops blinking, it means that BIOS has finished updating. Turn on your computer to finish the update process.
Method 3. Update Gigabyte BIOS Without USB
The final option is to use the Gigabyte app center to update BIOS. Check these steps to update BIOS without a USB drive:
Step 1. Download, install, and launch the Gigabyte app center on your computer.
Step 2. Next, navigate to the top right and click the download icon.
Step 3. Select «@BIOS» then «Update from Server.» Select the nearest available server.
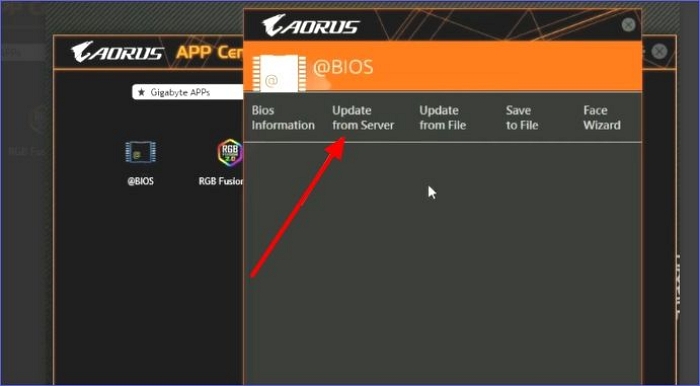
Step 4. App Center will scan for details about your motherboard and link you with the latest BIOS update. Click on the BIOS update file and select «Next.»
Step 5. You can then follow the instructions displayed to finish installing the BIOS update on your device.
Why You Need to Update BIOS Gigabyte
BIOS helps to link your computer’s hardware components with the motherboard. You may encounter compatibility or security issues if BIOS is outdated. Below are the main reasons for updating BIOS gigabyte:
- Ensure the compatibility of your motherboard with new hardware.
- To boost the performance of your system, i.e., faster boot times.
- To guarantee the stability of your system by fixing bugs.
- To keep your device against potential security threats.
- To obtain new features that could enhance the efficiency of your Gigabyte motherboard.
To Wrap Things Up
This tutorial has provided 3 ways on how to update BIOS Gigabyte. You can achieve that via USB, from Windows, or using the Gigabyte app center. A BIOS update enhances your device’s security, stability, and compatibility. It’s wise to back up your data before launching a BIOS update process.
EaseUS Todo Backup meets this objective quite easily. The tool lets you backup data to local drives or the cloud. You can quickly access the backup data whenever needed. Download this tool today to safeguard your computer against data loss.
FAQs on How to Update Gigabyte Motherboard BIOS
Below are the common FAQs on this topic.
1. Should You Update Gigabyte BIOS?
There’s no need to update the BIOS if your device works correctly. However, the following situations may call for a BIOS update:
- Incompatibility with new hardware.
- Bugs and crashes in your system.
- Security vulnerabilities.
- Declining system performance.
The steps for updating Gigabyte BIOS are very straightforward.
2. How Do I Know If My Motherboard Needs a BIOS Update?
You must fulfill an update after installing new hardware to your system. Another situation is when your device keeps crashing due to frequent bugs. Updating your Gigabyte BIOS could fix this issue.
3. Does Updating the BIOS Reset Settings?
YES. The system will restore all settings to their defaults. You must consider this factor before you start updating the BIOS. However, a BIOS update helps boost your system’s performance and promotes system security and stability.
4. Will I Have to Reinstall Windows If I Update BIOS?
NO. The update only seeks to find the latest drivers for your BIOS. It won’t affect how your operating system works or delete the data on your hard drive. Windows will work pretty fine after the update.
Server Motherboard
Server motherboards for demanding applications come in form factors: EEB/E-ATX/ATX/microATX/mini-ITX.
Workstation Motherboard
Professionals that work in AI, animation, and data science rely on solid, scalable, and performant workstation boards.
Rack Server
Innovation and performance are in these optimal rack servers to be deployed in data centers with demanding applications.
GPU Server
Scalable parallel computing GPU dense servers that are built for high performance.
High Density Server
Compute, Storage, and Networking are possible in high density, multi-node servers at lower TCO and greater efficiency.
Direct Liquid Cooling
Ensure peak performance in all configurations. Adopt direct-to-chip liquid cooling for the rising AI/HPC era.
Immersion Cooling
Address rising server heat with submerged cooling. Embrace next-gen liquid cooling for improved TCO and PUE.
Data Center — OCP
Based on OCP Open Rack Standards, barebone racks and nodes for datacenters.
x86
Tried and true x86 architecture based servers with support for the latest Intel and AMD processors.
ARM Server
Arm architecture servers will compete in Cloud to Edge as they tackle compute-bound workloads.
AI Platform
Processing power, large amounts of data, fast networking, and accelerators all bundle into a scale out ready HPC and/or AI server solution.
Visual Computing
Systems that do visual applications from computer graphics to computer animation rely on visual computing servers.
High-Performance Computing Server
Processing power, large amounts of data, fast networking, and accelerators all bundle into a scale out ready HPC and/or AI server solution.
Hyper-Converged Server
Software defined cluster of nodes can be dedicated for compute, storage, networking, or virtualization.
Storage Server
Capacity, reliability, and storage flexibility are built into these storage servers for enterprise and datacenters.
Network Server
Securely manage the use of files and applications for office environments while storing large amounts of data.
Edge Server
Real time data processing at the source is required for edge computing with reduced latency for Internet of Things (IoT) and 5G networks as they use cloud.
e-Mobility
Telematics and Edge computing platform for Electric vehicle, Autonomous driving, ADAS, ITS, and V2X applications
Readers help support Windows Report. We may get a commission if you buy through our links.
Read our disclosure page to find out how can you help Windows Report sustain the editorial team. Read more
Fixing any motherboard-related issues require you to make sure that you are running the latest version of the BIOS. Updating the BIOS of a Gigabyte motherboard can be a complex task and you should follow proper steps to accomplish it.
In this guide, we will share with you all the different ways via which you can easily update Gigabyte BIOS on your PC. Let us check out the methods.
How to check the BIOS version you currently have?
- Open the Start menu by pressing the Win key.
- Type System Information and open the top result.

- Locate BIOS Version/Date section on the right side.

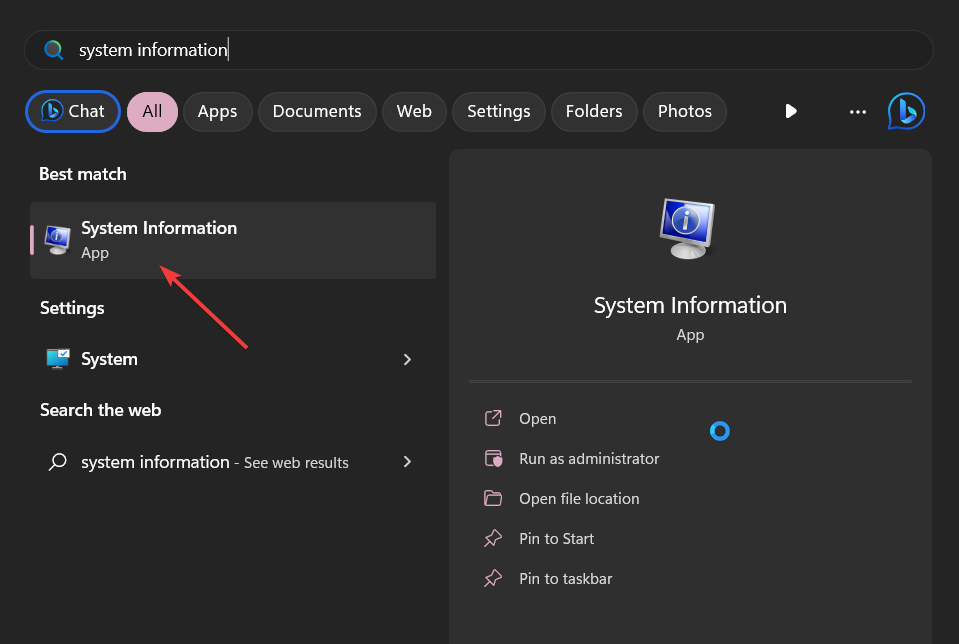

Note down the version of the BIOS you are running. This will let you decide whether you are running the latest version or not.
How can I update Gigabyte BIOS?
1. Use the Gigabyte App Center
- Download the Gigabyte app center.
- Install the App Center on your PC and launch the program.
- Click on the downward arrow in the top-right corner.

- Click on @BIOS.

- Switch to the Update from Server tab.

- Choose the closest server.
- The App Center will automatically detect your motherboard details and provide you with the latest BIOS update.
- Click on the file and select Next.
- Follow the on-screen prompts and install the BIOS update.


Updating the Gigabyte motherboard BIOS using the App Center is probably the easiest way. It simply needs you to perform some clicks and you are all set.
Apart from updating BIOS, you can also use the Gigabyte App Center to update the drivers as well. You can manually update the BIOS using the App Center as well. For that, you need to download the BIOS update file onto a USB drive and then select it within the App Center.
2. Use Gigabyte Q-Flash
2.1 Format the USB drive to FAT32
- Insert the USB flash drive to your PC.
- Press Win + E to open the File Explorer.
- Right-click on your USB drive and click on Format.

- Choose FAT32 from the File system dropdown menu.
- Click on the Start button.

2.2 Download the Gigabyte BIOS update
- Visit the official Gigabyte motherboard support page.
- You can search for the BIOS file based on your processor, chipset, or even your computer’s model name.
- Select BIOS for your computer model.

- Under the BIOS section, download the latest available update.
- Once the download is complete, extract the contents onto your FAT32 formatted USB drive.


2.3 Update the BIOS
- Insert the USB drive containing the Gigabyte BIOS update file into any USB port on your PC.
- Restart your PC and when it is booting up enter the BIOS menu by pressing the Del key.

- Select Q-Flash menu.

- Choose Update BIOS option.

- Locate the BIOS update file and select it.

- Start the BIOS update process.
- Once the BIOS is updated, switch to the Save & Exit tab, and select Load optimized defaults.


This process of the Q-Flash method may look a bit complex, but in reality, it isn’t. All you need to do is follow the steps mentioned above carefully and you will be done with the Gigabyte BIOS update process without any issues.
Make sure that the USB drive onto which you have copied the BIOS update file is in FAT32 format.
- Microsoft Office Lens: A Powerful Tool for Capturing and Organizing Information
- Swap Left/Right Speaker in Realtek Audio Console [How to]
- How to Get DirectX 12 End-User Runtime and Fix Installation Issues
3. Use the Q-Flash+ update method
- Copy the BIOS update file downloaded from the Gigabyte official website to the FAT32 formatted USB drive.
- Insert the USB drive into the white USB port on your motherboard.

- Turn on the motherboard.
- The LED light next to the USB will flicker indicating the BIOS update is in progress.

- Once the update is complete, the LED will stop blinking.
- Start your PC and wait for the BIOS update process to complete.


This is another one of the Gigabyte exclusive ways of updating the BIOS. However, there are some other manufacturers that offer the same process of updating the BIOS. You should check with your manufacturer about that.
That is it from us in this guide. You can check out our guide that gives you a proper explanation of what is BIOS and everything that you need to know about BIOS.
We have also listed 3 different ways to access the BIOS menu on your computer that will be beneficial to update the BIOS. In case you come across any issues, you can read our guide to fixing the BIOS corruption issue on a Windows PC.
Feel free to let us know in the comments below, which one of the above methods you used to update the Gigabyte BIOS.
Sagar Naresh
Sagar is a web developer and technology journalist. Currently associated with WindowsReport and SamMobile. When not writing, he is either at the gym sweating it out or playing country music on his guitar.
He is an avid traveler and has been to 15 countries, going to more places soon. TRAVEL and WORK is his mantra for a peaceful life.
| Как обновить микрокод BIOS системной платы | |||||||||
| О процедуре обновления BIOS… | |||||||||
| К процедуре обновления BIOS нужно относиться с особой осторожностью. Если текущая версия BIOS работает стабильно и без критических ошибок, рекомендуем вам сохранить ее резервную копию. При обновлении BIOS следует учитывать, что вы берете на себя всю ответственность за возможный выход из строя вашей системы. В случае неудачного обновления BIOS, пожалуйста, обращайтесь к поставщику или дистрибьютору/реселлеру для дальнейшего решения проблемы. | |||||||||
| Подготовительные процедуры… | |||||||||
|
|||||||||
| Три способа обновления микрокода BIOS… | |||||||||
| Утилиты для обновления BIOS доступны для загрузки на официальном сайте GIGABYTE. Ниже представлено краткое описание способов обновления микрокода BIOS. | |||||||||
| 1 : | |||||||||
| Фирменная утилита Q-Flash встроена непосредственно в BIOS, при этом сама процедура перепрограммирования микрокода достаточно проста и не требует от пользователя каких-либо специальных знаний. В том случае, если материнская плата не поддерживает технологию Q-Flash, рекомендуем воспользоваться утилитой @BIOS или обновить в среде DOS. | |||||||||
|
|||||||||
| 2 : | |||||||||
| Утилита для обновления BIOS в среде Windows. | |||||||||
|
|||||||||
| 3 : Обновление BIOS в среде DOS | |||||||||
|
|||||||||
| Руководство пользователя PDF | |||||||||
| Для просмотра данных PDF-файлов вам понадобится программа Acrobat Reader. | |||||||||