
Все способы:
- Способ 1: Ожидание
- Способ 2: Отключение устройств
- Способ 3: Перезапись флешки
- Дополнительные действия
- Вопросы и ответы: 1
Способ 1: Ожидание
В зависимости от используемой сборки, процесс подготовки Windows при установке занимает от 20 минут до часа, но в некоторых случаях он может затянуться. Иногда кажется, что экран с сообщением «Getting ready» или «Подготовка к настройке Windows» завис, в то время как система продолжает выполнять действия по настройке. О проблемах с установкой можно будет говорить, если ничего не изменится через два часа или более. Поэтому наберитесь терпения и просто немного подождите.
Способ 2: Отключение устройств
Теоретически проблемы с завершением установки могут быть вызваны ошибками идентификации подключенных к компьютеру устройств. Если сообщение «Getting ready» не исчезнет через продолжительное время (более часа), выключите компьютер кнопкой питания, отключите все второстепенные устройства и включите компьютер. Процедура настройки продолжится и, возможно, завершится успешно.
Способ 3: Перезапись флешки
Нельзя исключать, что причиной неполадки являются ошибки записи установочного образа Windows 10 на флешку. Также ошибки может содержать сам дистрибутив. Пересоздайте установочную флешку, также рекомендуется сравнить контрольные суммы ISO-образа с указанными хешами на сайте (если таковые имеются), с которого был скачан установочный образ. Избегайте по возможности использования пользовательских кастомизированных сборок Windows, так как они могут содержать ошибки.
Читайте также: Как создать загрузочную флешку с Windows 10
Дополнительные действия
В случае зависания на экране «Подготовка к настройке Windows» («Getting ready») не будет лишним проверить работу сети и диска. Во-первых, убедитесь в исправности и стабильности интернет-соединения. Возможно, компьютер отключился от сети и не может скачать нужное обновление. Если ПК подключен к роутеру по беспроводной сети, попробуйте подключиться с помощью кабеля Ethernet. Во-вторых, проверьте жесткий диск на предмет ошибок файловой системы и поврежденных секторов.
- Загрузите компьютер в среду восстановление любым подходящим способом, лучше всего с помощью установочного образа.
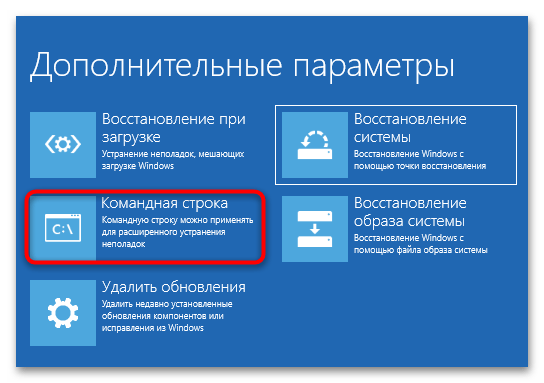
Подробнее: Как попасть в среду восстановления в Windows 10 - На экране выбора действия выберите «Поиск и исправление неисправностей» → «Дополнительные параметры» → «Командная строка».
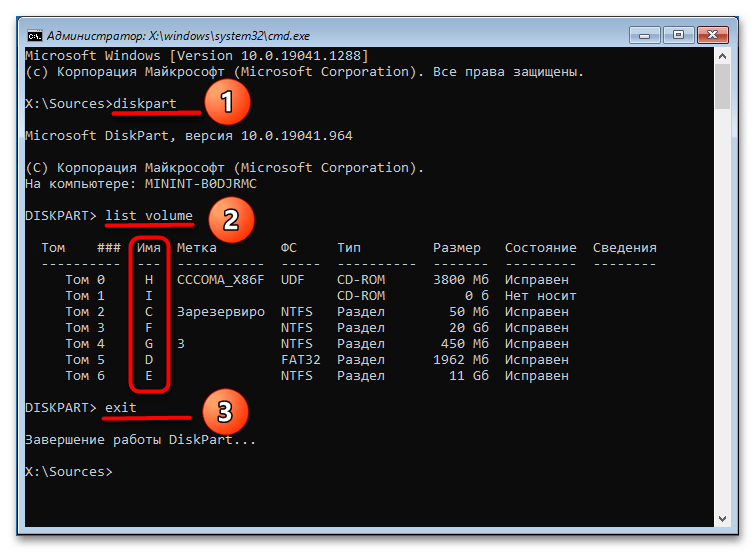
- В открывшейся консоли последовательно выполните команды
diskpartиlist volume, чтобы определить буквы разделов в загрузочной среде. Ориентируйтесь на строку «Размер», чтобы найти там системный диск. - Завершите работу «Diskpart» командой
exit. - Проверьте системный раздел, выполнив команду
chkdsk D: /f /r, где D – буква раздела с операционной системой.

Если ошибки будут найдены, утилита их исправит. После этого можно пробовать загружаться в обычном режиме. Для проверки диска на наличие поврежденных секторов лучше использовать специальное программное обеспечение, например программу Victoria. Так как компьютер не загружается, жесткий диск с него придется снять и проводить проверку уже с другого рабочего компьютера. Если такая возможность отсутствует, можно будет воспользоваться одним из спасательных LiveCD, на борту которого имеется программа Victoria.
Скачать Victoria
Читайте также: Восстанавливаем жесткий диск программой Victoria
Наша группа в TelegramПолезные советы и помощь
Installing an OS is a complicated task. Users only see a few progress bars as their system goes through the various steps of installation. They will have to provide some input e.g., select a language, a timezone, a keyboard layout, a user account name and password, etc. Beyond this, the process is more or less automated and users don’t have to do much.
Under the hood, the installation of any OS goes through several different steps/stages. Often, the progress bar we see, or the messages we get may disappear or remain on the screen longer.
When Windows 10 is installed, or updated, the system must restart several times. On the final leg of the installation, after which a user will boot to the desktop, Windows 10 displays the ‘Getting Windows ready’ message. This message doesn’t show a progress bar but will show a percentage in terms of progress. The progress may reach 100% but it tends to remain on the screen, on average, for fifteen to twenty minutes.
That said, this message may remain on your screen for considerably longer. Reasons the message remains on the screen much longer include, but are not limited to;
- A slower system running older hardware e.g., a slow hard disk drive.
- A particularly old Windows 10 installation that is being updated to the newest version e.g. 1703 to 2004.
- A device that is low on storage space on the installation/C/Windows drive.
If the Getting Windows ready message appears to be stuck, try the following fixes.
1. A bit of patience
The Getting Windows Ready message may remain on the screen for twenty minutes on a good, stable system. If your system is a bit old, it is best to give the OS some time to finish installing.
Many users have reported that waiting significantly longer e.g., two or three hours, eventually completed the installation and they were able to boot to their desktop. This is one reason why installing Windows 10 or updating it should always be a weekend project.
2. Restart the system
Sometimes the screen really does get stuck at the Getting Windows ready message. You can force shut down and reboot the system manually but only after you’ve waited a considerable amount of time for the message to go away on its own.
Press and hold the power button on your PC until it powers down. Wait a few minutes and then press the power button to boot the system again.
If you see the Getting Windows ready screen again, wait a while for it complete. It should eventually take you to your desktop.
3. Disconnect external drives
If you’ve connected an external drive to your system, disconnect it. You will have to restart the PC (see previous section).
If you’ve connected an installation disk or if it’s a storage drive that you back items up to, remove it and then allow the update or the installation to continue.
4. Run Windows startup repair
A Windows installation or an update can go wrong. This normally happens if the process was interrupted (in case of a clean installation), or if the installation media has problems (in case of installation or upgrade), or if you had apps installed on the desktop that are known to cause problems with updates (in case of Windows updates).
To fix it, you should run Windows Startup repair.
- Force shut down the system by holding down the power button.
- Connect Windows installation media (normally created on a USB) to your system.
- Boot to the installation screen and select the Windows 10 version and language you want to use.
- Click the repair option.
- Go to Troubleshoot>Startup repair.
- Run Startup repair and you will boot to your desktop.
Conclusion
Progress bars that we see during the installation of an OS are rarely accurate. In many cases, as long as the progress bar is ‘moving’ it means nothing is wrong. The ‘Getting Windows ready’ screen tends to remain on a certain percentage for quite some time which is why users think it is stuck. In most cases, waiting for it to complete is often the best and most reliable solution.

Fatima Wahab
Fatima has been writing for AddictiveTips for six years. She began as a junior writer and has been working as the Editor in Chief since 2014.
Fatima gets an adrenaline rush from figuring out how technology works, and how to manipulate it. A well-designed app, something that solves a common everyday problem and looks
Sometimes, when you reboot or turn on your desktop or laptop, you might see the following message:
Getting Windows ready
Don’t turn off your computer
There are several reasons why Windows can get stuck on this screen. Regardless of the cause, it is a frustrating experience, and failure to fix the issue could lead to data loss.
If you’re stuck in a boot loop on Windows 10 or 11, we can help. Our experts offer troubleshooting tips and explain what to do when your computer is stuck on the “Getting Windows Ready” screen. And, if nothing resolves the issue, our data recovery services can often retrieve critical files from your system drive.
Step-by-Step Guide:
- Wait It Out
- Check Internet Connection
- Shut Down and Reset Computer
- Uninstall Windows Updates in Safe Mode
- Uninstall New Quality or Feature Updates
- Perform a System File Check
- Use the Startup Repair Tool
- Update BIOS and Drivers
- Restore the System to a Previous Point
- Reset Your Computer and Reinstall Windows (Last Resort)
Why Does “Getting Windows Ready” Become Stuck?
The “Getting Windows Ready” screen could become stuck for multiple reasons.
Common reasons why Windows might fail to load include:
- Pending installs. Updates or installations that were interrupted or not completed can result in Windows stalling during startup.
- Faulty Windows update. Failed quality or feature updates may lead to the system freezing on the loading screen.
- Software conflicts. Issues between Windows and third-party software can interfere with the boot process.
- Missing or corrupted system files. Corruption of key system files can prevent Windows from loading properly, leading to an indefinite startup.
How Long You Should Wait
Sometimes, Windows must go through several steps before booting to your desktop. These processes all happen in the background, so it can be difficult to track the progress. It is possible that nothing is wrong with your system and it simply needs more time. Make sure more than enough time has passed for the update to complete. In most cases, a few hours will suffice.
A systematic troubleshooting approach will typically fix Windows boot issues and bypass the “Getting Windows Ready” screen.
First, we will walk you through a few common troubleshooting steps. If those don’t solve the issue, we have a few more advanced steps below. Often, there is a simple solution that can solve a problem like this.
1. Wait It Out
As mentioned, Windows might just need more time to install updates. Some updates can take 2-3 hours to complete. If your system runs on a hard disk drive (HDD), you can check to see if its indicator is blinking. If it is, you may only have to wait it out.
2. Check Internet Connection
Alternatively, the issue could be that you’re not connected to the internet. If that is the case, your computer may be stuck on this screen because it needs a stable connection to proceed with the update process. Check your router or test another device (like your phone) on the same network.
3. Shut Down and Reset Computer
Even though the screen says “Don’t turn off your computer,” you may have to shut down your device with a power reset to fix the issue. A power reset (also known as a hard reset), can sometimes clear the memory cache.
Note: Turning off your computer on the “Getting Windows Ready” screen carries a risk of data loss and file corruption.
To perform a power reset:
- Disconnect all peripheral devices (such as USB devices, like USB flash drives, or external hard drives).
- Remove the power cable.
- Press and hold the power button for 10-15 seconds to shut down your computer.
- Wait 10-15 seconds to turn your computer on again.
4. Uninstall Windows Updates in Safe Mode
Before applying these solutions, you will need to learn how to access Windows Recovery Environment (WinRE).
Here is the recommended method to access Windows Recovery Environment:
- Turn on your computer (after turning it off).
- Hold the Shift key down and press the power button at the same time.
- Continue holding the Shift key as your machine powers on.
If the above approach does not work, you can also try these steps:
- Hold the power button down for 10-15 seconds to turn off your device.
- Press the power button again to restart your device.
- Once you see that Windows is starting (for example, the manufacturer’s logo shows on the screen), hold the power button for 10 seconds to turn off your device again.
- Repeat this three times total to enter WinRE.
If these methods don’t work, try using Windows Installation Media to Enter WinRE. You can download the media creation utility for your Windows operating system from the Microsoft software download page.
Use another device to download the software, then run it to create Windows installation media on a separate USB drive or disk. You can then use this external device to boot your computer.
A note on when and how to use Windows’ built-in repair tools: These tools are designed to fix system issues that prevent Windows from booting. However, they should be used carefully to avoid unintended consequences.
You can now enter Safe Mode to uninstall failed Windows updates. Safe Mode is a built-in environment designed to help fix your operating system.
Getting to Safe Mode involves similar steps to the methods above:
- Enter WinRE using the steps above.
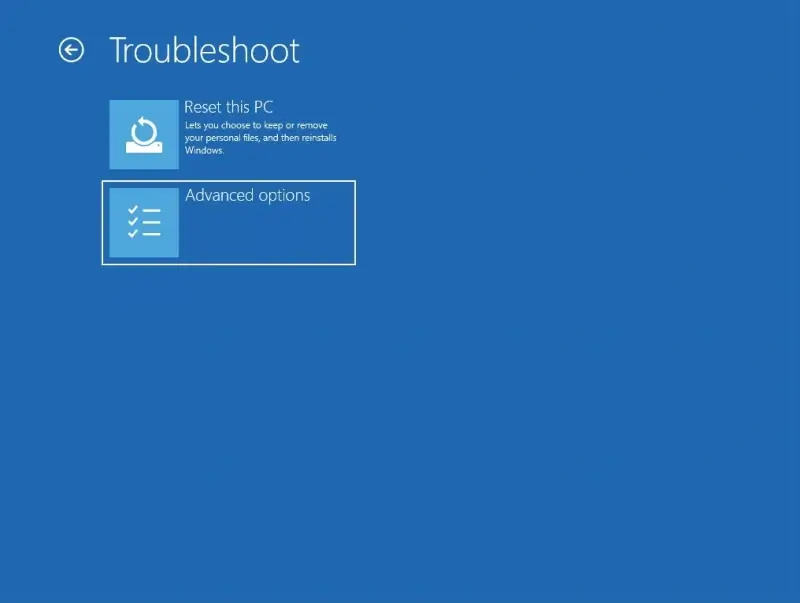
- Click Troubleshoot, then Advanced Options.
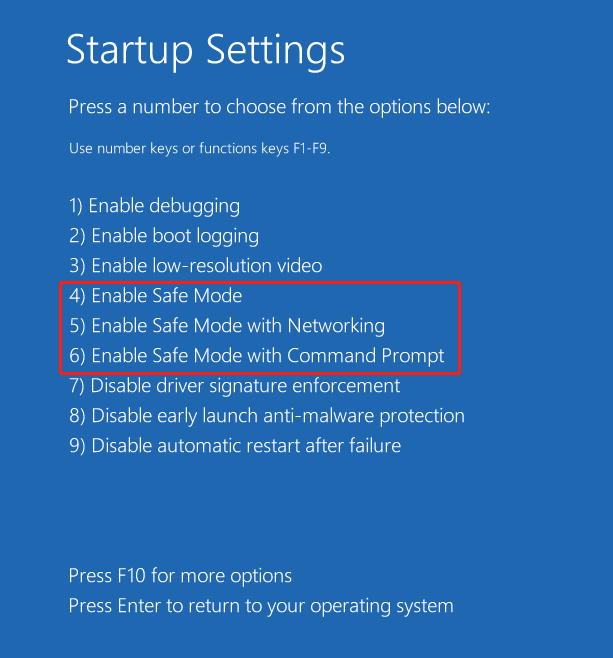
- Click Startup Settings, then Restart.
- Choose one of the Safe Mode options from the list or Press F4.
Once you’re in Safe Mode:
- Type Control Panel into the search box on the taskbar.
- Click Programs and Features.
- Click Recently Installed Update.
- Select recent updates and uninstall them.
- Restart your computer.
New updates can sometimes cause compatibility issues with existing software. Removing them may help with boot issues. If the issue persists, move to the next solution.
5. Uninstall New Quality and Feature Updates
Windows quality and feature updates are meant to fix bugs and improve your experience, but they sometimes can cause issues with existing software or hardware and affect drivers. This is a common reason why a computer may keep crashing.
To try uninstalling quality and feature updates on your system, start by entering WinRE again. You use the instructions above to get back to this screen.
Once in WinRE, follow these steps to uninstall updates:
- Click Troubleshoot.
- Click Advanced Options.

- Choose Uninstall Updates.
- Try uninstalling the latest quality or feature updates.
- Restart your computer.

6. Perform a System File Check
If none of the methods we’ve recommended up to now have worked, and you’re not confident using command prompts on a computer, you might want to consult a professional at this stage.
If you feel confident using command prompts, try performing a system file check. The System File Checker (SFC) scans the protected system files on your device and replaces corrupted ones with cached working copies. This can sometimes fix some operational issues.
Note: The design of CHKDSK and System File Checker can cause data loss. Assess the value of the files before proceeding.
To access and run the System File Checker, follow the steps in previous methods to reach the Advanced Options menu from WinRE. From there, follow these steps:
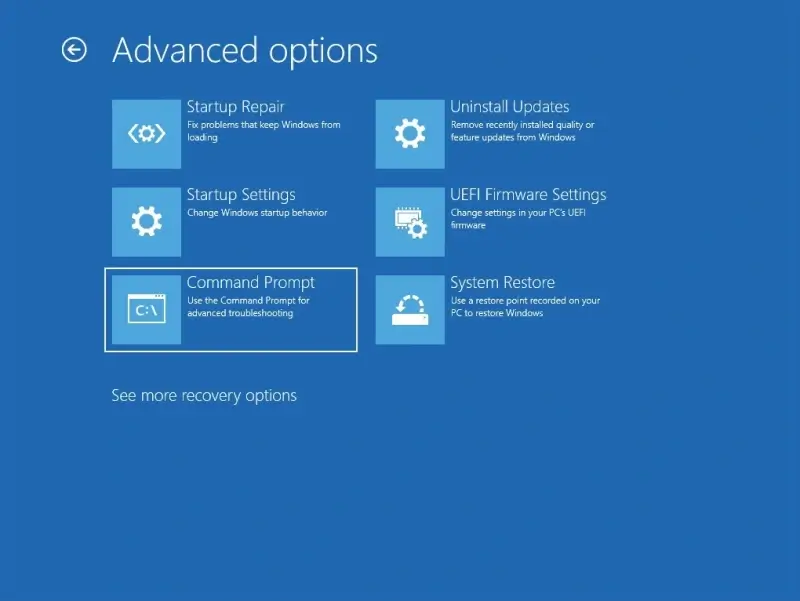
- Select Command Prompt in the Advanced Options menu.
- Type in “sfc /scannow” and press Enter to begin the system scan.
- Once the scan is complete, type in “chkdsk / f c:” (Replace “c:” with the drive where Windows is installed if different) and press Enter.
- Reboot the computer once the scan reaches 100%.
If you are still experiencing the same problem, try the following.
7. Use the Startup Repair Tool
The Startup Repair Tool performs diagnostics, analyzing startup log files to determine the cause of the problem and then trying to fix the problem.
Once you’ve entered WinRE, you can access and use the Startup Repair Tool through the following steps:
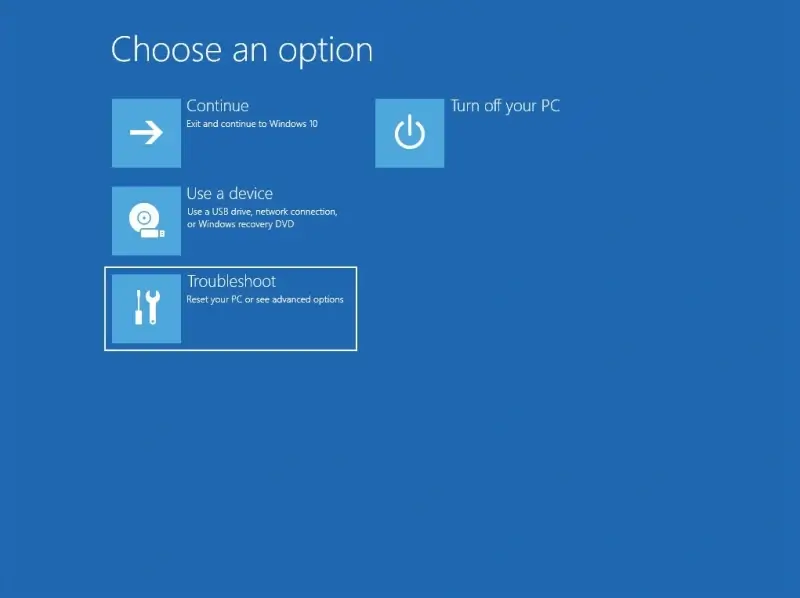
- Click on Troubleshoot in WinRE.

- Click Advanced Options.
- Click Startup Repair in the Advanced Options menu.
- Select an account from the Startup Repair screen. You will need admin privileges to proceed.
- Enter your password.
- Click Continue to start the repair tool.
- Give the Windows Startup Repair Tool time to run.
- Restart your computer once it is finished.
If you start your computer and get stuck on the loading screen again, move on to the next troubleshooting step.
8. Update BIOS or Drivers
An outdated BIOS or driver conflict could also cause Windows to enter a boot loop. Without access to Safe Mode, you can sometimes circumvent these issues by updating the BIOS or drivers from WinRE.
Note: These steps can contribute to further system instability. Exercise caution when updating BIOS or drivers, especially without valid backups of critical data.
To update the BIOS on Windows:
- Download the BIOS update file to a bootable USB drive (FAT32 format) for your motherboard or laptop model from their support website.
- Click Troubleshoot in WinRE.
- Click Advanced Options.
- Select UEFI Firmware Settings.
- Select the BIOS Update or equivalent option within the menu.
- Select the desired BIOS file from the USB drive.
- Restart your computer.
To update drivers in Windows:
- Download the desired drivers to a bootable USB drive from the device’s support website.
- Click Troubleshoot.
- Click Advanced Options.
- Click Command Prompt.
- Enter cd X:\DriverFolder in Command Prompt to navigate to the . (Note: Replace X with the actual drive letter and DriverFolder with the actual folder name.)
- Enter pnputil /add-driver drivername.inf /install in Command Prompt. (Note: Replace drivername.inf with the actual driver file name.)
- Restart your computer.
9. Restore the System to a Previous Point in WinRE
Once you’re in WinRE, you can also restore your operating system to a prior point or date if you have any saved. System Restore creates restore points either automatically, such as when you install new apps, drivers, or Windows updates, or manually when you create them. If system updates are creating problems, you can restore your Windows system to a previous restore point, removing the update without affecting all your personal data.
Note: Any files saved between the current point in time and your previous point will be lost during a System Restore. Make sure the data is backed up or non-essential.
To restore your system from a previous restore point, follow these steps:
- Follow the steps above to enter WinRE again.
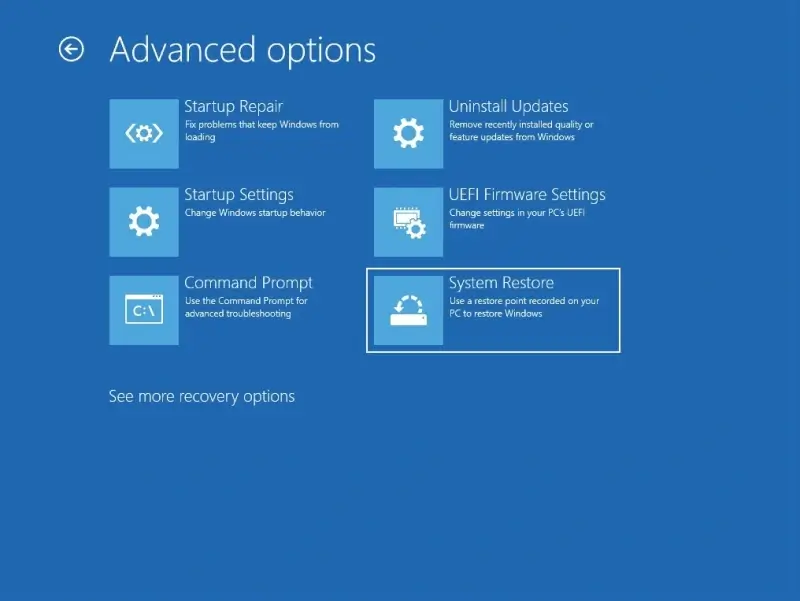
- Click Troubleshoot.
- Click Advanced Options.

- Click System Restore.
- Select a restore point and follow the on-screen instructions.
Remember, any new data that was created after the chosen restoration point may be lost. Also, in some cases, the restore may not work and could lead to other error messages.
10. Reinstall Windows (Last Resort)
If none of these methods work, you can try to reset your device.
This is a drastic step, so you might want to consult a professional first. It could potentially overwrite your files. If you want to proceed with resetting your device, follow these steps:
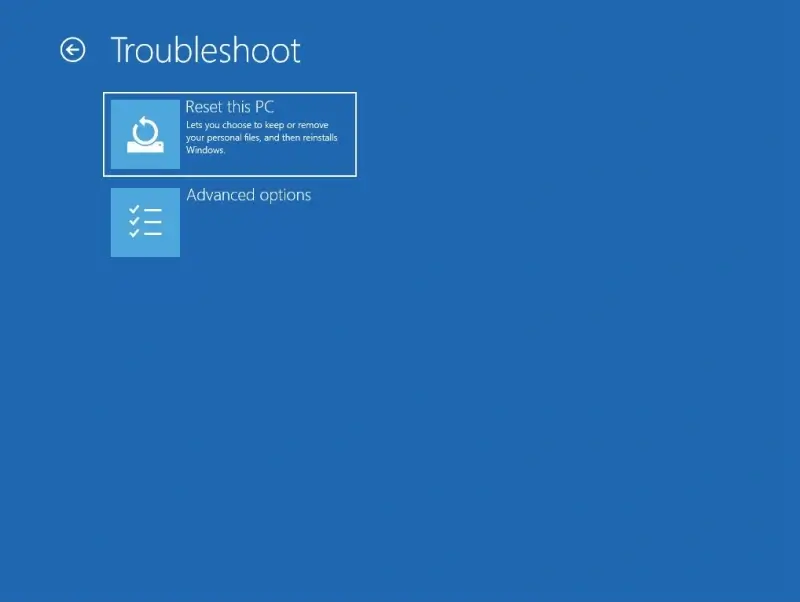
- From the Troubleshoot menu, select Reset This PC.
- Choose Keep My Files or Remove Everything. (Note: Even if you choose Keep My Files, you could still lose data. Proceed cautiously.)
- Click Local Reinstall and follow the instructions that appear on the screen.
Call Experts to Safely Recover Your Lost Data
Dealing with any computer error is frustrating, especially when the problem prevents you from using your device at all. If you’ve exhausted all efforts, it may be time to reach out to a data recovery expert.
Since 2007, Secure Data Recovery has resolved over 100,000 cases across every storage device and failure type. In the process, we have recovered billions of files. Our certified engineers can recover your data, too. Trust the service with free diagnostics and quotes and a No Data, No Recovery Fee guarantee to restore lost files.
Call us at 800-388-1266, request help from an expert, or find a location to start a case and get your data back.
Yevgeniy Reznik is Laboratory Operations Manager at Secure Data Recovery Services in Cleveland, Ohio, and has more than a decade of experience as a data recovery engineer. He graduated from Cleveland State University with a degree in computer science and spent 15 years as an IT entrepreneur and small business owner before joining the company.
Just built a custom pc that works with windows 10. Every time I try to install windows 10, it goes through with Windows 10 clean install stuck at getting files ready for installation but stops at 75 — 76%. Please help.»
Getting files ready is one of the stages you go through when you install the Windows 10 operating system on your computer. Sometimes, though, getting files ready for installation stuck Windows 10 occurs. This causes you to be stuck on the process screen and it will not let you get past that.
If you have found yourself in this situation, and you have the getting files ready for installation stuck issue, this guide will be of great use to you.
- Part 1. How Long Does It Take for Windows 10 Getting Files Ready for Installation?
- Part 2. How to Fix Windows 10 Stuck at Getting Files Ready for Installation
- Part 3. How to Recover Important Files When Getting Files Ready for Installation Stuck
Part 1. How Long Does It Take for Windows 10 Getting Files Ready for Installation?
There are many factors that affect how long it takes for Windows 10 to get the installation files ready. On some fast computers, this takes less time compared to old computers.
Usually, this process should not take more than two hours. In case it does, you can classify it as a stuck issue and you need to then find solutions to fix the problem.
Part 2. How to Fix Windows 10 Stuck at Getting Files Ready for Installation
Now that you know the normal time the procedure should take, you can easily identify if your screen is actually stuck or not.
If you find your Windows 10 stuck at getting files ready for installation, the following methods should help you potentially fix this problem on your machine.
Fix 1. Restart Your PC and Disconnect It from the Internet
One of the workarounds to fix it when your computer is stuck on getting files ready screen is to reboot your computer. Doing so helps fix many minor glitches on your computer.
Also, this is relatively easy to do and you do not need any prior tech experience to be able to pull this.
- Turn your computer off.
- Unplug the power cable from your computer and let your computer sit idle for about an hour.
- Eject the Ethernet cable from your computer if you have one connected. Basically, you need to disconnect your computer from the Internet.
- Turn your computer on, make sure it does not have the Internet, and wait for the setup process to finish.
Fix 2. Reset the BIOS
It might be that there is an issue with your BIOS and this is causing Windows not to be able to gather all the files it needs for Windows installation. Resetting your BIOS to the default settings should likely fix the problem for you.
- Turn your machine off.
- Turn your machine back on and press the key that helps access the BIOS menu.
- In BIOS, look for the option that says Load Default Settings and select it. If you do not find this exact option, your system might be using another but similar name.
Fix 3. Boot Your Computer into Safe Mode and Check Problems
Your computer has a mode called safe mode that you can reboot into to find possible causes of the issue and fix them. Basically, safe mode only loads the essential files to turn your computer on, and this lets you investigate third-party apps and such other content to see if they are causing the Windows 10 stuck at getting setup files issue.
- Turn your computer off and then turn it back on a few times.
- When you see a menu, navigate to Troubleshoot > Advanced options > Startup Settings, and click Restart.
-
Select the Safe mode option using the F4 key to enter the mode.
- If your computer works just fine in safe mode, the issue is likely with your installed apps. You need to remove them one by one to see which is the culprit.
Fix 4. Delete Problematic Files
If Windows 10 getting files ready for installation process will not move forward, one of the possible reasons is that there are problematic files on your system. Until and unless you get rid of these files, you will not be able to make progress with your task.
Luckily, you can use the Command Prompt to find and remove problematic files from your computer.
- Reboot your computer a few times and you will see a menu.
- Navigate to Troubleshoot > Advanced options > Command Prompt to open a Command Prompt window.
-
Type the following command into the Command Prompt and hit Enter.
cd Windows\System32\LogFiles\Srt. SrtTrail.txt
- If the result of the above command says that a file is corrupt, navigate to that file using the Command Prompt and use the del command to delete that file from your computer.
Part 3. How to Recover Important Files When Getting Files Ready for Installation Stuck
Your computer is basically useless when it is stuck on the getting ready screen. If you need to access your files during this time, you cannot do that as your machine will not just load.
Luckily, there is a program called Tenorshare Windows Boot Genius that allows users to recover data from their computers. Using this program, you can actually recover files from your unbootable computer. All you need to do is run the program, select the files to recover, and you are good to go.
-
Download and open the program on your computer. Insert a blank CD/DVD/USB flash drive into your computer, select it in the software, and click on Burn. It will turn your drive into a bootable drive.
-
Boot your faulty computer from the newly created bootable drive. Click the Data Recovery at the top.
-
Select Deleted Recovery and continue. Select the drive where your files are located, and click Scan in the bottom.
-
Find the files you want to recover and select Recover.
That should help you get access to your important files until you fix your computer issue.
Summary
While everyone expects their Windows 10 installation process to go through without issues, the process sometimes acts up. If you are stuck on the screen as explained above, there are various methods to get around it.
-
Home
-
News
- Windows 10 Getting Files Ready for Installation Stuck – 6 Ways
By Vera | Follow |
Last Updated
When installing Windows 10/8/7, you may run into the issue of getting files ready for installation stuck at 17%, 27%, 70%, 72%, 94%, etc. What should you do to get out of the stuck screen? Today MiniTool Solution lists some effective methods in this post and just have a try to fix your issue.
Getting Files Ready for Installation Stuck Windows 10/8/7
When using a Windows bootable USB drive or CD/DVD to install Windows 10, 8, or 7, there may be a failure, for example, getting files ready for installation stuck. The PC doesn’t freeze and you can still have full control of the mouse but the installation process gets stuck at 17%, 27%, 70%, 72%, 94%, etc.
The possible reasons for this may be file system errors, the system itself, bad sectors, virus/malware attacks, disk integrity corruption, third-party software issue, and more. Fortunately, you can try many methods to easily fix this issue. Let’s go to see them.
Tip: Before taking any actions, it is best to back up your important files. To back up files, you can use the professional backup software – MiniTool ShadowMaker. This post gives you many details – How to Back up Data without Booting Windows? Easy Ways Are Here!
Fixes for Windows 7/8 or Windows 10 Getting Files Ready for Installation Stuck
Wait Until the Installation Process Finishes
According to Microsoft, you should wait for the procedure to complete and then take further action. When the computer screen shows “getting files ready for installation”, the system may be handing some background tasks and needs some time to finish them. Thus, wait patiently. If your PC still gets stuck on the screen after 2 or 3 hours, try the following methods.
Disconnect Any External Devices
If some additional peripherals are connected to your PC, you may run into the issue of Windows 10 stuck at getting setup files. So, make sure you have unplugged any external devices (additional monitors, card readers, keyboards, and more) other than the C drive. If possible, turn off Wi-Fi and use a LAN cable to plug into a router.
Enter Safe Mode to Restart Your PC
In Safe Mode, the system only runs necessary drives and applications. It can be troubleshooting mode. To get out of installing Windows 10 stuck at 0, 17, 27, etc., you can boot your machine to Safe Mode.
- Restart your computer several times and it will go to Windows Recovery Environment (WinRE). Or prepare a Windows repair disk to boot the PC and click Repair your computer to enter WinRE.
- Go to Troubleshoot > Advanced options > Startup Settings > Restart.
- Press a specific key to enter Safe Mode.
- Reboot the computer in Safe Mode and the PC will get out of the stuck screen.
Check BIOS
This could be a solution to fix getting files ready for installation stuck. Follow these steps to check BIOS:
- Restart your PC to enter BIOS. Related article: [5 Ways] How to Get Into BIOS on Windows 11 on Restart.
- Check the boot priority – make sure the PC boots from the drive used to install Windows.
- Save the change and exit BIOS. Restart your PC.
Delete Problematic Files
The following are steps to delete problematic files or folders:
- Boot your Windows 10 to WinRE.
- Go to Troubleshoot > Advanced Options > Command Prompt.
- Type C: cd Windows\System32\LogFiles\Srt. SrtTrail.txt and press Enter.
- If you see a message saying Boot critical file c:\windows\system32\drivers\vsock.sys is corrupt, track the specific location, and type the del command in the command window to delete it.
Bring the PC to a Repair Shop
If none of these solutions can fix getting files ready for installation stuck, the last method you can try is to bring the PC to a repair shop and ask a professional for help.
Final Words
Windows 10/8/7 getting files ready for installation stuck at 17%, 27%, 70%, 72%, 94%, etc.? Try these solutions above and you can easily get rid of the problem. Hope this post is helpful to you.
About The Author
Position: Columnist
Vera is an editor of the MiniTool Team since 2016 who has more than 7 years’ writing experiences in the field of technical articles. Her articles mainly focus on disk & partition management, PC data recovery, video conversion, as well as PC backup & restore, helping users to solve some errors and issues when using their computers. In her spare times, she likes shopping, playing games and reading some articles.