
The $GetCurrent folder is a hidden file that contains data related to any recently applied Windows updates. While this folder is completely safe and doesn’t affect any other processes on your device, it can take up a significant amount of space when left unchecked. But is it safe to remove the $GetCurrent folder?
This guide details how to free up disk space and minimize unnecessary upgrade files on your computer.
What is the $GetCurrent Folder?
The $GetCurrent folder is a temporary storage installation file from the latest Windows update on your device.
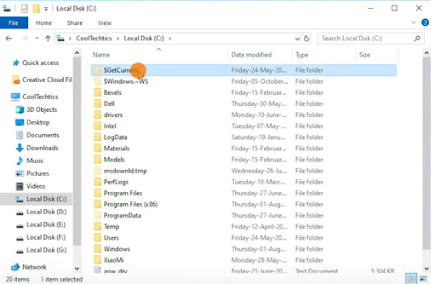
This hidden folder can be found in the root directory of your C:\ drive. It should be a relatively small-sized file folder – however, if you still have pending Windows Updates, it might still contain leftover installation files, which take up a larger amount of space on your hard drive.
Is it safe to delete the $GetCurrent folder?
If you don’t have any pending Windows Updates, deleting the $GetCurrent folder and its contents should be safe. Otherwise, it could impact the update progress and affect overall system performance.
You can check for any pending updates by checking the file dates within the folders. If the dates reflect a significant amount of time (e.g. around 6-12 months), then it should be safe to delete.
You can also check the Logs subfolder by locating the PartnerSetupCompleteResult.log file. This should reflect whether or not the operation was completed successfully. To be sure, you can always check your Windows Update settings for pending actions.
💡NOTE: Once the $GetCurrent folder is deleted, it can’t be used for rollback.
Overall, if you do not urgently need to free up drive space, it is safe to keep the $GetCurrent folder. Windows should automatically delete it alongside any other update installation files after 30 days. If it is past the 30-day period, you can remove the folder yourself or report the issue to an IT administrator.
How to Delete the $GetCurrent Folder in Windows
Method 1: Using File Explorer
- Click Win + E to open the File Explorer.
- Click on the View tab, and find Hidden items in the ribbon. Check the box.
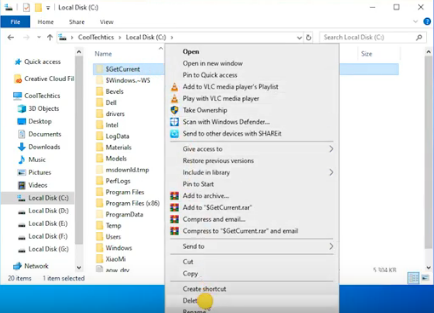
- Open the Windows C: drive, right click on the $GetCurrent folder. Click on Delete.
- If a prompt dialog appears, click Continue to approve.
- If you prefer not to view it in the File Explorer, you can go back to the ribbon and uncheck the Hidden items box.
Method 2: Using Command Prompt (CMD)
- Open an elevated command prompt.
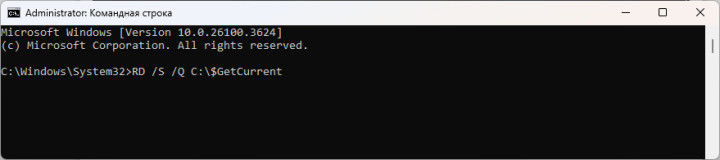
- Enter the following command and press Enter: RD /S /Q “C:\$GetCurrent”
- Once finished, you can close the elevated command prompt.
What should you do if the folder won’t be deleted?
If you’ve noticed that space hasn’t been freed up from your drive even after completing the steps mentioned above, you might want to check the Recycle Bin. Deleting the file from the Windows File Explorer will automatically place it there, where you will have the option to delete the folder permanently.
However, in some instances you might not be able to delete it completely. In this case, it means you might have some pending updates that still need to be installed on your device. You should finish installing the update or delete any pending updates from your settings.
💡NOTE: Before attempting to delete the $GetCurrent folder, ensure that you have administrator permissions.
How do you remove unnecessary Windows update files?
Aside from the $GetCurrent folder, you can remove other Windows upgrade files such as the $WINDOWS.~BT and ~WINDOWS.~WS folders. You can easily remove these files by using disk cleanup utilities from Windows.
Alternatively, you can learn how to disable Windows updates to manage space on your device.
Option 1: Using the Disk Cleanup utility
- Use Win+R to open Run.
- In the dialog box, enter the following: c:\windows\SYSTEM32\cleanmgr.exe /d[Drive Name] then click Enter to run. Replace [Drive Name] with the disk you intend to clean. This will open Disk Cleanup.
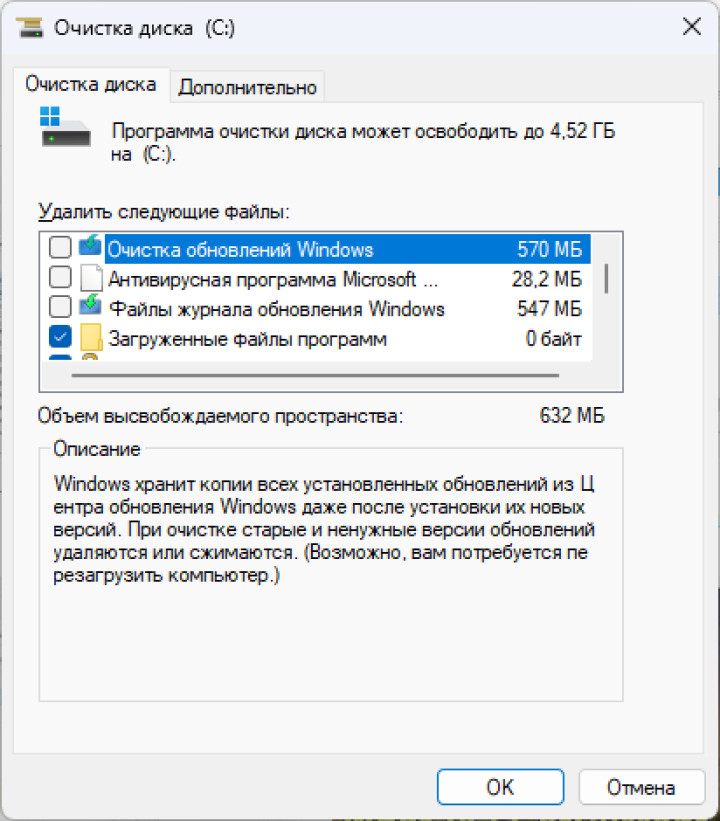
- Choose the Windows Update Cleanup option to delete any Windows update leftover files that your system no longer needs.
Option 2: Command-line switches
To avoid the hassle of cleaning up unnecessary files for every Windows update, you can opt to automate the entire process. Simply follow the steps above to run Disk Cleanup, then you can take advantage of any of the following command-line switches:
- /d <driveletter>: This lets you choose the drive that you want to clean. /d can’t be used with /sagerun:n.
- /sageset:n: This command will essentially help you specify which tasks the Disk Cleanup should do. It will prompt a dialog box that creates a registry key for task automation. You can set any integer value under n from 0 to 65535.
- /sagerun:n: This command will run the specific tasks assigned to the /sageset switch. All drives will be enumerated, and the selected profile will be run against them.
The /sageset and /sagerun switches can help you remove temporary setup files, downloaded program files, and Recycle Bin files, all of which could contain residual upgrade-related data that you no longer need.
Option 3: Using Storage Sense
Storage Sense is another storage cleanup utility from Windows that can remove unnecessary Windows update files.
However, it will not directly delete Windows update files on its own. It can delete temporary files and Recycle Bin files, which may contain items such as the $GetCurrent folder.
To run Storage Sense:
- Open Start > Settings.
- In the Settings window, click on System and then click on Storage on the sidebar.
- If the Storage Sense toggle isn’t turned on, enable it.
- Click on Configure Storage Sense to run. Under the Temporary Files section, check the Delete temporary files that my apps aren’t using option.
- Click on Clean now to trigger the cleanup process.
Free up disk space by safely removing the $GetCurrent folder
While the $GetCurrent folder won’t harm or affect your computer in any way, it can still take up a significant amount of space on your disk. You can easily remove these files through built-in Windows functions and utilities, but ensure you have the proper administrative access.
Your Windows device will still operate smoothly once the $GetCurrent folder is deleted, provided you have no pending updates. Automating disk cleanup could significantly ease your workflow if your device needs regular updates and you often face this problem.
Если включить показ скрытых и системных файлов, вы можете обнаружить папку с именем $GetCurrent на диске С. Один из частых вопросов пользователей — что это за папка и можно ли её удалить.
В этой статье подробно о назначении папки $GetCurrent в Windows 11 и Windows 10 и о процессе её безопасного удаления.
Назначение папки и её удаление
Прежде всего: эта обычная системная папка и не представляет какой-либо угрозы. Однако, в некоторых случаях она может занимать сравнительно много места на диске.

Папка $GetCurrent создается при установке обновлений Windows и содержит файлы журнала, содержащие информацию о процессе установки последних обновлений (во вложенной папке Logs).
В некоторых случаях в папке содержатся и сами файлы обновлений, а иногда — и целиком образ системы (например, после обновления Windows 10 до Windows 11) во вложенной папке Media, как на приведенном ниже изображении.

Как удалить папку $GetCurrent
Для удаления этой папки со всем содержимым необходимо иметь права администратора на компьютере, само удаление вполне безопасно.
Способы удалить папку $GetCurrent:
- Использовать встроенную утилиту очистки диска Windows 11 или Windows 10 (Win+R — cleanmgr.exe), запустить очистку системных файлов и очистить обновления и файлы журнала обновления Windows (этот способ может не удалить саму папку, но точно очистит её содержимое). Подробнее: Очистка диска встроенными средствами Windows 11, Программы и системные утилиты для очистки диска C.

- Включить показ скрытых и системных файлов и удалить папку вручную в проводнике — обычно, при наличии прав администратора задача выполняется успешно.
- Запустить командную строку от имени администратора и ввести команду
RD /S /Q "C:\$GetCurrent"


Надеюсь, инструкция помогла разобраться в вопросе, а при необходимости — и удалить ненужную папку.
Table of Contents
$GetCurrent Definition
$GetCurrent is a folder which creates when Windows 10 upgrades. While Windows 10 upgrades, you will find the logs about the update process. And also the necessary files to carry it out.
$getcurrent file system can occupy more than 3 GB after updating to the Creators Update. And it is precise because this folder contains the files which are essential for the update. And after the update, it leaves the data abandoned.
The $GetCurrent folder is a folder where Windows saves all the necessary configuration files for the updates it installs. When the update is finished installing, this folder is usually released since the information stored in it is no longer necessary.
But, sometimes these files are not deleted, and over time they can take up enough space on our hard drive, space that we could entirely have released.
Can we Delete $GetCurrent Folder?
Yes, we can delete $GetCurrent. Deleting this folder has no negative impact on our computer, but rather the opposite. In addition to being safe to delete it, since it only saves unnecessary files, free space can make our machine work better, and we can use it to keep other types of data on our PC.
The problem is that Microsoft does not make it easy for us to delete this folder. Free up space in Windows by deleting $GetCurrent folder.
What is $Getcurrent folder in Windows 10?
When you update Windows 10, the operating system creates a hidden folder called $GetCurrent on the local drive of your system. It contains the installation files and log files for the latest update.
When there is a Windows 10 upgrade error, you will only be able to upgrade Windows 7/8 / 8.1 to Windows 10 with the upgrade wizard. However, you still need to upgrade the drivers and service packs on Windows 10 with the Windows Update.
How to delete the $GetCurrent folder step by step in Windows 10?
To delete this folder, the first thing we must do is show the hidden folders inside our hard drive.
Since $GetCurrent saves as a hidden folder. To do this, we will use the Ribbon bar so that, from the “View” tab, we activate the view of hidden elements.

Once you see click on View tab, $GetCurrent folder should appear among first in the list.
Most likely, this folder takes up enough space on our hard drive. We can check the space it occupies merely by clicking on it with the right button and selecting the properties option.
Now that we have the folder insight, we can delete it. Windows 10 will not put any impediment to do so, nor will we have problems with permissions. To delete this folder, simply select the “Delete” option from the context menu and click on it.
When it is deleted we can free up enough space on our hard drive. Windows will recreate this folder when you need it and save files in it. Although, it is likely that from now on you will delete the files without problems.
Conclusion
Hope you like the information. If you still have any questions related to $getcurrent, you can comment below.
Если вы когда-либо заглядывали в корневой каталог диска C:\, то могли заметить папку $GetCurrent. Она скрыта по умолчанию, как и другие системные папки, однако может занимать значительное пространство на диске. Владельцам объемных накопителей это может быть незаметно, но те, кто ограничен в памяти — сразу почувствуют неладное. Разберемся, зачем нужна папка $GetCurrent и как её удалить, если она больше не требуется.
Что за папка
Папка $GetCurrent создаётся Windows при установке крупных обновлений. Она содержит временные файлы, которые используются для корректного перехода на новую версию системы. После завершения обновления эта папка становится бесполезной и может занимать сотни мегабайт, а иногда и больше. Удаление $GetCurrent не влияет на работу системы, если обновление уже установлено. Однако, если оно не завершилось корректно, удаление может затруднить откат изменений.
Удаление вручную
Если вам нужна простая очистка и быстрая, можно удалить папку вручную. Для этого откройте Проводник любым удобным способом и перейдите в диск C:\. Теперь включите отображение скрытых файлов. Для этого переходим по пути Меню (отмечено тремя точками) Параметры,в открывшемся окне переходим во вкладку “Вид” и отмечаем пункт Показывать скрытые файлы, папки и диски. Сохраняем внесенные изменения.
Теперь находим папку $GetCurrent и удаляем её. Используйте Shift + Delete для полного удаления. При необходимости подтвердите удаление от имени администратора. Если система выдаёт ошибку, попробуйте закрыть все активные приложения или перезагрузиться в безопасном режиме и повторить удаление.
Удаление через командную строку
Для более быстрого удаления можно использовать командную строку. Запустите ее любым удобным способом. Например, используя Win + R, введите cmd, а затем Ctrl + Shift + Enter для запуска с правами администратора. Введите команду:
RD /S /Q C:\$GetCurrent
и нажмите Enter. Эта команда безвозвратно удалит папку без необходимости дополнительных подтверждений.
Удаление через «Очистку диска»
Если вы остерегаетесь удалить лишнее вручную, используйте встроенную утилиту Windows под названием “Очистка диска”. Для этого откройте меню Пуск и введите в строку поиска “Очистка диска”. В открывшемся окне выберите диск C:\ и нажмите OK. В открывшемся окне отметьте пункты “Очистка обновлений Windows” и “Файлы журнала обновлений Windows”. Подтвердите удаление.
На что обратить внимание
Хотя удаление $GetCurrent обычно безопасно, есть ситуации, когда лучше ее оставить. В частности, сразу после обновления Windows, когда вы еще не уверены, что система работает стабильно и проблем из-за обновления не возникнет. Тем более не нужно удалять $GetCurrent если у вас есть незавершенные обновления. Кроме того, эта папка потребуется, если вам или администратору вашего устройства нужно просматривать файлы журналов обновлений.

На этом закончим. Как правило, Windows удаляет папку $GetCurrent автоматически через 30 дней после обновления, однако если место на диске ограничено и вы уверены, но обновление прошло без проблем, от нее можно избавиться и вручную. Надеемся, эта информация поможет вам держать ваш компьютер в чистоте и порядке, а чтобы получать больше полезных материалов и новостей о ваших гаджетах, подписывайтесь на PDALIFE Official в Telegram.
,
Have you ever come across C:\$GetCurrent folder while trying to free up space and wondered what it is and why it’s taking up so much room? In this article, we will explain what the $GetCurrent folder is and provide steps on how to safely delete it in Windows 10 or 11.
What is $GetCurrent folder in Windows 10/11?
$GetCurrent folder is created by the operating system during the Windows upgrade process. The $GetCurrent folder usually keeps log files from your recent Windows 10/11 upgrade. Normally, these leftover files are quite small in size. But sometimes, the $GetCurrent folder may also have the installation files for a feature update and may take up a lot of space.
Actually, the size of the $GetCurrent folder varies depending on the size of the update and the data generated during installation. If it contains leftover Windows Update installation files, it can take up about 3.38 GB of space. Otherwise, it can have a minimum size of about 192-200 KB.
Is it safe to delete the $GetCurrent folder?
Yes, you can safely delete the $GetCurrent folder once you have confirmed that your system is running smoothly after an upgrade. For example, if you find that the last modification date of the $GetCurrent folder is a month ago, then you can safely delete the folder.
Windows usually automatically removes the $GetCurrent folder after 30 days of upgrading, but you can also do it manually as explained below.
How to Safely Delete the C:\$GetCurrent folder on Windows 10/11.
* Notes:
1. Before deleting $GetCurrent folder, make sure there are no pending updates to install by going to Start > Settings > Windows Update.
2. The $GetCurrent folder is a hidden folder and before you can delete it you must first enable the «Hidden files» view to make the folder visible. To do this, simply open File Explorer and from the View tab in the ribbon menu, check the Hidden items checkbox. Once it’s visible, you can delete $GetCurrent folder using one of the methods below.

Method 1. Delete $GetCurrent folder using Windows File Explorer
To delete the C:\$GetCurrent folder using Windows File Explorer, follow these steps:
1. Open File Explorer.
2. In the File Explorer window, select the (C:) drive from the left panel.
3. Then, at the right pane, right-click on the $GetCurrent folder and click Delete. If you receive a UAC prompt, select Yes to proceed.

4. After deleting the folder, right-click on Recycle bin and empty it.
Method 2. Delete $GetCurrent folder using Command Prompt
1. Click the Start button, type «command prompt» in the search box, and select Run as Administrator. *
* Note: Click Yes on the User Account Control (UAC) prompt.

2. Now, copy and paste the command below into the elevated command prompt, and then press Enter to delete the «$GetCurrent» .
- RD /S /Q «C:\$GetCurrent»

3. Once the command executed, close command prompt and you’re done!
What to Do If You Cannot Delete $Getcurrent Folder?
If you are having difficulty deleting the $GetCurrent folder, it may be due to pending updates that need to be installed on your Windows computer. In this case, finish installing the updates first and then remove the $GetCurrent folder.
That’s it! Which method worked for you?
Let me know if this guide has helped you by leaving your comment about your experience. Please like and share this guide to help others.
If this article was useful for you, please consider supporting us by making a donation. Even $1 can a make a huge difference for us in our effort to continue to help others while keeping this site free:
- Author
- Recent Posts
Konstantinos is the founder and administrator of Wintips.org. Since 1995 he works and provides IT support as a computer and network expert to individuals and large companies. He is specialized in solving problems related to Windows or other Microsoft products (Windows Server, Office, Microsoft 365, etc.).