
Download Windows Speedup Tool to fix errors and make PC run faster
The Hardware ID is a unique identification that’s associated with every piece of hardware that you attach or is already connected to your system. They also help in downloading the correct driver for your hardware. In this article, we are going to see how to get the Hardware ID from Device Manager on a Windows 11 or Windows 10 computer.

What is Hardware ID?
The manufacturer of a device sets a unique ID for it. This ID is a string that your Operating System uses to match the device to its package. So, if a device package declares that it can work with this Hardware ID, what this means is that it can work with the device with the same ID up to some functionality. A device can have multiple IDs sorted in most to least suitable for it.
A Hardware ID is a combination of bus type, manufacturer, and device identifier. Every single device that’s connected to your computer, be it, something as important as your GPU to something as unimportant as a wireless headphone, will have Hardware ID(s). However, the problem in most cases is that users are unaware of this ID and hence don’t use it to find the correct driver for their device. We are going to show you how to fetch the correct Hardware ID.
Finding the Hardware ID is quite easy, all you need to do is follow the given steps to get the Hardware ID from the Device Manager in Windows 11/10.
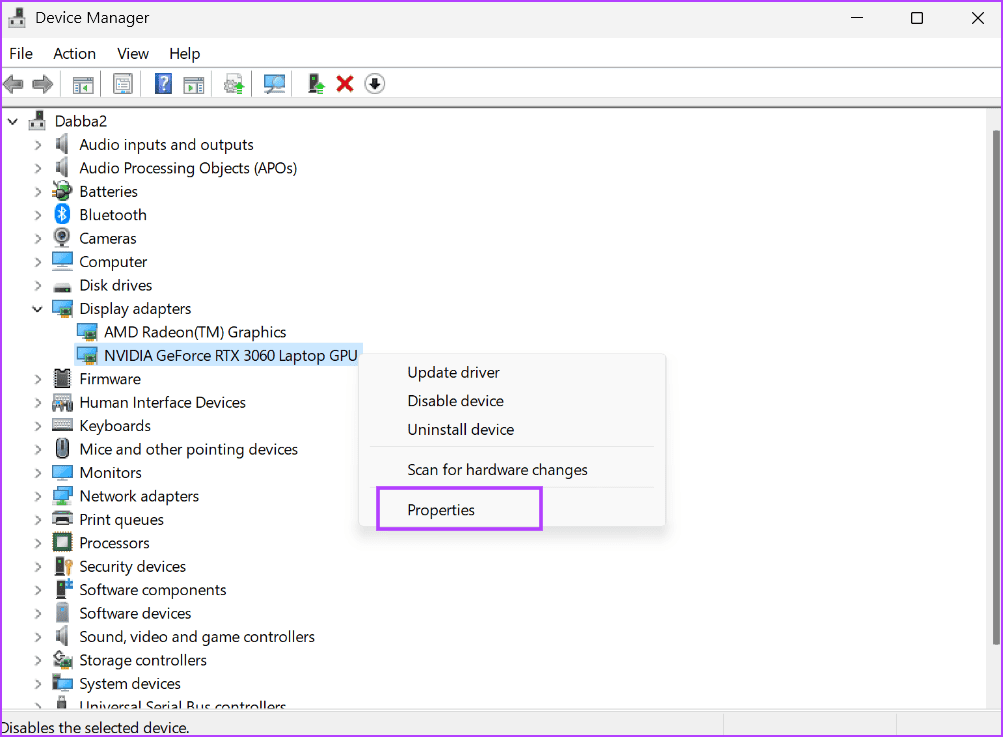
- Open Device Manager on your computer.
- Now, expand the option that’s containing your driver (for example, Display Adapter for Graphics Driver).
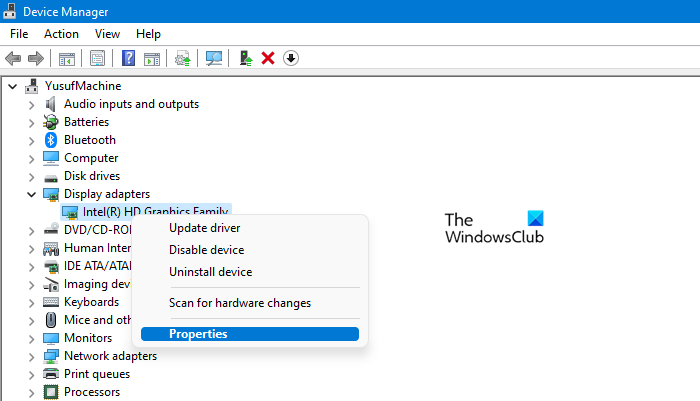
- Right-click on the driver you want to know the Hardware ID of and click Properties.
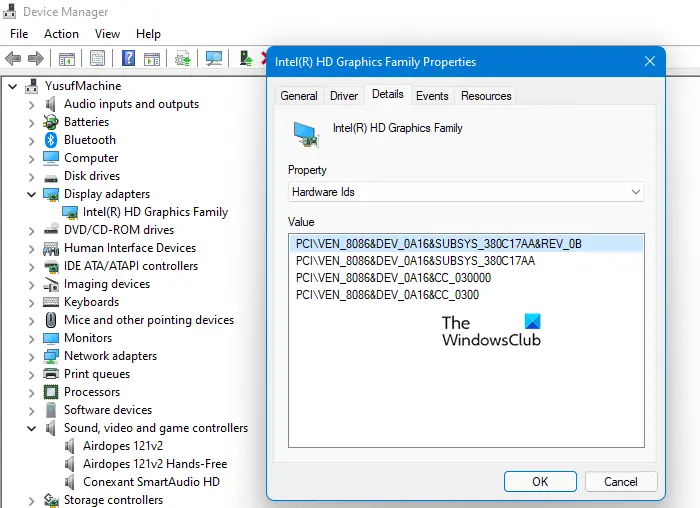
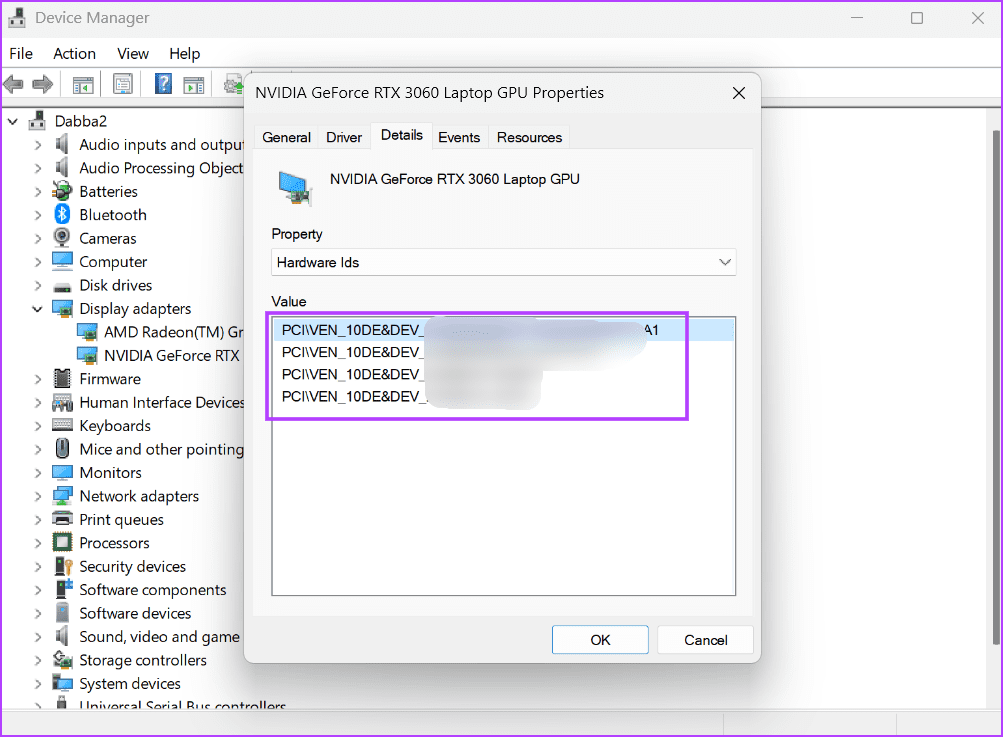
- Go to the Details tab.
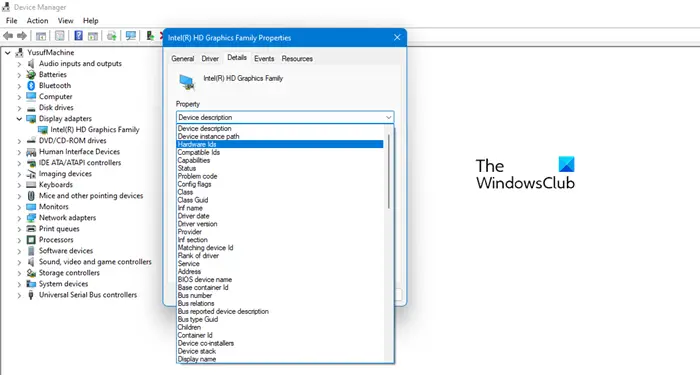
- Now, from the drop-down menu of Properties, select Hardware ID or Compatibility ID.
- Now, you can see all the Hardware IDs in the Value field.
That’s how you can fetch Hardware ID for any device using the Device Manager. You can also check other information about that driver by selecting options from the drop-down menu. Just select them and you will find what you are looking for in the Values section.
Hopefully, with these options, you will be able to find your hardware specification.
TIP: You can use the Get-WindowsAutoPilotInfo.ps1 PowerShell script to get a device’s hardware hash and serial number. The serial number is useful for quickly seeing which device the hardware hash belongs to. You can search on microsoft.com to learn more about it.
How do I find out what hardware is installed on my computer?
There are multiple ways to find out your Hardware specification. Following are some of them.
- Via Windows Settings: Open Settings by Win + I. Go to System > About. Now, you will see your Device Specification and all the hardware attached to it.
- Via DirectX: Open Run, type “dxdiag” and hit Enter. This will launch DirectX Diagnostic Tool. You can see your system information along with the DirectX version you have installed.
- Via System Information: Open Start, type “msinfo32”, and open the System Information app. You will see System Summary, to know more about your hardware, expand Hardware Resources and select a subcategory.
How do I find my USB Hardware ID in Windows?
As mentioned earlier, every single device that’s connected to your computer has Hardware ID(s). This allows them to install appropriate drivers. If you want to know the Hardware ID for your USB, follow the prescribed steps.
- Open Device Manager.
- Expand Disk Drives and right-click on your USB device.
- Go to Details and set your Property to Hardware Ids
You will be able to find the Hardware ID of that USB device.
Now read: Hardware ID binding is beyond the level of tolerance 0xC004F00F.
Anand Khanse is the Admin of TheWindowsClub.com, a 10-year Microsoft MVP (2006-16) & a Windows Insider MVP (2016-2022). Please read the entire post & the comments first, create a System Restore Point before making any changes to your system & be careful about any 3rd-party offers while installing freeware.
Reader Interactions
How to Find Computer Hardware ID: A Comprehensive Guide
In today’s digital age, understanding your computer’s hardware is essential for various reasons, including troubleshooting, system upgrades, and software activation. One crucial aspect of the hardware is the Hardware ID (HWID), a unique identifier for your computer’s components. Whether you’re looking to secure your software, validate your components, or simply need this information for troubleshooting, finding your computer’s Hardware ID can be a pivotal step. This article walks you through the process of discovering your computer’s Hardware ID and understanding its importance.
Understanding Hardware ID
Before diving into the methods for finding your Hardware ID, it’s essential to grasp what it represents. The Hardware ID is a unique alphanumeric code that identifies hardware components in your computer. These IDs help operating systems or software applications recognize and interact with the components correctly. The Hardware ID is often tied to the following:
- Motherboard
- CPU (Central Processing Unit)
- GPU (Graphics Processing Unit)
- Network Adapters
- Storage Devices
The IDs can serve multiple purposes, including:
- Licensing Software: Many software solutions require a Hardware ID to activate or validate licenses. By binding the license to a unique hardware configuration, software vendors aim to reduce piracy.
- Troubleshooting: Knowing your Hardware ID helps in diagnosing issues. If a specific component fails or needs replacement, the ID facilitates communication with customer support and ensures you get the right replacement.
- Upgrades: When planning to upgrade hardware, comparing Hardware IDs helps ensure compatibility with existing components or software.
Understanding the importance of Hardware ID will make the efforts to find it worthwhile. Now, let’s discuss how to find your Hardware ID across different operating systems.
Windows Operating Systems
Finding the Hardware ID on a Windows operating system is generally straightforward. Below are several methods to locate the Hardware ID.
Method 1: Using Command Prompt
-
Open Command Prompt:
- Press
Win + Rto open the Run dialog. - Type
cmdand hit Enter.
- Press
-
Get Hardware IDs for Devices:
-
In the Command Prompt window, type the following command and press Enter:
wmic path win32_computersystemproduct get uuid -
This command retrieves the UUID (Universally Unique Identifier) for your computer.
-
-
Retrieve Hardware ID for Specific Devices:
-
To find the Hardware ID for different devices such as the motherboard or network interface, you can use specific commands. For example:
wmic diskdrive get serialnumber wmic baseboard get serialnumber -
This will give you the serial number for the relevant hardware.
-
Method 2: Using System Information
-
Access System Information:
- Press
Win + R, typemsinfo32, and press Enter.
- Press
-
View System Summary:
- In the System Information window, navigate to the «System Summary» section.
-
Find Hardware IDs:
- Look for “System SKU” and “UUID”. The System SKU can often serve as a Hardware ID, depending on the manufacturer.
Method 3: Using Device Manager
-
Open Device Manager:
- Right-click on the Start menu and select Device Manager.
-
Examine Device Properties:
- Expand categories to find the hardware component you’re interested in.
- Right-click on the specific device (e.g., Disk Drives, Network Adapters) and select Properties.
-
Retrieve Hardware ID:
- In the Properties window, navigate to the “Details” tab.
- Under the “Property” dropdown, select “Hardware Ids.” This field will display your Hardware ID in the format of an alphanumeric string.
Linux Operating Systems
Finding the Hardware ID on Linux can differ depending on the distribution you are using, but the following general methods will help you retrieve the necessary information.
Method 1: Using Terminal Commands
-
Open Terminal:
- Access the terminal from your applications menu or by pressing
Ctrl + Alt + T.
- Access the terminal from your applications menu or by pressing
-
Get UUID:
- Type the command below to retrieve your motherboard’s UUID:
sudo dmidecode -s system-uuid
- Type the command below to retrieve your motherboard’s UUID:
-
Retrieve Hardware Information:
-
For more detailed information about various hardware components, use the following command:
lshw -short -
This command lists all hardware details, including their IDs.
-
Method 2: Using System Information Tools
- Many Linux distributions come with GUI-based system information tools, such as
Hardinfoorinxi. You can install and run these tools to view comprehensive hardware information, including IDs.
sudo apt-get install hardinfo
hardinfo
These tools often present information in a more user-friendly interface.
macOS
Apple computers, running macOS, have their own set of ways to find Hardware IDs. Here’s how you can do that.
Method 1: Using System Information
-
Access System Information:
- Click on the Apple menu in the upper left corner.
- Select “About This Mac,” then click “System Report.”
-
Retrieve Hardware Data:
- In the System Information window, look for a section called “Hardware Overview,” which provides various identifiers, including “Hardware UUID.”
Method 2: Using Terminal
-
Open Terminal:
- Open the Launchpad and type “Terminal.”
-
Get the UUID:
-
Enter the following command:
ioreg -rd1 -c IOPlatformExpertDevice | grep IOPlatformUUID -
This command will display your UUID.
-
Method 3: Using the About This Mac Window
- Simply click on the Apple logo, choose “About This Mac,” and navigate between the tabs to find information on your memory, storage, and other hardware components that often include IDs.
Identifying Specific Hardware Components
In addition to general methods for retrieving your computer’s Hardware ID, you may need to find the IDs for specific components. Here’s how to get Hardware IDs for some of the primary hardware components.
Finding Motherboard ID
-
Windows:
- Use the Command Prompt and enter:
wmic baseboard get product, manufacturer, version, serialnumber
- Use the Command Prompt and enter:
-
Linux:
- Use the command:
sudo dmidecode -t baseboard
- Use the command:
-
macOS:
- Use the System Information panel previously mentioned.
Finding CPU ID
-
Windows:
- In Command Prompt, type:
wmic cpu get name, caption, deviceid, manufacturer, currentclockspeed, maxclockspeed, socketdesignations
- In Command Prompt, type:
-
Linux:
- Use:
cat /proc/cpuinfo
- Use:
-
macOS:
- Access “About This Mac,” which will provide you info under the “Overview” and “System Report.”
Finding GPU ID
-
Windows:
- In Command Prompt, type:
wmic path win32_videocontroller get name, deviceid
- In Command Prompt, type:
-
Linux:
- Type:
lspci | grep -i vga
- Type:
-
macOS:
- Find this in the “System Report” under the Graphics/Displays section.
Finding Disk Drive ID
-
Windows:
- In Command Prompt, type:
wmic diskdrive get serialnumber
- In Command Prompt, type:
-
Linux:
- Use:
lsblk -o NAME,UUID,SERIAL
- Use:
-
macOS:
- Available through the System Information under the Storage section.
Finding Network Adapter ID
-
Windows:
- Type in Command Prompt:
wmic nic get name, description, deviceid
- Type in Command Prompt:
-
Linux:
- Use:
ip link show
- Use:
-
macOS:
- Via the System Information under the Network section.
Using Software Tools for Hardware ID Retrieval
If you find using command lines somewhat complicated or tedious, various third-party software applications can help in retrieving hardware information, including Hardware IDs.
CPU-Z
One of the best-known tools for Windows is CPU-Z, which provides detailed information about your CPU, motherboard, memory, and other hardware components.
-
Download and Install CPU-Z:
- Visit the official CPU-Z website and download the tool.
-
Launch the Application:
- Open CPU-Z to view detailed specs, including Hardware IDs and serial numbers.
Speccy
Another excellent tool for Windows is Speccy. It’s user-friendly and provides a comprehensive overview of components and their IDs.
-
Download and Install Speccy:
- Access the official Piriform website and download Speccy.
-
Launch the Application:
- Open Speccy to review a complete rundown of your hardware. The UI makes it easy to navigate through components and view IDs.
HWInfo
HWInfo is a powerful tool that offers detailed information about your hardware components in real-time.
-
Download HWInfo:
- Visit the official HWInfo website and download the application.
-
Run the Program:
- Open HWInfo for a comprehensive look at all hardware details, including Hardware IDs.
Best Practices for Handling Hardware IDs
After successfully finding your Hardware ID, it’s important to manage this information responsibly.
-
Secure Storage:
- Store your Hardware IDs securely, ideally in a password-protected document or encrypted storage. This data can be sensitive and might be used for unauthorized access if mishandled.
-
Software Licensing:
- Keep track of how your Hardware IDs correspond with your software licenses. Maintain a record of which software is bound to which Hardware IDs to avoid licensing conflicts.
-
Regular Updates:
- Whenever you upgrade hardware components, always check for any changes in your Hardware IDs. This is crucial for maintaining software compatibility and understanding your hardware setup.
Conclusion
Finding your computer’s Hardware ID is a fundamental skill that can greatly enhance your computing experience. Whether you’re troubleshooting hardware issues, upgrading components, or ensuring compliance with software licensing agreements, knowing how to retrieve your Hardware ID is invaluable.
With the various methods outlined in this article for different operating systems and hardware components, you should be fully equipped to locate and manage your Hardware IDs efficiently. Beyond just identifying your hardware, appreciate that this knowledge empowers you to maintain and enhance your system’s performance in ways that align with your personal or professional computing needs. Embrace technology and keep your hardware in check!
When dealing with hardware issues or needing specific drivers for a Windows device, it is often important to know the Hardware ID of your Windows Device. The Hardware ID is a unique identifier assigned to each piece of hardware by its manufacturer. By knowing this ID, you can search for the appropriate drivers or troubleshoot problems efficiently. Follow the steps below to learn how to find the Hardware ID for a Windows Device.
- Open up Device Manager. There are a couple of ways to do this. The easiest way is to click the Start button in the bottom left corner of your screen> Type “Device Manager” into the search bar> Click on “Device Manager” from the search results.
- In the Device Manager window, click the arrow next to the category that corresponds to the hardware for which you want to find the Hardware ID.
- Right-click on the specific hardware component you are interested in.
- From the context menu, select “Properties.”
- In the Properties window, click on the “Details” tab> Find the “Property” drop-down menu> Click “Hardware Ids.”
- In the “Value” box, you’ll be able to see the Hardware IDs.
How to Reset Network Settings in Windows 10
Quick Tips
- Open the Device Manager tool, right-click on the device, go to Properties > Details, and click on Hardware IDs in the Properties drop-down.
- You can also use CMD or PowerShell to search for the Hardware ID of a device.
- Alternatively, download and install the Windows Driver Kit (WDK) to check the Hardware IDs of devices on your PC.
Method 1: Using Device Manager
The easiest way to find the Hardware ID (HWID) is by using the Device Manager. It contains the complete information on all the devices. Here’s how to do it:
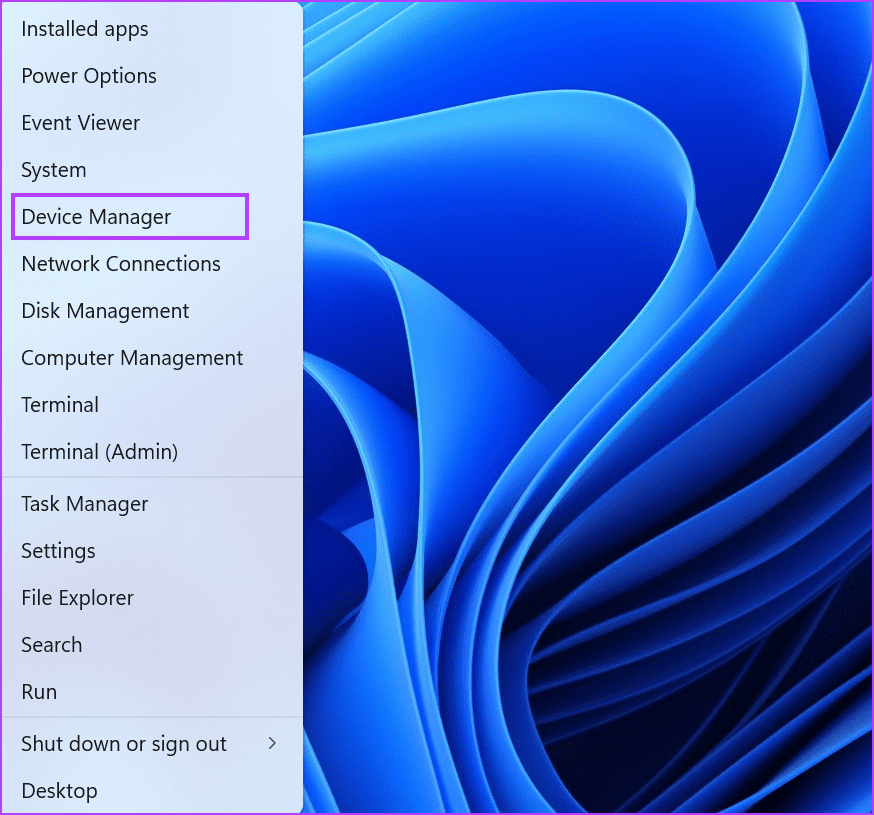
Step 1: Right-click on the Start button to open the Power User menu. Locate the Device Manager option and click on it to launch the utility.
Step 2: Scroll down to locate the device in the list and right-click on it. Select the Properties option from the context menu.
Step 3: Switch to the Details tab.

Step 4: Click on the drop-down list below the Property option. Select the Hardware IDs from the list.

Step 5: Under the Value section, you will see all the Hardware IDs associated with the device.
Step 6: If you want to copy the HWID, right-click on a value and select the Copy option.

Method 2: Using Command Prompt
If the Device Manager is not working on your PC, you can use the Command Prompt to find the Hardware ID of any device. Repeat the following steps:
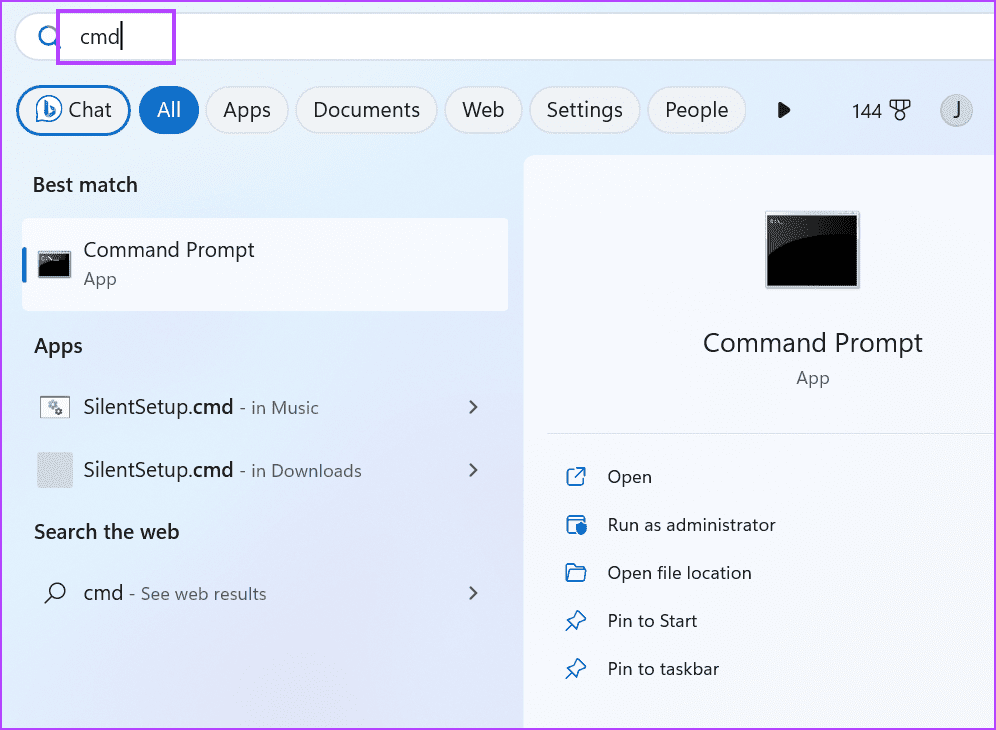
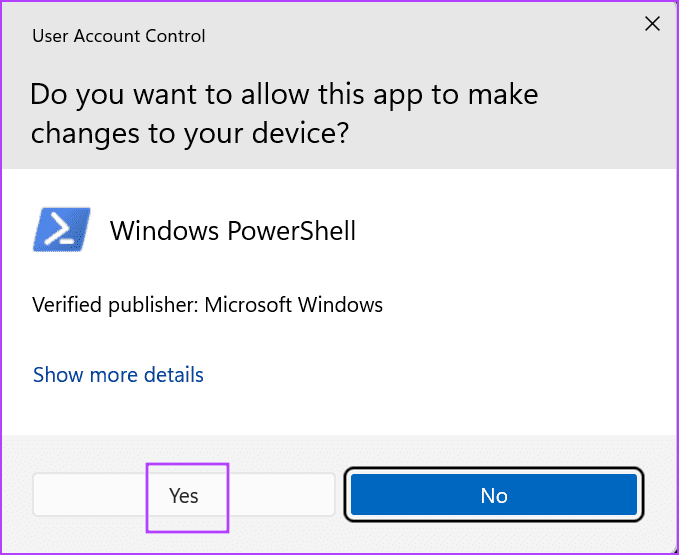
Step 1: Press the Windows key to open the Start Menu. Type cmd in the search box and press the Control + Shift + Enter keyboard shortcut.
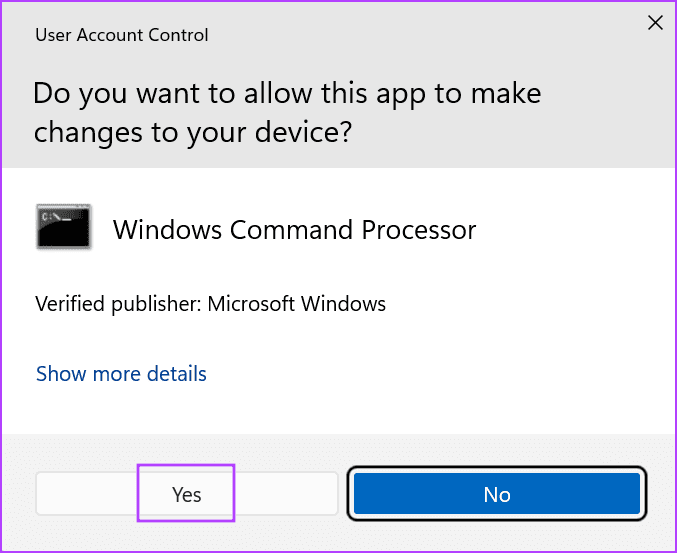
Step 2: The User Account Control window will launch. Click on the Yes button to open the Command Prompt with administrator privileges.
Step 3: Type the following command and press Enter:
DISM /Online /Get-Drivers /all /Format:Table > C:\a.txt
Step 4: The above command will create a text file containing the driver details. We purposely did it because the list is long and difficult to navigate in the Command Prompt window.
Step 5: Press the Windows + E keyboard shortcut to open the File Explorer. Navigate to the C drive and then open the newly created text file.

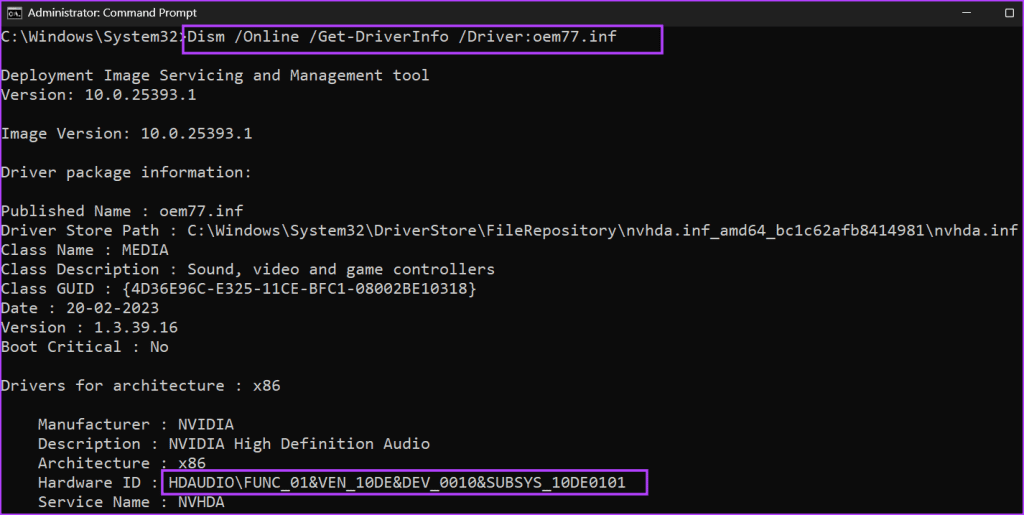
Step 6: Copy the Published Name of a device. The command to find the Hardware ID using the Published Name is:
DISM /Online /Get-DriverInfo /Driver:Published NameStep 7: Replace the Published Name part of the command with the text you copied from the file. Our final command looks like this:
DISM /Online /Get-DriverInfo /Driver:oem77.infStep 8: Execute the command by pressing Enter and it will generate the HWID of the device.
Step 9: Close the Command Prompt window.
Method 3: Using PowerShell
You can even use the Get-PnPDevice cmdlet in PowerShell to search for the Hardware ID of a device. Here’s how to do it:
Step 1: Press the Windows key to open the Start Menu. Type powershell in the search box and press the Control + Shift + Enter keyboard shortcut simultaneously.

Step 2: The User Account Control window will launch. Click on the Yes button to open the PowerShell with administrator privileges.
Step 3: Type the following command and press Enter:
Get-PnpDevice -PresentOnly | Sort-Object -Property "Class" | Format-Table -AutoSize > D:\ID.txt
Step 4: Like the previous method, the above command will save the results to a text file in the D drive. We purposely did it because the results won’t be completely visible in the PowerShell window.

Step 5: Copy the Instance ID of the device from the text file. The command to check the Hardware ID using the Instance ID is:
Get-PnpDeviceProperty -InstanceId "Instance Id" | Format-Table -AutoSizeStep 6: Replace the text inside the “Instance Id” part with the ID you copied from the text file. The final command will look something like this:
Get-PnpDeviceProperty -InstanceId "USB\VID_13D3&PID_3563&MI_00\7&1D754FA2&0&0000" | Format-Table -AutoSize > D:\HWID.txt
Step 7: The above command will export the results to a file called HWID on the D drive. Open the file and find the ‘DEVPKEY_Device_HardwareIds’ entry in the KeyName column. The corresponding value in the data column in the Hardware ID of the device.

Method 4: Using Microsoft’s Windows Drivers Kit
Microsoft offers a tool with the Windows Driver Kit (WDK) that you can use to check the Hardware IDs of devices on your PC. Since the Windows Device Console tool isn’t included with Windows 11, you must download and install the Windows Drivers Kit (WDK) to access the tool on your PC. Here’s how to do it:
Step 1: Download and install the Windows 11 WDK.
Step 2: Press the Windows + E keyboard shortcut to open the File Explorer.
Step 4: Go to the address bar at the top, paste the following path, and press Enter:
C:\Program Files (x86)\Windows Kits\10\Tools\10.0.22621.0\x64
Step 5: Right-click in the File Explorer window and click on the Open in Terminal option.

Step 6: Type the following command in the Terminal and press Enter:
devcon hwids * > D:\HWID.txt
Step 7: Like the previous methods, we have saved the command output to a text file for ease of usage. Open the file and see the Device Name and their Hardware IDs.

Was this helpful?
Thanks for your feedback!
The article above may contain affiliate links which help support Guiding Tech. The content remains unbiased and authentic and will never affect our editorial integrity.
Hardware ID is a unique identifier for your devices that your system uses to match it to its driver. You can use this value to check for a specific device on the internet or official websites if you need to update its driver or troubleshoot any issues with its software.
A hardware ID usually follows the format <BUS>\<VENDOR ID>&<Device ID>&<Additional IDs>. For instance, the ID for Generic USB Hub may show USB\VID_05E3&PID_0608&REV_6090. However, the identity for root devices and the computer doesn’t follow this format.
In this article, we provide the most convenient ways to look up this information on your Windows PC.
How to Look up for Hardware ID on Your PC
You can use the Device Manager or built-in command line tools to look up the hardware Id for individual devices on your PC. But, if you want more options, you can use the Windows Device Console.
Using Device Manager
The Device Manager is the built-in Windows tool that helps you check and control all the devices on your PC. You can also use it to look up the hardware IDs of such devices.
- Open Run by pressing Win + R.
- Type
devmgmt.mscand press Enter to launch the Device Manager. - Expand the device category for the device you want to look up.
- Right-click on the device and select Properties.

- Go to the Details tab.
- Click on the drop-down box under Property and set it to Hardware Ids.


The Hardware ID will show up under Value.
Also, keep in mind that a device may have more than one ID. However, the top ID is the most specific one.
Using Windows Command Line
You can also use the Command line interfaces such as Command Prompt or Windows PowerShell to look up the hardware ID of your devices.
Command Prompt
Command Prompt is the traditional command line on the Windows system. You can use the DISM utility to check your devices and get their hardware ID.
- Open Run.
- Type
cmdand press Ctrl + Shift + Enter to open the Elevated Command Prompt. - Enter the following command to list out your devices:
Dism /Online /Get-Drivers /all /Format:Table
- Check the class name to get a general idea of your driver. It will list all the possible drivers, so you can add | findstr “search string” on the command to only list the necessary ones.
For example,Dism /Online /Get-Drivers /all /Format:Table | findstr “usb” - The command only lists the Original and Published names, not the general names. Note down or copy the Published Name.
- Then, enter the command
Dism /Online /Get-DriverInfo /Driver:<Published Name>. - This command lists the information on all the devices within the category, not just those active on your PC. So, you need to search carefully for your device by checking the Description column.
- After determining the device, look at its Hardware ID value.


Windows PowerShell
Windows PowerShell is a powerful Command Line tool that you can use to control all your system activities. You also have various options for customizing the commands, so it’s an effective way to get the necessary information.
- Open Run.
- Type
powershelland press Ctrl + Shift + Enter to open the Elevated PowerShell. - Enter the following command to list your devices:
Get-PnpDevice -PresentOnly | Sort-Object -Property “Class” | Format-Table -AutoSize
- Then, search for your device using the Class and FriendlyName columns and copy or note down its InstanceId.
- Then, enter the following command while replacing the Instance ID with the value you copied or noted:
Get-PnpDeviceProperty -InstanceId "Instance Id" | Format-Table -AutoSize - Here, search for DEVPKEY_Device_HardwareIds and check its Data to get this information.


Using Windows Device Console
It is easy to check the Hardware ID of a device using the Device Manager or the built-in Command line. However, you can only look up this information for one or a few devices at a time. If you want to look up the ID for all your devices or the devices within a specific category, you need to use the Windows Device Console (Devcon).
Microsoft does not provide this utility in the default Windows OS but includes it in its Windows Driver Kit. So you need to install this package before you can use the Device Console.
- Download and install Windows Drivers Kit from Microsoft’s platform. You only need to download the WDK and not the SDK or Visual Studio.
- Then, you need to set the location of the console on the system path so that you can access it from anywhere on the Command line. To do so,
- Now, open Run.
- Type
cmdand press Enter to open the Command Prompt. - Enter the commands below to look up the hardware ID according to the corresponding scenario:
devcon hwids *: List out all devices with their hardware Ids
devcon hwids =<class>: List out the hardware IDs for all devices in a particular class. You can look for the available classes using the commanddevcon listclassdevcon hwids * > “D:\HardwareId.txt”: Create aHardwareId.txtfile inD:\which lists all devices with their hardware IDs. You can use any location you want or create a text file that displays the output of the other command.

If you want to know more about using Devcon to check and manage your devices, we recommend you visit its documentation on Microsoft.