
Хэш или контрольная сумма файла — короткое уникальное значение, вычисляемое из содержимого файла и обычно использующееся для проверки целостности и соответствия (совпадения) файлов при загрузке, особенно если речь идет о больших файлах (образы системы и подобные), которые могут быть скачены с ошибками или есть подозрения о том, что файл был подменен вредоносным ПО.
На сайтах загрузок часто бывает представлена контрольная сумма, вычисленная по алгоритмам MD5, SHA256 и другим, позволяющая сверить загруженный файл с файлом, выложенным разработчиком. Для вычисления контрольных сумм файлов можно использовать сторонние программы, но есть способ сделать это и стандартными средствами Windows 10, 8 и Windows 7 (требуется версия PowerShell 4.0 и выше) — с помощью PowerShell или командной строки, что и будет продемонстрировано в инструкции.
Получение контрольной суммы файла средствами Windows
Для начала потребуется запустить Windows PowerShell: проще всего использовать поиск в панели задач Windows 10 или меню Пуск Windows 7 для этого.
Команда, позволяющая вычислить хэш для файла в PowerShell — Get-FileHash, а чтобы использовать ее для вычисления контрольной суммы достаточно ввести ее со следующими параметрами (в примере вычисляется хэш для образа ISO Windows 10 из папки VM на диске C):
Get-FileHash C:\VM\Win10_1607_Russian_x64.iso| Format-List

При использовании команды в таком виде, хэш вычисляется по алгоритму SHA256, но поддерживаются и другие варианты, задать которые можно с помощью параметра -Algorithm, например, для вычисления контрольной суммы MD5 команда будет выглядеть как в примере ниже
Get-FileHash C:\VM\Win10_1607_Russian_x64.iso -Algorithm MD5 | Format-List

При этом поддерживаются следующие значение для алгоритмов вычисления контрольной суммы в Windows PowerShell
- SHA256 (по умолчанию)
- MD5
- SHA1
- SHA384
- SHA512
- MACTripleDES
- RIPEMD160
Подробное описание синтаксиса команды Get-FileHash доступно также на официальном сайте https://technet.microsoft.com/en-us/library/dn520872(v=wps.650).aspx
Получение хэша файла в командной строке с помощью CertUtil

В Windows присутствует встроенная утилита CertUtil для работы с сертификатами, которая, помимо прочего, умеет высчитывать контрольную сумму файлов по алгоритмам:
- MD2, MD4, MD5
- SHA1, SHA256, SHA384, SHA512
Для использования утилиты достаточно запустить командную строку Windows 10, 8 или Windows 7 и ввести команду в формате:
certutil -hashfile путь_к_файлу алгоритм
Пример получения хэша MD5 для файла показан на скриншоте ниже.

Дополнительно: на случай, если вам требуются сторонние программы для вычисления хэшей файлов в Windows, можно обратить внимание на SlavaSoft HashCalc.
Если же требуется вычислить контрольную сумму в Windows XP или в Windows 7 без PowerShell 4 (и возможности его установить), вы можете использовать утилиту командной строки Microsoft File Checksum Integrity Verifier, доступную для загрузки на официальном сайте https://www.microsoft.com/en-us/download/details.aspx?id=11533 (формат команды для использования утилиты: fciv.exe путь_к_файлу — результат будет MD5. Также можно вычислить хэш SHA1: fciv.exe -sha1 путь_к_файлу)
Проверка контрольной суммы скачанного файла позволяет проверить его целостность и убедиться, что содержимое файла не было изменено. Чаще всего администраторы используют процедуру проверки чексуммы для загруженных дистрибутивов ОС и установочных образов ПО.
Идея контрольной суммы заключается в том, что для оригинального файла выполняется расчет некоего значения (хэша) по определенному алгоритму получения хэш-функции (чаще всего это MD5, SHA1 и SHA256), а пользователи потом могут выполнить такую же проверку для файла, который они скачали. Сравнение этих двух значений хэшей позволяет убедиться, что вы получили не модифицированный оригинальный файл. Если хэши файлов отличаются, значит файл был изменен или поврежден.
Для проверки контрольной суммы файла в Windows можно использовать встроенный PowerShell командлет Get-FileHash или утилиту certutil.
Например, чтобы получить значение хэша ISO образа, выполните команду:
Get-FileHash "F:\ISO\en-us_windows_10_enterprise_ltsc_2021_x64_dvd_d289cf96.iso"

Черех некоторое время (расчет может занять некоторое время в зависимости от размера файла), командлет вернет контрольную сумму файла по алгоритму SHA-256 (по умолчанию). С помощью атрибута
-Algorithm
можно задать другой алгоритм вычисления контрольной суммы
-
SHA1 -
SHA256
(по умолчанию) – наиболее популярный алгоритм с наименьшей вероятности возникновения коллизий (когда два разных файла имеют одинаковую контрольную сумму) -
SHA384 -
SHA512 -
MD5
– самый быстрый, но устаревший алгоритм хэширования
Аналогично можно получить хэш сумму файла с помощью certutil.exe:
certutil -hashfile F:\ISO\en-us_windows_10_enterprise_ltsc_2021_x64_dvd_d289cf96.iso SHA256

Где получить контрольные суммы оригинальных ISO файлов образов Windows?
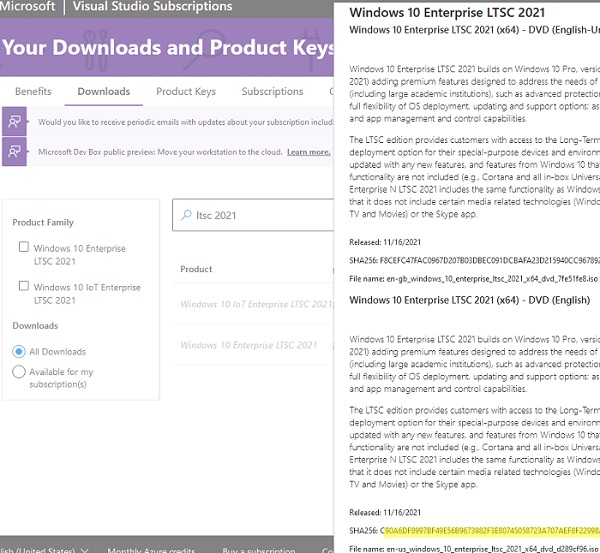
Если у вас есть учетная запись Microsoft, вы можете найти контрольную сумму интересующего вас дистрибутива на сайте https://my.visualstudio.com/Downloads/. Для этого не обязательно иметь активную подписку MSDN. Информация о контрольной сумме образа доступна на вкладке с информацией о продукте.
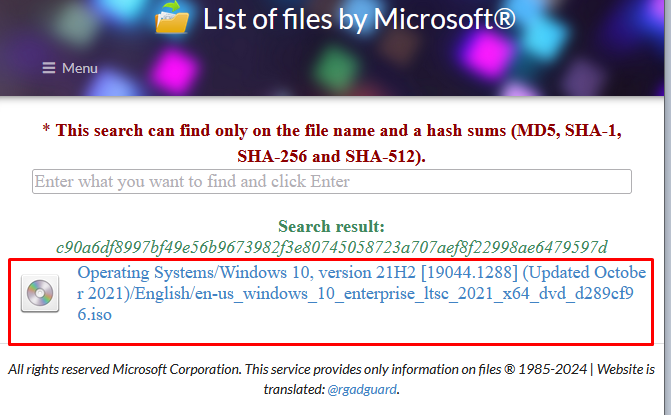
Также список всех оригинальных образов от Microsoft и их хэшей доступен в следующей сторонней онлайн базе https://files.rg-adguard.net/search. В отличии от сайта Microsoft, здесь можно искать сразу по значению хэша. Выполните поиск по полученному хэшу, чтобы убедиться, что вы скачали оригинальный файл образа.
Регистр символов в хэш сумме не имеет значения.
Для автоматизации проверки хэш сумму скачанного образа с оригинальным значением, можно использовать такой однострочник PowerShell:
((get-filehash .\ en-us_windows_10_enterprise_ltsc_2021_x64_dvd_d289cf96.iso).hash) -eq "c90a6df8997bf49e56b9673982f3e80745058723a707aef8f22998ae6479597d"

Команда вернет
True
, если контрольная сумма файла совпадает с эталонной.
Do you need to compare two files or make sure a file has not changed? The PowerShell cmdlet Get-FileHash generates hash values both for files or streams of data. A hash is simply a function that converts one value into another. Sometimes the hash value may be smaller to save on space, or the hash value may be a checksum used to validate a file.
Not a reader? Watch this related video tutorial!
Not seeing the video? Make sure your ad blocker is disabled.
In this article, you will learn several ways to use Get-FileHash as well as more details on hashing background and security best practices!
Prerequisites
Any version of PowerShell greater than 4, which includes both Windows PowerShell and PowerShell Core.
What is a Hash?
What if you can create a simple value that represents a bit of data or file? A hash value or digital signature allows you to compare two sets of data. Hashes are considered consistent and functional because the same input will always create the same output.
Therefore a hash will be different if even a single character in the input is changed. Hashes are computed using a specific hashing algorithm, the method of computing the hash value.
Each hashing algorithm has specific situations that it is well suited for. Often there is a tradeoff between speed and security. An algorithm such as MD5 is fast, but with less complex hash values. On the other hand, SHA512 generates more complex hashes but is slower overall.
For security measures, MD5 is typically not recommended. Instead, try to use SHA512.
One important use of hashing is for signing data. Sometimes, two different inputs will produce the same output hash. This is called a hash collision. When anyone can predictably create hashing collisions for a specific algorithm, that algorithm becomes considered less secure or “broken”.
PowerShell’s Get-FileHash cmdlet supports a variety of algorithms as listed below.
- PowerShell Core (version 6 and 7):
MD5,SHA1,SHA256,SHA384, andSHA512 - Windows PowerShell (version 4 through 5.1):
MACTripleDES,MD5,RIPEMD160,SHA1,SHA256,SHA384, andSHA512
Computing a Hash Value for a Single File
To become familiar with the Get-FileHash cmdlet, pass a single file to the command, as seen in the below example.
Get-FileHash C:\Windows\write.exeGet-FileHash will output the algorithm used, the hash value of the file, and the full path of the file that you specified, as shown below. The default value is SHA256 for all versions of PowerShell, if no other algorithm is specified.

Computing Hash Values for Files in a Directory
To generate hash values for every file in a directory, use wildcards (*) in the Path parameter. You may notice that no algorithm is specified.
Copy the command below and run from the root C:\ directory to generate SHA256 hash values for all executables in the C:\Windows directory.
# The example below computes the hashes relative to the current directory
# notated by the "." before the "\".
Get-FileHash .\Windows\*.exe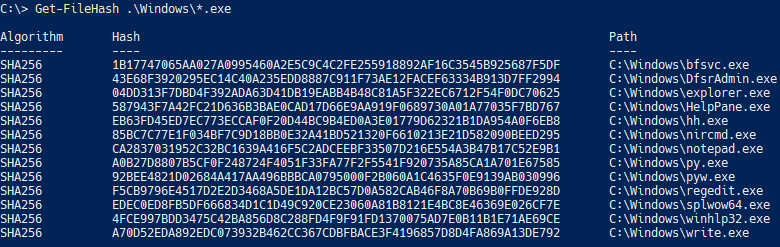
C:\\Windows directory.Recursively Generate Hash Values for All Files
To hash all files in a directory and its sub-directories, recursively list items via Get-ChildItem and pass the results to Get-FileHash. Although you are able to use the wildcard character with Get-FileHash this does not recursively traverse each sub-directory.
Get-ChildItem -Path C:\py* -Recurse -Filter *.exe | Get-FileHash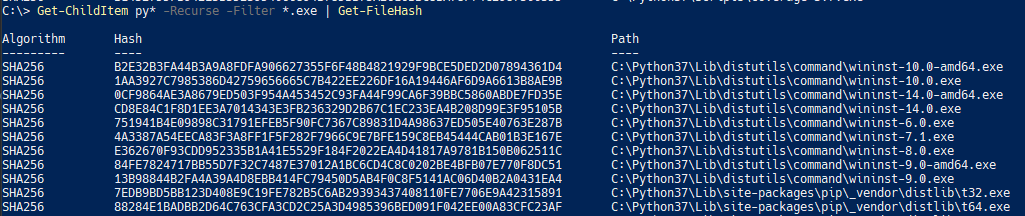
Adding a File Hash to Get-ChildItem Output via a Calculated Property
Get-FileHash by itself has limited output. When used in conjunction with Get-ChildItem many file properties are lost in the output. To keep the file information, create a calculated property to dynamically add the file hash.
The example below reads the windows-version.txt example file, selects only the Name and Length property from the Get-ChildItem output, and adds the Hash calculated property.
Select-Object uses a hashtable to create a calculated property. Define a "Name" and an
 "Expression", which operates on the current object in the pipeline.
 Get-ChildItem .\windows-version.txt |
 Select-Object -Property Name,Length,
 @{name="Hash";expression={(Get-FileHash $_.FullName).hash}}
Get-ChildItem.Comparing All Files in Two Directories Using Hashes
Suppose you have two folders and need to find which files are different. You can compare all files in these folders by generating a hash with Get-FileHash for each file and then comparing them.
Building on what you have learned with calculated properties and Get-FileHash, the cmdlet Compare-Object compares the computed hash for each file and outputs any differences.
First, retrieve a set of executable files and computed hashes for use with Compare-Object.
# Retrieve all executables directly located within the C:\Windows directory and compute a hash value for each.
$WindowsExesOnly = Get-ChildItem C:\Windows\*.exe |
Select-Object -Property *,
@{name="Hash";expression={(Get-FileHash $_.FullName -Algorithm MD5).hash}}

# Retrieve all executables located in any directory from the C:\ drive, but not recursively, and compute a hash value for each.
$SecondLevelExes = Get-ChildItem C:\*\*.exe |
Select-Object -Property *,
@{name="Hash";expression={(Get-FileHash $_.FullName -Algorithm MD5).hash}}
Next, supply the resulting file object arrays, $WindowsExesOnly and $SecondLevelExes, to Compare-Object using the ReferenceObject and DifferenceObject parameters. Run the following code and pass both the Name and Hash properties for comparison to Compare-Object. Using both the Name and Hash properties allows for identical files but with different file names.
Compare-Object -Ref $WindowsExesOnly -Dif $SecondLevelExes -Property Name,Hash
The Compare-Object output shows the SideIndicator property, which indicates which array the non-identical files exist in. As shown below, six unique files are located in the $SecondLevelExes array.
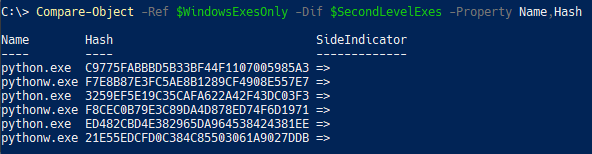
Compare-Object to retrieve unique executables compared across directories.What if you wanted to see the file length for the unique files? With the PassThru parameter, the original properties are carried through the pipeline with the SideIndicator property added to the original object.
Compare-Object -Ref $WindowsExesOnly -Dif $SecondLevelExes -Property Name,Hash -PassThru | Select-Object SideIndicator,Name,Hash,Length

Length, with the compared objects.Generate a Hash Value From a Stream of Data
So far you’ve learned how to find a file’s hash but Get-FileHash can do you one better. It can also get a hash of data that isn’t stored in a file, a stream of data.
Keep in mind that any difference, even an extra newline character, would cause the hash to change. One method to avoid any hashing issues is by converting the data to a stream of data that is passed to Get-FileHash via the InputStream parameter, as shown below.
Create an in-memory stream of data with the [System.IO.MemoryStream] constructor.
 Retrieve the bytes of a string using the [System.Text.Encoding]::ASCII static method.
 $String = "Hello World"
 Get-FileHash -InputStream ([System.IO.MemoryStream]::New([System.Text.Encoding]::ASCII.GetBytes($String)))
In fact, you can turn any series of bytes into a MemoryStream, a series of data stored in RAM, for Get-FileHash to generate a hash from, not just strings!
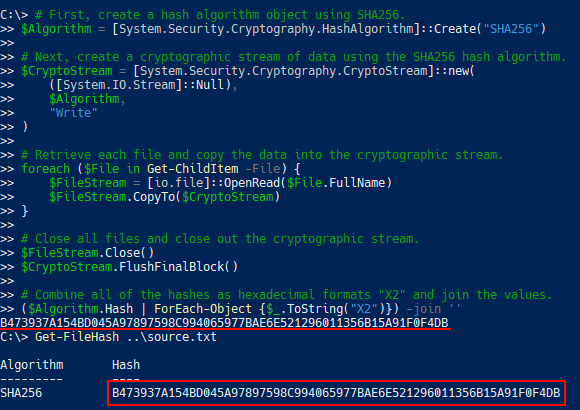
Calculating the Hash of a File Split Into Multiple Files (Chunked Data)
Suppose you have a large 5TB backup file and the resulting hash value to validate the file. Due to the size, the file was split into 100GB blocks of chunked data for storage flexibility.
One potential way to validate the original file is to combine all 100GB files together and verify the hash of the resulting file. Of course, 5TB is a lot of disk space!
Instead, you can combine individual file hash values. By combining the hash values, you skip the disk space-consuming step of combining the files. See the below code for an example of how to stream the chunked data into a combined hash value.
# First, create a hash algorithm object using SHA256.
$Algorithm = [System.Security.Cryptography.HashAlgorithm]::Create("SHA256")

# Next, create a cryptographic stream of data using the SHA256 hash algorithm.
$CryptoStream = [System.Security.Cryptography.CryptoStream]::new(
    ([System.IO.Stream]::Null),
    $Algorithm,
    "Write"
)

# Retrieve each file and copy the data into the cryptographic stream.
foreach ($File in Get-ChildItem -File) {
    $FileStream = [io.file]::OpenRead($File.FullName)
    $FileStream.CopyTo($CryptoStream)
}

# Close all files and close out the cryptographic stream.
$FileStream.Close()
$CryptoStream.FlushFinalBlock()

# Combine all of the hashes as hexadecimal formats "X2" and join the values.
($Algorithm.Hash | ForEach-Object {$_.ToString("X2")}) -join ''
Aside: Understanding Chunking and Streaming of Files
It’s not necessary to understand all the ins-and-outs of chunking and streaming data to compute file hashes, but really learn exactly how this all works!
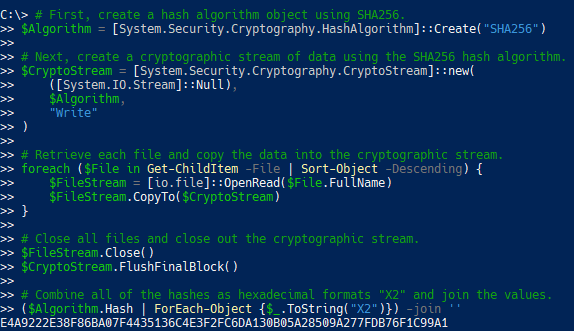
To illustrate the nature of this chunking and streaming, imagine that your source file contains the values of 1 and 2. In between each number, is a Windows newline (\r\n) as represented in the hex editor shown below.
This source file has been split into two files with the content 1 and 2 in them respectively. Viewing each file in a hex viewer shows that each file is three bytes with a number and the Windows newline.
As shown below, the source file hash and the hash of these two chunked files match.
It is important that you ensure your input file’s order matches the order of bytes in the source file in order to get the same hash. Notice that if you change the ordering of the input files with Sort-Object then the hash changes completely.
Armed with this knowledge, you can get that 5TB file hashed in almost no time at all!
Next Steps
In this article, you’ve learned how to use the Get-FileHash cmdlet in PowerShell. You’ve also learned about the nature of hashing, secure hashing requirements, and best practices to help you pick the right algorithm for your needs.
Armed with this knowledge, you’ll be able to thoroughly identify changes to data, even when only a single character is changed!
Provide feedback
Saved searches
Use saved searches to filter your results more quickly
Sign up
Appearance settings
It is possible to obtain the Hash values of a file without using an application in Windows 8, Windows 10 and higher windows operating systems. A special cmdlet allows you to calculate the SHA1, SHA256, SHA384, SHA512, MACTripleDES, MD5 and RIPEMD160 Hash values of a given file. The general purpose of hashes is to ensure that the file is authentic and that its contents have not been altered by a third party, other software or malware. When a file is modified, its hash value is also changed. It is also possible to compare and match hashes to find out if two or more files are identical.
The ability to calculate the file hash is part of the Windows cryptographic API. The operating system’s user interface does not have the option to calculate or display hashes for files. You can use the “Get-FileHash” command in PowerShell instead.
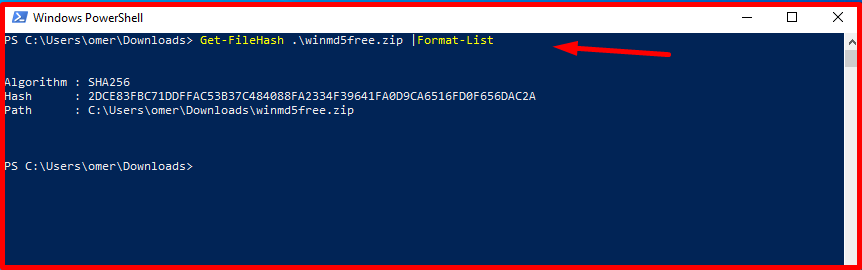
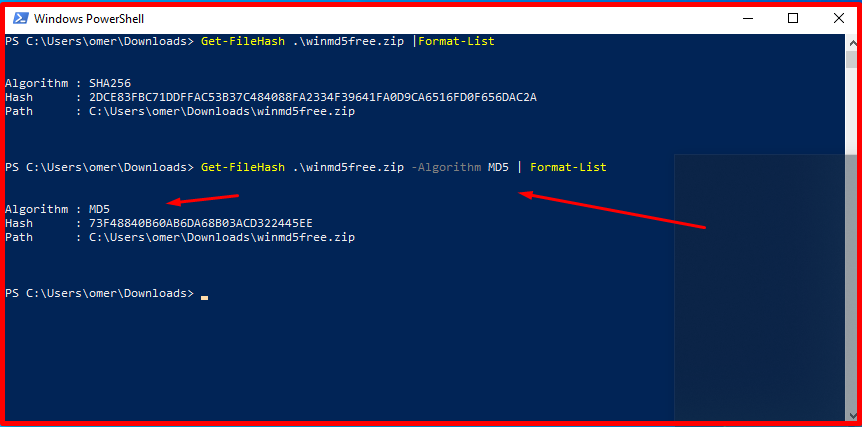
You can use the following command to get the file hash with PowerShell in Windows 10.
Get-FileHash .\winmd5free.zip |Format-List
For example, we open PowerShell and write the above command. By default, it calculates the SHA256 hash value for the given file and produces the output as follows.
To find hashes other than SHA256, we use the Algorithm key. For example, we run the following command to get the MD5 hash.
Get-FileHash .\winmd5free.zip -Algorithm MD5 | Format-List
The list of possible values for the algorithm is as follows. These;
- MD5
- SHA1
- SHA256
- SHA384
- SHA512
- RIPEMD160
- MACTripleDES
Note: Another useful key to know is -LiteralPath. Specifies the path of a file. Unlike the default path parameter, the value of the LiteralPath parameter is used exactly as it is typed. No character is interpreted as a wildcard. If the path contains escape characters, enclose the path in single quotation marks. Single quotes instruct Windows PowerShell not to interpret characters as escape sequences.