
Download Windows Speedup Tool to fix errors and make PC run faster
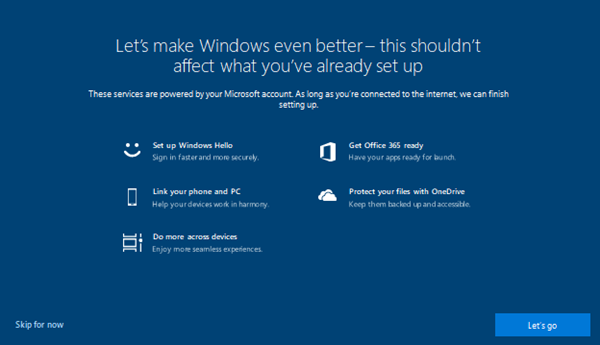
Microsoft wants to make sure anybody using Windows 11/10 knows that there are a lot more you can get from Windows. It can be in the form of services, extra features, and so on. To get that done, Windows 11/10 displays — Get even more out of Windows or Let’s make Windows even better prompt occasionally. It showcases additional services such as Windows Hello, Office 365, Link phone to computer, OneDrive and more. That said, if it annoys you, you can disable Get even more out of Windows prompt on Windows 11/10.
Disable Let’s make Windows even better
Get even more out of Windows is not necessarily a bad thing. It’s designed for users who have a tough time discovering useful features on Windows 11/10. It can help users to set up these services. However, once you have seen it enough, it gets annoying. The window shows up at multiple instances including new installation, after feature updates, and at random times.
You can disable Get even more out of Windows, Let’s make Windows even better or Let’s finish setting up your device message on Windows 11/10 in two ways:
- Notification and Actions Settings
- Registry Editing
1] Disable via the Settings app
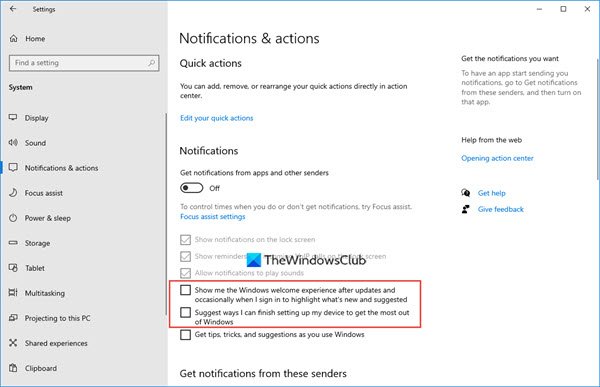
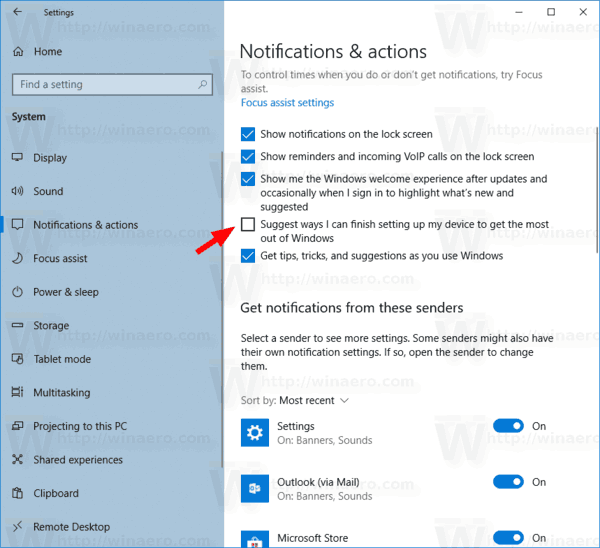
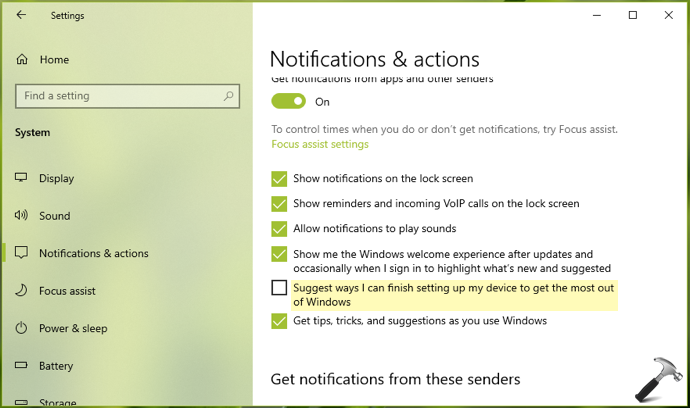
- Go to Windows 10 Settings > System > Notifications & actions
- Locate the checkbox which says “Show me the Windows welcome experience after updates and occasionally when I sign in to the highlight what’s new and suggested“
- Uncheck the box
- Do the same for Suggest ways I can finish setting up my device to get the most out of Windows
- Close the Settings application.
In Windows 11 too, you will see this setting here.
Windows Settings > System > Notifications. Scroll down till you see:
- Show me the Windows welcome experience after updates and occasionally when I sign in to highlight what’s new and suggested
- Suggest ways to get the most out of Windows and finish setting up the device
- Offer suggestions on how I can set up my device.
The wordings may vary depending on your Version or Build – but basically turn these settings off.
It is the easiest way to do it as it doesn’t involve anything with which the user can go wrong.
Related: Let’s finish setting up your device stuck
2] Disable via the Registry

Before we start with the instructions, make sure to create a Restore Point. The method is also useful when you want to change settings for remote computers or multiple computers.
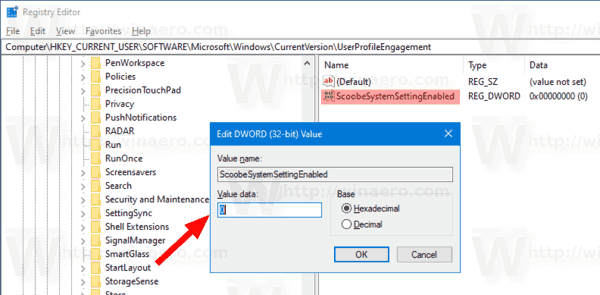
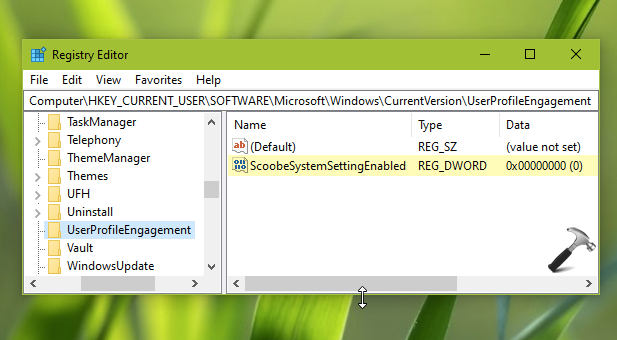
1] Open Registry Editor by typing regedit in the Run prompt, and confirm the UAC prompt. Next, navigate to:
Computer\HKEY_CURRENT_USER\Software\Microsoft\Windows\CurrentVersion\UserProfileEngagement
2] Next change the value of DWORD ScoobeSystemSettingEnabled to 0 if you want to disable the feature.
In case the DWORD is not there, then right-click on UserProfileEngagement and select New > DWORD (32-bit) Value. Name it ScoobeSystemSettingEnabled.
If UserProfileEngagement itself does not exist, then you will have to create UserProfileEngagement as well as ScoobeSystemSettingEnabled.
3] Restart the Windows computer
We hope the steps were easy to follow, and you were able to disable Get even more out of Windows on Windows 11/10.
Related: Get rid of Let’s finish setting up your device.
Ashish holds a Bachelor’s in Computer Engineering and is a veteran Windows. He has been a Microsoft MVP (2008-2010) and excels in writing tutorials to improve the day-to-day experience with your devices.
Skip to content
How to disable the ‘Disable Get Even More Out of Windows screen’ in Windows 10
Recent Windows 10 versions occasionally display a nag screen ‘Get Even More Out of Windows’ when you sign-in to your user account. If you find it annoying, here are two methods you can use to get rid of this screen.
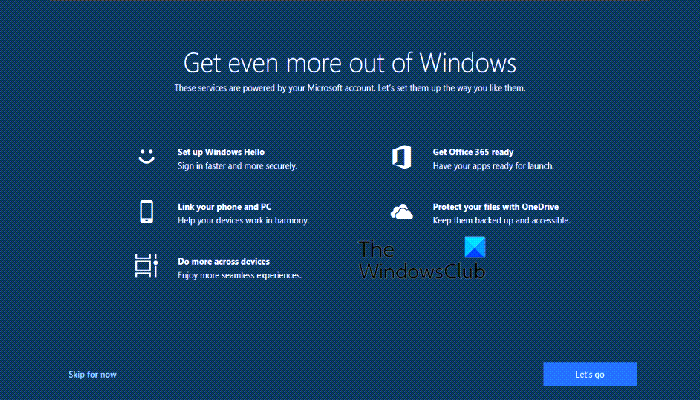
The ‘Get Even More Out of Windows’ screen is intended to help a new user to configure advanced features of the OS. The screen shows a number of links to quickly set up services powered by Microsoft Account.
The links include
- Protect your files with OneDrive
- Get Office 365 ready
- Set up Windows Hello
- Link your phone and PC
- Do more across devices
Some users find this screen annoying. After receiving user’s feedback, Microsoft has implemented a new option in Settings to disable the feature. Starting in Windows 10 build 18945 and above, the screen can be disabled from the Notifications & actions page in Settings. Also, you can apply a Registry tweak.
- Open the Settings app.
- Navigate to System > Notifications & actions.
- On the right, turn off (uncheck) the option Suggest ways I can finish setting up my device to get the most out of Windows.

- Now you can close the Settings app.
You are done. The option can be re-enabled at any moment later.
Alternatively, you can apply a Registry tweak to enable or disable this feature. Here’s how it can be done.
Disable ‘Get Even More Out of Windows Screen’ With Registry Tweak
- Open the Registry Editor app.
- Go to the Registry key
HKEY_CURRENT_USER\SOFTWARE\Microsoft\Windows\CurrentVersion\UserProfileEngagement.
See how to go to a Registry key with one click. - On the right, modify or create a new 32-Bit DWORD value ScoobeSystemSettingEnabled.
Note: Even if you are running 64-bit Windows you must still create a 32-bit DWORD value.
Set its value data to 0 to disable the screen.
- A value data of 1 will enable the feature.
- To make the changes done by the Registry tweak take effect, you need to sign out and sign in to your user account.
To save your time and avoid manually editing the Registry, you can download the following Registry files.
Download Registry Files
That’s it!
Support us
Winaero greatly relies on your support. You can help the site keep bringing you interesting and useful content and software by using these options:
If you like this article, please share it using the buttons below. It won’t take a lot from you, but it will help us grow. Thanks for your support!
Tired with “Get even more out of Windows” and “Let’s make Windows even better” splash screen prompt occasionally on Windows after update that displays additional services? It is a good idea to disable the notification if you don’t need any of the new features or already setup.

How to Disable Windows 10 “Get Even More Out of Windows” Notification

How to Disable Windows 10 “Let’s make Windows even better” Notification
Here are the steps to disable “Get Even More Out of Windows” and “Let’s make Windows even better” Notification on Windows 10.
Table of contents
Disable via Settings
Disable via ScoobeSystemSettingEnabled Registry Key
Disable via SubscribedContent-310093Enabled Registry Key
Disable via Settings
Step 1: Click the Start menu and select the small gear icon to open the Settings or you can press Windows + I key.

Click the Start menu and select the small gear icon to open the Settings or you can press Windows + I key.
Step 2: Click the System.

Click the System.
Step 3: Select Notification & actions in the sidebar.

Select Notification & actions in the sidebar.
Step 4: Uncheck for Show me the Windows welcome experience after updates and occasionally when I sign in to highlight what’s new and suggested.

Uncheck for Show me the Windows welcome experience after updates and occasionally when I sign in to highlight what’s new and suggested.
Step 5: Uncheck for Suggest ways I can finish setting up my device to get the most out of Windows.

Uncheck for Suggest ways I can finish setting up my device to get the most out of Windows.
Step 6: Uncheck for Get more prompt.
Step 7: Close Settings.
Disable via ScoobeSystemSettingEnabled Registry Key
Step 1: Press Windows key + R to open a Run box.
Step 2: Type regedit and press Enter to open up the Registry Editor. Click Yes to grant administrative privileges when prompted by the UAC (User Account Control).
Step 3: Navigate to the following location: Computer\HKEY_CURRENT_USER\Software\Microsoft\Windows\CurrentVersion\UserProfileEngagement
Step 4: Check if the Dword ScoobeSystemSettingEnabled exists. If it does not exist, right-click on the right pane then select New > DWORD (32-bit) Value. Name the new DWORD as ScoobeSystemSettingEnabled.
Step 5: Double-click on ScoobeSystemSettingEnabled and change its value to 0 to disable the feature. Click on the OK button and close the registry editor.

Double-click on ScoobeSystemSettingEnabled and change it’s value to 0 to disable the feature.
Step 6: Restart the PC.
Disable via SubscribedContent-310093Enabled Registry Key
Step 1: Press Windows key + R to open a Run box.
Step 2: Type regedit and press Enter to open up the Registry Editor. Click Yes to grant administrative privileges when prompted by the UAC (User Account Control).
Step 3: Navigate to the following location: HKEY_CURRENT_USER\Software\Microsoft\Windows\CurrentVersion\ContentDeliveryManager
Step 4: Check if the Dword SubscribedContent-310093Enabled exists. If it does not exist, right-click on right pane then select New > DWORD (32-bit) Value. Name the new DWORD as SubscribedContent-310093Enabled.
Step 5: Double-click on SubscribedContent-310093Enabled and change it’s value to 0 to disable the feature. Click on the OK button and close the registry editor.
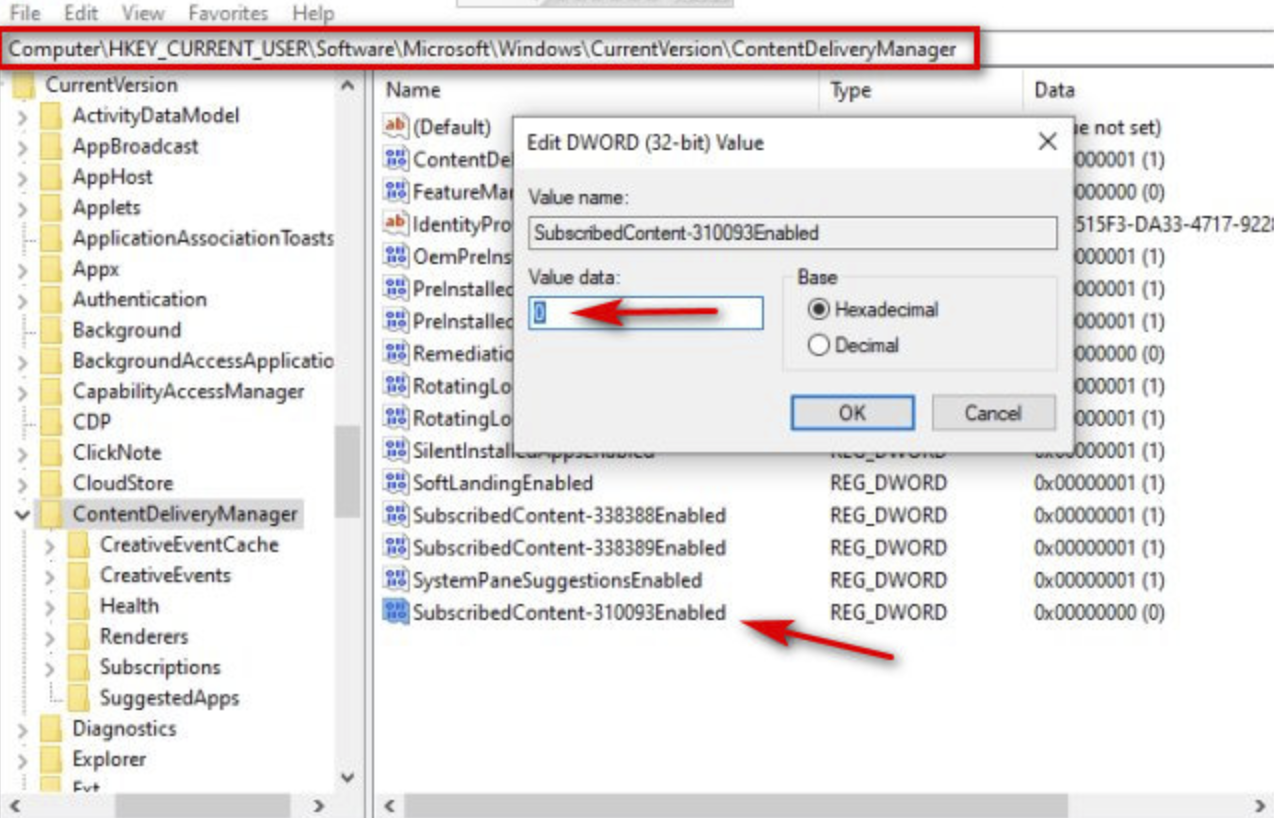
Double-click on SubscribedContent-310093Enabled and change it’s value to 0 to disable the feature.
Step 6: Restart the PC.
Source: Microsoft Community > Disable Get Even More Out of Windows
Disable the “Get Even More Out of Windows” Splash Screen on Windows 10
Windows 10 has been designed to deliver a streamlined and intuitive user experience. However, as with any operating system, certain features can sometimes become bothersome or unnecessary for individual users. One of these features is the “Get Even More Out of Windows” splash screen, a pop-up message that encourages users to explore new features, programs, and services associated with Microsoft’s operating system. While this message is intended to enhance the user experience, it can be perceived as intrusive or annoying, especially for those who prefer a more minimalist, uninterrupted desktop environment. In this article, we will delve into the reasons behind this splash screen’s appearance, its implications, and, most importantly, the steps necessary to disable it.
Understanding the “Get Even More Out of Windows” Splash Screen
The “Get Even More Out of Windows” splash screen primarily serves as a promotion for various Microsoft services, applications, and features that users might not be aware of. The reasoning behind introducing such promotional content stems from Microsoft’s commitment to not just operating system functionality but also providing a plethora of added services that have become integral in today’s interconnected digital ecosystem. When users first install Windows 10 or receive a significant update, the operating system runs through an introductory series of prompts, including the “Get Even More Out of Windows” splash screen.
For new users, this can be a helpful introduction to the features and applications that Windows 10 offers, such as Microsoft Edge, OneDrive, Cortana, and updates on security. However, as users become more familiar with the operating system and its offerings, they may find these prompts more distracting than useful. Frequent interruptions and prompts can degrade the user experience, prompting many users to seek ways to disable or remove these notifications.
Why Would You Want to Disable It?
There are various reasons why a user might wish to disable the splash screen:
-
Distraction: Regular pop-ups can disrupt the workflow and can be frustrating, especially in the middle of important tasks.
-
Performance: While the splash screen doesn’t necessarily take up a lot of resources, any unnecessary application loading can slightly affect performance. Users who demand high efficiency may want to eliminate every ounce of delay.
-
Preference: Some users prefer a cleaner, uncluttered desktop environment free from promotional materials. These users tend to prioritize a simplified, tailored computing experience.
-
Reduced Clutter: Especially for users who are already familiar with the operating system and its functionalities, seeing this reminder can feel like clutter rather than a helpful hint.
-
Control: Disabling these notifications can provide a sense of control over the operating system, which can contribute to a more personalized experience.
Steps to Disable the “Get Even More Out of Windows” Splash Screen
There are several effective methods to disable the “Get Even More Out of Windows” splash screen on Windows 10. Below are the most straightforward approaches to make this possible.
Method 1: Using the Settings App
One of the easiest ways to eliminate unnecessary notifications is through the Windows 10 Settings app. Here is how you can do that:
-
Open the Settings App: Press the
Windows + Ikeys simultaneously to open the Settings window. -
Go to System: Click on the ‘System’ option within the settings menu.
-
Open Notifications & Actions: On the left sidebar, select ‘Notifications & actions’.
-
Disable Notifications: Under the «Notifications» section, toggle off the notifications for apps and other senders. This action will turn off notifications system-wide, stopping the splash screen from appearing.
While this method is effective in reducing notifications, be aware that it will also disable notifications from other applications. If you want to retain notifications for other applications, proceed to the next method.
Method 2: Modify the Group Policy Settings
For users with Windows 10 Professional, Enterprise, or Education editions, the Group Policy Editor provides a more targeted approach to disable the splash screen.
-
Open the Group Policy Editor: Press
Windows + Rto open the run dialog box. Typegpedit.mscand pressEnter. -
Navigate to User Configuration: In the Local Group Policy Editor, expand the ‘User Configuration’ section.
-
Access Administrative Templates: Click on ‘Administrative Templates’, then ‘Start Menu and Taskbar’.
-
Locate “Show Notifications”: Find the setting named “Show notifications on the lock screen.”
-
Disable the Setting: Double-click on it and set it to ‘Disabled’ and click ‘OK’ to save changes.
By completing these steps, the notification for the “Get Even More Out of Windows” will be disabled, ensuring a more streamlined experience without interruptions.
Method 3: Registry Editor Method
This method is computer-advanced but might yield effective control over the notifications received by Windows. However, always be cautious when making changes in the Registry Editor, as incorrect alterations can adversely affect the operating system.
-
Open the Registry Editor: Press
Windows + R, typeregedit, and hitEnterto launch the editor. -
Navigate to the Appropriate Key: Go to
HKEY_CURRENT_USERSOFTWAREMicrosoftWindowsCurrentVersionPoliciesExplorer. -
Create a New Value: Right-click on the right pane, select
New, and then chooseDWORD (32-bit) Value. Name itNoToastApplicationNotification. -
Set the Value: Double-click the newly created value and set its value data to
1to disable toast notifications. -
Close the Registry Editor and restart your computer for the changes to take effect.
Be advised that modifying the registry carries risk; ensure you back it up before making any changes.
Additional Tips for a Cleaner Windows Experience
While disabling the “Get Even More Out of Windows” splash screen is a great step towards a cleaner and unobstructed experience, here are some additional tips to further optimize your Windows 10 interface:
-
Disable Unwanted Startup Programs: Navigate to the Task Manager, click on the ‘Startup’ tab, and disable any unnecessary applications that launch during startup to speed up your boot process.
-
Adjust Notification Settings: Consider further adjusting your notification settings through the Settings app to limit which apps can send notifications.
-
Uninstall Unused Applications: Regularly review installed applications and uninstall those you do not use. This helps free up resources and declutters your Start Menu.
-
Customize Your Taskbar: Personalize the taskbar by pinning your most-used applications and removing those you do not need.
-
Regular Maintenance: Consider running disk cleanup and regular updates to maintain the health and performance of your operating system.
Conclusion
As technology continues to evolve, digital landscapes cluttered with notifications and promotional messages can impede the user experience. The “Get Even More Out of Windows” splash screen is undoubtedly a helpful feature for some, but for many, it can feel intrusive and distracting. By following the steps outlined in this article, Windows 10 users can successfully disable this feature and streamline their computing experience.
By customizing your operating system and removing unnecessary features, you can reclaim your digital workspace and enjoy a more focused and efficient computing experience. Whether you choose to select the simpler path through the Settings app or delve deeper into advanced configurations like the Group Policy Editor or Registry Editor, the choice is ultimately yours. Enjoy a smoother, less interrupted experience in Windows 10 by implementing these changes today.
If you’ve latest Windows 10 Version 2004 installed, you may see Get even more out of Windows screen while signing in or restarting your device. The main objective of this screen is to make new users aware of basic Windows features they can leverage power of. On some devices, you may get similar Let’s finish setting up your device screen instead.
Here is screenshot of Get even more out of Windows screen.
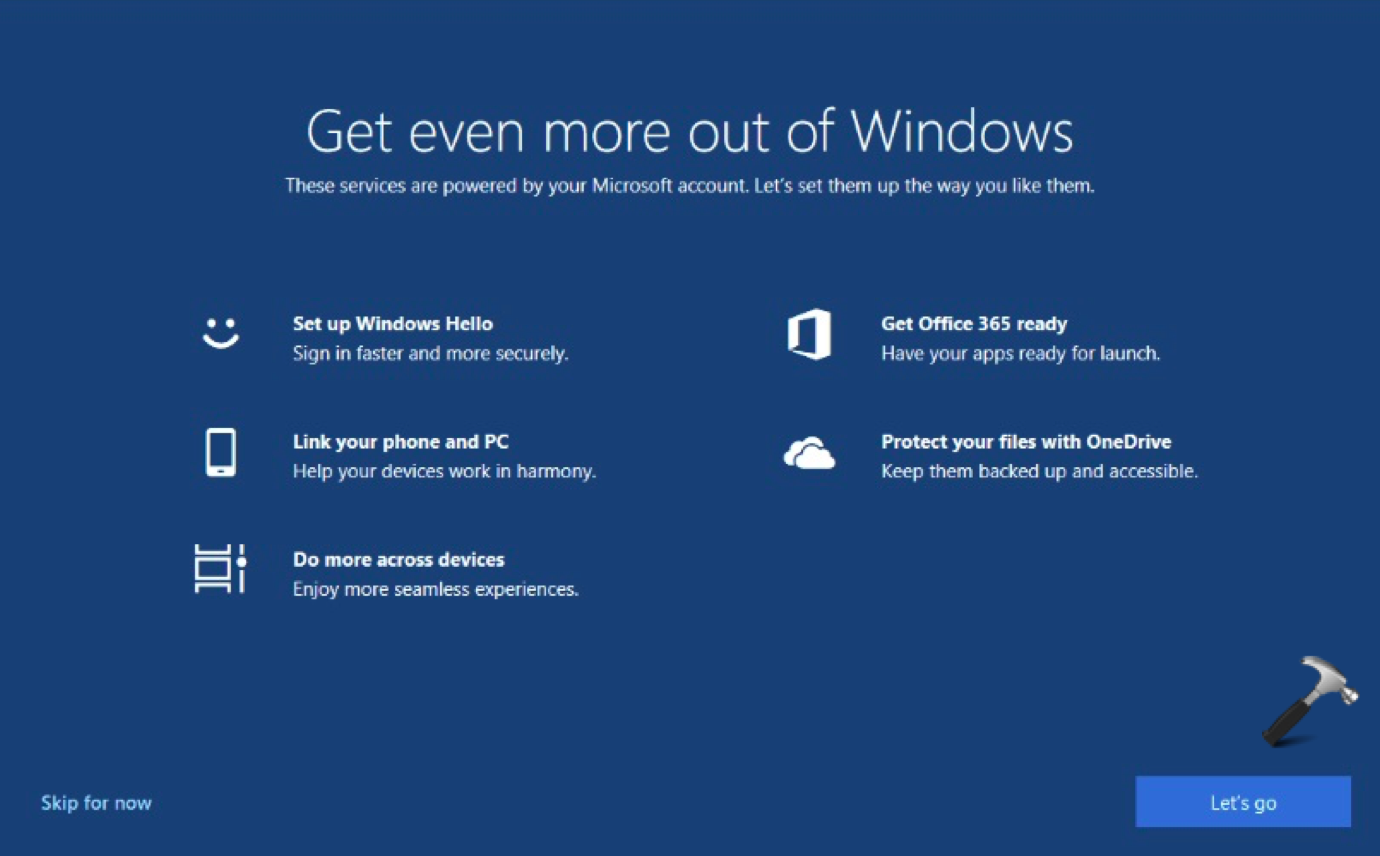
The screen provides following suggestions to users:
- Set up Windows Hello
- Link your phone and PC
- Do more across devices
- Get Office 365 ready
- Protect your files with OneDrive
These are the basic things users should go through. Of course, you can skip this screen, if you like. In case if you want to disable this screen from showing up, here’s how you can. Configure the relevant option is Settings app or using registry to turn off Get even more out of Windows screen.
Page Contents
How To Disable ‘Get Even More Out Of Windows’ Screen
Method 1 – Using Settings App
1. Right click Start Button or press + X keys and select Settings.
2. In the Settings app, navigate to System > Notifications & actions.
3. In right pane of Notifications & actions, uncheck Suggest ways I can finish setting up my device to get the most out of Windows option.
4. Close Settings app.
If Settings app not working, try changing this setting via registry, as mentioned in Method 2 below.
Method 2 – Using Registry Editor
Registry Disclaimer: The further steps will involve registry manipulation. Making mistakes while manipulating registry could affect your system adversely. So be careful while editing registry entries and create a System Restore point first.
1. Run regedit command to open Registry Editor.
2. In left pane of Registry Editor window, go to HKEY_CURRENT_USER\SOFTWARE\Microsoft\Windows\CurrentVersion\UserProfileEngagement.
3. Double click and set ScoobeSystemSettingEnabled to 0.
4. Close Registry Editor and reboot the machine.
To make changes, sign out and sign in back or simply reboot your system.
Check this video for more info:
For IT Pros: You can deploy this registry setting to multiple machines in your organization using Group Policy, refer this guide.
That’s it!