
This service lets you create answer files (typically named unattend.xml or autounattend.xml) to perform unattended installations of both Windows 10 and Windows 11, including 24H2. Answer files generated by this service are primarily intended to be used with Windows Setup run from Windows PE to perform clean (rather than upgrade) installations.
Import a file generated by this service
Presets
| Region and language settings: |
Install Windows using these language settings: Windows display language: Windows features like Settings and File Explorer will appear in this language. It must match the language of your Windows 10/11 .iso file. Choose language preferences and keyboard layouts Specify the first language and keyboard layout Language: Keyboard layout / Input Method Editor: Specify a second language and keyboard layout Language: Keyboard layout / Input Method Editor: Specify a third language and keyboard layout Language: Keyboard layout / Input Method Editor: Home location: Windows and apps might use your country or region to give you local content. Select language settings interactively during Windows Setup |
||||||||||||||||||||||||
|---|---|---|---|---|---|---|---|---|---|---|---|---|---|---|---|---|---|---|---|---|---|---|---|---|---|
| Processor architectures: |
When you select multiple processor architectures, a single |
||||||||||||||||||||||||
| Setup settings: |
Bypass Windows 11 requirements check (TPM, Secure Boot, etc.) Allow Windows 11 to be installed without internet connection Only check this option if your computer really does not have internet access. You will still have to click the I don’t have internet button during Windows Setup in that case. If you just want to create local (“offline”) user accounts in Windows 11, you do not need this option – simply use the User accounts section of this form. Use a distribution share / configuration set Hide any PowerShell windows during Windows Setup
Do not enable this checkbox if you are planning to use interactive prompts (like PowerShell’s |
||||||||||||||||||||||||
| Computer name: |
Let Windows generate a random computer name like Choose a computer name yourself Use this name: Provide a Windows PowerShell script to set the computer name dynamically: Your script will be evaluated during Windows Setup. The script must return a single string, which must be a valid computer name. You can also use a script such as |
||||||||||||||||||||||||
| Compact OS: |
Let Windows decide whether to use Compact OS Use Compact OS Do not use Compact OS |
||||||||||||||||||||||||
| Time zone: |
Let Windows determine your time zone based on language and region settings Set your time zone explicitly This is useful when your country or region spans multiple time zones, like Australia or the United States. Use this time zone: |
||||||||||||||||||||||||
| Partitioning and formatting: |
Partition the disk interactively during Windows Setup Let Windows Setup wipe, partition and format your hard drive (more specifically, disk 0) using these settings: Choose partition layout GPT The MBR MBR The MBR-based partition layout must be used for legacy BIOS systems. Choose how to install Windows RE Create a separate partition with a size of MB and install Windows RE to it. Install on Windows partition This will install Windows RE in Remove Windows RE This will delete the Use a custom If your disk is already partitioned and formatted, enter a Choose partition to install Windows to after script has run Install Windows to the first available partition that has enough space and does not already contain an installation of Windows Install to another partition:
When you let Windows Setup partition your disks unattendedly, there is a risk they were assigned unexpected index numbers. In rare cases, disk 0 does not refer to your primary hard drive, but rather your USB thumb drive. You can therefore provide VBScript code to check the assigned disk index numbers before Do not run a script Run this VBScript code to check disk layout: |
||||||||||||||||||||||||
| Windows edition: |
Use a generic product key Such a key can be used to install Windows, but will not activate it. You can change the product key later. Install this edition of Windows: Enter another product key Use this product key: Enter a product key interactively during Windows Setup You can also enter your key in the Use product key stored in BIOS/UEFI firmware Choose this if your computer came pre-installed with Windows and you want to reuse that license. |
||||||||||||||||||||||||
| User accounts: |
Let Windows Setup create the following local (“offline”) accounts:
Leave Display name empty unless you want it to be different from Account name. First logon Several settings will only be applied when an administrator logs on for the first time. You should therefore let Windows log you on to an administrator account once – this does not affect subsequent logons. Choose which account to use for this: Logon to the first administrator account created above Activate built-in account Set its password to: Do not logon The installation ends with the sign-in screen being shown. Obscure all account passwords in your Add a Microsoft (“online”) user account interactively during Windows Setup Add a local (“offline”) user account interactively during Windows Setup |
||||||||||||||||||||||||
| Password expiration: |
Passwords do not expire This is in accordance to NIST guidelines that no longer recommend password expiration. Use Windows default Passwords expire after 42 days. Use custom password expiration: Passwords expire after days. These settings only apply to local accounts. Also, the password of the built-in account |
||||||||||||||||||||||||
| Account Lockout policy: |
Use default policy By default, Windows will lock out an account after 10 failed logon attempts ( Disable policy Disabling Account Lockout might leave your computer vulnerable to brute-force attacks. Use custom policy: Lock out an account after failed logon attempts within minutes. After minutes, unlock the account automatically. |
||||||||||||||||||||||||
| File Explorer tweaks: |
Choose which files are hidden in File Explorer Use File Explorer default setting This will hide any file that has the Hide protected operating system files This will only hide files that have both the Show all files This setting is recommended for advanced users. Always show file extensions By default, File Explorer would hide extensions for known file types. Use classic context (right-click) menu in Windows 11 Open File Explorer to This PC instead of Quick access Show End task command in the taskbar |
||||||||||||||||||||||||
| Start menu and taskbar: |
Choose how to display the search box in the taskbar Full Icon and label Icon Hide Choose icons to display in the taskbar Use default icons Remove all icons Configure icons using an XML file: See Microsoft’s documentation for more examples. Disable widgets This hides the news and weather widget in the lower-left corner in Windows 11. Left-align the taskbar in Windows 11 Hide the Task view button from the taskbar Always show all tray icons On Windows 10, this will simply set the Do not show Bing results when searching in the Start menu or the search box Windows 10 Configure the tiles that are initially shown in the Windows 10 Start menu. You can add or remove tiles later. On Windows 11, this setting is simply ignored. Use default tiles If you select apps in the Remove bloatware section below, Windows 10 will automatically remove their tiles from the Start menu. Remove all tiles Configure tiles using an XML file created by PowerShell’s Windows 11 Configure the pins that are initially shown in the Windows 11 Start menu. You can add or remove pins later. On Windows 10, this setting is simply ignored. Use default pins Avoid this setting if you select apps in the Remove bloatware section below, as Windows 11 will deceptively retain their pins in the Start menu. Remove all pins Configure pins using a JSON file created by PowerShell’s |
||||||||||||||||||||||||
| System tweaks: |
Disable Windows Defender This disables certain services ( Disable Windows Update Disable User Account Control (UAC) Disable Smart App Control This turns Smart App Control off in Windows 11. Note that you will not be able to turn it back on. Disable SmartScreen in Windows and Edge Disable Fast Startup Disable System Protection / System Restore Windows will not create restore points for drive Enable long paths This sets the LongPathsEnabled registry value, which enables several programs (including PowerShell, 7-Zip and TreeSize) to use long paths with up to 32,767 characters without resorting to the Enable Remote Desktop services (RDP) Harden ACLs This removes write permissions on Allow execution of PowerShell script files This runs the command Do not update Last Access Time stamp This runs the command Prevent Windows Update from rebooting your computer This creates a scheduled task that periodically moves your active hours, tricking Windows into thinking your device is in use all the time. Turn off system sounds This changes the sound scheme from Windows Default to No sounds for all users. Disable app suggestions / Content Delivery Manager Prevent device encryption Windows 11 would otherwise enable BitLocker encryption automatically. Hide Edge First Run Experience This will skip the annoying dialogs when Edge is run for the first time. Disable Edge Startup Boost and Background mode This will stop Edge from running in the background all the time. Make Edge uninstallable This will modify the Disable the Enhance Pointer Precision mouse setting This may be useful for players of first-person shooters. Delete empty Audit process creation events Each time a new process is created, Windows writes an event to the Security log. This is a powerful tool for troubleshooting. Include command line in log events |
||||||||||||||||||||||||
| Visual effects: |
Use default settings chosen by Windows Adjust for best appearance Adjust for best performance Use custom settings: Animate controls and elements inside windows Animate windows when minimizing and maximizing Animations in the taskbar Enable Peek Fade or slide menus into view Fade or slide ToolTips into view Fade out menu items after clicking Save taskbar thumbnail previews Show shadows under mouse pointer Use drop shadows for icon labels on the desktop Show thumbnails instead of icons Show translucent selection rectangle Show window contents while dragging Slide open combo boxes Smooth edges of screen fonts Smooth-scroll list boxes Show shadows under windows |
||||||||||||||||||||||||
| Desktop icons: |
Show default desktop icons Show these desktop icons: Control Panel Desktop Documents Downloads Gallery Home Music Network Pictures Recycle bin This PC User’s Files Videos |
||||||||||||||||||||||||
| Virtual machine support: |
Install Oracle VirtualBox Guest Additions Install VMware Tools Install VirtIO Guest Tools and QEMU Guest Agent (e.g. for Proxmox VE) Make sure to check the usage notes for how to properly configure your VM. |
||||||||||||||||||||||||
| WLAN / Wi-Fi setup: |
Configure Wi-Fi interactively during Windows Setup Skip Wi-Fi configuration Choose this if you have a wired connection to the internet. Configure Wi-Fi using these settings:
If both your Wi-Fi router and your computer’s Wi-Fi adapter support it, make sure to select WPA3. Otherwise, Windows Setup will try to switch from WPA2 to WPA3 and require manual interaction. You should not enter your actual Wi-Fi password here. Once you have downloaded the Configure Wi-Fi using an XML file created by |
||||||||||||||||||||||||
| Express settings: |
Disable all Windows will not send diagnostic data, personalized input or your location history to Microsoft. Choose this if you value privacy. Enable all Windows will send data to Microsoft to provide location-based services, improve language recognition, and show personalized ads. Choose settings interactively during Windows Setup This lets you enable some settings while disabling others. |
||||||||||||||||||||||||
| Lock key settings: |
Use default lock key states and behaviors Configure the initial state and behavior of lock keys as follows:
This will affect all users and also the login screen. |
||||||||||||||||||||||||
| Sticky keys: |
Use default Sticky keys settings Disable Sticky keys altogether Configure Sticky keys as follows: Press the Shift key 5 times to turn Sticky keys on or off Play a siren sound when Sticky keys are turned on or off by using the Shift key Show the Sticky keys icon on the taskbar Play a sound when shortcut keys are pressed and released Lock shortcut keys when pressed twice in a row Turn off Sticky keys when two keys are pressed at the same time This will affect all users and also the login screen. |
||||||||||||||||||||||||
| Personalization settings: |
These settings are particularly useful if you want to use Windows without activation when the Personalization settings page is not available. Colors Use default color theme Use custom color theme
Desktop wallpaper Use default wallpaper settings Use a solid color background: Provide a Windows PowerShell script to load a desktop wallpaper image: Your script will be evaluated during Windows Setup, after your computer has connected to a network. The script must return a |
||||||||||||||||||||||||
| Remove bloatware: |
Windows comes with several apps that many users do not want or do not need. Check all the apps you want removed during Windows Setup: 3D Viewer Bing Search Calculator Camera Clipchamp Clock Copilot Cortana Dev Home Family Feedback Hub Get Help Handwriting (all languages) Internet Explorer Mail and Calendar Maps Math Input Panel Media Features Mixed Reality Movies & TV News Notepad (modern) Office 365 OneDrive OneNote OneSync OpenSSH Client Outlook for Windows Paint Paint 3D People Photos Power Automate PowerShell 2.0 PowerShell ISE Quick Assist Recall Remote Desktop Client Skype Snipping Tool Solitaire Collection Speech (all languages) Steps Recorder Sticky Notes Teams Tips To Do Voice Recorder Wallet Weather Windows Fax and Scan Windows Hello Windows Media Player (classic) Windows Media Player (modern) Windows Terminal WordPad Xbox Apps Your Phone / Phone Link Bloatware removal works best with the original Windows 10 and 11 .iso images downloaded from Microsoft. I did not perform any tests with custom images. |
||||||||||||||||||||||||
| Run custom scripts: |
You may want to take a look at some sample scripts first. Scripts to run in the system context, before user accounts are created
Scripts to modify the default user’s registry hive This will automatically mount the
Scripts to run when the first user logs on after Windows has been installed The first user to log on is typically an administrator. In this case, these scripts will run with elevated privileges.
Scripts to run whenever a user logs on for the first time
Restart File Explorer after scripts have run This will restart the Your scripts will be run as follows:
|
||||||||||||||||||||||||
| Windows Defender Application Control: |
Do not configure WDAC policy Configure a basic WDAC policy using these settings: Applications in Choose how to enforce the policy Auditing mode Logs drivers and applications that would have been blocked. Auditing mode on boot failure When the policy blocks a system driver and thus would prevent Windows from booting, use audit mode. Otherwise, use enforcement mode. Enforcement mode Drivers and applications will be blocked unless allowed by the policy. Choose script enforcement Restricted PowerShell will run in Constrained Language Mode. See Script Enforcement for details. Unrestricted PowerShell will run in Full Language Mode. |
||||||||||||||||||||||||
| XML markup for more components: |
You can optionally add settings for all available components, with respect to their valid configuration passes.
The generator itself uses some components (displayed with a reddish background below). You may assign your own XML markup to these components, but this will completely replace their generated content, and there is no guarantee that the resulting Do not include
|
||||||||||||||||||||||||
| Download settings: |
Use filename Windows Setup will not process the |
||||||||||||||||||||||||
| Submit form: |
Привет, друзья. В этой статье поговорим об автоматизации установки Windows путём генерации файла ответов. Файл ответов – это сценарий заранее заданных пользовательских выборов на запрашиваемые в процессе установки Windows действия и настройки. Внедрение такого файла ответов на установочный носитель с операционной системой позволяет в разы упростить процесс установки, сделав его по большей части автоматическим, «тихим», сведя к минимуму наши, пользовательские действия. Но те из вас, кто о осведомлён в этой теме, знают, что создание этого файла под свою конкретную ситуацию – процесс непростой, требующий и должного уровня подготовки, и навыков по работе со специальным софтом. В этой статье, друзья, хочу предложить вам простейший способ создания файла ответов: нам не понадобится устанавливать и изучать сложное профильное ПО, этот файл мы сгенерируем в несколько кликов с помощью одного интересного веб-сервиса. Способ, конечно, с нюансом, но его всё равно можно взять опытным пользователям на заметку.
Генератор файла ответов для автоматизации установки Windows
Что такое файл ответов для автоматизации установки Windows
Итак, друзья, файл ответов для автоматизации установки Windows – это сценарий наших ответов на запросы мастера установки операционной системы. Он создаётся в файле формата XML с названием «autounattend», внутри являет собой подборку плохо понимаемых для обывателя символов.
И помещается в корень установочной флешки, установочного оптического диска или интегрируется в файл ISO-дистрибутива Windows.
{banner_google1}
При каждой новой установке системы мы обычно выбираем одни и те же настройки. Как правило, даже имя учётной записи Windows не меняем. При частой установке Windows, а с ней сталкиваются не только те их вас, кто работает в сфере IT, но обычные домашние пользователи, её установочный процесс со всеми этими вопрошающими окошками отвлекает нас, забирает кучу времени, заставляет быть постоянно возле компьютера. И вот эти вопрошающие окошки можно свести к минимуму, задав заранее значения места установки Windows, выбор региональных настроек, создание пользовательской учётной записи, сетевых и прочих системных настроек. А главное, что наверняка понравится многим из вас, файл ответов избавляет нас от ненужных этапов типа принятия лицензионных соглашений и назойливого навязывания учётной записи Microsoft.
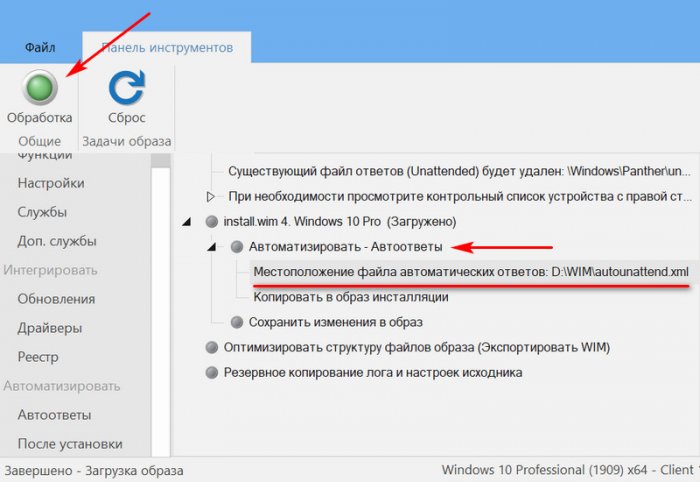
Для тех из вас, друзья, кто имеет какой-то опыт в редактировании дистрибутива Windows в части подгонки под свои потребности, но, возможно, впервые сталкивается с таким понятием, как файл ответов, поясню, в чём заключается преимущество генерации этого файла, в частности, с помощью предлагаемого ниже способа. Ввязываться в тонкости создания этого файла, если вам это не нужно для профильной деятельности, нет смысла. Чтобы его создать, нужно установить комплект средств для развертывания и оценки Windows ADK для соответствующей версии Windows, извлечь дистрибутив Windows из файла ISO, потом извлечь содержимое непосредственно образа установки операционной системы из файла WIM (или ESD), разобраться в витиеватом механизме работы самого Windows ADK. Кому интересно, можете посмотреть, как всё это происходит на деле в статье «Автоматизация установки Windows 10 с использованием файла ответов». Есть способ проще – с использованием программы для редактирования дистрибутива Windows NTLite и WinNTSetup Этот способ также требует распаковки дистрибутива, но программа NTLite универсальная для всех версий дистрибутива Windows, у неё русифицированный интерфейс с понятным описанием позиций и действий для файла ответов. Не все возможности по работе с файлом ответов доступны в бесплатной версии программы, но с большей частью вы поработать сможете.
Если при редактировании дистрибутива проводилась работа с файлом ответов, он автоматически сохраняется в папке распаковки дистрибутива. И его оттуда, соответственно, можно извлечь.
И Windows ADK, и программа NTLite – полезнейшие инструменты для тех, кому профильно необходимо заниматься редактированием и подгонкой дистрибутива. В частности, они позволяют гибко настроить тот же файл ответов. Но вряд ли они понадобятся обычному пользователю, пусть даже опытному. Есть в сети один интерфейсный веб-ресурс, который предлагает нам генерацию и скачивание готовых файлов ответов для автоматизации установки разных версий Windows, адаптированных под массового пользователя.
Сервис Windowsafg.Com
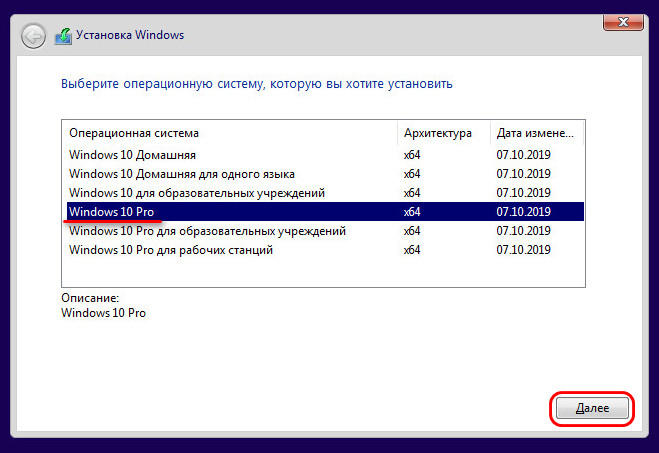
Сервис Windowsafg.Com – это сайт, созданный специально для генерации файлов ответов, применяемых к установочному процессу Windows. Здесь поддерживаются клиентские Windows, начиная с XP и заканчивая 10, а также серверные Windows, начиная с 2008 R2 и заканчивая 2019. Здесь также можно сгенерировать файлы ответов для установки Microsoft Office, файлы настроек системных служб и компонентов Windows, применяемые к установочному процессу. Сайт англоязычный, но, друзья, даже для тех из вас, кто с английским «на Вы», особых проблем не будет. Все пункты генерации мы разберём сейчас. Да и разбирать здесь особо нечего: Windowsafg.Com предлагает немногие настройки файла ответов, повторюсь, всё сделано в расчёте на массового пользователя. Но сделано максимально эффективно. Применив сгенерированный на этом сайте файл ответов к установке, например, Windows 10, вот какой процесс получим. Этап начала установки.

Выбор редакций – это единственный этап, где от нас потребуется наше пользовательское действие.
Далее установка будет произведена полностью в автоматическом режиме. Пойдёт этап копирования файлов.
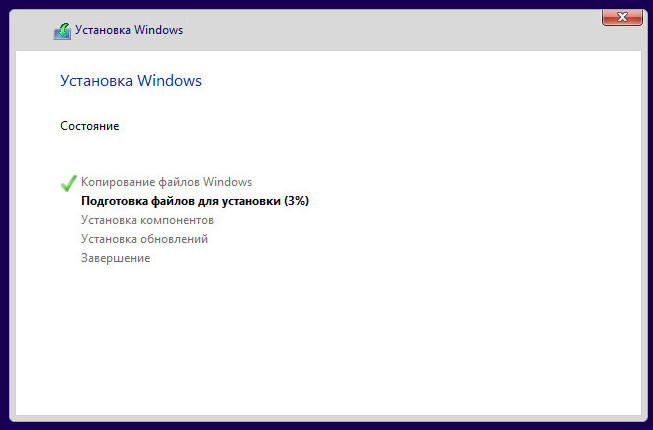
Потом — перезагрузка, подготовка устройств и системных компонентов.
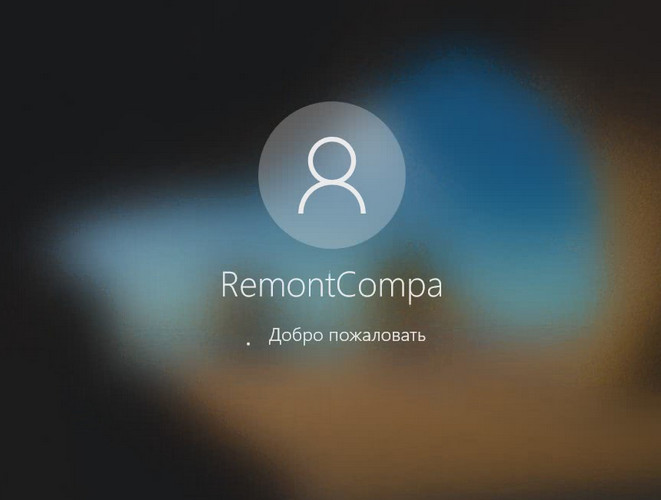
Потом — автоматический вход в нашу учётную запись.
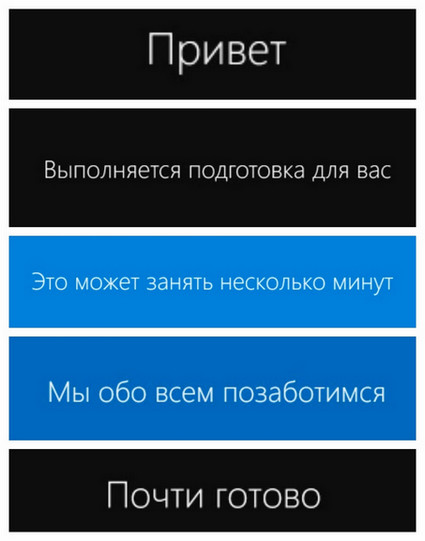
Затем будут мельтешить текстовки моральной поддержки пользователя.
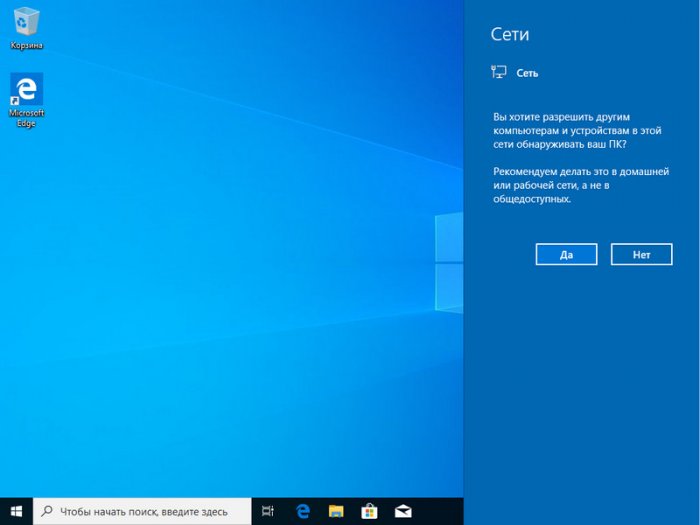
И всё – запустится рабочий стол установленной операционной системы.
Вот так чудесно всё может быть у вас, друзья, но при единственном условии. Генерация файла ответов, предлагаемая сайтом Windowsafg.Com, не предусматривает выбор отдельно раздела диска С для форматирования и установки на него Windows. Можно выбрать только стирание всего жёсткого диска с новой его переразметкой под нужный стиль — MBR или GPT. Т.е. если у вас Windows установлена на жёстком диске с большим объёмом, и на этом диске имеются другие несистемные разделы с хранящимися ценными данными, всё, что описывается ниже – увы, не для вас. Ваши данные исчезнут в процессе стирания и переразметки диска. Но у многих Windows стоит на отдельном SSD-диске на 60 или 120 Гб, полностью отданном под нужды операционной системы. Если это ваш случай, тогда смотрите далее.
Как сгенерировать файл ответов для автоматизации установки Windows
{banner_google1}
Выбираем раздел клиентских систем Windows, а в нём – нужную нам версию и стиль разметки MBR или UEFI (т.е. GPT). Я выберу Windows 10 UEFI.

Теперь нам нужно пройтись по предлагаемым параметрам генерации файла ответов и указать некоторые значения.
Первый блок параметров – «General Settings», здесь есть:
-
Product Key – этот параметр по умолчанию предусматривает введённый официальный ключ установки Windows. Он пригоден только для установки и никоим боком не касается легальной активации Windows, с ней нужно будет разбираться отдельно. Вместо предусмотренного по умолчанию ключа можно ввести ключ многократной активации корпоративной лицензии (MAK);
-
Accept Eula – это принятие лицензионных условий;
-
Skip Product Key – пропуск ввода ключа продукта;
-
Skip Auto Activation – пропуск этапа активации Windows;
-
Skip License Rearm – сброс состояния лицензирования.
Все эти параметры, друзья, оставляем по умолчанию. Изменим только эти:
-
Setup Language – язык процесса установки Windows;
-
Computer Name – имя компьютера;
-
Organization Name – имя организации, если это принадлежащий компании компьютер, можем ввести её название.

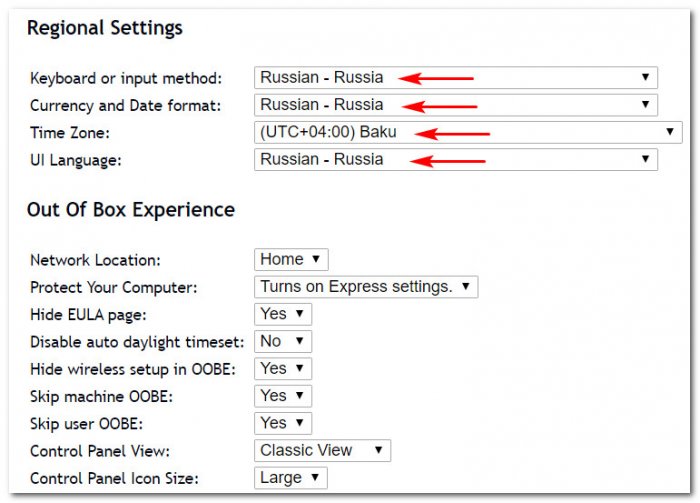
Второй блок — «Regional Settings», здесь всё указываем своё:
-
Keyboard or input method – раскладка клавиатуры;
-
Currency and Date format – формат валюты и даты;
-
Time Zone – часовой пояс;
-
UI Language – язык интерфейса Windows.
Третий блок – «Out Of Box Experiance», здесь можно всё оставить по умолчанию:
-
Network Location – сетевое расположение, по умолчанию выбрана настройка домашней сети;
-
Protect Your Computer – окошко справки по защите Windows, отключено по умолчанию;
-
Hide EULA page – скрытие условий лицензионного соглашения на страничке приветствия Windows;
-
Disable auto daylight timeset – отключение автоматического перехода на летнее время;
-
Hide wireless setup in OOBE – скрытие настройки беспроводной сети;
-
Skip Machine OOBE – скрытие отдельных этапов экрана приветствия;
-
Skip user OOBE – пропуск окна центра приветствия;
-
Control Panel View – настройка вида панели управления;
-
Control Panel Icon Size – настройка иконок панели управления.
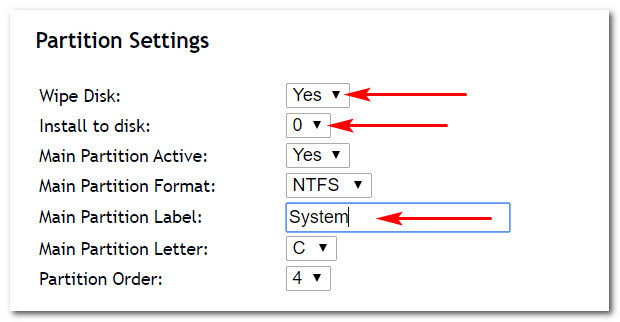
Четвёртый блок – «Partition Settings» — это настройка места установки Windows, т.е. настройка жёсткого диска, здесь:
-
Wipe Disk – это стирание диска, ставим «Yes», поскольку без этого значения процесс установки будет выдавать ошибку;
-
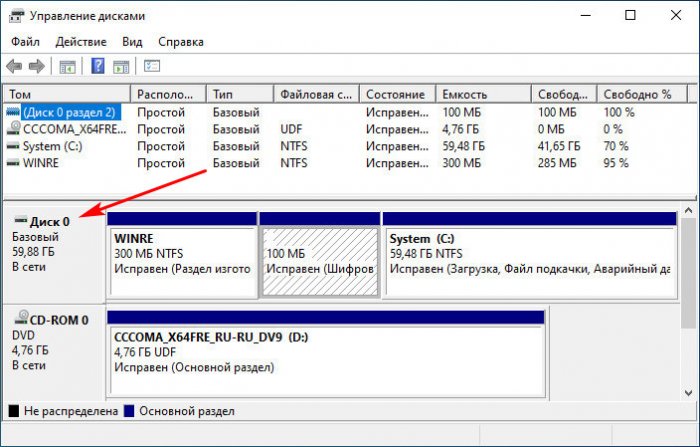
Install to disk – указываем номер жёсткого диска, поскольку мы дело имеем с операцией стирания диска, нужно внимательно указывать номер. Если вы не знаете, под каким номером числится ваш SSD, где стоит Windows, откройте управление дисками и посмотрите номер диска. В моём случае, это, например, диск 0.

-
Main Partition Active – это отметка раздела С активным, она может быть нужна для стиля разметки MBR, для UEFI этот параметр не имеет значения;
-
Main Partition Format – это файловая система раздела С, оставляем значение по умолчанию NTFS;
-
Main Partition Label – это метка раздела С, я укажу «System»;
-
Main Partition Letter – это буква раздела С;
-
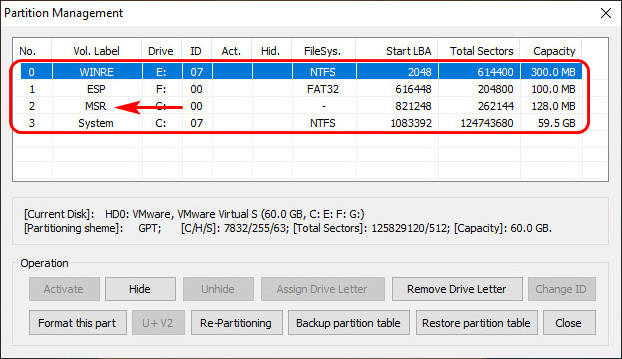
Partition Order – это порядковый номер раздела С, должен быть 4. Друзья, при GPT-разметке диска под EFI-систему Windows в управлении дисками Windows мы видим только 3 системных раздела, но их на самом деле 4, что можно увидеть в сторонних программах. Управление дисками скрывает из представления технический MSR-раздел, но по факту раздел С имеет порядковый номер 4.
В общем, параметры настроек диска под EFI-систему Windows 10 у вас должны быть такие.
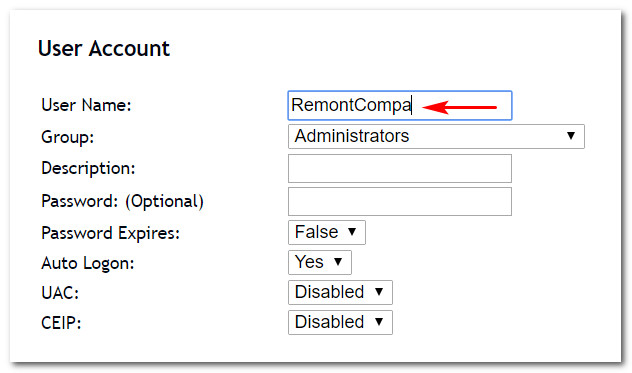
Наконец, пятый блок – «User Account» — это параметры профиля, т.е. учётной записи Windows. Здесь есть:
-
User Name – имя пользователя, нужно вводить на латинице;
-
Group – тип учётной записи, не меняем указанный по умолчанию тип администратора;
-
Description – описание (не обязательно);
-
Password – пароль (не обязательно);
-
Password Expires – срок истечения действия пароля (отключён по умолчанию);
-
Auto Logon — автоматический вход в систему;
-
UAC – контроль учётных записей пользователей, по умолчанию отключён;
-
CEIP – программа по улучшения качества Microsoft, по умолчанию отключена.
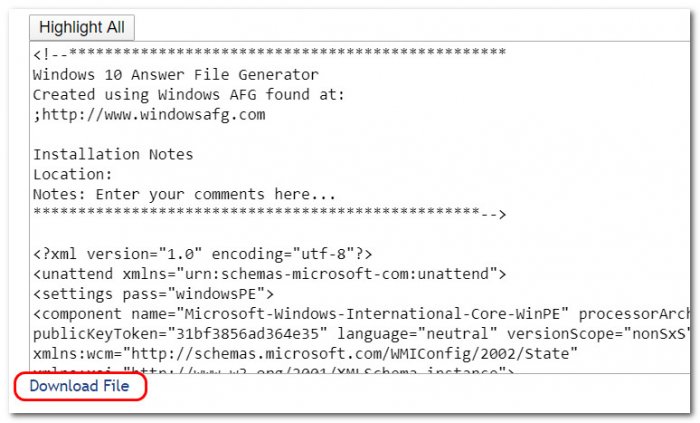
Как видим, друзья, настроек вроде бы и много, но по факту всё здесь настроено оптимально для автоматизации установки Windows, нам нужно только персонализировать некоторые из настроек. По итогу всего этого действа скачиваем файл ответов.
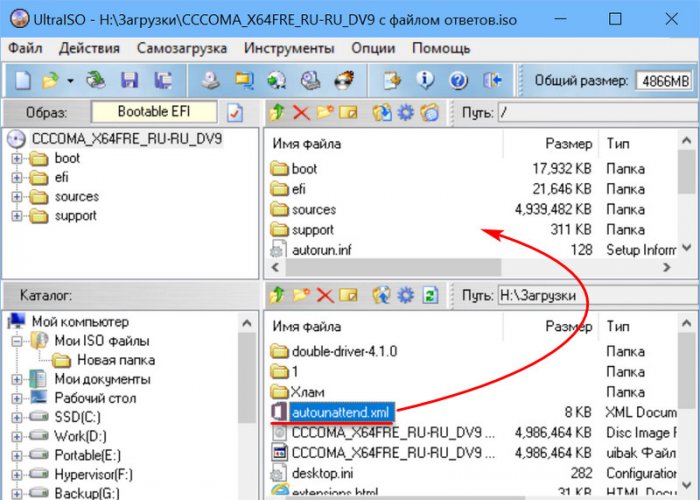
Интеграция файла ответов в дистрибутив Windows
Далее скачанный файл ответов – файл autounattend.xml — закидываем в корень установочной флешки. Если вы хотите протестировать процесс установки Windows с созданным файлом ответов на виртуальной машине, интегрируйте этот файл в установочный ISO Windows. Это можно сделать с помощью программы, например, UltraISO. В её окне жмём Ctrl+O и указываем путь к ISO-файлу, затем на нижней панели открываем путь к файлу ответов autounattend.xml и перебрасываем его в корень образа.
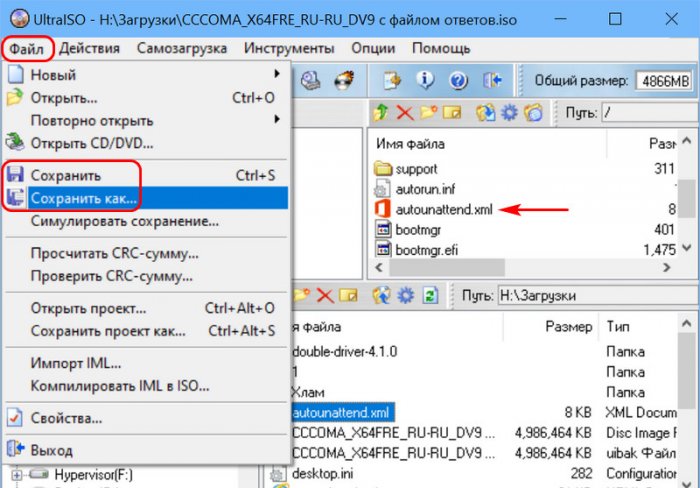
Сохраняем обновлённый образ.
Windows Answer File Generator
The Answer File Generator is a command line application and library for
generating answer files for unattended Windows installations. These files are commonly called
unattend.xml or autounattend.xml (depending on the installation method used).
This tool can be used to generate answer files as part of an automated workflow for installing
Windows, or just as a convenient way to generate answer files for personal use, without the need to
install the Windows System Image Manager, or manually edit XML files.
Answer files can customize many aspects of the Windows installation, only some of which are
available through this tool. Customizations supported by the Answer File Generator include:
- The installation method, partition layout, and target disk and partition.
- Enabling optional features during installation.
- Creation of local user accounts.
- Joining a domain, and adding domain accounts to a local security group.
- Configuring automatic log-on.
- The product key, computer name, language/culture, and time zone.
- Display resolution.
- Disabling Windows Defender.
- Enabling remote desktop access.
- Running PowerShell scripts and other commands on first log-on.
Answer files generated by this application will always skip the entire OOBE experience, unless no
local account was created and no domain was joined.
Below, the core functionality is explained with several examples. You can also check the
full list of command line arguments, or run ./GenerateAnswerFile -Help. It’s
also possible to specify customization options using a JSON file.
See what’s new in Answer File Generator.
If you need additional customization, you will have to edit the generated answer file. If you’d like
any other options to be available through the tool, you can
file an issue or
submit a pull request.
Installation method
The Answer File Generator supports several methods of installing Windows, which are specified using
the -Install argument. The following values are supported.
| Method | Description |
|---|---|
| PreInstalled | This is the default method, which is used to customize an already installed Windows image, such as one created using sysprep, or an image that was manually expanded using DISM tools such as Expand-WindowsImage. Some features are unavailable using this method, including installation of optional features. |
| CleanEfi | Performs a clean installation for systems using UEFI on the disk indicated by the -InstallToDisk argument. This disk will be repartitioned according to the -Partition argument, or using a default layout of a 100MB EFI partition, a 128MB MSR partition, and the remainder of the disk used for the OS installation. |
| CleanBios | Performs a clean installation for systems using legacy BIOS on the disk indicated by the -InstallToDisk argument. This disk will be repartitioned according to the -Partition argument, or using a default of a 100MB system partition, and the remainder of the disk used for the OS installation. |
| ExistingPartition | Installs Windows to an existing partition, specified using the -InstallToDisk and -InstallToPartition arguments. This partition will be formatted before installation, but other partitions are not touched. The system must already have a suitable system or EFI partition. |
| Manual | Allows the user to specify the target disk/partition during setup. When using this method, installation is not fully unattended and will require user intervention during the first stage. |
The -InstallToDisk argument takes the zero-based disk index, in the order that the Windows
installation (when executed manually) would list them. The -InstallToPartition argument is
one-based instead (don’t look at me; that’s how the IDs work in the answer file).
Selecting the edition to install
Usually, Windows installation media contains multiple editions, such as Professional or Home, and
you must select which edition to install. The most common way to do this is using the product key,
which can be set using the -ProductKey argument. Setting the product key will select the correct
edition to install, and activate Windows using that key. Setting a product key in the answer file is
required for most installations of Windows unless the installation method is PreInstalled.
Versions of Windows that use alternative activation methods, such as volume licensing, do not
require a product key in the answer file. In this case, if the installation media holds multiple
editions, you can select the desired one using the -ImageIndex argument. You can use the
Get-WindowsImage PowerShell
command to list the images in an install.wim or install.esd file.
Passwords in answer files
Passwords are needed for several actions taken by the answer file. When creating local accounts,
their initial password must be set. To join a domain, the password of a domain account with
the appropriate permissions must be specified (unless a provisioned computer account is used). For
automatic log-on, you must specify the password of the account that will be logged on.
Warning
Passwords in answer files are not securely stored!
They are at best base64-encoded (which is easily reversible), and at worst just stored in plain
text. Do not store answer files with sensitive passwords in unsecure locations, and delete such
files when you are done with them.
The answer file generator also does not treat these passwords securely (it can’t, to be able to
write them out to the answer file in this fashion), so copies of the passwords may remain in system
memory after the application is terminated.
Time zone
The Answer File Generator defaults to Pacific Standard Time. To change this, use the -TimeZone
argument. Run tzutil /l for a list of accepted time zone names.
Examples
To make them easier to read, the examples below are split over multiple lines, using the PowerShell
syntax to continue a command on the next line.
Clean installation using UEFI
./GenerateAnswerFile autounattend.xml `
    -Install CleanEfi `
    -ProductKey ABCDE-12345-ABCDE-12345-ABCDE
The resulting answer file will install a 64 bit version of Windows on the first disk of a UEFI
system, using the default UEFI partition layout, and activates it using the specified product key.
Installing a 32 bit OS
./GenerateAnswerFile autounattend.xml `
    -Install CleanBios `
    -ProcessorArchitecture x86 `
    -ProductKey ABCDE-12345-ABCDE-12345-ABCDE
By default, the generated answer files are for Windows editions running on 64 bit Intel or AMD
processors. Use the -ProcessorArchitecture argument to specify a different CPU architecture,
such as «x86» for 32 bit processors, or «arm64» for ARM based systems.
Creating a user during installation
./GenerateAnswerFile autounattend.xml `
    -Install CleanEfi `
    -LocalAccount "John,Password" "Users:Steve,OtherPassword" `
    -ProductKey ABCDE-12345-ABCDE-12345-ABCDE
This example creates a user named «John» with the password «Password» (don’t use that as your
password, obviously), and a user named «Steve» with the password «OtherPassword». The
-LocalAccount argument takes one or more values, allowing the creation of any number of
accounts.
By default, accounts created using this method will be added to the local Administrators group.
You can customize which group(s) to add them to by prefixing the account name with the group,
separated by a colon. You can use multiple groups by separating them with a semicolon.
In the above example, John is an administrator, but Steve is added to the Users group, so they will
be a restricted user.
Custom partition layout
If you use the CleanEfi or CleanBios installation method, you can choose to customize the
partition layout for the disk specified by -InstallToDisk, by using the -Partition
argument. This argument accepts multiple values, each creating a partition on that disk in the order
specified.
If the -Partition argument is not specified, the default partition layout for the install
method is used, as listed in the table above.
The -Partition argument uses the format label:size, where label is the volume label, and
size is the size of the partition. The size can use multiple-byte units, such as GB or MB1, and
will be rounded down to a whole number of megabytes. If the size is *, it indicates the partition
will fill the remainder of the disk.
./GenerateAnswerFile autounattend.xml `
    -Install CleanEFI `
    -ProductKey ABCDE-12345-ABCDE-12345-ABCDE `
    -Partition System:100MB MSR:128MB Windows:256GB Data:*
This example creates four partitions: a 100 MB EFI partition, a 128 MB Microsoft Reserved partition,
a 256 GB partition that the OS will be installed to, and an additional partition that fills the
remainder of the disk.
Several values for the volume label are used to create special partition types.
| Label | Meaning |
|---|---|
| System | For CleanEfi, creates the EFI system partition (ESP). For CleanBios, creates the system partition holding the Windows boot manager. |
| MSR | Creates a partition with the Microsoft Reserved partition type. For use with CleanEfi only. |
| WinRE or Recovery | Marks the partition as a utility partition. |
These special partition types will not have a drive letter. All other volume labels create regular
data partitions with that label. These will be assigned drive letters in the order they were
specified, starting with C:.
You can use the format label:size[fs], where fs is a file system like FAT32 or NTFS, to specify
a file system to format the volume with. If no file system is specified, it defaults to NTFS, except
for EFI partitions, which must be FAT32. MSR partitions are not formatted, so this attribute is
ignored for that partition type.
You can use the -InstallToPartition argument to specify which partition should hold the OS. If you
don’t supply this argument, Windows will be installed on the first regular data partition.
If you use CleanBios and specify more than four partitions, the Answer File Generator will create
an answer file that creates an extended partition, and creates the remaining partitions as logical
volumes in that partition.
Optional features
Answer files can be used to enable optional features during installation. To do this, use the
-Feature argument. This argument can take multiple values to enable multiple features.
./GenerateAnswerFile autounattend.xml `
    -Install CleanEfi `
    -Feature Microsoft-Windows-Subsystem-Linux VirtualMachinePlatform `
    -WindowsVersion 10.0.22621.1
This example enables the Windows Subsystem for Linux feature, and the Virtual Machine Platform
feature.
When using optional features, the answer file must contain the exact version number of the Windows
version being installed, such as «10.0.22621.1» (this is the version for Windows 11 22h2). You must
specify this version using the -WindowsVersion argument. To find out the exact version number, the
easiest way is to look at the file properties of the setup.exe file on your Windows installation
media. The Windows version is not needed if you don’t enable any optional features.
To determine the names of available optional features, you can use the
Get-WindowsOptionalFeature
PowerShell command.
You cannot specify optional features when using the PreInstalled method, as this is not supported
by unattended installations. Optional features for a pre-installed image must be enabled prior to
using sysprep, or by using DISM tools.
First log-on commands and scripts
./GenerateAnswerFile autounattend.xml `
    -Install CleanEfi `
    -FirstLogonCommand "reg add HKCU\Software\MyCompany /v ImportantRegistryKey /t REG_DWORD /d 1 /f" `
    -FirstLogonScript "\\server\share\script.ps1 -Argument" `
    -LocalAccount "John,Password" `
    -AutoLogonUser John `
    -AutoLogonPassword Password `
    -ProductKey ABCDE-12345-ABCDE-12345-ABCDE
The -FirstLogonCommand argument can be used to execute a command when a user first logs on to
the system after installation (either manually, or automatically as in the above example). For
convenience, there is also a -FirstLogonScript argument which executes the specified Windows
PowerShell script, including any arguments. PowerShell scripts will be executed using the command
PowerShell.exe -ExecutionPolicy Bypass.
Either argument accepts multiple values to run multiple commands or scripts. Both are executed in
the order they are supplied, but all commands will be executed before any scripts.
If you execute any scripts, they must be stored in a location that is accessible to the system after
installation, such as a network share like the example above.
Joining a domain and automatic log-on
./GenerateAnswerFile unattend.xml `
    -ComputerName mypc `
    -JoinDomain mydomain `
    -JoinDomainUser domainuser `
    -JoinDomainPassword Password `
    -DomainAccount domainuser `
    -AutoLogonUser mydomain\domainuser `
    -AutoLogonPassword Password
The answer file created by this command sets the computer name to «mypc» and joins it to the domain
«mydomain», using the supplied credentials. It also adds the account «domainuser» from the
«mydomain» domain to the local Administrators group, and logs in using that account automatically on
first boot.
This sample does not use the -Install argument, so it creates an answer file suitable for
pre-installed Windows images, such as those created using sysprep or DISM tools. The
-JoinDomain argument can be used with any install method, however.
The -AutoLogonUser argument can be used for both domain or local accounts; to use a local
account, specify the user name only, without a domain. To log in automatically more than once, use
the -AutoLogonCount argument2.
Joining a domain using provisioning
./GenerateAnswerFile unattend.xml `
    -Install CleanEfi
    -JoinDomainProvisioningFile AccountData.txt `
    -JoinDomainOffline
Instead of embedding a domain account password into the answer file, you can provision a domain
account using the djoin.exe utility, and use that to join the domain by passing the name of the
file created by djoin.exe to the -JoinDomainProvisioningFile argument.
When using provisioning, you can also join the domain during the offlineServicing pass by using the
-JoinDomainOffline argument. This is not supported if you join a domain by using credentials.
To provision a domain account for the computer, you can use the following command:
djoin.exe /provision /domain domainname /machine machinename /savefile filename
Specifying a computer name
When you provide a computer name using the -ComputerName argument, the Answer File Generator
does not check whether that computer name is valid. Specifying an invalid computer name will cause
Windows setup to fail when applying the answer file. Make sure you follow the
rules for computer names
when choosing a name.
If you do not specify a computer name, Windows will automatically choose one during installation.
In addition, you can also use the # character to generate a name containing a random number.
Every occurrence of # in the provided computer name will be replaced with a digit between 0 and 9
when generating the answer file. For example PC-### would be replaced with PC-123 (or some
other random number).
Using JSON to provide options
Because the large number of command line arguments may get unwieldy, the Answer File Generator
provides a custom JSON file format that can be used as an alternative way to provide the options
for generating an answer file.
For more information, see the JSON file documentation.
Using an answer file
Please refer to the official Microsoft documentation
to see how to use an answer file during Windows setup.
Ookii.AnswerFile library
The core functionality for generating answer files is implemented in the
Ookii.AnswerFile library, which you can use in your own applications targeting
.Net 8.0 or later.
Building and testing
To build Answer File Generator, make sure you have the following installed:
- Microsoft .Net 9.0 SDK or later
To build the application, library, and tests, simply use the dotnet build command in the src
directory. You can run the unit tests using dotnet test.
The class library documentation is generated using Sandcastle Help File Builder.
Disclaimer
The Answer File Generator will generate files that, when used to install Windows, can erase a disk
or partition on your system without user intervention. I am not responsible for any loss of data or
any other adverse effects caused by the use of answer files generated by this tool.
-
All sizes use powers of two, so 1MB is 1,048,576 bytes. You can also use IEC units such as MiB
or GiB, with the same meaning. ↩ -
Windows has a known issue with the
LogonCountelement
which causes it to be inaccurate. The Answer File Generator adjusts the count and uses a first
log-on command if needed to ensure the-AutoLogonCountargument is accurate. ↩
Уровень сложностиСредний
Время на прочтение9 мин
Количество просмотров17K

Начиная с Windows 7 компания Microsoft разработала новую технологию массовой установки (развёртывания) своей операционной системы. В оригинальных образах дистрибутивов появились ключевые файлы boot.wim и install.wim, которые являются Предустановочной средой (англ. — Preinstallation Environment, PE) и Устанавливаемой системой, соответственно. И хотя, версии Windows: 7, 8, 8.1 являются устаревшими, а текущими являются версии Windows: 10 и 11, процесс развёртывания (автоматической установки) указанных операционных систем в целом не поменялся. Поэтому приведённые здесь мои наработки работоспособны для всех версий, за исключением некоторых не критичных параметров. А вот в Windows XP всё было по-другому.
Официальная документация и инструменты
На сайте Microsoft Learn — документации компании, есть раздел посвящённый загрузке и установке Windows для производителей компьютеров. Там присутствует подраздел Windows Setup Automation Overview (рус. — Обзор автоматической установки Виндовс). В этом и последующих разделах (есть перевод на русский язык, но может быть несовершенным) подробно описано использование файлов сценариев, этапы установки ОС, конфигурирование системы с помощью скриптов. Замечу, что когда сам осваивал эту технологию и лет 8 назад читал официальную документацию — информация подавалась более логично и полно, а сейчас как-то намешано и неясно, но другого официального источника не нашел нет.
Для создания (генерирования) подходящего сценария автоматической установки — файла autounattend.xml к предполагаемому для развёртывания Установочного образа — файла install.wim используется официальный бесплатный инструмент — Windows Assessment and Deployment Kit (рус. — Средство оценки и развёртывания Виндовс). Скачать подходящую версию можно со страницы Download and install the Windows ADK, а после установить на свой компьютер. Править файл сценария можно и в обычном текстовом редакторе, если знаешь что делаешь, но после желательно проверить ошибки в синтаксисе и применимость параметров к развёртываемому образу с помощью конфигуратора.
Пример файла сценария автоматической установки
Мой вариант создан для автоматической установки 64-битной версии Windows 10 VL (корпоративное лицензирование без ввода ключа во время установки). Указаны языковые параметры, применены некоторые твики, выполнен «трюк» с пользователями, и скрыты различные экраны подтверждения. Работа с диском оставлена на «ручную» настройку.
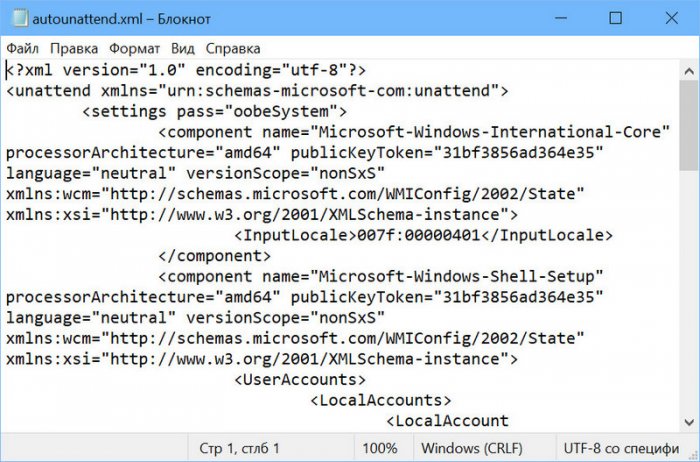
Файл autounattend.xml целиком
<?xml version="1.0" encoding="utf-8"?>
<unattend xmlns="urn:schemas-microsoft-com:unattend">
    <settings pass="windowsPE">
        <component name="Microsoft-Windows-International-Core-WinPE" processorArchitecture="amd64" publicKeyToken="31bf3856ad364e35" language="neutral" versionScope="nonSxS" xmlns:wcm="http://schemas.microsoft.com/WMIConfig/2002/State" xmlns:xsi="http://www.w3.org/2001/XMLSchema-instance">
            <InputLocale>en-US</InputLocale>
            <SystemLocale>ru-RU</SystemLocale>
            <UILanguage>ru-RU</UILanguage>
            <UserLocale>ru-RU</UserLocale>
        </component>
        <component name="Microsoft-Windows-Setup" processorArchitecture="amd64" publicKeyToken="31bf3856ad364e35" language="neutral" versionScope="nonSxS" xmlns:wcm="http://schemas.microsoft.com/WMIConfig/2002/State" xmlns:xsi="http://www.w3.org/2001/XMLSchema-instance">
            <ImageInstall>
                <OSImage>
                    <InstallFrom>
                        <MetaData wcm:action="add">
                            <Key>/image/index</Key>
                            <Value>1</Value>
                        </MetaData>
                    </InstallFrom>
                </OSImage>
            </ImageInstall>
            <UserData>
                <AcceptEula>true</AcceptEula>
            </UserData>
        </component>
    </settings>
    <settings pass="specialize">
        <component name="Microsoft-Windows-ErrorReportingCore" processorArchitecture="amd64" publicKeyToken="31bf3856ad364e35" language="neutral" versionScope="nonSxS" xmlns:wcm="http://schemas.microsoft.com/WMIConfig/2002/State" xmlns:xsi="http://www.w3.org/2001/XMLSchema-instance">
            <DisableWER>1</DisableWER>
        </component>
        <component name="Microsoft-Windows-RemoteAssistance-Exe" processorArchitecture="amd64" publicKeyToken="31bf3856ad364e35" language="neutral" versionScope="nonSxS" xmlns:wcm="http://schemas.microsoft.com/WMIConfig/2002/State" xmlns:xsi="http://www.w3.org/2001/XMLSchema-instance">
            <fAllowFullControl>false</fAllowFullControl>
            <fAllowToGetHelp>false</fAllowToGetHelp>
            <fEnableChatControl>false</fEnableChatControl>
        </component>
        <component name="Microsoft-Windows-Shell-Setup" processorArchitecture="amd64" publicKeyToken="31bf3856ad364e35" language="neutral" versionScope="nonSxS" xmlns:wcm="http://schemas.microsoft.com/WMIConfig/2002/State" xmlns:xsi="http://www.w3.org/2001/XMLSchema-instance">
            <ComputerName>*</ComputerName>
        </component>
        <component name="Microsoft-Windows-SQMApi" processorArchitecture="amd64" publicKeyToken="31bf3856ad364e35" language="neutral" versionScope="nonSxS" xmlns:wcm="http://schemas.microsoft.com/WMIConfig/2002/State" xmlns:xsi="http://www.w3.org/2001/XMLSchema-instance">
            <CEIPEnabled>0</CEIPEnabled>
        </component>
        <component name="Microsoft-Windows-SystemRestore-Main" processorArchitecture="amd64" publicKeyToken="31bf3856ad364e35" language="neutral" versionScope="nonSxS" xmlns:wcm="http://schemas.microsoft.com/WMIConfig/2002/State" xmlns:xsi="http://www.w3.org/2001/XMLSchema-instance">
            <DisableSR>1</DisableSR>
        </component>
    </settings>
    <settings pass="oobeSystem">
        <component name="Microsoft-Windows-International-Core" processorArchitecture="amd64" publicKeyToken="31bf3856ad364e35" language="neutral" versionScope="nonSxS" xmlns:wcm="http://schemas.microsoft.com/WMIConfig/2002/State" xmlns:xsi="http://www.w3.org/2001/XMLSchema-instance">
            <InputLocale>en-US</InputLocale>
            <SystemLocale>ru-RU</SystemLocale>
            <UILanguage>ru-RU</UILanguage>
            <UserLocale>ru-RU</UserLocale>
        </component>
        <component name="Microsoft-Windows-Shell-Setup" processorArchitecture="amd64" publicKeyToken="31bf3856ad364e35" language="neutral" versionScope="nonSxS" xmlns:wcm="http://schemas.microsoft.com/WMIConfig/2002/State" xmlns:xsi="http://www.w3.org/2001/XMLSchema-instance">
            <AutoLogon>
                <Enabled>true</Enabled>
                <LogonCount>1</LogonCount>
                <Password>
                    <PlainText>true</PlainText>
                    <Value></Value>
                </Password>
                <Username>Administrator</Username>
            </AutoLogon>
            <FirstLogonCommands>
                <SynchronousCommand wcm:action="add">
                    <CommandLine>net user Временный /delete</CommandLine>
                    <Order>1</Order>
                </SynchronousCommand>
            </FirstLogonCommands>
            <OOBE>
                <HideOEMRegistrationScreen>true</HideOEMRegistrationScreen>
                <HideOnlineAccountScreens>true</HideOnlineAccountScreens>
                <HideWirelessSetupInOOBE>true</HideWirelessSetupInOOBE>
                <ProtectYourPC>3</ProtectYourPC>
            </OOBE>
            <TimeZone>Russian Standard Time</TimeZone>
            <UserAccounts>
                <AdministratorPassword>
                    <PlainText>true</PlainText>
                    <Value></Value>
                </AdministratorPassword>
                <LocalAccounts>
                    <LocalAccount wcm:action="add">
                        <Group>Users</Group>
                        <Name>Временный</Name>
                        <Password>
                            <PlainText>true</PlainText>
                            <Value></Value>
                        </Password>
                    </LocalAccount>
                </LocalAccounts>
            </UserAccounts>
        </component>
        <component name="Microsoft-Windows-WinRE-RecoveryAgent" processorArchitecture="amd64" publicKeyToken="31bf3856ad364e35" language="neutral" versionScope="nonSxS" xmlns:wcm="http://schemas.microsoft.com/WMIConfig/2002/State" xmlns:xsi="http://www.w3.org/2001/XMLSchema-instance">
            <UninstallWindowsRE>true</UninstallWindowsRE>
        </component>
    </settings>
</unattend>
Далее пройдём по этапам установки и параметрам указанным в соответствующих компонентах образа в файле сценария. Мой сценарий установки задаёт конфигурацию для следующих этапов: «windowsPE», «specialize», «oobeSystem».
Настройка установочной среды — этап «windowsPE»
Здесь с помощью группы параметров задаются языковые настройки. В настройках среды установки и устанавливаемой системы используется интерфейс на русском языке, русский формат даты и времени, но английская раскладка клавиатуры.
<InputLocale>en-US</InputLocale>
<SystemLocale>ru-RU</SystemLocale>
<UILanguage>ru-RU</UILanguage>
<UserLocale>ru-RU</UserLocale>
Теоретически, один файл установочного образа системы — install.wim может содержать несколько индексов, т.е. разных редакций устанавливаемой ОС. Я подготавливаю свои образы так, чтобы они содержали только одну редакцию, а значит один индекс.
<ImageInstall>
    <OSImage>
        <InstallFrom>
            <MetaData wcm:action="add">
                <Key>/image/index</Key>
                <Value>1</Value>
            </MetaData>
        </InstallFrom>
    </OSImage>
</ImageInstall>
Конечно, мы не хотим отвлекаться, чтобы ещё раз прочитать Лицензионное соглашение и принять его.
<UserData>
    <AcceptEula>true</AcceptEula>
</UserData>
Конфигурирование системы — этап «specialize»
Каждый параметр на этом этапе задаёт определённые значения для компонентов. Кто читал мои предыдущие статьи — знает, что мне нравится оптимизировать работу ОС, отключая всё лишнее, ненужное. Так и здесь, указанные параметры в основном что-либо отключают. Данные действия также можно выполнить ручной настройкой на установленной системе.
Отключение отправки отчёта об ошибках в корпорацию Microsoft.
<DisableWER>1</DisableWER>Отключение функций удалённого помощника средствами Windows.
<fAllowFullControl>false</fAllowFullControl>
<fAllowToGetHelp>false</fAllowToGetHelp>
<fEnableChatControl>false</fEnableChatControl>
Важный параметр — имя компьютера. Если этот параметр пропустить, то установка прервётся и спросит. Можно указать любое, но если с одного файла сценария будут произведены установки на множество компьютеров в локальной сети, то возникнут конфликты одинаковых имён. Указывается символ «*«, чтобы имена генерировались случайно.
<ComputerName>*</ComputerName>Отказ от участия в программе улучшения качества программных продуктов методом сбора телеметрии. Есть предположение, что данный параметр игнорируется.
<CEIPEnabled>0</CEIPEnabled>Отключение системы восстановления Windows считаю рациональным решением, так как при серьёзных повреждениях ОС — мне её проще переустановить предварительно сохранив пользовательские файлы, чем выяснять причины невозможности загрузки.
<DisableSR>1</DisableSR>Подготовка к первому запуску — этап «oobeSystem»
Повторение настройки языковых параметров, но уже для установленной системы.
<InputLocale>en-US</InputLocale>
<SystemLocale>ru-RU</SystemLocale>
<UILanguage>ru-RU</UILanguage>
<UserLocale>ru-RU</UserLocale>
В случае ручной установки, на завершающем этапе, программа предложит установщику создать пользователя, указав его имя и другие данные. Отказаться от создания пользователя — нельзя! Созданный пользователь будет принадлежать к группе «Администраторы» и войдёт в систему по завершении установки. Встроенный пользователь Администратор также присутствует но будет отключён по-умолчанию. Это излишество, а также потенциальная уязвимость.
Я придумал следующий обходной трюк: создаём временного пользователя (в примере — имя «Временный») в группе Пользователи. Также, включаем встроенного Администратора с пустым паролем и разрешаем ему автоматическую авторизацию в системе. Задаём для Администратора асинхронную команду, выполняемую при первом входе — удалить пользователя «Временный». После перезагрузки Администратор выполняет команду и остаётся единственным (и всемогущим) активным пользователем в системе.
<AutoLogon>
    <Enabled>true</Enabled>
    <LogonCount>1</LogonCount>
    <Password>
        <PlainText>true</PlainText>
        <Value></Value>
    </Password>
    <Username>Administrator</Username>
</AutoLogon>
<FirstLogonCommands>
    <SynchronousCommand wcm:action="add">
        <CommandLine>net user Временный /delete</CommandLine>
        <Order>1</Order>
    </SynchronousCommand>
</FirstLogonCommands>
<UserAccounts>
    <AdministratorPassword>
        <PlainText>true</PlainText>
        <Value></Value>
    </AdministratorPassword>
    <LocalAccounts>
        <LocalAccount wcm:action="add">
            <Group>Users</Group>
            <Name>Временный</Name>
            <Password>
                <PlainText>true</PlainText>
                <Value></Value>
            </Password>
        </LocalAccount>
    </LocalAccounts>
</UserAccounts>
Скрываем финальные диалоги входа в аккаунт Microsoft, подключения к беспроводным сетям и установливаем уровень безопасности.
<HideOEMRegistrationScreen>true</HideOEMRegistrationScreen>
<HideOnlineAccountScreens>true</HideOnlineAccountScreens>
<HideWirelessSetupInOOBE>true</HideWirelessSetupInOOBE>
<ProtectYourPC>3</ProtectYourPC>
Обязательно указать часовой пояс, иначе процесс автоматической установки также прервётся запросом. Словесное наименование своего часового пояса нужно узнать из справочника. В моём примере — время по-Москве.
<TimeZone>Russian Standard Time</TimeZone>Отдельным и последним параметром идёт команда удалить агент восстановления Windows, как ненужный.
<UninstallWindowsRE>true</UninstallWindowsRE>Послесловие
Рассмотренный файл сценария autounattend.xml у меня сохранён в кодировке UTF-8, так что если копировать из статьи нужно поступить также. Для личных нужд имею модифицированные файлы autounattend-mbr.xml и autounattend-gpt.xml, в которых указаны параметры для автоматической разбивки диска в соответствующих стандартах. В общем, вариантов много и каждый может детально изучив документацию создать свой сценарий автоматической установки Windows.
Файл ответов autounattend.xml интегрированный в установщик Windows 11/10 позволяет автоматизировать шаги при установке системы: от настройки региональных предпочтений и учетной записи пользователя до создания разделов на диске. Его можно создать вручную, используя документацию, но это может оказаться затратным по времени.
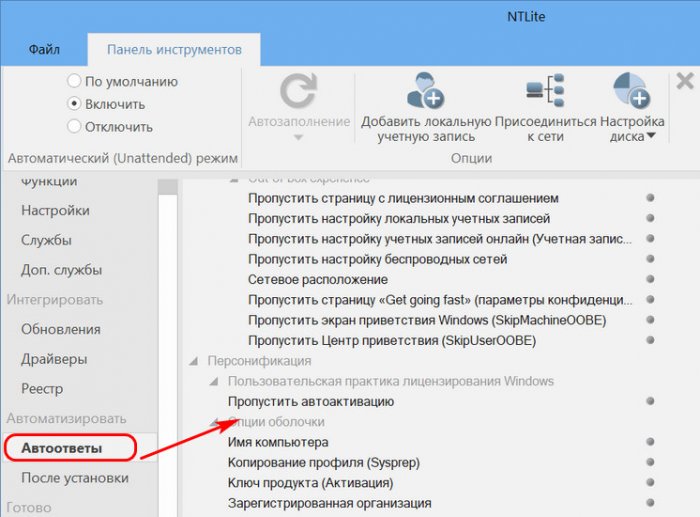
Бесплатная утилита DISMTools содержит простой визуальный редактор файла ответов для Windows, который позволяет создать его даже пользователю, который ранее был не знаком с unattended.xml. Пример использования — в этой статье.
Использование DISMTools для настройки файла unattended.xml
Программа DISMTools, её установка и функции описывались в отдельной инструкции, самый простой способ установки — запустить Windows PowerShell или Терминал Windows от имени администратора, например, через меню по правому клику на кнопке «Пуск» и ввести команду:
winget install CodingWondersSoftware.DISMTools.Preview
После чего скачивание и установка будут выполнены автоматически.
Далее переходим к примеру создания файла ответов unattended.xml в DISMTools:
- Запустите DISMTools (будет расположен в списке всех программ в меню «Пуск»), в меню Tools откройте пункт «Unattended answer file creator». При первом запуске вам могут предложить доустановить компоненты .NET, согласитесь.
- Откроется мастер создания файлов ответов в экспресс-режиме, наиболее подходящем для начинающих. Нажмите «Next», после чего по порядку установите нужные настройки.

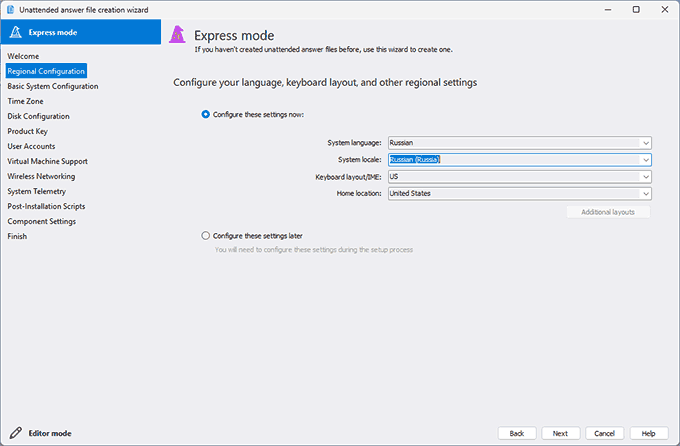
- Regional Configuration — региональные настройки: язык системы, региональные стандарты системы, язык клавиатуры, регион использования.

- Basic System Configuration — базовые настройки системы: архитектура процессора, обход системных требования и требования к наличию доступа в Интернет для Windows 11, настройка имени компьютера.

- Time Zone — настройки часового пояса (оставить автоматически определяемые или переопределить вручную).
- Disk Configuration — позволяет переопределить параметры диска и разделов системы. По умолчанию предполагается, что это будет выполнено на этапе установки, но если снять отметку «I want to configure these settings during installation», можно изменить таблицу разделов на диске (GPT или MBR), выбрать расположение и размер раздела для среды восстановления. Вторая возможность — прописать все необходимые команды в скрипт для DiskPart таким образом, чтобы разделы были созданы именно настроенным вами образом.

- Product Key — ключ продукта: ввод собственного Retail или OEM-ключа, либо использование общего (Generic) ключа продукта для определённой версии Windows 11/10. В последнем случае факт активации будет зависеть от наличия цифровой лицензии Майкрософт, привязанной к оборудованию.
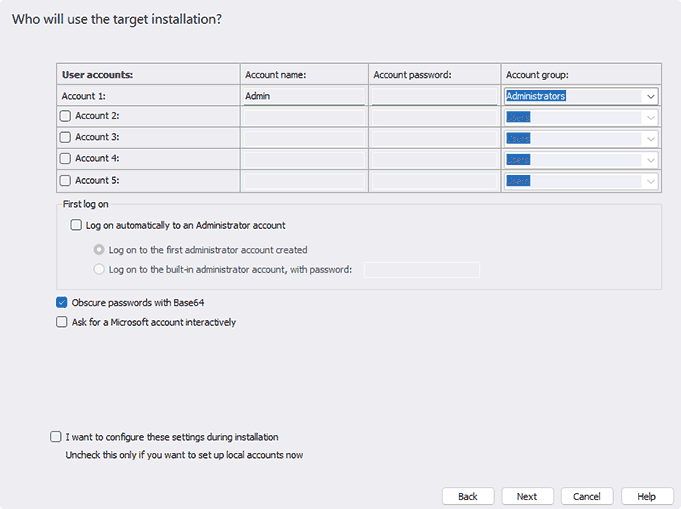
- User Accounts — настройка локальных учётных записей, создаваемых автоматически при установке и их параметров. При необходимости можно включить интерактивный запрос на создание учётной записи Майкрософт или оставить настройки без изменений, чтобы запрос о создании учётной записи появился при установке. Если вы изменили параметры учетных записей, то после нажатия «Next» вам также будет предложено ограничить время действия паролей, если это требуется.

- Virtual Machine Support — включение поддержки виртуальной машины (в случае если подготавливаемый образ планируется к установке в виртуальную машину).
- Wireless Networking — настройки параметров сети Wi-Fi, если требуется автоматическое подключение к определённой сети.
- System Telemetry — включение или отключение телеметрии Windows.
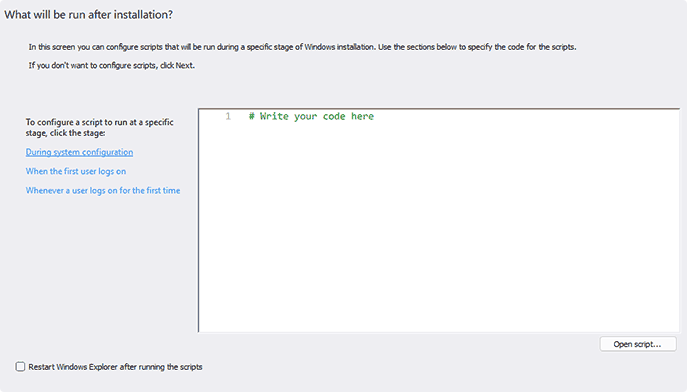
- Post-Installation Scripts — настройка сценариев для автоматического выполнения в разные моменты времени: при настройке системы, при первом входе первого пользователя, при каждом входе нового пользователя впервые.

- Component Settings — настройки компонентов Начинающим пользователям рекомендую не изменять настройки.
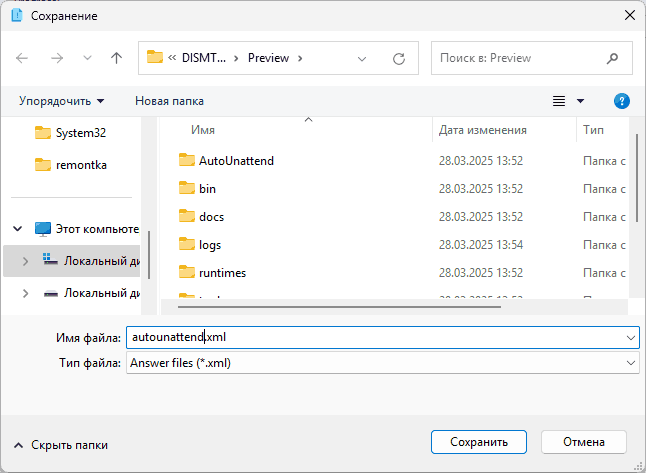
- На завершающем этапе вам будет предложено сохранить файл. Сохраните его с именем autounattend.xml


Готово, теперь, когда файл создан, вам останется скопировать его в корень загрузочной флешки (или, если требуется, в сам ISO образ) с дистрибутивом Windows 11 или 10, чтобы при чистой установке с этого накопителя были применены заданные вами в файле ответов настройки.
Важно: простое помещение в корневую папку установочного накопителя сработает только для тех накопителей, где присутствует единственный распакованный образ Windows 11/10, например, для загрузочных флешек, созданных с помощью Rufus или Media Creation Tool. В случае с флешками, содержащими сами файлы ISO, шаги могут быть другими, например, для Ventoy они описаны на соответствующей официальной странице.