
Что такое SSL-сертификат и как его сгенерировать и использовать для локальной разработки, в том числе — для тестирования на мобильных устройствах, разбирает старший веб-разработчик Noveo Антон.
Немного теории
SSL-сертификат — это цифровой сертификат, позволяющий убедиться в том, что сервер, передавший данные клиенту, не подменен и данные передал именно он.
Сертификат состоит из закрытого ключа, который держится в секрете и с помощью которого данные шифруются сервером, и самого сертификата с открытым ключом, с помощью которого данные расшифровываются клиентом. Не имея закрытого ключа, невозможно зашифровать данные таким образом, чтобы клиент расшифровал их тем же открытым ключом. Главная информация в сертификате — это то, кому он выдан, то есть доменное имя.
Также в сертификат может кодироваться информация об издателе (сертификате), которым был подписан сертификат сервера. Это информация имеет контрольную подпись, которая может быть сгенерирована только обладателем закрытого ключа сертификата издателя. Таким образом, только издатель может подписать и сгенерировать валидный сертификат.
Клиент считает соединение защищенным, если, проверяя цепочку сертификатов, доходит до корневых доверенных центров сертификации, встроенных в систему или браузер, которые, в свою очередь, являются самоподписанными.
Для чего это нужно?
Приложения, требующие наличие валидного сертификата при локальной разработке:
- PWA-приложения,
- приложения, использующие WebRTC.
Есть два способа выполнить эту задачу:
- Сгенерировать самоподписанный сертификат и добавить его в список доверенных корневых центров сертификации; таким образом устройство будет считать его валидным. Как следует из названия, это сертификат, который подписан закрытым ключом его самого же.
- Сгенерировать корневой сертификат и добавить его в список доверенных корневых центров сертификации, далее сгенерировать сертификат сервера и подписать его ранее созданным корневым сертификатом.
Подготовка
Нам понадобится OpenSSL. Инсталляторы-бинарники для Windows.
Файл конфигурации openssl.cfg
			[ req_distinguished_name ]
countryName         = CO
stateOrProvinceName = ST
localityName        = ST
organizationName    = O

####################################################################
# Extensions for when we sign normal certs (specified as default)
[ usr_cert ]
basicConstraints = CA:false
subjectKeyIdentifier = hash
authorityKeyIdentifier = keyid,issuer
subjectAltName = email:move

####################################################################
# Same as above, but cert req already has SubjectAltName
[ usr_cert_has_san ]
basicConstraints = CA:false
subjectKeyIdentifier = hash
authorityKeyIdentifier = keyid,issuer

####################################################################
# Extensions to use when signing a CA
[ v3_ca ]
subjectKeyIdentifier = hash
authorityKeyIdentifier = keyid:always,issuer:always
basicConstraints = CA:true
subjectAltName=email:move

####################################################################
# Same as above, but CA req already has SubjectAltName
[ v3_ca_has_san ]
subjectKeyIdentifier = hash
authorityKeyIdentifier = keyid:always,issuer:always
basicConstraints = CA:true

[ req ]
prompt             = no
default_bits       = 4096
distinguished_name = req_distinguished_name
req_extensions = req_ext

[ req_ext ]
subjectAltName = @alt_names

[ alt_names ]
DNS.0 = example.com
DNS.1 = *.example.com
Генерируем самоподписанный сертификат
1. Генерируем приватный ключ:
			mkdir example.com
openssl genrsa -out example.com/example.com.key
Результат:
			Generating RSA private key, 2048 bit long modulus (2 primes)
........................+++++
..........................................................+++++
e is 65537 (0x010001)
2. Создаем запрос на сертификат:
			openssl req -new -key example.com/example.com.key -out
example.com/example.com.csr -config openssl.cfg -subj
"/CN=example.com certificate"
3. В файле конфигурации openssl.cfg нужно прописать доменное имя или несколько имен в блоке [alt_names].Раньше поддерживалось только одно имя, которое задавалось в поле CN, но сейчас можно указать несколько имен, а также сделать wildcard-сертификат на все поддомены.
			[ alt_names ]
DNS.0 = example.com
DNS.1 = *.example.com
4. Генерируем сертификат:
			openssl x509 -req -in example.com/example.com.csr -extensions
req_ext -extfile openssl.cfg -signkey
example.com/example.com.key  -out example.com/example.com.crt
-days 1825
5. Проверяем результат:
openssl x509 -in example.com/example.com.crt -text
Результат:
			Certificate:
    Data:
        Version: 3 (0x2)
        Serial Number:
            0f:63:6b:b8:76:27:71:d1:e9:f3:53:01:11:11:7c:52:d6:c7:ea:c6
        Signature Algorithm: sha256WithRSAEncryption
        Issuer: CN = example.com certificate
        Validity
            Not Before: Sep 27 05:08:48 2022 GMT
            Not After : Sep 26 05:08:48 2027 GMT
        Subject: CN = example.com certificate
        Subject Public Key Info:
            Public Key Algorithm: rsaEncryption
                RSA Public-Key: (2048 bit)
                Modulus:
                    00:c9:...:3b:24:
                    26:0f
                Exponent: 65537 (0x10001)
        X509v3 extensions:
            X509v3 Subject Alternative Name:
                DNS:example.com, DNS:*.example.com
    Signature Algorithm: sha256WithRSAEncryption
         20:a9:...:fe:fd:
         5f:30:e8:4a
-----BEGIN CERTIFICATE-----
MIIC+zCCAeO…8w6Eo=
-----END CERTIFICATE-----
Теперь у вас есть сам сертификат example.com.crt и файл ключа example.com.key, которые можно использовать в ваших приложениях.
Генерируем корневой сертификат + сертификат сервера
1. Генерируем приватный ключ корневого сертификата:
			mkdir ca
openssl genrsa -out ca/ca.key
Результат:
			Generating RSA private key, 2048 bit long modulus (2 primes)
...........................................+++++
...................................+++++
e is 65537 (0x010001)
2. Создаем сертификат:
			openssl req -x509 -new -key ca/ca.key -days 1825 -out ca/ca.crt
-extensions v3_ca_has_san -config openssl.cfg -subj "/CN=Root CA
3. Повторяем шаги 1-5 инструкции про самоподписанный сертификат.
4. Генерируем сертификат, подписанный нашим корневым сертификатом:
			openssl x509 -req -in example.com/example.com.csr -CA ca/ca.crt
-CAkey ca/ca.key -CAcreateserial -extensions req_ext -extfile
openssl.cfg -out example.com/example.com.ca.crt -days 1825
5. Проверяем результат:
openssl x509 -in example.com/example.com.ca.crt -text
Результат:
			Certificate:
    Data:
        Version: 3 (0x2)
        Serial Number:
            27:f4:ec:08:a8:36:b8:38:81:53:d9:8f:b5:fe:91:13:79:f0:9e:dc
        Signature Algorithm: sha256WithRSAEncryption
        Issuer: CN = Root CA
        Validity
            Not Before: Sep 27 05:46:19 2022 GMT
            Not After : Sep 26 05:46:19 2027 GMT
        Subject: CN = example.com certificate
        Subject Public Key Info:
            Public Key Algorithm: rsaEncryption
                RSA Public-Key: (2048 bit)
                Modulus:
                    00:c9:...:26:0f
                Exponent: 65537 (0x10001)
        X509v3 extensions:
            X509v3 Subject Alternative Name:
                DNS:example.com, DNS:*.example.com
    Signature Algorithm: sha256WithRSAEncryption
         9e:72:...:57:17
-----BEGIN CERTIFICATE-----
MIIC…JXFw==
-----END CERTIFICATE-----
Теперь у вас есть сертификат сервера example.com.crt в комплекте с ключом example.com.key, а также корневой сертификат ca.crt в комплекте с ключом ca.key. Если добавить корневой сертификат в хранилище корневых сертификатов в вашей системе или браузере, то это сделает валидными все сертификаты, подписанные им.
Браузер Chrome использует системное хранилище сертификатов:

Добавляем корневой сертификат в браузере Mozilla

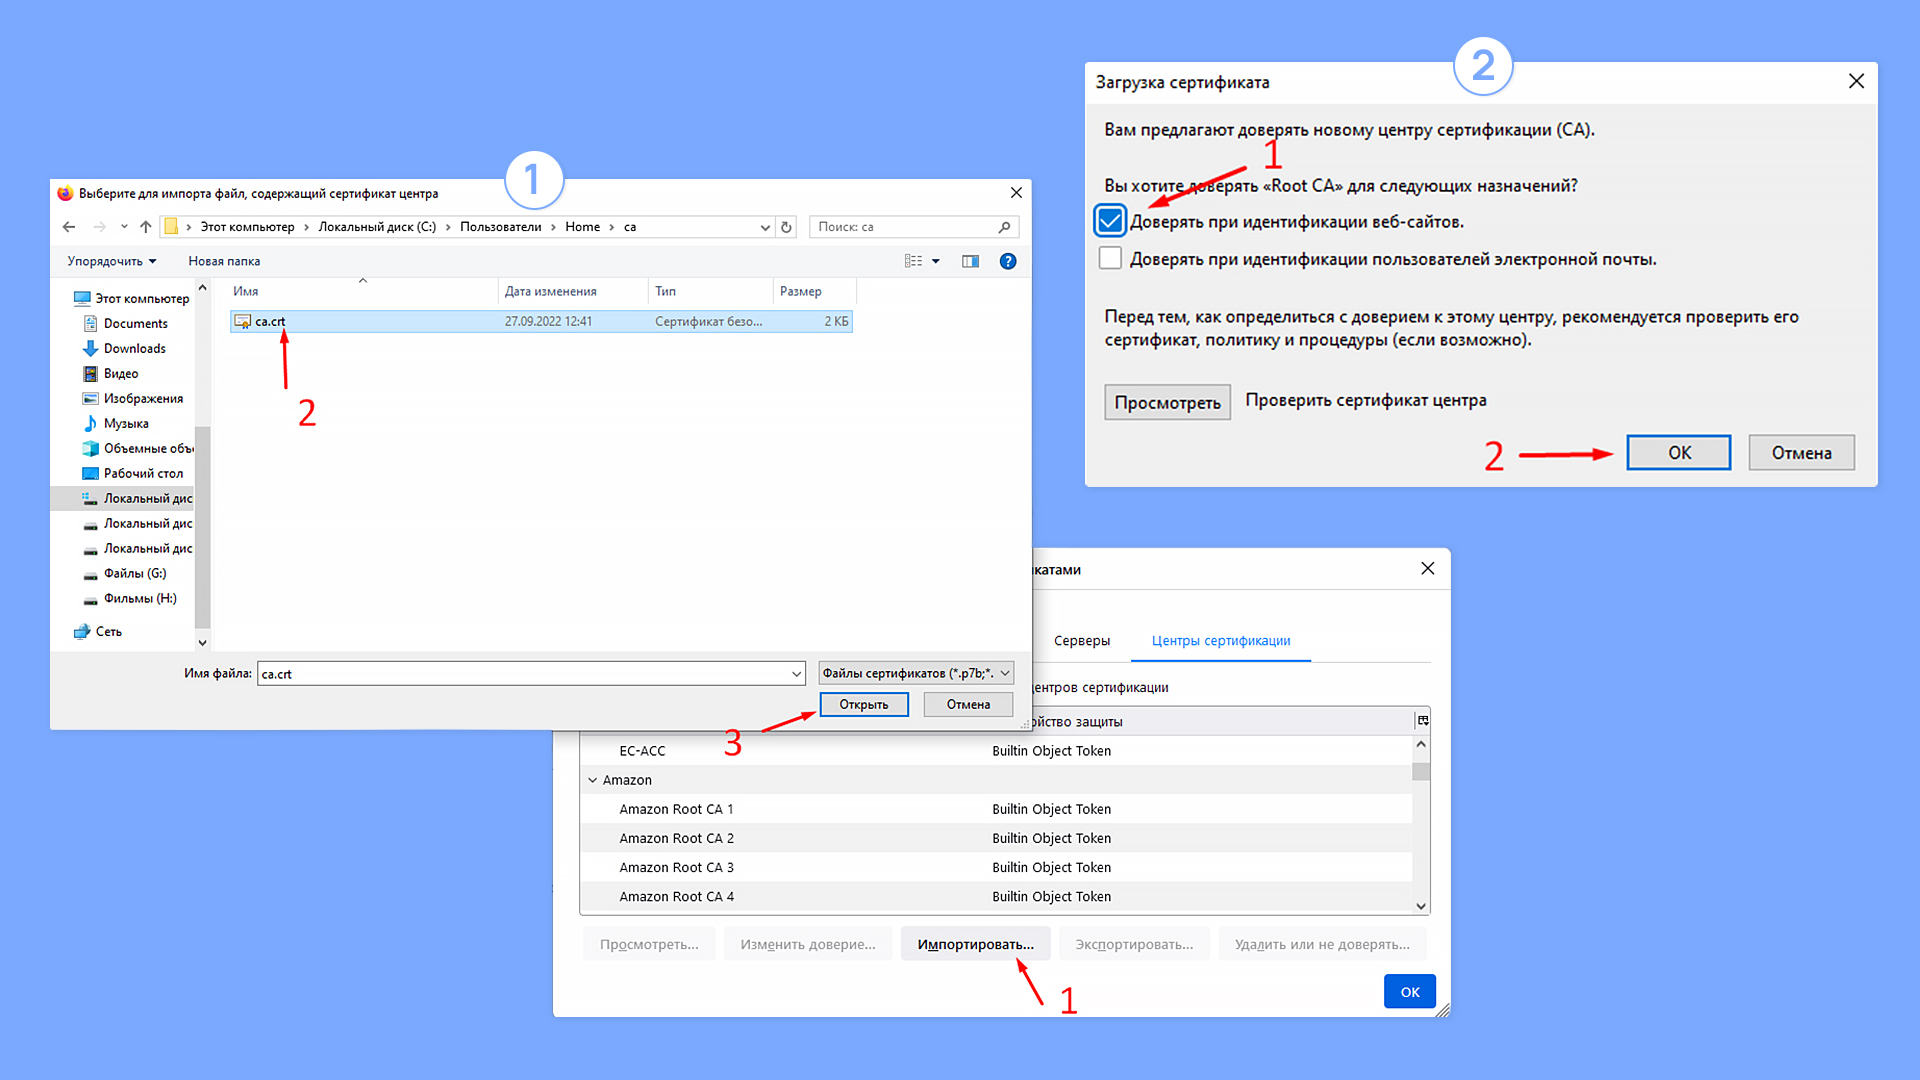
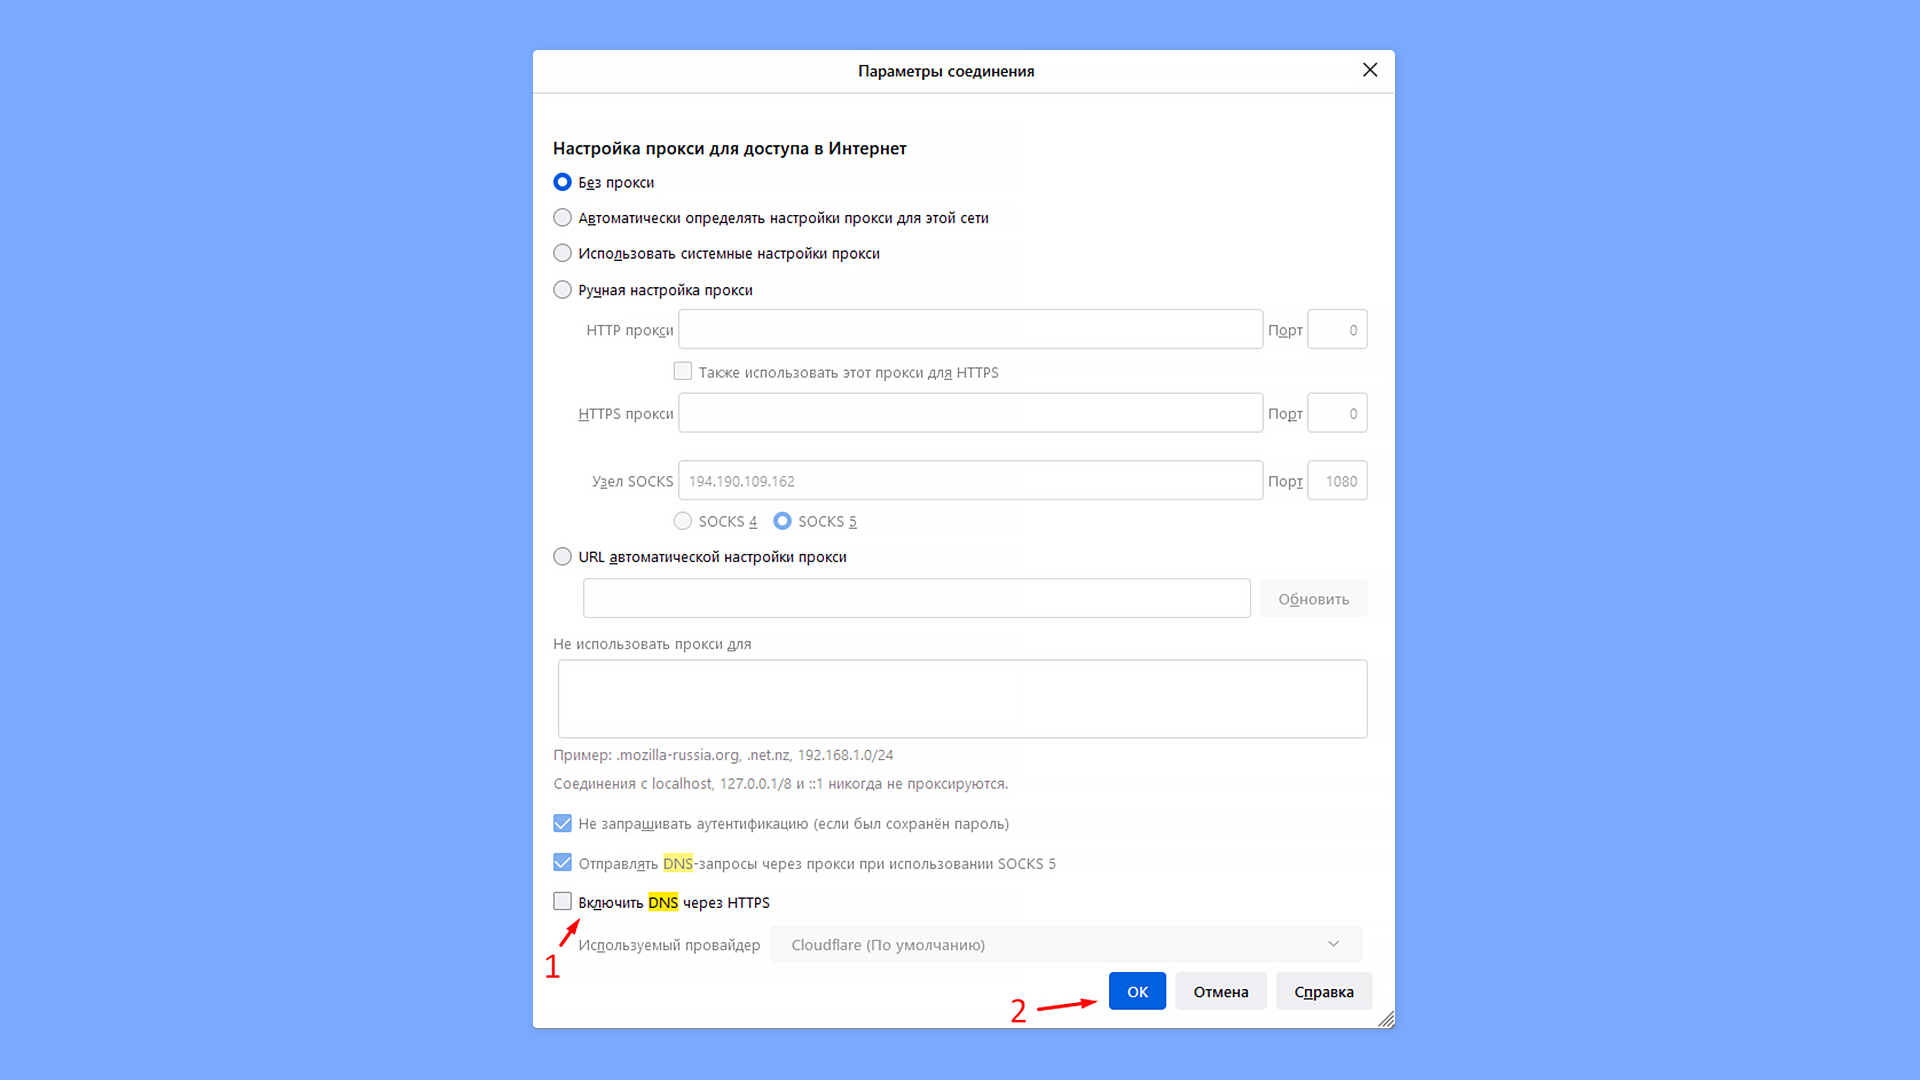
Возможно, придется отключить DNS over HTTPS, чтобы браузер использовал системный DNS, который, в свою очередь, использует файл hosts.

Использование на примере create-react-app
1. Добавляем в .env следующие переменные:
			HTTPS=true
SSL_CRT_FILE=certs/example.com.crt
SSL_KEY_FILE=certs/example.com.key
HOST=example.com
2. Добавляем в файл host (C:WindowsSystem32Driversetchosts для Windows, /etc/hosts для Ubuntu) строку:
192.168.2.116 example.com
чтобы example.com резолвился на локальный адрес компьютера (свой можно посмотреть в свойствах подключения).
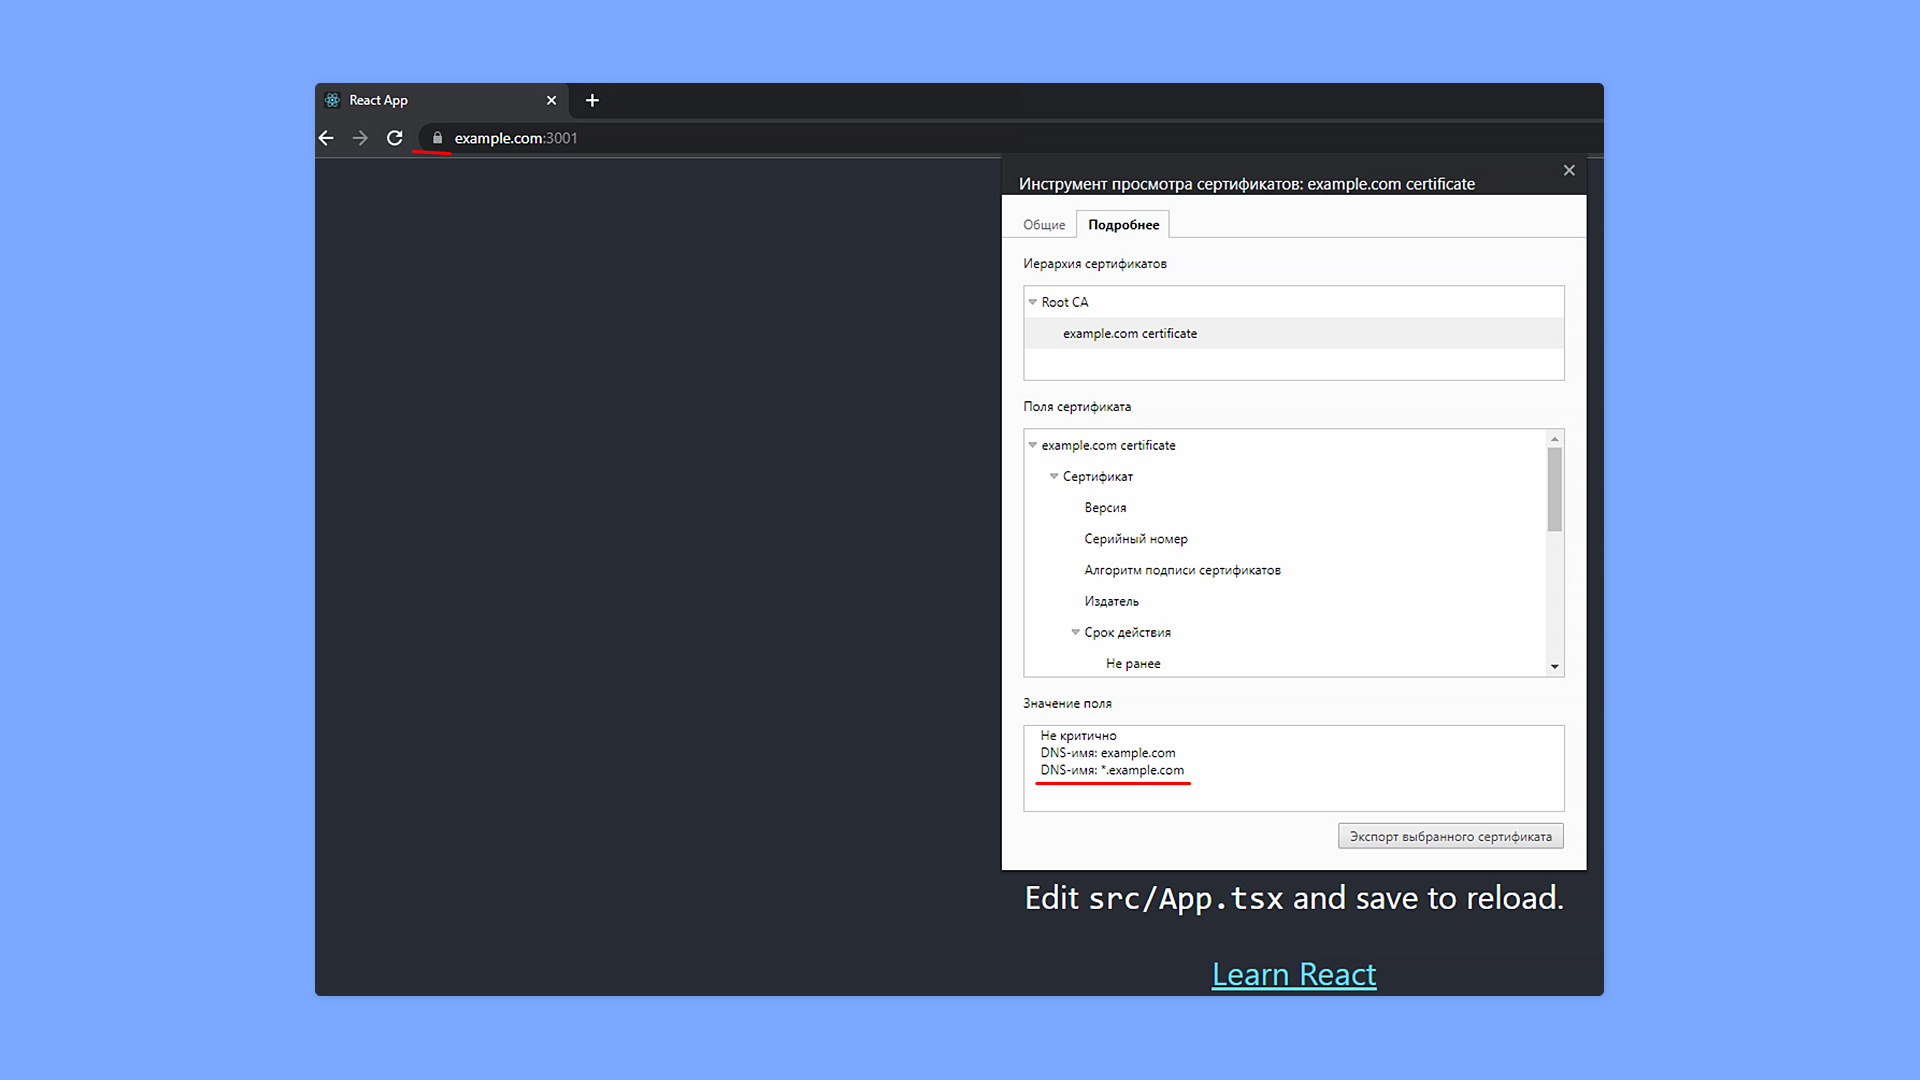
3. Запускаем приложение и видим, что соединение защищено и сертификат валидный:
Как установить сертификат на мобильное устройство Android?
1. Поместить телефон и ПК в одну локальную сеть.
2. Использовать create-react-app.
3. Положить в папку public ca.crt.
4. Прописать в .env адрес компьютера в локальной сети:
5. Запустить create-react-app без https.
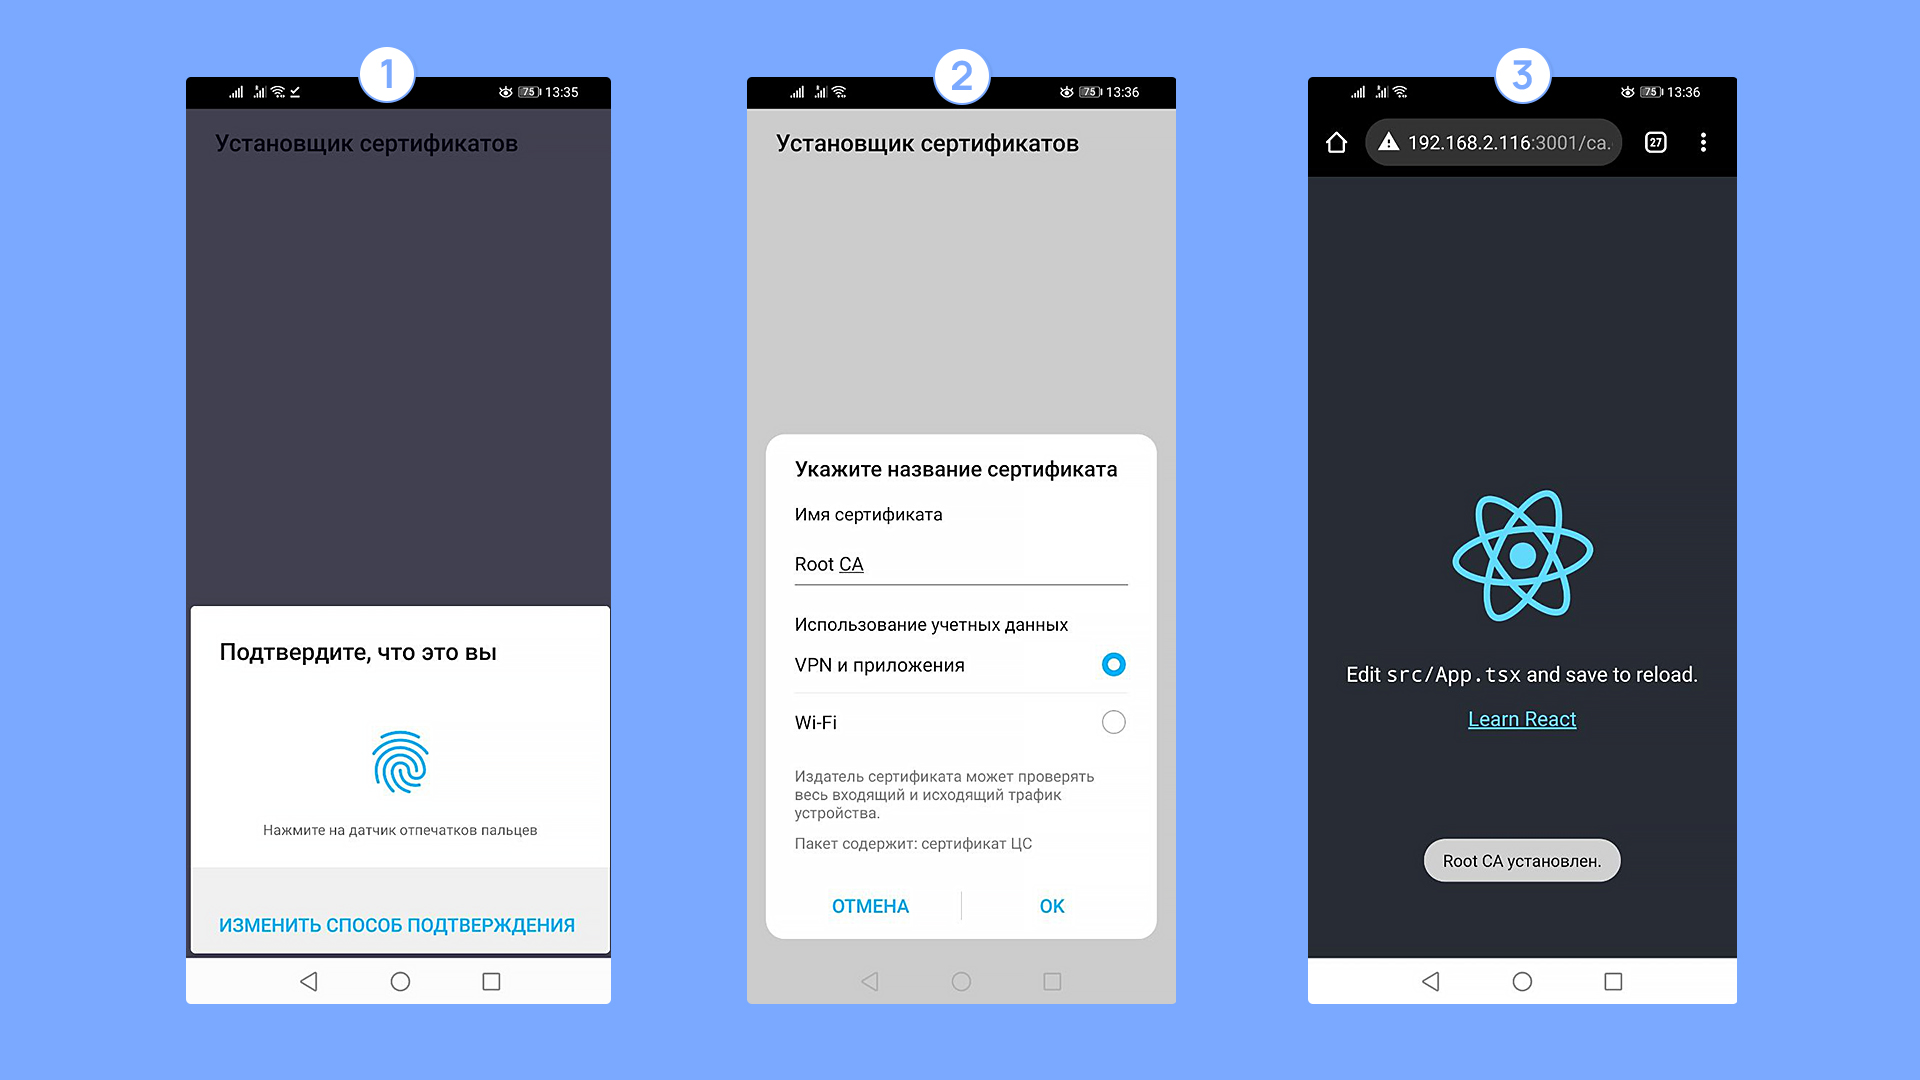
6. Открыть на телефоне http://192.168.2.116:3000/ca.crt и установить сертификат:
Как прописать домен на Android устройстве?
Для того, чтобы тестировать приложения, нужно обеспечить, чтобы ваше доменное имя резолвилось на локальный адрес компьютера. Тут есть два решения:
1. Имея root-доступ на смартфоне, отредактировать файл hosts.
2. Если прав root нет, то есть более элегантное решение — воспользоваться приложением Postern. Это VPN-сервер, запускаемый на вашем устройстве и способный модифицировать трафик, в том числе перехватывать DNS-запросы и отвечать на них. Через него можно установить соответствие доменного имени example.com ip-адресу вашего компьютера в локальной сети, где запущен webpack-dev-server:
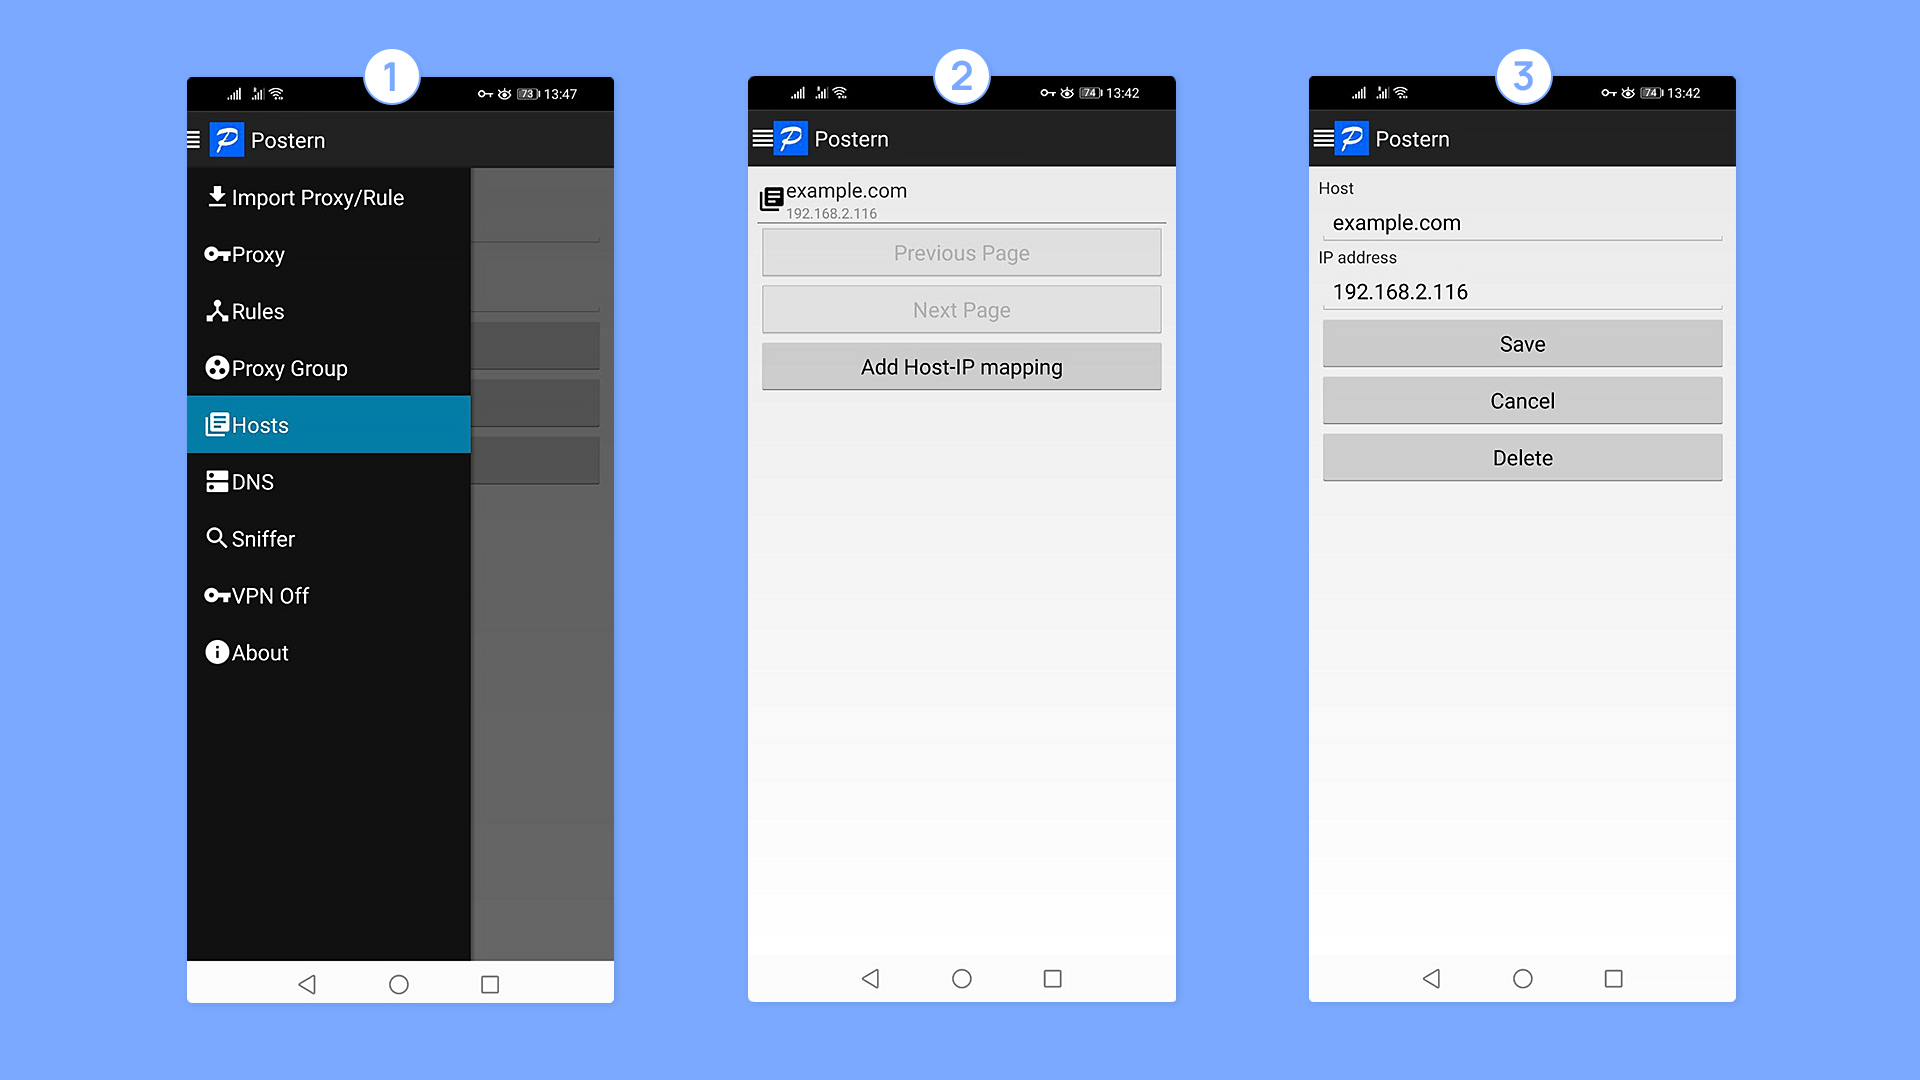
То, что Postern запущен, можно понять по иконке замка в статус-баре (VPN включен, все запросы идут через него).
После того, как все действия проделаны, можно открыть в браузере ваше приложение:

Готово! Теперь вы не только знаете в теории, что такое SSL-сертификат, но и умеете с ним работать на практике.
Introduction
In this post, I will go over details of how to create SSL Certificates using OpenSSL on your server and online.
Our online SSL script generator will generate OpenSSL shell script code that you can copy to run on your FreeBSD, Linux and Windows servers.
What is OpenSSL?
OpenSSL is a set of cryptographic tools that provide various tools to generate various functions such as Certificate Signing Requests (CSR), private and public key generation as well as SSL Certificate generation used with Secure Sockets Layer (SSL) and Transport Layer Security (TLS) network protocols.
Where Do I Get OpenSSL For Windows and Linux
OpenSSL toolkit is not installed by the default setup of both Linux and Windows. Therefore you must download a software package for Windows or use the apt command for Linux to get OpenSSL.
Install OpenSSL on Linux
On Linux based systems, such as Ubuntu you can run the following command to install OpenSSL.
root@mars:~# sudo apt install opensslInstall OpenSSL on Windows
Windows does not have a central package manager that has bundled OpenSSL available. With that said there are multiple software packages available for Windows, which you may have already installed on your computer with OpenSSL command line tools bundled.
Here is a short list of available software packages. Downland any of these if you don’t have them installed.
- Apache HTTPD Server: The web server has an OpenSSL tool in the
binfolder. - Git for Windows: Comes with bundled OpenSSL.
- MSYS2: A set of utilities built upon modified Cygwin tools.
- OpenSSL Wiki: Different OpenSSL builds are available for you to download.
How to Generate SSL or TLS Certificate using OpenSSL
In this section, I will go over multiple ways to use OpenSSL.
Before doing so let review various types of encrypted docs.
- CRT:
certandcrtfiles are the signed certificates. - CSR: This is the certificate signing request, a challenge used by a trusted third party to verify the ownership of a keypair without having direct access to the private key. A CSR allows end users to be sure that the certificate is valid. In the self-signed case, the CSR will be used with your own private key to verify your private key.
- KEY:
keyfiles are the private keys used by the server to encrypt and package data.
How to Generate Private Key with OpenSSL
To generate your private key, you need to specify the key algorithm, the key size, and an optional passphrase. The standard key algorithm is RSA, but you can also select different algorithms. But it is better to use an algorithm that is used commonly across most browsers and RSA is one such algorithm.
Type the following command to view all available encryption algorithms.
root@mars:~# openssl enc -listOnce you’re ready to generate your private key, run the command as shown below to generate a private key file using RSA encryption.
root@mars:~# openssl genrsa -out private.key 2048Running OpenSSL command as shown above with create a 2048 bit encrypted key in the current folder.
Note: In the command above we are using 2048 bits for encryption. You can use more bits such as 4096 but doing so will slow down enc/dec process.
Generate a new Private Key and Certificate Signing Request
You can use an existing private key or create a new private key while generating a new CSR.
Use the command req to create a new private key and CSR.
root@mars:~# openssl req -new -out mydomain.csrNote: The command req specifies that you want to use X.509 CSR. The X.509 is a public key infrastructure standard that SSL and TLS for its key and certificate management.
Multiple questions will be asked, with the first being a PEM passphrase..
If you are planning to create a self-signed certificate then you can just press enter on all prompts. But since a CSR is for a certificate you will need to enter your domain and location information or else the CSR will be invalid.
Following is the complete output of running this tool while generating a new private key.
root@mars:~# openssl req -new -out mydomain.csr
Generating a RSA private key
............................................................................................................................+++++
........................................+++++
writing new private key to 'privkey.pem'
Enter PEM pass phrase:
Verifying - Enter PEM pass phrase:
-----
You are about to be asked to enter information that will be incorporated
into your certificate request.
What you are about to enter is what is called a Distinguished Name or a DN.
There are quite a few fields but you can leave some blank
For some fields there will be a default value,
If you enter '.', the field will be left blank.
-----
Country Name (2 letter code) [AU]:
State or Province Name (full name) [Some-State]:
Locality Name (eg, city) []:
Organization Name (eg, company) [Internet Widgits Pty Ltd]:
Organizational Unit Name (eg, section) []:
Common Name (e.g. server FQDN or YOUR name) []:
Email Address []:

Please enter the following 'extra' attributes
to be sent with your certificate request
A challenge password []:
An optional company name []:
sohail@mars:~$ ls
privkey.pem  mydomain.csr
Create Self Signed SSL Certificate
Using OpenSSL you can create your own SSL certificates. These don’t have to be signed by any certification authority.
To create your own SSL cert use the following command.
root@mars:~# openssl req -x509 -nodes -days 365 -newkey rsa:2048 -keyout mykey.key -out mycert.crtNote: Unlike the CSR generation you are not asked to enter a password for the key file here.
This openssl command will create a private key and a certificate file in the local folder. You will be asked to enter various organizational pieces of info, but you can just accept the defaults if you don’t want to enter those pieces of info for a self-signed certificate.
Pros & Cons of Using Self-Signed SSL Certificates
Listed below are few pros and cons of using self-signed SSL certificates.
Pros
- You can create as many certificates as you want without any costs.
- Great for use in development and testing environments.
- If a company needs encryption and secure data for their internal non-public facing applications, then self-signed certificates are and excellent option.
Cons
- Self signed certificates are not trusted by any of the browsers or operating systems.
- They are unsafe for public facing applications.
- Prone to man-in-the-middle attacks.
Conclusion
Using self-signed SSL/TLS certificates for internal development and testing makes the whole DevOps pipeline easier to manage. They are also great for use on internal non-public facing corporate applications as they do provide encryption and security for data transferred over the wire.
On my backend servers, where I use both Apache HTTPD and NGINX web servers I am using self-signed certificates for encryption and web server communication. Since I have the NGINX load balancers/proxy behind the Cloudflare CDN, I am able to host my websites publicly without running into any browser or security issues.
Let me know if you have any questions about any topic discussed in this post.
Большинству администраторов Windows, знакомых с темой PKI, известна утилита MakeCert.exe, с помощью которой можно создать самоподписанный сертификат. Эта утилита включена в состав Microsoft .NET Framework SDK и Microsoft Windows SDK. В современных версиях Windows 11/10/8.1 и Windows Server 2022/2019/2016/2012R2 вы можете создать самоподписанный сертификат с помощью встроенных командлетов PowerShell без использования дополнительных утилит.
Содержание:
- New-SelfSignedCertificate: создать самоподписанный SSL сертификат в PowerShell
- Как сгенерировать SAN (SubjectAltName) сертификат с помощью PowerShell?
- Экспорт самоподписаного сертификата в Windows
- Сгенерировать сертификат для подписи кода типа Code Signing
- Создать самоподписанный SSL сертификат SHA-256 для IIS
New-SelfSignedCertificate: создать самоподписанный SSL сертификат в PowerShell
Для создания самоподписанного сертификата в PowerShell нужно использовать командлет New-SelfSignedCertificate, входящий в состав модуля PKI (Public Key Infrastructure).
Чтобы вывести список всех доступных командлетов в модуле PKI, выполните команду:
Get-Command -Module PKI

Самоподписанные SSL сертификаты рекомендуется использовать в тестовых целях или для обеспечения сертификатами внутренних интранет служб (IIS, Exchange, Web Application Proxy, LDAPS, ADRMS, DirectAccess и т.п.), в тех случая когда по какой-то причине приобретение сертификата у внешнего провайдера или разворачивание инфраструктуры PKI/CA невозможны.
Совет. Не забывайте, что вы можете использования полноценные бесплатные SSL сертификаты от Let’s Encrypt. Например, вы можете SSL сертификат Let’s Encrypt и привязать его к сайту IIS.
Для создания сертификата нужно указать значения -DnsName (DNS имя сервера, имя может быть произвольным и отличаться от имени localhost) и -CertStoreLocation (раздел локального хранилища сертификатов, в который будет помещен сгенерированный сертификат).
Чтобы создать новый SSL сертификат для DNS имени test.contoso.com (указывается FQDN имя) и поместить его в список персональных сертификатов компьютера, выполните команду:
New-SelfSignedCertificate -DnsName test.contoso.com -CertStoreLocation cert:\LocalMachine\My
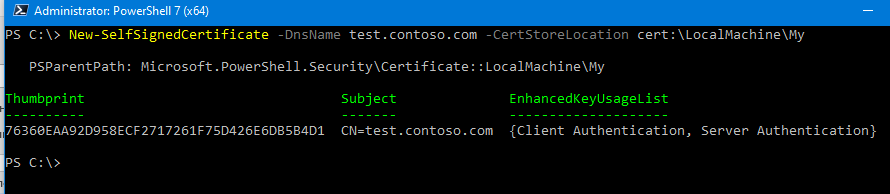
Команда вернет отпечаток нового сертификата (Thumbprint), Subject и EnhancedKeyUsageList. По умолчанию такой сертификат можно использовать для аутентификации клиента Client Authentication (1.3.6.1.5.5.7.3.2) или сервера Server Authentication (1.3.6.1.5.5.7.3.1).
Если вы запустите эту команду в PowerShell без прав администратор, появится ошибка:
New-SelfSignedCertificate : CertEnroll::CX509Enrollment::_CreateRequest: Access denied. 0x80090010 (-2146893808 NTE_PERM)
Если вы указали нестандартный криптографический провайдер CSPs (например, с помощью параметров
-KeyAlgorithm "ECDSA_secP256r1" -Provider 'Microsoft Smart Card Key Storage Provider'
), убедитесь, что он установлен на компьютере (по умолчанию используется CSP Microsoft Enhanced Cryptographic Provider). Иначе появится ошибка:
New-SelfSignedCertificate: CertEnroll::CX509Enrollment::_CreateRequest: Provider type not defined. 0x80090017 (-2146893801 NTE_PROV_TYPE_NOT_DEF).
По-умолчанию генерируется самоподписанный сертификат со следующим параметрами:
- Криптографический алгоритм: RSA;
- Размер ключа: 2048 бит;
- Допустимые варианты использования ключа: Client Authentication и Server Authentication;
- Сертификат может использоваться для: Digital Signature, Key Encipherment ;
- Срок действия сертификата: 1 год.
- Криптопровадер: Microsoft Software Key Storage Provider
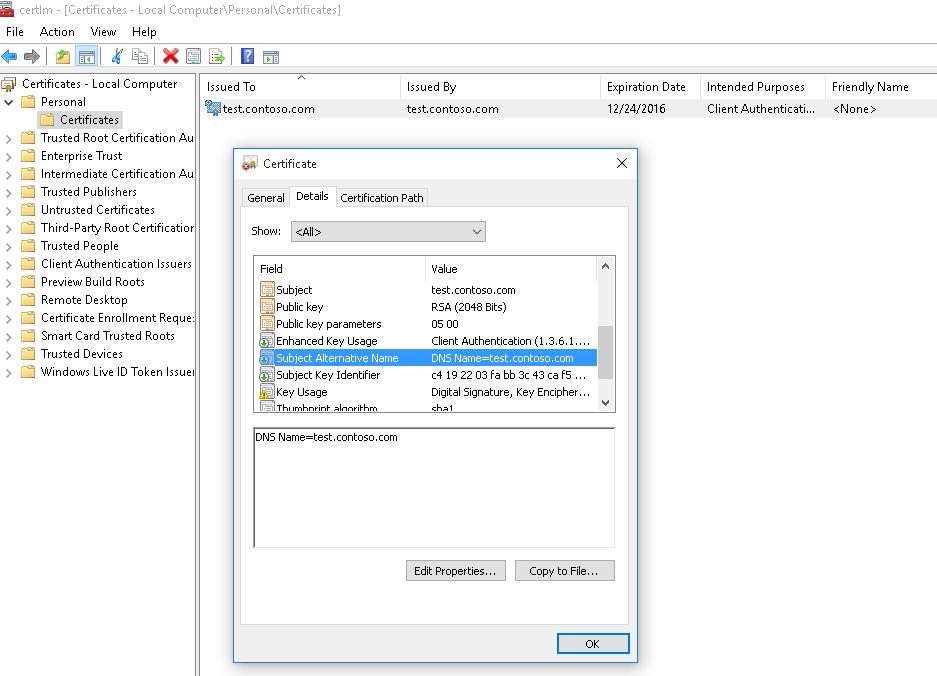
Данная команда создаст новый сертификат и импортирует его в персональное хранилище компьютера. Откройте оснастку certlm.msc и проверьте, что в разделе Personal хранилища сертификатов компьютера появился новый сертификат.
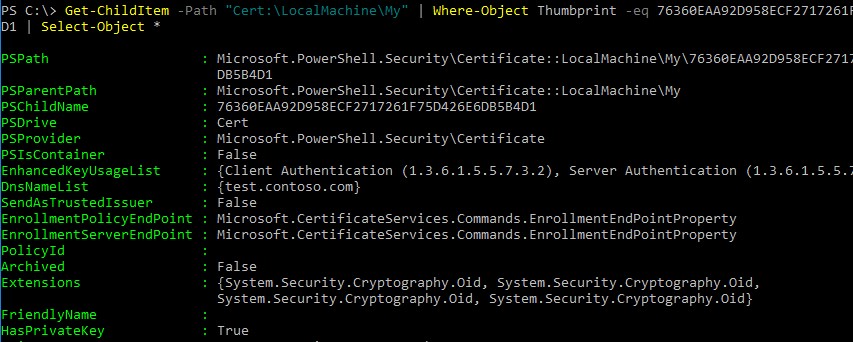
С помощью командлета Get-ChildItem можно вывести все параметры созданного сертификата по его отпечатку (Thumbprint):
Get-ChildItem -Path "Cert:\LocalMachine\My" | Where-Object Thumbprint -eq 76360EAA92D958ECF2717261F75D426E6DB5B4D1 | Select-Object *
PSPath                   : Microsoft.PowerShell.Security\Certificate::LocalMachine\My\76360EAA92D958ECF2717261F75D426E6
  DB5B4D1
PSParentPath             : Microsoft.PowerShell.Security\Certificate::LocalMachine\My
PSChildName              : 76360EAA92D958ECF2717261F75D426E6DB5B4D1
PSDrive                  : Cert
PSProvider               : Microsoft.PowerShell.Security\Certificate
PSIsContainer            : False
EnhancedKeyUsageList     : {Client Authentication (1.3.6.1.5.5.7.3.2), Server Authentication (1.3.6.1.5.5.7.3.1)}
DnsNameList              : {test.contoso.com}
SendAsTrustedIssuer      : False
EnrollmentPolicyEndPoint : Microsoft.CertificateServices.Commands.EnrollmentEndPointProperty
EnrollmentServerEndPoint : Microsoft.CertificateServices.Commands.EnrollmentEndPointProperty
PolicyId                 :
Archived                 : False
Extensions               : {System.Security.Cryptography.Oid, System.Security.Cryptography.Oid,
                           System.Security.Cryptography.Oid, System.Security.Cryptography.Oid}
FriendlyName             :
HasPrivateKey            : True
PrivateKey               : System.Security.Cryptography.RSACng
IssuerName               : System.Security.Cryptography.X509Certificates.X500DistinguishedName
NotAfter                 : 12/2/2023 3:41:18 PM
NotBefore                : 12/2/2022 3:21:18 PM
PublicKey                : System.Security.Cryptography.X509Certificates.PublicKey
 RawData                  : {48, 130, 3, 45…}
SerialNumber             : 24682351DA9C59874573BA2B5BB39874
SignatureAlgorithm       : System.Security.Cryptography.Oid
SubjectName              : System.Security.Cryptography.X509Certificates.X500DistinguishedName
Thumbprint               : 76360EAA92D958ECF2717261F75D426E6DB5B4D1
Version                  : 3
Handle                   : 2007435579936
Issuer                   : CN=test.contoso.com
Subject                  : CN=test.contoso.com
Примечание. Срок действия такого самоподписанного сертификата истекает через 1 год с момента его создания. Можно задать другой срок действия сертификата с помощью атрибута —NotAfter.Чтобы выпустить сертификат на 3 года, выполните следующие команды:
$todaydate = Get-Date
$add3year = $todaydate.AddYears(3)
New-SelfSignedCertificate -dnsname test.contoso.com -notafter $add3year -CertStoreLocation cert:\LocalMachine\My
Можно создать цепочку сертификатов. Сначала создается корневой сертификат (CA), а на основании него генерируется SSL сертификат сервера:
$rootCert = New-SelfSignedCertificate -Subject "CN=TestRootCA,O=TestRootCA,OU=TestRootCA" -KeyExportPolicy Exportable  -KeyUsage CertSign,CRLSign,DigitalSignature -KeyLength 2048 -KeyUsageProperty All -KeyAlgorithm 'RSA'  -HashAlgorithm 'SHA256'  -Provider "Microsoft Enhanced RSA and AES Cryptographic Provider"
New-SelfSignedCertificate -CertStoreLocation cert:\LocalMachine\My -DnsName "test2.contoso.com" -Signer $rootCert -KeyUsage KeyEncipherment,DigitalSignature
Чтобы изменить длину ключа сертификата и алгоритм шифрования, нужно использовать параметры
–KeyAlgorithm
,
–KeyLength
и
–HashAlgorithm
. Например:
New-SelfSignedCertificate -KeyAlgorithm RSA -KeyLength 2048 -HashAlgorithm "SHA256"
Если на компьютере доступен модуль TPM 2.0, можно использовать его для защиты ключа:
New-SelfSignedCertificate -Type Custom -Provider "Microsoft Platform Crypto Provider" ...
Провайдер Microsoft Platform Crypto Provider использует Trusted Platform Module чип устройства для создания ассиметричного ключа.
$Params = @{
"DnsName"           = "mylocalhostname"
"CertStoreLocation" = "Cert:\\CurrentUser\\My"
"KeyUsage"          = "KeyEncipherment","DataEncipherment","KeyAgreement"
"Type"              = "DocumentEncryptionCert"
}
New-SelfSignedCertificate @Params
Как сгенерировать SAN (SubjectAltName) сертификат с помощью PowerShell?
Командлет New-SelfSignedCertificate позволяет создать сертификат с несколькими различными именами Subject Alternative Names (SAN).
Примечание. Утилита Makecert.exe, в отличии от командлета New-SelfSignedCertificate, не умеет создавать сертификаты с SAN.
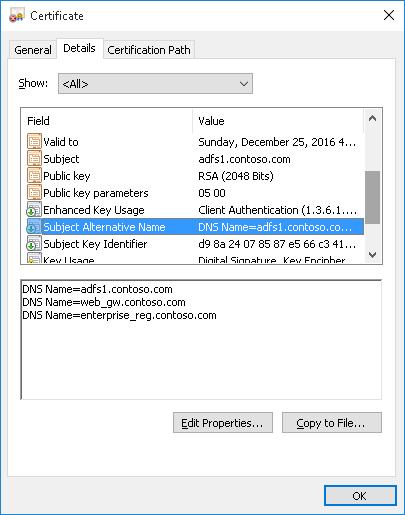
Если создается сертификат с несколькими именами, первое имя в параметре DnsName будет использоваться в качестве CN (Common Name) сертификата. К примеру, создадим сертификат, у которого указаны следующие имена:
- Subject Name (CN): adfs1.contoso.com
- Subject Alternative Name (DNS): web-gw.contoso.com
- Subject Alternative Name (DNS): enterprise-reg.contoso.com
Команда создания сертификата будет такой:
New-SelfSignedCertificate -DnsName adfs1.contoso.com,web_gw.contoso.com,enterprise_reg.contoso.com -CertStoreLocation cert:\LocalMachine\My
Также можно сгенерировать wildcard сертификат для всего пространства имен домена, для этого в качестве имени сервера указывается *.contoso.com.
New-SelfSignedCertificate -certstorelocation cert:\localmachine\my -dnsname *.contoso.com
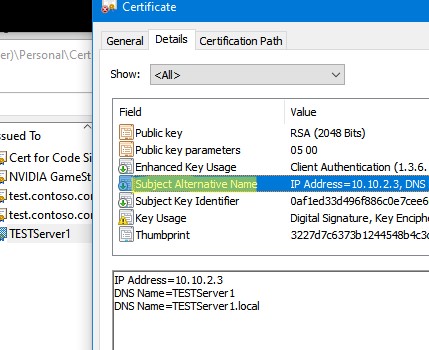
Вы можете привязать сертификат не только к DNS имени, но и к IP адресу. Для этого вместе параметр -DnsName нужно использовать -TextExtension. Например:
New-SelfSignedCertificate -TextExtension @("2.5.29.17={text}IPAddress=10.10.2.3&DNS=TESTServer1&DNS=TESTServer1.local")
Как вы видите, в поле Subject Alternative Name теперь содержится IP адрес.
Экспорт самоподписаного сертификата в Windows
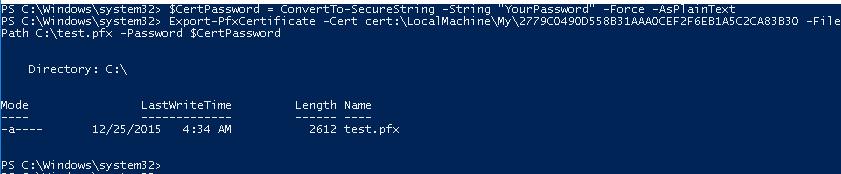
Для экспорта полученного сертификата c закрытым ключом в pfx файл, защищенный паролем, нужно получить его отпечаток (Thumbprint). Сначала нужно указать пароль защиты сертификата и преобразовать его в формат SecureString. Значение Thumbprint нужно скопировать из результатов выполнения команды New-SelfSignedCertificate.
$CertPassword = ConvertTo-SecureString -String “YourPassword” -Force –AsPlainText
Export-PfxCertificate -Cert cert:\LocalMachine\My\2779C0490D558B31AAA0CEF2F6EB1A5C2CA83B30 -FilePath C:\test.pfx -Password $CertPassword
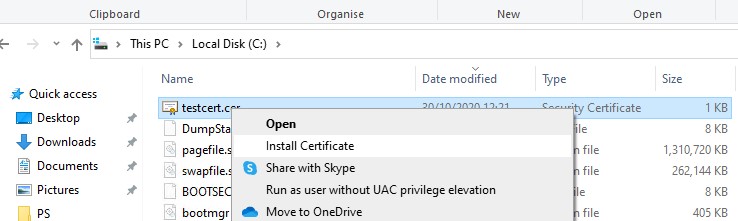
Можно экспортировать открытый ключ сертификата:
Export-Certificate -Cert Cert:\LocalMachine\My\2779C0490D558B31AAA0CEF2F6EB1A5C2CA83B30 -FilePath C:\testcert.cer
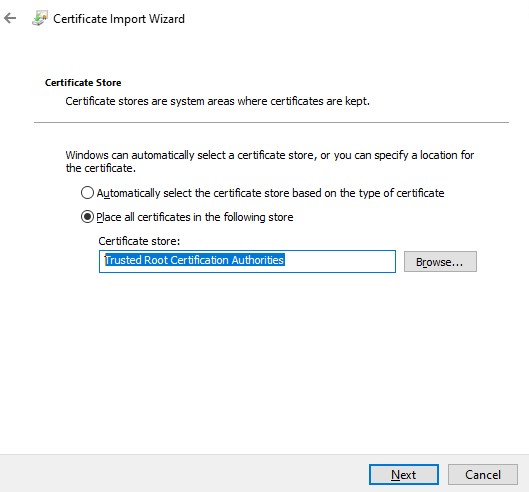
Проверьте, что в указанном каталоге появился CER (PFX) файл сертификата. Если щелкнуть по нему правой клавишей и выбрать пункт меню Install Certificate, можно с помощью мастера импорта сертификатов добавить сертификат в корневые доверенные сертификаты компьютера.
Выберите Store location -> Local Machine, Place all certificates in the following store -> Trusted Root Certification Authorities.
Можно создать сертификат и сразу импортировать его в доверенные корневые сертификаты компьютера командами:
$cert=New-SelfSignedCertificate …..
$certFile = Export-Certificate -Cert $cert -FilePath C:\certname.cer
Import-Certificate -CertStoreLocation Cert:\LocalMachine\AuthRoot -FilePath $certFile.FullName
Полученный открытый ключ или сам файл сертификата можно распространить на все компьютеры и сервера в домене с помощью GPO (пример установки сертификата на компьютеры с помощью групповых политик).
Сгенерировать сертификат для подписи кода типа Code Signing
В PoweShell 3.0 командлет New-SelfSifgnedCertificate позволял генерировать только SSL сертификаты, которые нельзя было использоваться для подписывания кода драйверов и приложений (в отличии сертификатов, генерируемых утилитой MakeCert).
В версии PowerShell 5 командлет New-SelfSifgnedCertificate теперь можно использовать чтобы выпустить сертификат типа Code Signing.
Вы можете обновить версию PowerShell согласно инструкции.
Для создания самоподписанного сертфиката для подписывания кода приложений, выполните команду:
$cert = New-SelfSignedCertificate -Subject "Cert for Code Signing” -Type CodeSigningCert -CertStoreLocation cert:\LocalMachine\My
Теперь можно подписать ваш PowerShell скрипт эти сертификатом:
Set-AuthenticodeSignature -FilePath C:\PS\test_script.ps1 -Certificate $cert
Если при выполнении команды появится предупреждение UnknownError, значит этот сертификат недоверенный, т.к. находится в персональном хранилище сертификатов пользователя.

Нужно переместить его в корневые сертификаты (не забывайте периодически проверять хранилище сертификатов Windows на наличие недоверенных сертфикатов и обновлять списки корневых сертификатов):
Move-Item -Path $cert.PSPath -Destination "Cert:\CurrentUser\Root"
Теперь вы можете использовать этот самоподписанный сертификат для подписи PowerShell скриптов, драйверов или приложений.
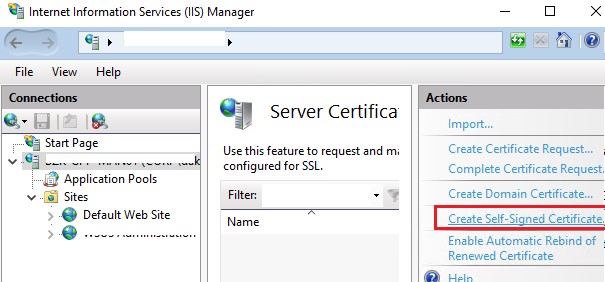
Создать самоподписанный SSL сертификат SHA-256 для IIS
Обратите внимание, что при создании самоподписанный сертификат для IIS через консоль Internet Information Manager (пункт меню Create Self-Signed Certificate), создается сертификат с использованием алгоритма шифрования SHA-1. Такие сертификаты многими браузерами считаются недоверенными, поэтому они могут выдавать предупреждение о небезопасном подключении. Командлет New-SelfSignedCertificate позволяет создать более популярный тип сертификата с помощью алгоритма шифрования SHA-256.
Вы можете привязать самоподписанный сертификат SHA-256, созданный в PowerShell, к сайту IIS. Если вы с помощью PowerShell создали SSL сертификат и поместили его в хранилище сертификатов компьютера, он будет автоматически доступен для сайтов IIS.
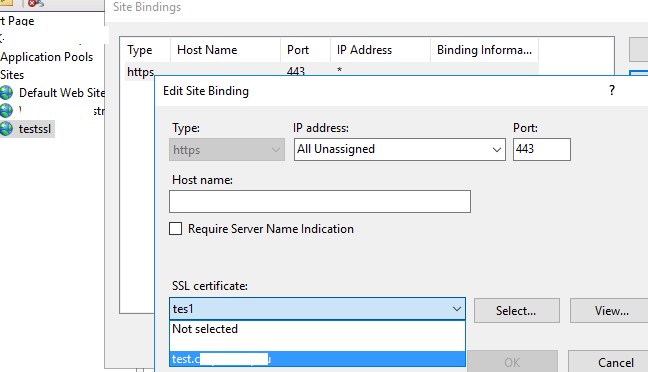
Запустите консоль IIS Manager, выберите ваш сайт, затем в настройке Site Binding, выберите созданный вами сертификат и сохраните изменения.
Также можно привязать SSL сертификат к сайту IIS по его отпечатку:
New-IISSiteBinding -Name "Default Web Site" -BindingInformation "*:443:" -CertificateThumbPrint $yourCert.Thumbprint -CertStoreLocation "Cert:\LocalMachine\My" -Protocol https
Step 1
Generate a private root key
openssl genrsa -des3 -out myCA.key 2048
Step 2
Generate a root certificate
openssl req -x509 -new -nodes -key myCA.key -sha256 -days 1825 -out myCA.pem
Step 3
Windows specific
Bundle root certificate and private key into a format that
can be uploaded into Trusted Root Certification Authorities.
openssl pkcs12 -inkey myCA.key -in myCA.pem -export -out certificate.p12
Step 4
Windows specific
Upload into Trusted Root Certification Authorities.
- Open up Microsoft Management Console
- Go to File > Add Snap In.
- Open Certificates.
- Right click on Trusted Root Certification Authorities.
- Select All Tasks > Import.
- Upload .p12 file from Step 3.
openssl pkcs12 -inkey myCA.key -in myCA.pem -export -out certificate.p12
Step 5
Create a private key for a specific site that needs HTTPS.
openssl genrsa -out kals.dev.key 2048
Step 6
Create a certificate signing request (CSR) for a specific site that needs HTTPS.
openssl req -new -key kals.dev.key -out kals.dev.csr
Step 7
Create a Subject Alternative Name extension to .ext file (e.g. kals.dev.ext) which will be used along with the key from Step 5 and CSR from Step 6 to create a site specific certificate.
authorityKeyIdentifier=keyid,issuer
basicConstraints=CA:FALSE
keyUsage = digitalSignature, nonRepudiation, keyEncipherment, dataEncipherment
subjectAltName = @alt_names

[alt_names]
DNS.1 = localhost
Step 8
Create the certificate for a specific site that needs HTTPS
openssl x509 -req -in kals.dev.csr -CA myCA.pem -CAkey myCA.key -CAcreateserial
-out kals.dev.crt -days 1825 -sha256 -extfile kals.dev.ext
Step 9
Use the .crt from Step 8 and the .key file from Step 5 with your server to enable HTTPS.
/* config settings for Webpack Dev Server */

  devServer: {
    open: true,
    historyApiFallback: true,
    https: {
      key: fs.readFileSync('kals.dev.key'),
      cert: fs.readFileSync('kals.dev.crt')
    }
  }
A Step-by-Step Guide for Creating Self-Signed SSL Certificates in Windows 11
SSL certificates play a crucial role in securely encrypting and protecting data flow between websites and users’ browsers. While publicly trusted SSL certificates provide fully verified encryption, there are scenarios where using self-signed SSL certificates in Windows 11 can be handy for testing securely over HTTPS. These self-signed certificates are simply encryption certificates generated on your local Windows machine without formal validation from a certificate authority.
This guide will provide you with a comprehensive walkthrough on how to create self-signed SSL certificates in Windows 11 using the inbuilt Certificates Manager and expert PowerShell methods. We will cover how to properly generate, export, and install the self-signed certificates to enable HTTPS encryption on your internal websites using the capabilities within Windows 11 itself.
How to Generate a Self-Signed Certificate in Certificates Manager
Windows includes the Certificates Manager, which provides a graphical interface for managing certificates.
Here are the steps to use it to generate a self-signed SSL certificate:
Open Certificates Manager
Create a Certificate Signing Request
Enter Details for the CSR
Submit an Issue the Certificate
Export the Certificate and Private Key
This PFX file can now be installed on the webserver to use the self-signed SSL certificate to encrypt connections.
Easy Steps for Creating a Self-signed Certificate using PowerShell
Windows 11 also allows the generation of self-signed certificates through PowerShell commands.
Here is the full process:
Launch PowerShell as Administrator
New-SelfSignedCertificate -DnsName www.example.com -CertStoreLocation cert:\LocalMachine\My
Convert CSR to a Self-Signed Certificate
$cert=Get-ChildItem -Path cert:\LocalMachine\My\ | Where-Object {$_.Subject -match "www.example.com"}

Set-SelfSignedCertificate -Cert $cert -Subject www.example.com -EKU 'Server Authentication' -KeyUsage DigitalSignature, KeyEncipherment -Type Custom -KeyExportPolicy ExportableEncrypted
Export-PfxCertificate -Cert "cert:\LocalMachine\My\$($cert.Thumbprint)" -FilePath C:\examplecert.pfx -Password (ConvertTo-SecureString -String "password" -Force -AsPlainText)
This .PFX can then be installed on the target web server like IIS to utilize the self-signed certificate for enabling HTTPS.
How to Enable HTTPS with a Self-signed Certificate
Once you have a self-signed certificate PFX file, follow these steps to configure an HTTPS website:
server {
listen 443 ssl;
ssl_certificate /etc/nginx/ssl/examplecert.pfx;
location / { }
}
The website will now serve over HTTPS encrypted with the self-signed certificate when accessed over port 443.
Final Thoughts
Self-signed SSL certificates provide a simple way to enable HTTPS encryption on internal or development websites when an expensive public certificate is not required. While they do not offer full security due to the lack of browser trust, self-signed certs allow sites to be accessed over HTTPS for testing purposes before deploying with a trusted commercial certificate.
On Windows 11, creating self-signed certificates involves making a signing request and converting it into a certificate signed by your own CA. With the proper export and installation, these certificates can encrypt connections using HTTPS without the need for formal validation.
However, self-signed certificates should never be used on public production websites where valid trust is mandatory for true security.
FAQs about Self-Signed SSL Certificates in Windows 11
Why do browsers show security warnings for self-signed certificates?
Browsers show warnings for self-signed certificates because they are not issued and validated by any trusted Certificate Authority. So, the browser cannot verify their authenticity and knows they could be used in attacks.
Can self-signed certificates be used for public production websites?
Self-signed certificates should never be used on public production websites. They do not provide actual security because they are not trusted. For public sites, get an SSL certificate from a reputed CA like Comodo or DigiCert.
What are some valid use cases for self-signed certificates?
Self-signed certificates can be useful for testing locally, for intranets and development environments to enable HTTPS before getting a real certificate. They are meant for temporary use on internal servers.
How do I create a self-signed SSL certificate in Windows 11?
In Windows 11, you can use the built-in Certificate Manager tool to create a self-signed SSL certificate. This involves generating a new certificate, specifying the required details, and exporting the certificate and private key for use on your web server.
How do I remove the browser warnings for self-signed certificates?
The proper solution is not to use a self-signed certificate on public sites. For internal use, you can add a website as a trusted site in browser settings to ignore the warnings, but this will make your connection insecure.
Can I run HTTPS and HTTP together with a self-signed cert?
Yes, a self-signed certificate allows you to run both HTTPS and HTTP simultaneously. Users who access over HTTP will not face any certificate warnings.
Can I renew or extend the validity period of a self-signed certificate?
Self-signed certificates cannot be renewed like Paid SSL certificates. When a self-signed cert expires, you need to generate a new one to continue using it. Many servers are also configured to generate new self-signed certs when needed automatically.
Is there a size limit for common names in self-signed certificates?
The RFC standards recommend that the common name for server authentication certificates not exceed 64 characters. However, modern web servers and browsers generally support common names up to 64 characters.
Can I run multiple sites on the same IP with different self-signed certs?
Technically, you can generate different self-signed certificates for multiple websites on the same IP address using the Subject Alternative Name (SAN) extension. However, this is not commonly implemented with self-signed certs.
Can self-signed certificates be used for client authentication?
While self-signed certificates are primarily meant for HTTPS server authentication, they can also technically be utilized for client authentication if explicitly configured at both client and server ends. However, public CA certificates are more common and trusted for client auth use cases.