
Introduction
In this article, I’ll walk through the process of setting up and troubleshooting SSH key authentication for connecting to GitHub repositories on a Windows system using Git Bash. SSH key authentication provides a secure and convenient way to interact with GitHub without entering your username and password repeatedly.
Prerequisites
Before you begin, ensure you have the following:
- Git installed on your Windows machine. Download here
- A GitHub account. If you don’t have one, you can sign up at GitHub.
Steps to Set Up SSH Key Authentication
1. Generate SSH Key Pair
- Open Git Bash on your Windows machine.
- Create a new ssh folder:
mkdir ssh
Enter fullscreen mode
Exit fullscreen mode
- Change your directory into that folder:
cd ssh
Enter fullscreen mode
Exit fullscreen mode
- Generate a new SSH key pair by running the following command:
ssh-keygen -t rsa -C "your-email-address" -f "github-username"
Enter fullscreen mode
Exit fullscreen mode
Replace with your email address and username associated with your GitHub account.
- Optionally, provide a passphrase for extra security.
2. Start SSH Agent and Add SSH Key
- You can now change directory back into your default root:
cd ..
Enter fullscreen mode
Exit fullscreen mode
- Start the SSH agent by running:
eval $(ssh-agent -s)
Enter fullscreen mode
Exit fullscreen mode
- Add your SSH private key to the SSH agent:
ssh-add /c/Users/USER/.ssh/id_rsa
Enter fullscreen mode
Exit fullscreen mode
Replace /c/Users/USER/.ssh/id_rsa with the actual file location.
3. Add SSH Public Key to GitHub Account
- Change directory into the ssh folder again:
cd ssh
Enter fullscreen mode
Exit fullscreen mode
- Copy the contents of your SSH public key (
id_rsa.pub):
cat id_rsa.pub
Enter fullscreen mode
Exit fullscreen mode
replace «id_rsa.pub» with the name of your ssh with the .pub extension.
- Log in to your GitHub account.
- Navigate to
Settings > SSH and GPG keys. - Click on
New SSH key. - Paste your SSH public key into the
Keyfield and give it a descriptive title. - Click
Add SSH keyto save.
4. Configure SSH for GitHub
- Change directory into the ssh folder again:
cd ssh
Enter fullscreen mode
Exit fullscreen mode
- Open or create the SSH configuration file (
config) in the.sshdirectory:
touch config.txt
Enter fullscreen mode
Exit fullscreen mode
it is a normal txt file so fine ways to add the information below to it, you can use vim too.
- Add the following SSH configuration for GitHub in the config file:
   Host github.com
     HostName github.com
     User git
     IdentityFile "/c/Users/USER/.ssh/id_rsa"
Enter fullscreen mode
Exit fullscreen mode
Replace /c/Users/USER/.ssh/id_rsa with the path to your SSH private key. Don’t forget the double quote if you are on windows, use this if you are on mac:
~/.ssh/id_rsa
Enter fullscreen mode
Exit fullscreen mode
5. Test SSH Connection to GitHub
- Test the SSH connection to GitHub:
ssh -T git@github.com
Enter fullscreen mode
Exit fullscreen mode
- If prompted to confirm the authenticity of the host, type
yesand pressEnter.
Troubleshooting
- Permission Denied (publickey) Error: If you encounter this error, ensure that your SSH key is added to the SSH agent and correctly configured in your GitHub account and SSH configuration file.
-
Path Formatting (Windows): Use forward slashes (
/) and quotes (" ") for file paths in the SSH configuration file (config) on Windows.
Conclusion
By following these steps, you should now have SSH key authentication set up and working with GitHub on your Windows machine. This method provides a secure and efficient way to interact with GitHub repositories using Git commands without the need to enter your GitHub credentials repeatedly.
Feel free to share this article with others who may encounter similar issues when setting up SSH key authentication with GitHub on Windows.
4.3 Git на сервере — Генерация открытого SSH ключа
Генерация открытого SSH ключа
Как отмечалось ранее, многие Git-серверы используют аутентификацию по открытым SSH-ключам.
Для того чтобы предоставить открытый ключ, каждый пользователь в системе должен его сгенерировать, если только этого уже не было сделано ранее.
Этот процесс аналогичен во всех операционных системах.
Сначала вам стоит убедиться, что у вас ещё нет ключа.
По умолчанию пользовательские SSH ключи сохраняются в каталоге ~/.ssh домашнем каталоге пользователя.
Вы можете легко проверить наличие ключа перейдя в этот каталог и посмотрев его содержимое:
$ cd ~/.ssh
$ ls
authorized_keys2  id_dsa       known_hosts
config            id_dsa.pub
Ищите файл с именем id_dsa или id_rsa и соответствующий ему файл с расширением .pub.
Файл с расширением .pub — это ваш открытый ключ, а второй файл — ваш приватный ключ.
Если указанные файлы у вас отсутствуют (или даже нет каталога .ssh), вы можете создать их используя программу ssh-keygen, которая входит в состав пакета SSH в системах Linux/Mac, а для Windows поставляется вместе с Git:
$ ssh-keygen -o
Generating public/private rsa key pair.
Enter file in which to save the key (/home/schacon/.ssh/id_rsa):
Created directory '/home/schacon/.ssh'.
Enter passphrase (empty for no passphrase):
Enter same passphrase again:
Your identification has been saved in /home/schacon/.ssh/id_rsa.
Your public key has been saved in /home/schacon/.ssh/id_rsa.pub.
The key fingerprint is:
d0:82:24:8e:d7:f1:bb:9b:33:53:96:93:49:da:9b:e3 schacon@mylaptop.local
Сначала программа попросит указать расположение файла для сохранения ключа (.ssh/id_rsa), затем дважды ввести пароль для шифрования.
Если вы не хотите вводить пароль каждый раз при использовании ключа, то можете оставить его пустым или использовать программу ssh-agent.
Если вы решили использовать пароль для приватного ключа, то настоятельно рекомендуется использовать опцию -o, которая позволяет сохранить ключ в формате, более устойчивом ко взлому методом подбора, чем стандартный формат.
Теперь каждый пользователь должен отправить свой открытый ключ вам или тому, кто администрирует Git-сервер (подразумевается, что ваш SSH-сервер уже настроен на работу с открытыми ключами).
Для этого достаточно скопировать содержимое файла с расширением .pub и отправить его по электронной почте.
Открытый ключ выглядит примерно так:
$ cat ~/.ssh/id_rsa.pub
ssh-rsa AAAAB3NzaC1yc2EAAAABIwAAAQEAklOUpkDHrfHY17SbrmTIpNLTGK9Tjom/BWDSU
GPl+nafzlHDTYW7hdI4yZ5ew18JH4JW9jbhUFrviQzM7xlELEVf4h9lFX5QVkbPppSwg0cda3
Pbv7kOdJ/MTyBlWXFCR+HAo3FXRitBqxiX1nKhXpHAZsMciLq8V6RjsNAQwdsdMFvSlVK/7XA
t3FaoJoAsncM1Q9x5+3V0Ww68/eIFmb1zuUFljQJKprrX88XypNDvjYNby6vw/Pb0rwert/En
mZ+AW4OZPnTPI89ZPmVMLuayrD2cE86Z/il8b+gw3r3+1nKatmIkjn2so1d01QraTlMqVSsbx
NrRFi9wrf+M7Q== schacon@mylaptop.local
Более подробное руководство по созданию SSH-ключей и конфигурации клиента на различных системах вы можете найти в руководстве GitHub.
OpenSSH, the open source version of the Secure Socket Shell (SSH) tools, is a standard part of the Windows 10 and Windows Server 2019 operating systems. This greatly simplifies how to connect to GitHub with SSH on Windows.
Step-by-step Windows GitHub SSH example
To connect to GitHub with SSH from Windows, follow these steps:
- Open PowerShell
- Run the ssh-keygen command to create SSH keys
- Copy the value of the SSH public key
- Save the public key in your GitHub account settings
- Perform a Git clone operation using your repo’s SSH URL
Create SSH Keys for GitHub
To start, store a public SSH key on GitHub. This is validated against a locally stored private key that Git uses to validate and establish a connection. GitHub SSH keys are created with the ssh-keygen tool that comes prepackaged with updated versions of Windows.
In Windows PowerShell, issue the following ssh-keygen command to create GitHub SSH keys:
PS C:\github\ssh\example> ssh-keygen -o -t rsa -C "[email protected]"
You will be asked for an optional passphrase. It’s permissible to click enter and leave this blank.
| ssh-keygen flags | Purpose | Suggested |
|---|---|---|
| -C | Comments or metadata to add to the public key | Email address |
| -t | The type of GitHub SSH key to create | RSA |
| -o | Use the newest OpenSSH format | Leave blank |
You will also be asked for a location to save the GitHub SSH keys on Windows. Again, just click enter to accept the default location, which is the .ssh folder under the user’s home directory.
| Git and SSH tutorials |
|---|
|
Need to setup SSH for GitHub, GitLab, or CodeDeploy? These SSH Key tutorials will help:
These quick tutorials will get you working with Git and the secure shell in no time. |
The Windows GitHub SSH keys live in the .ssh folder under the current user’s home directory. The following directory listing under the .ssh folder of a user named Cameron shows the two files created by the ssh-keygen tool:
PS C:\Users\Cameron\.ssh> dir
LastWriteTime      Name
-------------      ----
1/1/2022           id_rsa
1/1/2022           id_rsa.pub
GitHub SSH config
Open the SSH public key in a text editor such as Notepad++, perform a Select All, and copy the key.
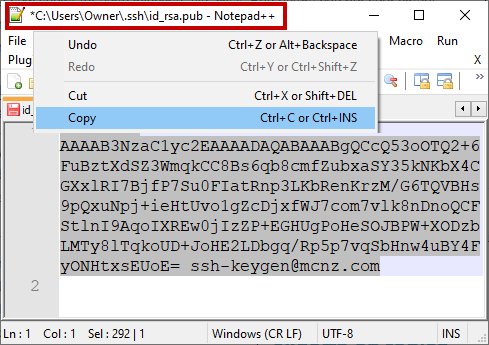
Copy the public GitHub SSH key and store this value as a registered SSH key in your GitHub account.
With the SSH key copied, log into GitHub, navigate to your account settings, and paste the public key as a new SSH key.
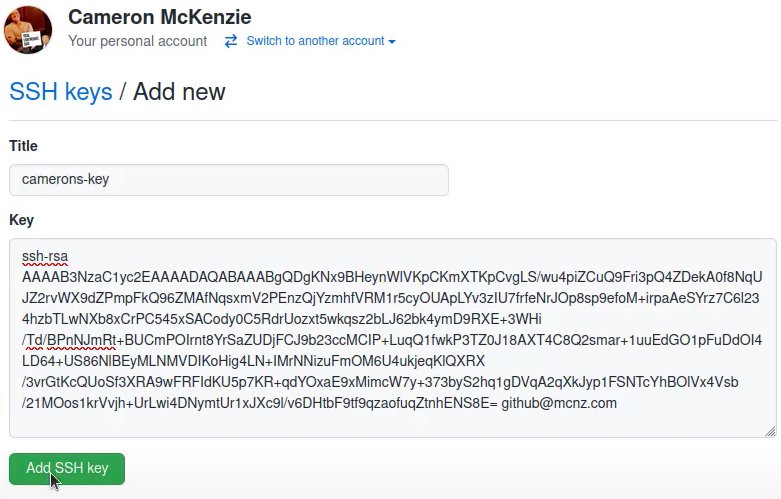
To obtain a secure, GitHub SSH Windows connection, you must register the public key in your online account settings.
SSH to GitHub on Windows
With the SSH keys generated, and the public key registered in your GitHub account, you can now use Git to connect to GitHub over SSH on Windows.
Simply copy the SSH URL from the GitHub page of the repository you wish to clone, and then provide that SSH link to the Git clone command:
PS C:\github\ssh\example> git clone [email protected]:cameronmcnz/java-jakarta-ee.git
Cloning GitHub SSH Windows into ‘java-jakarta-ee’…
Host authenticity cannot be established.
Do you still want to connect(yes or no)? yes
Receiving objects: 100% (55/55),5.78 MiB | 1.32 MiB/s, Windows GitHub SSH done.
Resolving deltas: 100% (66/66), Windows GitHub SSH done.
Notice the initial git clone with GitHub SSH on Windows complains about being unable to establish the host authenticity. That warning message is expected. Just type yes and allow the GitHub SSH clone operation to continue.
Once the remote repository is cloned, you can continue to use Git as you normally would, issue commits, add submodules, rebase branches and push back and forth with GitHub. All operations that use the network will automatically use an SSH connection.
And that’s how easy it is to connect to GitHub over SSH on Windows based machines.
Last Updated :
03 Jun, 2024
An SSH (Secure Shell) key is a pair of cryptographic keys used for authenticating and securing network communications over the SSH protocol. SSH keys are commonly used to securely access remote systems, transfer files, and execute commands on remote machines without passwords.
Components of an SSH Key
Private Key:
- The private key is kept secret and stored securely on the user’s local machine.
- It is used to decrypt encrypted messages with the corresponding public key.
Public Key:
- The public key is meant to be shared with the remote systems you want to access.
- It encrypts messages that can only be decrypted with the corresponding private key.
Now let’s start by generating an SSH key to be used in our Github account:
Step 1: Generate a New SSH Key
If you don’t already have an SSH key, you’ll need to generate one. If you already have one, you can skip to Step 2.
- Open a terminal on your computer.
- Generate a new SSH key using the ssh-keygen command:
ssh-keygen -t ed25519 -C "your_email@example.com"
- If your system doesn’t support the ed25519 algorithm, you can use rsa:
ssh-keygen -t rsa -b 4096 -C "your_email@example.com"
Replace «your_email@example.com» with your GitHub email address.
Follow the prompts:
- When asked to «Enter a file in which to save the key,» you can press Enter to accept the default location.
- When prompted, you can optionally enter a passphrase for added security.
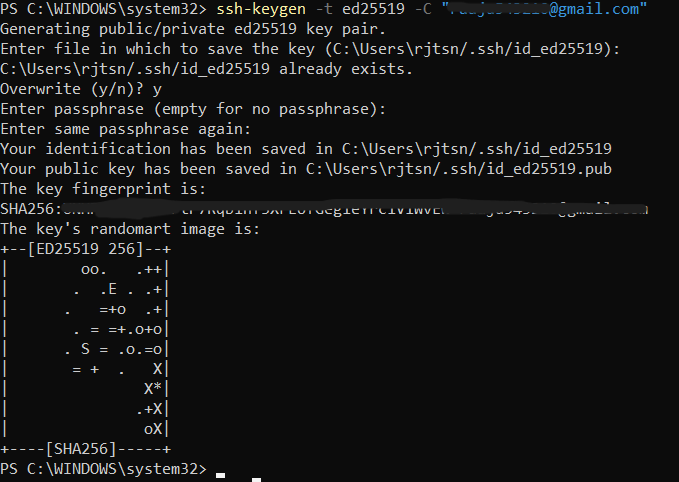
Note: It is asking for overwrite because i have already generated a ssh key earlier.
Step 2: Start the SSH Agent
- Start the SSH agent in the background:
Start-Service ssh-agent
- Add your SSH private key to the SSH agent:
ssh-add ~/.ssh/id_ed25519
- If you used the RSA algorithm, the command will be:
ssh-add ~/.ssh/id_rsa
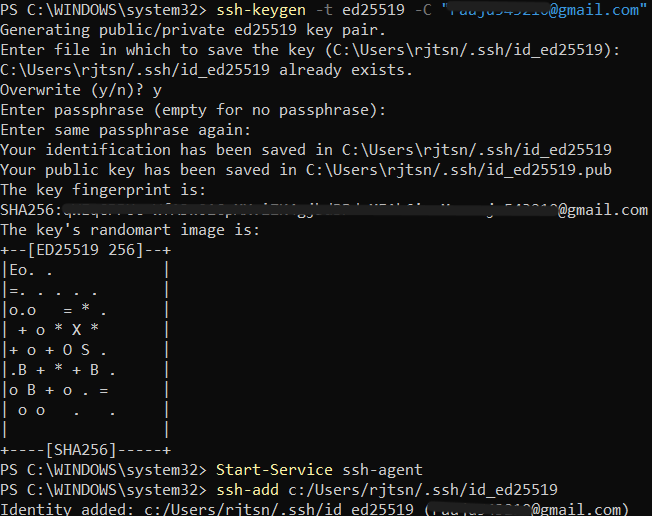
Started the ssh-agent and added the private key.
Step 3: Add the SSH Key to Your GitHub Account
- Copy the SSH public key to your clipboard:
cat ~/.ssh/id_ed25519.pub
If you used RSA:
cat ~/.ssh/id_rsa.pub
- Select and copy the output starting with ssh-ed25519 or ssh-rsa.
Log in to your GitHub account.
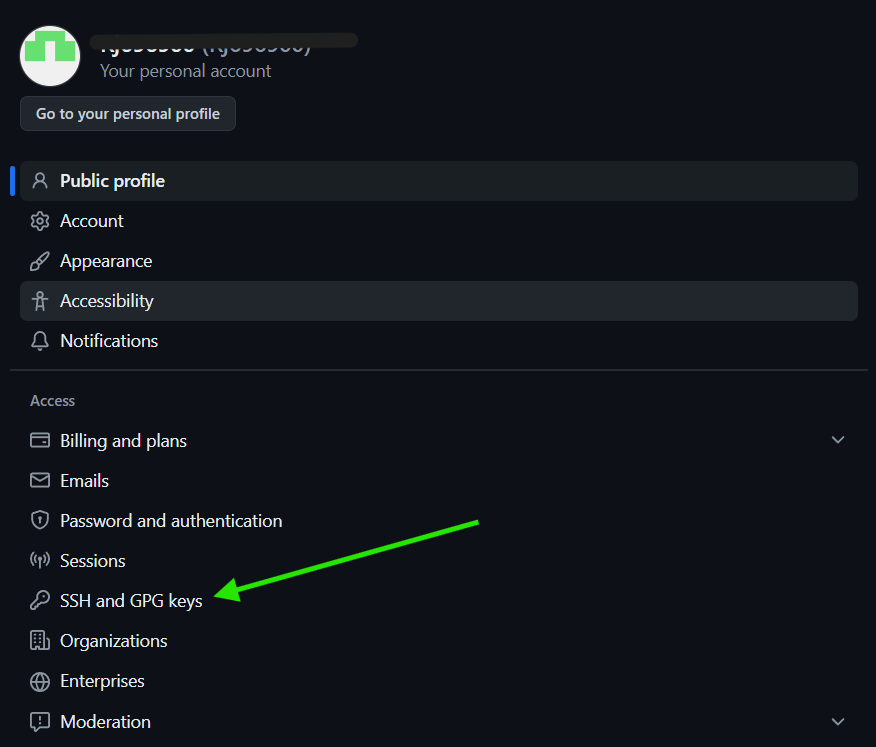
Navigate to SSH and GPG keys settings:
- Click on your profile picture in the top-right corner and select «Settings».
- In the left sidebar, click on «SSH and GPG keys».
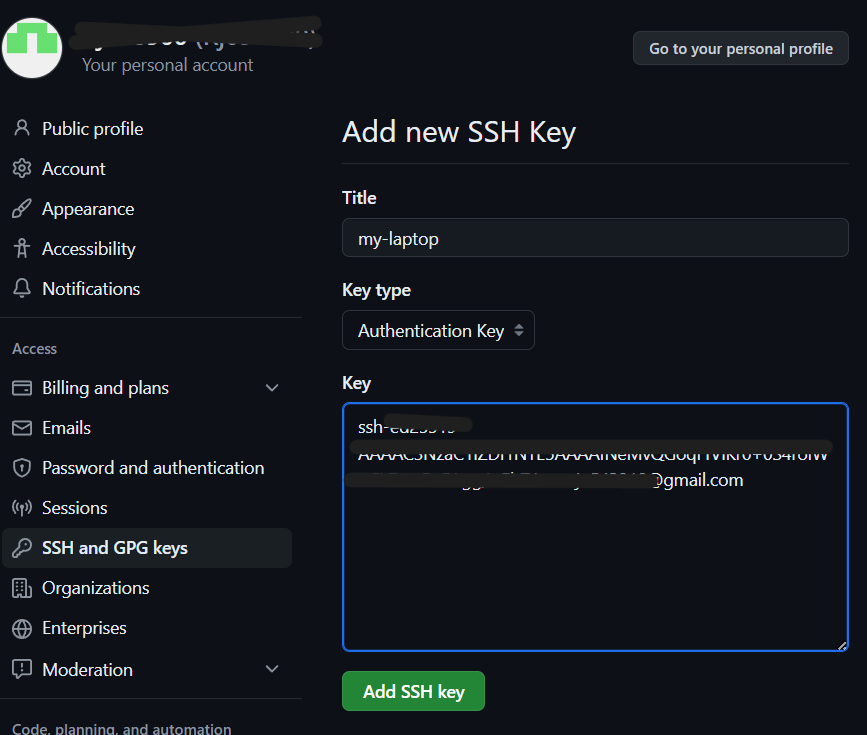
Add a new SSH key:
- Click on the «New SSH key» button.
- In the «Title» field, add a descriptive label for the new key (e.g., «My Laptop»).
- In the «Key» field, paste the SSH key you copied in Step 3.1.
- Click «Add SSH key».
Confirm your GitHub password to complete the process.
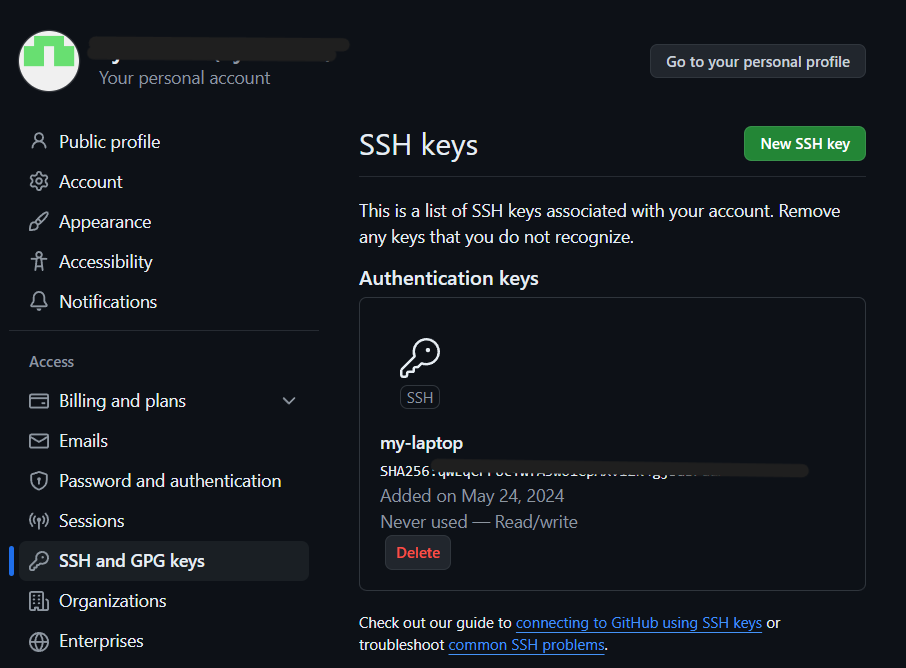
Successfully added ssh key:
Step 4: Test Your SSH Connection
- Open a terminal.
- Test the connection to GitHub
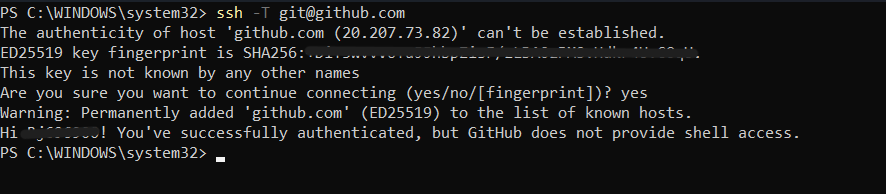
ssh -T git@github.com
You might see a warning the first time you connect:
The authenticity of host 'github.com (IP ADDRESS)' can't be established.
RSA key fingerprint is SHA256:...
Are you sure you want to continue connecting (yes/no)?
Type yes to continue.
- Verify successful connection:
If everything is set up correctly, you should see a message like:
Hi username! You've successfully authenticated, but GitHub does not provide shell access
You’ve successfully added an SSH key to your GitHub account.
Now you can clone repositories, push changes, and perform other Git operations over SSH without needing to enter your password each time.
Git and GitHub are essential tools for every developer. They’re widely used in almost every kind of software development project.
There are other Git hosting services like Gitlab and Bitbucket, but GitHub is the most popular choice for developers. You can even edit your profile to seem more attractive to recruiters.
You can use Git and GitHub to organize your projects, collaborate with other developers, and — of course — at Kinsta.
But because Git and GitHub are related yet different tools, you need to update your workflow with each of them constantly.
We recommend using SSH keys for each one of your machines. So, in this tutorial, you’ll learn what they are, some of their advantages, and how to generate and configure GitHub SSH keys.
Let’s get started!
What Are SSH Keys?
Simply put, SSH keys are credentials used for the SSH (Secure Shell) protocol to enable secure access to remote computers over the internet. Usually, that authentication occurs in a command-line environment.
This protocol is based on client-server architecture, which means you as the user (or “client”) need to use special software, called an SSH client, to log into a remote server and execute commands. This is basically what you’re doing when authenticating via a terminal to GitHub.
But SSH is not only used for GitHub. It’s broadly used by other platforms like Kinsta, Google Cloud, and Amazon Web services to create a secure channel to access their services.
Now, heading into how SSH keys really work, you need to understand the differences between public and private keys.
Public vs Private Keys
Let’s start with the basics.
The SSH protocol uses a technique of cryptography called asymmetric encryption. This term may sound complicated and weird, but nothing could be further from the truth.
Basically, asymmetric encryption is a system that uses a pair of keys, namely public and private keys.
As you may guess, the public key can be shared with anyone. Its main purpose is to encrypt data, converting the message into secret code or ciphertext. This key is usually sent to other systems — for example, servers — to encrypt the data before sending it over the internet.
On the other hand, the private key is the one that you must keep to yourself. It’s used to decrypt the encrypted data with your public key. Without it, it’s impossible to decode your encrypted information.
This method allows you and the server to keep a safe communication channel for transmitting the information.
Here’s what happens in the background when you connect to a server via SSH:
- The client sends the public key to the server.
- The server asks the client to sign a random message encrypted with the public key using the private key.
- The client signs the message and forwards the result to the server.
- A secure connection is established between the client and the server.
It’s important to keep your private keys safe and share them with anyone under no circumstances. They’re literally the key to all the information sent to you.
Using SSH Keys With GitHub
Since August 13, 2021, Github no longer accepts password authentication for command-line access. This means now you need to authenticate via a personal access token or use an SSH key (a little bit more convenient).
Here’s what happens when you try to authenticate with your GitHub password over HTTP in a terminal:
Username for 'https://github.com': yourusername

Password for 'https://[email protected]':

remote: Support for password authentication was removed on August 13, 2021. Please use a personal access token instead.

remote: Please see https://github.blog/2020-12-15-token-authentication-requirements-for-git-operations/ for more information.

fatal: Authentication failed for 'https://github.com/yourusername/repository.git/'
GitHub needs your public key to authorize you to edit any of your repos via SSH.
Let’s see how you can generate SSH keys locally.
How to Generate SSH Keys Locally
Now that you understand a little bit about the SSH protocol and the differences between public and private keys, it’s time to set up the secure SSH channel between your machine and your GitHub repos.
Before we move forward, you should already have a GitHub account, and a terminal/command prompt with Git installed in your system. If you’re running Windows, make sure you installed Git bash, which has all the tools you’ll need to follow along with this tutorial built-in.
The OpenSSH client is the most popular open-source software used to connect via SSH. You won’t need to worry about your operating system because it’s installed by default on Linux, macOS, and Windows 10.
You need to fire up a command prompt on Windows or a terminal on Unix-based systems to generate local SSH keys. Usually, you can do this by searching for “terminal”, “cmd”, or “powershell” in your application panel, then clicking the icon that shows up.

After doing this, you should have a window similar to the following image.

Run the following command to generate a local SSH pair of keys:
ssh-keygen -t ed25519 -C "[email protected]"It’s time to tell you a secret: No one can really remember this command! Most developers have to Google it every time because:
- It’s a really long command, with forgettable, random-seeming numbers.
- We use it rarely, so it’s not worth it to commit it to memory most of the time.
However, it’s important to understand each command that we introduce into our terminals, so let’s see what each part of this one means.
- ssh-keygen: The command-line tool used for creating a new pair of SSH keys. You can see its flags with
ssh-keygen help - -t ed25519: The
-tflag is used to indicate the algorithm used to create the digital signature of the key pair. If your system supports it,ed25519is the best algorithm you can use to create SSH key pairs. - -C “email”: The
-Cflag is used to provide a custom comment at the end of the public key, which usually is the email or identification of the creator of the key pair.
After you’ve typed the command into your terminal, you’ll have to enter the file to which you would like to save the keys. By default, it’s located in your home directory, in a hidden folder named “.ssh”, but you can change it to whatever you like.
Then you’ll be asked for a passphrase to add to your key pair. This adds an extra layer of security if, at any time, your device is compromised. It is not obligatory to add a passphrase, but it’s always recommended.
This is what the whole process looks like:
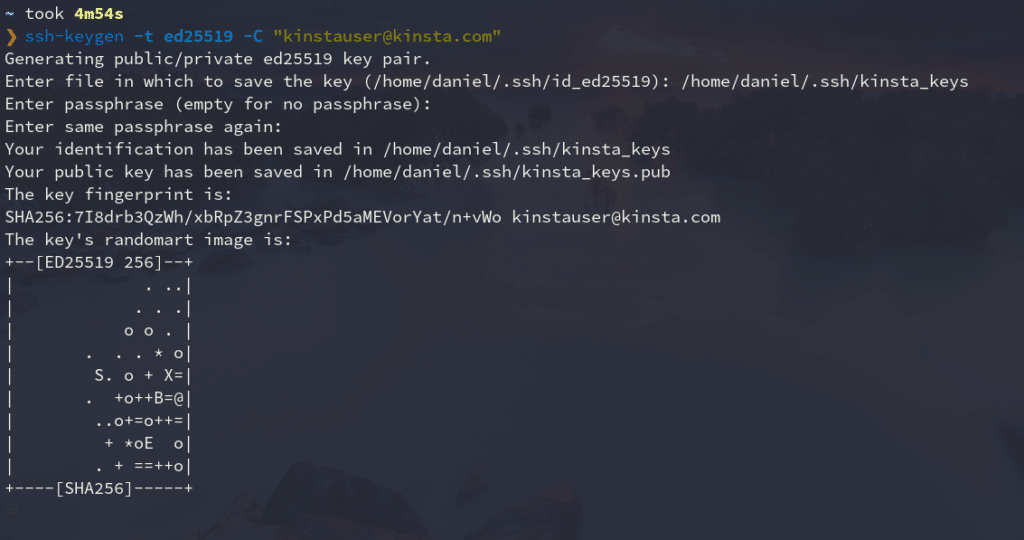
As you can see, this command generates two files in the directory you selected (commonly ~/.ssh): the public key with the .pub extension, and the private one without an extension.
We’ll show you how to add the public key to your GitHub account later.
Add SSH Key to ssh-agent
The ssh-agent program runs in the background, holds your private keys and passphrases safely, and keeps them ready to use by ssh. It’s a great utility that saves you from typing your passphrase every time you want to connect to a server.
Because of this, you’re going to add your new private key to this agent. Here’s how:
- Make sure ssh-agent is running in the background.
eval `ssh-agent`
# Agent pid 334065
If you get a message similar to this if everything is fine. It means the ssh-agent is running under a particular process id (PID).
- Add your SSH private key (the one without extension) to the ssh-agent.
ssh-add ~/.ssh/kinsta_keysReplace kinsta_keys with the name of your SSH key. If this is the first key you’ve created, it should be named “id_algorithm_used,” for instance, id_ed25519.
Add SSH Key to GitHub Account
The final step is to add your public key to your GitHub account. Just follow these instructions:
- Copy your SSH public key to your clipboard. You can open the file where it is located with a text editor and copy it, or use the terminal to show its contents.
cat ~/.ssh/kinsta_keys.pub # ssh-ed25519 AAAAC3NzaC1lZDI1NTE5AAAAIJl3dIeudNqd0DPMRD6OIh65tjkxFNOtwGcWB2gCgPhk [email protected] - Log into GitHub and go to the upper-right section of the page, click in your profile photo, and select Settings.
GitHub settings. - Then, in profile your settings, click SSH and GPG keys.
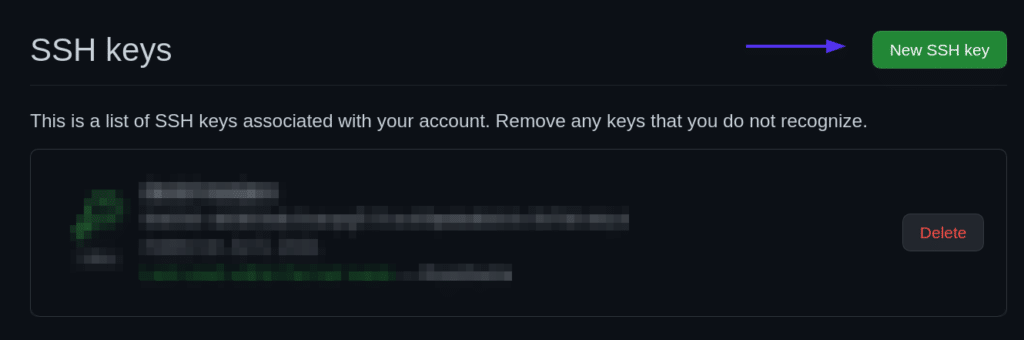
SSH and GPG keys. - Click the New SSH key button.

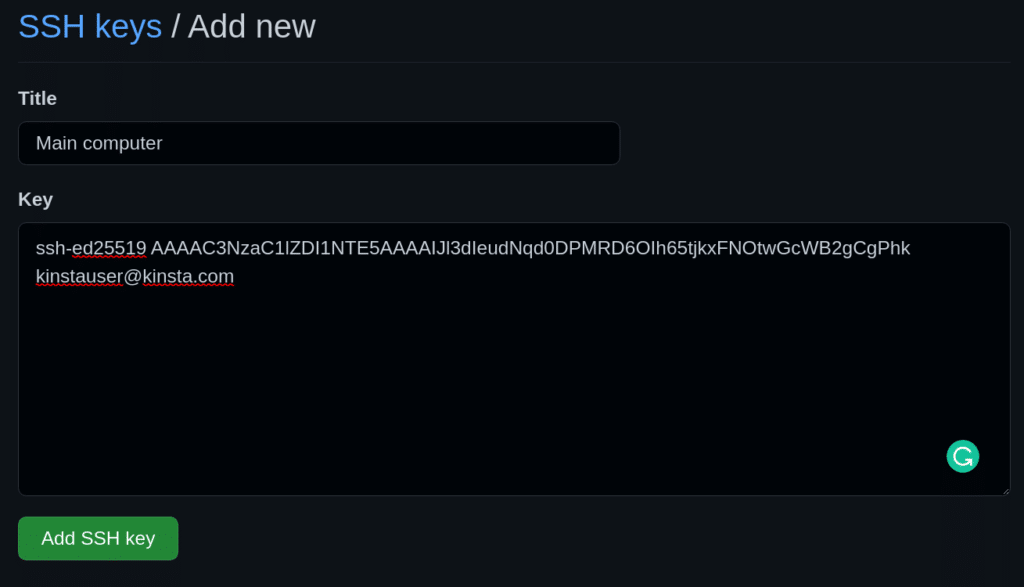
New SSH key button. - Give your new SSH key on GitHub a Title — usually, the device you’ll use that key from. And then paste the key into the Key area.

Add a new SSH key form. - Add your SSH key.

Add SSH key button.

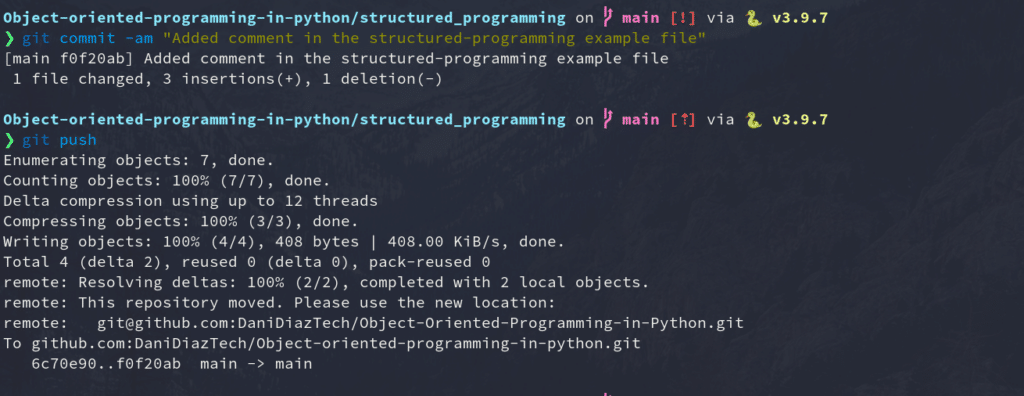
Test SSH Connection With a Repo Push
It’s time to test everything you’ve done so far. You’re going to change, commit, and push to one of your existing repos using SSH to ensure your connection is set up correctly.
For our example, we will modify the simple HTML site we created in our Git for Web Development tutorial.
First, we’ll need to clone the repository into our local machine. We can go to the repo page on GitHub and copy the SSH address it provides.
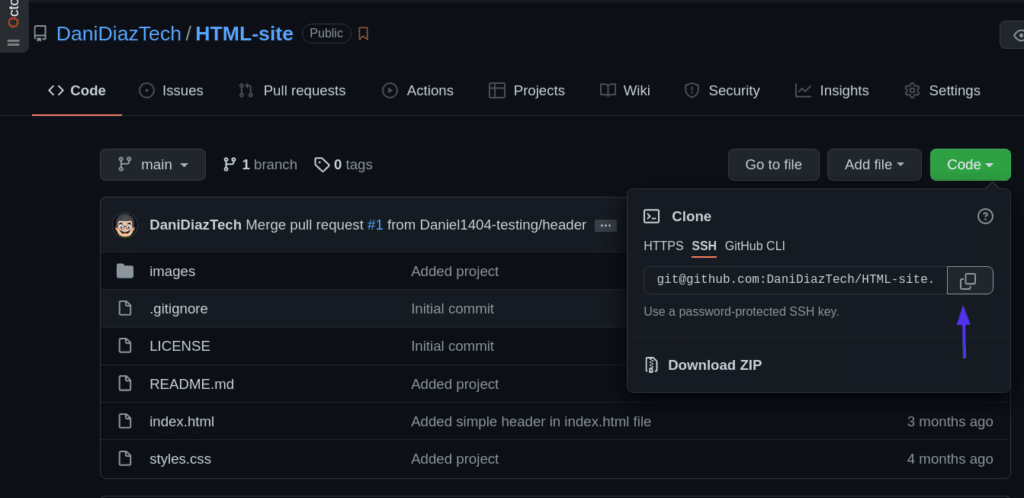
Then, clone the repo using a terminal:
git clone [email protected]:DaniDiazTech/HTML-site.gitNow, let’s add a simple <h1> tag in the index.html file:
...
<div class="container my-2">
    <h1 class="text-center">A new title!<h1>
</div>

<div class="container my-3">
...
We’re not touching any JavaScript or CSS to keep this edit simple. But if you’re skilled with JavaScript, you might find a place at Kinsta. Check the coding skills you need to be part of the Kinsta team.
After doing this, commit the changes:
git commit -am "Added a simple title"And push them into GitHub just as you’d normally do.
git pushIf everything went fine, congratulations! You just set up an SSH connection between your machine and GitHub.
Manage Multiple SSH Keys for Different GitHub Accounts
If you have multiple GitHub accounts — let’s say one for your personal projects and one for your work — it’s difficult to use SSH for both of them. You would normally need separate machines to authenticate to different GitHub accounts.
But this can be solved easily by configuring the SSH config file.
Let’s get into it.
- Create another SSH key pair, and add it to your other GitHub account. Keep in mind the name of the file you’re assigning the new key to.
ssh-keygen -t ed25519 -C "[email protected]" - Create the SSH config file. The config file tells the ssh program how it should behave. By default, the config file may not exist, so create it inside the .ssh/ folder:
touch ~/.ssh/config - Modify the SSH config file. Open the config file and paste the code below:
#Your day-to-day GitHub account

Host github.com
  HostName github.com
  IdentityFile ~/.ssh/id_ed25519
  IdentitiesOnly yes

# Work account
Host github-work
  HostName github.com
  IdentityFile ~/.ssh/work_key_file
  IdentitiesOnly yes
Now, every time you need to authenticate via SSH using your work or secondary account, you tweak a bit the repo SSH address, from:
[email protected]:workaccount/project.git…to:
git@github-work:workaccount/project.gitSummary
Congratulations — you’ve learned most of the practical knowledge you need to connect to GitHub via SSH!
This tutorial discussed the need for the SSH protocol, the differences between public and private keys, how to generate keys, add them to GitHub, and even manage multiple SSH keys for different GitHub accounts. Keep in mind that unless you want to lose access to everything, your private key needs to stay that way: private.
With this knowledge, now you’re ready to develop a flawless workflow with Git and GitHub. Keep coding!
Daniel Diaz
Daniel is a self-taught Python Developer, Technical Writer, and long-life learner. He enjoys creating software from scratch and explaining this process through stunning articles. Follow him on Twitter: @DaniDiazTech
-
Website
-
LinkedIn
-
Twitter