
- Tier: Free, Premium, Ultimate
- Offering: GitLab.com, GitLab Self-Managed, GitLab Dedicated
Git is a distributed version control system, which means you can work locally,
then share or push your changes to a server. In this case, the server you push to is GitLab.
GitLab uses the SSH protocol to securely communicate with Git.
When you use SSH keys to authenticate to the GitLab remote server,
you don’t need to supply your username and password each time.
What are SSH keys
SSH uses two keys, a public key and a private key.
- The public key can be distributed.
- The private key should be protected.
It is not possible to reveal confidential data by uploading your public key. When you need to copy or upload your SSH public key, make sure you do not accidentally copy or upload your private key instead.
You can use your private key to sign commits,
which makes your use of GitLab and your data even more secure.
This signature then can be verified by anyone using your public key.
For details, see Asymmetric cryptography, also known as public-key cryptography.
Prerequisites
To use SSH to communicate with GitLab, you need:
- The OpenSSH client, which comes pre-installed on GNU/Linux, macOS, and Windows 10.
- SSH version 6.5 or later. Earlier versions used an MD5 signature, which is not secure.
To view the version of SSH installed on your system, run ssh -V.
Supported SSH key types
To communicate with GitLab, you can use the following SSH key types:
- ED25519
- ED25519_SK
- ECDSA_SK
- RSA
- ECDSA (As noted in Practical Cryptography With Go, the security issues related to DSA also apply to ECDSA.)
Administrators can restrict which keys are permitted and their minimum lengths.
ED25519 SSH keys
The book Practical Cryptography With Go
suggests that ED25519 keys are more secure and performant than RSA keys.
OpenSSH 6.5 introduced ED25519 SSH keys in 2014, and they should be available on most
operating systems.
ED25519 keys might not be fully supported by all FIPS systems. For more information, see issue 367429.
ED25519_SK SSH keys
To use ED25519_SK SSH keys on GitLab, your local client and GitLab server
must have OpenSSH 8.2 or later installed.
ECDSA_SK SSH keys
To use ECDSA_SK SSH keys on GitLab, your local client and GitLab server
must have OpenSSH 8.2 or later installed.
RSA SSH keys
Available documentation suggests ED25519 is more secure than RSA.
If you use an RSA key, the US National Institute of Standards and Technology in
Publication 800-57 Part 3 (PDF)
recommends a key size of at least 2048 bits. Due to limitations in Go,
RSA keys cannot exceed 8192 bits.
The default key size depends on your version of ssh-keygen.
Review the man page for your installed ssh-keygen command for details.
See if you have an existing SSH key pair
Before you create a key pair, see if a key pair already exists.
- Go to your home directory.
- Go to the
.ssh/subdirectory. If the.ssh/subdirectory doesn’t exist,
you are either not in the home directory, or you haven’t usedsshbefore.
In the latter case, you need to generate an SSH key pair. - See if a file with one of the following formats exists:
Algorithm Public key Private key ED25519 (preferred) id_ed25519.pubid_ed25519ED25519_SK id_ed25519_sk.pubid_ed25519_skECDSA_SK id_ecdsa_sk.pubid_ecdsa_skRSA (at least 2048-bit key size) id_rsa.pubid_rsaDSA (deprecated) id_dsa.pubid_dsaECDSA id_ecdsa.pubid_ecdsa
Generate an SSH key pair
If you do not have an existing SSH key pair, generate a new one:
-
Open a terminal.
-
Run
ssh-keygen -tfollowed by the key type and an optional comment.
This comment is included in the.pubfile that’s created.
You may want to use an email address for the comment.For example, for ED25519:
ssh-keygen -t ed25519 -C "<comment>"For 2048-bit RSA:
ssh-keygen -t rsa -b 2048 -C "<comment>" -
Press Enter. Output similar to the following is displayed:
Generating public/private ed25519 key pair. Enter file in which to save the key (/home/user/.ssh/id_ed25519): -
Accept the suggested filename and directory, unless you are generating a deploy key
or want to save in a specific directory where you store other keys.You can also dedicate the SSH key pair to a specific host.
-
Specify a passphrase:
Enter passphrase (empty for no passphrase):
Enter same passphrase again:
A confirmation is displayed, including information about where your files are stored.
A public and private key are generated. Add the public SSH key to your GitLab account
and keep the private key secure.
Configure SSH to point to a different directory
If you did not save your SSH key pair in the default directory,
configure your SSH client to point to the directory where the private key is stored.
-
Open a terminal and run this command:
eval $(ssh-agent -s) ssh-add <directory to private SSH key> -
Save these settings in the
~/.ssh/configfile. For example:# GitLab.com Host gitlab.com PreferredAuthentications publickey IdentityFile ~/.ssh/gitlab_com_rsa # Private GitLab instance Host gitlab.company.com PreferredAuthentications publickey IdentityFile ~/.ssh/example_com_rsa
For more information on these settings, see the man ssh_config page in the SSH configuration manual.
Public SSH keys must be unique to GitLab because they bind to your account.
Your SSH key is the only identifier you have when you push code with SSH.
It must uniquely map to a single user.
Update your SSH key passphrase
You can update the passphrase for your SSH key:
-
Open a terminal and run this command:
ssh-keygen -p -f /path/to/ssh_key -
At the prompts, enter the passphrase and then press Enter.
Upgrade your RSA key pair to a more secure format
If your version of OpenSSH is between 6.5 and 7.8, you can save your private
RSA SSH keys in a more secure OpenSSH format by opening a terminal and running
this command:
ssh-keygen -o -f ~/.ssh/id_rsaAlternatively, you can generate a new RSA key with the more secure encryption format with
the following command:
ssh-keygen -o -t rsa -b 4096 -C "<comment>"Generate an SSH key pair for a FIDO2 hardware security key
To generate ED25519_SK or ECDSA_SK SSH keys, you must use OpenSSH 8.2 or later:
-
Insert a hardware security key into your computer.
-
Open a terminal.
-
Run
ssh-keygen -tfollowed by the key type and an optional comment.
This comment is included in the.pubfile that’s created.
You may want to use an email address for the comment.For example, for ED25519_SK:
ssh-keygen -t ed25519-sk -C "<comment>"For ECDSA_SK:
ssh-keygen -t ecdsa-sk -C "<comment>"If your security key supports FIDO2 resident keys, you can enable this when
creating your SSH key:ssh-keygen -t ed25519-sk -O resident -C "<comment>"-O residentindicates that the key should be stored on the FIDO authenticator itself.
Resident key is easier to import to a new computer because it can be loaded directly
from the security key byssh-add -K
orssh-keygen -K. -
Press Enter. Output similar to the following is displayed:
Generating public/private ed25519-sk key pair. You may need to touch your authenticator to authorize key generation. -
Touch the button on the hardware security key.
-
Accept the suggested filename and directory:
Enter file in which to save the key (/home/user/.ssh/id_ed25519_sk): -
Specify a passphrase:
Enter passphrase (empty for no passphrase):
Enter same passphrase again:
A confirmation is displayed, including information about where your files are stored.
A public and private key are generated.
Add the public SSH key to your GitLab account.
Generate an SSH key pair with a password manager
Generate an SSH key pair with 1Password
You can use 1Password and the 1Password browser extension to either:
- Automatically generate a new SSH key.
- Use an existing SSH key in your 1Password vault to authenticate with GitLab.
- Sign in to GitLab.
- On the left sidebar, select your avatar.
- Select Edit profile.
- On the left sidebar, select SSH Keys.
- Select Add new key.
- Select Key, and you should see the 1Password helper appear.
- Select the 1Password icon and unlock 1Password.
- You can then select Create SSH Key or select an existing SSH key to fill in the public key.
- In the Title box, enter a description, like
Work Laptopor
Home Workstation. - Optional. Select the Usage type of the key. It can be used either for
AuthenticationorSigningor both.Authentication & Signingis the default value. - Optional. Update Expiration date to modify the default expiration date.
- Select Add key.
For more information about using 1Password with SSH keys, see the 1Password documentation.
Add an SSH key to your GitLab account
To use SSH with GitLab, copy your public key to your GitLab account:
-
Copy the contents of your public key file. You can do this manually or use a script.
For example, to copy an ED25519 key to the clipboard:macOS
tr -d '\n' < ~/.ssh/id_ed25519.pub | pbcopyLinux (requires the
xclippackage)xclip -sel clip < ~/.ssh/id_ed25519.pubGit Bash on Windows
cat ~/.ssh/id_ed25519.pub | clipReplace
id_ed25519.pubwith your filename. For example, useid_rsa.pubfor RSA. -
Sign in to GitLab.
-
On the left sidebar, select your avatar.
-
Select Edit profile.
-
On the left sidebar, select SSH Keys.
-
Select Add new key.
-
In the Key box, paste the contents of your public key.
If you manually copied the key, make sure you copy the entire key,
which starts withssh-rsa,ssh-dss,ecdsa-sha2-nistp256,ecdsa-sha2-nistp384,ecdsa-sha2-nistp521,
ssh-ed25519,sk-ecdsa-sha2-nistp256@openssh.com, orsk-ssh-ed25519@openssh.com, and may end with a comment. -
In the Title box, type a description, like
Work Laptopor
Home Workstation. -
Optional. Select the Usage type of the key. It can be used either for
AuthenticationorSigningor both.Authentication & Signingis the default value. -
Optional. Update Expiration date to modify the default expiration date.
- Administrators can view expiration dates and use them for
guidance when deleting keys. - GitLab checks all SSH keys at 01:00 AM UTC every day. It emails an expiration notice for all SSH keys that are scheduled to expire seven days from now.
- GitLab checks all SSH keys at 02:00 AM UTC every day. It emails an expiration notice for all SSH keys that expire on the current date.
- Administrators can view expiration dates and use them for
-
Select Add key.
Verify that you can connect
Verify that your SSH key was added correctly.
The following commands use the example hostname gitlab.example.com. Replace this example hostname with your GitLab instance’s hostname, for example, git@gitlab.com.
By default, GitLab uses git username to authenticate. It can be different if it was changed by the administrator.
-
To ensure you’re connecting to the correct server, check the server’s SSH host keys fingerprint. For:
- GitLab.com, see the SSH host keys fingerprints documentation.
- GitLab.com or another GitLab instance, see
gitlab.example.com/help/instance_configuration#ssh-host-keys-fingerprintswheregitlab.example.comisgitlab.com(for
GitLab.com) or the address of the GitLab instance.
-
Open a terminal and run this command, replacing
gitlab.example.comwith your
GitLab instance URL:ssh -T git@gitlab.example.com -
If this is the first time you connect, you should verify the
authenticity of the GitLab host. If you see a message like:The authenticity of host 'gitlab.example.com (35.231.145.151)' can't be established. ECDSA key fingerprint is SHA256:HbW3g8zUjNSksFbqTiUWPWg2Bq1x8xdGUrliXFzSnUw. Are you sure you want to continue connecting (yes/no)? yes Warning: Permanently added 'gitlab.example.com' (ECDSA) to the list of known hosts.Type
yesand press Enter. -
Run the
ssh -T git@gitlab.example.comcommand again. You should receive a Welcome to GitLab,@username! message.
If the welcome message doesn’t appear, you can troubleshoot by running ssh
in verbose mode:
ssh -Tvvv git@gitlab.example.comUse different keys for different repositories
You can use a different key for each repository.
Open a terminal and run this command:
git config core.sshCommand "ssh -o IdentitiesOnly=yes -i ~/.ssh/private-key-filename-for-this-repository -F /dev/null"This command does not use the SSH Agent and requires Git 2.10 or later. For more information
on ssh command options, see the man pages for both ssh and ssh_config.
View your SSH keys
To view the SSH keys for your account:
- On the left sidebar, select your avatar.
- Select Edit profile.
- On the left sidebar, select SSH Keys.
Your existing SSH keys are listed at the bottom of the page. The information includes:
- The title for the key
- Public fingerprint
- Permitted usage types
- Creation date
- Last used date
- Expiry date
Remove an SSH key
You can revoke or delete your SSH key to permanently remove it from your account.
Removing your SSH key has additional implications if you sign your commits with the key. For more information, see Signed commits with removed SSH keys.
Revoke an SSH key
If your SSH key becomes compromised, revoke the key.
Prerequisites:
- The SSH key must have the
SigningorAuthentication & Signingusage type.
To revoke an SSH key:
- On the left sidebar, select your avatar.
- Select Edit profile.
- On the left sidebar, select SSH Keys.
- Next to the SSH key you want to revoke, select Revoke.
- Select Revoke.
Delete an SSH key
To delete an SSH key:
- On the left sidebar, select your avatar.
- Select Edit profile.
- On the left sidebar, select SSH Keys.
- Next to the key you want to delete, select Remove (
remove ). - Select Delete.
Use different accounts on a single GitLab instance
You can use multiple accounts to connect to a single instance of GitLab. You
can do this by using the command in the previous topic.
However, even if you set IdentitiesOnly to yes, you cannot sign in if an
IdentityFile exists outside of a Host block.
Instead, you can assign aliases to hosts in the ~/.ssh/config file.
- For the
Host, use an alias likeuser_1.gitlab.comand
user_2.gitlab.com. Advanced configurations
are more difficult to maintain, and these strings are easier to
understand when you use tools likegit remote. - For the
IdentityFile, use the path the private key.
# User1 Account Identity
Host <user_1.gitlab.com>
  Hostname gitlab.com
  PreferredAuthentications publickey
  IdentityFile ~/.ssh/<example_ssh_key1>

# User2 Account Identity
Host <user_2.gitlab.com>
  Hostname gitlab.com
  PreferredAuthentications publickey
  IdentityFile ~/.ssh/<example_ssh_key2>
Now, to clone a repository for user_1, use user_1.gitlab.com in the git clone command:
git clone git@<user_1.gitlab.com>:gitlab-org/gitlab.gitTo update a previously-cloned repository that is aliased as origin:
git remote set-url origin git@<user_1.gitlab.com>:gitlab-org/gitlab.gitPrivate and public keys contain sensitive data. Ensure the permissions
on the files make them readable to you but not accessible to others.
Configure two-factor authentication (2FA)
You can set up two-factor authentication (2FA) for
Git over SSH. You should use
ED25519_SK or ECDSA_SK SSH keys.
Use EGit on Eclipse
If you are using EGit, you can add your SSH key to Eclipse.
Use SSH on Microsoft Windows
If you’re running Windows 10, you can either use the Windows Subsystem for Linux (WSL)
with WSL 2 which
has both git and ssh preinstalled, or install Git for Windows to
use SSH through PowerShell.
The SSH key generated in WSL is not directly available for Git for Windows, and vice versa,
as both have a different home directory:
- WSL:
/home/<user> - Git for Windows:
C:\Users\<user>
You can either copy over the .ssh/ directory to use the same key, or generate a key in each environment.
If you’re running Windows 11 and using OpenSSH for Windows, ensure the HOME
environment variable is set correctly. Otherwise, your private SSH key might not be found.
Alternative tools include:
- Cygwin
- PuTTYgen 0.81 and later (earlier versions are vulnerable to disclosure attacks)
Overriding SSH settings on the GitLab server
GitLab integrates with the system-installed SSH daemon and designates a user
(typically named git) through which all access requests are handled. Users
who connect to the GitLab server over SSH are identified by their SSH key instead
of their username.
SSH client operations performed on the GitLab server are executed as this
user. You can modify this SSH configuration. For example, you can specify
a private SSH key for this user to use for authentication requests. However, this practice
is not supported and is strongly discouraged as it presents significant
security risks.
GitLab checks for this condition, and directs you
to this section if your server is configured this way. For example:
$ gitlab-rake gitlab:check

Git user has default SSH configuration? ... no
  Try fixing it:
  mkdir ~/gitlab-check-backup-1504540051
  sudo mv /var/lib/git/.ssh/id_rsa ~/gitlab-check-backup-1504540051
  sudo mv /var/lib/git/.ssh/id_rsa.pub ~/gitlab-check-backup-1504540051
  For more information see:
  doc/user/ssh.md#overriding-ssh-settings-on-the-gitlab-server
  Please fix the error above and rerun the checks.
Remove the custom configuration as soon as you can. These customizations
are explicitly not supported and may stop working at any time.
Verify GitLab SSH ownership and permissions
The GitLab SSH folder and files must have the following permissions:
- The folder
/var/opt/gitlab/.ssh/must be owned by thegitgroup and thegituser, with permissions set to700. - The
authorized_keysfile must have permissions set to600. - The
authorized_keys.lockfile must have permissions set to644.
To verify that these permissions are correct, run the following:
stat -c "%a %n" /var/opt/gitlab/.ssh/.Set permissions
If the permissions are wrong, sign in to the application server and run:
cd /var/opt/gitlab/
chown git:git /var/opt/gitlab/.ssh/
chmod 700  /var/opt/gitlab/.ssh/
chmod 600  /var/opt/gitlab/.ssh/authorized_keys
chmod 644 /var/opt/gitlab/.ssh/authorized_keys.lockSSH-ключи используются для аутентификации вашего компьютера на удалённом сервере, в данном случае на сервере GitLab. Благодаря этому вы можете подтверждать свою личность без ввода пароля.
Чтобы создать ключ, откройте терминал или командную строку и введите команду для генерации ключей ssh-keygen. Если вы хотите сгенерировать их в определённой папке, то введите путь до неё. При генерации ключа можно указать пароль, но это необязательно.
Подробная инструкция по генерации ключей находится по это ссылке docs.gitlab.com/17.0/ee/user/ssh.html
☝️
ssh или https
Если при работе с ssh возникнут проблемы, то всегда можно использовать способ работы через https. В разделе документации работы с репозиторием используется пример с подключением через https.
Для генерации ключа желательно использовать консоль Git Bash.
Выполним команду
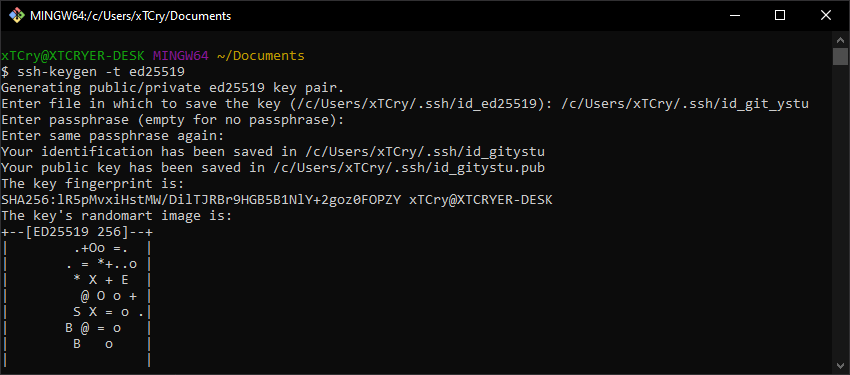
Если вы хотите сгенерировать ключ в определённой папке со своим названием, то введите путь до неё и название файла.
Так, в моем примере, было изменено название файла с /c/Users/xTCry/.ssh/id_ed25519 на /c/Users/xTCry/.ssh/id_git_ystu
При генерации ключа можно указать пароль, который будет запрашиваться каждый раз при использовании ssh, но это необязательно (просто нажать Enter).
Как мы можем видеть в сообщении, что в указанной папке у нас появится два файла с ключами — приватный (id_git_ystu) и открытый (id_git_ystu.pub).
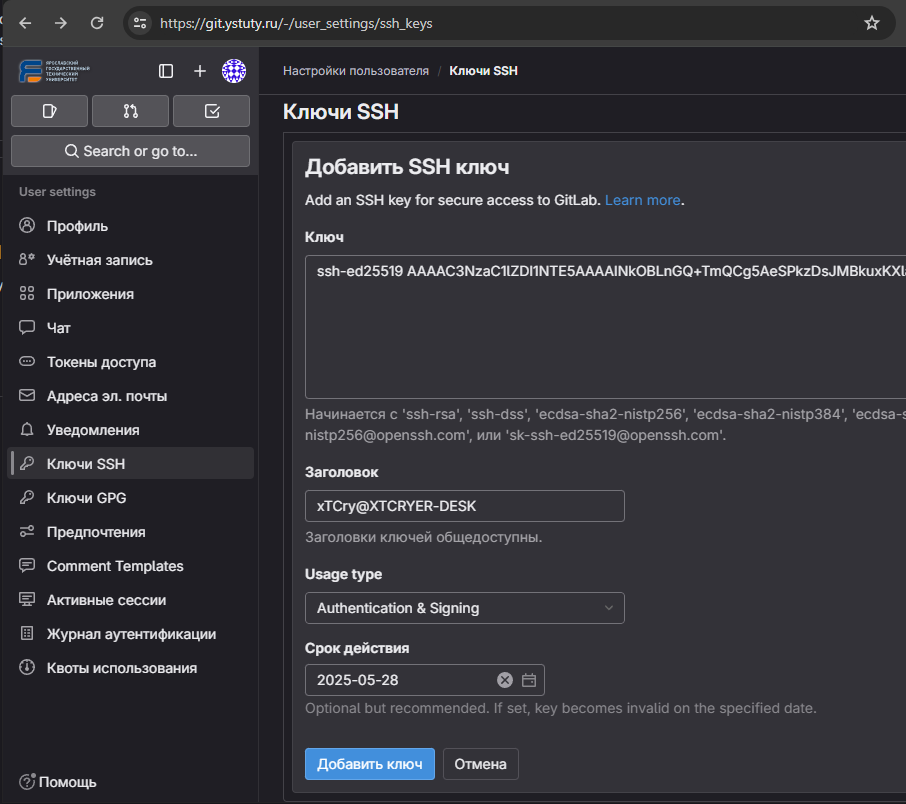
Добавлять в GitLab нужно второй файл с расширением .pub. Откройте его в текстовом редакторе и скопируйте содержимое в буфер обмена.
Или выполните в консоли команду cat с указанием пути до публичного ключа.cat /c/Users/xTCry/.ssh/id_git_ystu.pub

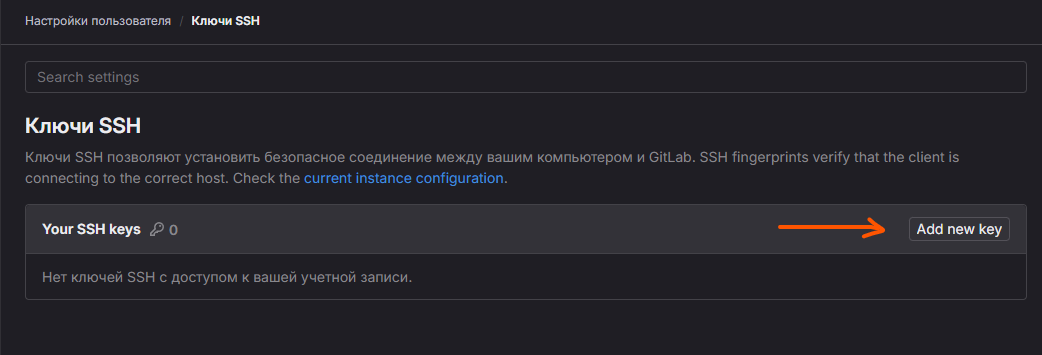
Перейдите на страницу добавления вашего ssh-ключа на GitLab через меню настроек профиля и пункт Ключи SSH.

Нажмите на кнопку добавления ключа
Публичный ключ добавляем в свой профиль
Теперь вы можете работать со своими проектами в git через ssh подключение, а не только https с авторизацией по логину/паролю.
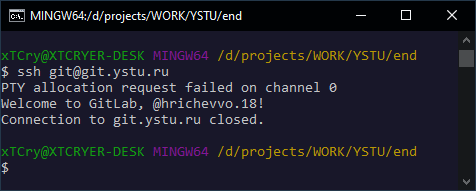
Проверим, что ssh успешно подключается к нашему GitLab пространству.
Выполните команду в Bash консоли для простого подключения к ssh GitLab сервера
Если подключение прошло успешно и вывод содержит следующее, то всё отлично и можете клонировать/пушить и пуллить проекты
PTY allocation request failed on channel 0
Welcome to GitLab, @ivanovaa.20!
Connection to git.ystu.ru closed.
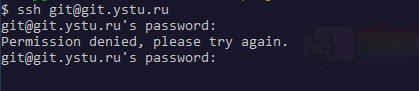
Если же при подключении у вас запрашивается ввод пароля, то значит наш приватный ключ не был обнаружен ssh-агентом или конфигом.
Тогда нам следует настроить конфиг подключения ssh
Для начала можно проверить, что мы можем подключиться по конкретному ключу.
Выполните команду (в аргумент -i передается путь к сгенерированному приватному ключу). Если пир генерации ключа был указан другой путь и/или название файла, то замените на свое.
Если подключение было успешным, то можно приступить к настройке конфига, чтобы не указывать путь к ключу каждый раз.
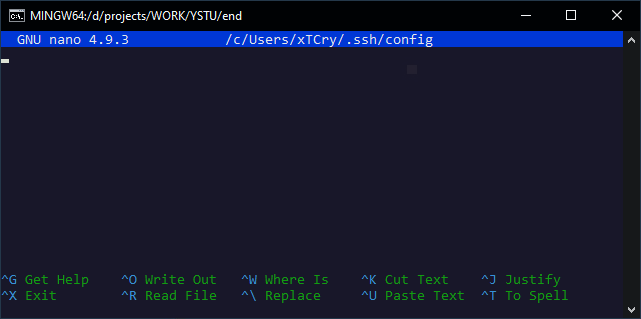
Выполните команду nano ~/.ssh/config для редактирования файла в Bash консоли.
Или можете открыть этот файл в любом редакторе по пути (Windows) C:\Users\<username>\.ssh\config
Предположим, что мы работаем через консоль
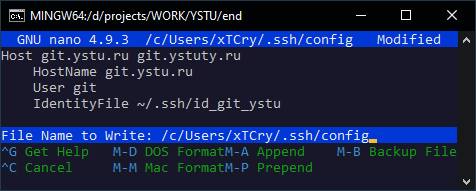
Нам надо добавить в этот файл следующее содержимое
Host git.ystu.ru git.ystuty.ru
HostName git.ystu.ru
User git
IdentityFile ~/.ssh/id_ed25519
В параметре IdentifyFile указывается путь к нашему приватному ключу. Если при генерации ключа вы не изменяли путь и/или название, то вносить изменения не надо.
Если вы также указали название ключа как в примере на id_git_ystu, то надо изменить IdentityFile ~/.ssh/id_ed25519 на IdentityFile ~/.ssh/id_git_ystu и сохраняем файл.
Чтобы сохранить файл в редакторе nano, нужно нажать следующее сочетание клавиш: Ctrl+X, чтобы выполнить выход; потом нажать Y, чтобы подтвердить, что мы хотим сохранить изменения, а потом Enter.
Теперь можно снова попробовать выполнить команду
И убедиться, что подключение по нужному ключу произошло успешно
Introduction
Git connects to remotes by default via HTTPS, which requires you to enter your login and password every time you run a command like Git pull or git push, using the SSH protocol. You may connect to servers and authenticate to access their services. The three services listed allow Git to connect through SSH rather than HTTPS. Using public-key encryption eliminates the need to type a login and password for each Git command.
Make sure a Git is installed
Make sure Git is installed before you start. Run the following command in your Windows terminal to see if Git is installed on your computer:
git --version
Enter fullscreen mode
Exit fullscreen mode
Install Git
To install Git, you can download the latest version from the official Git website. You can also install Git using Chocolatey or Winget package manager.
Install Git official website
To install Git from the official website, follow the steps below:
- Go to the official Git website and download the latest version of Git for Windows.
- Run the installer and follow the steps below:
- Click Next on the first two screens to accept the default options.
- Click Next on the Select Components screen.
- Click Next on the Choosing the default editor used by Git screen.
- Click Next on the Choosing the default terminal emulator screen.
- Select the Use Git from the Windows Command Prompt option.
- Select the Checkout Windows-style, commit Unix-style line endings option.
- Select the Use Windows’ default console window option.
- Click Next on the Configuring the line ending conversions screen.
- Click Next on the Configuring the terminal emulator to use with Git Bash screen.
- Click Install on the Choosing HTTPS transport backend screen.
- Click Finish on the Completing the Git Setup screen.
- Open a new command prompt window and verify that Git is installed correctly by typing
git --version.
Install Git using Chocolatey
To install Git using Chocolatey, follow the steps below:
- Open Windows Terminal.
- Run the following command to install Git:
choco install git -y
Enter fullscreen mode
Exit fullscreen mode
- Verify that Git is installed correctly by typing
git --version.
Install Git using Winget
To install Git using Winget, follow the steps below:
- Open Windows Terminal.
- Run the following command to install Git:
winget install --id=Git.Git -e
Enter fullscreen mode
Exit fullscreen mode
- Verify that Git is installed correctly by typing
git --version.
Note: Don’t forget to specify global Git settings using the following command after installing git:
git config --global user.name 'USERNAME'
git config --global user.email 'YOUR_EMAIL@EXAMPLE.COM'
Enter fullscreen mode
Exit fullscreen mode
Generate SSH keys
To generate SSH keys, follow the steps below:
- Open Windows Terminal.
- Run the following command (change your
YOUR_EMAIL@EXAMPLE.COMwith your email address) to establish a new SSH key pair:
ssh-keygen -t rsa -b 4096 -C "YOUR_EMAIL@EXAMPLE.COM"
Enter fullscreen mode
Exit fullscreen mode
- It will ask you where you want to save the private key (id rsa), and you may accept the default location by pressing Enter.
Whether you already have a private key, it will ask if you want to override it:
Overwrite (y/n)?
Enter fullscreen mode
Exit fullscreen mode
- If this happens, hit Enter and type y. Then, enter and re-enter the following passcode (think of it as a password):
Enter a file in which to save the key (/c/Users/you/.ssh/id_rsa): [Press enter]
Enter fullscreen mode
Exit fullscreen mode
- Enter a secure passphrase.
Enter passphrase (empty for no passphrase): [Type a passphrase]
Enter same passphrase again: [Type passphrase again]
Enter fullscreen mode
Exit fullscreen mode
- The SSH key pair is created in ~/.ssh, and the whole interaction should look like this:
Enter fullscreen mode
Exit fullscreen mode
- Verify that the SSH key was created by running the following command:
ls .\.ssh\
Enter fullscreen mode
Exit fullscreen mode
Add SSH key to the ssh-agent to your account
Copy the SSH key to your clipboard by running the following command:
Get-Content .\.ssh\id_rsa.pub | Set-Clipboard
Enter fullscreen mode
Exit fullscreen mode
GitHub
Sign in to your GitHub account using a browser by going to github.com and entering your username and password. Click your profile photo in the upper-right corner of the page, then Settings:

Select SSH and GPG keys from the user settings sidebar. Then select New SSH key from the drop-down menu. Put a descriptive label for the new key in the Title area (for example, your computer’s name) and paste your public key into the Key field. Last but not least, click Add SSH key:

The key is now visible in the list of SSH keys linked to your account:

GitLab
Sign in to your GitLab account using a browser by going to gitlab.com and entering your username and password. Click your profile photo in the upper-right corner of the page, then Settings:

Click SSH Keys in the User Settings sidebar. In the Key area, paste your public key. Fill in the Title area for the new key with a descriptive term (for example, the name of your computer). Finally, click the Add key:
The key is now visible in the list of SSH keys linked to your account:
Bitbucket
Log in to your Bitbucket account using a browser by going to bitbucket.org and entering your username and password. Click your profile photo in the lower-left corner of the website, then Bitbucket settings:
SSH keys may be found in the Settings sidebar’s Security section. After that, select Add key from the drop-down menu. Fill up the Description box with a descriptive label for the new key (such as your computer’s name), and then paste your public key into the Key field. Last but not least, choose to Add key:

The key has now been added to your account’s list of SSH keys:

Test connecting via SSH
Before utilizing SSH with Git, GitHub, GitLab, and Bitbucket allow you to verify whether the connection has been set up successfully.
GitHub Test Connecting via SSH
Open the terminal once you’ve added your SSH key to your GitHub account and type:
ssh -T git@github.com
Enter fullscreen mode
Exit fullscreen mode
If you’re connecting to GitHub over SSH for the first time, the SSH client will ask if you trust the GitHub server’s public key:
The authenticity of host 'github.com (140.82.113.4)' can't be established.
RSA key fingerprint is SHA256:a5d6c20b1790b4c144b9d26c9b201bbee3797aa010f2701c09c1b3a6262d2c02.
Are you sure you want to continue connecting (yes/no)?
Enter fullscreen mode
Exit fullscreen mode
Press Enter after typing yes. GitHub has been added to the list of trustworthy hosts in the SSH client:
Warning: Permanently added 'github.com,140.82.113.4' (RSA) to the list of known hosts.
Enter fullscreen mode
Exit fullscreen mode
You won’t be asked about GitHub’s public key again once you’ve added it to the list of known hosts.
The server notifies you that you have successfully authenticated and ends the connection: Because this remote access through SSH is offered by GitHub only for testing purposes and not for practical usage, the server informs you that you have successfully authenticated and terminates the connection:
Hi YOUR_USER_NAME! You've successfully authenticated, but GitHub does not provide shell access.
Enter fullscreen mode
Exit fullscreen mode
If you passed the test, you may now utilize SSH with GitHub.
The entire interaction should look something like this:
ssh -T git@github.com

The authenticity of host 'github.com (140.82.113.4)' can't be established.
RSA key fingerprint is SHA256:a5d6c20b1790b4c144b9d26c9b201bbee3797aa010f2701c09c1b3a6262d2c02.
Are you sure you want to continue connecting (yes/no)? yes
Warning: Permanently added 'github.com,140.82.113.4' (RSA) to the list of known hosts.
Hi your_user_name! You've successfully authenticated, but GitHub does not provide shell access.
YOUR_USER_NAME@YOUR_HOST_NAME:~>
Enter fullscreen mode
Exit fullscreen mode
GitLab Test Connecting via SSH
The test is pretty similar if you’ve added your SSH key to your GitLab account:
ssh -T git@gitlab.com

The authenticity of host 'gitlab.com (35.231.145.151)' can't be established.
ECDSA key fingerprint is SHA256:4ac7a7fd4296d5e6267c9188346375ff78f6097a802e83c0feaf25277c9e70cc.
Are you sure you want to continue connecting (yes/no)? yes
Warning: Permanently added 'gitlab.com,35.231.145.151' (ECDSA) to the list of known hosts.
Welcome to GitLab, @YOUR_USER_NAME!
Enter fullscreen mode
Exit fullscreen mode
If you passed the test, you may now utilize SSH with GitLab.
Bitbucket Test Connecting via SSH
The test is pretty similar if you’ve added your SSH key to your Bitbucket account:
ssh -T git@bitbucket.org

The authenticity of host 'bitbucket.org (104.192.143.1)' can't be established.
RSA key fingerprint is SHA256:fb7d37d5497c43f73325e0a98638cac8dda3b01a8c31f4ee11e2e953c19e0252.
Are you sure you want to continue connecting (yes/no)? yes
Warning: Permanently added 'bitbucket.org,104.192.143.1' (RSA) to the list of known hosts.
logged in as YOUR_USER_NAME.

You can use git or hg to connect to Bitbucket. Shell access is disabled.
Enter fullscreen mode
Exit fullscreen mode
If you passed the test, you may now utilize SSH with Bitbucket.
References
- GitHub SSH Key Setup
- GitLab SSH Key Setup
- Bitbucket SSH Key Setup

Добрый день, с вами ваш писатель-программист из компании SimplGroup. В этой статье я, насколько могу, подробно расскажу вам, как настроить SSH для подключения к виртуальной машине (VM) и интегрировать процесс CI/CD для вашего проекта с использованием Docker и GitLab/GitHub. Мы пройдем через все необходимые шаги, чтобы вы могли легко развернуть ваше приложение.
Стоит сказать, что сама я новичок и вообще бэкенд разработчик, которому неожиданно пришлось развернуть проект на виртуальной машине, так что, если сюда забрел такой же новичок, то, дружище, я может и не достаточно хорошо, но постараюсь тебе все объяснить.
Оглавление
-
Подключение к виртуальной машине
-
Создание SSH-ключа
-
Добавление ключа на VM
-
Проверка подключения
-
-
Настройка Git через SSH
-
Генерация ключа для Git
-
Добавление ключа в GitHub/GitLab
-
Клонирование репозитория
-
-
Работа с Docker
-
Создание Dockerfile
-
Локальная сборка
-
-
Настройка CI/CD
-
Добавление SSH-ключа
-
Конфигурация для GitLab
-
Конфигурация для GitHub
-
-
Заключение
Шаг 1: Подключение к виртуальной машине (VM)
Первым делом убедимся, что мы можем подключиться к нашей виртуальной машине с помощью SSH.
1. Создание SSH ключа
SSH ключи используются для безопасного подключения к удаленным серверам. Чтобы создать SSH ключ, выполните следующую команду в терминале:
ssh-keygen -t ed25519 -C "your_email@example.com"
-
-t ed25519указывает тип ключа (еще можно rsa — побольше в размере, но постарше). -
-C "your_email@example.com"добавляет метку для ключа (обычно это ваш email), но можно в целом не писать, если не хотите.
Далее протыкиваем везде Enter, чтобы сильно не морочиться дальше. Если что, там задавался путь (по умолчанию (ваш пользователь)/.ssh/) и пароль к ключу.
2. Прокидывание публичной части ключа в VM
После создания ключа вам нужно добавить его публичную часть на вашу виртуальную машину. Выполните следующую команду:
ssh-copy-id user@your_vm_ip
-
user— это ваш логин на VM. -
your_vm_ip— это IP-адрес вашей виртуальной машины.
Эта команда добавит ваш публичный ключ в файл ~/.ssh/authorized_keys на VM, что позволит вам подключаться без пароля.
3. Подключение к VM
Теперь вы можете подключиться к вашей виртуальной машине с помощью команды:
ssh user@your_vm_ip
Если вы все сделали правильно, вы должны войти в систему без ввода пароля.
Шаг 2: Настройка SSH в VM для Git
Теперь настроим SSH для работы с Git, чтобы вы могли безопасно взаимодействовать с вашими репозиториями на GitLab или GitHub.
1. Создание SSH ключа (если вы еще этого не сделали)
В VM выполним знакомую нам команду:
ssh-keygen -t ed25519 -C "your_email@example.com"
2. Прокидывание публичной части ключа в ваш Git
Теперь добавьте публичную часть ключа в настройки вашего репозитория на GitLab или GitHub.
Для GitHub:
-
Перейдите в настройки вашего аккаунта.
-
Выберите «SSH and GPG keys».
-
Нажмите «New SSH key».
-
Вставьте содержимое файла
~/.ssh/id_ed25519.pubв поле «Key». -
Нажмите «Add SSH key».
Для GitLab:
-
Перейдите в настройки вашего аккаунта.
-
Выберите «SSH Keys» в боковом меню.
-
Вставьте содержимое файла
~/.ssh/id_ed25519.pubв поле «Key». -
Нажмите «Add key».
3. Проверка подключения
После добавления ключа проверьте, что все работает, выполнив команду в VM:
Для GitHub:
ssh -T git@github.com
Для GitLab:
ssh -T git@gitlab.com
Если все настроено правильно, вы увидите сообщение о том, что вы успешно аутентифицированы.
Шаг 3: Клонирование репозитория
Теперь, когда SSH настроен, вы можете клонировать репозиторий на свою локальную машину. Выполните команду:
git clone git@github.com:username/repository.git
Замените username и repository на ваши данные.
Шаг 4: Разработка и тестирование
Будем считать что локально, на вашем пк или ноутбуке, вы разработали некое приложение. Чтобы запустить это все на VM, для начала, нам нужно убедиться, что докер образ у вас вообще соберется, поэтому протестим.
(Дальше убедитесь, что у вас установлен докер на компьютере. Docker Desktop самый оптимальный вариант.)
В корневой папке вашего проекта (cd корень) создайте файл Dockerfile, чтобы описать, как собирать ваш проект в контейнер.
Пример простого Dockerfile для приложения на Node.js:
FROM node:14
WORKDIR /app
COPY . .
RUN npm install
CMD ["npm", "start"]
После создания Dockerfile убедитесь, что образ собирается локально:
docker build -t myapp .
Пока не соберется, лучше не переходить дальше, но если докер не устанавливали и хотите разворачивать сразу на VM, то хотя бы убедитесь, что ваш проект сам по себе запускается, даже без докера.
Шаг 5: Настройка CI/CD в GitLab/GitHub
Теперь создадим переменную в репозитории, куда вставим приватную часть своего SSH ключа.
1. Создание переменной
Для GitLab:
-
Перейдите в настройки вашего репозитория.
-
Выберите «CI/CD» в боковом меню.
-
Нажмите «Variables».
-
Добавьте новую переменную с именем SSH_PRIVATE_KEY и вставьте в нее содержимое файла
~/.ssh/id_ed25519(открывать можно через блокнот).
Пометка:
— Visibility лучше поставить Visible, потому что другие запрещают пробелы.
— Flags ставим Expand variable reference, чтобы можно было использовать
Для GitHub:
-
Перейдите в настройки вашего репозитория.
-
Выберите «Secrets and variables» в боковом меню.
-
Нажмите «Actions».
-
Нажмите «New repository secret».
-
Введите имя SSH_PRIVATE_KEY и вставьте содержимое вашего приватного ключа
~/.ssh/id_ed25519(открывать можно через блокнот).
2. Создание файла CI/CD
Создайте файл .gitlab-ci.yml (для GitLab) или .github/workflows/ci.yml (для GitHub) в корне вашего репозитория.
Пример для GitLab:
stages:
  - build
  - deploy

before_script:
  - echo "$SSH_PRIVATE_KEY" | tr -d '\r' | sed 's/\\n/\n/g' > ~/.ssh/id_rsa
  - chmod 600 ~/.ssh/id_rsa
  - ssh-keyscan -H your_vm_ip >> ~/.ssh/known_hosts

build:
  stage: build
  script:
    - docker build -t myapp .

deploy:
  stage: deploy
  only:
    - master
  script:
    - ssh user@your_vm_ip "
	    cd /path/to/app &&
	    sudo docker stop myapp || true &&
	    sudo docker rm myapp || true &&
	    git pull origin master
	    sudo docker build -t myapp . &&
	    sudo docker run -d -p 3000:3000 --name myapp myapp
        "
Пример для GitHub:
name: CI/CD

on:
  push:
    branches:
      - master

jobs:
  build:
    runs-on: ubuntu-latest
    steps:
      - name: Checkout code
        uses: actions/checkout@v2

      - name: Build Docker image
        run: docker build -t myapp .

  deploy:
    runs-on: ubuntu-latest
    needs: build
    steps:
      - name: SSH into VM and deploy
        env:
          SSH_PRIVATE_KEY: ${{ secrets.SSH_PRIVATE_KEY }}
        run: |
          echo "$SSH_PRIVATE_KEY" > private_key
          chmod 600 private_key
          ssh -o StrictHostKeyChecking=no -i private_key user@your_vm_ip << 'EOF'
            cd /path/to/app
            sudo docker stop myapp || true
            sudo docker rm myapp || true
            git pull origin master
            sudo docker build -t myapp .
            sudo docker run -d -p 3000:3000 --name myapp myapp
          EOF
Шаг 6: Объяснение CI/CD файла
-
before_script (для GitLab):
— Получаем наш ключ из переменной и создаем файл ~/.ssh/id_rsa.
— Устанавливаем права на файл ключа.
— Добавляем IP адрес VM в known_hosts, чтобы избежать предупреждений о безопасности. -
build:
— Проверяем, что образ собирается с помощью команды docker build. -
deploy:
— Подключаемся по SSH к нашей VM.
— Переходим в нужную директорию.
— Останавливаем и удаляем предыдущий контейнер, если он существует.
— Подтягиваем изменения из гита.
— Собираем образ заново и запускаем его на порту 3000. -
only (для GitLab) и on: push: branches: (для GitHub):
— Указываем, что деплой должен выполняться только на ветке master.
Заключение
Теперь у вас настроен процесс CI/CD, который автоматически развертывает ваше приложение на виртуальной машине при каждом обновлении ветки master.
Это значительно упрощает процесс развертывания и управления приложением. Следуя этому руководству, вы сможете легко настроить свою среду разработки и развертывания, используя SSH, Docker и CI/CD.
Ну и, напоминаю, строго не судите, я только учусь. Девиз всех начинашек: «работает и ладно»:‑)
Learn how to create a SSH key to work with Github and Gitlab using PuTTYGen in Windows 10.
When you work with Git either with Github or Gitlab, you will need often to authenticate yourself using your username and password. The SSH Keys are an alternative to identify yourself without providing the mentioned credentials every time you interact with your repositories. While getting your amazon aws certification, you will definitely do this as first step in all of the tutorials you follow. You will only need to share your public key with the service and the private key will remain stored in your computer, so when the keys match, you have full access to your stuff.
For example, if you try to clone one of your repositories through SSH like this:
git clone [email protected]:username-or-organization/repository.gitIn Windows, if you don’t have any SSH key configured properly, the following message will appear:
Cloning into 'your-git-repo'...
[email protected]: Permission denied (publickey,keyboard-interactive).
fatal: Could not read from remote repository.

Please make sure you have the correct access rights
and the repository exists.
In this article, I will explain to you how to easily generate your own SSH key to identify your device.
1. Install PuTTYGen
The first thing you gotta do to work with the SSH authentication with your repositories is to install PuTTYGen in the system. This application comes included in the installation setup of PuTTY on the official website here. However, you can download the puttygen.exe file as well if you don’t want the entire PuTTy bundle.
PuTTYGen is an RSA and DSA key generation utility that will be used to create our SSH key in the Windows environment.
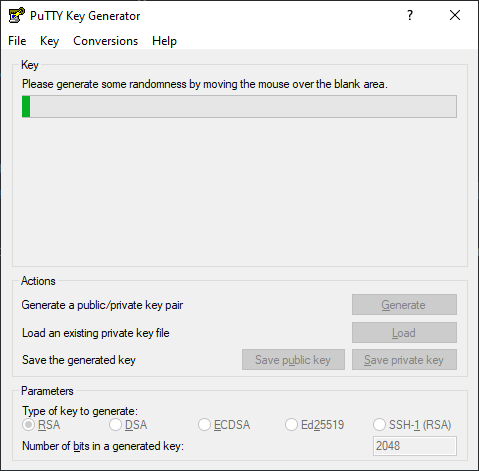
2. Generate your SSH Key
Launch the PuttyGen binary and start creating the SSH key by clicking on «Generate», after that, you will be asked to move the mouse over the blank space to generate some randomness in your key:
After moving the mouse at this point, the SSH key will be generated and you will have to fill the following fields:
- Key comment: the name to use for this key, usually the name of the computer that you are working on right now.
- Key passphrase: this will be the password that you will need to provide to unlock the key every time you need it.
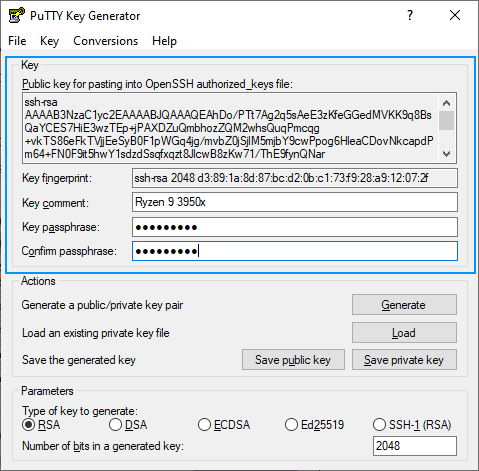
Now that we have the password of the SSH key and a name for it, you can now proceed to save in the required formats for Windows.
3. Create the .ssh folder in your user directory
Create the .ssh folder in the current user’s directory. For example, on my computer, it is located at C:/Users/sdkca. So I created the .ssh folder in there (you can obtain the directory with the environment variable %USERPROFILE%):
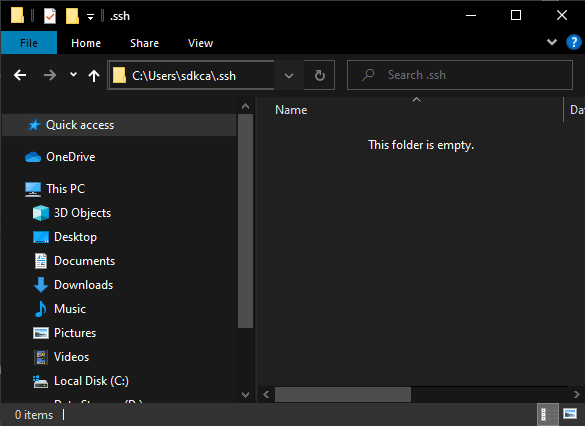
You will store all the created files in the mentioned directory.
4. Store PuTTY Private Key (PPK File)
The first file to generate from our now generated SSH key is the file with .ppk extension that you can generate by clicking on «Save private key»:
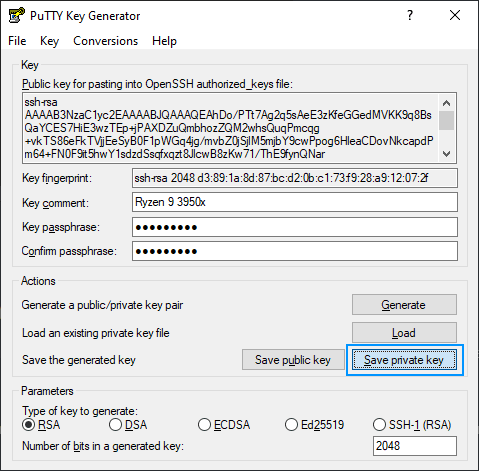
You can provide a custom name, in our case we will use the same name as the comment «ryzen93950x.ppk» and will be stored in the .ssh directory created in step #3. The content of the .ppk file looks something like this:
PuTTY-User-Key-File-2: ssh-rsa
Encryption: aes256-cbc
Comment: Ryzen 9 3950x
Public-Lines: 6
AAAAB3NzaC1yc2EAAAABJQAAAQEAhDo/PTt7Ag2q5sAeE3zKfeGGedMVKK9q8BsQ
aYCES7HiE3wzTEp+jPAXDZuQmbhozZQM2whsQuqPmcqg+vkTS86eFkTVjjEeSyB0
F1pWGq4jg/mvbZ0jSjlM5mjbY9cwPpog6HleaCDovNkcapdPm64+FN0F9it5hwY1
sdzdSsqfxqzt8JlcwB8zKw71/ThE9fynQNar+utL2LrPPWS2bR4ZlI1WlQSWAkd2
9z3vk78zxRyuL5wdQf9j7Ay42j7bwkTcjCucC0T0iDeK+KoKyMysvbQFp4SLYXQq
xsPzU/BkEZmnqLxNzp6lShT6W1PcfNeVIH1DY1BsqtghaddHlQ==
Private-Lines: 14
ksW4kvFIMD4OqwgDYbEkhiB0l1uNsfj2uXw/lch/mHmaUSS08+2RHojc4GNDD2VG
....
.....
5. Store OpenSSH Public Key for authorized keys (id_rsa.pub File)
Now you need to create the file id_rsa.pub that will contain the string in the middle of the PuTTYGen application (Public key). The string is used on the authorized_keys file of the servers so you can access them:
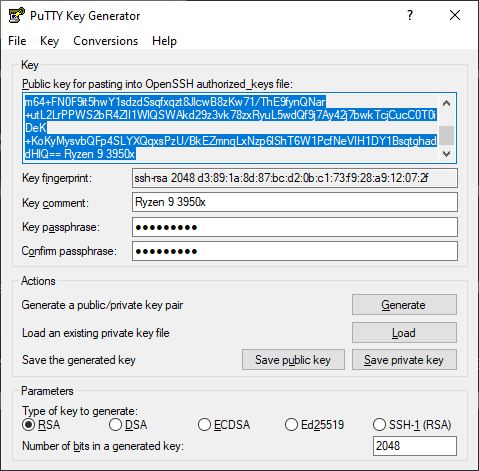
Copy the content and paste it into the mentioned id_rsa.pub file in the .ssh directory created in step #3. The file content will look something like this:
ssh-rsa AAAAB3NzaC1yc2EAAAABJQAAAQEAhDo/PTt7Ag2q5sAeE3zKfeGGedMVKK9q8BsQaYCES7HiE3wzTEp+jPAXDZuQmbhozZQM2whsQuqPmcqg+vkTS86eFkTVjjEeSyB0F1pWGq4jg/mvbZ0jSjlM5mjbY9cwPpog6HleaCDovTROLOLOLOLO-DONTUSETHISKEY-USEYOUROWNKEYJlcwB8zKw71/ThE9fynQNar+utL2LrPPWS2bR4ZlI1WlQSWAkd29z3vk78zxRyuL5wdQf9j7Ay42j7bwkTcjCucC0T0iDeK+KoKyMysvbQFp4SLYXQqxsPzU/BkEZmnqLxNzp6lShT6W1PcfNeVIH1DY1BsqtghaddHlQ== Ryzen 9 3950x6. Store OpenSSH Key (id_rsa File)
Finally, the third file will be your identity file that will be your SSH Key in Open SSH format. You will need to convert your key to this format as it’s the one you require on tools like Github and Gitlab. You can easily do this by clicking on the Conversions tab of PuTTYGen and then clicking on Export OpenSSH Key (force new file format):
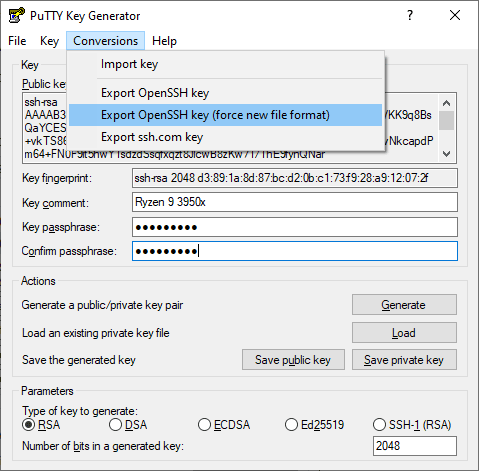
Note: if you don’t use the new file format, it will work anyway, however, you will always find the warning «load pubkey «/c/Users/USERNAME/.ssh/id_rsa»: invalid format».
This will prompt you where to save the file, use id_rsa as name and store it in the .ssh directory created in step #3. The content of this file should look like this:
-----BEGIN RSA PRIVATE KEY-----
Proc-Type: 4,ENCRYPTED
DEK-Info: DES-EDE3-CBC,920A7C839CE3CABE

qWuTR1ARsILMzEGwhmr5SYFdu/MxsLKA3XTLy1dO4RYsvLqZOmloRvtZgy9VSNpg
...............................
-----END RSA PRIVATE KEY-----
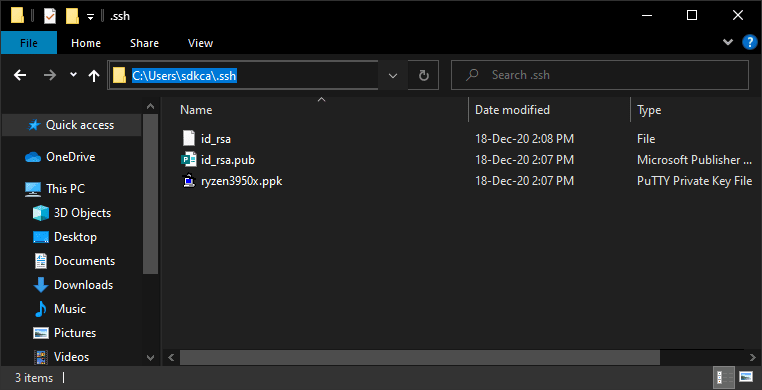
After following all the previous steps you will end up with 3 files in the .ssh directory:
7. Register SSH key in Github and Gitlab
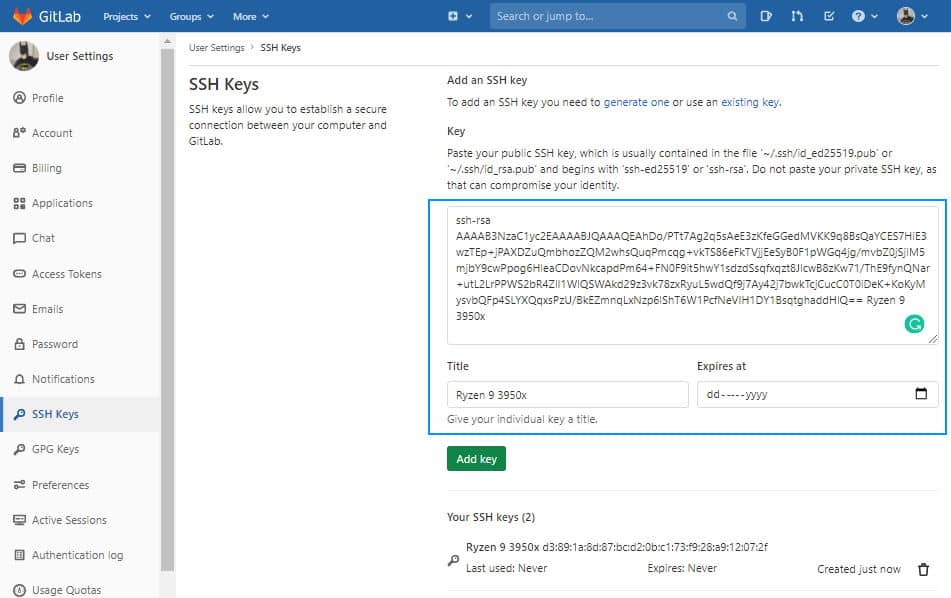
As the final step, you need to register your OpenSSH Public Key in the platform of your choice in your SSH Keys:
Gitlab
Login to Gitlab and open your user settings. In the left side menu, choose the SSH Keys option and register the value of your id_rsa.pub file:
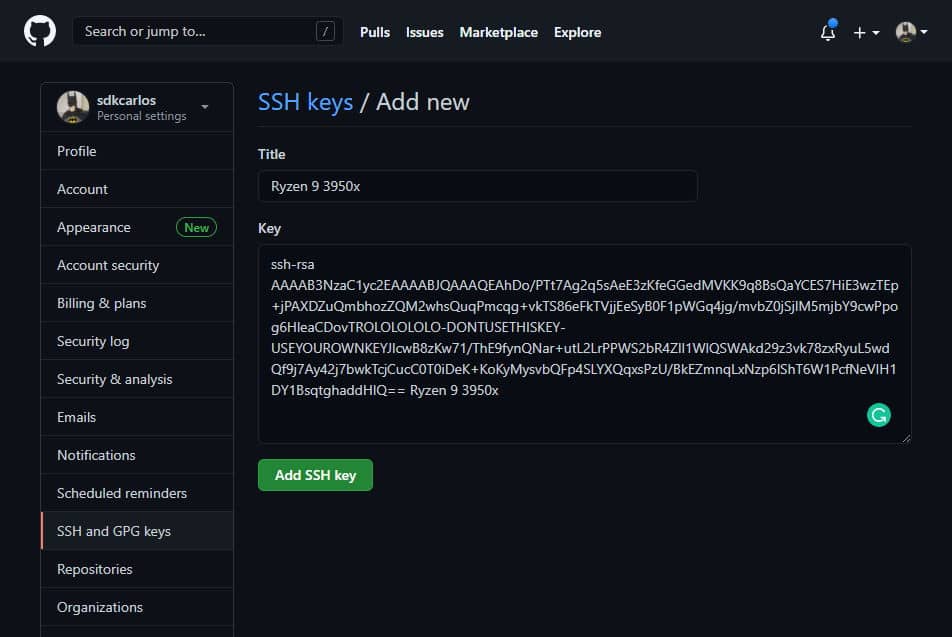
Github
Login to Github and open your user personal settings through the top right side dropdown. Select SSH AND GPG keys and register your key:
8. Using SSH Authentication
Now that you have your keys registered, you can clone your repositories and make changes to your repositories:
git clone [email protected]:username/repository-name.gitHappy coding ❤️!