
You are here: Home / How to / How to Fix Unable to Connect to NVIDIA error in Windows?
The error ‘Unable to Connect to NVIDIA, Try Again Later’ displaying on the screen means GeForce Experience app unable to connect to NVIDIA and hence led to such an issue. Most of the times the error notification looks like
Unable to Connect to NVIDIA
Try Again Later
OR
Unable to Connect to NVIDIA
Check your Internet Connection
Many users are facing this issue and you are not alone to report this error saying GeForce Experience won’t open. So, to resolve the same there are some fruitful solutions which will help you to overcome this issue. Before proceeding to the solution part let us discuss why this error occurs. Keep reading!
What is NVIDIA GeForce Experience?
NVIDIA GeForce Experience app is used in your computer to optimize the game settings, automatic video drivers updates, capture and share videos, live streams and screenshots between the users. This application is used to assists the GeForce GTX graphics card that’s why so many users prefer this app for automatic driver updates. Sometimes this NVIDIA GeForce Experience app won’t open and remains idle and launches the error Unable to connect to NVIDIA.
Reasons behind the error “Unable to connect to NVIDIA”
NVIDIA Graphics card enables the user to experience the ultra-definition of high-quality graphics and amid the same GeForce Experience plays a crucial role that also manages the NVIDIA graphics card. This error mostly occurs with the NVIDIA GeForce Experience app, which is a part of the NVIDIA graphics driver and manages a few things like games, drivers, etc., as well as update the graphics driver.
As you all know that this error is specifically related to NVIDIA users. However, if your computer is having graphic card such as Intel, AMD, etc then you will never encounter this error. The probable causes for this error could be any of the following:
- An outdated version of GeForce Experience.
- NVIDIA Network Service is not responding.
Various Display messages during this error
Sometimes this Unable to connect to NVIDIA could appear differently for you. It always depends on what program or game is trying to access GeForce and for which purpose. However, some variations of this error are listed below:
- GeForce Experience is unable to download the recommended driver.
- NVIDIA GeForce Experience is unable to connect to NVIDIA.
- NVIDIA Servers down.

If you are facing this error on your computer then as a troubleshooting step check your internet connection. If it is working fine then you can proceed for the steps mentioned below to fix the error:
Start NVIDIA Network Service
Some services come along with the NVIDIA graphics card and one such is the ‘NvContainer NetworkServices’ which enables the driver to connect the network. If the same service gets stopped, then the issue arises. So, all you need to start the service and the steps for the same are listed below.
- Press ‘Windows’ and ‘R’ keys together to open the ‘Run’ box.

- Type ‘services.msc’ in the box and then click on the ‘OK’ button.

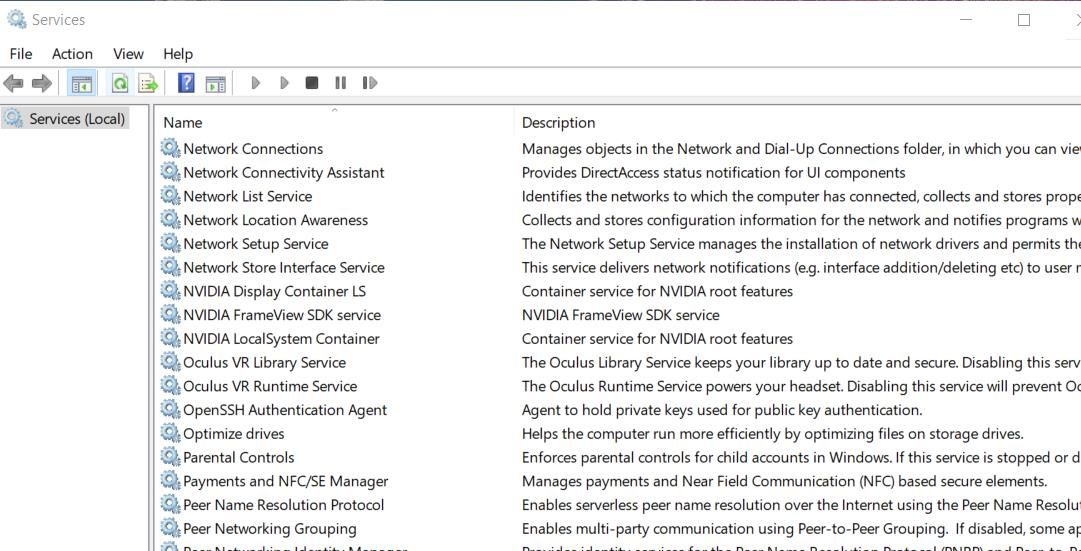
- Thereafter, the services page will appear on the screen and you need to look for ‘NVIDIA Network Service’. Just right-click and open the Properties window.

- Now select ‘NVIDIA Network Service, right-click on it and then check the status, if it shows ‘stopped’, then click on the ‘Start’ button to turn the status to ‘Started’.

Update GeForce Experience
As stated earlier, GeForce Experience is a service which updates the NVIDIA drivers but if you are accessing the outdated GeForce Experience, then definitely you will meet with the error NVIDIA GeForce experience unable to connect to NVIDIA and to resolve the same you will need to update the GeForce Experience and the process for the same are listed beneath.
- Visit the official website of GeForce Experience by clicking on the link https://www.geforce.com/geforce-experience/download
- Thereafter, you will be directed to the latest version of GeForce Experience, click on ‘Download’ button.

- Now wait till the downloading gets completed and when you find the popup displaying the successful completion of the download, double-click on the download file to install the latest version of the GeForce Experience.
- After the completion of the installation process, make sure to restart your computer.
Delete NSManagedTasks.xml file to Disable NVIDIA services
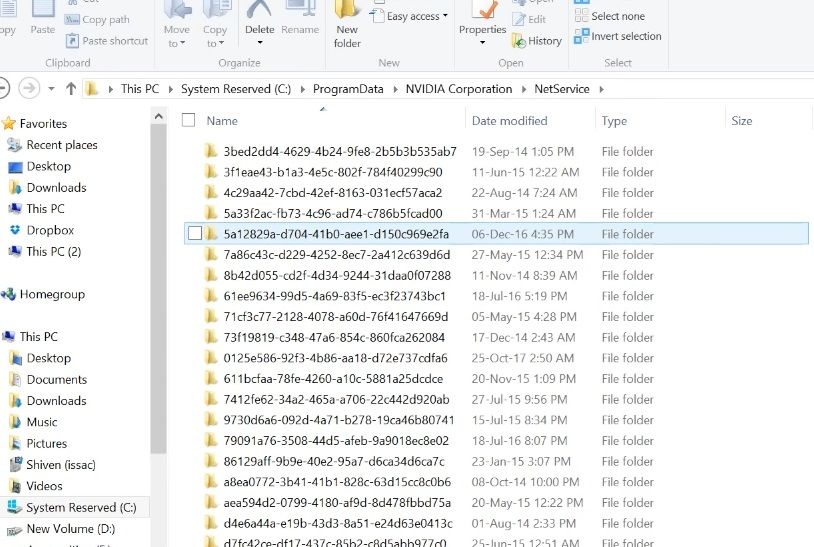
- To perform the task, open ‘C’ drive from your computer, move to ‘NVIDIA Corporation folder followed by the ‘Program Data’ and then select a folder ‘NetService’.
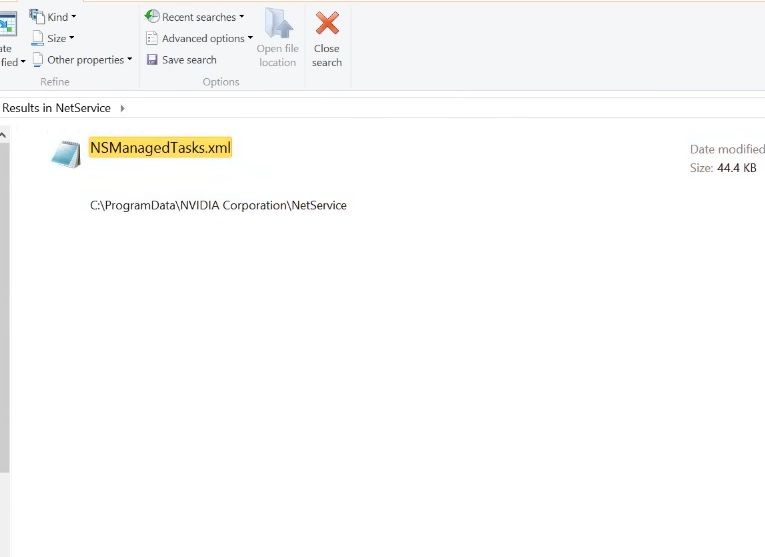
- Inside the folder, you will get the ‘NSManagedTasks.xml file, select the one and then delete the file.

- However, if you didn’t get such file, then make sure to enable the ‘show hidden files and folders’.

- After deleting the file, move to the ‘Task Manager’ and for that, right-click on the ‘taskbar’ and select ‘Task Manager’.

- Now, click on the ‘Details’ tab of the Task Manager and the same is located at the top of the page. And then navigate for ‘NVNetworkService.exe’ file, select the same and click on ‘End Task’.

- After completing the above step, open the command box and type ‘services.msc’ to open the ‘services’ page of the Windows.

- Select NVIDIA Network Service and enable it in Start mode.

- Now restart your computer to resolve NVIDIA GeForce experience unable to connect issues.
Update Graphics Card Driver
If the graphics card driver is outdated or not matching with the current requirements of the OS, then the issue GeForce experience unable to connect to NVIDIA arises and to resolve the same, you will need to update the graphics card. The process for the same is listed below.
- First and foremost, right-click on the ‘Start’ menu and then select the ‘Device Manager’ option from the featured list.

- Soon, you will get the list of drivers enclosed with the hardware. Move to the ‘Display Adapter’ section and then double click on it to see the drivers.

- Now select the ‘HD Graphics’, right-click on it and choose ‘Update driver’ from the featured options.

- After completing the above steps, restart your computer.
Conclusion
So, these were effective solutions against the issue ‘Unable to Connect to NVIDIA’. On the off chance if you need other assistance, feel free to contact our techies. They will help you to resolve the issue in a short span of time. Hence, stay connected with us and enjoy the salient features of the Windows 10 OS without any interruption.
If you feel this article helpful please like, share and follow our Facebook page and keep visiting our website for such tutorials.
Sign in to your MUO account
GeForce Experience is a handy app for gaming optimization. However, some GeForce Experience users have posted on NVIDIA’s forum about the “unable to connect to NVIDIA” error message. Those users see that message when they start GeForce Experience.
GeForce Experience still opens when the “unable to connect to NVIDIA” error occurs. However, users can’t download NVIDIA drivers or utilize other features like ShadowPlay in that software because of this error. As such, here is how you can fix the “unable to connect to NVIDIA” error in Windows 11 and 10.
1. Erase the NSManagedTasks.xml and Restart the NVIDIA Network Service
Users with older GeForce Experience versions have been able to fix the “Unable to connect to NVIDIA” error by deleting an NSManagedTasks.xml file. However, that file doesn’t exist for more recent GeForce Experience versions. So, not all users will be able to apply this potential fix.
If you’re utilizing older GeForce Experience software, you might be able to resolve this issue by erasing the NSManagedTasks.xml file like this:
- To view File Explorer, press Win + E.
-
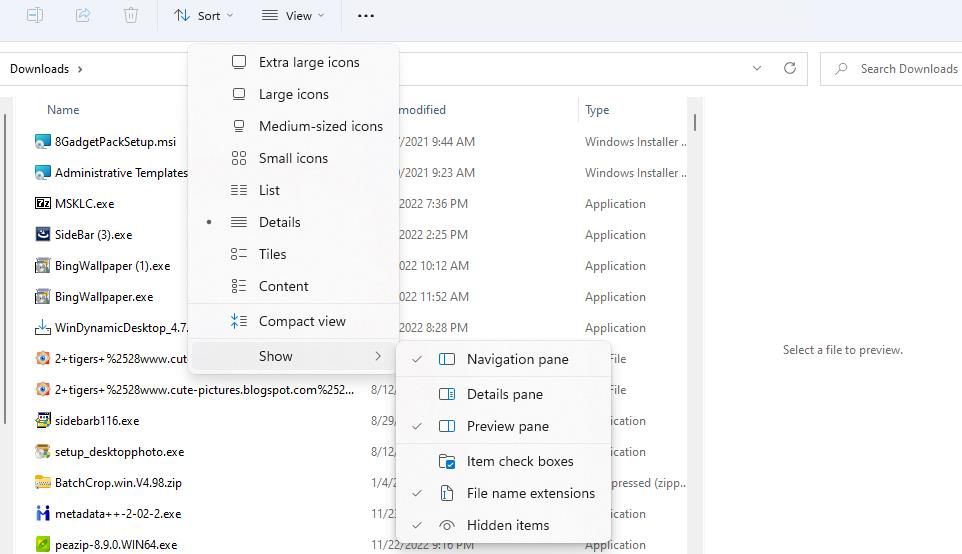
Click View > Show > Hidden Items in Windows 11 File Explorer. In Windows 10 File Explorer, you’ll need to select the Hidden Items checkbox on the View tab.

-
Clear the current folder path in File Explorer’s address bar. Then input this NetService folder path and hit Enter:
C:\ProgramData\Nvidia Corporation\NetService\
-
Input NSManagedTasks.xml in Explorer’s search box to find that file within the folder.

- Right-click the NSManagedTasks.xml file and select its Delete option (the trash can in Windows 11).
Once that’s done, it’s time to restart the NVIDIA network service.
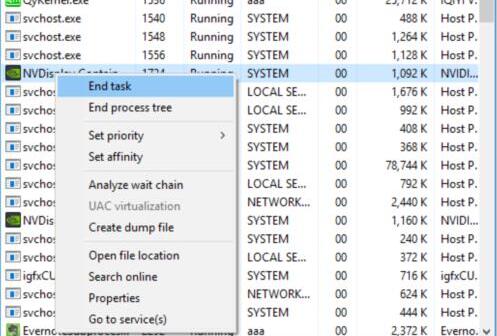
- Bring up the Task Manager tool, which has a useful Ctrl + Shift + Esc hotkey for quick access.
- Select Task Manager’s Details tab.
-
Then find and select the NvStreamNetworkService.exe (NVIDIA Network Service) there.

- Click End Task to stop the service.
- Exit the Task Manager window.
- Next, click a Search box or Type here to search button on the Windows taskbar.
- Enter a services search phrase.
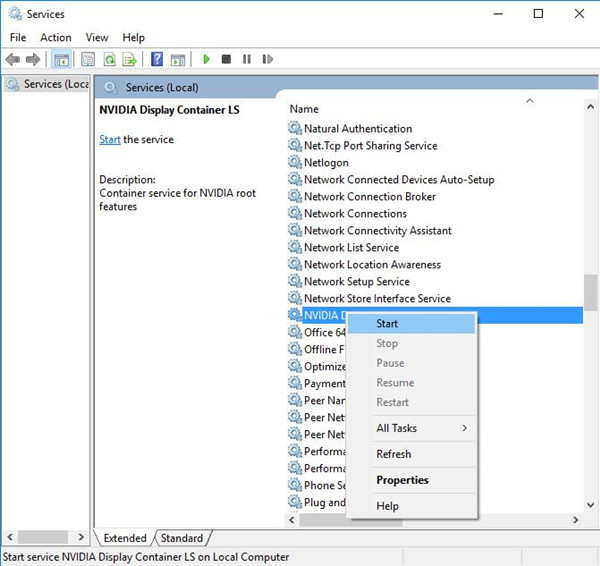
- Click Services inside the search tool’s results.
- Then double-click the NVIDIA Network Service to access its options.
- Select Start for the NVIDIA Network Service to restart it.
- Press the NVIDIA Network Service Properties window’s Apply > OK buttons.

Now launch GeForce Experience to see if the “unable to connect” error persists.
If you can’t find a NetService folder or NSManagedTasks.xml file, then this isn’t the “Unable to connect” resolution for you. Proceed with the other potential fixes below.
2. Run the Relevant NVIDIA Services
Some GeForce Experience users have confirmed they’ve been able to fix the Unable to connect to NVIDIA” error by starting NVIDIA services. Thus, this error can seemingly occur because of disabled NVIDIA services.
Here is how you can enable and run NVIDIA services in Windows 10 and 11:
- Open Services as instructed in steps 11-13 of the first resolution above.
-
Then double-click an NVIDIA service in the window to open its properties window.

- Select the Start option in the properties window if the service isn’t running (stopped).
-
Click Apply and OK to save settings and exit the service’s window.

- Repeat those steps for all NVIDIA services you can find.
3. Manually Update the NVIDIA Graphics Driver With Device Manager
Updating the NVIDIA graphics driver is a potential resolution some users confirm to fix the “Unable to connect” error. However, users can’t update their graphics drivers with GeForce Experience because of the issue. Instead, manually update your NVIDIA GPU’s driver with Device Manager like this:
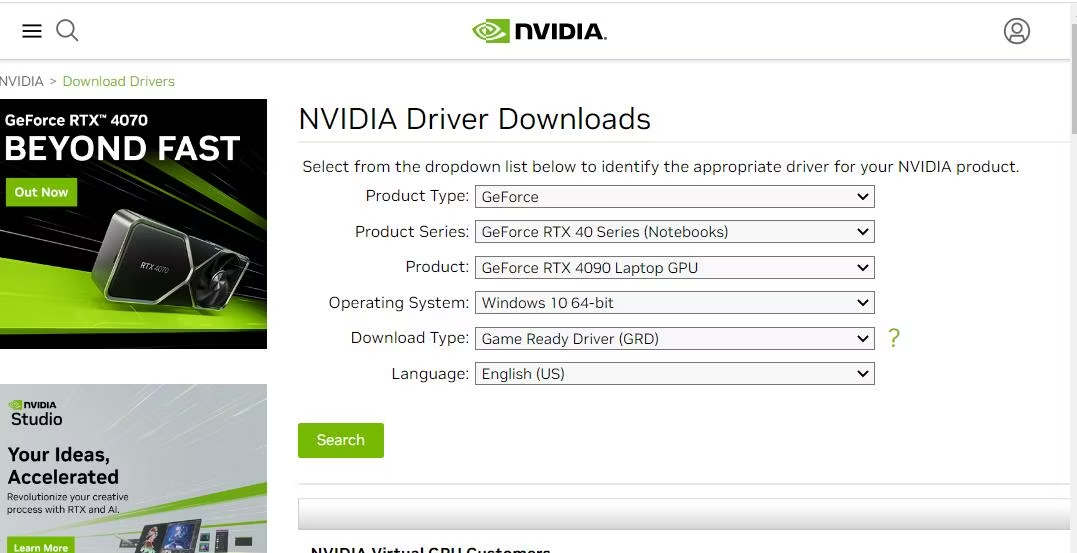
- Open the NVIDIA driver download website.
-
Select your graphics card model and PC OS in the drop-down menus and click Search.

- Select Download to obtain the NVIDIA driver pack.
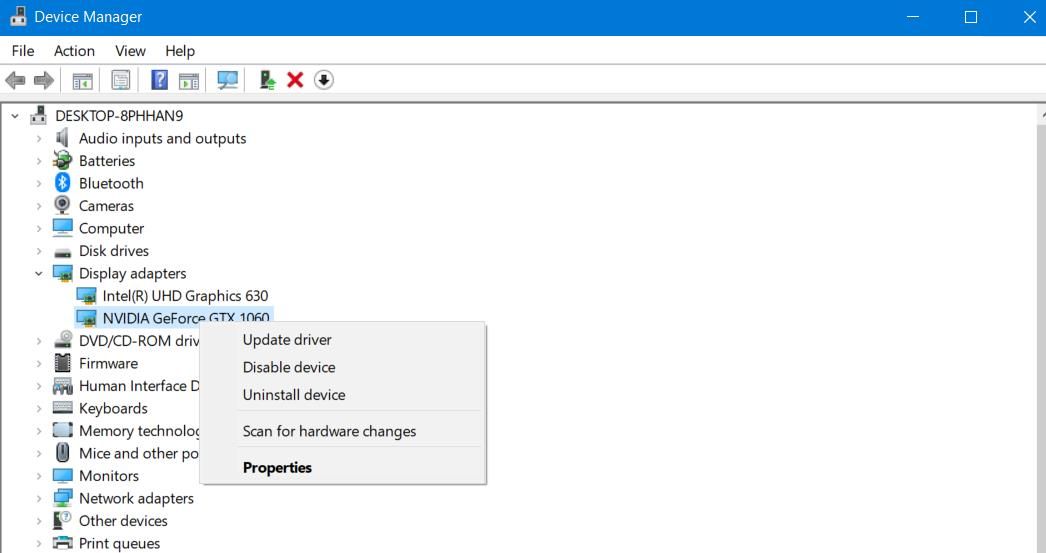
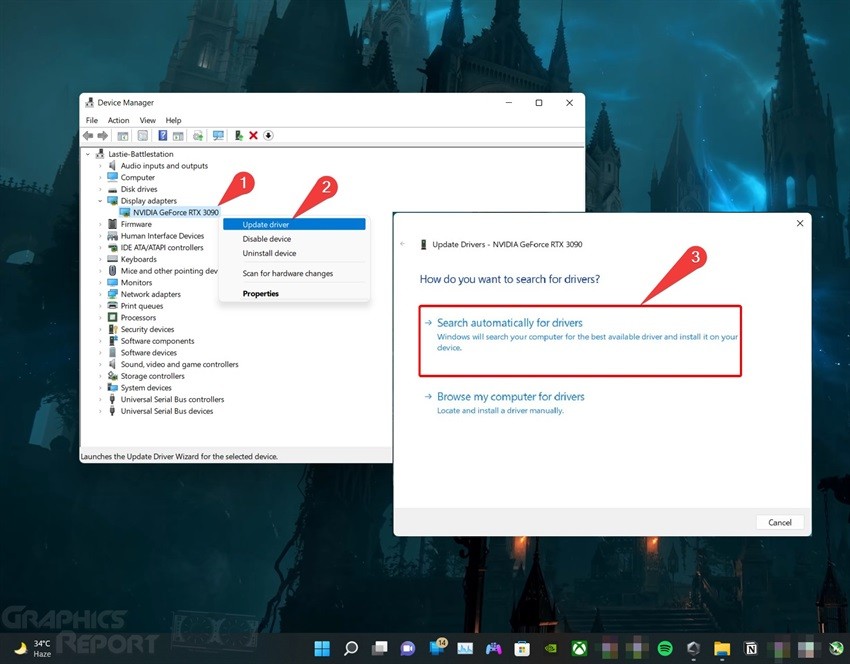
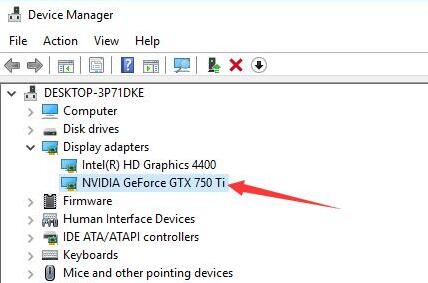
- Then open Device Manager, which you can access by right-clicking your Start button in Windows and selecting the shortcut for that tool. You can also use one of the other ways to open the Device Manager.
- Next, click the arrow beside the Display adapters to view that category.
-
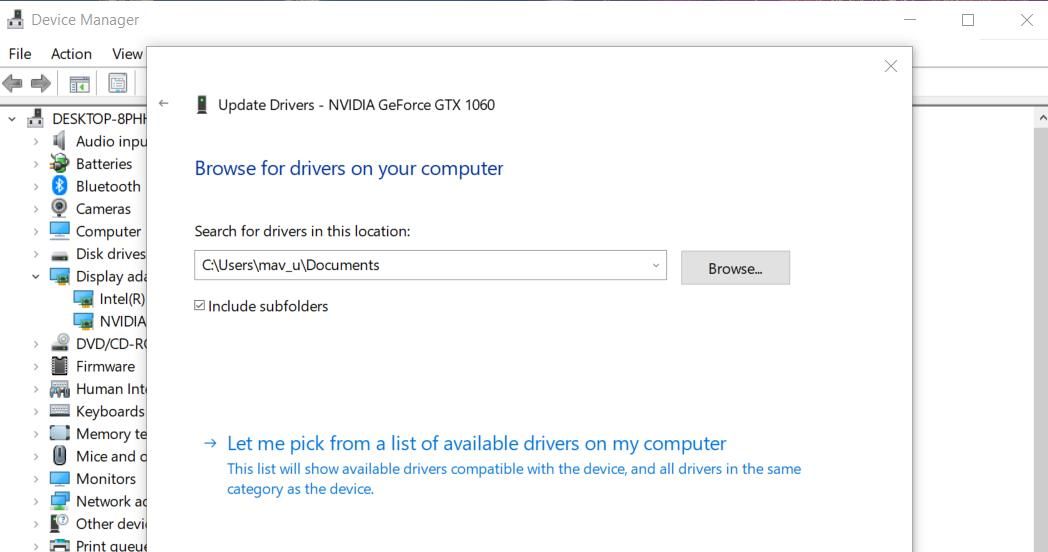
Right-click the NVIDIA GPU to select Update driver on the context menu.

- Select Browse my computer to locate a driver package.
-
Click Browse to select the downloaded driver package.

- Select Next to install the selected NVIDIA driver.
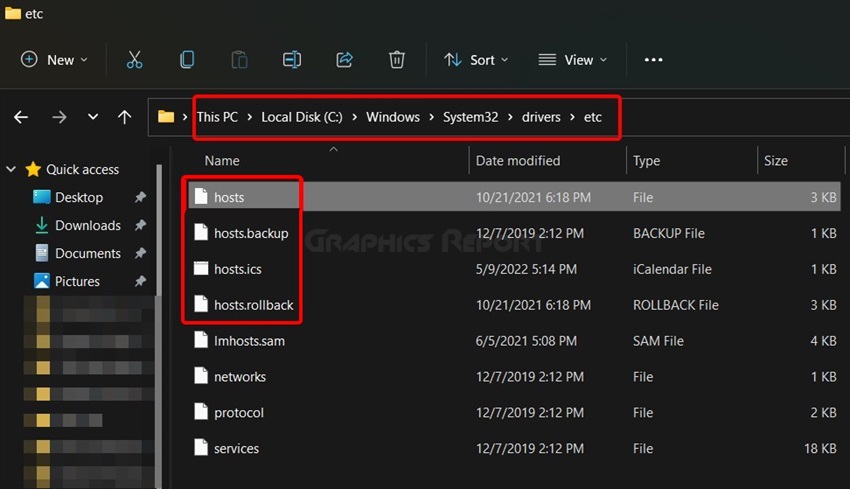
4. Edit the Hosts File
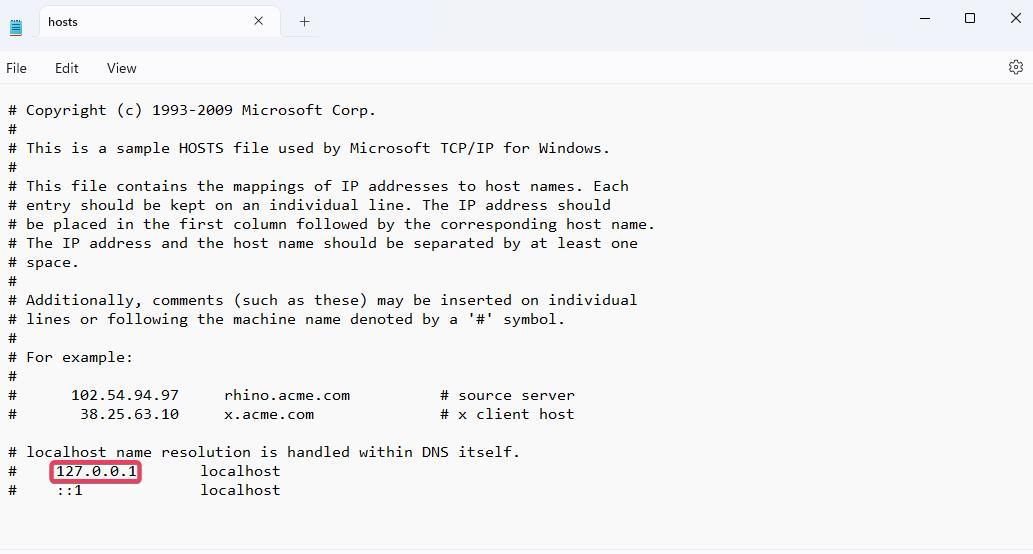
Hosts is a file for mapping domain names. The “Unable to connect to NVIDIA” error occurs when the localhost value in it equals 0.0.0.0. Some GeForce Experience users have fixed the “Unable to connect to NVIDIA” error by changing the localhost value to 127.0.0.1 in the hosts file like this:
-
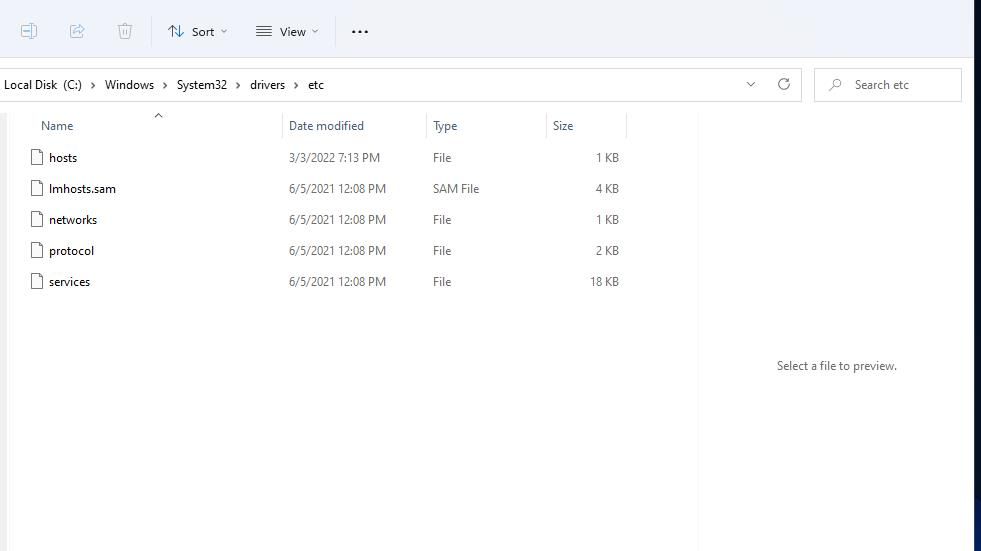
Open File Explorer and input this folder location in the folder address bar:
C:\Windows\System32\drivers\etc -
Click the hosts file with the mouse’s right button and select Open with.

- Then click Notepad to view the hosts file in that text editor.
-
If the localhost is set to 0.0.0.0, or another value, change it to 127.0.0.1 as shown in the image below.

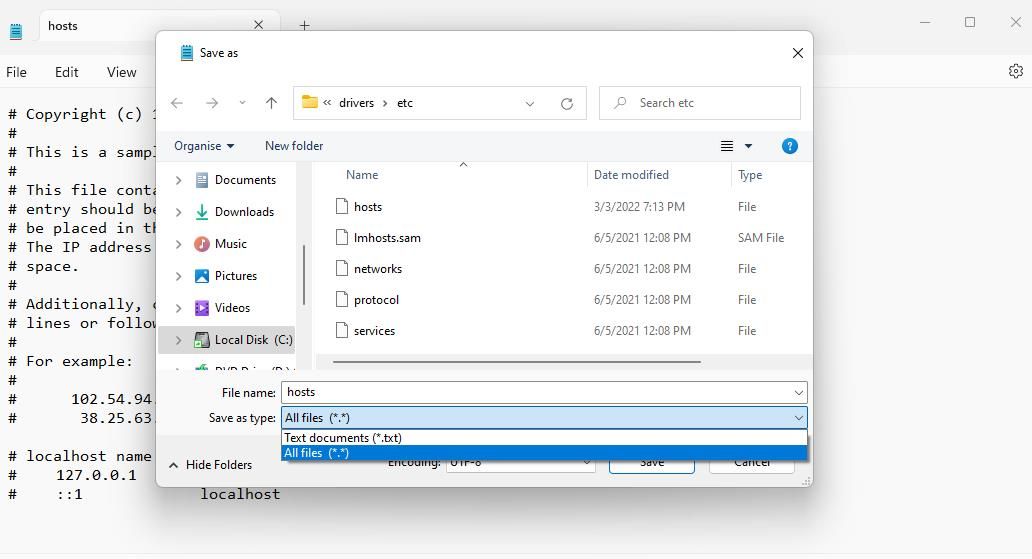
- Then click File at the top of Notepad to select a Save option.
-
Select All Files on the drop-down menu and click Save.

If you can’t edit hosts because of permission restrictions, copy and paste the file onto the desktop. To do so, right-click hosts and select Copy. Then right-click the desktop and select Paste.
Next, edit and save hosts as outlined above. Copy the edited hosts file on the desktop. Open the etc folder that includes the original hosts file again and press the Ctrl + V hotkey. Click the Replace option to overwrite the original file.
5. Reinstall GeForce Experience
Outdated GeForce Experience software is one of the most common causes of the “Unable to connect to NVIDIA” error. Many users have resolved the issue by uninstalling GeForce Experience and installing the latest version. You can uninstall GeForce Experience within the Control Panel as instructed in this guide to removing Windows software.
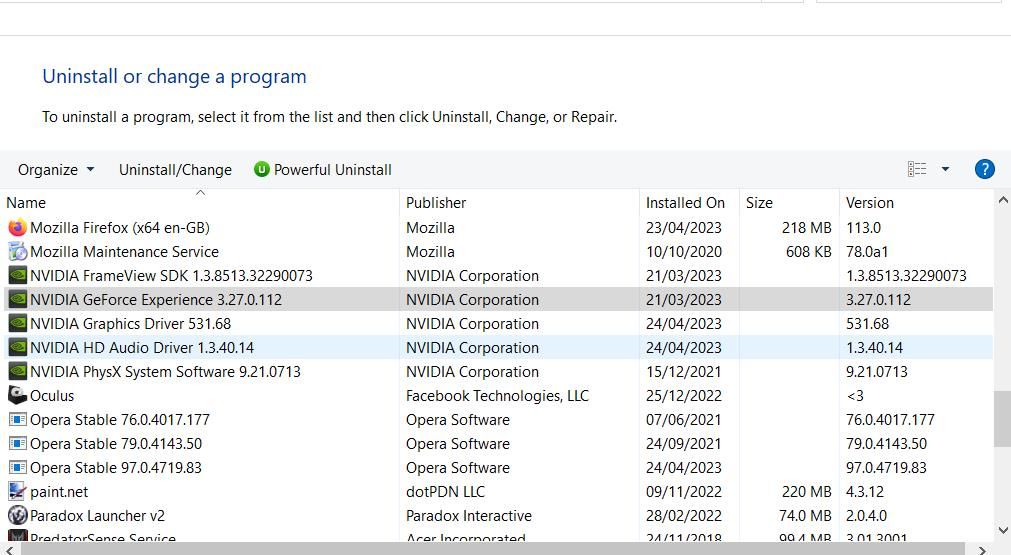
When you’ve uninstalled the old software version, open the GeForce website. Click Download Now to obtain the setup wizard for the latest GeForce Experience version. Go into File Explorer, open the folder containing the downloaded setup file, and double-click GeForce_Experience_v3.27.0.112.exe. Then select Agree and Install within the setup wizard.
Get the “Unable to connect to NVIDIA” Error Sorted
The “unable to connect to NVIDIA” error is an old issue GeForce Experience users have talked about on the NVIDIA forum for many years. A lot of users have been able to fix that issue by applying the potential resolutions outlined above. So, it’s likely one of them will get the same “unable to connect to NVIDIA” error sorted on your Windows PC.
NVIDIA’s GeForce Experience is a companion application that is used to provide automatic driver updates and game optimization for GTX graphic card users. Although this is a very helpful application that makes the task of keeping drivers up to date, it can cause a lot of troubles as well. Sometimes, you might encounter the Unable to connect to NVIDIA or Unable to update drivers’ messages while GeForce is attempting to download the latest drivers. This can happen at any time and for any length of time. Although it doesn’t make your system unusable but it can make some games unplayable especially if you can’t update drivers for a long period of time.

The exact reason for this problem is unknown. Most of the time it’s an issue from their server side which usually gets fixed within a few hours or days. Sometimes the issue might be a bug in their present application which gets fixed in the next updates of the application. Your issue will most likely get solved by manually downloading and updating the drivers.
Tip
Sometimes the problem is in the NVIDIA servers or on the NVIDIA’s side. The best thing that you can do in this situation is to just wait until the problem is fixed. Wait a few hours or a day and then try to reconnect.
Method 1: Deleting NSManagedTasks.xml
This solution works for the majority of the users. All you have to do is delete the file named NSManagedTasks.xml and then either reboot or start the NVIDIA service.
Follow the instructions given below to implement this solution
- Hold Windows key and press R
- Type C:\ProgramData\Nvidia Corporation\NetService\ and press Enter
- Click View in the File Explorer and check the option Hidden Items

- Locate the file named NSManagedTasks.xml

- Right click NSManagedTasks.xml and select Delete
- Press ALT, CTRL and DELETE keys simultaneously (ALT + CTRL + DELETE)
- Select Task Manager
- Make sure you are in the Details
- Locate NVNetworkService.exe from the process list
- Select NVNetworkService.exe and click End task
- Hold Windows key and press R
- Type services.msc and press Enter
- Locate and double click Nvidia Network Service
- Start the service by clicking the Start button


Now start and update your GeForce. You should be good to go.
Method 2: Changing Hosts File
Another solution for this is to change the value of the localhost in your hosts file. The steps for this are given below
- Hold Windows key and press R
- Type C:\Windows\System32\drivers\etc and press Enter
- Locate, right click the hosts file and select Open with
- Select Notepad from the available options and click ok
- Locate and check if the localhost has the value 0.0.0.0. If it is something like this “localhost = 0.0.0.0” then change it to “localhost = 127.0.0.1”
- Hold CTRL key and press S to save the file
- Close the file
If you can’t make the changes in the file then do the following. Basically, you will be copying the hosts file to the Desktop, make changes and then replace it back on to the original hosts file
- Follow the steps 1-2
- Locate, right click the hosts file and select Copy
- Go to your Desktop
- Hold CTRL key and press V
- Now the hosts file should be on your Desktop
- Follow the steps from 3-7 that are given above
- Right click the hosts file (from the Desktop) and select Copy
- Hold Windows key and press R
- Type C:\Windows\System32\drivers\etc and press Enter
- Hold CTRL key and press V
- Select Replace the file in the destination when it asks
Now you should be good to go.
Method 3: Automatic Driver Updates
Downloading the Automatic Driver Updates from the NVIDIA’s official website also solves the problem for a lot of users. This utility will automatically update your drivers.
- Go here and click Download in Automatic Driver Updates section

- Run the file once it is downloaded. Follow any additional on-screen instruction
This updater will automatically update your GeForce and the problem should be solved
Method 4: Uninstall and Re-install
If nothing else works for you then you have to do it the old school way. Just simply uninstall the GeForce program, re-download and re-install it. It will fix the issue that you are having
- Hold Windows key and press R
- Type appwiz.cpl and press Enter
- Locate GeForce Experience program, select it and click Follow any additional on-screen instructions
- Go here and download the GeForce Experience Install the program and the problem should be solved now.
Method 5: Manual Installation
Your last resort is to manually download and install the driver yourself. You can simply download the driver from the NVidia’s website and then install it via the device manager.
Follow the instructions below to manually install the drivers
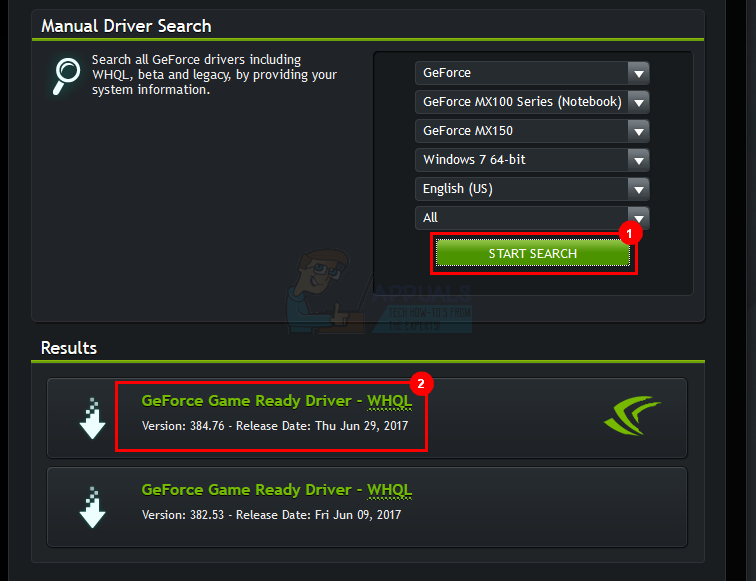
- Go here and search for the driver under section Manual Driver Search.

- Click the driver that you want to download (probably the latest one) from the search results
- Click Agree & Download
- Hold Windows key and press R
- Type devmgmt.msc and press Enter
- Expand Display Drivers by double clicking it
- Right click your Graphic card and select Update driver software…
- Select Browse my computer for driver software
- Click Browse
- Navigate to the location where you downloaded the driver package in step 3 and select it
- Click Next and follow any additional on-screen instructions

Your problem should be solved once the driver is installed.
Kevin Arrows
Kevin Arrows is a highly experienced and knowledgeable technology specialist with over a decade of industry experience. He holds a Microsoft Certified Technology Specialist (MCTS) certification and has a deep passion for staying up-to-date on the latest tech developments. Kevin has written extensively on a wide range of tech-related topics, showcasing his expertise and knowledge in areas such as software development, cybersecurity, and cloud computing. His contributions to the tech field have been widely recognized and respected by his peers, and he is highly regarded for his ability to explain complex technical concepts in a clear and concise manner.
If you are constantly trying to connect to NVIDIA and getting the same message repeatedly, there is nothing to worry about. Because there are many NVIDIA users on the same boat who receive the message “Unable to connect to NVIDIA,” try again later when they use the GeForce Experience to update their display driver.
The error usually appears on your Windows 7/8/10, and it often appears because the NVIDIA GeForce Experience app is not connecting to the server. The app is a part of the NVIDIA graphics driver and is very useful in updating the video drivers, optimizing game settings, recording videos, etc.
However, the unable to connect NVIDIA windows 10 and 11 issue is solvable. There are many ways to solve this connection issue, and I will discuss some of the most effective solutions.
What Causes Unable To Connect To Nvidia Error?
The NVIDIA unable to connect error only occurs for the GeForce Experience app in NVIDIA. This is why the error is solely related to this app. There are instances when the error is caused by a malfunction of some other service requiring the GeForce to work smoothly.
But, let me tell you about a few reasons why the error happens.
Outdated software:
NVIDIA is famous for regularly releasing new versions of the GeForce Experience Program, but users miss the recent update for the app most of the time. In such cases, the app might show a connection error of cannot connect to NVIDIA.
Service problem:
Mostly, this is the problem behind connection issues to NVIDIA. Most of the users who face this issue; have issues with their computers. And to automatically update the NVIDIA drives, it requires a proper functioning Network service.
But if the service is not running as it should, then you will face the unable to connect NVIDIA issue in the GeForce program.
These two scenarios can pretty much halt your app of the GeForce program, so you need to find ways to solve this issue. That is what I am here for; I will guide you through a list of potential solutions to connect back to NVIDIA.
When NVIDIA GeForce cannot connect to the server, our first reaction is panic and then thinking of taking the PC to a repair store and getting it fixed. But what if I told you that you could easily solve this issue at home.
There is no need to worry as long as you follow the right steps and sequence. So, buckle up for some useful solutions to your NVIDIA problem.
Related guides:
Fixed “graphics card not detected” on windows 10
Fixed “this effect requires GPU acceleration?”
How to fix “GPU fans not spinning” in 2023?
GPU sag explained: and how to fix it easily?
How to fix Minecraft not using GPU?
GPU coil whine explained
#1- Change The Status of NVIDIA Services
The main reason why GeForce’s experience cannot connect to NVIDIA is that NVIDIA Network Services cant run itself on the PC. But, you can solve this issue by changing the status of NVIDIA services. Here are the steps you can follow to do it on any Windows OS.
- Open the Run dialog box by pressing the ‘Win + R’ keys together. And when the box appears, type ‘Services.msc’ in the search column and press ‘OK.’
- Now, on the services page, look for ‘NVIDIA Network Service’ and then look for status. If it says ‘Starting’ under the status column, the service cannot start independently. Leave the page for the time being.
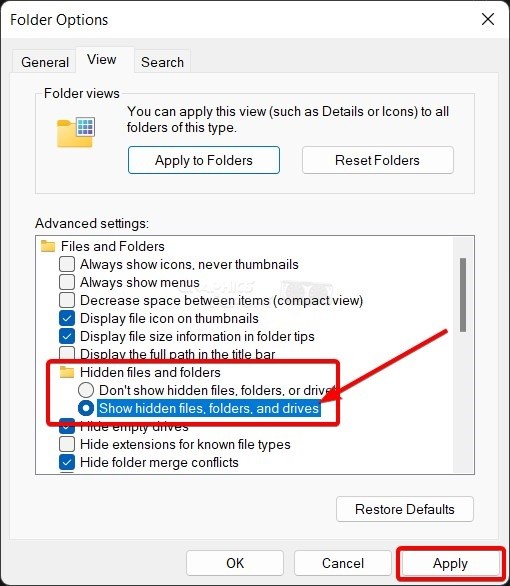
- Open the Windows Explorer and go to the ‘ProgramData’ folder, usually in ‘Drive C.’ Search for NVIDIA Corp in that Folder. But if you can’t find it, then it must be hidden. Click ‘Organize’ from the top menu and select the ’Folder and search options to unhide the Folder. Then choose the ‘View’ tab and go to the ‘Advanced Settings.’ Finally, check the ‘Show hidden files, drives, and folder’s box and click on ‘Apply .’ Once this step is done, you will be able to see ‘ProgramData’ in Drive C.

- Go to the NVIDIA Corp folder and enter the ‘NetService’ Folder. Look for the ‘NSManagedTasks.xml’ file. Delete or move this file out of the Folder. Then right-click on the taskbar and choose the ‘Start Task Manager’ from the available options. Now choose the ‘Show processes from all users’ option, and from there, go to ‘NvNetworkService.exe,’ right-click on it, and ‘End Process.’
- Go back to Services Page and refresh it. You will see that the status of the NVIDIA Network Service is empty. Click on the NVIDIA Network Service and choose ‘Start’ from the options.
- In a while, you will see the status displaying ‘Started,’ and then you can close the window.
This whole process is bound to update your NVIDIA driver and fix the issue of GeForce unable to connect to NVIDIA.
#2- Reinstall Latest GeForce Experience Program
Sometimes, the connection issue occurs because the GeForce Experience app on your computer is outdated (as I already told you, NVIDIA regularly releases app updates). So, the simple solution is to uninstall and then reinstall the latest version, which you can download from the official website of NVIDIA.
But, before you uninstall the old version, download the new version and save it somewhere separately. Once you do that, you can follow the steps below to uninstall and reinstall the program.
Open ‘the start menu and go to settings, then go on the ‘Apps’ option, look for ‘GeForce Experience’ in the app list, click on the ‘Uninstall’ button, and follow the instructions that your PC gives you.
- Once the app is installed, restart your PC.
- After reboot, open the updated installer of the GeForce Experience file and choose ‘Run as Administrator.’ Click yes on the user account control window and then wait for the installer to load. Once loaded, click on ‘agree and install’ to accept the NVIDIA agreement.
- Finally, wait for the installation to complete and then restart the computer to solve your ‘Unable to connect to NVIDIA’ error. If this doesn’t work, then you can try the next solution.
#3- Update NVIDIA Drivers
An outdated graphics card driver may lead to a connection issue with NVIDIA. So updating is crucial if you don’t want the app to stop working. Here is how you can update it:
- Open ‘Device Manager’ via the start menu and then click on ‘Display Manager’ in the Device Manager window to expand it.
- Then click on NVIDIA graphics card and choose ‘Update Driver,’ then select the option of ‘Search automatically for updated driver software’. The windows will automatically start searching, downloading, and installing the latest version of the NVIDIA graphics card.

- Finally, restart your PC and check whether or not the NVIDIA update cannot connect or the issue is solved.
Side note: you can also uninstall the device instead of updating it and then reinstall the driver from NVIDIA’s official website.
#4- Uninstall And Reinstall GeForce Experience
You can easily solve the connection issue by uninstalling and then reinstalling the GeForce Experience app. Then, all you have to do is follow the steps I am mentioning.
- On your main screen, press ‘Win + R’ at the same time to open a Run box.
- Type ‘Devmgmt.msc’ and ‘enter’ to open the device manager window. Now double click on the ‘display adapters’ to expand this option. Then right-click on the NVIDIA graphics card installed on your PC. Now an option will pop up to uninstall the device. Choose that.
- Once you select it, confirm it in the dialog box and ‘delete the driver’ check the box and finally uninstall it.
- Restart your PC and wait a while.
- Open your browser and go to the official website of NVIDIA: https://www.NVIDIA.com/en-us/. From here, you can download the correct app installer. Now, on the official website, mention the details of your system and the graphics card model.
- Follow all the instructions on your screen to download the GeForce Experience.
- Once the installer is complete, click on the downloaded file and follow the installer’s instructions.
- Once installed, you can restart your computer and check whether or not the issue is solved.
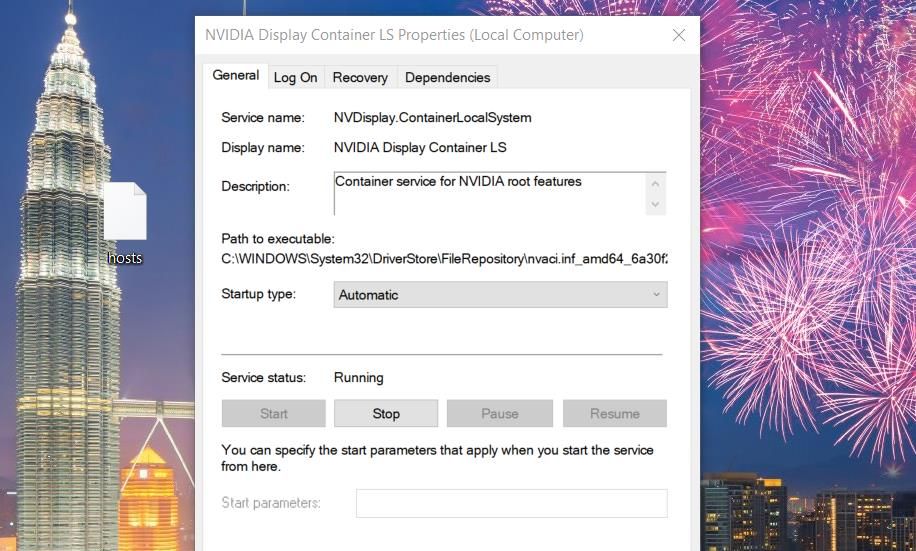
#5- Restart NVIDIA Network Services
Another helpful solution to the connection problem is simply to restart your NVIDIA Network Services. Although restarting is a simple process and takes hardly 5 minutes to complete, here is how to do it.
- Press the ‘windows key + R’ from your keyboard, and once the dialog box opens, type ‘services.msc’ in it and ‘Enter.’
- Now, look for the following services: NVIDIA Display Container LS, NVIDIA NetworkService Container, NVIDIA LocalSystem Container, and NVIDIA Telemetry Container. NVIDIA Display Container LS and’ right-click on it. Choose the ‘properties’ from the context menu.
- Once the properties open, look for the Service Status and click ‘stop’ under it.

- Now click on the drop-down list beside ‘startup type’ and select automatically. Wait for a few moments and then click ‘start.’ Choose ‘Apply’ to save your changes.
- Now repeat the steps for all the services mentioned in step 2.

#6- Delete NSManagedTasks.xml To Disable NVIDIA Services
There is a chance that the connection problem you are facing while using NVIDIA GeForce could be that the NVIDIA Network Services’ status is stuck in the starting status.
This can lead to connection problems in the network and make it impossible for you to download things via GeForce Experience. But, you can disable NVIDIA services to fix this problem.
Here is how:
- Press the ‘windows key + R’ from your keyboard, and once the dialog box opens, type ‘services.msc’ in it and ‘Enter.’
- Press ‘N’ from your keyboard to locate the NVIDIA Network Services and ensure that the service status is ‘Starting’ and not ‘Started.’
- Now, open ‘C:\ProgramData\NVIDIA Corporation\NetService\’. And delete ‘NSManagedTasks.xml.’ This file should be in XML Document. But if you can’t find it, then it must be hidden. Click ‘Organize’ from the top menu and select the ’Folder and search options to unhide the Folder. Then choose the ‘View‘ tab and go to the ‘Advanced Settings.’ finally, check the box of ‘Show hidden files, drives, and folders and click on ‘Apply.’ Once this step is done, you will be able to see hidden files.
- Now on your keyboard, press ‘Windows key + X’ and then open the ‘task manager. Click on the ‘details’ tab and ‘NVNetworkService.exe’ and click on ‘end task.’
- Go back to the ‘Service’ window and’ right-click on NVIDIA Network Services to start it.
#7- Changing Hosts File
Changing your windows host files is the ultimate solution to solve your NVIDIA connection problem, and you can easily do it without professional help. Just follow the below-mentioned steps.
- Open the ‘start menu and search for ‘folder options.’ Right-click on the result and open the ‘file explorer option. Then open ‘View’ and go to ‘advanced settings, ‘hidden files’ and finally open ‘folders.’ Select the ‘radio’ button.
- Then click on ‘OK’ and “apply’ to save changes.
- Now ‘right-click on start and go to ‘file explorer’ from the menu.
- Write ‘C:\Windows\System32\drivers\etc in the ‘File explorer’ address bar to reach the folder.

- Now from the etc. Copy the host files, and paste them onto the ‘desktop.’
- Click on the host files on the desktop, and when it asks, ‘How do you want to open this file, select the notepad and click ‘OK.’
- Now that the files are open in the ‘notepad,’ you can add or remove any links from it. But remember to save it.
- Now, drag the host files from the desktop to the, etc. Folder in ‘File Explorer. Select the option of ‘Replace the file’ and then press ‘Continue’ to save changes.
#8- Update Your Windows
It is possible that your GeForce Experience is not working because the Windows version you are trying to run is outdated. However, you can fix it by updating your operating system. Here is how to do it.
- Search for ‘Windows update settings’ in the start menu and once you find it, click on ‘update and security and select the ‘windows update.’
- Now click on the ‘check for update’s button and allow installation of all the windows updates.
- While the installation is happening, your windows might restart many times. Do not interrupt the process.
- After the installation is complete, you can try running your app and see if the issue has been resolved or not.
My Final Thoughts On It!
Hopefully, these solutions will have proved to you while trying to solve the connection issue. Therefore, ensure that you try all these solutions when you encounter unable to connect to NVIDIA.
One of these solutions is bound to work for you, but if non of these work for you, you can take your issue to an expert PC technician or call NVIDIA to guide you. Good Luck!
Contents:
Unable to Connect to NVIDIA Overview
Why I cannot Connect to NVIDIA on Windows 10/11?
3 Ways to Fix Windows 10/11 Unable to Connect to NVIDIA Error
Unable to Connect to NVIDIA Overview
Have you gotten the error message saying Unable to connect to NVIDIA. Try again later? Or you may meet with the error that Unable to connect to NVIDIA. Check your internet connection.
Many people may think it is the network issue after seeing the reminding, so they wait for a period of time and try again, but the GeForce Experience still pops up the error message telling you that it cannot connect NVIDIA. Nothing changed, problem is still here.
Why I cannot Connect to NVIDIA on Windows 10/11?
When you use the NVIDIA hardware in Windows 10, why Windows 10 Geforce Experience occurs to cannot connection error? It may lies in two aspects.
One is the NVIDIA server may have problem at this time, so when you running the NVIDIA Geforce Experience, it pops up the message that let you try again later. And sometimes, it is the Geforce Experience program running error.
The other one falls on the NVIDIA network service. The NIVIDIA network service is stuck in restarting status, so you are unable to connect NVIDIA server.
How to Make GeForce Experience Connect to NVIDIA?
Let’s get down to solve this NVIDIA problem on Windows 10 in view of its causes. Before trying the complicated solutions, you need to make sure there is no trouble with your NVIDIA server, reconnect NVIDIA again.
Solutions:
- 1. Restart NVIDIA Services
- 2. Uninstall and Reinstall GeForce Experience
- 3. Update NVIDIA Driver
Solution 1: Restart NVIDIA Network Services
The NVIDIA service does not work may cause the GeForce Experience to disconnect to NVIDIA, so you should restart it.
To restart the NVIDIA Service, first off, you are supposed to delete the NSManagedTasks.xml which is a kind of XML file related to the NVIDIA activities.
1. In order to finish removing the NSManagedTasks.xml, go to C:\ProgramData\Nvidia Corporation\NetService\
2. Then right click to Delete the NSManagedTasks.xml file.
Tips: If you do not find this NSManagedTasks.xml, try to move on the top of the File Explorer, click View > Show Hidden Items.

After that, move on to start the NVIDIA services for the purpose of connecting it to GeForce Experience.
It is wise for you to start the NVIDIA services again in task manager. For this GeForce Experience cannot connect to NVIDIA to a great extent can ascribe to the NVIDIA network service issues.
You may restart the video card services on Windows 10/11.
In this process, you are experiencing two main procedures, namely, to end task for NVNetworkService.exe which is a software component of NVIDIA Network Service tracking updates for NVIDIA card and then start NVIDIA Network Service.
3. Right click the Start and select Task Manager from the list.
4. Under Details tab, locate NVNetworkService.exe and right click it to End task.
After ending task for the NVnetworkservcie.exe, to solve the error cannot connect to NVIDIA, go deeper to start the NVIDIA Network Services again for Windows 10.
5. Press Windows + R to activate the Run. Type services.msc in the box and hit OK to open Services window.
6. Scroll down to find out NVIDIA Network Service and right click it to Start.
Solution 2: Uninstall and Reinstall GeForce Experience
Sometimes, you find your GeForce Experience cannot download the NVIDIA drivers and returns the simple error of Unable to connect NVIDIA, try again later. Under this circumstance, it is suggested to update the GeForce Experience on Windows 10 especially when it is older than 2.5xx.
1. Exit the running GeForce Experience.
2. Goes to Control Panel > Program and Features to Uninstall the GeForce Experience.
3. Download the latest version of GeForce Experience from here.
4. Following the installation guide to install it step by step.
All done, you are capable of trying to connect the NVIDIA with GeForce Experience and see if GeForce Experience can update drivers for your NVIDIA card drivers this time on Windows 10.
And now, when you opened up it, the error of Unable to connect NVIDIA with your GeForce Experience will not show up.
Solution 3: Update NVIDIA Driver
Some NVIDIA GeForce Experience users have reported that if their GeForce GTX graphics card driver are outdated or incompatible with Windows 10, they cannot also connect to NVIDIA, let alone update drivers automatically for NVIDIA cards.
Accordingly, you might as well spare no effort to download the up-to-date NVIDIA drivers to resolve the unable to connect to NVIDIA error on Windows 10.
For this part, several options are available for you to get the updated video card drivers for Windows 10.
Option 1: Update NVIDIA card drivers in Device Manager
via this path: Device Manager > Display adapter > the NVIDIA GeForce driver > Update driver.
Then follow the instructions to let Windows 10 automatically search online for NVIDIA drivers.
Option 2: Update the NVIDIA Graphics card driver manually
For NVIDIA GeForce users, it is your privileges to turn to NVIDIA Support website to download the latest version of the NVIDIA graphics driver it has released. And here is the solution: Steps for updating NVIDIA drivers manually.
It is possible that after you installed the most up-to-date NVIDIA drivers, the GeForce can connect to NVIDIA.
Option 3: Update NVIDIA Card Drivers Automatically by Driver Booster
To fix GeForce Experience cannot connect to NVIDIA error by updating NVIDIA drivers, or when you failed to find it on NVIDIA site, Driver Booster can be a good helper.
Driver Booster can download the latest NVIDIA graphics drivers for you quickly and safely. It is capable of updating it in two clicks — Scan and Update.

For clients who would rather finish solving unable to connect to NVIDIA problem without delay, Driver Booster can be called the best choice for you.
In reference to this cannot or unable to connect to NVIDIA issue for GeForce Experience, this thread focuses on teaching you resolve this GeForce update error, you are recommended to concentrate on the driver, services related to NVIDIA card.
More Articles:
Fix Gaming Stuttering With FPS Drops After Creators Update
Fix NVIDIA Driver Crashes on Windows 10/11
Fix NVIDIA Control Panel Missing on Windows 10/11