
|
Описание |
: |
|
Размер |
: 49152 Byte ( 48 KB ) |
|
Дата |
: 2015-6-30 |

Как установить DLL файл?
Подробная инструкция по установке
- Загрузите файл GDI.DLL на компьютер.
- Поместите файл в папку с требующей его программой.
- Скопируйте файл dll file в следующие системные директории.
- (Windows XP, Vista, Windows 7, Windows 8.1, Windows 10) — C:\Windows\System32
- (Windows NT/2000) — C:\WINNT\System32
- (Windows 95/98/Me) — C:\Windows\System
В Windows x64 необходимо поместить файл в директорию C:\Windows\SysWOW64\
- Перезагрузите компьютер.
Проблемы связанные с файлом
Наиболее распространенные проблемы связанные с файлом.
- «GDI.DLL Missing»
- «GDI.DLL не найден.»
- «Файл GDI.DLL отсутствует.»
- «GDI.DLL нарушение прав доступа.»
- «Файл GDI.DLL не удалось зарегистрировать.»
- «Файл C:\Windows\System32\ GDI.DLL не найден.»
About Gdi32.dll
The Gdi32.dll file is 0.07 MB. The download links are current and no negative feedback has been received by users. It has been downloaded 9545 times since release and it has received 4.0 out of 5 stars.
Table of Contents
- About Gdi32.dll
- Operating Systems Compatible with the Gdi32.dll File
- Other Versions of the Gdi32.dll File
- How to Download Gdi32.dll
- Methods for Solving Gdi32.dll
- Method 1: Solving the DLL Error by Copying the Gdi32.dll File to the Windows System Folder
- Method 2: Copying the Gdi32.dll File to the Software File Folder
- Method 3: Doing a Clean Reinstall of the Software That Is Giving the Gdi32.dll Error
- Method 4: Solving the Gdi32.dll Problem by Using the Windows System File Checker (scf scannow)
- Method 5: Fixing the Gdi32.dll Errors by Manually Updating Windows
- Guides to Manually Update for All Windows Versions
- Common Gdi32.dll Errors
- Dll Files Similar to Gdi32.dll
Operating Systems Compatible with the Gdi32.dll File
- Windows 10
- Windows 8.1
- Windows 8
- Windows 7
- Windows Vista
- Windows XP
Other Versions of the Gdi32.dll File
The newest version of the Gdi32.dll file is the 4.00.950 version. This dll file only has one version. No other version has been released.
- 4.00.950 — 32 Bit (x86) Download this version
- Click on the green-colored «Download» button (The button marked in the picture below).

Step 1:Starting the download process for Gdi32.dll - When you click the «Download» button, the «Downloading» window will open. Don’t close this window until the download process begins. The download process will begin in a few seconds based on your Internet speed and computer.

Methods for Solving Gdi32.dll
ATTENTION! In order to install the Gdi32.dll file, you must first download it. If you haven’t downloaded it, before continuing on with the installation, download the file. If you don’t know how to download it, all you need to do is look at the dll download guide found on the top line.
Method 1: Solving the DLL Error by Copying the Gdi32.dll File to the Windows System Folder
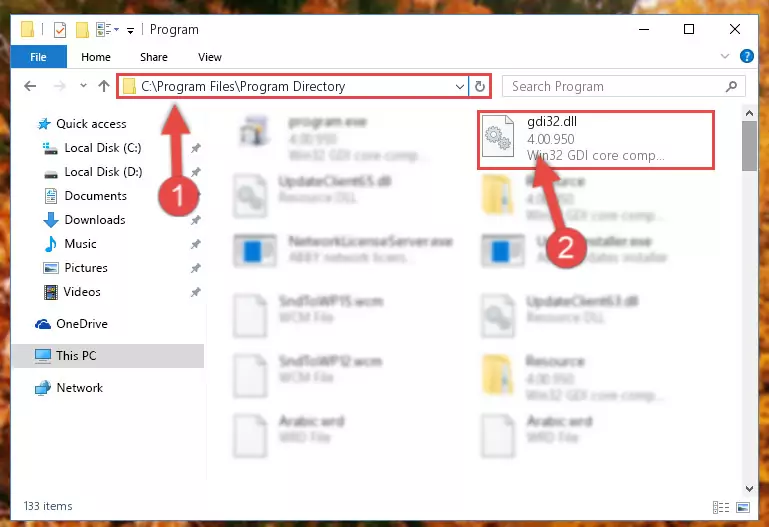
- The file you downloaded is a compressed file with the «.zip» extension. In order to install it, first, double-click the «.zip» file and open the file. You will see the file named «Gdi32.dll» in the window that opens up. This is the file you need to install. Drag this file to the desktop with your mouse’s left button.
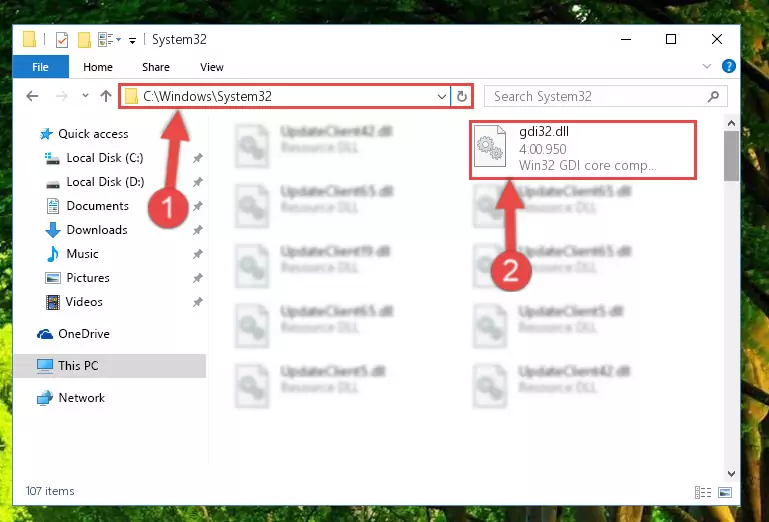
- Copy the «Gdi32.dll» file you extracted and paste it into the «C:\Windows\System32» folder.
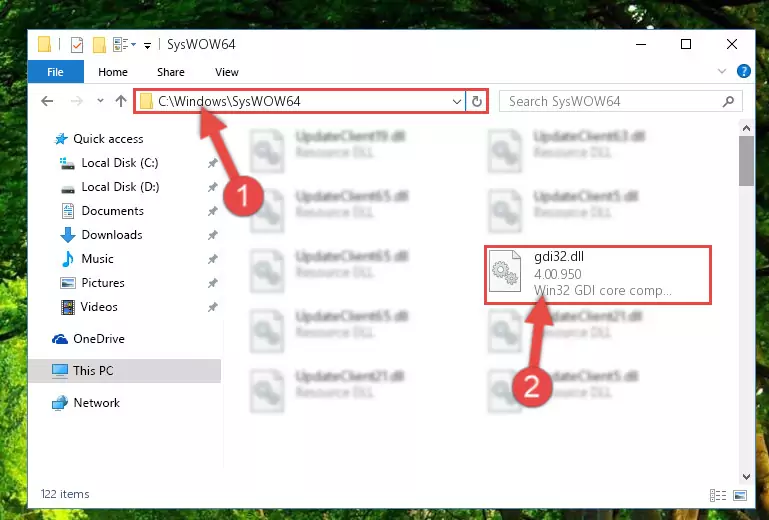
Step 2:Copying the Gdi32.dll file into the Windows/System32 folder - If you are using a 64 Bit operating system, copy the «Gdi32.dll» file and paste it into the «C:\Windows\sysWOW64» as well.
NOTE! On Windows operating systems with 64 Bit architecture, the dll file must be in both the «sysWOW64» folder as well as the «System32» folder. In other words, you must copy the «Gdi32.dll» file into both folders.
Step 3:Pasting the Gdi32.dll file into the Windows/sysWOW64 folder - In order to run the Command Line as an administrator, complete the following steps.
NOTE! In this explanation, we ran the Command Line on Windows 10. If you are using one of the Windows 8.1, Windows 8, Windows 7, Windows Vista or Windows XP operating systems, you can use the same methods to run the Command Line as an administrator. Even though the pictures are taken from Windows 10, the processes are similar.
- First, open the Start Menu and before clicking anywhere, type «cmd» but do not press Enter.
- When you see the «Command Line» option among the search results, hit the «CTRL» + «SHIFT» + «ENTER» keys on your keyboard.
- A window will pop up asking, «Do you want to run this process?«. Confirm it by clicking to «Yes» button.
Step 4:Running the Command Line as an administrator - Let’s copy the command below and paste it in the Command Line that comes up, then let’s press Enter. This command deletes the Gdi32.dll file’s problematic registry in the Windows Registry Editor (The file that we copied to the System32 folder does not perform any action with the file, it just deletes the registry in the Windows Registry Editor. The file that we pasted into the System32 folder will not be damaged).
%windir%\System32\regsvr32.exe /u Gdi32.dll
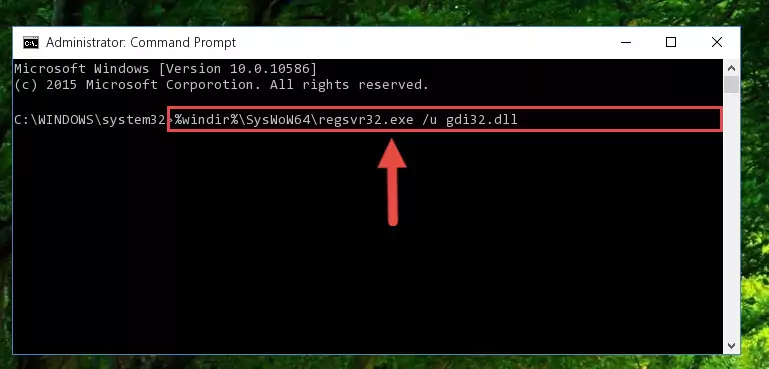
Step 5:Deleting the Gdi32.dll file’s problematic registry in the Windows Registry Editor - If you are using a Windows version that has 64 Bit architecture, after running the above command, you need to run the command below. With this command, we will clean the problematic Gdi32.dll registry for 64 Bit (The cleaning process only involves the registries in Regedit. In other words, the dll file you pasted into the SysWoW64 will not be damaged).
%windir%\SysWoW64\regsvr32.exe /u Gdi32.dll
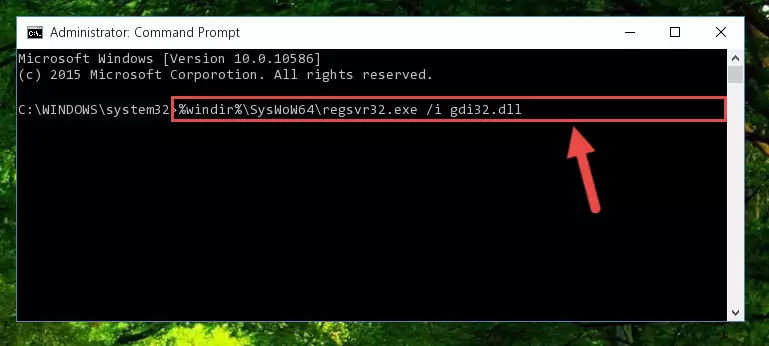
Step 6:Uninstalling the Gdi32.dll file’s problematic registry from Regedit (for 64 Bit) - We need to make a new registry for the dll file in place of the one we deleted from the Windows Registry Editor. In order to do this process, copy the command below and after pasting it in the Command Line, press Enter.
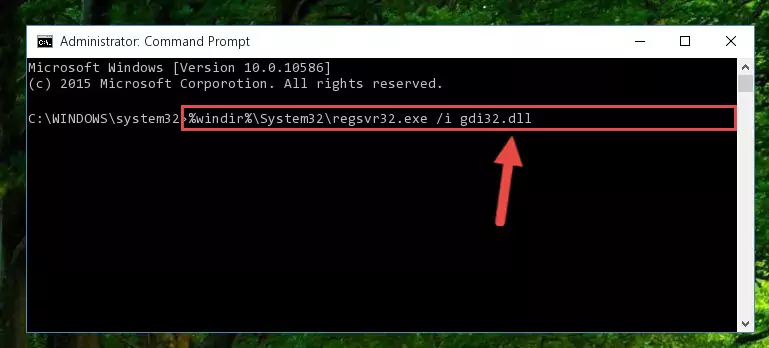
%windir%\System32\regsvr32.exe /i Gdi32.dll
Step 7:Creating a new registry for the Gdi32.dll file in the Windows Registry Editor - If you are using a 64 Bit operating system, after running the command above, you also need to run the command below. With this command, we will have added a new file in place of the damaged Gdi32.dll file that we deleted.
%windir%\SysWoW64\regsvr32.exe /i Gdi32.dll
Step 8:Reregistering the Gdi32.dll file in the system (for 64 Bit) - You may see certain error messages when running the commands from the command line. These errors will not prevent the installation of the Gdi32.dll file. In other words, the installation will finish, but it may give some errors because of certain incompatibilities. After restarting your computer, to see if the installation was successful or not, try running the software that was giving the dll error again. If you continue to get the errors when running the software after the installation, you can try the 2nd Method as an alternative.
Method 4: Solving the Gdi32.dll Problem by Using the Windows System File Checker (scf scannow)
- In order to run the Command Line as an administrator, complete the following steps.
NOTE! In this explanation, we ran the Command Line on Windows 10. If you are using one of the Windows 8.1, Windows 8, Windows 7, Windows Vista or Windows XP operating systems, you can use the same methods to run the Command Line as an administrator. Even though the pictures are taken from Windows 10, the processes are similar.
- First, open the Start Menu and before clicking anywhere, type «cmd» but do not press Enter.
- When you see the «Command Line» option among the search results, hit the «CTRL» + «SHIFT» + «ENTER» keys on your keyboard.
- A window will pop up asking, «Do you want to run this process?«. Confirm it by clicking to «Yes» button.
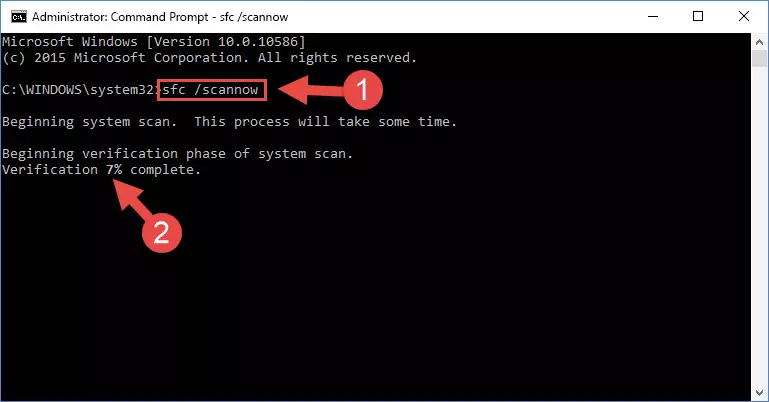
Step 1:Running the Command Line as an administrator - After typing the command below into the Command Line, push Enter.
sfc /scannow
Step 2:Getting rid of dll errors using Windows’s sfc /scannow command - Depending on your computer’s performance and the amount of errors on your system, this process can take some time. You can see the progress on the Command Line. Wait for this process to end. After the scan and repair processes are finished, try running the software giving you errors again.
Method 5: Fixing the Gdi32.dll Errors by Manually Updating Windows
Some softwares need updated dll files. When your operating system is not updated, it cannot fulfill this need. In some situations, updating your operating system can solve the dll errors you are experiencing.
In order to check the update status of your operating system and, if available, to install the latest update packs, we need to begin this process manually.
Depending on which Windows version you use, manual update processes are different. Because of this, we have prepared a special article for each Windows version. You can get our articles relating to the manual update of the Windows version you use from the links below.
Guides to Manually Update for All Windows Versions
- Guide to Manually Update Windows 10
- Guide to Manually Update Windows 8.1 and Windows 8
- Guide to Manually Update Windows 7 and Windows Vista
- Guide to Manually Update Windows XP
Common Gdi32.dll Errors
When the Gdi32.dll file is damaged or missing, the softwares that use this dll file will give an error. Not only external softwares, but also basic Windows softwares and tools use dll files. Because of this, when you try to use basic Windows softwares and tools (For example, when you open Internet Explorer or Windows Media Player), you may come across errors. We have listed the most common Gdi32.dll errors below.
You will get rid of the errors listed below when you download the Gdi32.dll file from DLL Downloader.com and follow the steps we explained above.
- «Gdi32.dll not found.» error
- «The file Gdi32.dll is missing.» error
- «Gdi32.dll access violation.» error
- «Cannot register Gdi32.dll.» error
- «Cannot find Gdi32.dll.» error
- «This application failed to start because Gdi32.dll was not found. Re-installing the application may fix this problem.» error
Dll Files Similar to Gdi32.dll
- Gogo.dll
- Gk10.dll
- Go.dll
- Gi90.dll
- Gsda.dll
Скачал сам поделись с друзьями. Поддержи сайт.
Нужна помощь в установке GDI.DLL?
Администрация сайта не несет ответственности за ваши действия
- Загрузите файл GDI.DLL на компьютер.
- Распакуйте и поместите файл в папку с требующей его программой.
- Скопируйте файл GDI.DLL в следующие системные директории.
- (Windows 95/98/Me) — C:\Windows\System
- (Windows NT/2000) — C:\WINNT\System32
- (Windows XP, Vista, 7) — C:\Windows\System32
В Windows x64 необходимо поместить файл в директорию C:\Windows\SysWOW64\
- Перезагрузите компьютер.
Проблемы с установкой? Прочтите рекомендации по установке DLL файлов
Ошибки GDI.DLL
Наиболее распространенные ошибки связанные с файлом.
- «GDI.DLL не найден.»
- «Файл GDI.DLL отсутствует.»
- «GDI.DLL нарушение прав доступа.»
- «Файл GDI.DLL не удалось зарегистрировать.»
- «Файл C:\Windows\System32\GDI.DLL не найден.»
Вы выполняете: Windows 7
Подходящая версия GDI.DLL найдена в нашей базе
Windows 7 — это не ваша операционная система? Пожалуйста, выберите вашу операционную систему ниже: специальное предложение
Чтобы быстро решить вашу проблему, мы рекомендуем скачать и использовать GDI.DLL Инструмент для исправления. Если у вас есть технический опыт и вы хотите установить DLL файл вручную, пожалуйста, выберите вашу версию Windows и скачайте GDI.DLL, после чего скопируйте его в соответствующее место с помощью приведенной ниже инструкции, это исправит ошибки dll.
Что за GDI.DLL?
GDI.DLL — dll файл с именем «» является частью программы , разработанной .
Некоторые приложения или игры могут нуждаться в этом файле для корректной работы. Если GDI.DLL отсутствует, то при запуске приложения/игры Вы можете столкнуться с различного рода ошибками. Чтобы исправить эти ошибки, пожалуйста, ознакомьтесь с Рекомендуемым решением ниже.
version: файла
Размер: файла 48.00 KB
MD5 файл sum: CBEF3CF6D1D28C7D9028E5D39CA39BDD
SHA1 файл sum: 15822D621BE6831349D008DE059EA76C15948DC7
GDI.DLL Error Screenshot
Возможные сообщения об ошибках относительно этого файла:
GDI.DLL отсутствует
GDI.DLL ошибка загрузки
GDI.DLL поломка
GDI.DLL не найдено
Точка входа в процедуру GDI.DLL
GDI.DLL не может быть найдено
GDI.DLL Нарушение доступа
Не могу найти GDI.DLL
Невозможно зарегистрировать GDI.DLL
Рекомендуемое решение для исправления ошибки Dll
Для исправления ошибок, связанных с .DLL файлом, необходимо скачать GDI.DLL и скопировать его в папку установки приложения или игры, либо скопировать его в системную папку Windows, и он должен исправить ошибку. Если вы не знаете, как установить этот файл, пожалуйста, прочитайте наше руководство «Как установить DLL файлы.
ВЕРСИИ GDI.DLL
| Версия / биты | Размер | Язык | Описание | MD5/SHA-1 | |
|---|---|---|---|---|---|
| 320.0.0.0 | 48 kb | Microsoft® C Runtime Library |
MD5 MD5cbef3cf6d1d28c7d9028e5d39ca39bdd SHA1 SHA115822d621be6831349d008de059ea76c15948dc7 |
Вы можете прочитать больше информации о gdi.dll на WikiDll.com
/GDI32.dll not found: Fix for Windows XP, Vista, 7, 8 and 10
Get the fix for the error GDI32.dll not found on Windows XP, Windows Vista, Windows 7, Windows 8 and Windows 10.
About “GDI32.dll not found”
The following information on this error has been compiled by NeoSmart Technologies, based on the information gathered and reported by our global network of engineers, developers, and technicians or partner organizations.
Description and Symptoms
The error messages, alerts, warnings, and symptoms below are tied to this error.
Symptom 1: “GDI32.dll not found” error screen on startup
GDI32.DLL exports Graphics Device Interface (GDI) functions that perform primitive drawing functions for output to video displays and printers. Applications call GDI functions directly to perform low-level drawing, text output, font management, and similar functions. If this file becomes missing or corrupt, then the system is unable to load properly and the “GDI32.dll not found” error screen appears.
Here is an example of “GDI32.dll not found” error screen for Windows XP, Vista and Windows 7:

STOP: c0000135 (Unable To Locate Component)
This application has failed to start because GDI32.dll was not found. Re-installing the application may fix the problem.
On Windows 8 this error generates a more generic “Your PC did not start correctly” error screen:

Automatic Repair

Your PC did not start correctly
Press "Restart" to restart your PC, which can sometimes fix the problem. You can also press "Advanced options" to try other options to repair your PC.
While on Windows 10, it also causes a slightly different error screen to appear:

Your PC ran into a problem and needs to restart. We're just collecting some error info, and then we'll restart for you(45% complete)
If you'd like to know more, you can search online later for this error: 0xc0000135
Causes of this Error
This error has been known to occur as a result of one of the following causes:
Cause 1: GDI32.dll file is corrupt or missing
Virus attacks, power outages and disk write errors may cause files to become missing or corrupt. If that’s the case, then the operating system can’t find the GDI32.dll file, and the boot process is halted with a “GDI32.dll was not found ” error.
Fixing “GDI32.dll not found” on Windows
Windows Setup CD/DVD Required!
Some of the solutions below require the use of the Microsoft Windows setup CD or DVD. If your PC did not come with a Windows installation disc or if you no longer have your Windows setup media, you can use Easy Recovery Essentials for Windows instead. EasyRE will automatically find and fix many problems, and can also be used to solve this problem with the directions below.
Fix #1: Replace GDI32.dll
Windows Setup CD/DVD Required!
Some of the solutions below require the use of the Microsoft Windows setup CD or DVD. If your PC did not come with a Windows installation disc or if you no longer have your Windows setup media, you can use Easy Recovery Essentials for Windows instead. EasyRE will automatically find and fix many problems, and can also be used to solve this problem with the directions below.
If gdi32.dll is in fact missing or corrupt, you can restore the original gdi32.dll file back from your Windows XP installation disc.
Unable to boot into the Windows setup CD?
See our guide on setting up a PC to boot from the CD or DVD for troubleshooting and more detailed instructions.
- Insert your XP CD into the computer.
- Restart your computer.
- Press any key to boot into the CD when you see the “Press any key to boot from CD” message.
- Press R to start Recovery Console when the Options screen appears.
- Type in your Administrator password followed by the Enter key to submit it.
- You’ll reach the Command Prompt now, type the following command, where
D:\is your CD’s drive letter andC:\is the letter of the drive you installed Windows to:expand D:\i386\gdi32.dl_ C:\Windows\system32\
- Press Y when you are asked if you want to overwrite this file and then hit Enter to submit the command.
- Restart your computer.
Here is an example of what the PC’s console output should look like once the GDI32.dll file is properly restored:

GDI32.dll restored from Win XP install CD
Fix #2: Repair corrupted system files with the SFC command
On Windows Vista and Windows 7, it is possible to use the built-in Windows SFC(system file checker) tool to automatically scan a computer’s system files and repair them if necessary.
Here are the steps to run SFC:
- Boot from your Windows install disc
- Click on Repair your computer after selecting proper language, time and keyboard input.
- Select the Windows installation drive, which is usually
C:\, and click Next - Choose Command Prompt when the System Recovery Options box appears
- Write the following command and press Enter afterwards:
sfc /scannow /offbootdir=D:\ /offwindir=D:\Windows\
Replace D: with the letter of the driver where Windows is installed, and D:\Windows with the Windows folder location.
Here is an example of what the PC’s console output should look like once the sfc.exe scan is complete and missing files are successfully restored:

GDI32.dll restored by the SFC utility
Fix #3: Check the hard drive with CHKDSK utility
If the hard drive has its file integrity compromised, it is possible to use built-in Windows CHKDSK utility to scan the disk and fix the file system errors.
Here are the steps to run CHKDSK:
- Boot from your Windows install disc
- Click on Repair your computer after selecting proper language, time and keyboard input.
- Select the Windows installation drive, which is usually
C:\, and click Next - Choose Command Prompt when the System Recovery Options box appears
- Write the following command and press Enter afterwards:
chkdsk C: /f
Replace C: with the letter of the driver where Windows is installed.
Here is an example of what the PC’s console output should look like once the chkdsk.exe is complete:

Chkdsk utility results screen
More Information
Linked Entries
- chkdsk
Support Links
- Easy Recovery Essentials for Windows – our repair and recovery disk.
It’s an easy-to-use and automated diagnostics disk. It’s available for Windows 8, Windows 7 and Windows Vista. It’s also available for Windows XP and Windows Server.
Read more at Windows Recovery Disks.
- The NeoSmart Support Forums, member-to-member technical support and troubleshooting.
- Get a discounted price on replacement setup and installation discs: Windows XP, Windows Vista, Windows 7, Windows 8, Windows 10.
Applicable Systems
This Windows-related knowledgebase article applies to the following operating systems:
- Windows XP (all editions)
- Windows Vista (all editions)
- Windows 7 (all editions)
- Windows 8 (all editions)
- Windows 8.1 (all editions)
- Windows 10 (all editions)
Propose an edit