
Windows 11 (including earlier version), when, encounter a Blue Screen of Death (or BSOD), accumulates all the memory information into a file. Holding Dump file as name it further helps users to identify and debug the cause of the crashes. The files also allow writing the debugging details in different file formats in order to simplify the readability of the data.
Dump file may be of various types depending on the nature of crash and bug check values. These are “Small memory dump (Minidump)”, “Kernel memory dump”, “Complete memory dump”, “Automatic memory dump”, and “Active memory dump”. However, among all these, Windows 10/11 generates Automatic memory dump all by itself as its name suggests. The following section will deal with everything related to Dump File Location Windows 11 or 10.
Dump File Location Windows 10 or 11
Here is the Dump File Location Windows 11 or 10 –
Dump File Location
Instead, you can say Dump file locations so see the following paths to find out the data –
%SystemRoot%memory.dmp which means
C:\Windows\memory.dmp
This is the default location and here, C: refers to the system drive where Windows is installed.
Windows 11/10 can also capture memory dumps that consume a small amount of space. These are created at –
%SystemRoot%Minidump.dmp i.e.,
C:\Window\Minidump.dump
Change Dump File Location Windows 11 or 10
- Go to desktop and right-click on This PC icon. From the available options, choose Properties.
- Click Advanced system settings link that shows up on the top left of the subsequent window.
- Click Settings beneath Startup and Recovery section.
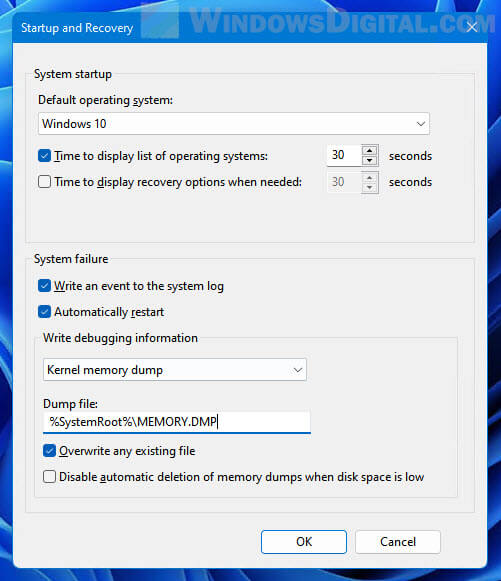
- Locate the Dump File text field and insert the location of the file.
Configure the Type of Memory Dump File
As aforementioned, Windows generates Automatic memory dump files but users can choose to configure the settings as per need. Thankfully, there are certain ways using which a user can change the type of memory dump file that Windows creates.
1]Through Startup and Recovery
- Press “Win logo+R” hotkey to open Run dialog box. System properties wizard will become visible, switch to Advanced tab.
- Here, click Settings just below Startup and Recovery section.
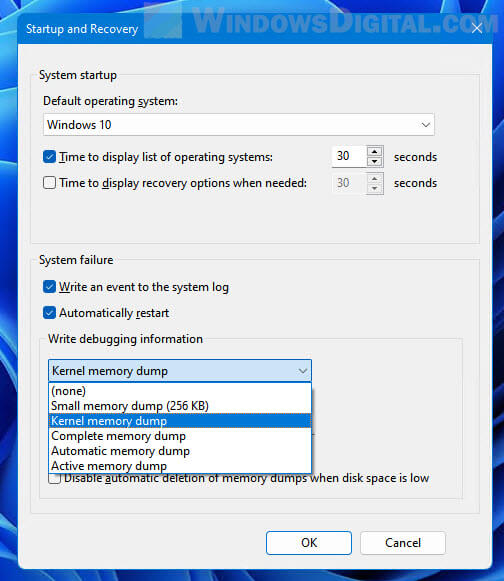
- Click the drop-down under Write debugging information. From the list of dump file types, choose the type that you wish Windows to generate when Windows crashes.
- To apply the changes, click OK.
Note – In case the system crashes a lot, it’s better to deselect the checkbox against the option Overwrite any existing file. Doing this will eventually create incremental dump files that will have a memory dump file for each crash that occurs.
2] Use Elevated Command Prompt
- Fire up taskbar search using Win+S combination of keys. Type in cmd.exe, right-click ok Command Prompt and choose Run as administrator.
- Click Yes on the prompt of UAC to access elevated Command Prompt.
- Once into the black window, insert the applicable command from the list below to change the type of dump file and hit Enter.
| Memory Type | Command Line |
| No memory | wmic RECOVEROS set DebugInfoType = 0 |
| Small memory dump | wmic RECOVEROS set DebugInfoType = 3 |
| Kernel memory dump | wmic RECOVEROS set DebugInfoType = 2 |
| Complete memory dump | wmic RECOVEROS set DebugInfoType = 1 |
| Automatic memory dump | wmic RECOVEROS set DebugInfoType = 7 |
| Active memory dump | wmic RECOVEROS set DebugInfoType = 1 |
- Finally, close the prompt window and Restart Windows 10 PC to make the changes effective.
Note – The Command Prompt also lets you view the current memory dump file. Just open Command Prompt as Administrator and run the following command-line –
wmic RECOVEROS get DebugInfoType
Types of Memory Dump Files
It is important to know the types after finding Dump File Location Windows 11 or 10 –
Small memory dump – It is the type that contains a minimal amount of details. Basically, the file includes the stop code, list of device drivers, parameters. Furthermore, it also contains the current process and informs which kernel thread or process crashed.
Kernel memory dump – This is the most useful and comprehensive one with respect to the kernel. Moreover, this type contains information in connection with programs and drivers in kernel mode. However, the dimension of this dump file completely depends on the amount of kernel-mode memory specified by Windows and drivers. Now, in case a second crash occurs and a kernel memory dump file is generated, the earlier content gets overwritten.
Complete memory dump – A remarkably large file type which is equal to the RAM of the system. It incorporates physical memory allocation that is basically left out in other kernel dumps.
Automatic memory dump – When compared to the kernel memory option, this is quite similar to it in terms of information. The only difference between them is the size of the paging file that Windows sets for them.
Active memory dump – It is comparatively smaller than complete memory dump. This type refines the items that are not influential in spotting the cause of a crash.
That’s all!!!
Windows 11 dump file is a file that stores a copy of your computer’s memory at the time of a system crash or a BSoD (Blue Screen of Death). It accumulates all the memory information during the crash into a file. These dump files are crucial to help diagnose and debug the problem that caused the crash.
If you are looking for the memory dump file location for diagnosing purposes or if you simply want to clear the dump files, this guide will show you where you can find the dump files in Windows 11, as well as how to clear the dump files or change the dump file location.
Also see: How to Startup Repair Windows 10/11 using Command Prompt
Where is the memory dump file in Windows 11
Dump File Location in Windows 11
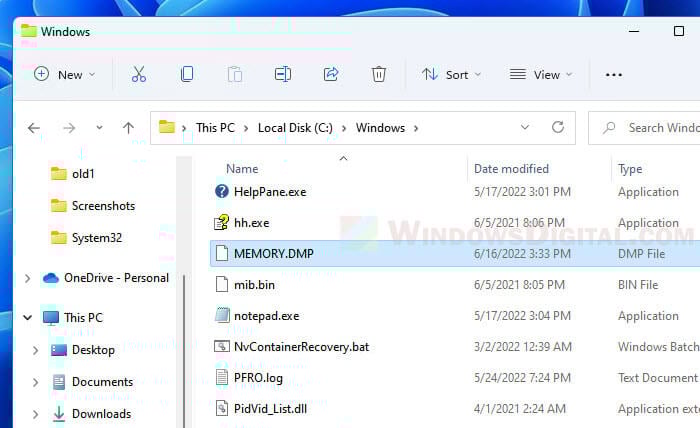
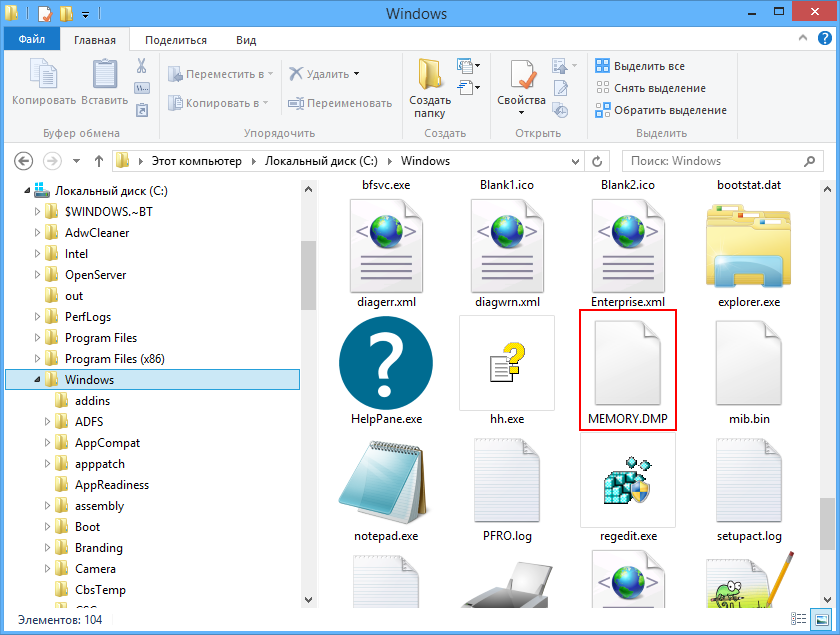
The memory dump file in Windows 11 is a single file called MEMORY.DMP which can be found in the system root folder – “C:\Windows”.
The full path to the memory dump file would be “C:\Windows\memory.dmp“, whereas “C:” is the drive of your Windows installation. Replace “C:” if your Windows was installed on a different drive.
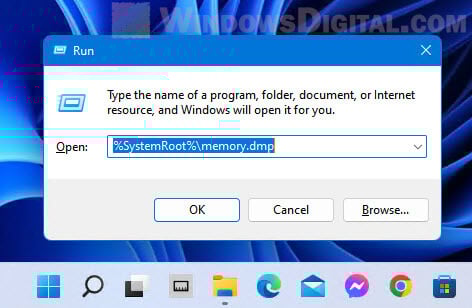
Alternatively, you can access the folder by first pressing Win + R keys to open the Run dialog box. Then, enter %SystemRoot% to the Open field and click OK to open the system root folder. From there, look for a file called “MEMORY.DMP” and that will be the dump file you are looking for. To open the dump file directly, enter %SystemRoot%\memory.dmp instead.
If you can’t find the memory.dmp dump file in the system root, it just means that there was no crash recorded, or you have recently cleared the dump file through disk cleanup recently after the system crash.
Related: How to Fix Blue Screen With Sad Face on Windows 11/10
Minidump files location
In Windows 11, dump files can also be stored as smaller memory dump files called Minidump. You can find these minidump.dmp dump files in C:\Windows\Minidump.dmp. Some minidump files will have their own names, usually numbers such as the date and time of the crash incident.
These are the default path to the memory dump files in Windows 11. To learn how to change the default dump file location in Windows 11, see the next section of this guide.
How to clear dump files in Windows 11
To clear the dump files in Windows 11, the better way to do it other than deleting the MEMORY.DMP in the system root folder is to clear it via the Disk Cleanup tool. To learn how to do so, follow the steps below.
Suggested Guide: How to Clean C: Drive in Windows 11
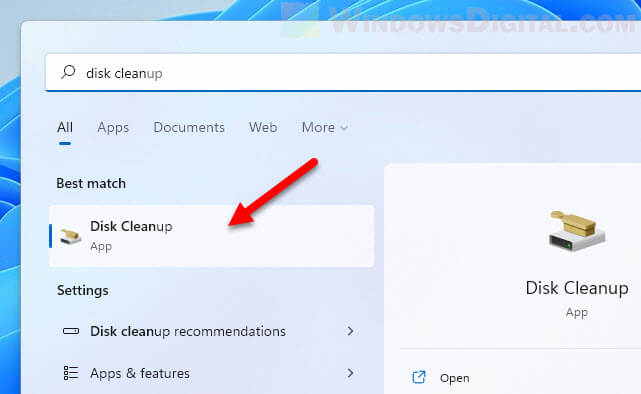
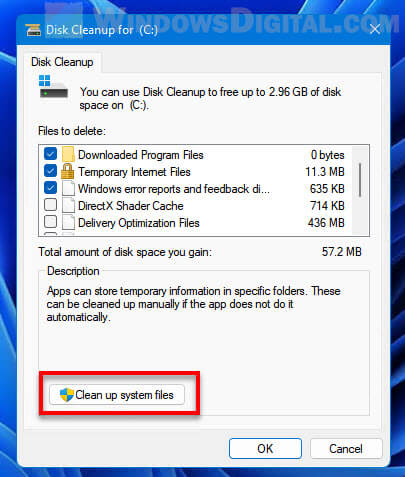
- In Windows 11, search for and open “Disk Cleanup” via Start.

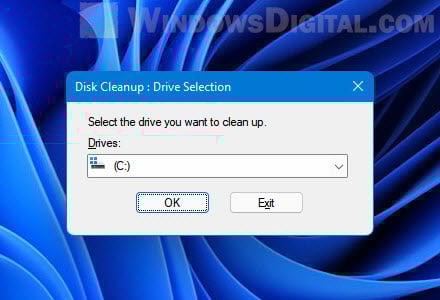
- When prompted to select drive, choose the system drive where your Windows installation is located, usually the C: drive.

- After the initial load, in the Disk Cleanup window, click “Clean up system files” under Description.

- Disk cleanup will then calculate what system files can be cleared and how much space you will be able to free on the drive. This may take a while to complete.

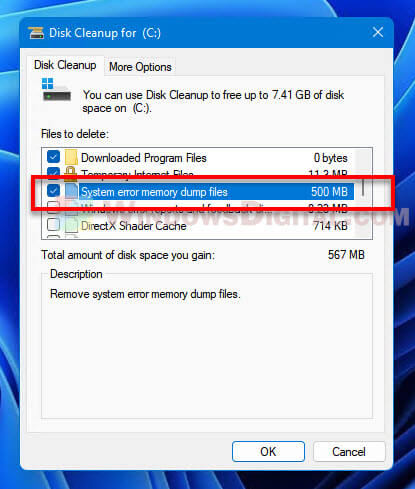
- On the next window, select “System error memory dump files” along with any other files you want to clear, and then click OK to begin clearing the unwanted files.

How to change default dump file location in Windows 11
The dump file location is defaulted to the system root folder – “C:\Windows”. You can change where Windows should save the dump file to a different location instead of the system root folder.
The most common reason users would want to change the default dump file location is when the dump file is taking up too much disk space on the system drive. This is especially the case when they choose the “Complete memory dump” option (a type of dump file) which will require significantly larger disk space as it writes the complete memory equals to the amount of RAM.
To change the default dump file location in Windows 11, follow the steps below.
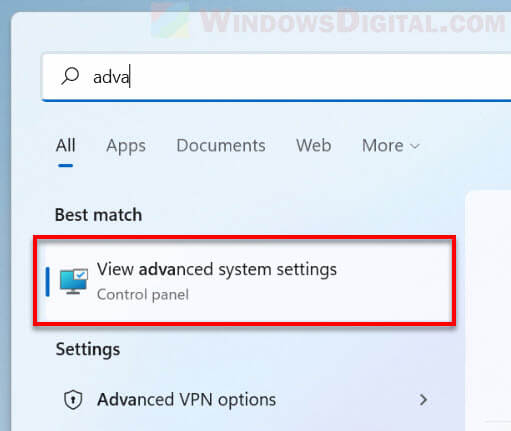
- Search for and open “View advanced system settings” via Start.

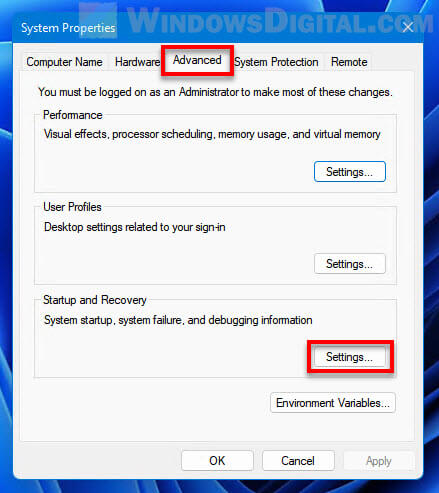
- In the System Properties window, select Advanced tab, and then click the Settings button under “Startup and Recovery“.

- In the “Dump file” text field, enter the new location you would like Windows to save the dump file to.
How to change the type of memory dump file
Windows can generate different types of memory dump file. The debugging information and details are written in different format in each type of memory dump file. The size of the dump file also depends on the type of the dump file. Some types of dump file will store more information, while some store lesser.
You can change the type of memory dump file in Windows 11 by first follow the exact same steps in the instructions above to open the “Startup and Recover” window. In the window, click the drop-down menu under “Write debugging information”, and then select the type of memory dump file you want Windows to generate in the event of system crash.
If you choose (none), Windows 11 will not generate any memory dump file in any system crash or blue screen event.
How to read dump file in Windows 11
Dump files are not designed to be understandable by the average users. Memory dump files are designed for technicians and developers who can make use of the data to fix the issues and improve the system so that these crashes don’t happen again.
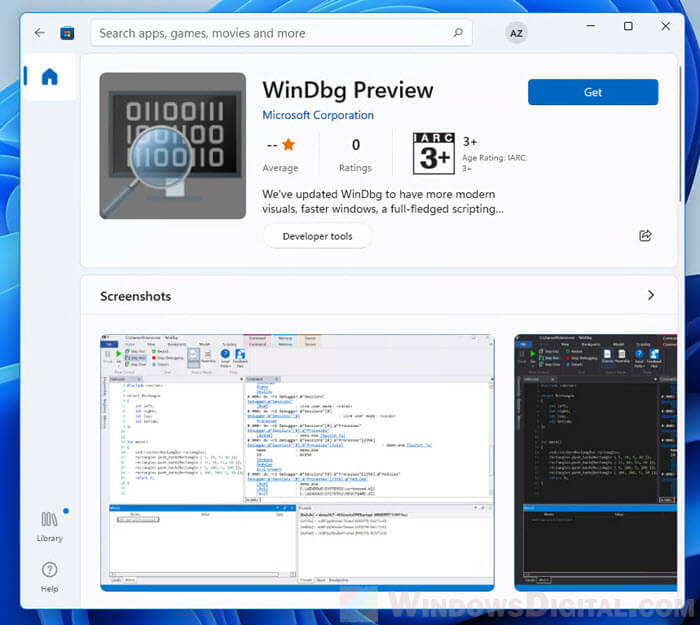
If you want to read the dump file in Windows 11, you will need a debugging tool specializes in reading dump files. You can use an app called WinDbg Preview by Microsoft which can be installed via Microsoft Store.
При системных сбоях Windows 11 по умолчанию создаёт файлы дампов памяти, которые в дальнейшем могут быть использованы для того, чтобы разобраться с причинами синего экрана и устранить их. Однако, некоторые пользователи могут столкнуться с тем, что дампы не сохраняются.
В этой инструкции подробно о том, как включить создание дампов памяти в Windows 11 в различных ситуациях и дополнительная информация, которая может быть полезной.
Настройка записи дампа памяти в свойствах системы
Прежде чем приступить к описанию необходимых действий, базовая информация о дампах памяти в Windows 11 и предыдущих версиях системы:
- Для создания дампов памяти требуется, чтобы файл подкачки не был отключён, ещё лучше, если его размер будет выбираться автоматически системой. Подробно про настройку файла подкачки.
- С параметрами по умолчанию при синем экране полный дамп памяти сохраняется в файл
C:\Windows\MEMORY.DMP
который заменяется при каждом сбое, одновременно сохраняются мини-дампы (малые дампы памяти) в папке
C:\Windows\Minidump
они не удаляются при новых сбоях (по умолчанию сохраняются 5 последних) и обычно достаточны для анализа причин ошибок со стороны пользователя.
- Различные программы для очистки и оптимизации Windows или продления срока службы SSD могут удалять файлы дампов или отключать их создание.
Для анализа дампов памяти можно использовать специальные утилиты, о которых в отдельной инструкции.
Базовый способ включить создание дампов памяти при сбоях — использовать параметры системы, шаги будут следующими:
- Нажмите клавиши Win+R на клавиатуре, либо нажмите правой кнопкой мыши по кнопке «Пуск» и выберите пункт «Выполнить», введите команду sysdm.cpl и нажмите Enter.
- Перейдите на вкладку «Дополнительно» и нажмите по кнопке «Параметры» в разделе «Загрузка и восстановление».

- В следующем окне, в разделе «Отказ системы» вы увидите доступные параметры создания дампов памяти, на скриншоте ниже — параметры по умолчанию при включенном автоматическом сохранении дампов: обычно достаточно установить «Автоматический дамп памяти», указать место сохранения дампа памяти, по умолчанию —
%SystemRoot%\MEMORY.DMP
и применить настройки.


В поле выбора типа записи отладочной информации есть несколько вариантов выбора:
- Автоматический дамп памяти — сохраняет снимок памяти ядра, отладочную информацию и снимок памяти, выделенной для устройств, драйверов и другого ПО, работающего на уровне ядра. Также сохраняются мини-дампы памяти в C:\Windows\Minidump
- Малый дамп памяти — выполняется сохранение только мини-дампов: файлов, содержащих базовую информацию о сбое и вызвавших синий экран модулях, загруженных драйверах и процессах. Для обычного пользователя, желающего разобраться в причинах ошибок, обычно бывает достаточным.
- Дамп памяти ядра — содержит дамп всей оперативной памяти, используемой ядром Windows на момент сбоя.
- Полный дамп памяти — сохраняет полный снимок оперативной памяти в файле MEMORY.DMP, размер дампа будет равен объёму занятой оперативной памяти на момент сбоя. В большинстве случаев не требуется.
- Активный дамп памяти — то же самое, что в предыдущем случае, но с фильтрацией страниц памяти, которые с большой вероятностью не относятся к сбою, потому занимает меньше места на диске.
Если несмотря на то, что создание дампов памяти включено, они не создаются, проверьте события в Просмотре событий, возможно там регистрируется ошибка их создание. Об исправлении — в отдельной инструкции Не удалось создать файл дампа из-за ошибки при создании дампа — варианты решения.
Редактор реестра
Способ включения создания дампов памяти в редакторе реестра может пригодиться в случае, если вы сталкиваетесь с синим экраном раньше, чем появляется возможность выполнить настройки в самой ОС.
В этом случае вы можете использовать редактор реестра в среде восстановления (regedit в командной строке) или с WinPE:
- Запустить редактор реестра, выбрать раздел
HKEY_LOCAL_MACHINE
- Использовать меню «Файл» — «Загрузить куст» и загрузить файл SYSTEM из
C:\Windows\System32\config
после чего задать удобное имя раздела, под которым загруженный куст будет отображаться внутри
HKEY_LOCAL_MACHINE
во время редактирования.
- Внутри созданного вами раздела перейти к нужному подразделу и выполнить необходимые изменения.
Основной параметр для определения типов создаваемых дампов памяти — это DWORD с именем CrashDumpEnabled, который при работающей ОС можно найти в разделе
HKEY_LOCAL_MACHINE\SYSTEM\CurrentControlSet\Control\CrashControl

в случае, если выполнялась загрузка куста удаленного реестра, как было описано выше, путь будет следующим:
HKEY_LOCAL_MACHINE\заданное_имя\ControlSet001\Control\CrashControl

Параметр CrashDumpEnabled может принимать значения:
- 0 — дамп памяти отключен
- 1 — полный дамп памяти
- 2 — дамп памяти ядра
- 3 — создание мини-дампов
- 7 — автоматический дамп памяти
Как было отмечено выше, следует также учитывать необходимость включенного файла подкачки, настройки которого хранятся в разделе
HKEY_LOCAL_MACHINE\SYSTEM\CurrentControlSet\Control\Session Manager\Memory Management
О том, как именно задать необходимые параметры — в отдельной инструкции по настройке файла подкачки в редакторе реестра.
Дополнительно, рекомендую не отключать сохранение события в системный журнал (параметры в реестре EnableLogFile и LogEvent, значение — 1), так как эта информация также может пригодиться для диагностики причин возникающих сбоев.
Readers help support Windows Report. We may get a commission if you buy through our links.
Read our disclosure page to find out how can you help Windows Report sustain the editorial team. Read more
The BSoD or Blue Screen of Death error is not a fun error to come across on Windows 11. It is accompanied by an endless loading circle, loud noises, and nothing else. If you are experiencing a BSoD error, you can check out our guide and get rid of it pretty quickly.
Troubleshooting such errors requires you to know the root cause of such issues, and thankfully in Windows 11, you can configure your PC to create Windows 11 BSoD dump file for easy diagnosis.
What is a BSoD dump file in Windows 11?
In simple terms, the BSoD dump file is a log file of your PC’s memory at the time it experienced the BSoD error.
This crash file contains information about what exactly was in your computer’s memory before it crashed and could help you locate the possible reason that caused the error in the first place.
There are basically three types of memory dump files:
- Complete memory dump – It contains all the information of your PC’s physical memory at the time it crashed. A complete memory dump is the most ideal dump file for troubleshooting errors.
- Automatic memory dump – By default, your Windows 11 PC is set to Automatic memory dump, which contains basic information such as loaded drivers, kernel info, and processes.
- Small memory dump: Small memory dumps or minidump contains the kernel stack information for the thread that caused the particular crash.
How can I find the Windows 11 BSoD dump file?
- In your homescreen, right-click on This PC and select Properties.
- Under Related links, select Advanced system settings.

- Click on Settings under the Startup and Recovery section.

- If under Write debugging information is selected as Automatic memory dump, then you need to select Complete memory dump for the dump file that contains all information for troubleshooting.

- The memory dump file is typically located in %SystemRoot%\MEMORY.DMP with system root is typically C:\Windows.
- You can locate the Small memory dump or Minidump file in %SystemRoot%\Minidump location.


How can I read the Memory.DMP file in Windows 11?
- Visit the official Microsoft WinDbg download page.
- Hit the Get in Store app button.

- Click on the Open Microsoft Store button in the dialogue box that appears.

- Click the Get button.

- Once the installation is complete, click on Open.
- Click on File.

- Select Start debugging and then click on Open Dump file.
- Locate the dump file in the folder %SystemRoot%\MEMORY.DMP which is usually found in the C Drive.
- Click Open.
- Do note that opening the dump file may take some time. So, you need to wait.
- In the run command, type the below and press Enter:
!analyze -v
- The process will start and you can keep an eye on the progress bar to know when the process will be complete.
- After completion, the WinDbg will show you the results, and based on that you can take further troubleshooting steps.


You can review the dump file, and as you go through it, you will also find more information. Notably, the FAILURE_BUCKET_ID and MODULE_NAME are the ones where you need to keep an eye out, which could indicate what is causing the problem.
While this report can be overwhelming for regular users, as it is not meant for them, you can always take cues from the report or search the hints mentioned in the report and search it over the internet to get help online.
- How to Fix the ERROR_OPLOCK_HANDLE_CLOSED?
- ERROR_CORRUPT_LOG_CORRUPTED: How to Fix BSoD Error
How to delete system error dump files in Windows 11?
Use Windows Settings
- Press the Win + I buttons to open Settings.
- Click on System then select Storage.

- Click on Temporary files.

- Check the box for the System error memory dump files option.
- Hit the Remove files button.


Use Disk Cleanup
- Press the Windows button to open the Start menu.
- Search for Disk Cleanup and open it.

- Select the drive where the system dump file is located and press OK.
- Click the Clean up system files option.

- Check the box for System error memory dump files.
- Hit the OK button.


Use Command Prompt
- Press Windows button to open the Start menu.
- Search for Command Prompt and click on Run as administrator option.

- Type the below command and press Enter:
del /f /s /q %systemroot%\memory.dmp


If you are coming across BSoD error, and want to fix it without going through the fuss of manually doing it, then you can check out our guide that lists some of the best BSoD fixers for Windows 11.
Moreover, before going ahead and fixing the problem, it is very important to know the root cause of it. If you want some behind-the-scenes knowledge on what causes BSoD error, then you can check out this article including the main BSoD causes.
That is it from us in this guide. Let us know in the comments below if you were able to locate the system crash memory dump file on your Windows 11 PC.
Sagar Naresh
Sagar is a web developer and technology journalist. Currently associated with WindowsReport and SamMobile. When not writing, he is either at the gym sweating it out or playing country music on his guitar.
He is an avid traveler and has been to 15 countries, going to more places soon. TRAVEL and WORK is his mantra for a peaceful life.
Каждый раз, когда Windows случается завершить свою работу сбоем с экраном BSOD, в системной папке %SystemRoot% создаётся отчёт — бинарный файл дампа памяти в формате DMP. Также файлы дампов могут создаваться сторонним программным обеспечением, например, популярным браузером Chrome. Дампы бывают весьма полезны в деле диагностики возникающих в работе системы и программ проблем, с другой стороны, они могут занимать на диске немало места, что не есть хорошо для небольших SSD-дисков.
{banner_google1}
Поэтому поставленный вопрос вполне закономерен и естественен — можно ли удалять файлы дампов и если можно, то как это правильно делать? Ответ на этот вопрос — да, файлы дампов можно удалять, это никак не повредит системе и установленным на компьютере программам. Более того, вы вообще можете отключить создание дампов, по крайней мере тех, которые создаются операционной системой при критических сбоях.
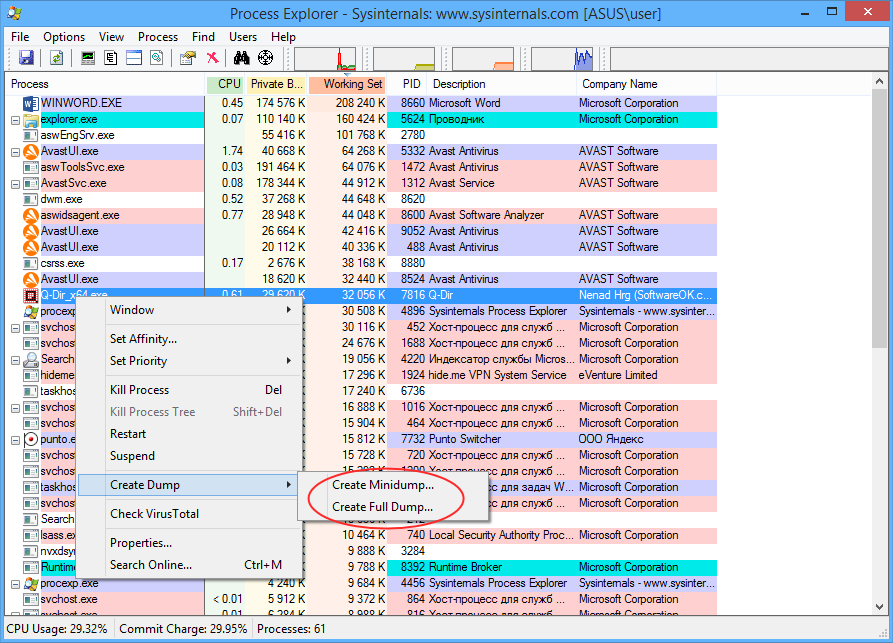
Windows поддерживается несколько типов системных дампов: полный, памяти ядра и малый дамп памяти. Полный дамп содержит всю физическую память системы, дамп памяти ядра — только ту часть ОЗУ, которая используется ядром, малый дамп содержит сведения об ошибках, загруженных драйверах и прочую служебную информацию. «Большие» дампы сохраняются в каталоге %SystemRoot% (Windows), под хранение минидампов в системе отведена папка %SystemRoot%\Minidump. Дампы сторонних программ обычно хранятся в папках профиля пользователя. Существуют также дампы отдельных процессов, создать такой дамп можно из Диспетчера задач или с помощью небезызвестной утилиты Process Explorer.
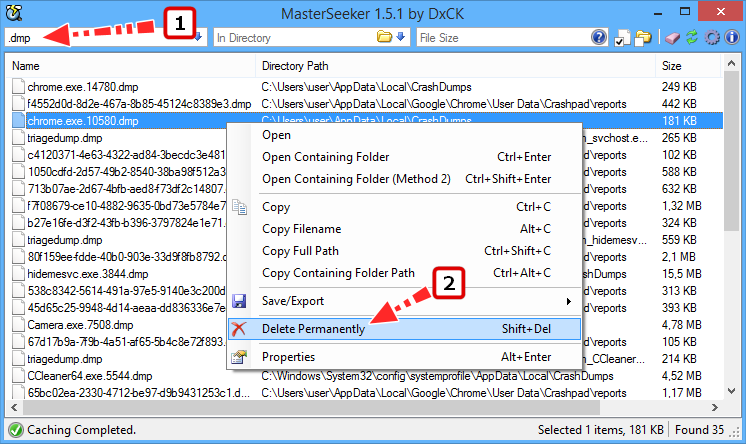
Этот способ сводится к поиску всех файлов в формате DMP и их удалению. Как уже было сказано, системные файлы дампов располагаются в папках C:\Windows и C:\Windows\Minidump, для обнаружения дампов, созданных другими программами можно задействовать встроенный поиск Windows или сторонние утилиты, например, MasterSeeker. Запустите утилиту и вставьте в поле поиска запрос «.dmp» без кавычек, и утилита тут же выведет список всех имеющихся на жёстком диске файлов дампов. Чтобы удалить дампы, выделите их кликом левой кнопкой мыши с зажатой Shift и нажмите Shift + Del или выберите опцию «Delete Permanently» в контекстном меню.
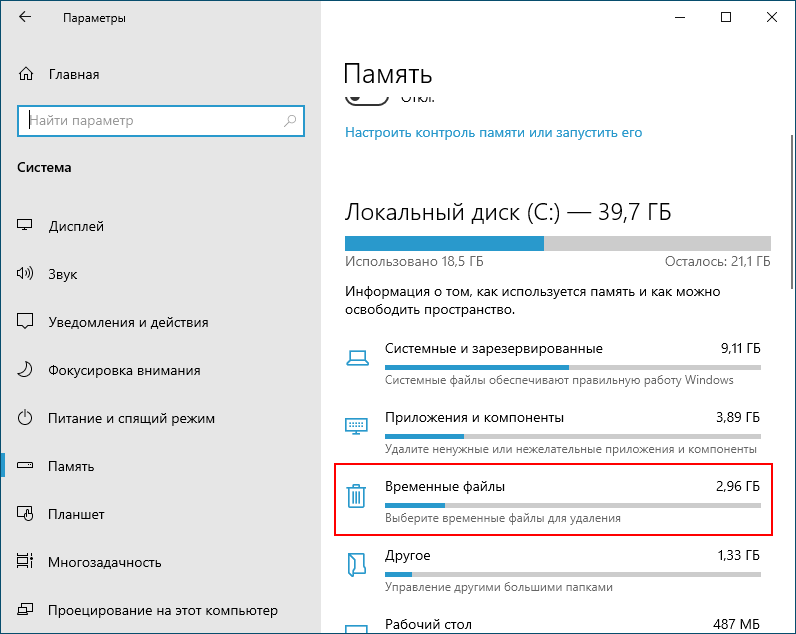
В Windows 10 удалить файлы дампов можно через приложение Параметры. Открыв последнее, перейдите в раздел Система → Память → Временные файлы, отметьте флажком пункт «Файлы дампа памяти и системных ошибок» и нажмите кнопку «Удалить файлы».
{banner_google1}

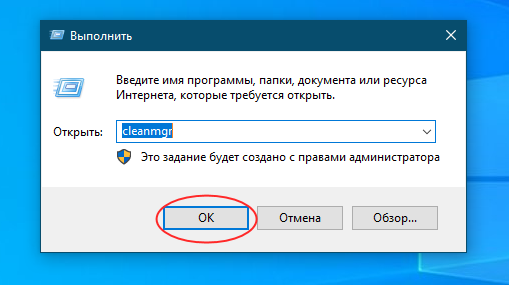
Более универсальным способом очистки (работает в Windows 10, 8.1 и 7) является использование классической утилиты cleanmgr. Запустите ее одноименной командой через диалоговое окошко «Выполнить», выберите очищаемый диск C и нажмите в открывшемся окне очистки диска кнопку «Очистить системные файлы».
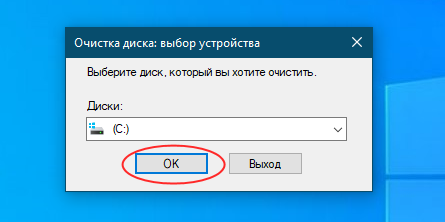
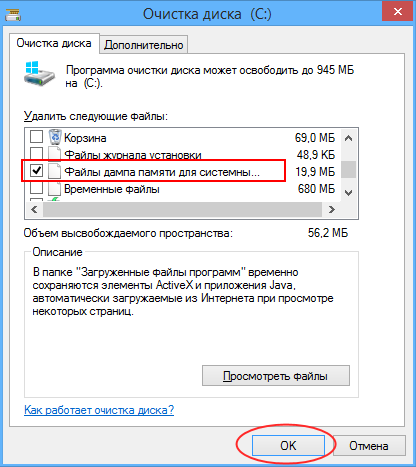
Опять выберите системный раздел, нажмите «OK» и дождитесь завершения сканирования. Отметьте в открывшемся окошке флажками пункты файлов дампов, нажмите «OK» и подтвердите действие.
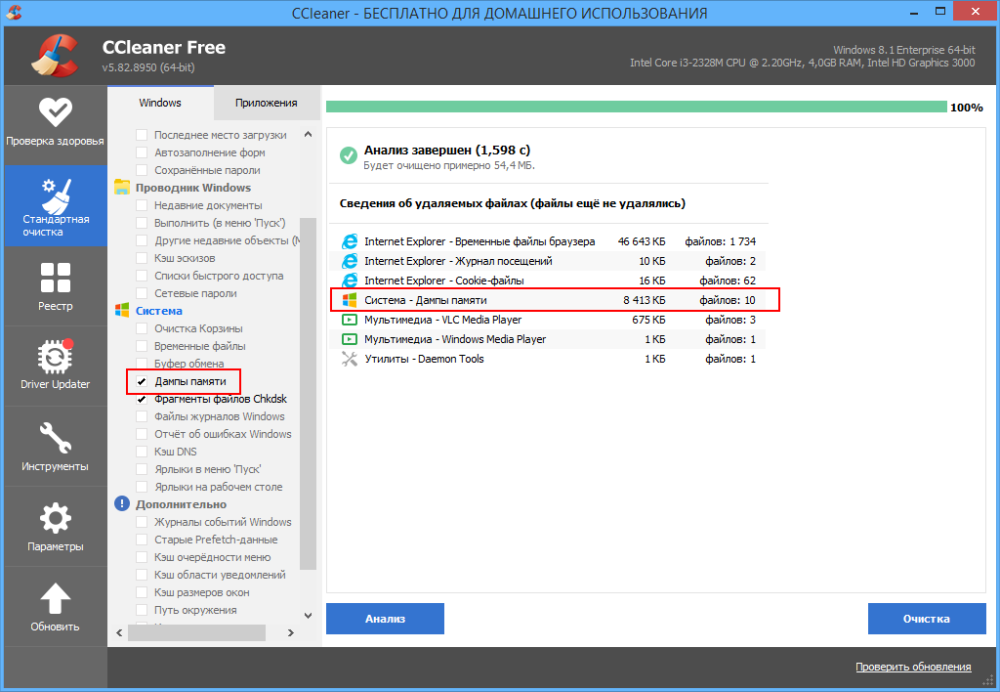
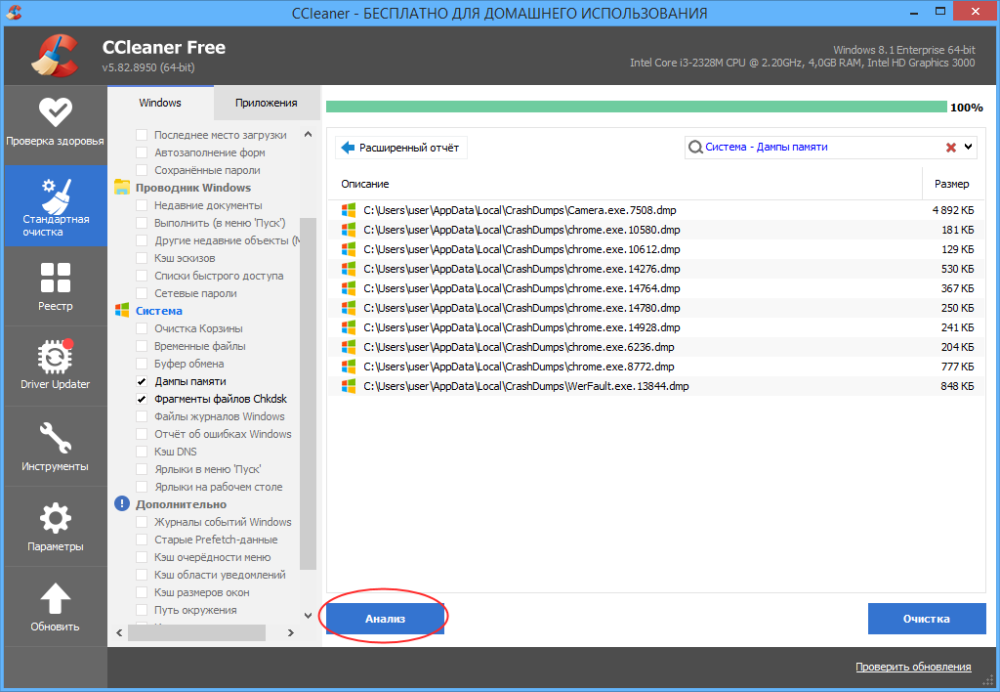
Наконец, для удаления временных файлов дампов можно использовать сторонние программы-чистильщики, ту же CCleaner. Кстати, по умолчанию этот чистильщик уже настроен на удаление дампов памяти, в чём вы сами можете убедиться, внимательно изучив список удаляемых данных в категории «Система» на вкладке «Система». Примечательно, что CCleaner обнаруживает дампы, созданные не только Windows, но и другими программами, в частности, браузером Google Chrome.
Приводить инструкцию по использованию чистильщика здесь не будем, программа достаточно известная, отметим лишь, что по сравнению с ручным поиском она выводит меньше результатов, но она же предлагает и более безопасное решение проблемы.