
Microsoft Defender — это простой способ защитить цифровую жизнь и все ваши устройства. Она входит в состав вашей Microsoft 365 для семьи или личной подписки без дополнительной платы.
Если вы еще не установили Defender на своих устройствах, выполните действия, описанные в разделе Установка Microsoft Defender.
Microsoft Defender — это приложение безопасности, которое помогает людям и семьям оставаться в Интернете более безопасными с помощью защиты от вредоносных программ, веб-защиты, уведомлений о безопасности в режиме реального времени и советов по безопасности. Microsoft Defender входит в Microsoft 365 для семьи или личную подписку и работает на вашем телефоне (Android или iOS), пк и Mac.
Безопасность Windows, ранее известный как Центр безопасности Защитника Windows, — это приложение, встроенное в Windows 10 или 11, которое помогает обеспечить безопасность компьютера. Он включает Microsoft Defender антивирусную программу, которая помогает защитить вас от вирусов, программ-шантажистов и других вредоносных программ.
Дополнительные сведения см. в статье Защита с помощью Безопасность Windows.
Брандмауэр Защитника Windows — это встроенное в Windows программное обеспечение брандмауэра , которое определяет, какой сетевой трафик разрешен или заблокирован для передачи на компьютер или из него по сети. Брандмауэр Защитника Windows включен по умолчанию.
Защита от вредоносных программ
Вредоносные программы — это вредоносное программное обеспечение, которое может украсть или повредить ваши личные данные, такие как файлы, фотографии или сообщения. Оно также может отслеживать или шпионить за вами, красть ваши деньги или использовать ваше устройство для причинения вреда, например, для атаки на других людей.
В Windows, Mac и Android Microsoft Defender могут проверка скачиваемые и устанавливаемые приложения, а также выполнять сканирование файлов, уже находящихся в вашей системе, чтобы обнаружить вредоносные программы, которые могут угрожать вашему устройству.
Дополнительные сведения о защите от вредоносных программ см. в статье Начало работы с вредоносными программами в Microsoft Defender.
Совет:
Следите за обновлениями и установите последние обновления на всех устройствах и приложениях (особенно в браузерах), чтобы предотвратить вредоносные программы.
Microsoft Defender работает вместе с существующими решениями для защиты от вредоносных программ, даже если они сделаны другими компаниями, такими как Norton или Bitdefender.
Защита от веб-угроз
Многие цифровые атаки, которые мы наблюдаем, осуществляются через вредоносные веб-сайты, которые пытаются обманом заставить вас раскрыть личные сведения, например имена пользователей и пароли, кредитные карты или другую информацию об учетной записи, или установить вредоносные программы в системе. В Windows, iOS и Android Microsoft Defender будут проверка ссылки, открытые вами (или приложением на вашем устройстве), чтобы попытаться обнаружить все, что может быть опасно.
Если мы найдем вредную ссылку, мы ее заблокируем и сообщим об этом.
Дополнительные сведения о защите веб-сайтов в Microsoft Defender см. в статье Начало работы с веб-защитой.
Совет:
Что такое фишинг? Это трюк, чтобы украсть вашу информацию или заставить вас установить вредоносную программу, притворившись сообщением от кого-то, кому вы доверяете. Дополнительные сведения см. в статье Защита от фишинга.
Мониторинг кражи удостоверений
Мы сотрудничаем с Experian®, чтобы обеспечить мониторинг кражи удостоверений мирового класса в Microsoft Defender. Эта функция позволяет отслеживать сведения о собственных удостоверениях, а также данные вашей семьи на наличие нарушений как в общедоступном Интернете, так и в темной сети.
Важно: Мониторинг кражи удостоверений в настоящее время доступен только для клиентов в США.
Если мы заменим ваши личные данные в брейке, вы получите оповещение и подробный отчет о нарушении, в котором сообщается, какие данные были найдены и где. Вы получите рекомендации о том, что нужно сделать сразу для решения ситуации, подробные сведения о том, как это могло произойти, сведения о возможных рисках и советы о том, как снизить вероятность повторения.
Вы также получите 24/7 телефонный доступ к команде высококвалифицированных специалистов по краже удостоверений, которые могут помочь вам в процессе рассмотрения нарушенных сведений или предоставить полный спектр услуг восстановления удостоверений в случае, если вор удостоверений использует ваши личные данные для совершения мошенничества.
Дополнительные сведения см. в статье Начало работы с мониторингом кражи удостоверений в Microsoft Defender.
Добавление других устройств
Вы можете добавить до 4 дополнительных устройств (в общей сложности 5 на человека) в учетную запись Microsoft Defender, установив приложение на других устройствах и выполнив вход с помощью той же личной учетной записи Майкрософт. Эти устройства появятся на панели управления Microsoft Defender, чтобы вы могли видеть состояние безопасности всех устройств в одном месте.
Дополнительные сведения см. в статье Добавление устройств в учетную запись Microsoft Defender.
Помощь в защите всей семьи
Если вы являетесь подписчиком Microsoft 365 для семьи, пользователи с ролью организатора семьи могут помочь защитить устройства и удостоверения всех членов семьи. Когда другие члены семьи устанавливают Microsoft Defender и решают поделиться состоянием безопасности устройства или мониторинга удостоверений, организаторы семьи увидят это состояние на панели мониторинга Microsoft Defender.
Дополнительные сведения см. в разделе Устройства вашей семьи в Microsoft Defender.
Мы с удовольствием вас выслушаем!
Ваш отзыв является ключом к улучшению наших продуктов, поэтому если есть что-нибудь, что вам нравится в Microsoft Defender, и особенно если есть что-то, что вам не нравится, пожалуйста, сообщите нам! Вы можете отправить нам отзыв в приложении, перейдя в меню Справка и обратная связь .
В Windows или Mac нажмите кнопку в правом верхнем углу окна. В Android или iOS коснитесь аватара учетной записи в левом верхнем углу, чтобы найти справку и отзыв.
Посетите сообщество Microsoft Defender на сайте Microsoft Answers!
Хотите задать вопросы о Microsoft Defender или ответить на них? Общаться с другими пользователями, которые используют Defender? Посетите сообщество Microsoft Answers для Microsoft Defender здесь!
Подробнее
Справка и обучение по безопасности Майкрософт
Windows Defender is the stock anti-virus that comes with Windows 10. It controls the firewall, keeps malware off your system, offers protection against ransomware, monitors websites and downloads in your browser, and tells you if your system settings need to be optimized, among other things.
It’s a good app and will offer fairly decent protection to a Windows 10 system. Users do have the option to change how it works and enable or disable some of its features. To do that, you must access Windows Defender.
There are two ways to open Windows Defender on Windows 10; the first and obvious method is from the system tray, and it’s easy. The second requires going through the Settings app and remembering where to look, and find the button that opens Windows Defender.
1. System tray
Windows Defender adds an icon to the system tray. Double-clicking it will open Windows Defender. It is possible that you do not see the icon, which means you need to enable it.
- Open the Settings app.
- Go to the Personalization group of settings.
- Select the Taskbar tab.
- Scroll down to the Notification Area section.
- Click Select which icons appear on the taskbar.
- Look for the Windows Security Notification icon switch, and turn it on.
- Double-click the Windows Defender icon in the system tray to open it.
2. Settings app
Windows Defender can be accessed from the Settings app.
- Open the Settings app.
- Go to Update and Security.
- Select the Windows Security tab.
- Click the ‘Open Windows Security’ button.
Windows Defender is a UWP app. Some of its services and certain features do exist as executables, but there is no longer a Windows Defender executable that can be run to open this app. The lack of an executable means that you cannot open Windows defender from Command Prompt, PowerShell, File Explorer, the Run box, or the Control Panel.
Conclusion
Windows Defender is always running unless you turn it off. Doing so will require admin access, and you will need to open the app to do so. There are scripts that you can use to disable real-time protection in Windows Defender, but they do not serve as an alternate way to open it. Of the two methods described in this article, neither is likely to be removed or phased out. It is possible that Microsoft moves the Open Windows Security button to a different tab in the Settings app, but it will still be there.

Fatima Wahab
Fatima has been writing for AddictiveTips for six years. She began as a junior writer and has been working as the Editor in Chief since 2014.
Fatima gets an adrenaline rush from figuring out how technology works, and how to manipulate it. A well-designed app, something that solves a common everyday problem and looks
Windows Security, a built-in Windows defense tool, works well in protecting computers away from virus and malware attacks. It runs automatically and can be accessed and set easily. This MiniTool post explains how to open and use Windows Defender in Windows 10/11.
About Windows Defender
Windows Defender is a free program included in Windows 10/11 system that helps protect your computer against security threats like malware, spyware, virus, etc. It is an anti-malware component of Microsoft Windows. Unlike other third-party antivirus software, Windows Defender doesn’t require additional download and installation. Windows Defender is also called Windows Security, Microsoft Defender, Windows Defender Antivirus, or Microsoft Defender Antivirus.
Windows Defender Download for Windows 10/11
Windows Defender is included in Windows 10/11 system and is not available for a standalone download now.
If you can’t find Windows Defender on your computer, you can update Windows 11/10 to the latest version.
- For Windows 10, you can click Start > Settings > Update & Security > Windows Update > Check for updates.
- For Windows 11, you can click Start > Settings > Windows Update > Check for updates.
How to Open Windows Defender in Windows 10/11 – 5 Ways
To open Windows Defender in Windows 10/11, you can try the 5 ways below.
Way 1. Use Windows Search
Click Start, type Windows Defender in the search box, and choose Windows Defender or Windows Security from the result to open it.
Way 2. Find it from the Start menu
For Windows 10, click Start and find Windows Security or Windows Defender from the apps list. For Windows 11, you can click the All Apps icon to list all apps in your system.
Way 3. Open Windows Defender from Settings
For Windows 10, press Windows + I to open Windows Settings. Click Update & Security. Click Windows Security in the left panel and click the Open Windows Security button in the right window to open it.
For Windows 11, you can press Windows + I, click Privacy & Security on the left and click Windows Security on the right, and click Open Windows Security to open it.
Way 4. Access Windows Defender from Control Panel
- Press Windows + R, type control panel, and press Enter to open Control Panel.
- Click System and Security and click Windows Defender Firewall to open its settings.
Way 5. Open Windows Defender in Windows 10/11 from the system tray
If you see a Windows Defender icon in the system tray, you can double-click it to open Windows Defender in Windows 10/11. If you don’t see the icon, it means you may not enable Windows Defender on your computer. Check how to enable or disable Windows Defender below.
How to Enable/Disable Windows Defender in Windows 11/10
Step 1: Press Windows + I to open Windows Settings.
Step 2: Click Privacy & Security in the left panel. For Windows 10, click Update & Security.
Step 3: Click Windows Security on the right.
Step 4: Click Open Windows Security.
Step 5: In the Windows Security window, you can select Virus & threat protection and click Manage settings on the right. Then you can toggle the switch on or off under Real-time protection to enable or disable Windows Defender in Windows 11 or 10.
How to Use Windows Defender in Windows 10/11
Windows Defender is included in the Windows Security. It provides antivirus scanning, real-time protection, and other functions in the Virus & threat protection section. This part introduces the functions of Windows Defender briefly.
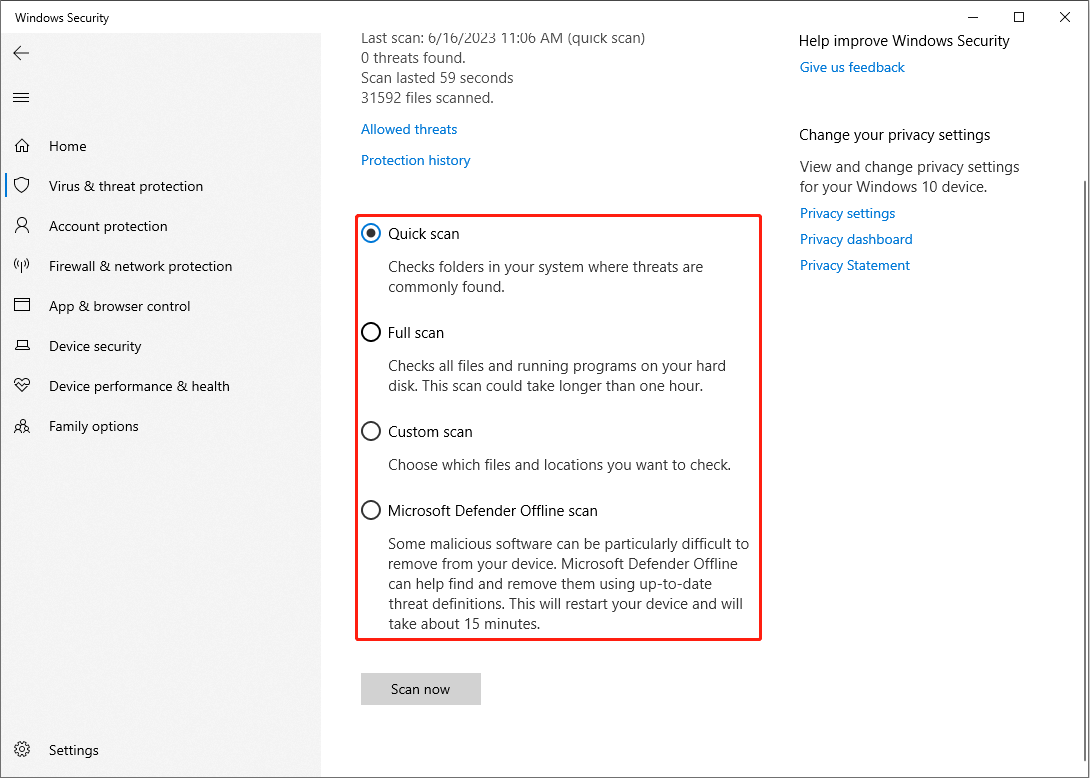
Perform a Variety of Scans
Under the Current threats section, you can select Scan options to perform different scans, like Quick scan, Full scan, Customs scan, and Microsoft Defender Offline scan. You can choose one to fix your computer problems based on your needs.
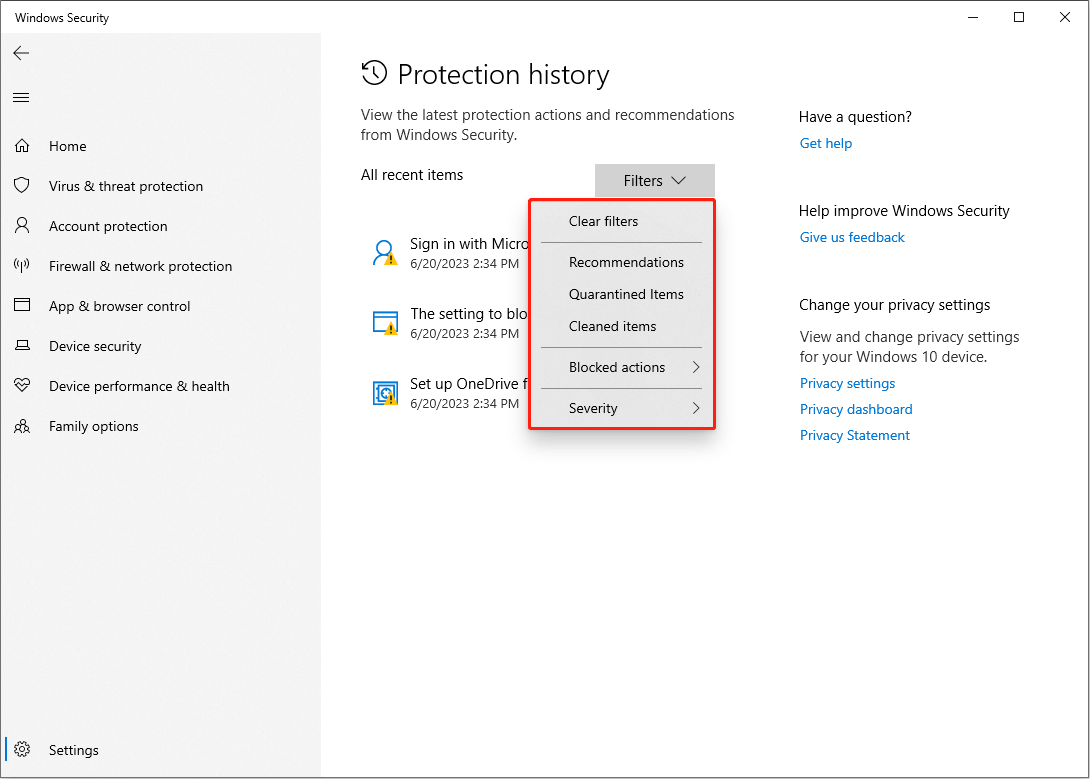
Keep the Protection History
Windows will quarantine the malware and other threats automatically and keep their trace in the Protection history. You can find the Cleaned items, Quarantined Items and some settings in this section. If your Windows Defender quarantines your files by mistake, you can restore them back with this function.
If you find your files are removed by Windows Defender and can’t get back in this way, please recover them with a free data recovery software, MiniTool Power Data Recovery.
MiniTool Power Data Recovery FreeClick to Download100%Clean & Safe
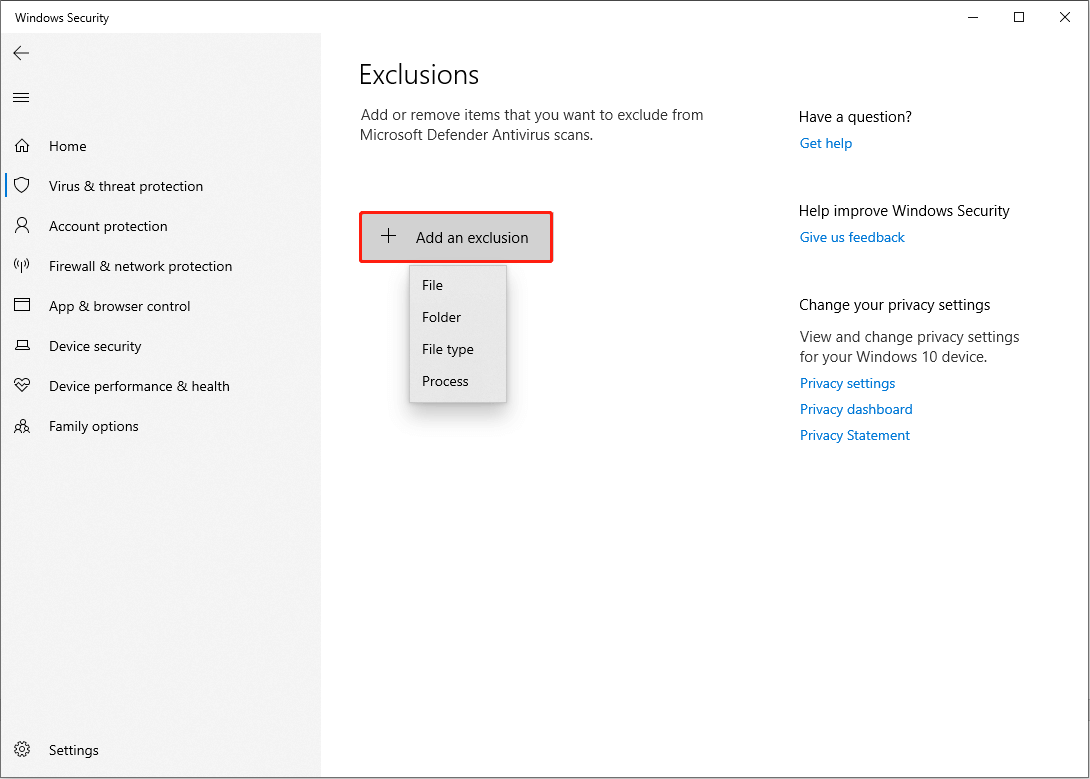
Set Virus & Threat Protection Settings
This feature provides different protection choice for users, including Real-time protection, cloud-delivered protection, Automatic sample submission, and Tamper protection.
Real-time protection allows Windows to scan your computer automatically to prevent the computer away from a malware attack. You can turn off Real-time protection temporarily but it will open automatically in the next scan schedule to ensure your computer’s health.
Besides, you can also add or remove exclusions in this section. This function can prevent your trust files, folders, or processes from being removed.
Perform Ransomware Protection
Ransomware is a type of malware which can lock your files and make it inaccessible for you. Ransomware protection can effectively protect your files from virus attack. But it is disabled by default. You can enable it if you needed.
Others
You can also perform other features in Windows Security like Account protection, Firewall & network protection, Device security, etc.
Bottom Line
Windows Defender protects computers with powerful features. You can use different functions based on your need.
If you need to recover data from a Windows 11/10 computer or other storage devices, you can try MiniTool Power Data Recovery.
MiniTool Power Data Recovery FreeClick to Download100%Clean & Safe
Windows Security, formerly known as Microsoft Defender, is the go-to app for those who want to know more about security in Windows 10 and Windows 11. This app is part of Microsoft’s operating system, and this is where you can find out what your antivirus has been doing, what your firewall has to say, and whether other security features are turned on and working well. However, before you can get any information, you must know how to access Windows Security. That’s why, in this article, I show you several ways to open Windows Security in Windows 10 and Windows 11:
1. Where to find Windows Security in the system tray
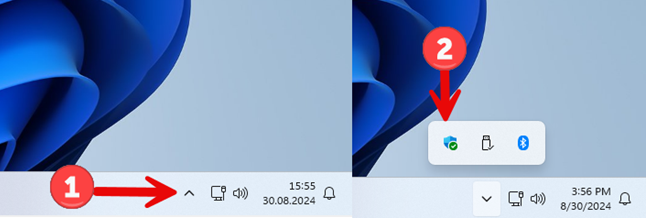
By default, Windows Security is started automatically by Windows, and it runs in the background, protecting your computer or device. Few people know that you can find its icon in the system tray (the bottom-right corner of the taskbar) in Windows 11 and Windows 10.
Click or tap the arrow pointing upwards to Show hidden icons, and then, in the list of icons, click or tap the blue shield. If you hover your mouse over it, it says Microsoft Defender. Don’t worry, it’s just another name for Windows Security.
Opening Windows Security from the system tray in Windows 11
In Windows 10, the process is identical, even though things look a little different. The main difference is that the Windows Security icon is a white shield instead of a blue one.
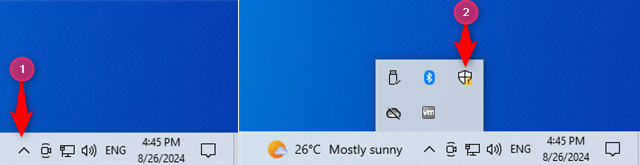
Opening Windows Security from the system tray in Windows 10
Keep in mind that Windows Security displays an exclamation mark alongside its icon when it finds issues that require your attention, similar to the screenshot above.
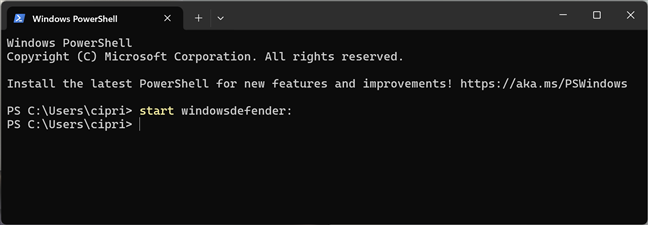
2. Open Windows Security from the command line (CMD, PowerShell, Terminal)
Some people who work with Windows Security need to find a way to open it from a command-line app like the Command Prompt, PowerShell, or Windows Terminal. Open any of these apps on your Windows computer, type this command, and press Enter:
start windowsdefender:
Here’s me running it in the Windows Terminal from Windows 11:
Opening Windows Security from Windows Terminal
In the screenshot below, I’ve started CMD and ran the same command in Windows 10:

Opening Windows Security from CMD
TIP: If your computer is having issues loading Windows, here’s how to open Command Prompt when Windows doesn’t boot.
3. How to access Windows Security from the Start Menu
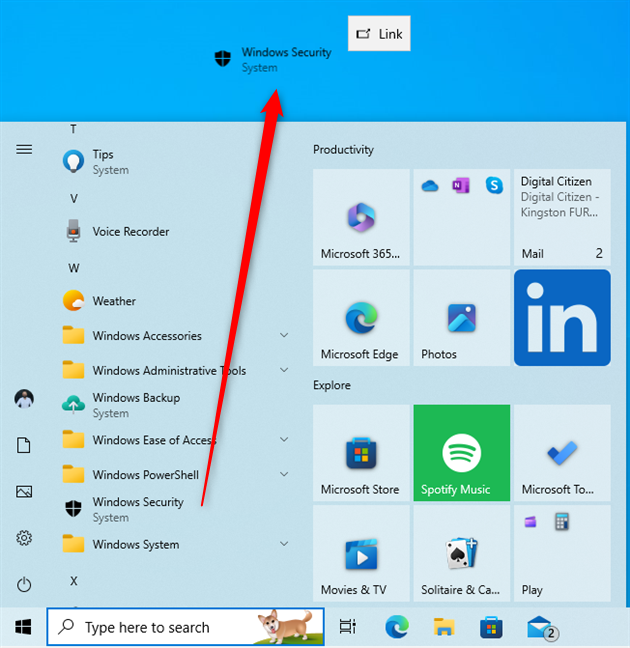
A simple way of accessing Windows Security is from the Start Menu. In Windows 10, click or tap Start, scroll down through the list of apps until you find those that start with the letter W, and then choose the Windows Security shortcut.
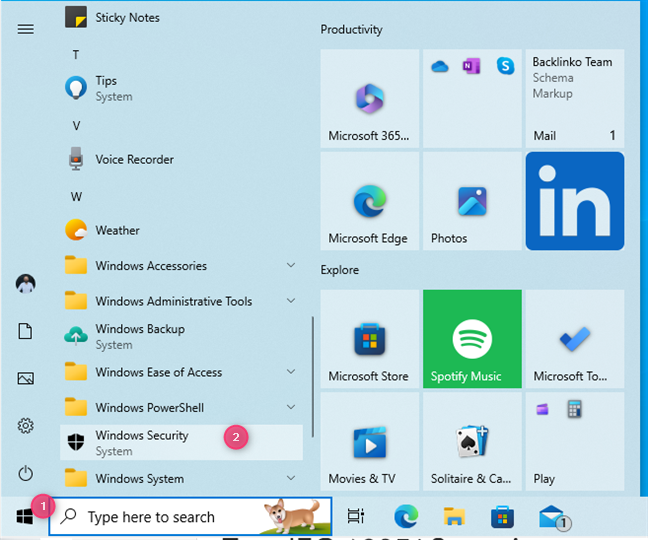
The Windows Security shortcut in the Windows 10 Start Menu
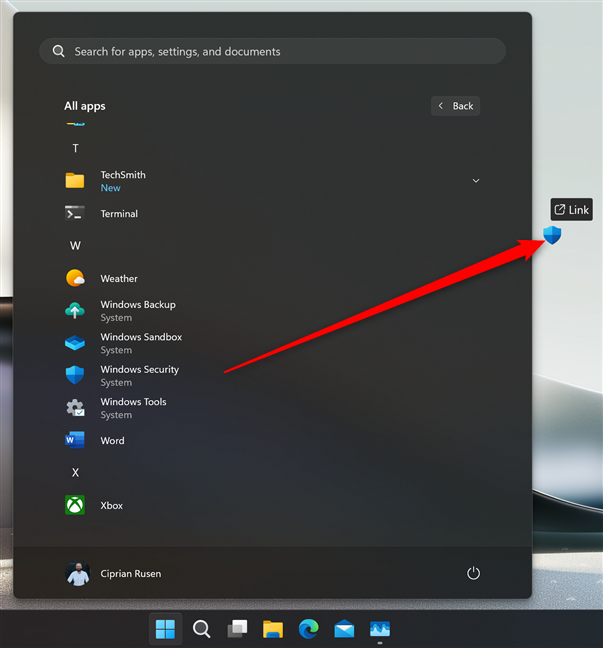
In Windows 11, things are a bit different: click or tap Start followed by All apps. Then, in the list of apps, scroll to the bottom, find the Windows Security shortcut, and tap on it.
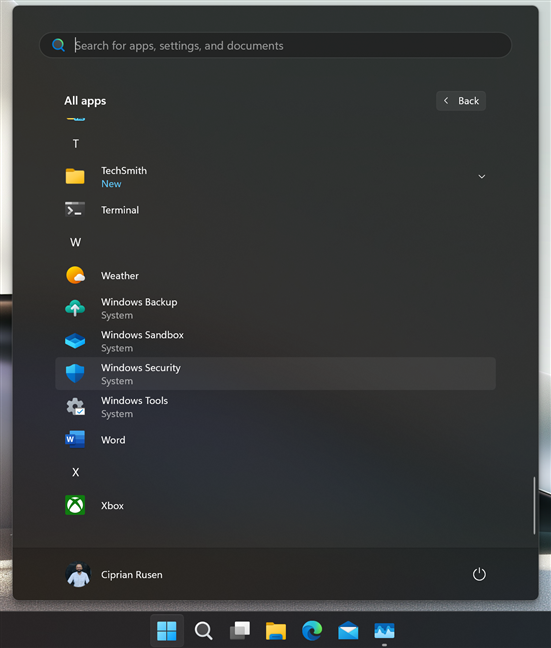
The Windows Security shortcut in the Windows 11 Start Menu
4. How to create a Windows Security shortcut on your desktop
After finding the Windows Security shortcut in the Start Menu (using the instructions from the previous section), you can drag and drop it to the desktop. If you execute the move correctly, a Link text and the Windows Security shortcut accompany your cursor as you move it across the desktop. Release the left mouse button (or lift your finger from the touchscreen) anywhere on the desktop, and Windows 10 creates a new shortcut right there.
Creating a Windows Security shortcut on the Windows 10 desktop
In Windows 11, it’s just as easy to create a Windows Security shortcut on the desktop using the Start Menu. Find the Windows Security shortcut in the All apps list, click or press and hold on it, and then move the mouse (or your finger) outside the Start Menu somewhere on the desktop. When you see the Link text alongside the shortcut, release the mouse or lift your finger, and the shortcut is created.
Creating a Windows Security shortcut on the Windows 11 desktop
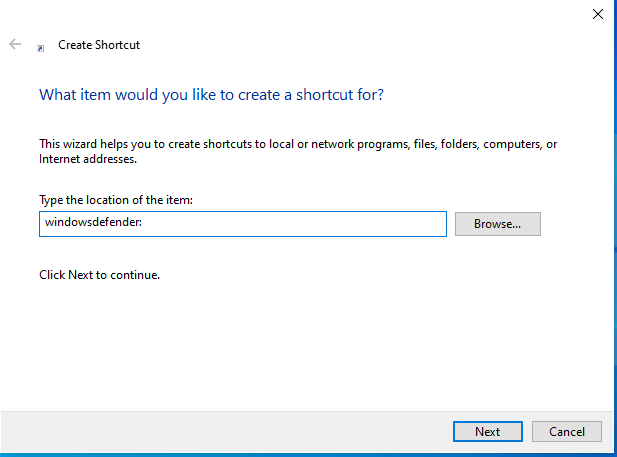
You can also create a Windows Security shortcut using the Create Shortcut wizard. Right-click (or press and hold) on the empty space on your desktop and choose New > Shortcut. Then, copy and paste or type the following as your target location:
windowsdefender:
You can also use this target:
%windir%\explorer.exe windowsdefender:
Click or tap Next, name the shortcut Windows Security, and press Finish.
Creating a Windows Security shortcut
Keep in mind that the first target that I provide creates a shortcut using the default Windows Security icon, while the second uses the File Explorer icon.
5. How open Windows Security with a keyboard shortcut
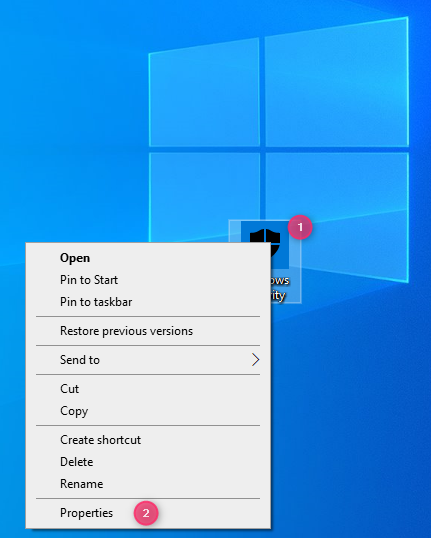
If you’ve created a Windows Security shortcut on the desktop by dragging it from the Start Menu, as shown in this guide’s fourth method, you can then edit the shortcut’s Properties in order to open this app with a keyboard shortcut. After creating the shortcut on the desktop, right-click (or press and hold) on it and choose Properties.
Accessing the Properties of the Windows Security shortcut
Next, click or tap inside the Shortcut key text box and press the shortcut key combination you want to use to open this app. For example, you could press CTRL + ALT + W, like I did in my screenshot. When you’re done setting up the shortcut key, press OK.
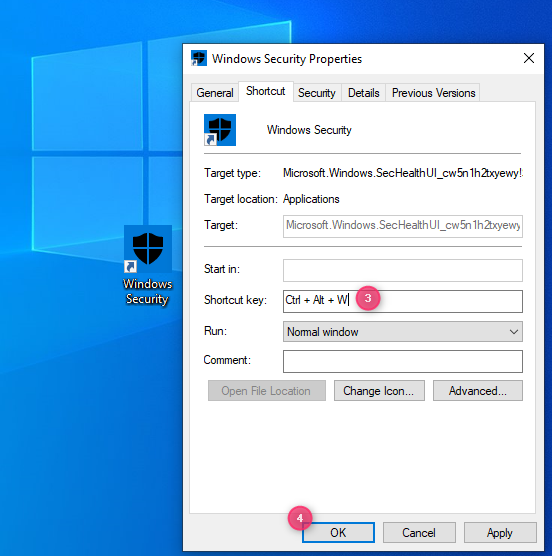
Setting the shortcut key for Windows Security
This method works the same in Windows 10 and Windows 11. If you need more information, read this guide: How to open any program (or app) with a keyboard shortcut in Windows.
6. How to open Windows Security with Run
An old-school way of opening apps in Windows is through the Run dialog. Press Windows + R on your keyboard, and in the Open field, type:
windowsdefender:
Don’t forget to press Enter on your keyboard or click/tap OK to execute your command and open Windows Security.
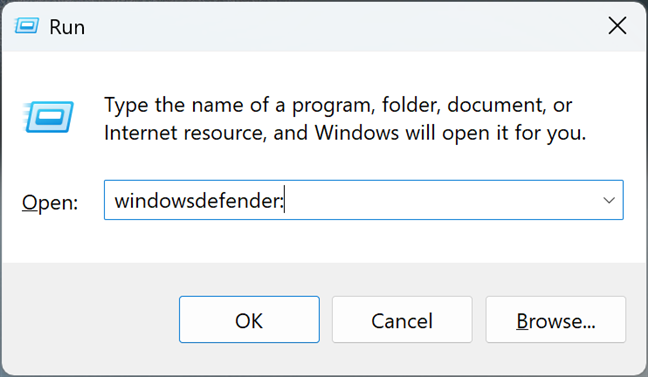
Opening Window Security from Run
7. How to find Windows Security using search
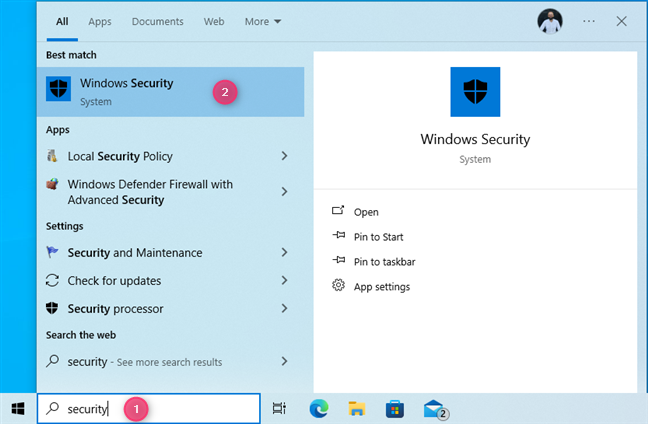
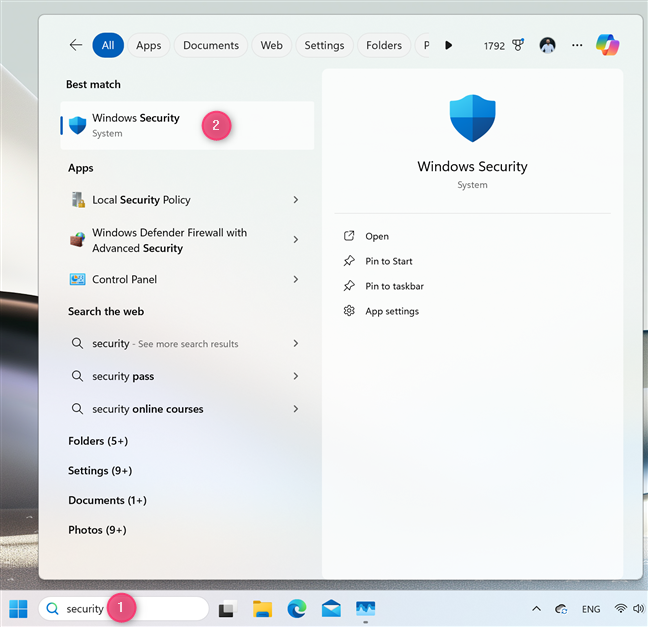
People who are wondering where to find Windows Security on their Windows computer can always use search. It’s a fast and reliable way of opening apps.
If you’re using Windows 10, click or tap inside the Search box on the taskbar, type the word security, and choose the Windows Security search result.
Accessing Windows Security via search in Windows 10
If you’re using Windows 11, finding Windows Security works exactly the same way. However, remember that the search feature may not always display Windows Security as the first search result on the list. It may also display folders with this name or apps like those in the screenshot below.
Accessing Windows Security via search in Windows 11
8. How to start Windows Security from File Explorer
Few people know that File Explorer offers another convenient way to start Windows Security. Open File Explorer and type or copy and paste this command in its address bar:
windowsdefender:
Then, press Enter on your keyboard to execute it.🙂
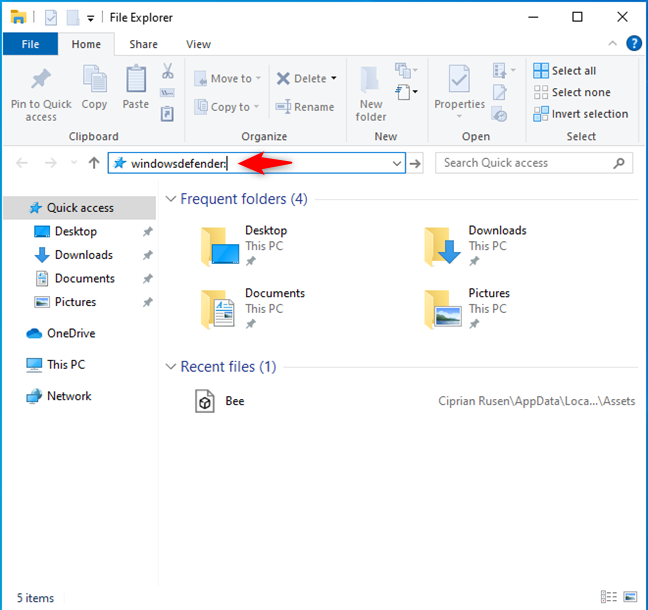
Opening Windows Security from File Explorer in Windows 10
While the screenshot above is from Windows 10, the steps involved work the same in Windows 11, even though File Explorer looks different.
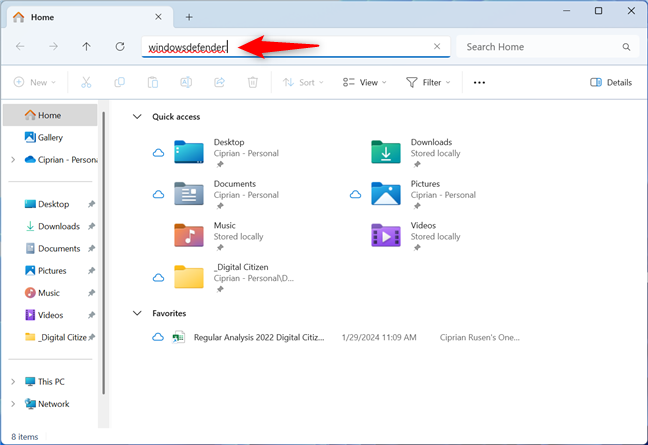
Opening Windows Security from File Explorer in Windows 11
9. Pin Windows Security on your taskbar or Start Menu
Locate the Windows Security shortcut in the Start Menu. As shown in method 3, in Windows 10, you can find this shortcut at the bottom of the apps list. Then, right-click or press and hold Windows Security, and a contextual menu appears. The first option in the menu is Pin to Start, which pins the Windows Security shortcut in the Start Menu. If you choose More, an extension opens, allowing you to Pin to taskbar.
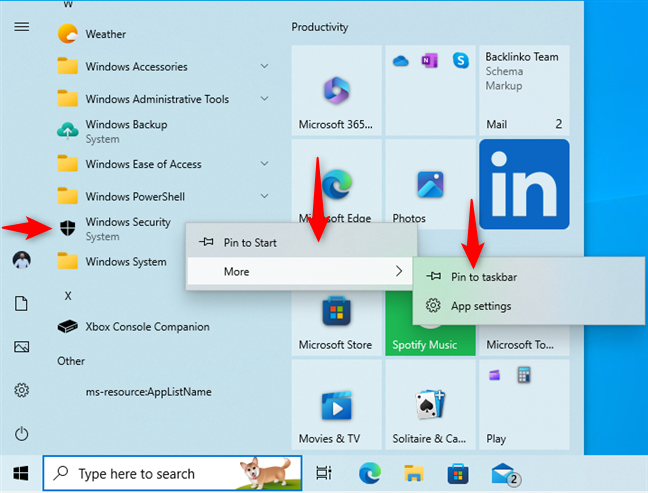
Pinning Windows Security to the Start Menu or the taskbar in Windows 10
The steps are similar in Windows 11. However, you first need to click or tap Start, followed by All apps, to see the list of apps installed on your computer. Then, right-click (or press and hold) the Windows Security shortcut and pin it where you want.
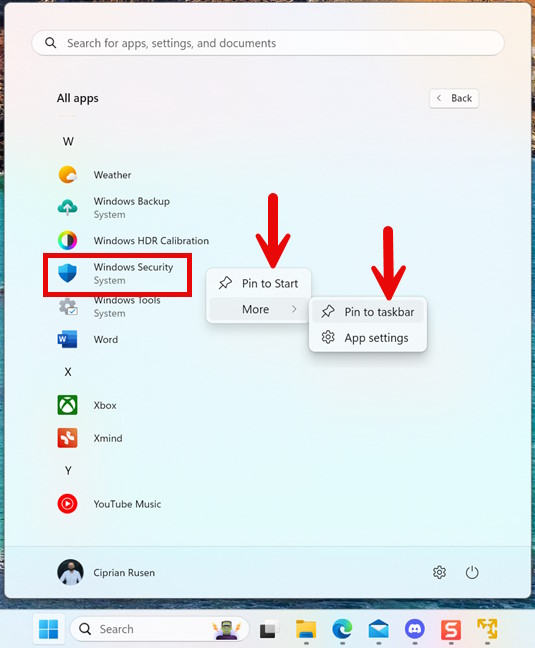
Pinning Windows Security to the Start Menu or the taskbar in Windows 11
10. How to open Windows Security using Settings
If you’re already using the Settings app and need to access Windows Security, you can do that really quickly:
Open Settings and go to the Update & Security category. On the left side of the window, select Windows Security; then, on the right, click or tap Open Windows Security.
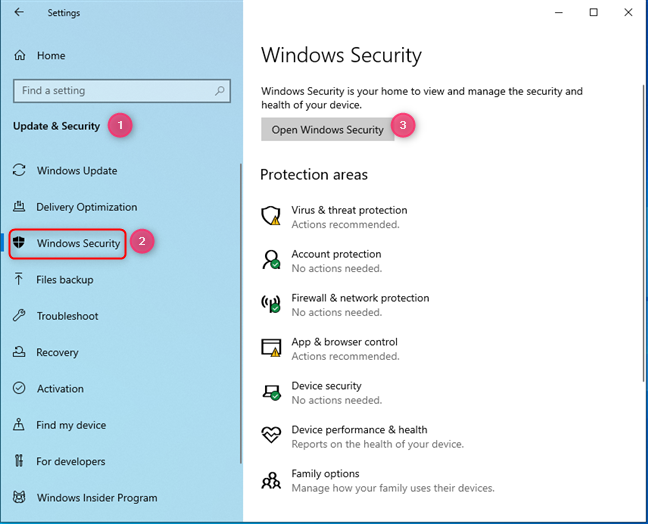
Open Windows Security from the Windows 10 Settings
If you’re using Windows 11, open the Settings app (Windows + I) and choose Privacy & security on the left. On the right side of the window, click or tap Windows Security, followed by Open Windows Security.
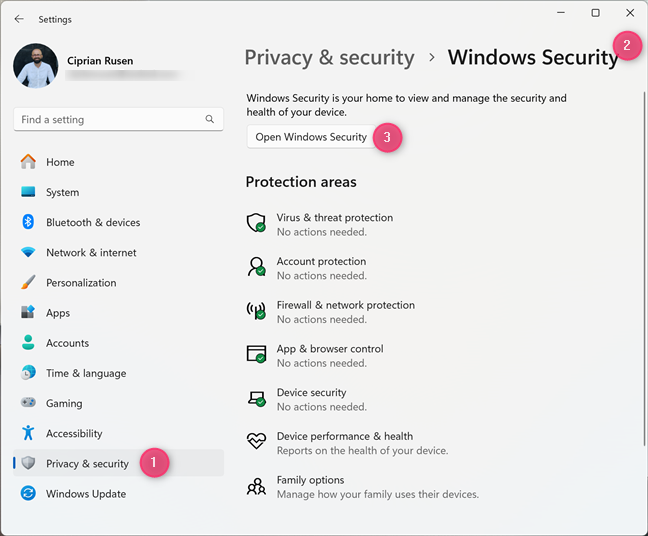
Open Windows Security from the Windows 11 Settings
11. Start Windows Security from Task Manager
If you’re using Task Manager to view running apps and processes, and you need to bring up Windows Security, you can do that straight from this app, like this:
In Windows 10, open Task Manager (a quick way is to press the Control + Shift + Escape keys simultaneously). If you get the compact view of the Task Manager, click or tap on More details. Next, click or tap File > Run new task.
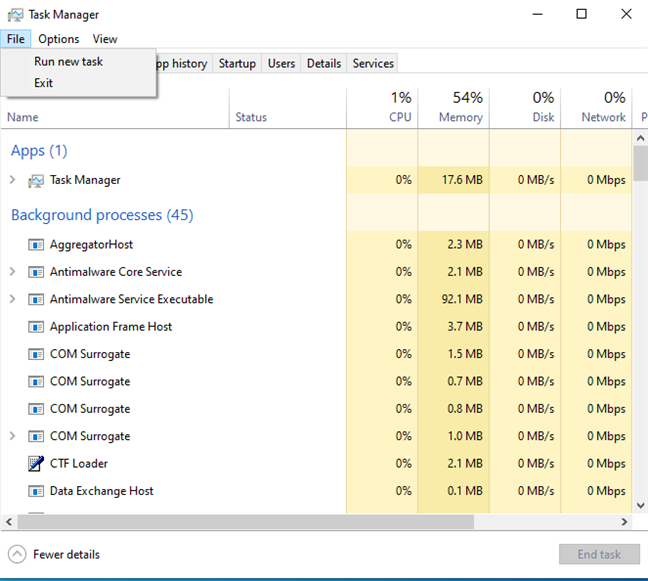
In Task Manager go to File > Run new task
In the Create new task window, type or copy and paste this command in the address bar:
windowsdefender:
Don’t forget to press Enter or click or tap OK.
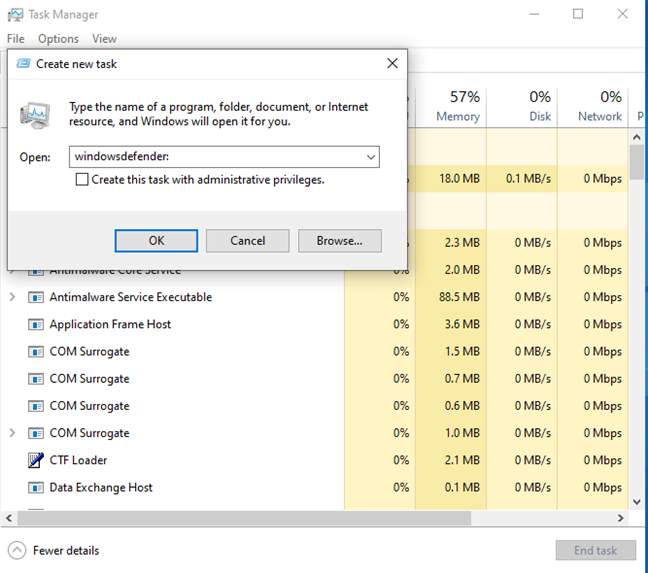
Run Windows Security from Task Manager
This process no longer works in Windows 11 because the Task Manager has been completely revamped, and it no longer gives you access to the Create new task window, like it does in Windows 10.
What is your preferred way of accessing Windows Security?
This is a lengthy tutorial that aims to provide you with as complete information as possible. Most people need to know a method or two for opening Windows Security, while others may have to experiment with most of the methods I detailed and then choose the one that suits their needs. Regardless, let me know which works best for you and why. How do you access Windows Security on your Windows 10 or Windows 11 computer?


