
Если в проводнике Windows у вас отображается область предварительного просмотра в папке, которая вам мешает, то отключить её можно следующим образом:
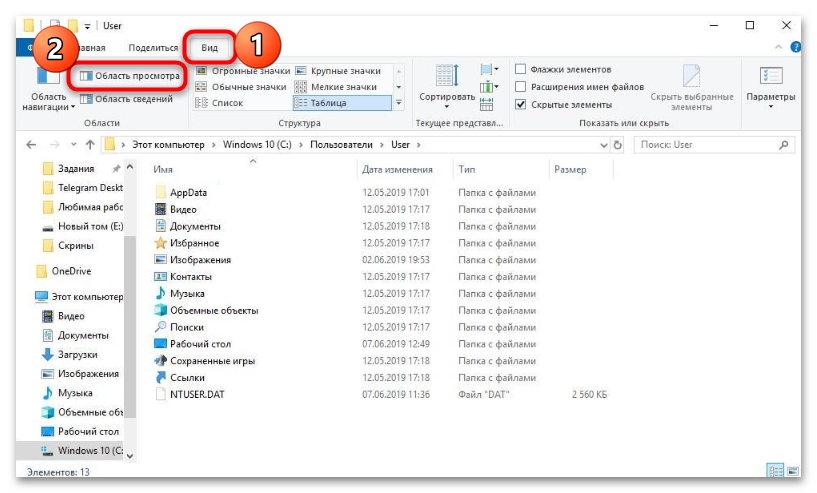
1) В меню, отображаемом наверху, выбрать пункт «Вид».

2) Теперь на панели, которая находится под этим меню, нажмите на кнопку «Область просмотра».

Всё готово!
Есть альтернативный вариант — использовать комбинацию клавиш Alt + P (нужно переключиться на латинскую раскладку).
Отмечу, что опция отображения панели предварительного просмотра включается/отключает
Если же вы убрали предварительный просмотр, а при следующем открытии папки он у вас появился снова, то скорее всего у вашей учётной записи не хватает прав — попробуйте войти из-под «учётки» с правами администратора.
Windows has no inbuilt mechanism to control options that get listed in the context (right-click) menu. If that’s not enough, they decided software publishers could add options to the menu, with the result that most users end up with a cluttered context menu.
Some publishers however do give users an option, either during installation or in their settings, to control their entries. Surprisingly, Microsoft products rarely include such an option. Such is the case with Windows Media Player (WMP).
WMP has a come a long way since its XP days, and to be fair, it’s a decent program if what you need is simply to play music. However, there are a myriad of better alternatives out there such as VLC, the nifty foobar or my personal favorite Jaangle that people prefer to it.
For that reason, the WMP related context menu entries usually go unused.
Windows Media Player Entries
Windows Media Player installs the above 3 entries in Windows’ explorer right-click menu. They include:
- Add to Windows Media Player list
- Play with Windows Media Player
- Shop for music online
These entries usually only appear when you right-click folders containing media files like music, video and images.
For most third party programs, ShellMenuView from Nirsoft (Nir Sorfer) usually removes this kind of entries with little hassle.
However, it seems that it can’t disable WMP entries as per my tests. To do that I had to scour the web for some solutions, and luckily I got the following three fixes. If you don’t want to tinker around with the registry, use either of the first two methods below.
1. Using Control Panel’s Default Programs
This method simply removes Windows Media Player as the default media player and as a result removes the associated entries. Here’s how to do that:
- Open the old Control Panel. You can find it easily by searching for it in the start menu.
- Switch the view to Large Icons or Small Icons if it’s in the Category view.
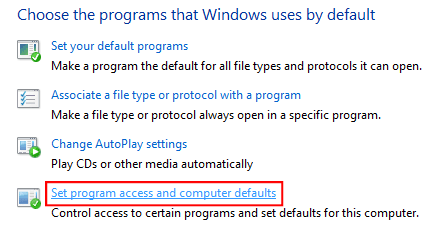
- Scroll down and open Default Programs.
- In the default programs window, open the option Set Program access and computer defaults.

- That will open a small window with one of three radio buttons selected: Microsoft Windows, Non-Microsoft and Custom. If you’re using a different media player, chances are the Custom option is already selected. If not so, select it and then enlarge the settings using the drop arrow on the far right.
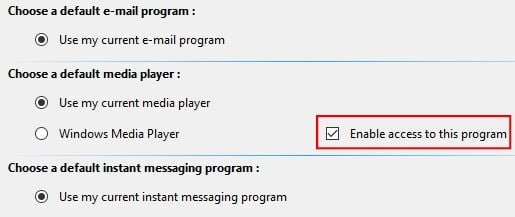
- Scroll down and go to Choose default media player. If you’re already using a different media player, then Use my current media player is selected by default. If not, do so. However, below it you’ll notice beside Windows Media Player there’s the option Enable access to this program. Remove that check mark.

7. Click Ok and you’re done
This will only “disable access” to WMP from Windows Explorer (File Manager) but you will still be able to use the program by launching it from elsewhere e.g the Start Menu.
2. By Turning off Windows Media Player
This method renders WMP inaccessible through “uninstallation” but not in the traditional sense. You won’t be able to use the program but you can “turn it on” later if you need to use it. Here’s how to go about it:
- Open the old Control Panel. You can find it easily by searching for it in the start menu.
- Switch the view to Large Icons or Small Icons if it’s in the Category view.
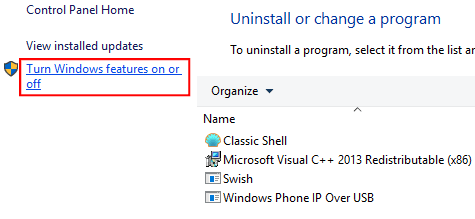
- Scroll down and open Programs and Features.
- In the Programs and Features window, go to the left panel and open the option Turn Windows features on or off.

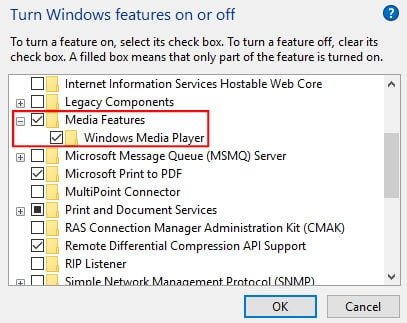
- That will open a small window titled Windows Features. Navigate through the categories listed and find Media Features. Expand that category by clicking on the little plus sign and remove the checkmark from Windows Media Player.

- You’ll get a warning prompt. Click Yes to accept.
- Windows may take some time to apply those settings, after which you’ll have to Restart your computer for the changes to be applied.
After restarting the computer WMP entries should be gone and the program should be inaccessible. If you had defaults set to WMP, like to open mp3s and other media files, they’ll will automatically default to another media player that’s installed; if not you’ll have to do that manually.
Option 3: Remove Manually using the Registry
This is the last method, and it’s the least user-friendly of the three. If you don’t know what the Registry is, it’s probably a good idea to stick with the first two methods.
Also, before editing anything in the registry, you may want to consider backing it up or simply create a system restore point. There’s no undo button here, so if you make an unwanted change there’s no way to revert unless if you remember exactly what you edited.
If you’ve some trouble going through the steps, please refer to the video below. It’s what I made for Windows 7 but the procedure is exactly the same for Windows 8 and 10.
- First, make sure you’re logged in as an Administrator.
- Open the Run window. You can do this by going to the Start Menu and on the bottom click on the button Run… or using the Windows Button + R keyboard shortcut.
- Enter regedit in the run box and click Ok. The registry editor should launch.
- On its left there’s what is referred to as Classes which houses the different kinds of settings and on the right is the preview window where the settings are previewed and edited. The keys we need to edit are under the HKEY_CLASSES_ROOT class.
- Navigate carefully to the following folders:
- HKEY_CLASSES_ROOT\SystemFileAssociations\Directory.Audio
- HKEY_CLASSES_ROOT\SystemFileAssociations\Directory.Image
- HKEY_CLASSES_ROOT\SystemFileAssociations\Directory.Video
- Directory.Audio holds the settings for folders with audio files, Directory.Image for images and Directory.Video files. Expand each of those folders and their respective sub-folders and on the right pane you’ll notice the data.
- Now chances are that there are keys from other programs and those should be left alone with. Window Media Player keys that we’re interested in are as follows:
- HKEY_CLASSES_ROOT\SystemFileAssociations\Directory.Audio\shell\Enqueue
- HKEY_CLASSES_ROOT\SystemFileAssociations\Directory.Audio\shell\Play
- HKEY_CLASSES_ROOT\SystemFileAssociations\Directory.Audio\shellex\ContextMenuHandlers\WMPShopMusic
- These are the only keys that you need to delete. You can confirm their data in the right pane which contains the following options:
- To delete, just right-click on each of the folders above and select delete. Before deleting you can back up the keys by right-clicking each of the folders and choosing Export. The exported file is a *.reg file that can be edited on a text editor like notepad and is restored by simply double-clicking it.
- Reboot your computer once you’re done.
Все способы:
- Способ 1: Панель инструментов «Проводника»
- Способ 2: Сброс вида папок
- Способ 3: Редактирование реестра
- Способ 4: «Редактор локальной групповой политики»
- Вопросы и ответы: 0
Способ 1: Панель инструментов «Проводника»
С помощью функции предварительного просмотра в папке можно посмотреть содержимое файла без его открытия в основной программе. Она окажется полезной при быстром поиске необходимого файла, на чаще всего окно с предпросмотром мешает, и отключить его можно через панель с инструментами «Проводника»:
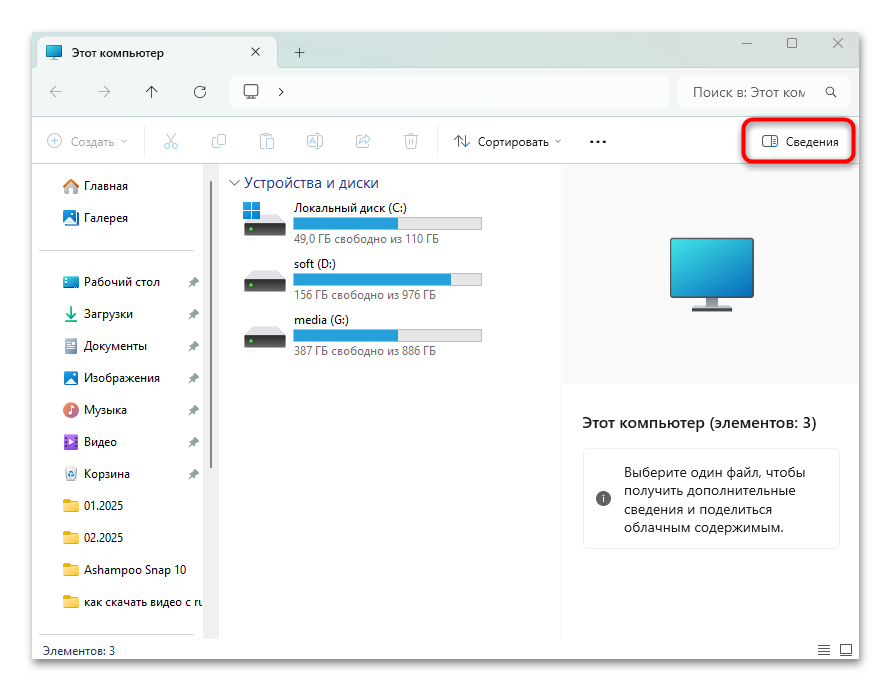
- В операционной системе Windows 11 отключить панель предварительного просмотра можно в одно нажатие. Для этого нажмите на кнопку «Сведения», которая располагается в верхнем правом углу.
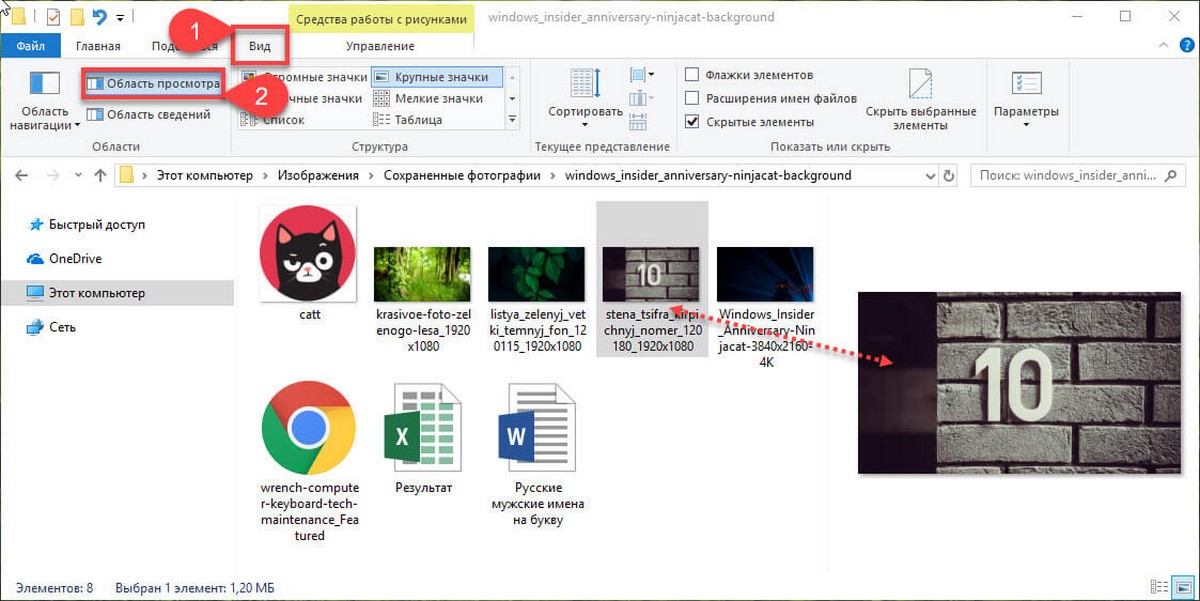
- Что касается Windows 10, нужно переключиться на вкладку «Вид», затем нажмите на кнопку «Область просмотра».
- В Windows 7 также есть кнопка для быстрого управления панель с предварительным просмотром.
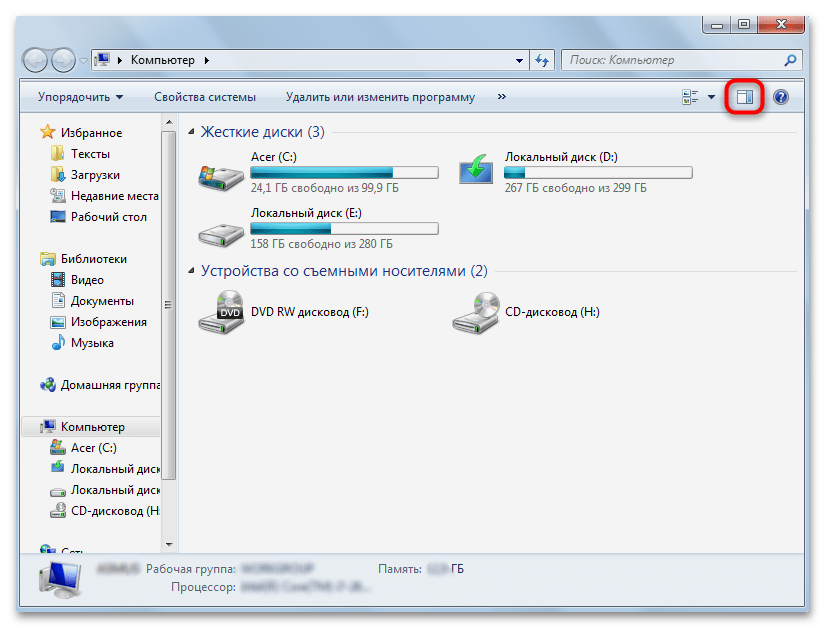
Можете также нажать на меню «Упорядочить», затем навести курсор на пункт «Представление» и снять галочку с опции «Область предпросмотра».
Панель с предварительным просмотром будет убрана для всех каталогов в «Проводнике». Если же случилось так, что вы отключили отображение области, но после последующего запуска она вновь появилась, это может значить, что у используемой учетной записи не хватает соответствующих прав. В этом случае поможет вход в систему под профилем, обладающим правами администратора.
Подробнее: Как включить администратора в Windows 11 / Windows 10 / Windows 7
Следующие способы, описанные ниже, помогут, если область предпросмотра не убирается либо снова появляется при запуске «Проводника».
Способ 2: Сброс вида папок
При возникновении проблем попробуйте сбросить настройки вида папок. Это позволит применить исходные настройки ко всем каталогам и разделам. Сброс зачастую помогает исправить ситуации, когда система не запоминает установленные пользователем настройки или когда в работе ОС произошел сбой.
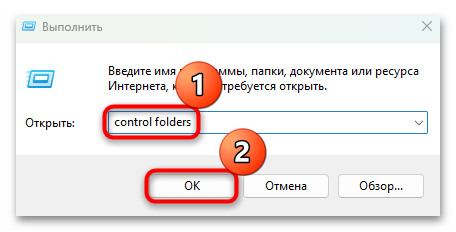
- Одновременно нажмите на клавиши «Win + R», чтобы запустить окно «Выполнить». В поле введите запрос
control foldersи нажмите на кнопку «ОК». - В окне «Параметры папок» переключитесь на вкладку «Вид» и нажмите на кнопку «Сброс папок».
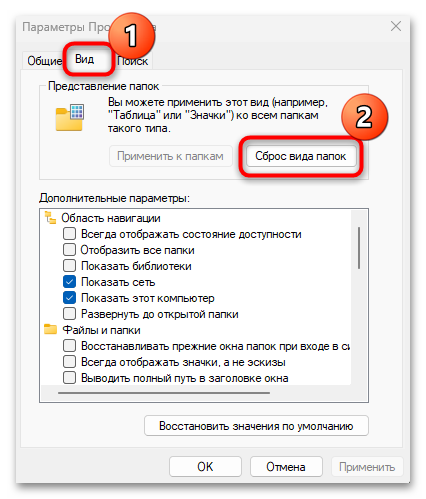
После выполненных действий будет восстановлен режим отображения «Таблица» файлов в каталогах, все параметры вернутся к исходным, а группировки файлов, если она была, будет отменена.
Способ 3: Редактирование реестра
Функцию предварительного просмотра в папках «Проводника» можно отключить насовсем посредством редактирования системного реестра. В этом случае включить ее не получится даже через панель с инструментами файлового менеджера, но это позволяет решить проблему, когда область появляется автоматически, а пользовательские настройки вида папок не сохраняются.
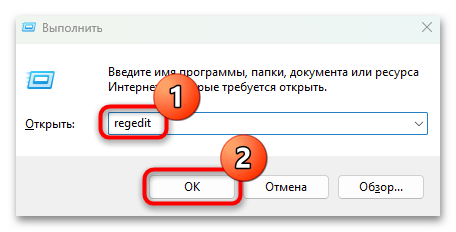
- С помощью окна «Выполнить» (сочетание «Win + R») запустите «Редактор реестра», выполнив запрос
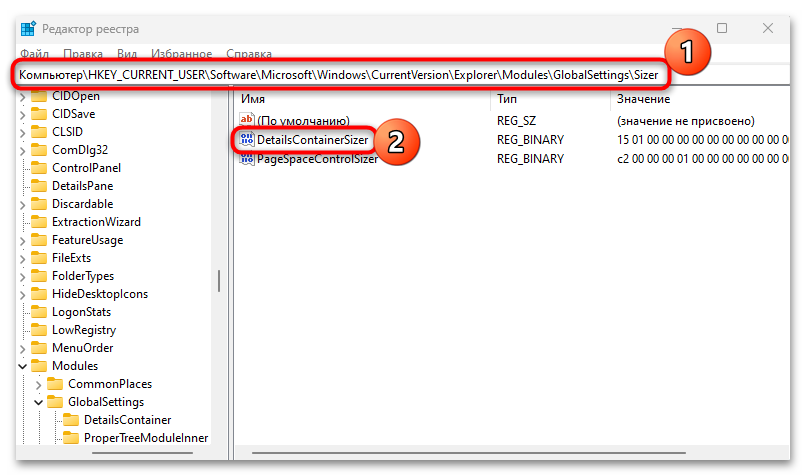
regedit. - Разверните ветку
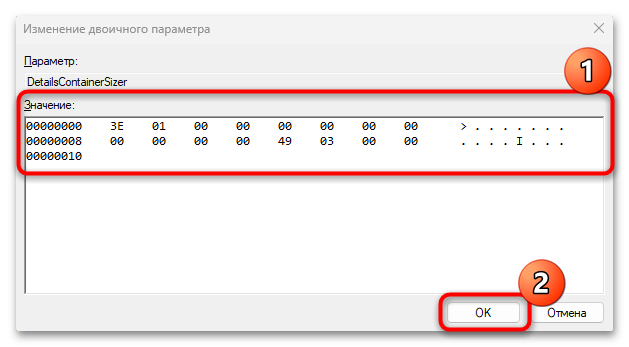
HKEY_CURRENT_USER\Software\Microsoft\Windows\CurrentVersion\Explorer\Modules\GlobalSettings\Sizerили вставьте путь в адресную строку и нажмите на клавишу «Enter». В центральной части окна найдите параметр «DetailsContainerSizer» и дважды кликните по нему левой кнопкой мыши. - В поле «Значение» введите
3e,01,00,00,00,00,00,00,00,00,00,00,49,03,00,00и сохраните настройки. Нужный нам параметр может называться «ReadingPaneSizer». Для него нужно установить значение6E,01,00,00,00,00,00,00,00,00,00,00,0C,03,00,00.
Чтобы настройки применились, перезагрузите компьютер. Если же способ не помог, попробуйте создать REG-файл самостоятельно:
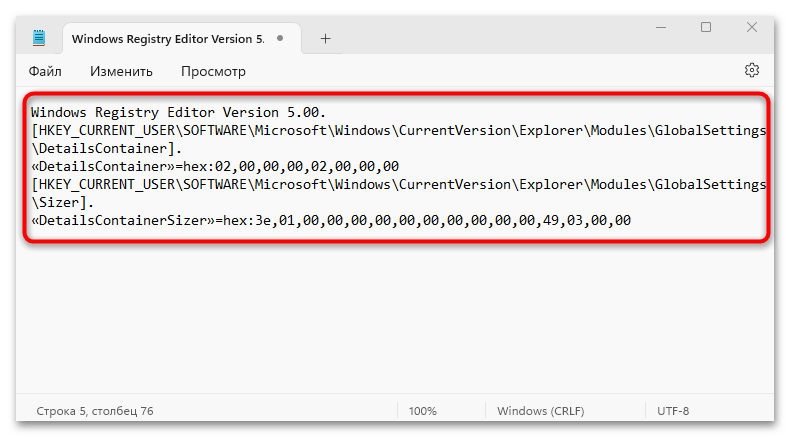
- Откройте штатный «Блокнот» и вставьте в поле текстового редактора такое содержание:
Windows Registry Editor Version 5.00.

[HKEY_CURRENT_USER\SOFTWARE\Microsoft\Windows\CurrentVersion\Explorer\Modules\GlobalSettings\DetailsContainer].

«DetailsContainer»=hex:02,00,00,00,02,00,00,00

[HKEY_CURRENT_USER\SOFTWARE\Microsoft\Windows\CurrentVersion\Explorer\Modules\GlobalSettings\Sizer].

«DetailsContainerSizer»=hex:3e,01,00,00,00,00,00,00,00,00,00,00,49,03,00,00 - Нажмите на вкладку «Файл» и выберите «Сохранить как».
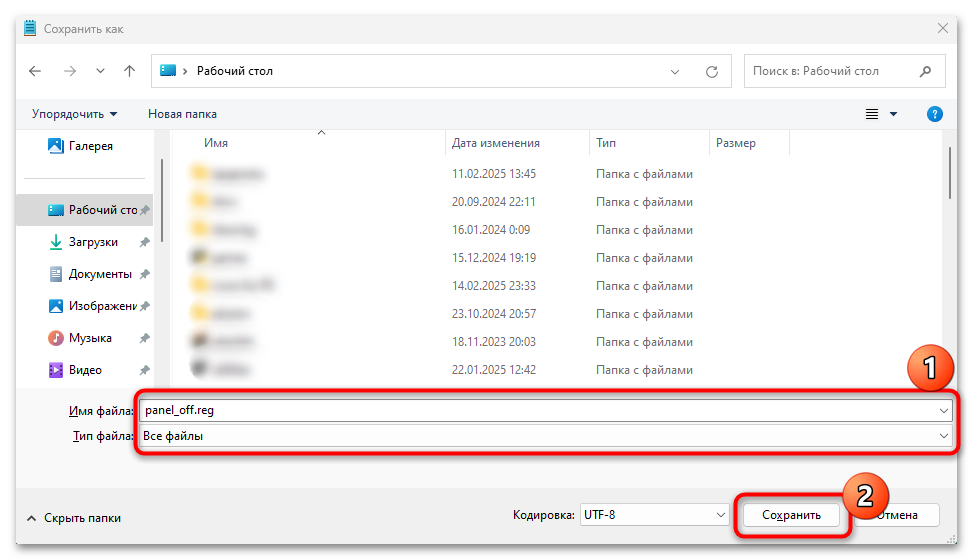
- Далее укажите путь для хранения файла, в меню «Тип файла» выберите значение «Все файлы» и задайте имя, обязательно дописав в конце через точку
.REG. Нажмите на кнопку «Сохранить».

После отыщите созданный файл и запустите его двойным кликом мыши. Согласитесь с внесением правок в системный реестр и перезагрузите компьютер.
Если же потребуется вновь показать область предварительного просмотра в «Проводнике» Windows, создайте аналогичным образом следующий файл реестра и примените его:
Windows Registry Editor Version 5.00.

[HKEY_CURRENT_USER\SOFTWARE\Microsoft\Windows\CurrentVersion\Explorer\Modules\GlobalSettings\DetailsContainer].

«DetailsContainer»=hex:02,00,00,00,01,00,00,00

[HKEY_CURRENT_USER\SOFTWARE\Microsoft\Windows\CurrentVersion\Explorer\Modules\GlobalSettings\Sizer].

«DetailsContainerSizer»=hex:3e,01,00,00,01,00,00,00,00,00,00,00,49,03,00,00
Способ 4: «Редактор локальной групповой политики»
Есть еще один способ полностью отключить панель с предварительным просмотром в штатном «Проводнике». Для этого потребуется изменить параметры через «Редактор локальной групповой политики». Способ подойдет для редакций Professional и Enterprise.
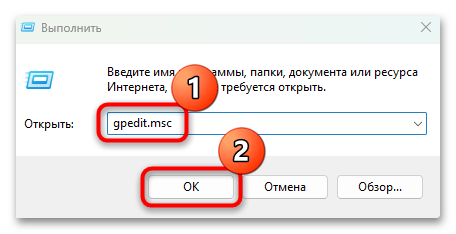
- Запустите «Редактор локальной групповой политики», выполнив запрос
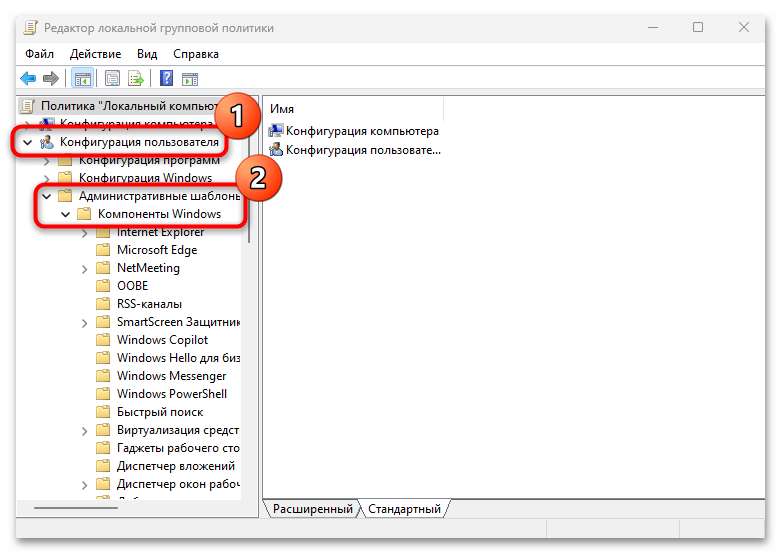
gpedit.mscчерез окно «Выполнить» («Win + R»). - На панели слева разверните меню «Конфигурация пользователя», затем «Административные шаблоны» и «Компоненты Windows».
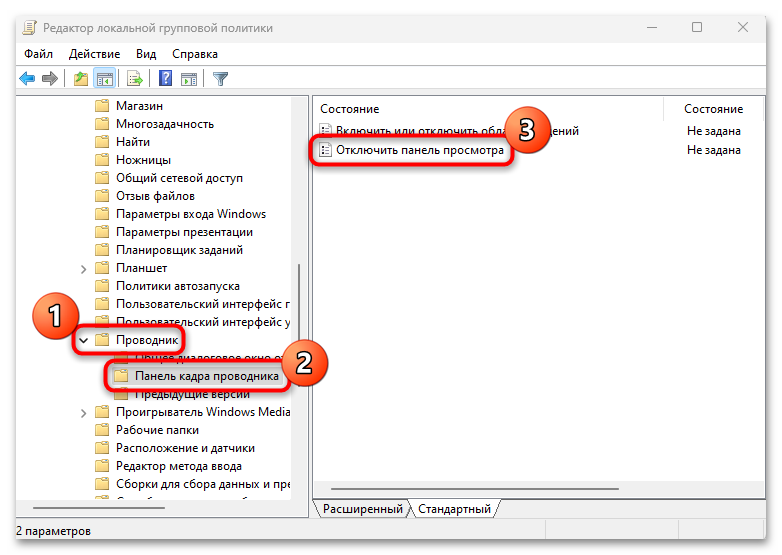
- Ниже в списке разверните каталог «Проводник» и выберите папку «Панель кадра проводника». В основной части окна найдите параметр «Отключить панель просмотра» и двойным кликом левой кнопкой мыши перейдите к его свойствам.
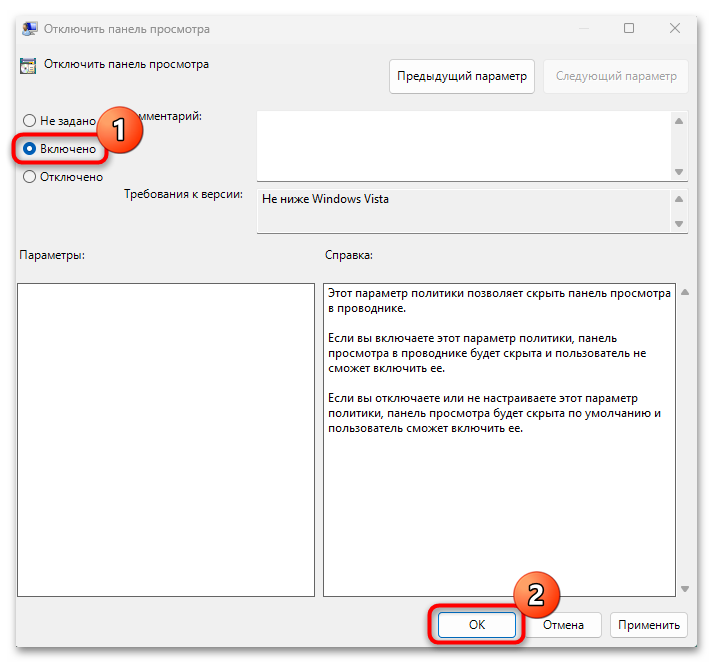
- Отметьте пункт «Включено» и сохраните настройки.
С помощью этого метода после перезагрузки пункт с включением/отключением области предпросмотра будет убран из меню «Представление» или с панели инструментов штатного «Проводника».
Наша группа в TelegramПолезные советы и помощь
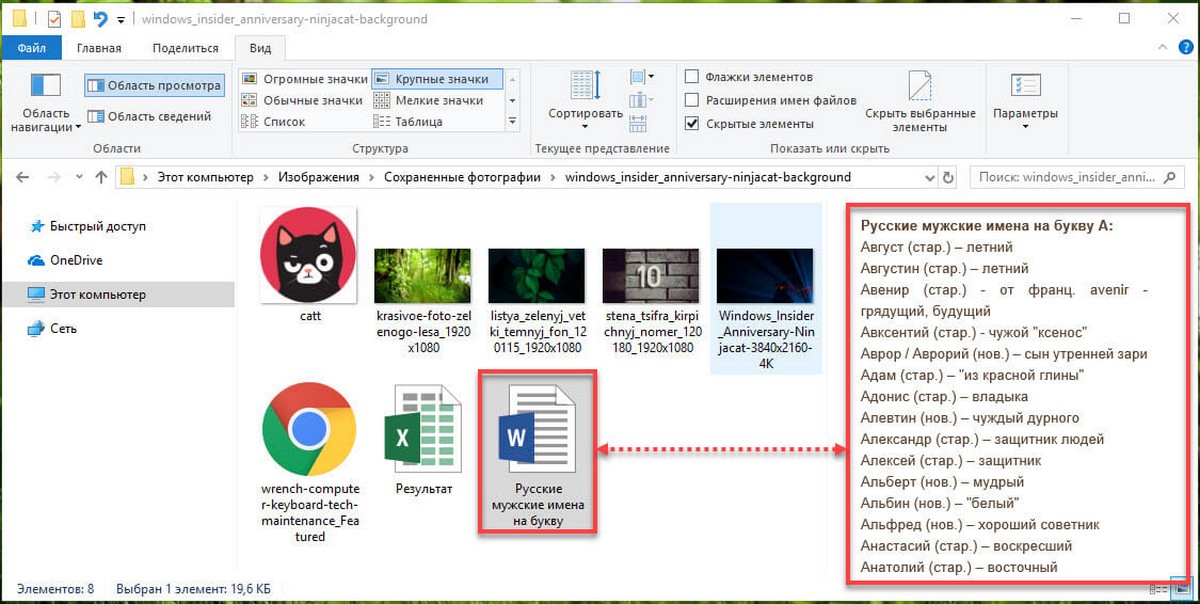
Как вы уже знаете, Проводник Windows 10 может отображать миниатюры изображений и значки файлов и папок. В этом руководстве мы покажем, как включить или отключить предварительный просмотр изображений и документов в правой части проводника Windows 10.
Область предварительного просмотра в проводнике Windows 10.
В проводнике Windows 10 можно включить функцию «Область просмотра», данная функция позволяет, не открывая файл посмотреть его содержание. Например, вы открыли папку с большим количеством фотографий или документами Word, Exel в правой части проводника вы можете посмотреть содержимое любого файла, просто кликнув на нем мышкой. Также вы можете изменить размер области предварительного просмотра, перетащив левую границу области пред просмотра. См. картинку ниже:
Как Показать \ Скрыть область предварительного просмотра с помощью сочетания клавиш.
Откройте проводник файлов Windows и нажмите сочетание клавиш Alt + P
Примечание: установите раскладку клавиатуры как — ENG.
С помощью ленты Проводника.
В ленте проводника перейдите на вкладку Вид
и нажмите на значок Область просмотра
. См. картинку ниже:
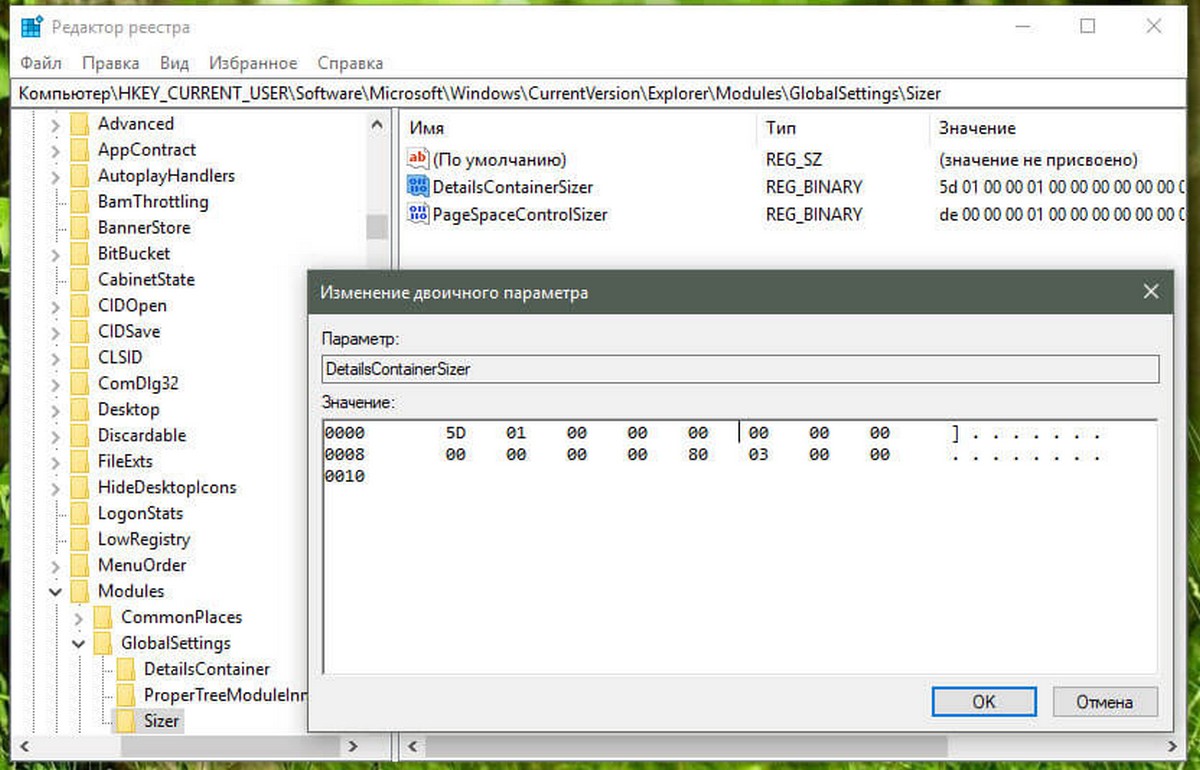
С помощью редактора реестра.
Примечание: Перед тем как внести изменения в реестр Windows рекомендуется создать точку восстановления системы.
1. Откройте редактор реестра.
2. Перейдите по следующему пути:
HKEY_CURRENT_USER\Software\Microsoft\Windows\CurrentVersion\Explorer\Modules\GlobalSettings\Sizer
- В разделе «Sizer» измените параметр «DetailsContainerSizer».
А) Показать область предварительного просмотра измените в первой строке значение шестого столбика на 01 и нажмите «ОК».
В) Отключить показ области просмотра измените в первой строке значение шестого столбика на 00 и нажмите «ОК».
4. Теперь перейдите в раздел:
HKEY_CURRENT_USER\SOFTWARE\Microsoft\Windows\CurrentVersion\Explorer\Modules\GlobalSettings\DetailsContainer
5.В разделе «DetalisContainer» откройте параметр «DetailsContainer».
А) Показать область предварительного просмотра измените в первой строке значение шестого столбика на 01 и нажмите «ОК».
В) Отключить показ области просмотра измените в первой строке значение шестого столбика на 02 и нажмите «ОК».
6.Закройте редактор реестра и перезагрузите систему, чтобы изменения вступили в силу.
Все!
You are here:
Home » Windows 10 » How To Remove Windows Media Player Entries From Context Menu (Without Using Third-Party Tools)
Countless numbers of free audio and video players are available for Windows. Most Windows users have installed at least two or more third-party media players. Users who have set Winamp, foobar2000, or any other audio player as their default media player may want to get rid of Windows Media Player entries from the context menu.
With default Windows installation settings, you can see Play and Add to Windows Media Player List entries in the context menu. Add to Windows Media Player List entry is visible even if you have set a third-party audio player as your default player. So, users who use a media player other than WMP may want to remove these entries.
Sure, one can always use available free utilities to remove entries from the context menu, but one can easily remove WMP entries without using a third-party tool. Just follow the simple steps given below to quickly remove Windows Media Player entries from the right-click menu.
This method works on Windows 10, 8.1, 8, and 7.
Procedure:
Step 1: Open Default Programs. To do this, open the Start menu on Windows 7 and then click on Default Programs. On Windows 10, type Default Programs in Start menu search and then press Enter key to open Default Programs. Windows 8 users can simply type Default Programs in Start screen, and press the Enter key to launch the same.

Step 2: Here, click Set program access and computer defaults to open Set Program Access and Computer Defaults window.

Step 3: Select Custom and then click the down arrow icon to expand the list. Here, under Choose a default media player, disable Enable access to this program next to Windows Media Player.

Step 4: Click the Ok button to exit the window. You are done! You just removed Windows Media Player entries from the context menu.

You might also like to know how to reinstall Windows Media Player, how to download and install Windows Media Player skins, and how to change Windows Media Player background picture guides.