
Настройка переменных среды Windows может помочь сократить время, необходимое для набора команд в командной строке или, если вы часто пишете скрипты для собственных задач, сделать их более читаемыми. В большинстве случаев обычные пользователи добавляют записи в системную переменную среды PATH, хотя бывают и другие задачи.
В этой пошаговой инструкции базовая информация о том, как открыть переменные среды Windows 11 и Windows 10, создать или отредактировать их.
Что такое переменные среды
Переменные среды в Windows — записи о расположении системных папок, свойствах системы и другие, которые доступны для любой программы или скрипта.
Одна из наиболее часто используемых переменных среды — PATH, указывающая на папки, в которых выполняется поиск файлов, вызываемых в командной строке, терминале Windows, файле bat или из других источников. В качестве примера её назначения:
- Если вы откроете командную строку (или диалоговое окно «Выполнить»), введёте regedit и нажмете Enter — вы сможете запустить редактор реестра, не указывая полный путь к файлу regedit.exe, поскольку путь C:\Windows добавлен в переменную среды Path.
- Если же тем же образом в командной строке написать имя программы, путь к которой не добавлен в Path (chrome.exe, adb.exe, pip и другие), вы получите сообщение «Не является внутренней или внешней командой, исполняемой программой или пакетным файлом».
Если предположить, что вы часто используете команды adb.exe (например, для установки приложений Android в Windows 11), pip install (для установки пакетов Python) или любые другие то для того, чтобы не писать каждый раз полный путь к этим файлам, имеет смысл добавить эти пути в переменные среды.
Также вы можете добавлять и иные переменные среды (не обязательно содержащие пути), а в дальнейшем получать и использовать их значения в сценариях BAT (командной строки) или PowerShell. Пример получения и отображения значения системной переменной PATH для обоих случаев:
echo %PATH%
echo $Env:PATH
Получить список всех переменных среды в командной строке и PowerShell соответственно можно следующими командами:
set
ls env:
Редактирование переменных среды Windows 11/10
Прежде чем приступать, учтите: изменение системных переменных среды по умолчанию может привести к проблемам в работе системы, не удаляйте уже имеющиеся переменные среды. Возможно, имеет смысл создать точку восстановления системы, если вы не уверены в своих действиях.
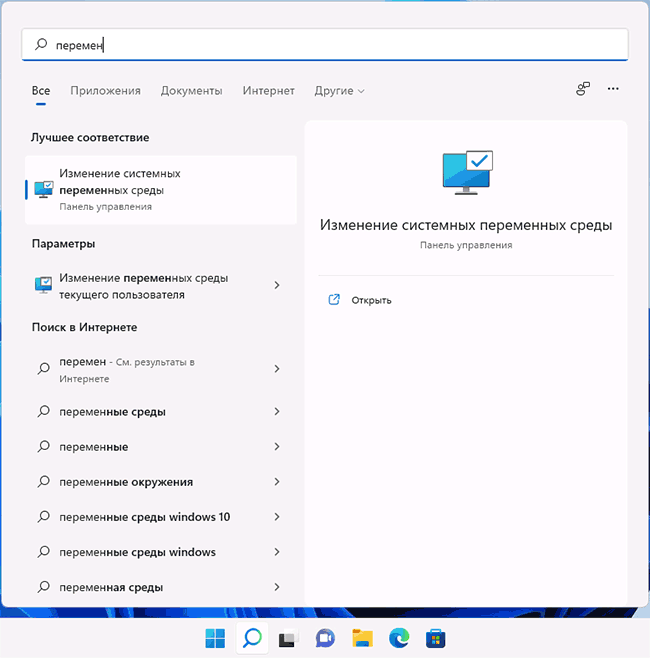
- Чтобы открыть переменные среды Windows вы можете использовать поиск в панели задач (начните вводить «Переменных» и откройте пункт «Изменение системных переменных среды») или нажать клавиши Win+R на клавиатуре, ввести sysdm.cpl и нажать Enter.

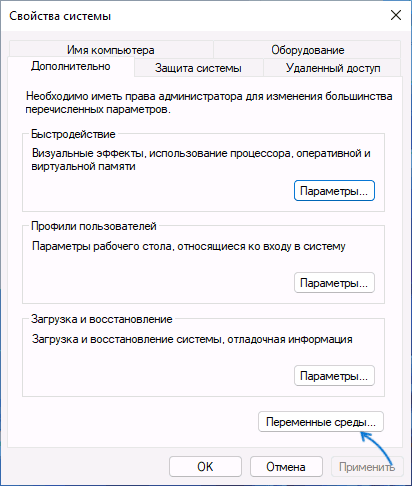
- На вкладке «Дополнительно» нажмите кнопку «Переменные среды…»

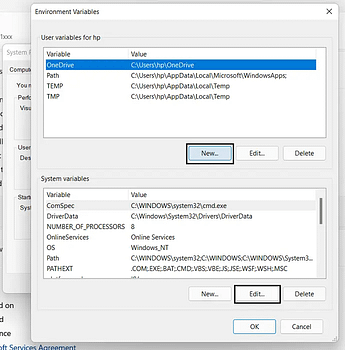
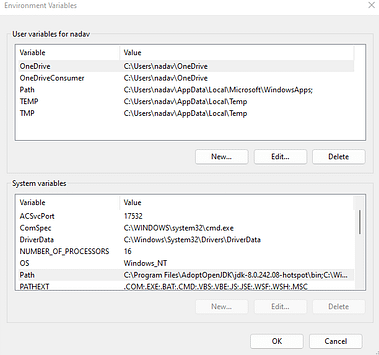
- В разделе «Переменные среды пользователя» (если требуется изменение только для текущего пользователя) или «Системные переменные» выберите переменную, которую нужно изменить и нажмите «Изменить» (обычно требуется именно это), либо, если необходимо создать новую переменную — нажмите кнопку «Создать». В моем примере — добавляем свои пути в системную переменную Path (выбираем эту переменную и нажимаем «Изменить»).

- Для добавления нового значения (пути) в системную переменную в следующем окне можно нажать кнопку «Создать», либо просто дважды кликнуть по первой пустой строке, затем — ввести нужный путь к папке, содержащей нужные нам исполняемые файлы.

- Также вы можете использовать кнопку «Изменить текст», в этом случае окно изменения системной переменной откроется в ином виде: имя переменной, а ниже — её значение. В случае указания путей значение будет представлять собой все пути, хранящиеся в переменной, разделенные знаком «точка с запятой».

- При создании новой переменной среды окно будет тем же, что и в 5-м шаге: необходимо будет указать имя системной переменной в верхнем поле, а её значение — в нижнем.


После создания или изменения переменной среды и сохранения сделанных настроек, переменная или обновленные значения сразу становятся доступны для текущего пользователя или в системе в целом в зависимости от того, какие именно переменные редактировались или создавались. Также есть методы добавления переменных среды в командной строке или PowerShell, подробнее в статье: Как добавить путь в переменную среды PATH
Last Updated on 2024-10-11
Understanding and managing environment variables through the environment variable dialog is a fundamental skill for any user or developer in the intricate landscape of computer systems.
At the heart of this crucial system configuration lies the Windows PATH, which determines how your operating system discovers and executes various programs.
Whether you’re a seasoned developer, a tech enthusiast, or a curious user eager to enhance your system skills—be it on personal computers or Windows server systems—this blog is tailored to provide invaluable insights and actionable tips on setting the Windows Path and managing environment variables effectively.
Join us on a comprehensive journey where we unravel the complexities surrounding these critical elements, empowering you to navigate and customize your computing environment with confidence.
What is Windows PATH?
Have you ever wondered how your computer knows where to find the programs you’re trying to run among folder-to-folder? This is where the PATH environment variable steps in like a smart assistant, guiding the system to the right locations.

PATH is an environment variable in operating systems such as Unix-like systems, DOS, OS/2, and Microsoft Windows that tells the system which directories to search for executable files. When you type a command like ‘python’ into the command line, the operating system uses the PATH setting to find the ‘python’ executable without needing the full address.
Understanding the Windows System Path
In Windows, the PATH environment variable is critical for the smooth running of software. It includes a list of directories where executable programs reside, separated by semicolons.
Typically, C:WINDOWSsystem32 stands at the forefront, followed by directories of certain installed software. Not every program requires a spot in the Windows PATH since many are designed for a Graphical User Interface (GUI) rather than command-line initiation.
Imagine each working directory listed in the PATH, including the system directory, as a desktop shortcut that Windows can take to swiftly access the tools or programs you’re instructing it to run. You’re telling Windows, “Hey, here are the places you should look when I command you to execute something.” Not every application you install will add itself to this list—only those often used from the command line.
Here’s a breakdown of the typical components within a Windows system PATH, including command-line and Windows GUI elements crucial in managing system data.
- System Directories: These are essential paths that Windows uses by default, such as C:WINDOWSsystem32 and C:WINDOWS.
- Third-Party Software: Programs that must be accessible via the command line might add their paths here during installation.
- Extra Utilities: Tools and utilities like Git, Node.js, or Python often suggest adding themselves to the PATH during their setup process.
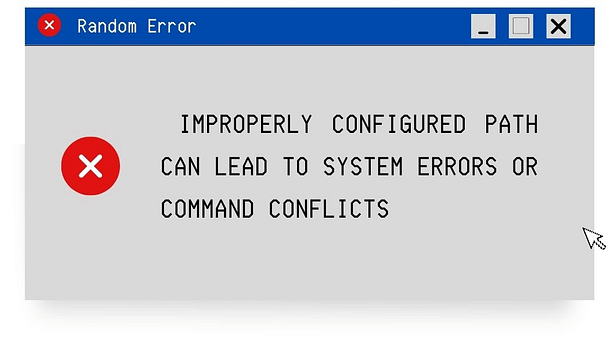
When introducing new tools to your workflow, you’ll sometimes need to add their directories to Windows PATH manually. While this is a straightforward process, it’s important to approach it with caution because an improperly configured PATH can lead to system errors or command conflicts. Appropriate fixes should be applied promptly if issues arise to maintain system stability.
By understanding how the system PATH works, including the PowerShell window, you enable yourself to significantly extend the functionality of your command-line experience, making it a valuable skill for efficiency and productivity when working with Windows.
Navigating to Environment Variables in Windows 11
You’ll first need to access the Environment Variables to manage your computer’s system PATH in Windows 11, which involves a couple of steps. First, right-click on the ‘This PC’ or ‘Computer’ icon on your desktop, and then select ‘Properties’. From there, they’re neatly tucked away in the System Properties, where you can edit your PATH to include the necessary directories.
- Right-click on the Start menu.
- Select ‘System.’
- Click on ‘About’ followed by ‘Advanced system settings.’
- In the ‘System Properties’ window, click ‘Environment Variables.’
Setting or Editing Environment Variables
Adding a new directory to your Windows PATH can unlock new command-line powers for you. To do this, select ‘PATH’ in the Environment Variables window and click the ‘Edit’ button. You can either append a new directory to the list or edit existing entries, separating them with a semicolon. Remember only to add directories that contain executable files you need to run from the command prompt.
5 Tips for Effective Path Management
Navigating your operating system’s environment variables, including the PATH parameter, can be as crucial as setting the sails correctly before a sea journey—you want to ensure everything’s optimized for smooth sailing.
When it comes to PATH management in Windows, understanding and adjusting this path parameter with a few handy tips can make your voyage through the digital seas much less daunting and far more efficient.
- Keep Path Backup: Before altering your PATH, it’s wise to chart your current course. Simply put, copy your existing PATH variable’s value and keep it in a safe harbor—a text file or cloud storage. This foresight can be a lifesaver in choppy waters.
- Meaningful Additions Only: Your PATH is not a treasure chest to be filled with every shiny object. Adding only necessary directories reduces the risk of overflowing your PATH and encountering haunted system errors. It’s the quality, not the quantity, that counts.
- Cohesive Grouping: Arrange associated paths together. This organizes your collection of paths so that they’re more readable and manageable, like a well-organized chart that guides you to your destination without unnecessary detours.
- Leverage Environment Variables: Incorporate other environment variables within your PATH. For example, referring to %USERPROFILE% instead of C:UsersYourName makes your PATH dynamically adjust to different users and system configurations, like a compass that automatically adjusts to true north.
- Regular Audits: Every so often, take a voyage through your PATH variables and clear out any that no longer serve a purpose, like removing barnacles from a ship’s hull to improve its speed and handling.
By keeping these navigational aids in mind, including ensuring Drive C is clutter-free, you can ensure that managing your PATH, an essential aspect of desktop optimization is a voyage of discovery, not a journey into frustration.
With a shipshape PATH and an organized Drive C, you’ll find that launching applications and executing tasks from the command line is a breeze, enhancing both your PC’s performance and your own productivity.
Remain attentive and systematic in your approach; you’ll find PATH management indispensable in your Windows toolkit. Including .bat extension files in your PATH can be a powerful addition, allowing the execution of batch scripts with a simple command.
With the right strategy, patience, and the ability to copy and paste critical PATH entries accurately, you’ll find managing your PATH isn’t just about upkeep; it’s about enabling new possibilities and streamlining your workflow.

5 Best Practices for Customizing Environment Variables
Customizing environment variables can feel like tuning a high-performance engine: each adjustment can improve efficiency and power. To ensure your computing environment runs like a well-oiled machine, here are some best practices to consider when customizing environment variables, especially the sensitive PATH variable.
- Validate Path Entries: Ensure it’s correct before adding a new path. Navigate the right directory name to verify its existence and check for typos. A wrong turn here could lead to a dead-end for your commands.
- Scope Appropriately: If all users use a software tool on a computer, elevate its path to the system variables; for personal tools, confine their paths to user variables. This is like choosing whether to build a private or public road.
- Avoid Unnecessary Changes: Treat system paths with respect. Refrain from deleting entries unless you are certain they serve no purpose. Removing the wrong path can lead to system-wide gridlock.
- Use Clear Variable Names: When creating a new environment variable, label it with a name that evokes its purpose. It’s like putting a sign on a road—it helps everyone navigate more easily.
- Consult with Experts: If you’re in uncharted waters, don’t hesitate to seek guidance from experienced users or IT professionals. A little expert advice goes a long way in preventing mishaps.
By adopting these best practices and their tactful implementation, your interactions with environment variables will be less about trial and error and more about precision and control.
Setting up an icon for different variables can enhance your navigating efficiency. Your effort to manage your Windows PATH intelligently can significantly boost your productivity and safeguard against common computing pitfalls.
Treat these best practices as your navigational stars, guiding you toward a more secure, stable, and swift computing experience, including safer ways to browse the internet through the security pane.
How Can Full Scale Help You?
If you want to take your project to the next level with state-of-the-art software development solutions, consider partnering with Full Scale.
With a reputation for excellence in offshore software development, Full Scale offers top-tier expertise to help you reach your project goals efficiently and effectively. Don’t settle for less; choose Full Scale for a team that’s as invested in your success as you are.
Remember, whether you’re just starting or scaling up, Full Scale is the partner you need for all your offshore software development requirements, including server management. Make the smart choice for your business and reach out now.
FAQs in Setting the Windows Path and Your Environment Variables
As you embark on the journey of customizing your Windows PATH and environment variables, questions may arise. For instance, you might wonder how to add a new path – that’s where a dialog box comes into play. Below are answers to some frequently asked questions that could help you avoid common obstacles, including navigating dialog boxes effectively.
1. What happens if I mess up my PATH?
Don’t worry! You can restore your PATH if you’ve made a backup. Otherwise, you may need to reinstall programs or reset the PATH manually.
2. Can I set temporary PATH variables?
Yes, you can set temporary PATH variables for a session by using the set command in the command prompt.
3. Do I need to restart after changing PATH?
Changes to PATH usually take effect immediately in new command prompt windows; a restart is not typically necessary.
4. How do I add multiple directories to PATH?
You can add multiple directories to streamline the directory search by separating them with semicolons in the PATH variable’s value.
5. Is there a limit to the number of entries in PATH?
Windows has a character limit for PATH that includes the filename, and a colon designates this limit. If this limit is exceeded, you may experience problems, so keep your filepaths and filenames as concise as possible.
Matt Watson is a serial tech entrepreneur who has started four companies and had a nine-figure exit. He was the founder and CTO of VinSolutions, the #1 CRM software used in today’s automotive industry. He has over twenty years of experience working as a tech CTO and building cutting-edge SaaS solutions.
As the CEO of Full Scale, he has helped over 100 tech companies build their software services and development teams. Full Scale specializes in helping tech companies grow by augmenting their in-house teams with software development talent from the Philippines.
Matt hosts Startup Hustle, a top podcast about entrepreneurship with over 6 million downloads. He has a wealth of knowledge about startups and business from his personal experience and from interviewing hundreds of other entrepreneurs.
Все способы:
- Переменные среды Windows
- Переменные PATH и PATHEXT
- Создание переменных среды
- Заключение
- Вопросы и ответы: 6
Переменная среды (переменная окружения) – это короткая ссылка на какой-либо объект в системе. С помощью таких сокращений, например, можно создавать универсальные пути для приложений, которые будут работать на любых ПК, независимо от имен пользователей и других параметров.
Переменные среды Windows
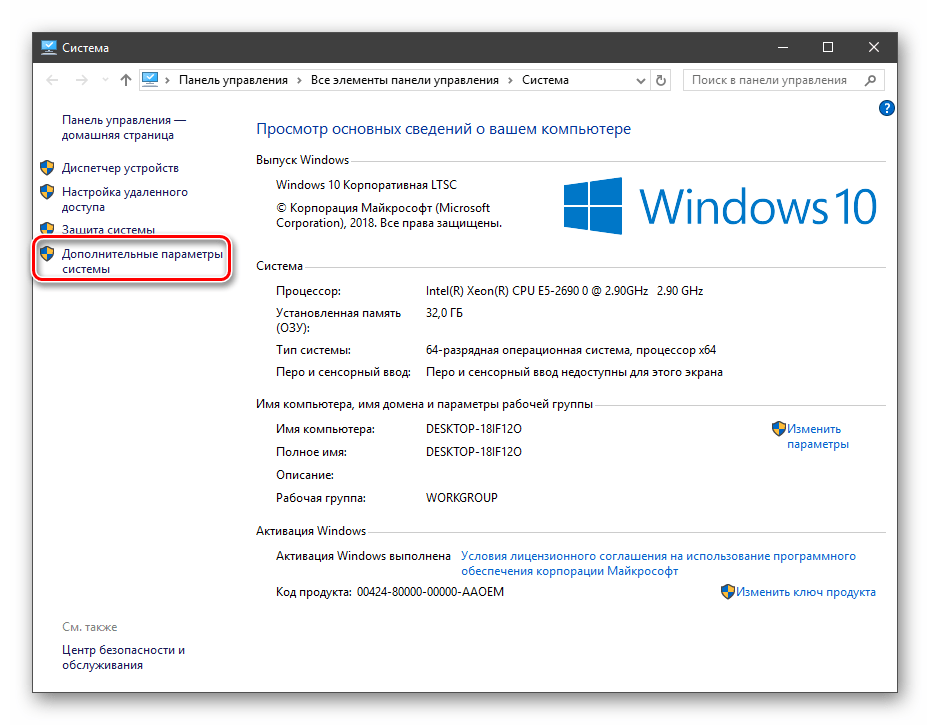
Получить информацию о существующих переменных можно в свойствах системы. Для этого кликаем по ярлыку Компьютера на рабочем столе правой кнопкой мыши и выбираем соответствующий пункт.

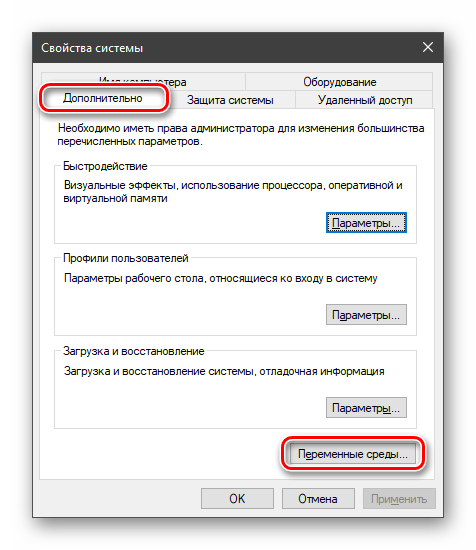
Переходим в «Дополнительные параметры».
В открывшемся окне с вкладкой «Дополнительно» нажимаем кнопку, указанную на скриншоте ниже.
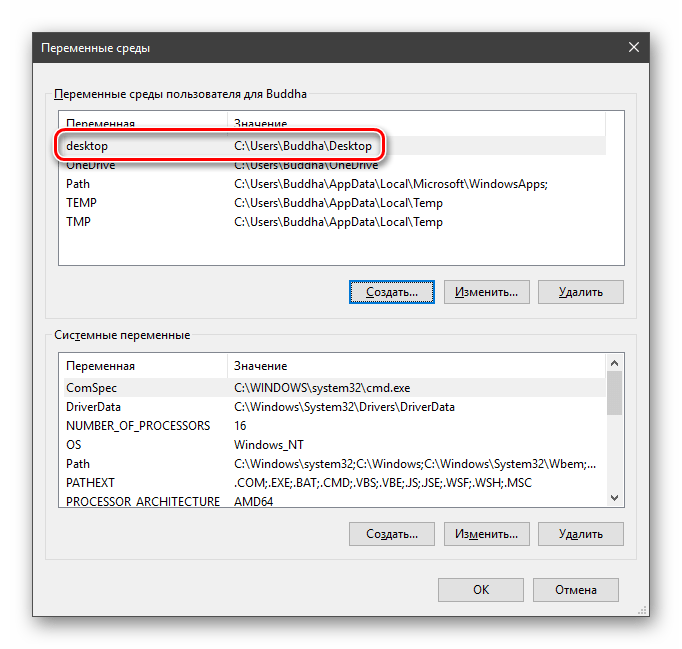
Здесь мы видим два блока. Первый содержит пользовательские переменные, а второй системные.
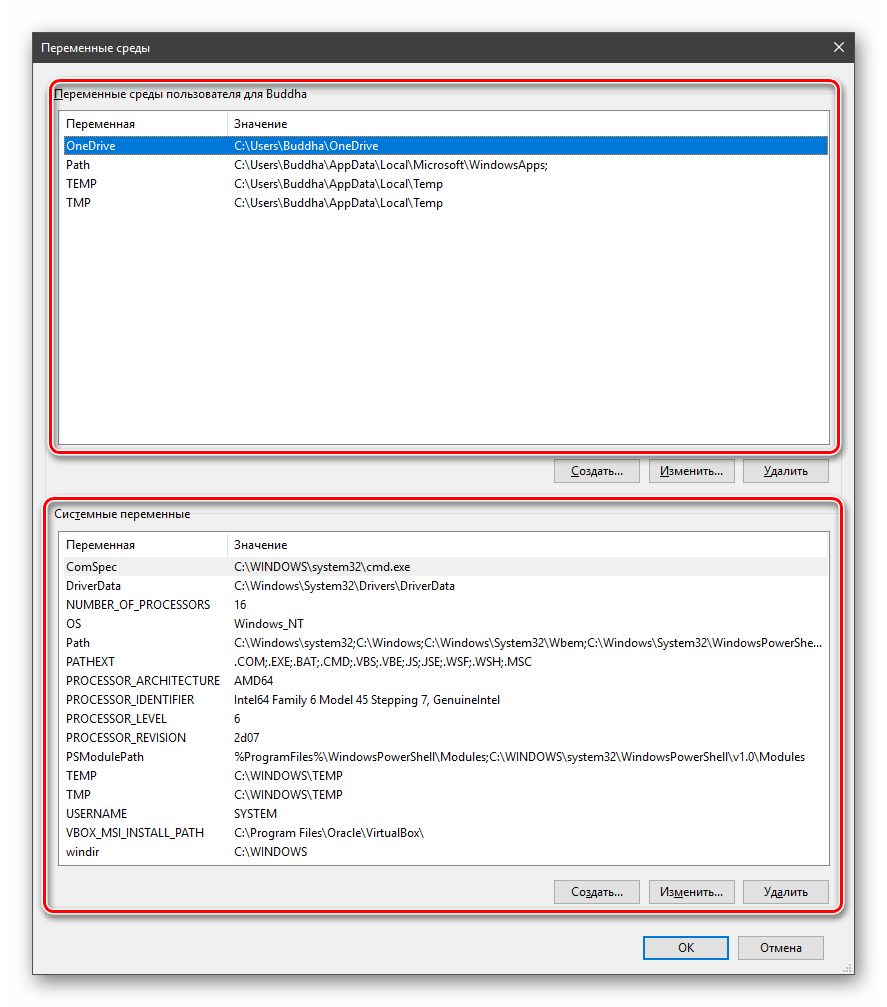
Если требуется просмотреть весь перечень, запускаем «Командную строку» от имени администратора и выполняем команду (вводим и нажимаем ENTER).
set > %homepath%\desktop\set.txt

Подробнее: Как открыть «Командную строку» в Windows 10
На рабочем столе появится файл с названием «set.txt», в котором будут указаны все переменные окружения, имеющиеся в системе.
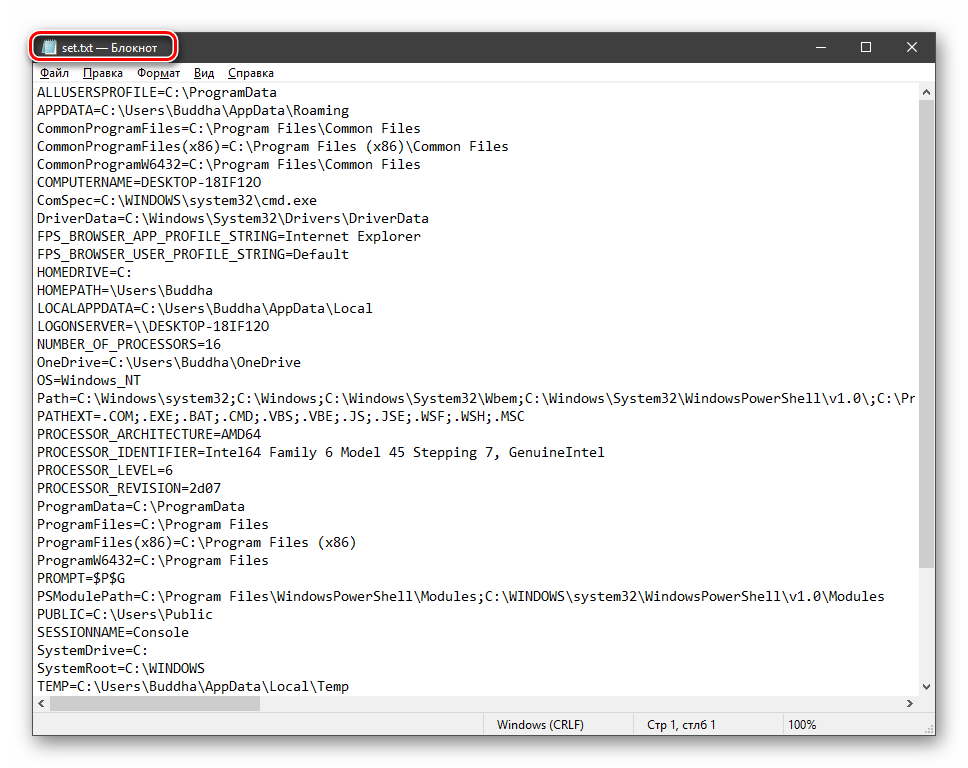
Все их можно использовать в консоли или скриптах для запуска программ или поиска объектов, заключив имя в знаки процента. Например, в команде выше вместо пути
C:\Users\Имя_пользователя
мы использовали
%homepath%
Примечание: регистр при написании переменных не важен. Path=path=PATH
Переменные PATH и PATHEXT
Если с обычными переменными все понятно (одна ссылка – одно значение), то эти две стоят особняком. При детальном рассмотрении видно, что они ссылаются сразу на несколько объектов. Давайте разберемся, как это работает.

«PATH» позволяет запускать исполняемые файлы и скрипты, «лежащие» в определенных каталогах, без указания их точного местоположения. Например, если ввести в «Командную строку»
explorer.exe
система осуществит поиск по папкам, указанным в значении переменной, найдет и запустит соответствующую программу. Этим можно воспользоваться в своих целях двумя способами:
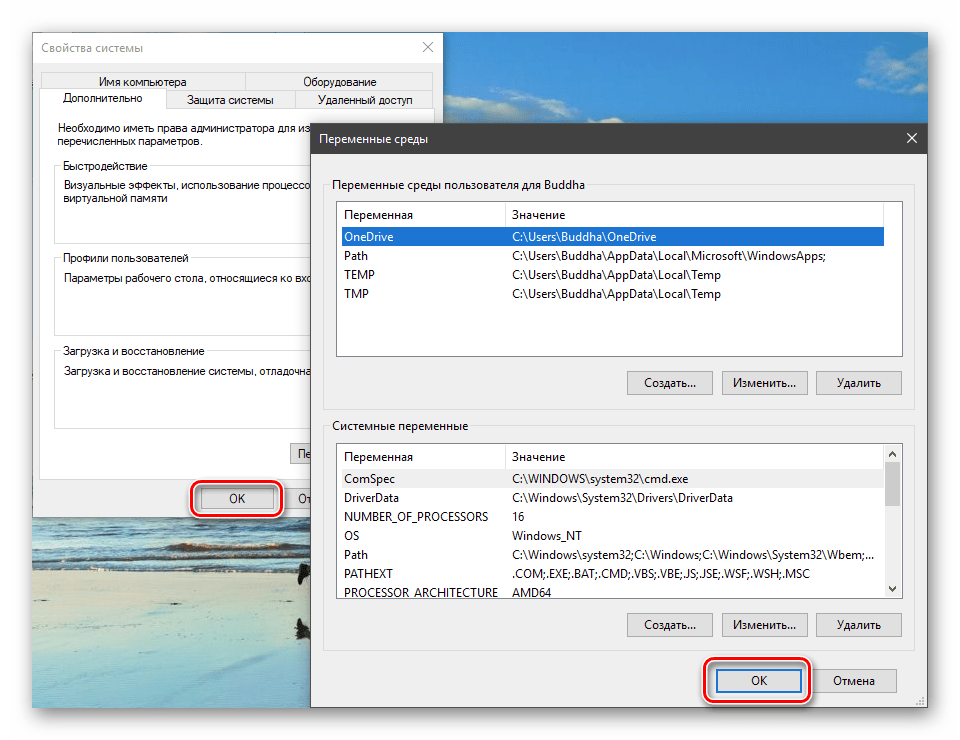
- Поместить необходимый файл в одну из указанных директорий. Полный список можно получить, выделив переменную и нажав «Изменить».

- Создать свою папку в любом месте и прописать путь к ней. Для этого (после создания директории на диске) жмем «Создать», вводим адрес и ОК.

%SYSTEMROOT% определяет путь до папки «Windows» независимо от буквы диска.
Затем нажимаем ОК в окнах «Переменные среды» и «Свойства системы».


Для применения настроек, возможно, придется перезапустить «Проводник». Сделать это быстро можно так:
Открываем «Командную строку» и пишем команду
taskkill /F /IM explorer.exe
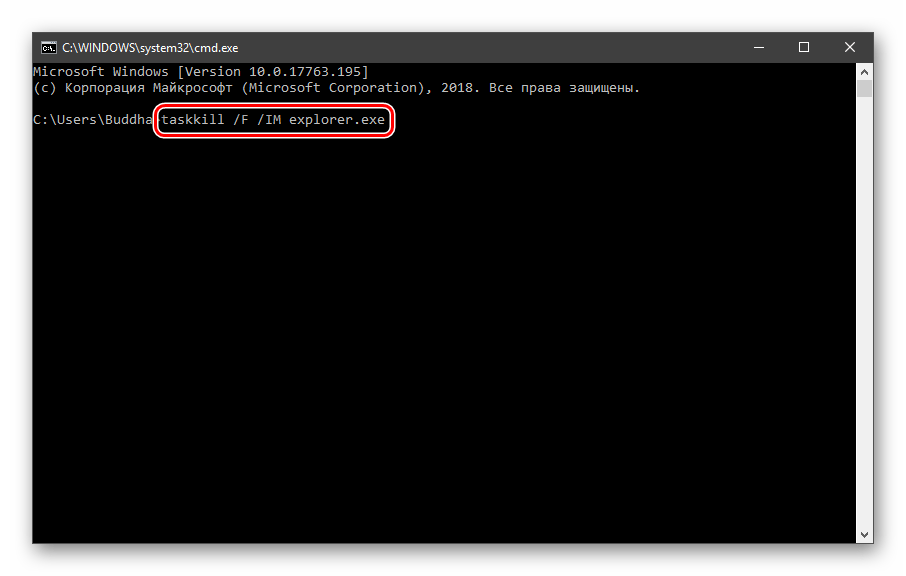
Все папки и «Панель задач» исчезнут. Далее снова запускаем «Проводник».
explorer
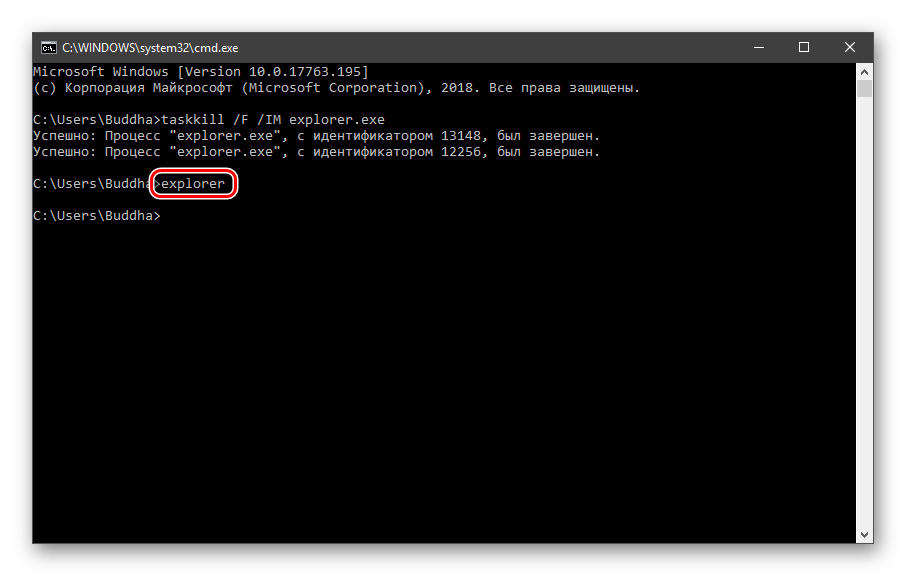
Еще один момент: если вы работали с «Командной строкой», ее также следует перезапустить, то есть консоль не будет «знать», что настройки изменились. Это же касается и фреймворков, в которых вы отлаживаете свой код. Также можно перезагрузить компьютер или выйти и снова зайти в систему.
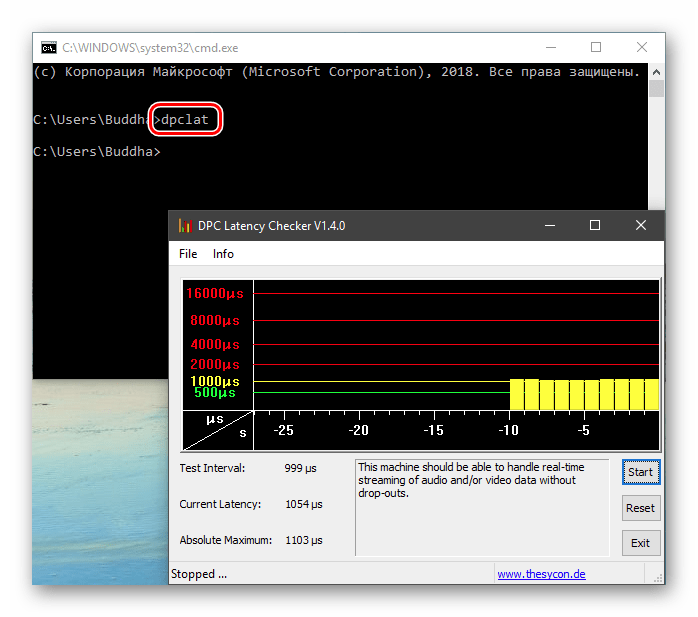
Теперь все файлы, помещенные в «C:\Script» можно будет открывать (запускать), введя только их название.
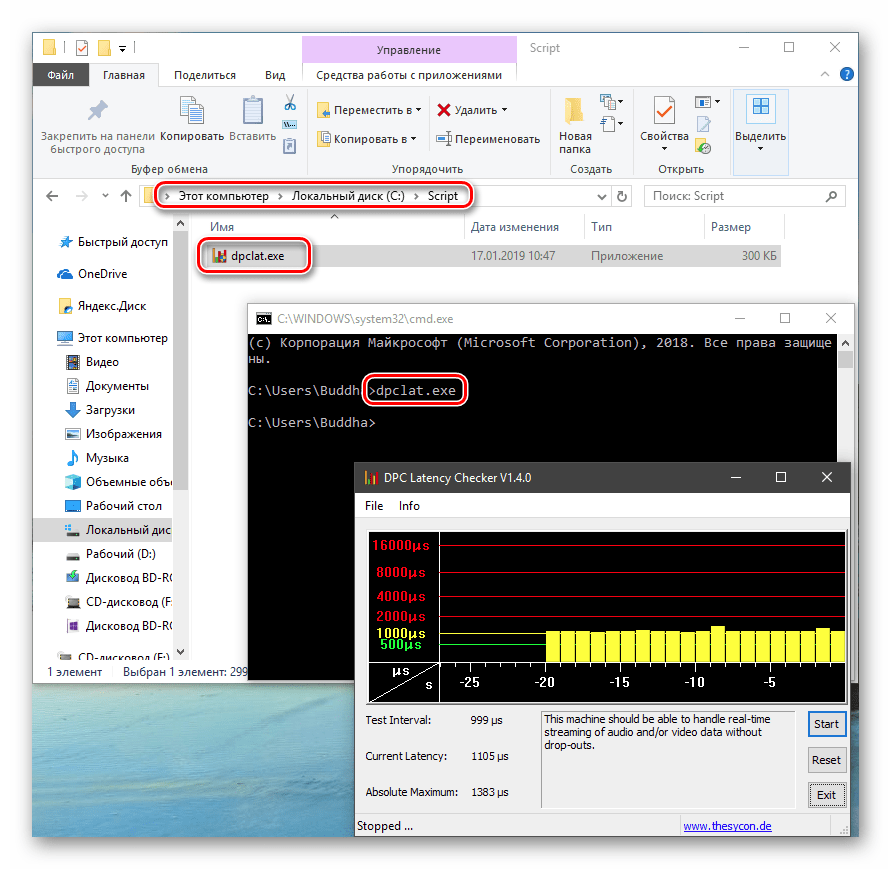
«PATHEXT», в свою очередь, дает возможность не указывать даже расширение файла, если оно прописано в ее значениях.
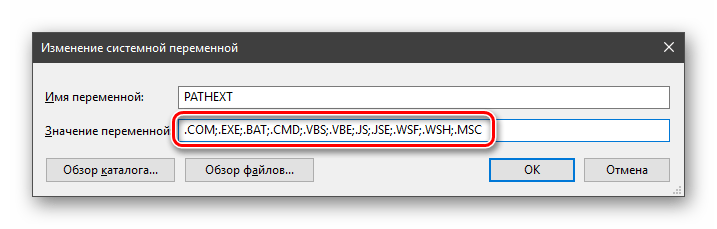
Принцип работы следующий: система перебирает расширения по очереди, пока не будет найден соответствующий объект, причем делает это в директориях, указанных в «PATH».
Создание переменных среды
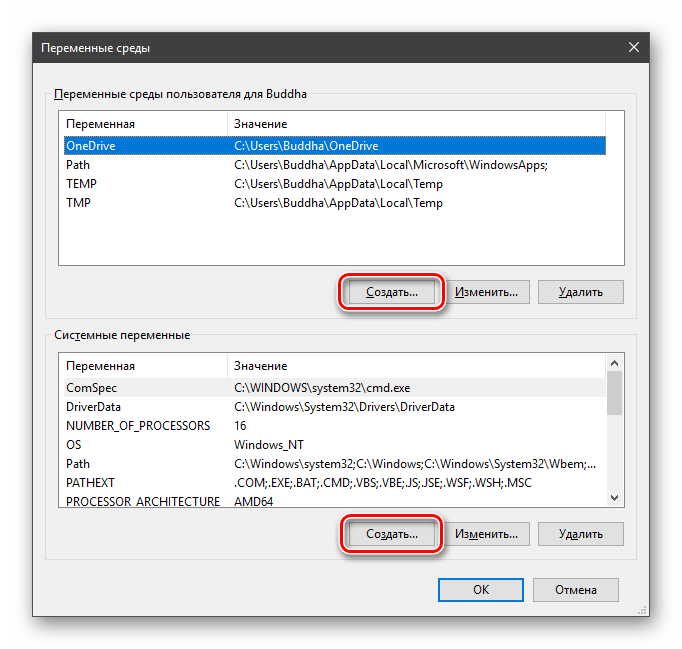
Создаются переменные просто:
- Нажимаем кнопку «Создать». Сделать это можно как в пользовательском разделе, так и в системном.

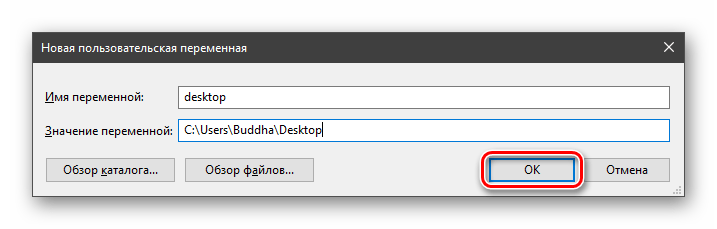
- Вводим имя, например, «desktop». Обратите внимание на то, чтобы такое название еще не было использовано (просмотрите списки).

- В поле «Значение» указываем путь до папки «Рабочий стол».
C:\Users\Имя_пользователя\Desktop
- Нажимаем ОК. Повторяем это действие во всех открытых окнах (см. выше).
- Перезапускаем «Проводник» и консоль или целиком систему.
- Готово, новая переменная создана, увидеть ее можно в соответствующем списке.


Для примера переделаем команду, которую мы использовали для получения списка (самая первая в статье). Теперь нам вместо
set > %homepath%\desktop\set.txt
потребуется ввести только
set > %desktop%\set.txt
Заключение
Использование переменных окружения позволяет значительно сэкономить время при написании скриптов или взаимодействии с системной консолью. Еще одним плюсом является оптимизация создаваемого кода. Имейте в виду, что созданные вами переменные отсутствуют на других компьютерах, и сценарии (скрипты, приложения) с их использованием работать не будут, поэтому перед тем, как передавать файлы другому пользователю, необходимо уведомить его об этом и предложить создать соответствующий элемент в своей системе.
Наша группа в TelegramПолезные советы и помощь
This post shows steps for students and new users to add or edit Windows PATH environment variables in Windows 11. Most programs will default add their custom shortcuts to Windows PATH environment variables.
Some programs will not automatically add to the System Path variables but let users edit or add to the path so that the program can function correctly.
The System PATH variable is one of the most used variables in Windows. It allows users to run any executable located inside the paths without giving the full path to the executable or directories to locate.
Users must search for and locate each executable without environment variables or provide full paths and directories of important program files. Environment variables create shortcuts to executables within those paths specified.
Below is how one can add or edit Windows PATH environment variables so they can run executables from their custom directories.
How to set path and environment variables in Windows 11
As mentioned, PATH and environment variables create shortcuts to executables and directories. It allows custom programs to be launched and used efficiently in Windows.
Administrator privileges are required to modify the path and environment variables. Below is how to add or edit Windows PATH and environment variables in Windows 11.
First, go to the Windows Settings app. To get to the Settings app, you can use the Windows key + I shortcut or click on Start ==> Settings, as shown in the image below:

Alternatively, you can use the search box on the taskbar and search for Settings. Then select to open it.
Windows Settings pane should look similar to the image below. In Windows Settings, click System, and select the About tile on the right pane of your screen, as shown in the image below.

Click the Advanced system settings link on the About screen, as highlighted below.

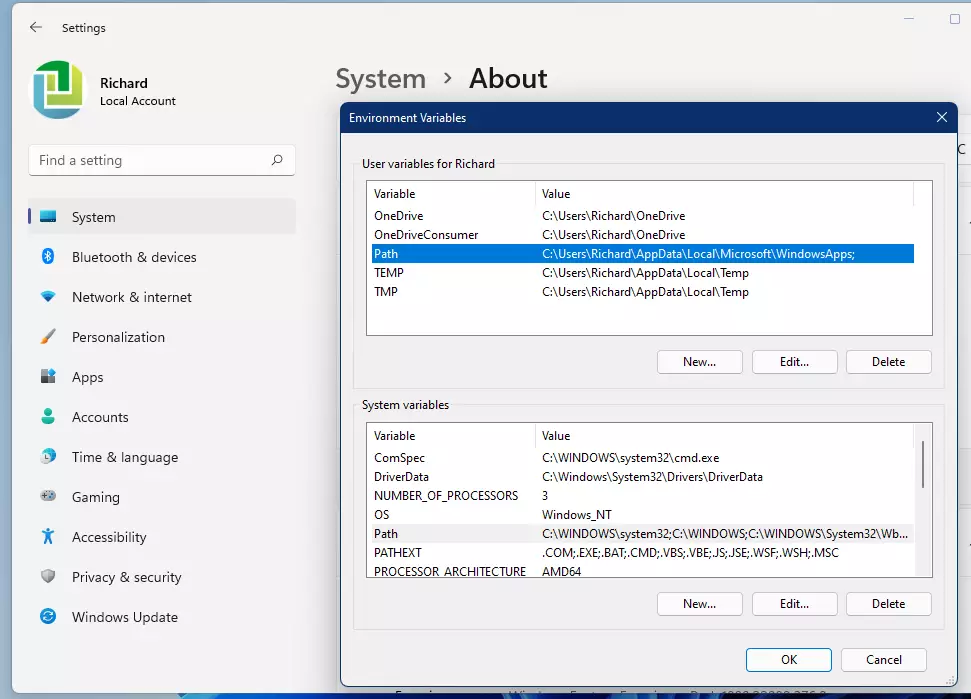
In the System Properties window, click the Advanced tab, then click the Environment Variables button near the bottom of that tab.

You’ll typically want to add to the System variables so everyone on the System can use it. If you use the User variable, only a user who adds it may use it.
Highlight the Path variable in the System variables section and click the Edit button.
Next, add or modify the path lines with the paths you want the computer to access. Each directory path is separated with a semicolon, as shown below.
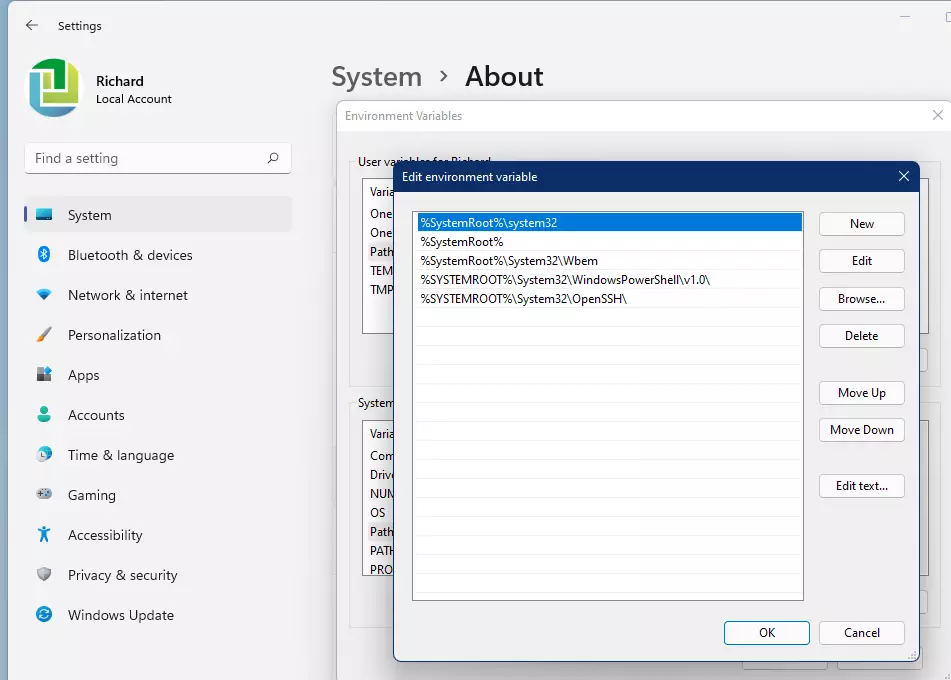
You can click the New button to add new paths or edit to modify the existing path. Delete will delete a path.
If you know the path, simply type it in or copy and paste it. You can also click Browse and navigate to the desired path you want to include in the System path variables.
Each directory path is separated with a semicolon, as shown below.
C:\Program Files;C:\Winnt;C:\Winnt\System32
That should do it.
Conclusion:
- Customizing the Windows PATH environment variables is essential for running programs seamlessly.
- Following the outlined steps, users can efficiently add or edit the PATH variables in Windows 11.
- Ensuring proper PATH configuration can save time and streamline the execution of various applications.
- Remember to use administrator privileges when making changes to system-wide variables.
- Regularly review and update your PATH variables to maintain optimal system performance.