
-
Home
-
News
- How to Check Motherboard Model in Windows 11? (4 Ways)
How to Check Motherboard Model in Windows 11? (4 Ways)
By Vera | Follow |
Last Updated
Knowing the information about your computer components is very important. A motherboard is a base from which all the components start. It is very important to check the motherboard model. How to tell what motherboard I have? If you ask this question, see this post and MiniTool gives four useful methods in this post.
A motherboard is one of the crucial components of your desktop or laptop and it is the heart of the computer. Many components are included in the motherboard, including RAM, CPU, graphics card, hard drive, and more.
If you want to replace the hardware on your motherboard, you first should make sure the new hardware is compatible with the motherboard. To do this thing, you must know what motherboard you have. In a word, figuring out the motherboard model is very important to update hardware devices and know the compatibility.
Well then, is it possible to see the motherboard details without opening the PC’s case? Of course, you can do that thing. Follow the four ways below to easily check the motherboard model in Windows 11.
Tip: What motherboard do I have? If you are running a Windows 10 PC, follow the methods in this post – How to Find Your PC Motherboard Model and Serial Number.
How to Find Motherboard Model in Windows 11
Four ways will be introduced here – CMD, system information, Windows PowerShell, and a professional motherboard check tool. Now, let’s go to see them one by one.
How to Check Motherboard Model Windows 11 CMD
Using Command Prompt (CMD) to see what motherboard you have is a straightforward way and here are the steps.
Step 1: Click the search button, type command prompt, and right-click this tool to choose Run as administrator.
Step 2: In the CMD window, type wmic baseboard get product,manufacturer,version,serialnumber, and press Enter. Then, you can see some details of your motherboard.

How to Check Motherboard Model Windows 11 – System Information
To find your motherboard model in Windows 11, you can check the system information.
Step 1: Press Win + R to get the Run dialog, type in msinfo32, and click OK to open the System Information window.
Step 2: In the pop-up window, go to find the items regarding Baseboard, including Baseboard Manufacturer, Baseboard Product, and Baseboard Version.

How to Find Your Motherboard Windows 11 – PowerShell
To check your motherboard model in Windows 11, you can run Windows PowerShell.
Step 1: Type powershell to the search box, right-click Windows PowerShell, and choose Run as administrator.
Step 2: Type in the command – Get-WmiObject win32_baseboard | Format-List Product,Manufacturer,SerialNumber,Version and press Enter.
How to Check Motherboard Model Windows 11 via a Motherboard Check Tool
In addition to finding your motherboard model via Windows built-in tools, you can do the thing using a motherboard check tool. On the Internet, many excellent tools are worthy of recommending, for instance, CPU-Z, HWiNFO, etc.
Just download one online and then launch it on your Windows 11 PC to perform a check for the motherboard information.
Tip: Some manufacturers have released motherboards for Windows 11. You can refer to this post – Windows 11 Motherboard List – Asus, MSI, Gigabyte, and ASRock to know some compatible motherboards.
Final Words
That’s all the information about how to find motherboard model in Windows 11. If you have a need, follow one way to check the motherboard model. If you have any suggestions, let us know by leaving a comment below.
About The Author
Position: Columnist
Vera is an editor of the MiniTool Team since 2016 who has more than 7 years’ writing experiences in the field of technical articles. Her articles mainly focus on disk & partition management, PC data recovery, video conversion, as well as PC backup & restore, helping users to solve some errors and issues when using their computers. In her spare times, she likes shopping, playing games and reading some articles.

This tutorial will show you how to find the manufacturer, model, serial number, and version details of the motherboard in Windows 10 and Windows 11.
A motherboard is the main printed circuit board (PCB) used to connect all the parts of a computer together. The CPU, memory, hard drives, and other ports and expansion cards all connect to the motherboard directly or via cables.
You need to know the brand (manufacturer) and model (product) of the motherboard to look up its specs for which components it supports.
Knowing the motherboard version number can be helpful when looking for BIOS firmware updates from the manufacturer’s support site.
The motherboard serial number allows the manufacturer to identify a product and get additional information about it, for registration, replacement, or as a means of finding compatible parts.
You could open the computer case and read the brand, model, and serial number directly from the motherboard, but it can often be much easier to get this information from within Windows instead.
Windows gets the motherboard details from BIOS/UEFI. If this information is not included on the BIOS/UEFI chip, then it will not be available in the options below.
Contents
- Option One: Find Motherboard Details in System Information
- Option Two: Find Motherboard Details using WMIC Command
- Option Three: Find Motherboard Details using Get-WmiObject Command
- Option Four: Find Motherboard Details using Get-CimInstance Command
Option One
Find Motherboard Details in System Information
1 Open System Information (msinfo32.exe).
2 In System Summary, you will see the Baseboard details on your computer. (see screenshot below)

Option Two
Find Motherboard Details using WMIC Command
1 Open Windows Terminal, and select Command Prompt.
2 Copy and paste the command below into Windows Terminal, and press Enter. (see screenshot below)
wmic baseboard get product, manufacturer, serialnumber, version

Add or Remove WMIC command Feature in Windows 11
This tutorial will show you how to add or remove the WMIC command as an optional feature for all users in Windows 11. The WMI command-line (WMIC) utility provides a command-line interface for Windows Management Instrumentation (WMI). WMIC is compatible with existing shells and utility commands…
www.elevenforum.com
3 You will now see the motherboard details for your computer.

Option Three
Find Motherboard Details using Get-WmiObject Command
1 Open Windows Terminal, and select Windows PowerShell.
2 Copy and paste the command below into Windows Terminal, and press Enter. (see screenshot below)
Get-WmiObject win32_baseboard | Format-List Product,Manufacturer,SerialNumber,Version
3 You will now see the motherboard details for your computer.

Option Four
Find Motherboard Details using Get-CimInstance Command
1 Open Windows Terminal, and select Windows PowerShell.
2 Copy and paste the command below into Windows Terminal, and press Enter. (see screenshot below)
Get-CimInstance -ClassName Win32_baseboard
3 You will now see the motherboard details for your computer.

That’s it,
Shawn Brink

It’s always good to be familiar with your motherboard’s hardware, whether it’s to find its model number, update drivers, check compatibility for upgrades, or just to sate your curiosity.
As many with OEM laptops and PCs would know, things are not always as straightforward as checking the motherboard’s box. But there are simpler ways to gain access to your motherboard’s details than trying to unscrew the case to check the motherboard itself.
Here are three ways to find what motherboard your Windows computer harbors.
Method 1: Check the Motherboard Brand and Model from the ‘System Information’
The native method is to check the System Information app in Windows. Here’s how to do so:
- Press Start, type ‘System information’, and run the app.
- Alternatively, press
Win+Rto open the RUN box, type in msinfo32, and hit Enter.
- In the System Information app, you’ll find your Baseboard manufacturer details. These will be in the System Summary section.


Method 2: Using the Command Prompt
- Press Start, type in cmd, and click on Run as administrator.
- Once inside cmd, type in
wmic baseboard getand hit Enter. This will display an array of baseboard modules whose details you can check.
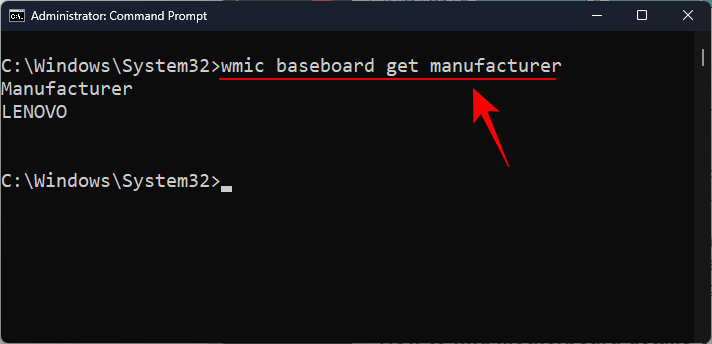
- The results can be a bit scattered but take note of the module whose details you want to find and type it in after the wmic baseboard command line (wmic baseboard get). For instance, if you want to get your motherboard’s manufacturer details only, type in
wmic baseboard get manufacturer
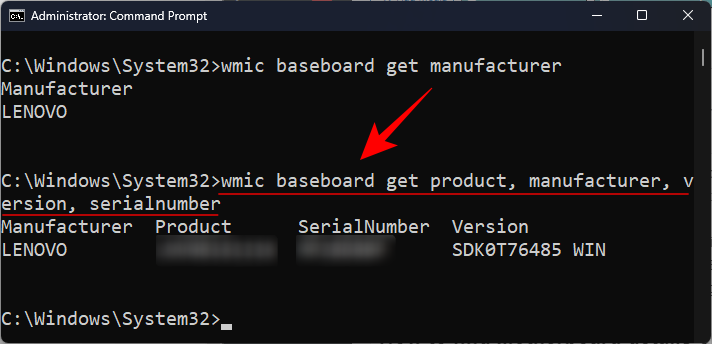
- The important motherboard details include the manufacturer, product, version, serialnumber. You can find these important motherboard details by typing the exact command line as given below and hitting enter:
wmic baseboard get product, manufacturer, version, serialnumber

Method 3: Using PowerShell
- Press Start, type powershell, and click on Run as administrator.
- Now type the following command and hit Enter:
Get-CimInstance -ClassName Win32_baseboard
Your motherboard’s information will be shown to you as above.

Method 4: Check Motherboard Info with a Third-Party Software
There are a bunch of free third-party apps and software that pull your motherboard’s hardware specs and display them under a single roof. One of them is CPU-Z, easily the best in the business that you can download here.
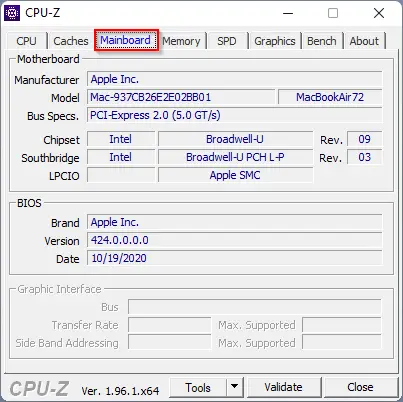
Once you’ve downloaded and installed CPU-Z on your computer, open it up. All the details regarding your motherboard will be displayed under the Mainboard tab.

And just like that, you have access to all the information regarding your motherboard.
Why are the Serial Number and Version Number sections blank?
There may be instances when you see just a blank space or a ‘To be filled by OEM later’ for the Serial Number and Version Number modules. This could mean one of two things: either your manufacturer didn’t fill in the hardware details, or you’re trying to use your OEM-manufactured motherboard on a different system. As such, Windows won’t be able to identify the hardware information when the serial number and/or version number command lines are run.
We hope this guide helped you find the details of your PC’s motherboard.
Read Next
Subscribe to Newsletter
Join me on this exciting journey as we explore the boundless world of web design together.
How do I find the details of the Motherboard on a Windows 10/11 PC? If your PC is not working well and you need to buy a component for your computer and laptop, you will prefer to check if it’s compatible. Once you know the motherboard model of your PC, you can assure that the component you are going to purchase will work with your PC or not. For instance, if you are planning to buy a PCIe card and want to ensure that the motherboard has it, you need the exact model of your motherboard.
Those Windows PC users running Windows 11/10 can check the motherboard details using a few methods, like Command Prompt, System Information, CPU-Z, HWiNFO, and the motherboard manual. Every motherboard will have its own manual, so we will not write in detail about it. However, we will concentrate on other methods, such as Command Prompt, System Information, CPU-Z, and HWiNFO.
How to Check the Details of Motherboard on Windows 10/11 PC using Command Prompt?
This is the easiest method to check motherboard details on Windows 11/10 PC if your PC is working. Using Command Prompt, you can quickly check the motherboard details of your computer or laptop, which means there is no need to use third-party software.
Step 1. Press and hold the Windows logo key, and then press the R key from the keyboard to open the Run command box.
Step 2. In the Run box, type the following and then hit Enter from the keyboard to open the command prompt window:-
CMD
Step 3. In the Command Prompt that appears, copy and paste the following command, and then press Enter from the keyboard:-
wmic baseboard get product,Manufacturer,version,serialnumber
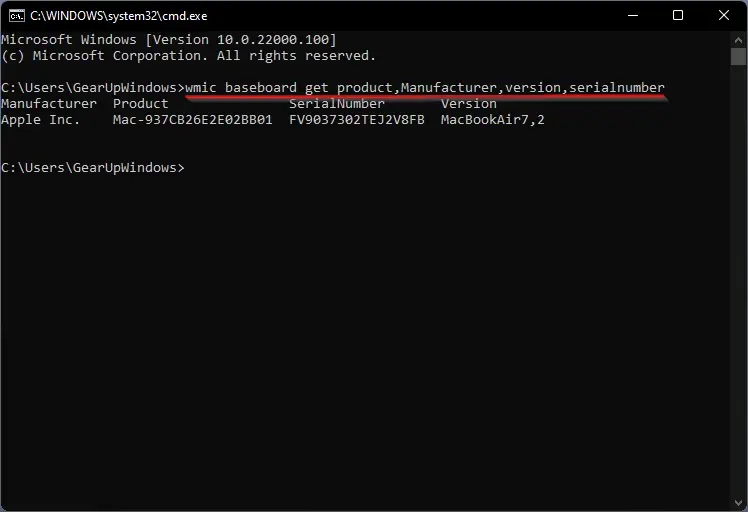
Once you complete the above steps, you will see the manufacturer, product, serial number, and version.
How to See the Details of the Motherboard on a Windows 10/11 PC via System Information?
To see the details of the motherboard on a Windows 11 or 10 PC using the System Information tool, use these steps:-
Step 1. Press and hold the Windows logo key, and then press the R key from the keyboard to open the Run command box.
Step 2. In the Run box, type the following and then hit Enter from the keyboard to open the command prompt window:-
msinfo32
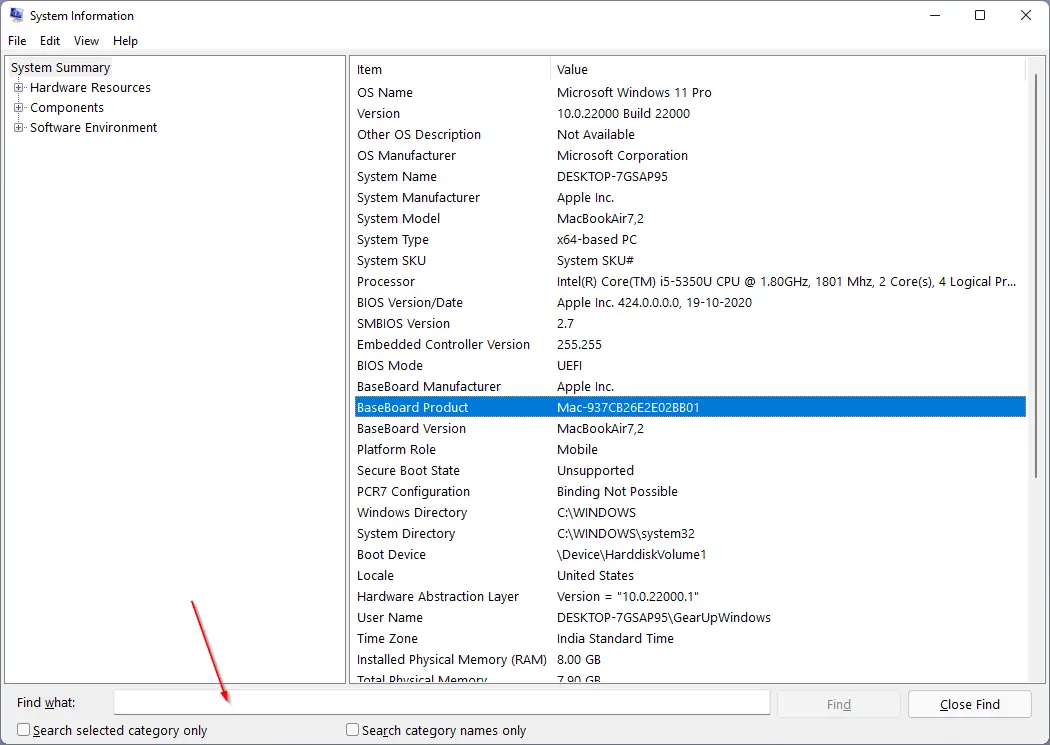
Step 3. After executing the above steps, the System Information window will open. Here, you can find information including Baseboard Product, Baseboard Version, Manufacturer, and so on. It also includes a search at the bottom of the application to type and search the required information.
How to Find the Details of the Motherboard on a Windows 10/11 PC using CPU-Z?
CPU-Z is a free and popular application to find several details of your PC. You can use this tool to check the motherboard details of your computer or laptop. To see the details of the motherboard, download and install CPU-Z from its official website. Once installed, double-click on its icon on the desktop to launch this software. Now, navigate to the Mainboard tab to see the required details.
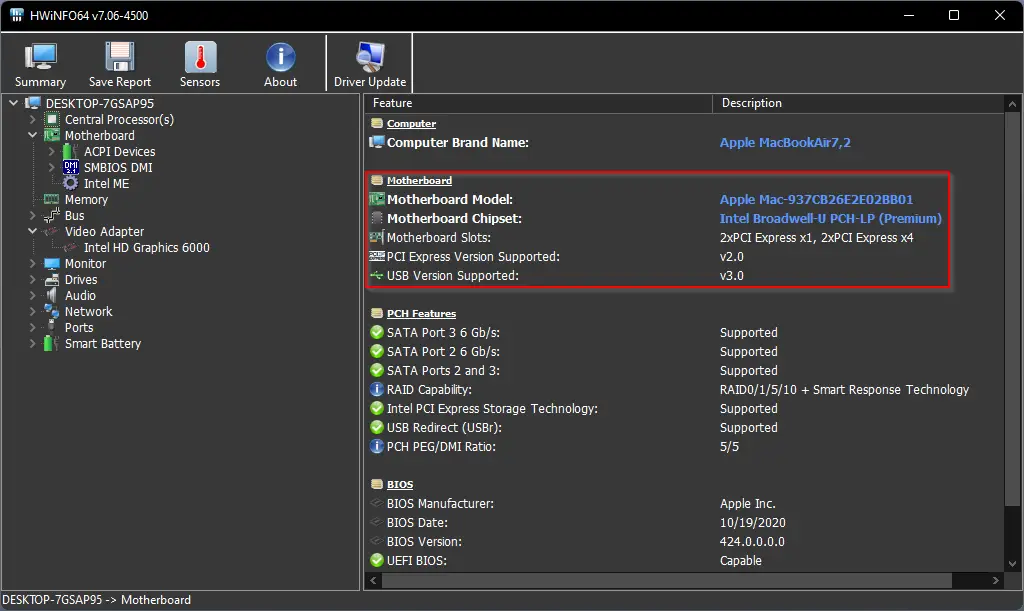
How to Check out the Details of the Motherboard on a Windows 10/11 PC using HWiNFO?
HWiNFO is another freeware tool that you can use to find several details about your PC, including the motherboard. It is also available in a portable version, which means there is no need to install it on your computer or laptop. Just download it from its official website to see the required details.
How to View the Details of Motherboard on Windows 10/11 PC through Windows PowerShell?
To view the details of the motherboard on a Windows 11 or 10 computer using Windows PowerShell, do these steps:-
Step 1. Open Windows PowerShell.
Step 2. Now, copy and paste either command on PowerShell and then hit Enter from the keyboard:-
Get-WmiObject win32_baseboard | Format-List Product,Manufacturer,SerialNumber,Version
gwmi win32_baseboard | FL Product,Manufacturer,SerialNumber,Version
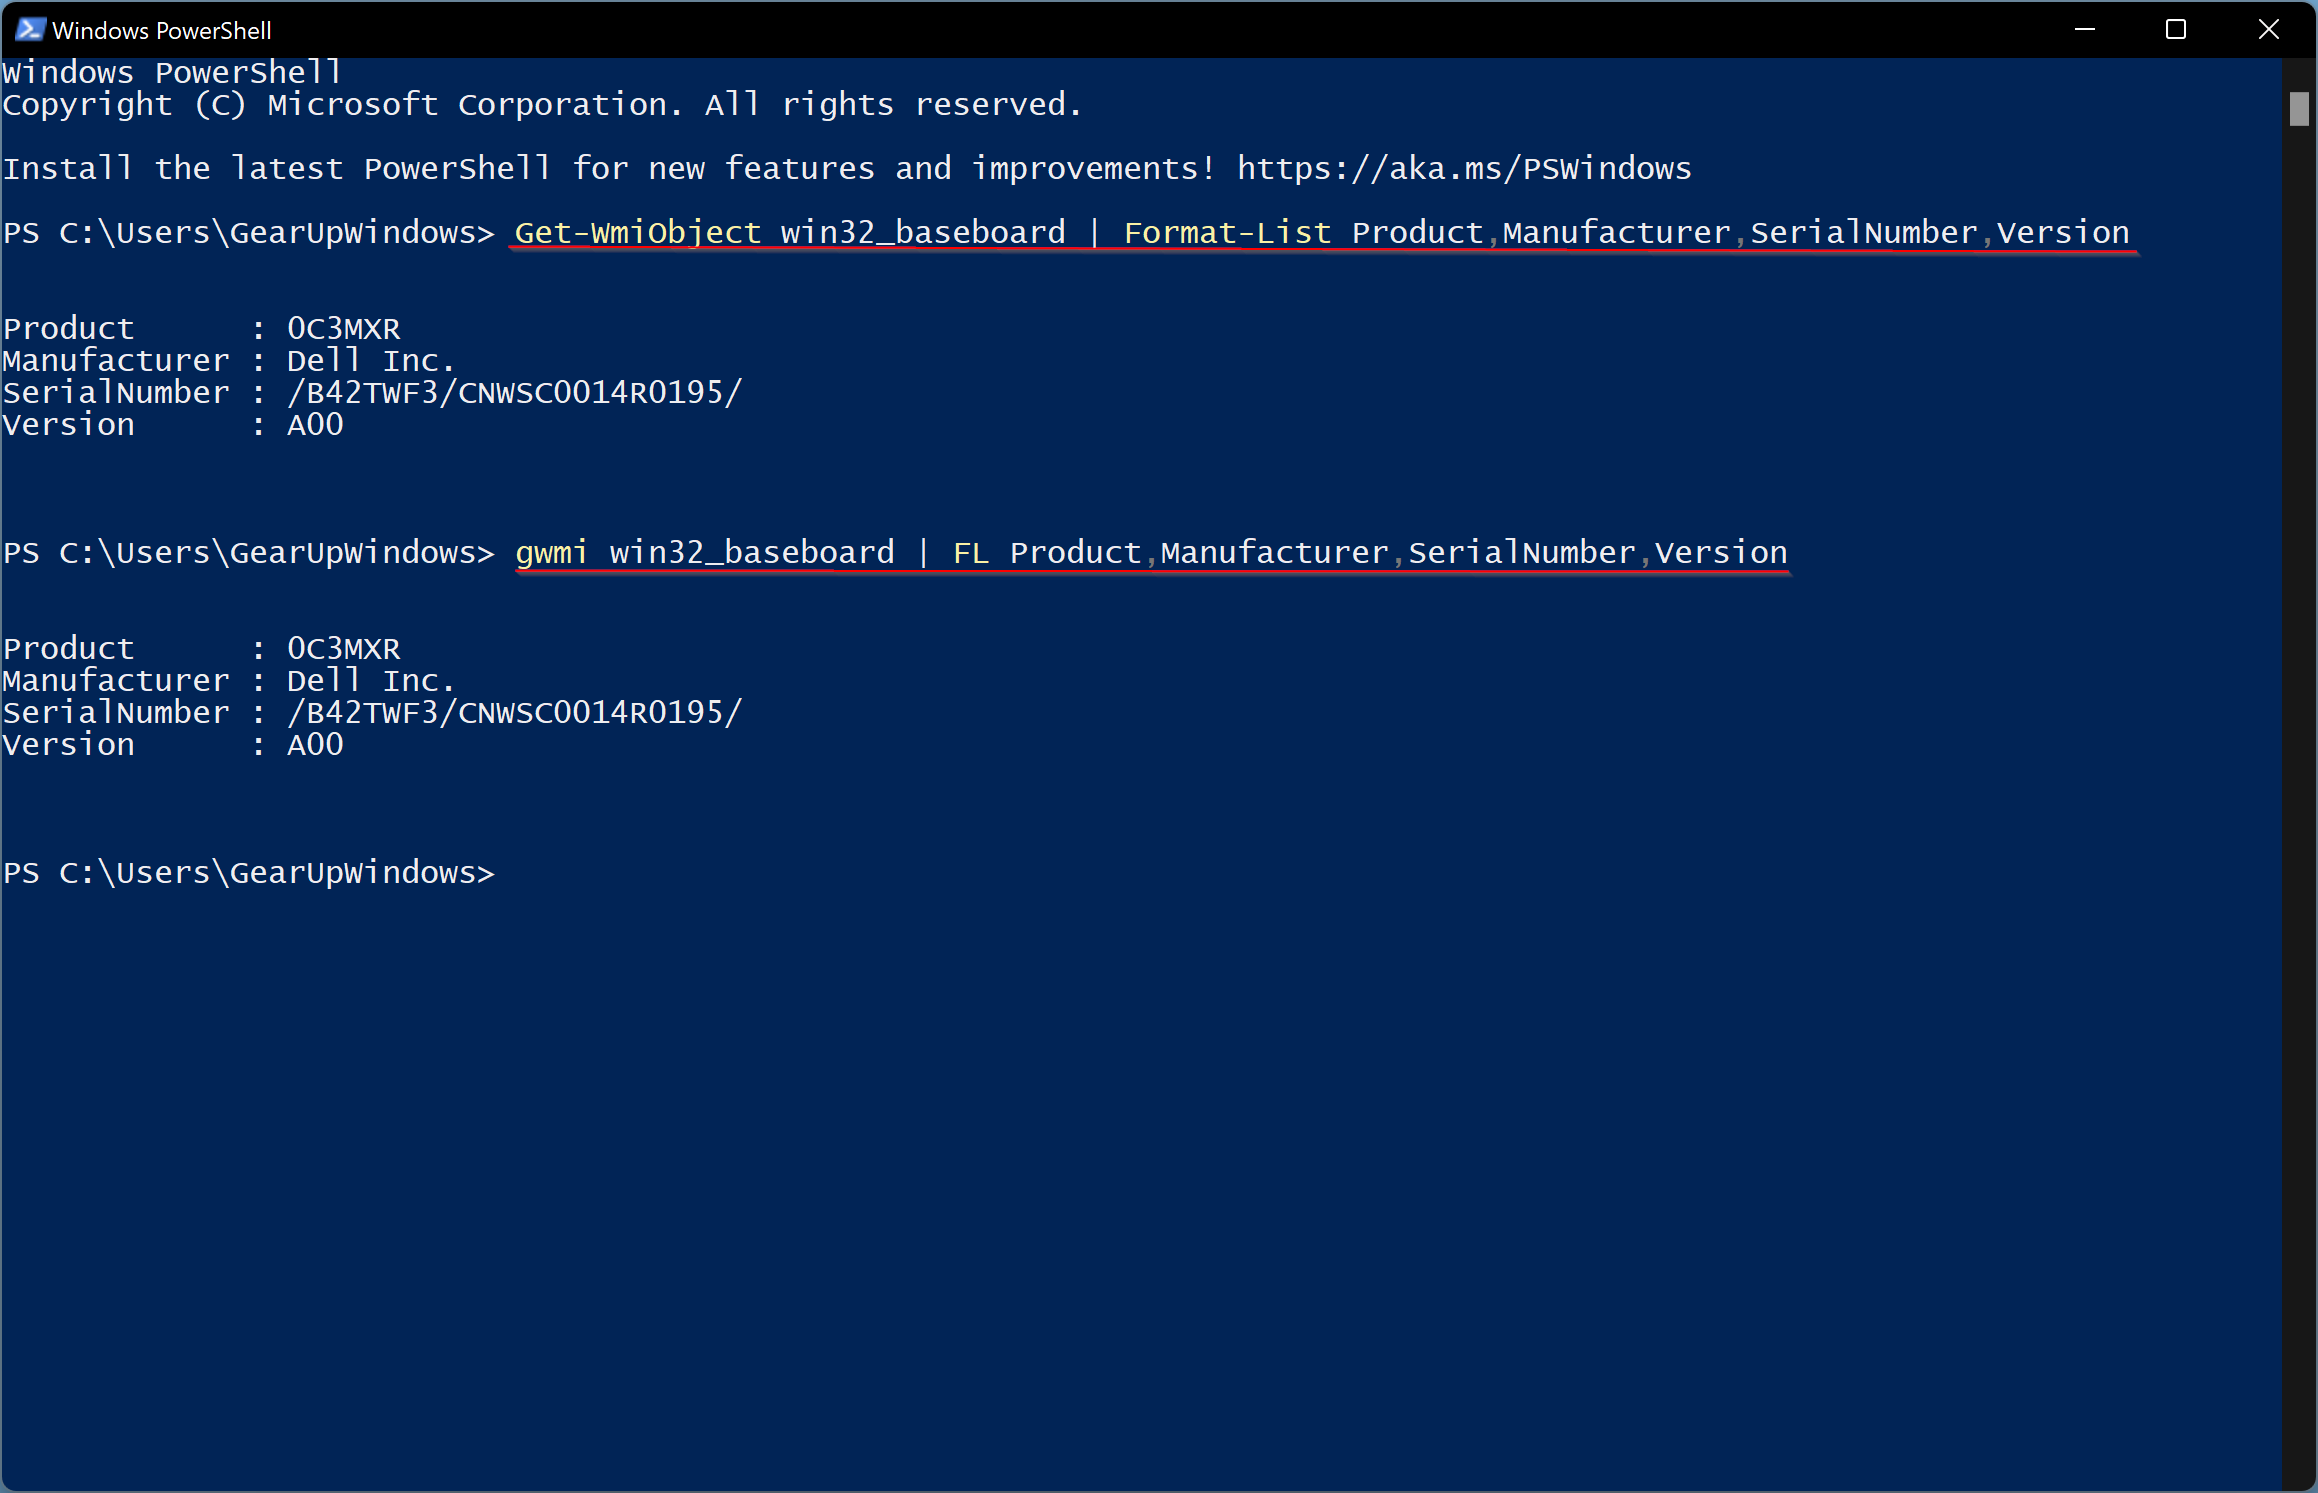
After executing the above command, you will find the motherboard’s basic details, including Serial Number, Model, or its current version.
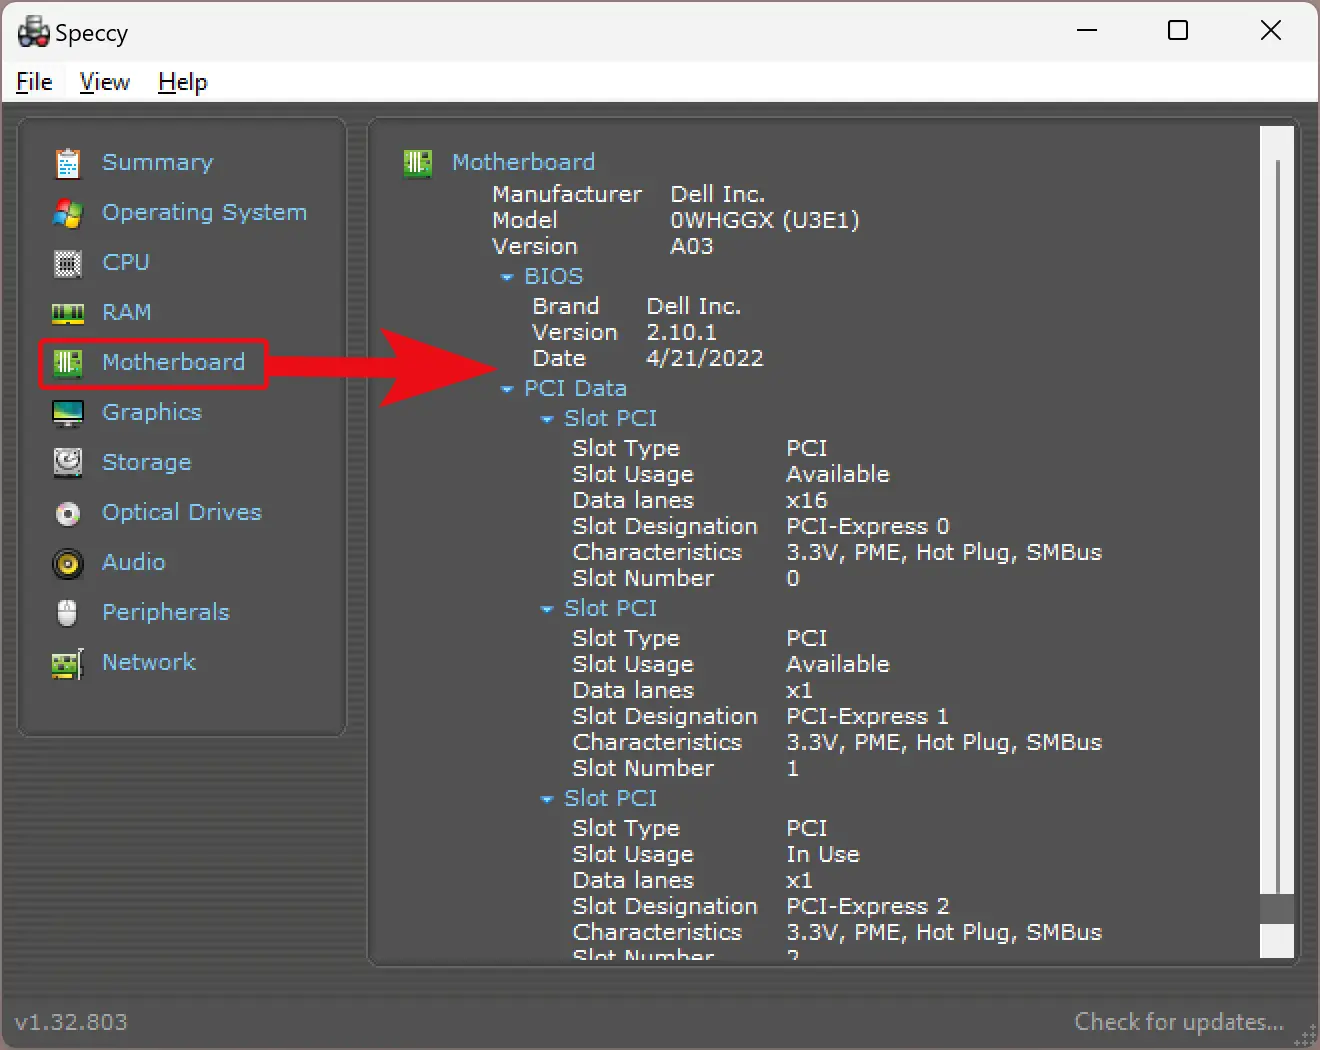
How to View the Details of Motherboard on Windows 10/11 PC through Speccy?
Speccy is another freeware tool that lets you view detailed information about your motherboard on Windows 11 and 10 PC. Just run the software and select the Motherboard tab in the left sidebar. On the right sidebar, you can find detailed information about your motherboard, including manufacturer, model, version, BIOS, PCI slots, etc.
Conclusion
In conclusion, checking the motherboard details of your Windows 10/11 PC is essential when upgrading or replacing components. You can use various methods such as Command Prompt, System Information, CPU-Z, HWiNFO, and Speccy to check the motherboard details. Each method has its advantages and disadvantages. Still, they all provide the necessary information, including the manufacturer, product, serial number, and version. By using these methods, you can quickly determine if a component is compatible with your PC or not. Therefore, it is recommended to check the motherboard details before purchasing any component for your Windows 10/11 PC.
Если вы покупали компьютер в сборке, то, наверное, и не имеете представления, на какой материнской плате он собран. Но вот возникла необходимость залезть внутрь «компа» для его обновления или переустановки драйвера, и эта информация сразу становится жизненно необходима. Рассказываем о нескольких способах, как узнать какая материнская плата используется в компьютере.
Содержание
- Встроенные средства операционной системы
- Используем сторонние утилиты
- Как узнать материнскую плату на ноутбуке
- Как узнать БИОС материнской платы
- Итоги
Встроенные средства операционной системы
К счастью, для того, чтобы узнать модель системной платы, вам даже не требуется скачивать для этого какое-то стороннее программное обеспечение. Все необходимые функции имеются в самой операционной системе.
Узнаем модель материнской платы через командную строку
- Нажмите сочетание клавиш Win+R, введите команду cmd и нажмите Enter.
- В появившемся окне введите команду wmic baseboard get product, manufacturer, version, serialnumber и нажмите Enter.
Эта команда выведет на экран не только модель и версию материнской платы, но и ее серийный номер. Как вы видите, в нашем случае используется плата ROG STRIX Z490-A GAMING от компании ASUS.
- Читайте нас там, где вам удобно: 🔹 Телеграм 🔹 Дзен 🔹 Вконтакте
Кстати, с помощью командной строки можно узнать и более подробную информацию о системе. Для этого используйте команду systeminfo. Особенно она актуальна для владельцев ноутбуков, которые смогут увидеть производителя и точную модель используемого ими устройства. Просто найдите поля «Изготовитель системы» и «Модель системы», и вы все узнаете.
Узнаем модель материнской платы через интерфейс Windows
Если вы не хотите работать с командной строкой, есть и не менее простой способ, как узнать свою материнскую плату на Windows через интерфейс системы. Для этого достаточно всего лишь нажать сочетание клавиш Win+R, ввести команду msinfo32 и нажать Enter.
Перед вами появится окно сведений о системе, где собрана вся важная информация о характеристиках компьютера. Ну а нужную нам информацию можно увидеть в строке «Модель основной платы».
Если же вам требуется узнать модель вашего ноутбука, ее можно увидеть, например, в средствах диагностики DxDiag. Для запуска утилиты нажмите сочетание клавиш Win+R, введите команду dxdiag и нажмите Enter.
После этого откроется встроенный в Windows системный модуль диагностики DirectX. Обратите внимание на поля «Изготовитель компьютера» и «Модель компьютера». Нужная информация находится именно здесь.
Используем сторонние утилиты
Если вы по какой-то причине не хотите использовать встроенные средства Windows, на рынке имеется немало сторонних программ, позволяющих узнать модель установленной в компьютере материнской платы. Причем подавляющее большинство из них бесплатны для простых пользователей.
Speccy
Ярким примером этому стала отличная утилита от создателей CCleaner — Piriform Speccy. Установив ее, вы сможете узнать всю информацию о комплектующих вашего компьютера или ноутбука, а также о их текущем состоянии. Например, вы легко сможете мониторить температуру процессора, что особенно пригодится при его разгоне или запуске «тяжелых» программ. Умеет программа и определять модель материнской платы компьютера.
В разделе Motherboard вы можете получить всю информацию о материнской плате. Причем мы говорим не только ее модели, но и о чипсете, BIOS, слотах PCI-Express и других деталях, необходимых для апгрейда компьютера.
CPU-Z
Бесплатная утилита CPU-Z очень популярна для получения таких данных о процессоре, как частота, температура, и так далее. Но она поддерживает сбор данных и о других комплектующих, например, о материнской плате. А найти эту информацию можно на вкладке Mainboard.
Более того, с помощью программы можно не только узнать, какая у вас материнская плата, но и посмотреть версию BIOS / UEFI, а также проверить наличие обновлений драйверов чипсета. Поможет она и тем, кто хочет увеличить объем оперативной памяти компьютера, но не уверен, есть ли у него свободные слоты. Конечно, в этом случае мы рекомендуем разобрать системный блок и увидеть все своими глазами, но вы можете воспользоваться и CPU-Z: информацию об установленных планках оперативки и свободных слотах можно найти на вкладке SPD утилиты.
System Spec
Еще одна старая, но все еще полезная и бесплатная информационная утилита — System Spec. Она также позволяет узнать обо всех комплектующих компьютера. Посмотреть же модель установленной у вас материнской платы можно в поле Motherboard.
Но учтите, что здесь есть своя специфика. Утилита требует запуска от имени администратора, иначе она не сможет показать все данные о системе. Впрочем, модель материнской платы вы сможете увидеть и без этих ухищрений.
HWInfo32 Portable
Эта утилита примечательна отсутствием необходимости установки. Просто скачайте архив с программой на компьютер и запустите нужный файл — для 32-битной или 64-битной платформы.
Информация о материнской плате доступна в дереве объектов в разделе Motherboard. Ну а помимо этого утилита поможет узнать и массу другой информации о комплектующих вашего компьютера, которая точно пригодится при его обновлении.
Как узнать материнскую плату на ноутбуке
Собственно, все вышеописанные способы подходят как для настольных ПК, так и для ноутбуков. Но у последних есть и еще один куда более простой и очевидный способ узнать модель используемой в нем материнской платы.
Дело в том, что на нижней крышке любого лэптопа есть стикер с указанием его точной модели. Ну а дальше останется лишь зайти на сайт производителя, вбить в поиске название ноутбука и посмотреть его официальную конфигурацию, где помимо прочего почти наверняка будет указана и используемая в нем системная плата.
Как узнать БИОС материнской платы
В некоторых случаях бывает важно узнать не столько модель используемой в компьютере системной платы, сколько версию ее BIOS / UEFI. Это пригодится, например, если вы хотите обновить процессор компьютера на более современный, но не уверены, обновлен ли BIOS для его поддержки. Ведь, если это не так, вам придется проводить обновление BIOS прямо во время апгрейда, а это намного сложнее, чем если бы вы позаботились о решении проблемы заранее.
К счастью, узнать версию BIOS / UEFI также можно с помощью встроенных средств Windows. Для этого просто нажмите сочетание клавиш Win+R и выполните уже знакомую нам команду msinfo32 для открытия сведений о системе. Ну а дальше останется найти строку «Версия BIOS», где и находится нужная информация.
Если же вам больше по душе работа с командной строкой, версию BIOS / UEFI можно узнать и с ее помощью.
- Нажмите сочетание клавиш Win+R, введите команду cmd и нажмите Enter.
- В открывшейся командной строке наберите wmic bios get smbiosbiosversion и нажмите ввод.
Как вы видите из результатов выполнения команды, наша системная плата использует BIOS версии 0226. Эта же информация показана и в окне сведений о системе.
Итоги
Мы разобрали сразу несколько простых способов, как можно узнать модель материнской платы, среди которых есть и работа через cmd, и через графический интерфейс Windows, и даже через сторонние утилиты.
Надеемся, что эти доступные и совершенно бесплатные способы узнать, какая материнская плата установлена в компьютере помогут вам лучше разобраться в устройстве компьютера и принципах его обновления. Кроме встроенных в Windows способов, CHIP рекомендует утилиту CPU-Z — нам она показалась наиболее интересной и удобной для анализа комплектующих конкретного ПК.
Читайте также
- Выбираем материнскую плату для компьютера: лучшие модели в 2022 году
- Как выбрать материнскую плату для домашнего, офисного, игрового компьютера?
- Лучшая материнская плата для i5: от бюджетных до топовых