
Все способы:
- Способ 1: «Командная строка»
- Способ 2: «Windows PowerShell»
- Способ 3: Фирменное программное обеспечение
- Вопросы и ответы: 3
Важно! В этой статье речь будет идти о просмотре серийного номера компьютера средствами операционной системы Windows 10, что не предполагает такие методы, как просмотр надписи на наклейке устройства и поиск информации в BIOS. Поэтому, в случае необходимости, рекомендуем обратиться за помощью к другой статье на нашем сайте. Несмотря на то, что в ней речь идет о ноутбуке, перечисленные способы в большинстве своем будут полезны и для владельцев стационарных компьютеров.
Подробнее: Как узнать серийный номер ноутбука
Способ 1: «Командная строка»
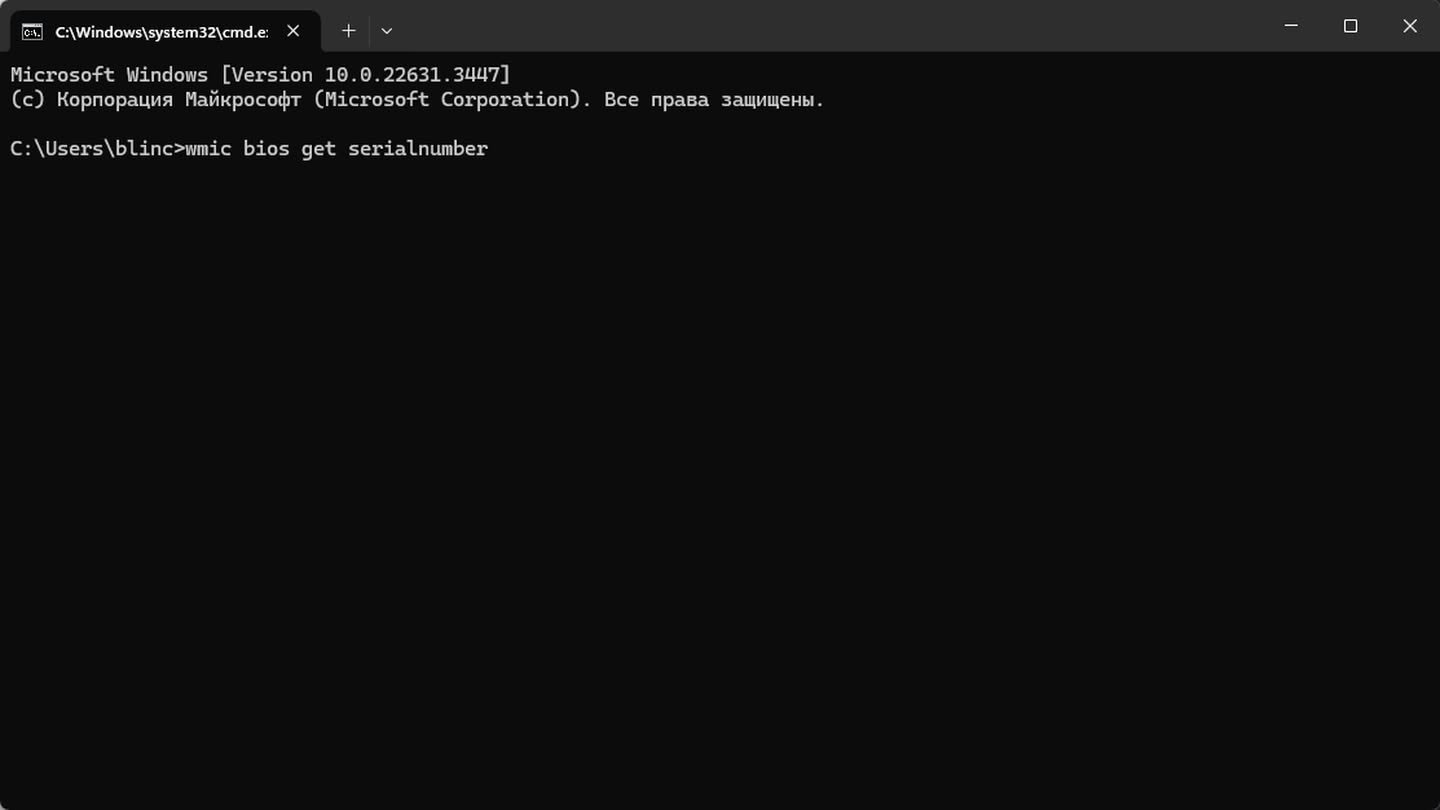
Наиболее распространенный способ просмотра серийного номера устройства — выполнение специального запроса в «Командной строке» операционной системы. Первостепенно необходимо будет запустить саму консоль. Сделать это можно многими способами, например, выполнив поиск по системе. Для этого установите курсор в поисковую строку на панели задач и введите запрос «Командная строка». Затем в результатах выдачи кликните по одноименному приложению.
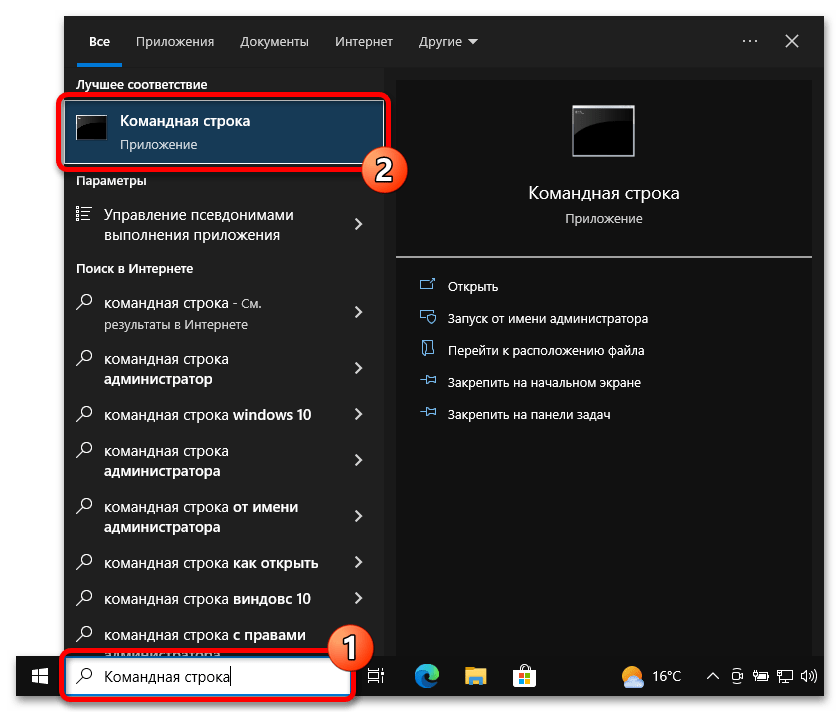
Читайте также: Все способы запуска «Командной строки» в Windows 10
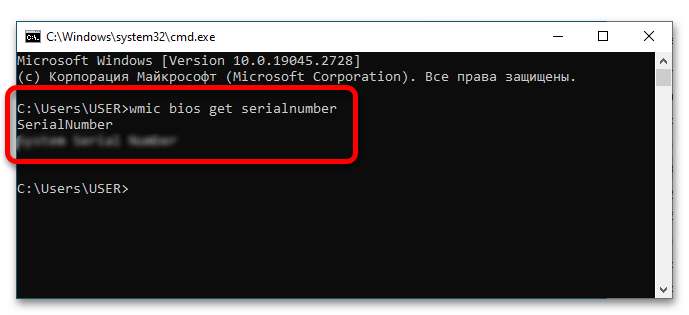
После того как на экране появится черное окно консоли, необходимо ввести вручную или скопировать приведенную ниже команду и нажать по клавише Enter:
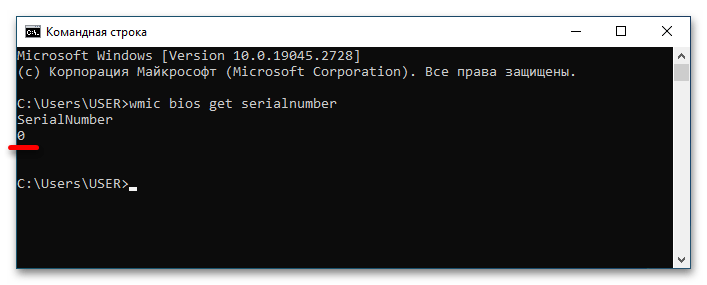
wmic bios get serialnumber
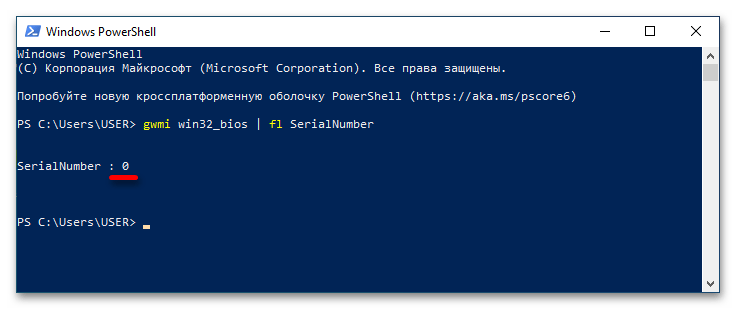
Обратите внимание! Этот способ подразумевает обращение системы к утилите ввода и вывода (BIOS), в которой серийный номер должен быть прописан поставщиком оборудования. Если в консоли после выполнения команды указан «0» (ноль), это означает, что нужных данных нет, тогда этот способ становится попросту бесполезным.
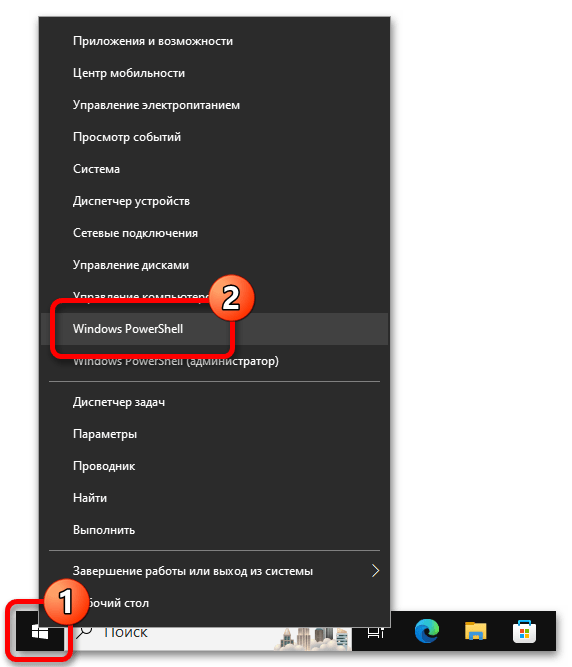
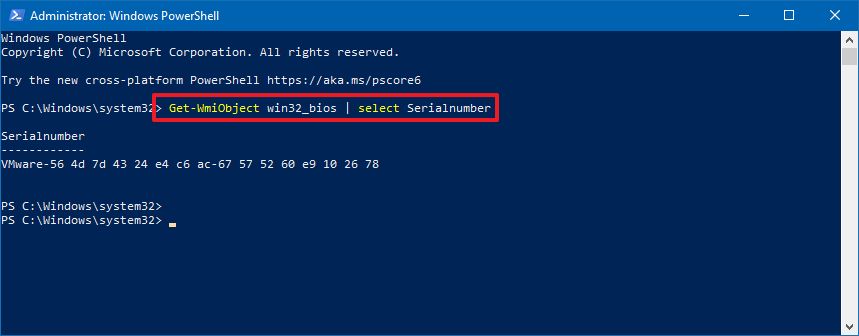
Способ 2: «Windows PowerShell»
«Windows PowerShell» тоже позволяет просмотреть серийный номер компьютера путем ввода специальной команды, более того, в отличие от «Командной строки», доступны две версии запроса.
Для начала следует открыть непосредственно «PowerShell» любым доступным способом. В последних версиях Windows 10 проще всего это сделать через контекстное меню кнопки «Пуск». Для этого сначала нажмите по ней правой кнопкой мыши, а затем щелкните по строке «Windows PowerShell».
Читайте также: Все способы запуска «PowerShell» в Windows 10
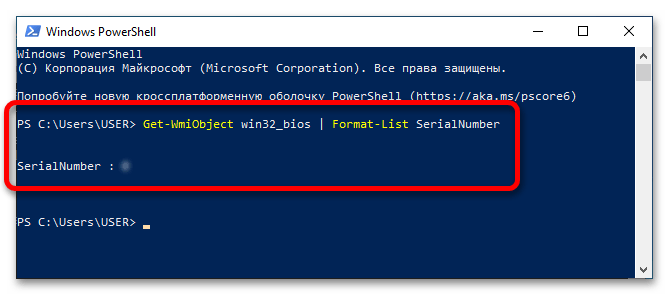
После появления окна вызываемого приложения дождитесь, пока отобразится строка запроса, в данном случае это «PS C:\Users\USER>», но у вас она может отличаться. Затем скопируйте и вставьте приведенную ниже команду и нажмите Enter:
Get-WmiObject win32_bios | Format-List SerialNumber
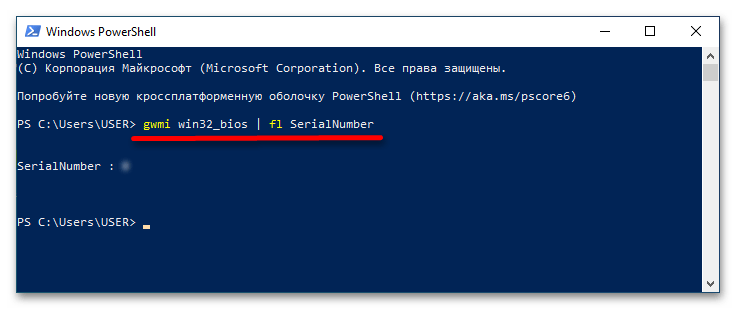
Если после выполнения команды по каким-то причинам серийный номер компьютера не выведется на экран, рекомендуется повторить попытку, только на этот раз отправить другой запрос, приведенный ниже:
gwmi win32_bios | fl SerialNumber
Важно! Как и в случае с «Командной строкой», после выполнения команды в Windows PowerShell следует обращение в BIOS для получения нужной информации. Если ее там не оказалось, в результатах будет отображаться «0» (ноль). В таком случае этот способ выполнения поставленной задачи неэффективен.
Способ 3: Фирменное программное обеспечение
Современные компьютеры зачастую имеют фирменное программное обеспечение для настройки отдельных компонентов устройства и просмотра дополнительной информации о нем. С помощью таких приложений можно узнать в частности и серийный номер. Например, компьютеры от HP поставляются с предустановленной утилитой «HP System Event Utility», которая подходит для выполнения поставленной задачи.
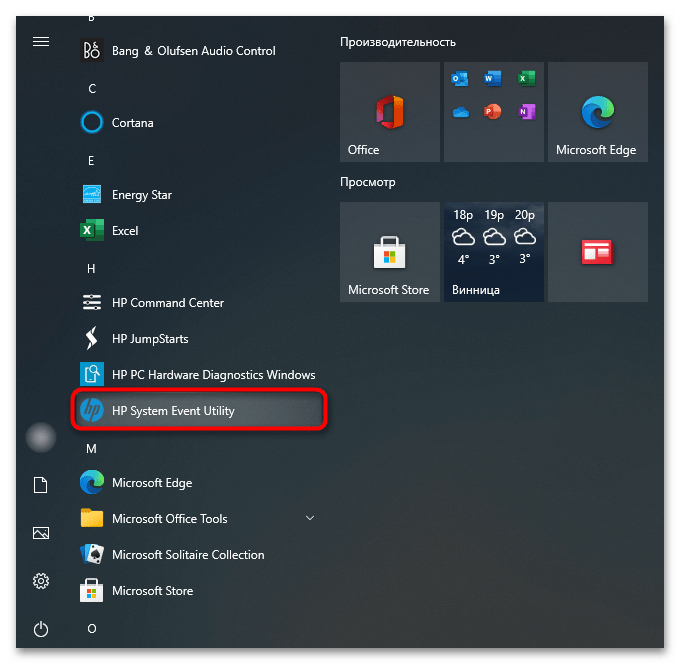
Достаточно просто найти ее в списке приложений меню «Пуск» и запустить. На экране сразу откроется информационное окно, в котором будет находиться серийный номер компьютера.
Примечание! В случае отсутствия фирменной программы на компьютере, загружать ее рекомендуется только с официальных ресурсов производителя компьютера, иначе имеется риск проникновения вредоносного ПО в операционную систему.
Читайте также: Методы удаления вируса с компьютера под управлением Windows 10
Наша группа в TelegramПолезные советы и помощь
77
77 people found this article helpful
Use these simple methods to get the serial number in seconds
The Download
- Enter this into Command Prompt: wmic bios get serialnumber. The serial number shows up instantly.
- Another way to find the serial number is to look on the underside of the laptop.
- Other methods include checking the purchase receipt or warranty details.
This article explains how to find the serial number of a Windows 10 or Windows 11 laptop and why you might need to.
How to Get the Laptop Serial Number in Command Prompt
One of the simplest ways to find your serial number is by entering a command into the Command Prompt. This will display the serial number in a fraction of a second, and it’s easy to copy it if you need to.
-
Open Command Prompt. One easy way to do this is to search for cmd from the taskbar.
-
Type this into Command Prompt, and then press Enter:
wmic bios get serialnumber -
Your serial number should be displayed. Highlight it and then right-click if you need to copy it.
Physically Find the Serial Number
If your laptop won’t boot up or you don’t feel comfortable using the command line, turn your laptop over and look for S/N or Serial Number followed by a string of letters and numbers on the label. You might also find it on the box your laptop came in.
Other Places to Look
If you registered your laptop with the manufacturer, your serial number should be included in the registration documentation, warranty service receipt, or email confirmation. You might also find it on the purchase receipt.
What Is a Laptop Serial Number?
The serial number is a unique string of numbers and letters assigned to your laptop. No two laptops have the same serial number.
Why You Might Need Your Laptop Serial Number
As mentioned previously, a laptop’s serial number is useful for warranty claims and insurance issues. It also helps technical support identify when your laptop was manufactured and explain what specific hardware it’s running.
So, it’s useful in many situations—for example, when:
- You must prove your laptop’s authenticity to a buyer.
- The manufacturer’s technical or customer support person must identify the specific model, specifications, and/or warranty details.
- The laptop has been stolen, and an insurance claim has been submitted.
- A technician must specify compatible parts for upgrades or repairs.
FAQ
-
First, check the underside or back edges of the laptop. Next, if you have a laptop with a removable battery, look inside the battery compartment. Finally, for a detachable laptop, remove the tablet from the dock to reveal the serial number.
-
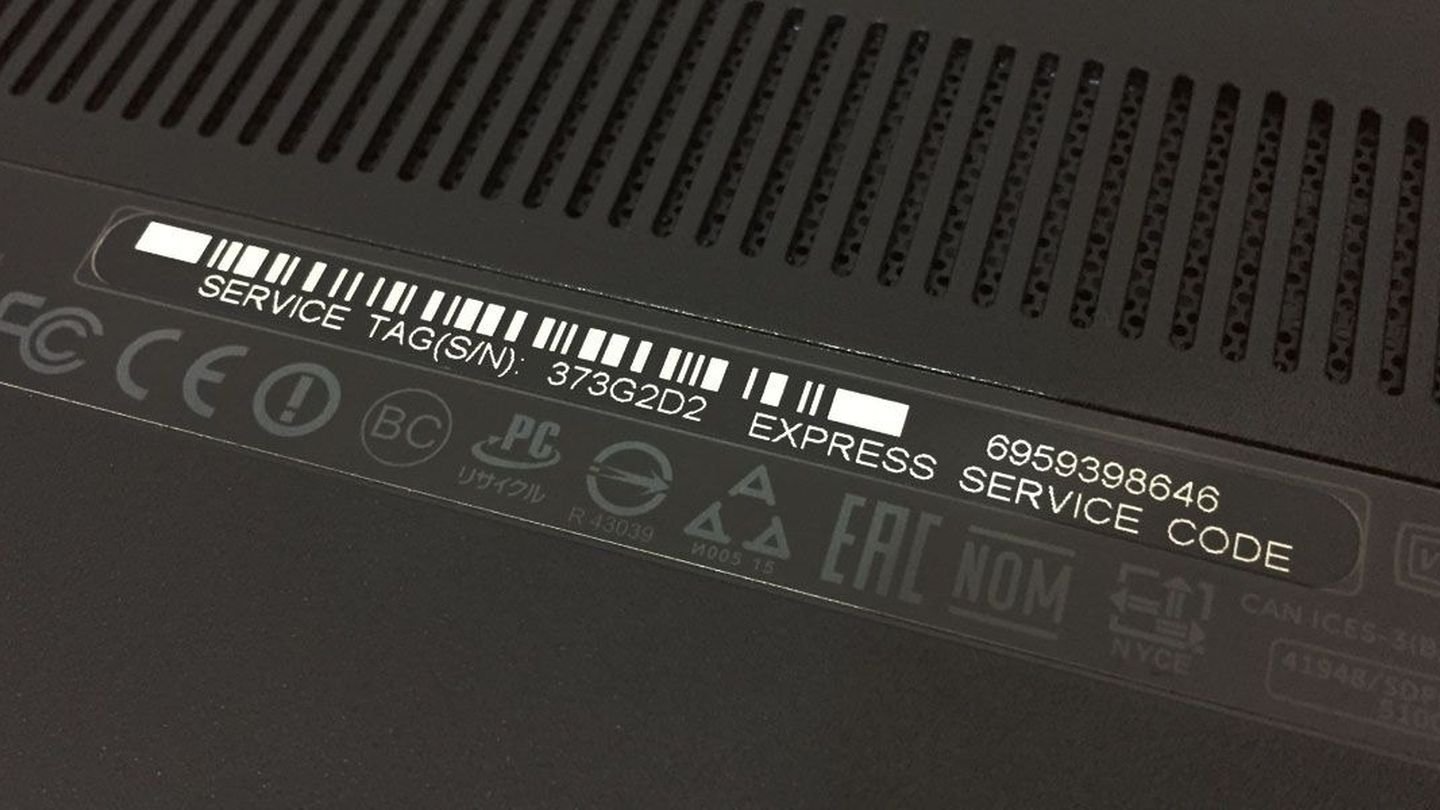
Although you can use Windows commands to find the serial number, you can also find it on the Service Tag of a Dell laptop. The Service Tag is located on the bottom panel.
-
The serial number can be found as a printed sticker or laser etching on the bottom case of a Toshiba laptop.
-
On a Lenovo laptop, the serial number is on the bottom of the system. Alternatively, you can go to the Lenovo Support website, select Detect Product, and install Lenovo Service Bridge. After installation, Lenovo Service Bridge will open a product page with your laptop’s information, including the serial number.
Thanks for letting us know!
Get the Latest Tech News Delivered Every Day
Subscribe
(Image credit: Windows Central)
On Windows 10, the ability to check the computer serial number can come in handy in many scenarios. For instance, when you need to create an inventory of the devices connected to your home network or organization, or need to contact technical support to troubleshoot a problem, order a replacement part, or check the warranty information.
Usually, you can find the required information on the sticker affixed on the back or bottom of your laptop or desktop, or checking the Basic Input/Output System (BIOS) or Unified Extensible Firmware Interface (UEFI) on your motherboard. However, if the sticker isn’t available or you don’t want to go through extra steps to access firmware, you can also use PowerShell and Command Prompt to retrieve this information quickly on Windows 10.
In addition, using commands can be useful to automate the process using a script when you need to retrieve the serial information from multiple devices.
In this Windows 10 guide, we’ll walk you through the steps to quickly find your device serial number using command lines.
- How to determine PC serial number using PowerShell
- How to determine PC serial number using Command Prompt
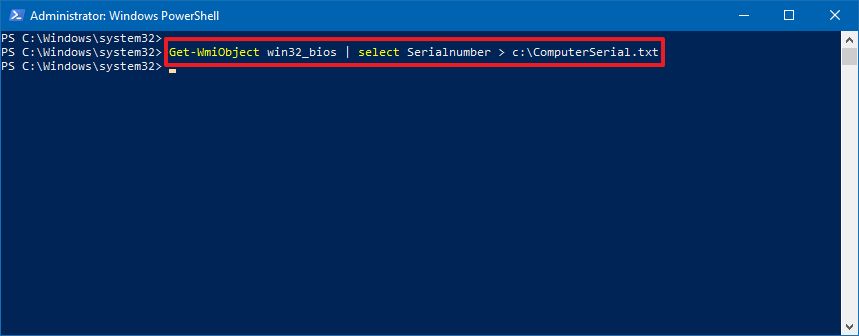
How to determine PC serial number using PowerShell
To retrieve the serial number of your computer with a PowerShell command, use these steps:
- Open Start.
- Search for PowerShell, right-click the top result, and select the Run as administrator option.
- Type the following command to find out the computer serial number and press Enter:
Get-WmiObject win32_bios | select Serialnumber
- Confirm the SerialNumber information.
- (Optional) Type the following command to determine device serial number and press Enter:
Get-CIMInstance win32_bios | format-list SerialNumber - Confirm the SerialNumber information.
- (Optional) Type the following command to export the serial information to a text file and press Enter:
Get-WmiObject win32_bios | select Serialnumber > PATH\TO\EXPORTIn the command, make sure to replace «PATH\TO\EXPORT» with the path to the text file you want to export the serial number information.For example, this command exports the output to the ComputerSerial.txt file in the C drive:Get-WmiObject win32_bios | select Serialnumber > C:\ComputerSerial.txt
Once you complete the steps, you’ll know the serial number of your desktop or laptop computer.
If you are using the command to export the output, you’ll find the file in folder location you specified. Also, since you exported it as a text format, you can open it with Notepad or any other text editor.
All the latest news, reviews, and guides for Windows and Xbox diehards.
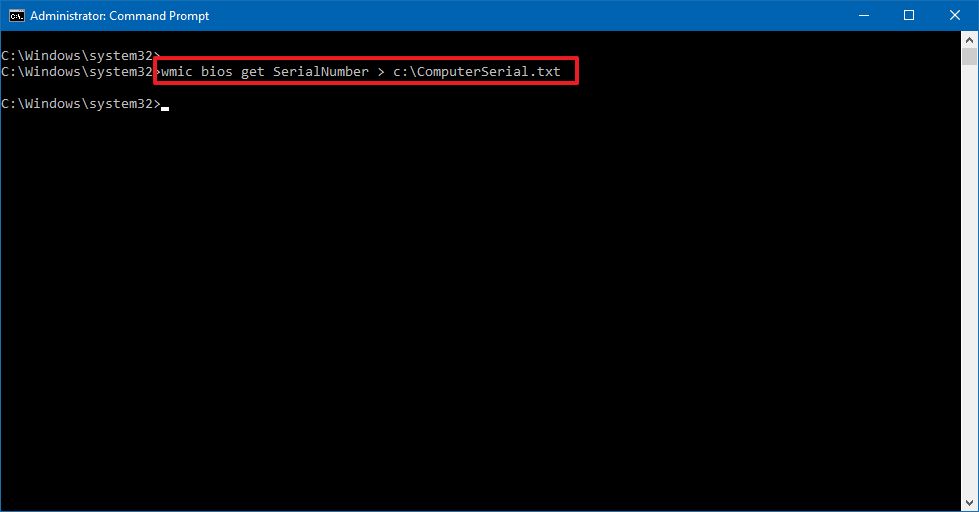
How to determine PC serial number using Command Prompt
To check the device serial number using a Command Prompt command, use these steps:
- Open Start.
- Search for PowerShell, right-click the top result, and select the Run as administrator option.
- Type the following command to find out the computer serial number and press Enter:
wmic bios get SerialNumber

- Confirm the computer serial number.
- (Optional) Type the following command to export the serial information to a text file and press Enter:
wmic bios get SerialNumber > PATH\TO\EXPORTIn the command, make sure to replace «PATH\TO\EXPORT» with the path to the text file you want to export the serial number information.For example, this command exports the output to the ComputerSerial.txt file in the C drive:wmic bios get SerialNumber > C:\ComputerSerial.txt
After you complete the steps, the command will return the serial number without needing to access the BIOS or going behind the device to look for the sticker.
Although these commands will work on any computer, custom-build devices don’t have a serial number. This means that the command output may read «To Be Filled By O.E.M.»
If you’re looking to retrieve the device model number, you can use these instructions.
Mauro Huculak has been a Windows How-To Expert contributor for WindowsCentral.com for nearly a decade and has over 15 years of experience writing comprehensive guides. He also has an IT background and has achieved different professional certifications from Microsoft, Cisco, VMware, and CompTIA. He has been recognized as a Microsoft MVP for many years.
The serial number is a unique identifier number consisting of the character string, numeric digits, or/and typographic symbols assigned to PC or laptops by the original equipment manufacturer. A serial number of a laptop helps the manufacturers in providing technical support service or warranty. Serial No. ( S/No.) also helps in tracing the equipment in case of theft. You can find the exact serial number of the laptop or branded PC in a number of ways described in simple steps in this article.
Find the serial number of PC/Laptop using Command prompt
- In Windows 10, right-click on the start button and open the Command prompt(Admin)
- Enter the following command. “wmic bios get serialnumber”
- You can now see the serial number of your PC/laptop
- Open PowerShell
- Type the command “gwmi win32_bios | fl SerialNumber”
- After you press Enter, you will be able to see the serial number.
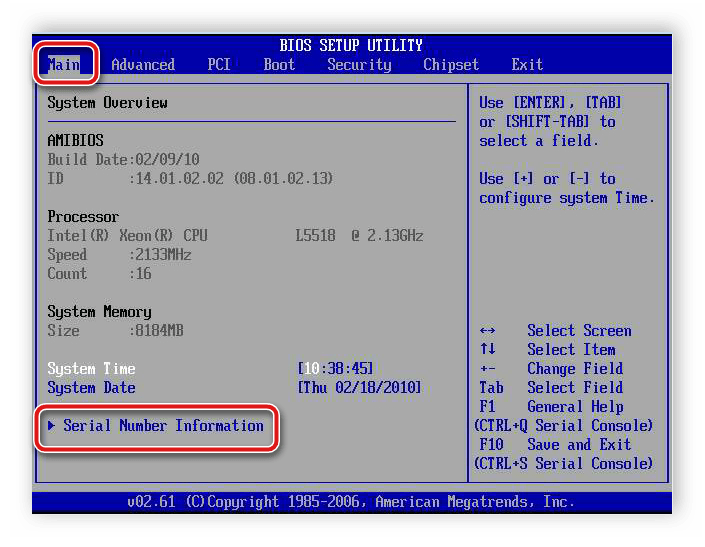
Find the serial number in BIOS settings
Depending on the system brand, you can enter the bios settings by pressing the F1, F2, F10, or Del button on the keyboard after restarting or just turning On the PC or laptop. In the main settings, you will be able to find the serial number of the system.
Find the Serial number of the PC by visual inspection
On a branded desktop PC, you can find the serial number on the sticker pasted on the backside of the computer. If you are using a laptop you can flip the laptop to the bottom side and you will find that either the serial number is directly printed on the body or a sticker with S/No. is pasted there. In some cases, a serial number is found under the laptop battery and you need to remove the battery of a laptop to find the same.
Whenever you buy a new PC or Laptop, it is important to get the invoice with the serial number mentioned in it since S/N is required to be cited while getting the part replacement or claim for warranty. In case the invoice is lost, you can use any of the above methods to find the serial number of the PC in windows 10 OS.
Существует несколько способов узнать серийный номер ноутбука. Рассмотрим каждый из них подробнее.
Способ №1: Командная строка
Вы можете использовать команду WMIC в командной строке Windows для получения серийного номера вашего ноутбука. Вот как это сделать:
- Нажмите сочетание клавиш Win + R;
- В появившемся окне введите cmd и нажмите Enter;
- В командной строке введите следующую команду и нажмите Enter: «wmic bios get serialnumber» без кавычек.
Эта команда покажет серийный номер BIOS, который обычно является серийным номером вашего ноутбука.
Примечание: Не забудьте запустить командную строку с правами администратора, если команда не работает. Это можно сделать, щелкнув правой кнопкой мыши на значке командной строки и выбрав «Запустить от имени администратора».
Также обратите внимание, что функция WMIC присутствует только в Windows 7, 8, 10 и 11.
Способ №2: PowerShell

Вы можете использовать программу PowerShell (в локализованной версии Windows называется «Терминал»), чтобы узнать серийный номер ноутбука. Для этого:
- Нажмите сочетание клавиш Win + X, затем выберите Терминал или Терминал (Администратор);
- В PowerShell введите следующую команду и нажмите Enter: «Get-WmiObject -Class Win32_BIOS | Select-Object SerialNumber» без кавычек.
Как и в предыдущем случае, вам покажут серийный номер BIOS, который является серийным номером ноутбука.
Способ №3: BIOS/UEFI
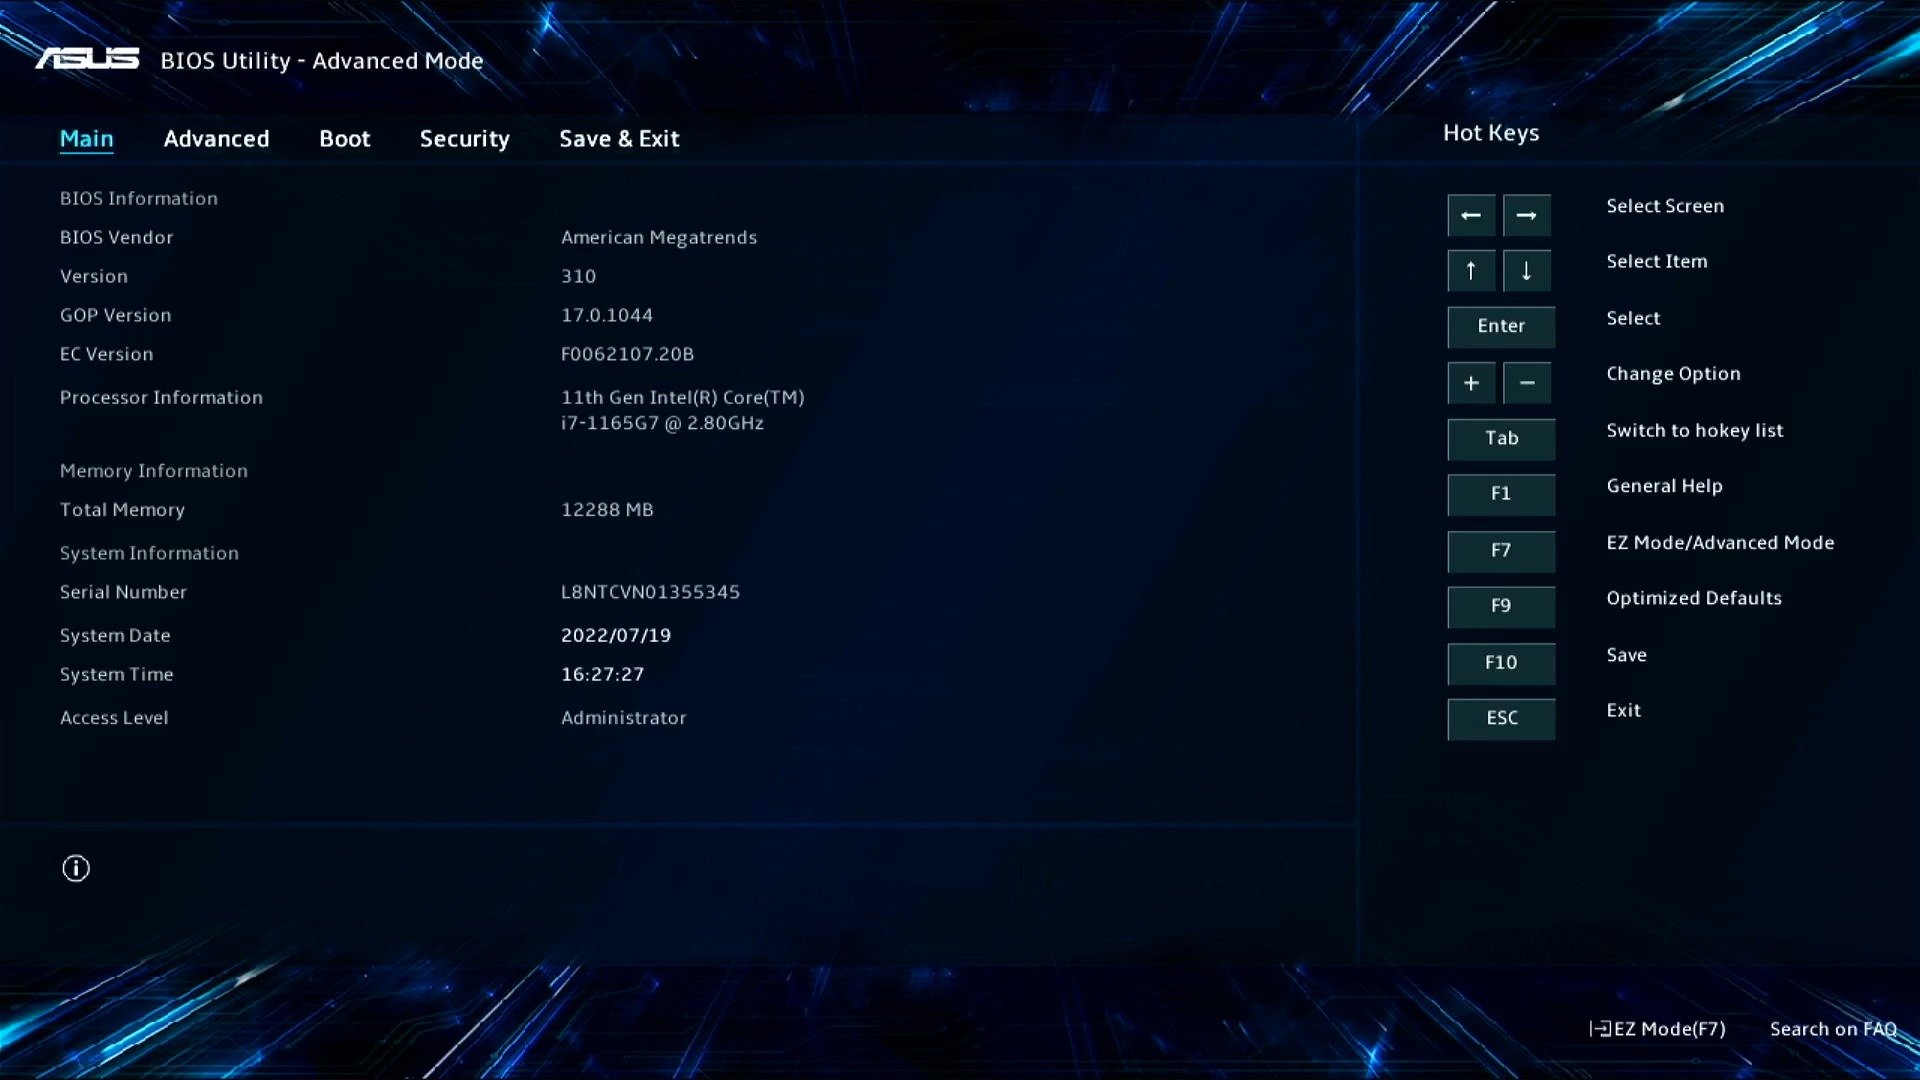
Для просмотра серийного номера ноутбука в BIOS/UEFI, следуйте этим шагам:
- Перезагрузите ваш ноутбук;
- Когда появится начальный экран (обычно с логотипом производителя), нажмите клавишу для входа в BIOS/UEFI. Чаще всего это клавиша F2, F10, F12 или Delete. Конкретная клавиша может отличаться в зависимости от производителя вашего ноутбука;
- После входа в BIOS/UEFI, ищите информацию о системе. Серийный номер обычно находится в разделе System Information или Main;
- Запишите серийный номер.
Будьте осторожны: Не меняйте другие настройки в BIOS/UEFI, если вы не уверены в своих действиях. Неправильные настройки могут привести к проблемам с загрузкой вашего ноутбука.
Способ №4: Проверить наклейки на ноутбуке
Серийный номер ноутбука обычно указывается на наклейке, которая находится на дне ноутбука или в отсеке для батареи. Вот как вы можете его найти:
- Выключите ноутбук и отключите его от источника питания;
- Переверните ноутбук и посмотрите на его дно. Найдите наклейку с информацией о продукте. На ней обычно указаны модель ноутбука, его серийный номер (S/N или SN) и другие данные;
- Если вы не видите наклейку на дне ноутбука, проверьте отсек для батареи. Некоторые производители помещают наклейку с информацией о продукте внутрь отсека для батареи;
- Запишите серийный номер.
Способ №5: О системе

В Windows 11 вы можете использовать раздел «О системе», чтобы посмотреть серийный номер ноутбука или ПК (если это заводская сборка).
- Нажмите «Пуск», выберите «Параметры»;
- В появившемся окне слева выберите «Система»;
- Найдите раздел «Характеристики Windows» и посмотрите серийный номер ноутбука.
Используйте способы выше, чтобы узнать серийный номер вашего ноутбука.
Заглавное фото: trustedreviews.com