
Sign in to your MUO account

The graphics processing unit (GPU) plays an integral part in your overall Windows experience, all the way from gaming to video editing. A high-performing graphic card can be a key deciding factor in your user experience.
You may know all of the significant graphic card manufacturers, such as AMD, Nvidia, Intel, and ASUS… but what model is your GPU, exactly? Here’s how to check your graphics card model on a Windows 11 PC.
1. How to Check Your Graphics Card Model via Windows 11’s Task Manager
The Task Manager was redesigned in Windows 11 and now boasts a sleek interface that complements its functionality. While users typically use the Task Manager to keep track of running applications and services, you can also use it to figure out your graphic card model name and specs.
To check the installed graphics card or GPU of your Windows 11 PC:
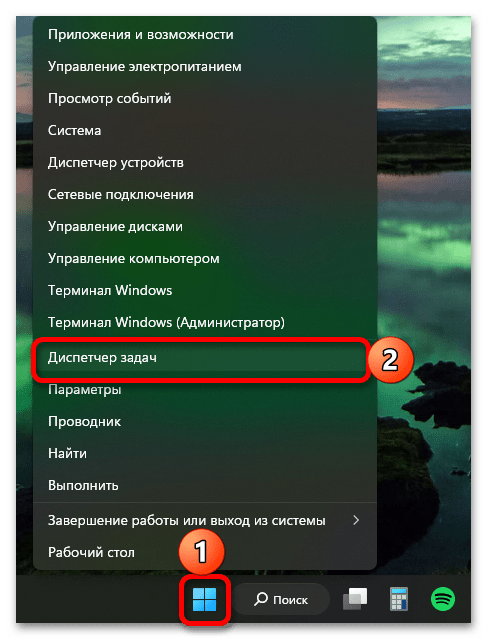
- Right-click the Start menu and select Task Manager.
-
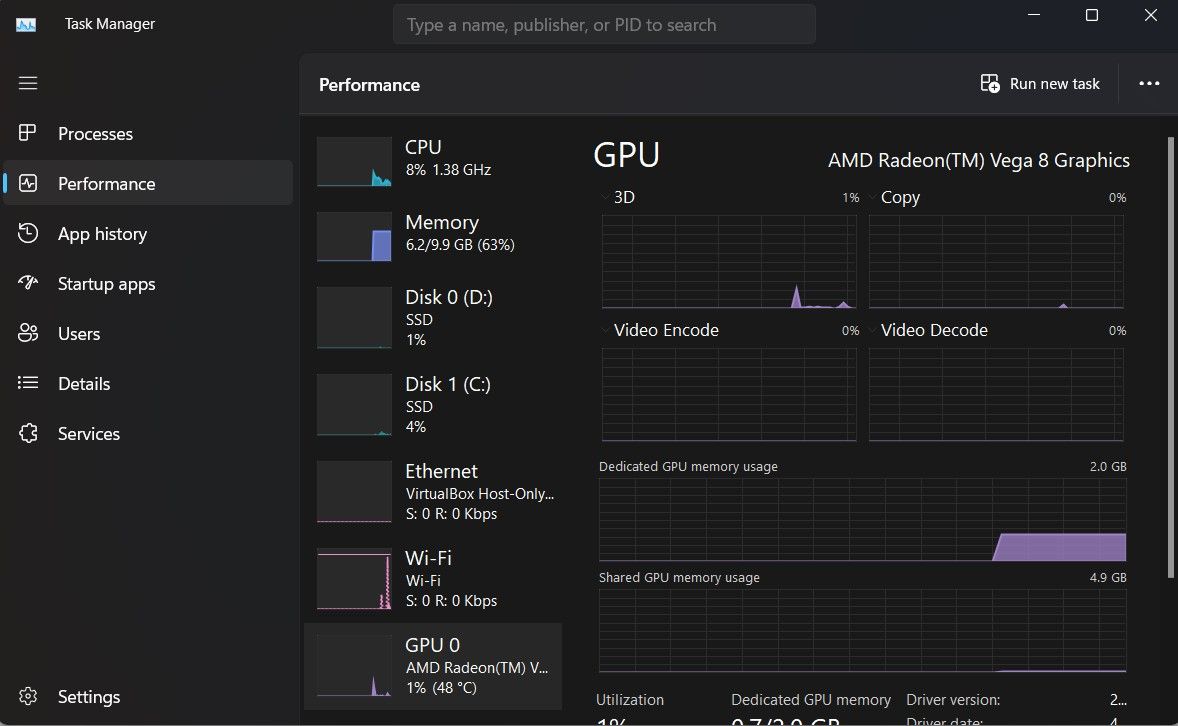
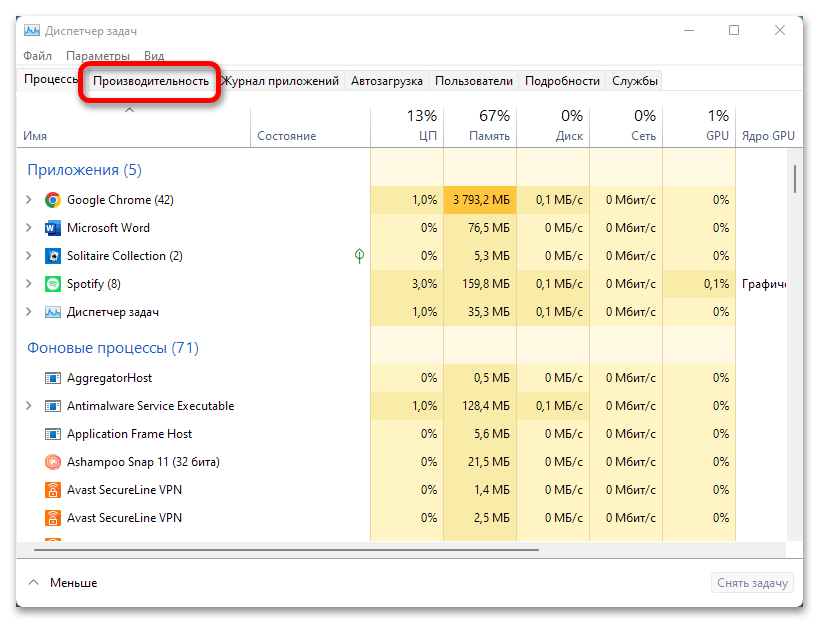
From the side menu, choose Performance and then GPU 0. If you have more than one GPU installed, you’ll see them labeled GPU 1, GPU 2, etc. Alternatively, if you don’t know any GPU option, it’s possible you may not have a graphics card on your system, or you may not have configured it correctly.

- The Task Manager window will list the name of your graphics card in the top right corner. You can also find the Driver and DirectX versions in the bottom right corner.
Check out how to use the Windows Task Manager for more in-depth instructions on this tool.
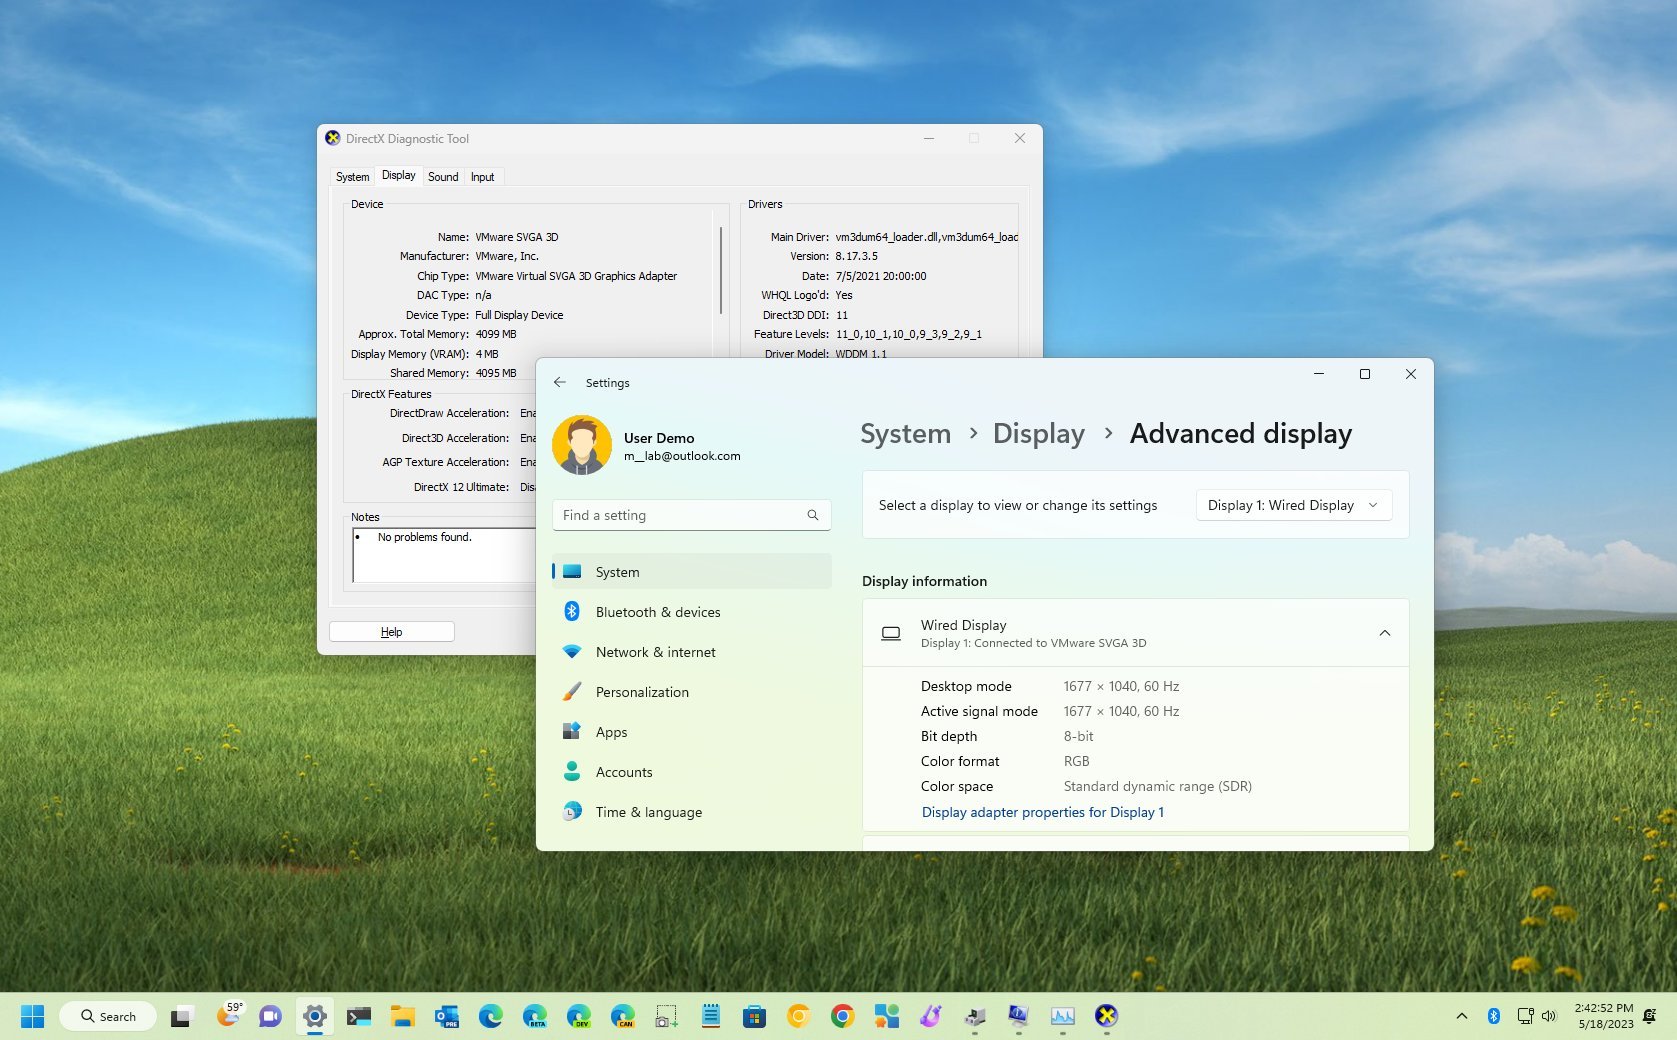
2. How to Find Your GPU Model Using DirectX on Windows 11
You can use the DirectX Diagnostics Tool to get detailed specs of your PC. You can find system details such as the processor, total available RAM, BIOS version, GPU, sound, and even the details of input devices configured to your PC.
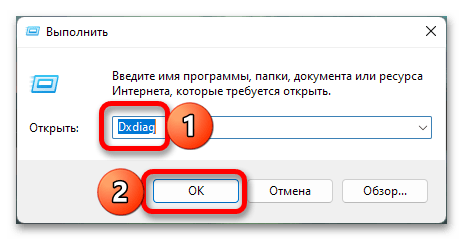
To find the details of your Windows 11 GPU using the DirectX Diagnostics Tool:
-
Launch the Start menu, search for dxdiag, and select the Best match.

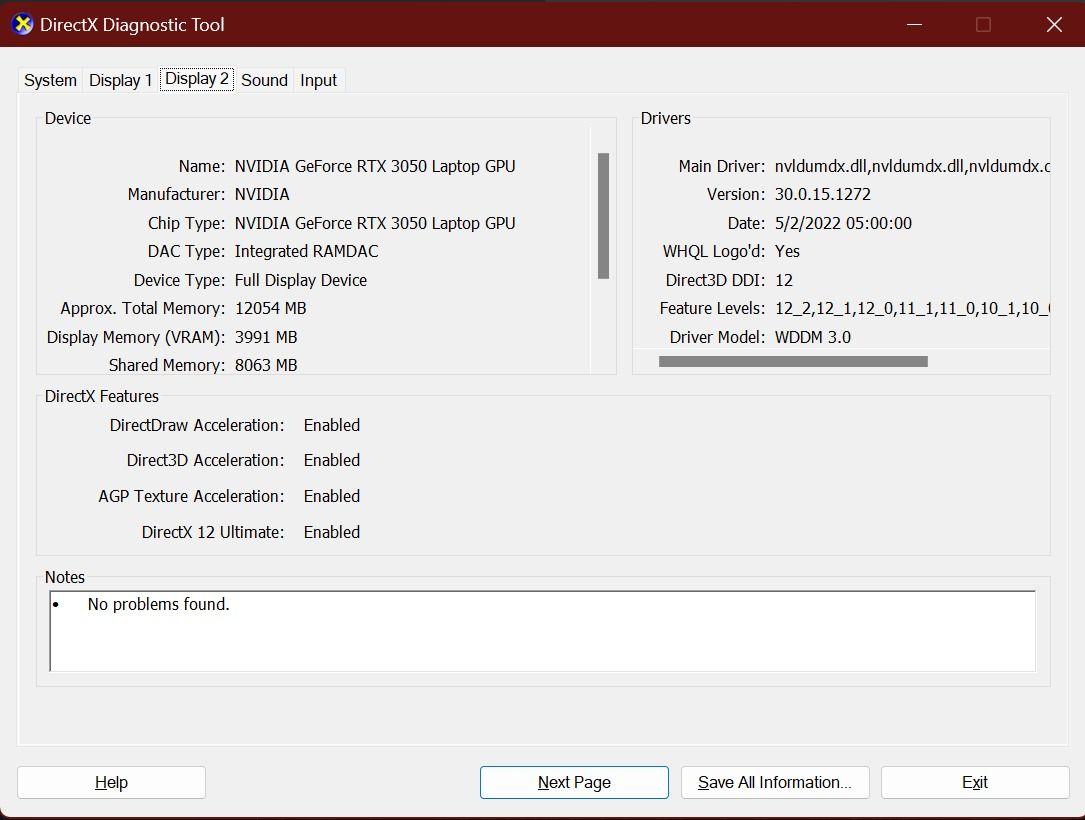
- Select the Display tab to view details of your GPU, including the GPU manufacturer, chip type, dedicated display memory, etc. If you have more than one GPU on your PC, you will see multiple Display tabs with details of each GPU.
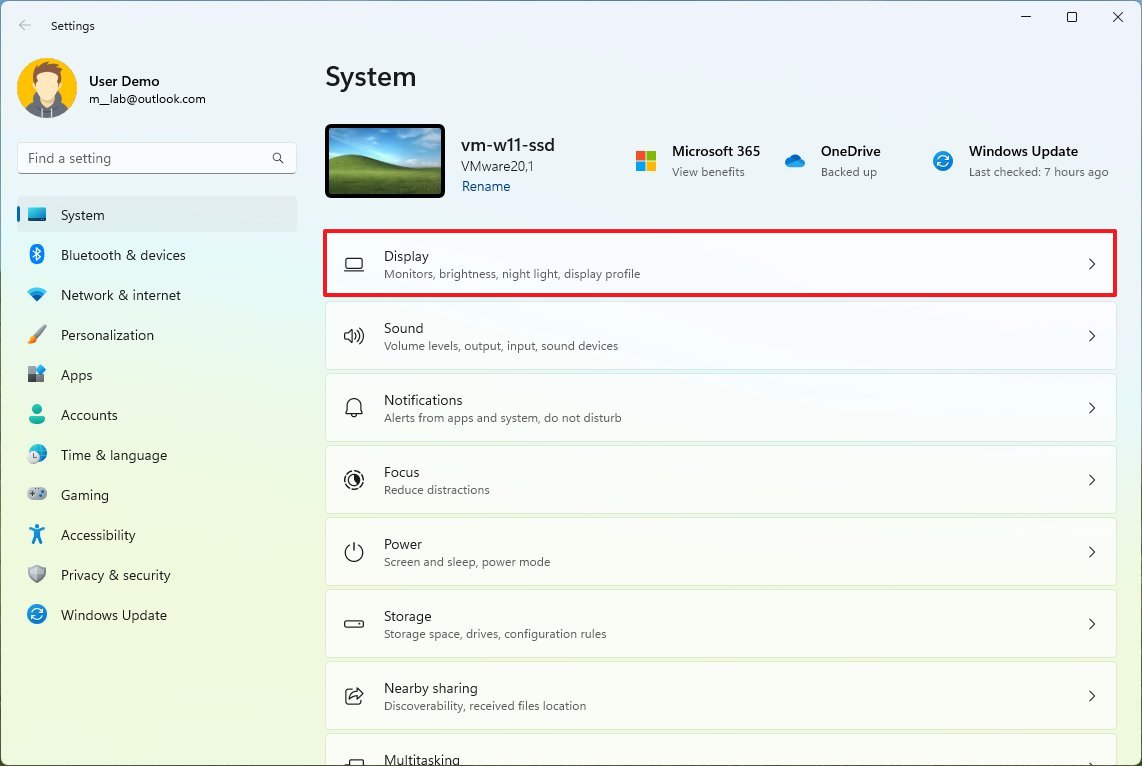
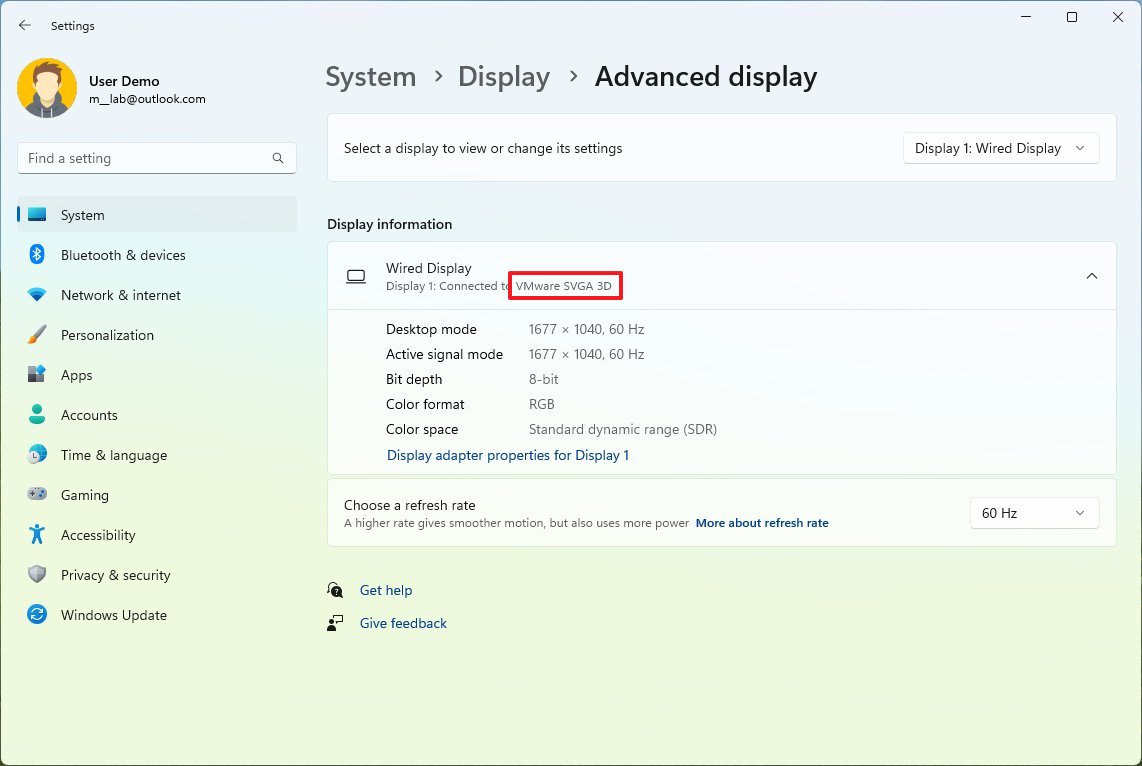
3. How to Confirm Your Graphics Card Model via the Windows 11 Settings App
While you may have used the Settings app to configure different aspects of your PC, you can also use it to view the specs of the graphic card installed in your system. You can also view other display settings, such as the screen resolution and display type.
To check the advanced display settings of your Windows 11 PC, including GPU specs:
- Launch the Settings app through the Start menu.
- From the side menu, select System and then Display.
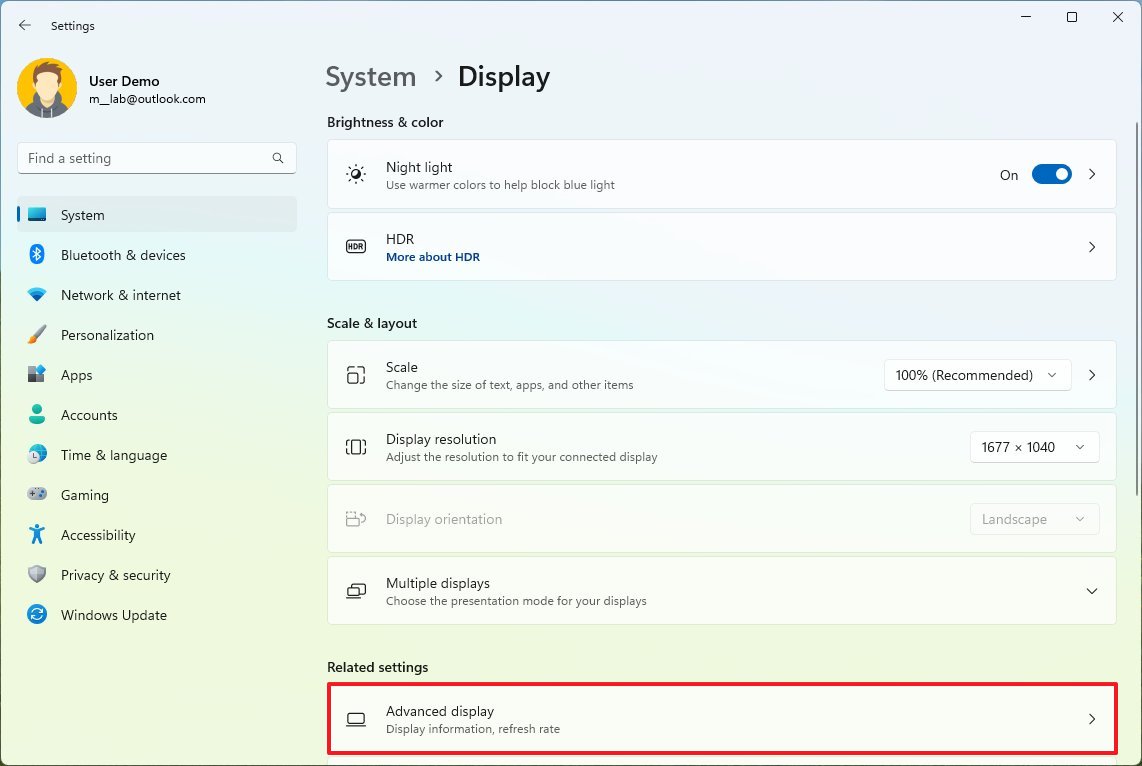
-
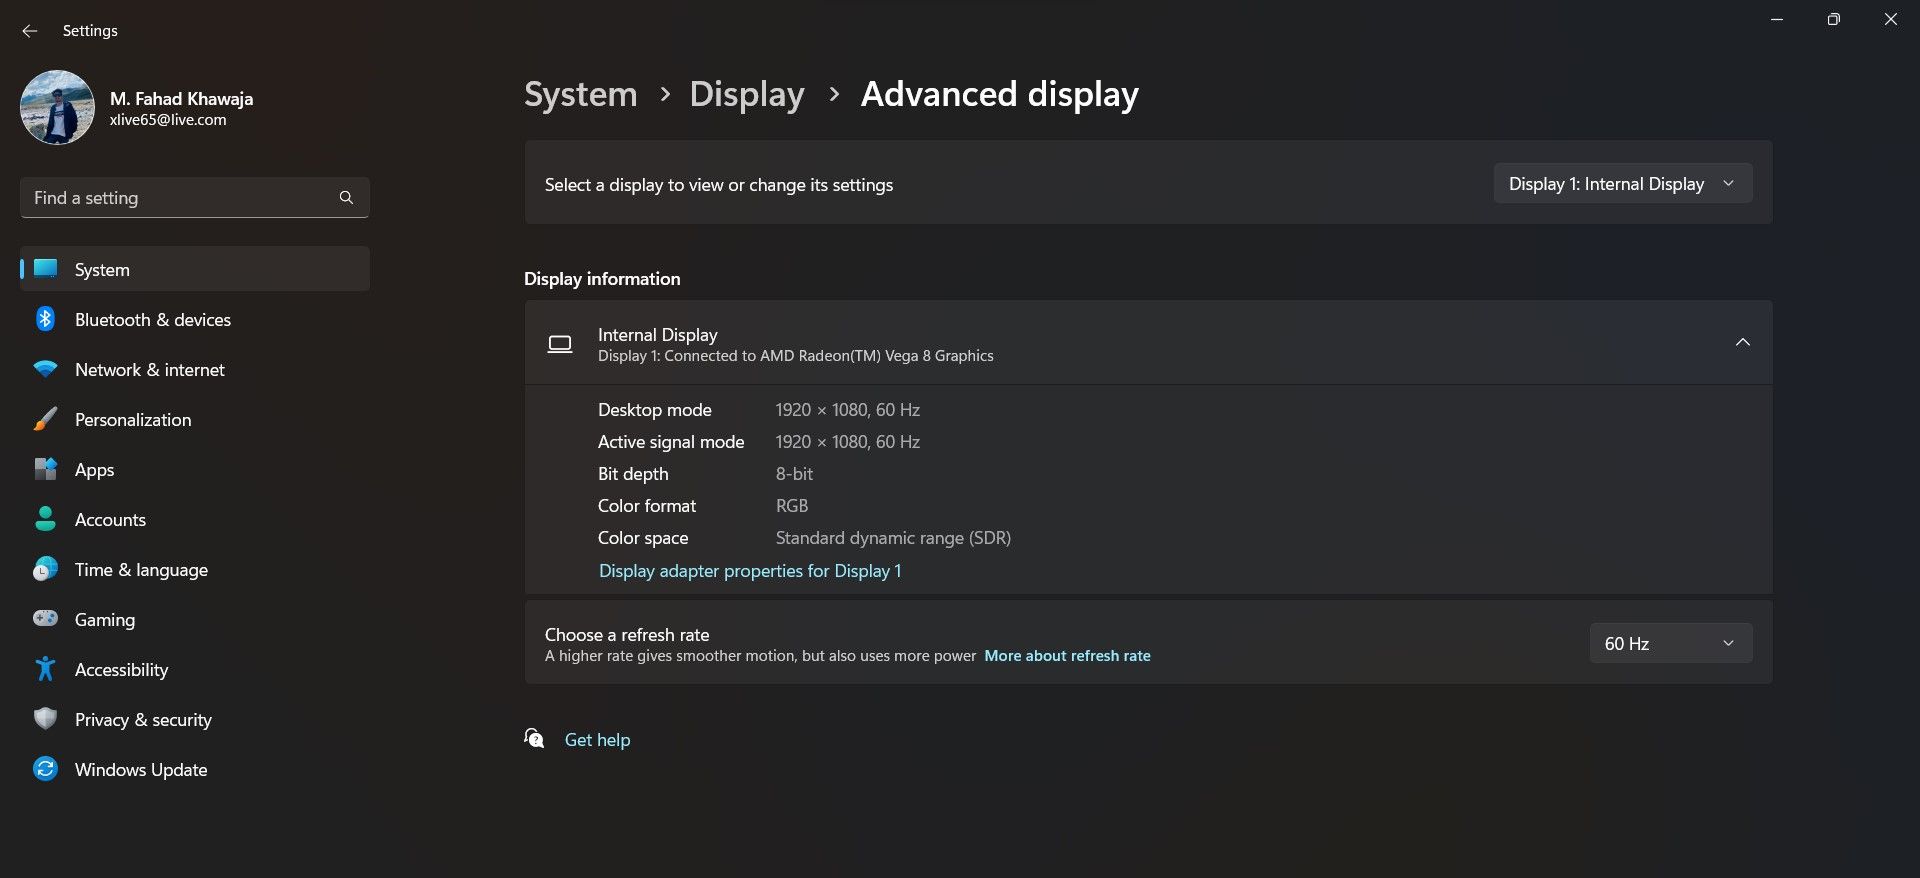
Under Related settings, select Advanced display.

-
You can see your GPU make and model under the Display information tab.

- For more details, select Display adapter properties for Display.

Get to Know Your GPU Model Better on Windows 11
Whether you want to double-check your system requirements for a new game, or you want to update your GPU’s drivers properly, knowing your graphics card’s model is essential. Now you know how to quickly find out which card you have on Windows 11.
Open Task Manager to see the GPU in the Performance tab
Updated on October 9, 2023
What to Know
- Press Ctrl+Shift+Esc, then go to Performance > GPU.
- You can also check in Device Manager, DirectX Diagnostic Tool, and Settings.
- Integrated cards are often listed as GPU 0, added cards as GPU 1.
This article explains how to find out what kind of graphics card or GPU you have on a Windows 11 computer, with instructions for desktops and laptops. Four methods exist: Device Manager, Task Manager, the DirectX Diagnostic Tool, and the Windows Settings app.
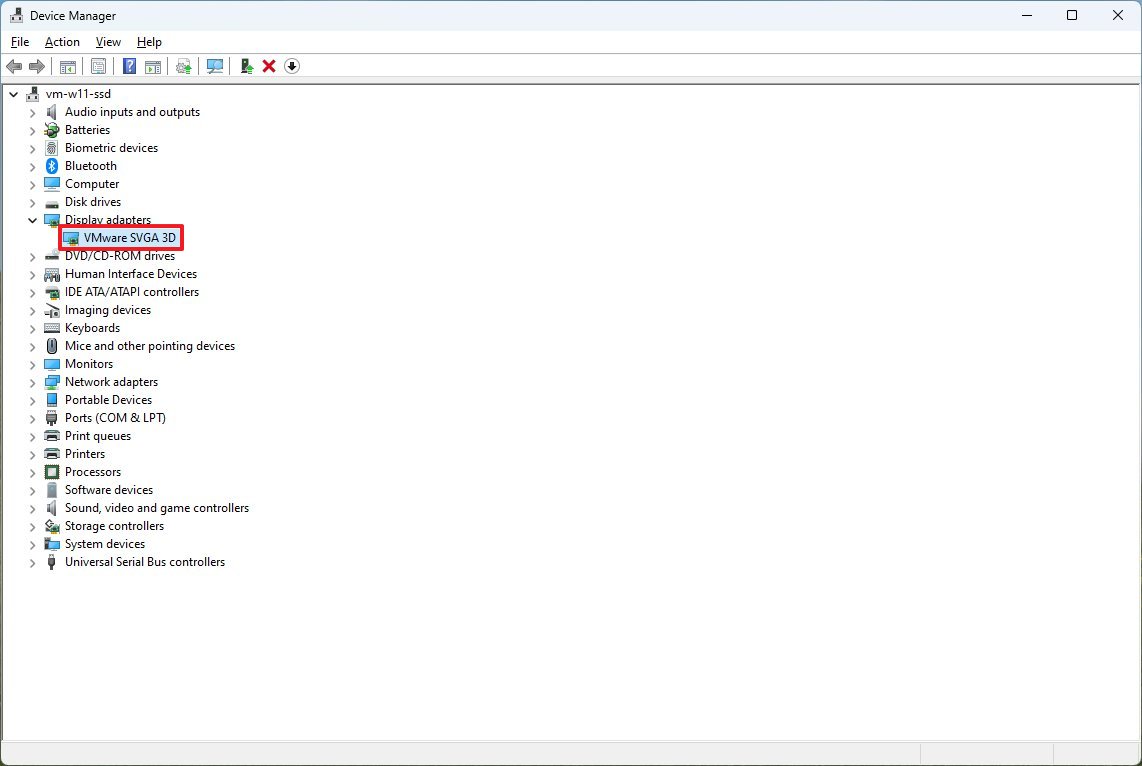
How to Check Your Graphics Card With Device Manager
The Windows 11 Device Manager provides a list of all the devices connected to your computer. It’s useful for checking the specifics of a device, like finding out what kind of graphics card you have, but you can also use it to update drivers, add new devices, remove devices, and more.
If you have both integrated graphics and a discrete graphics card, and you have multiple displays, use either the DirectX Diagnostic Tool or the Settings app (those directions are below) to see which GPU is connected to which display.
Here’s how to check your graphics card with Device Manager:
-
Open the Start menu, type Device Manager, and press Enter.
-
Double-click Display adapters, or press the > icon.
-
Your graphics card will be listed here.
If your computer has integrated graphics in addition to a discrete video card, you’ll see both listings. The graphics card will typically start with NVIDIA, GEFORCE, AMD, RADEON, etc.
How to Check Your Graphics Card With Task Manager
You can also check your graphics card with Task Manager. This utility allows you to see all of the currently open apps on your computer, check performance, and more.
Here’s how to check your graphics card with Task Manager:
-
Click the Start menu, type Task Manager, and press Enter.
There are lots of ways to open Task Manager, like with the Ctrl+Shift+Esc keyboard shortcut.
-
Select the Performance tab.
-
Click GPU.
Your computer will have multiple GPU entries if it has both integrated graphics and a discrete graphics card. The graphics card will typically be listed as GPU 1 in that case.
-
Your graphics card will be shown in the upper right corner of the window.
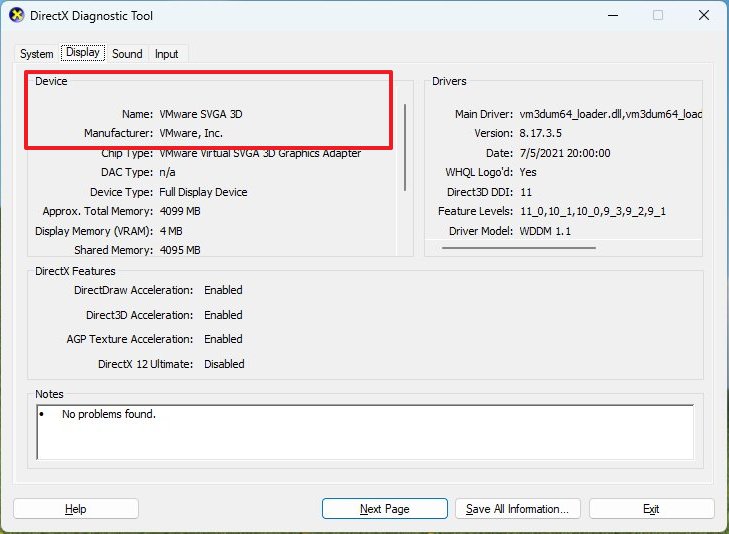
How to Check Your Graphics Card With DirectX Diagnostic Tool
The DirectX Diagnosis tool also allows you to check what graphics card you have, in addition to a lot of other handy information if you’re trying to diagnose a display or sound problem.
Here’s how to check your graphics card with dxdiag:
-
Click the Start menu, type dxdiag, and press Enter.
You might get a prompt asking if you want to check if the drivers are digitally signed. Just press Yes or No.
-
Select the first Display tab along the top.
-
Locate the Manufacturer field to see the manufacturer of the GPU powering the first display, and the Chip Type field to see the exact GPU you have.
If you have more than one display, click Display 2 to see information about the graphics card powering that display.
-
In the second display tab, locate the Manufacturer field to see the manufacturer of the GPU powering the second display, and the Chip Type field to see the exact graphics card powering that display.
If you have a second display and more than one GPU, the second display may be powered by a different GPU. In this example, the first display is powered by the computer’s integrated graphics, while the second display is powered by an NVIDIA GeForce RTX 3027 card.
How Do I Find Out What Kind of Graphics Card I Have Through Settings?
You can also find out what kind of graphics card you have through the Settings app. This doesn’t check the graphics card directly, but it does tell you what kind of graphics card is currently being used to power each of your displays.
Here’s how to find your graphics card in Windows 11 Settings:
-
Click the Start menu, type Settings, and press Enter.
-
Navigate to System > Display.
-
Select Advanced display.
-
Look for Display 1: Connected to to see what graphics card is powering that display.
-
If you have more than one monitor, select Display 1 in the upper right corner, choose Display 2, and then repeat Step 4 to view its details.
FAQ
-
You can check your graphics card in Windows 10 through the Start menu. Search for System Information, and then go to Components > Display and look under Adapter Description.
-
To replace your current graphics card with a newer model, first make sure you get one that’s compatible with your PC, including the size, connection, and power requirements. The specific instructions can differ based on the model of your computer, but generally, you’ll just open the tower, remove the current card from the PCI-e slot, and install the new one. Finally, install the graphics card drivers to your PC.
Thanks for letting us know!
Get the Latest Tech News Delivered Every Day
Subscribe
Все способы:
- Вариант 1: Системные средства
- Способ 1: «Параметры»
- Способ 2: «Диспетчер устройств»
- Способ 3: «Диспетчер задач»
- Способ 4: «Средство диагностики DirectX»
- Способ 5: «Сведения о системе»
- Вариант 2: Софт производителя видеокарты
- NVIDIA
- AMD
- Вариант 3: Сторонние программы
- Способ 1: HWMonitor
- Способ 2: Speccy
- Вопросы и ответы: 1
Вариант 1: Системные средства
В ОС Windows 11 существует сразу несколько стандартных способов получения информации об установленном в компьютере или ноутбуке графическом адаптере. Рассмотрим каждый из них.
Способ 1: «Параметры»
Узнать такие сведения о видеокарте, как ее производитель и модель, можно в системных настройках операционной системы.
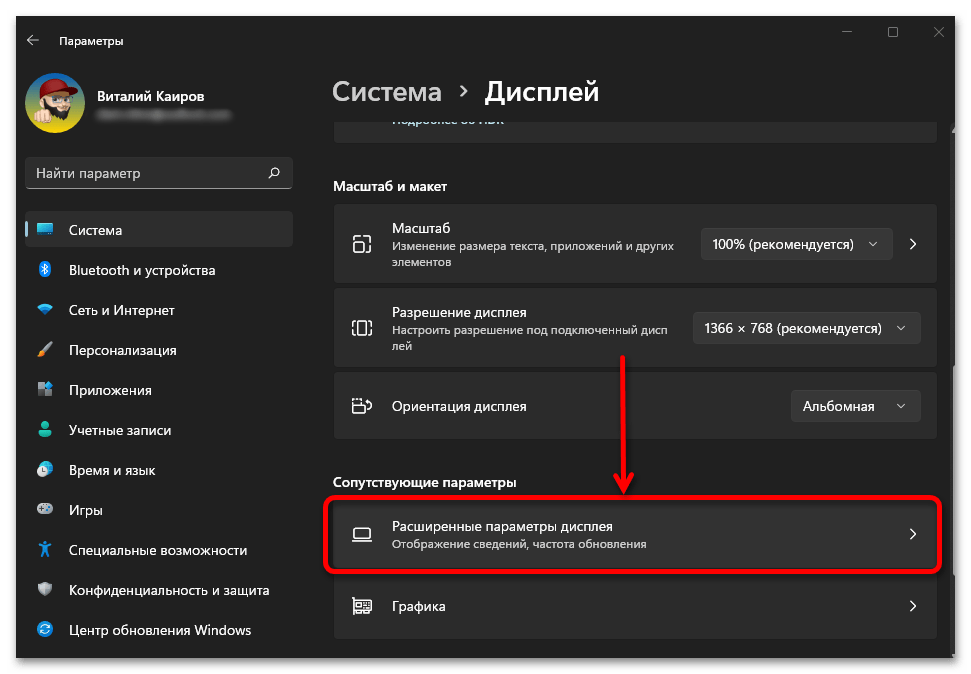
- Откройте «Параметры» Виндовс 11. Наиболее простой способ – сочетание клавиш «Win+I», но также можете воспользоваться основным или дополнительным меню кнопки «Пуск».
- Из открывшейся по умолчанию вкладки «Система» перейдите к разделу «Дисплей».

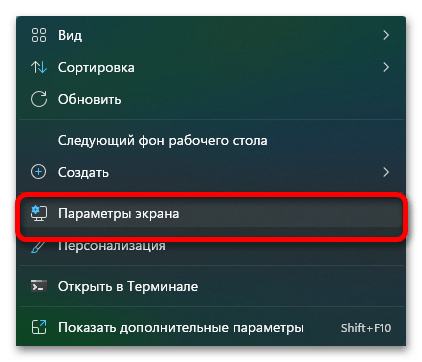
Примечание: Вместо выполнения этого и предыдущего пунктов инструкции можете нажать правой кнопкой мышки (ПКМ) по пустому месту Рабочего стола и выбрать в контекстном меню пункт «Параметры экрана».
- Пролистайте вниз список доступных подразделов и разверните «Расширенные параметры дисплея».
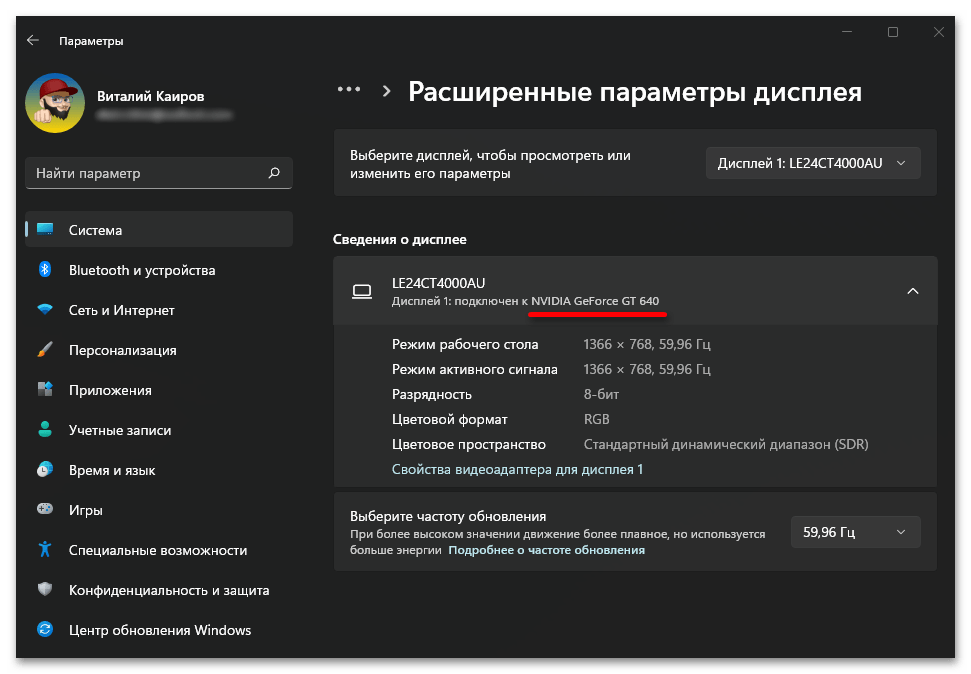
- В блоке «Сведения о системе» под названием дисплея будет указано то, к какой видеокарте он подключен – ее производитель и модель.


Способ 2: «Диспетчер устройств»
Информация об основных аппаратных компонентах ПК или ноутбука, включая графический адаптер, также представлена в «Диспетчере устройств».
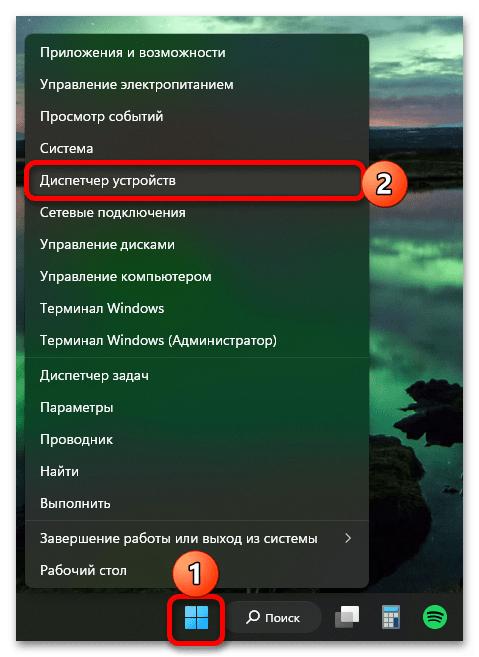
- Нажмите ПКМ по кнопке «Пуск» на панели задач и выберите обозначенный пункт.
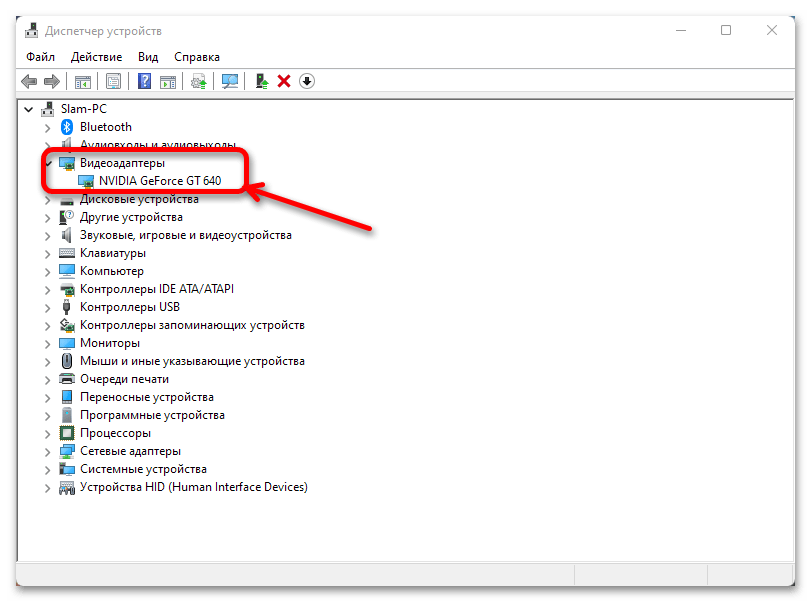
- Разверните список «Видеоадаптеры» и ознакомьтесь со сведениями о соответствующем оборудовании.
Способ 3: «Диспетчер задач»
В одном из разделов «Диспетчера задач» (ДЗ), который чаще всего используется для мониторинга операционной системы и принудительной остановки программ и процессов, также можно узнать об используемой видеокарте.
- Задействовав поиск, контекстное меню элемента «Пуск» или сочетание клавиш «Ctrl+Shift+Esc», откройте ДЗ.
- Перейдите на вкладку «Производительность» и пролистайте вниз список представленных в ней разделов с названиями аппаратных компонентов.
- Выделите блок «Графический процессор» — искомые сведения будут указаны сразу в двух частях окна.

Читайте также: Как открыть «Диспетчер задач» в Виндовс 11
Способ 4: «Средство диагностики DirectX»
Еще один из системных компонентов Windows 11, предоставляющий подробную информацию об установленных аппаратных компонентах и графических драйверах.
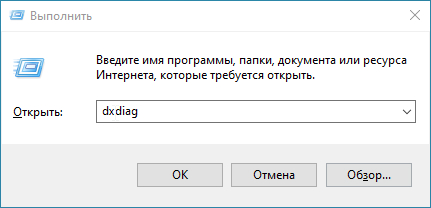
- С помощью клавиш «Win+R» или контекстного меню кнопки «Пуск» откройте окно «Выполнить».
- Введите указанную ниже команду и нажмите «Enter» или «ОК» для ее выполнения.
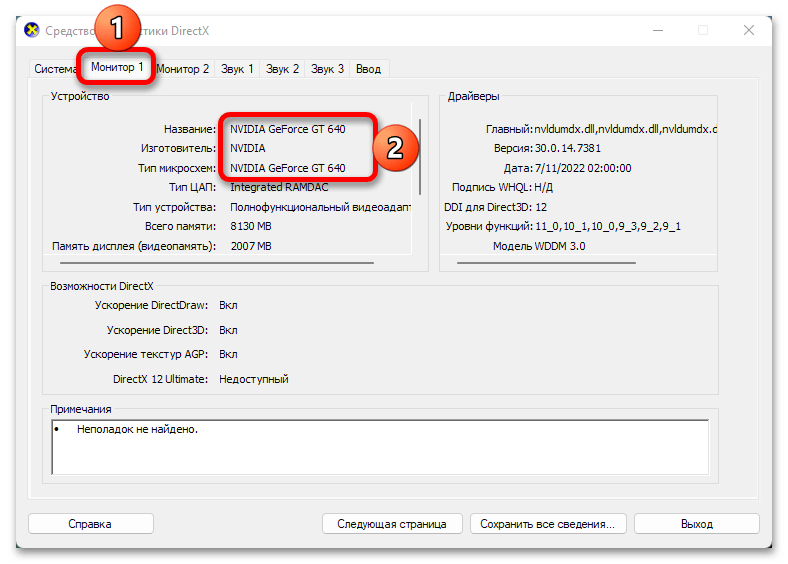
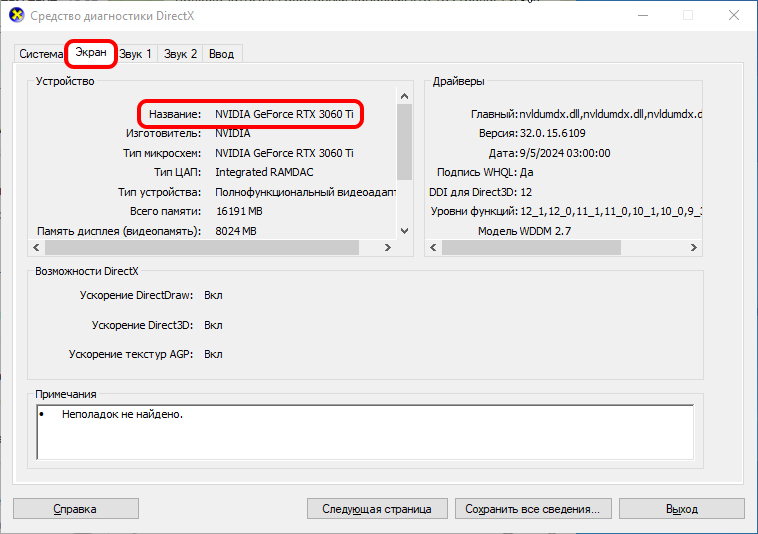
Dxdiag - Подождите, пока завершится непродолжительная загрузка, затем перейдите во вкладку «Монитор» и ознакомьтесь с информаций напротив трех первых строк в блоке «Устройство».
Способ 5: «Сведения о системе»
Системное приложение с говорящим названием является еще одним решением поставленной перед нами задачи.
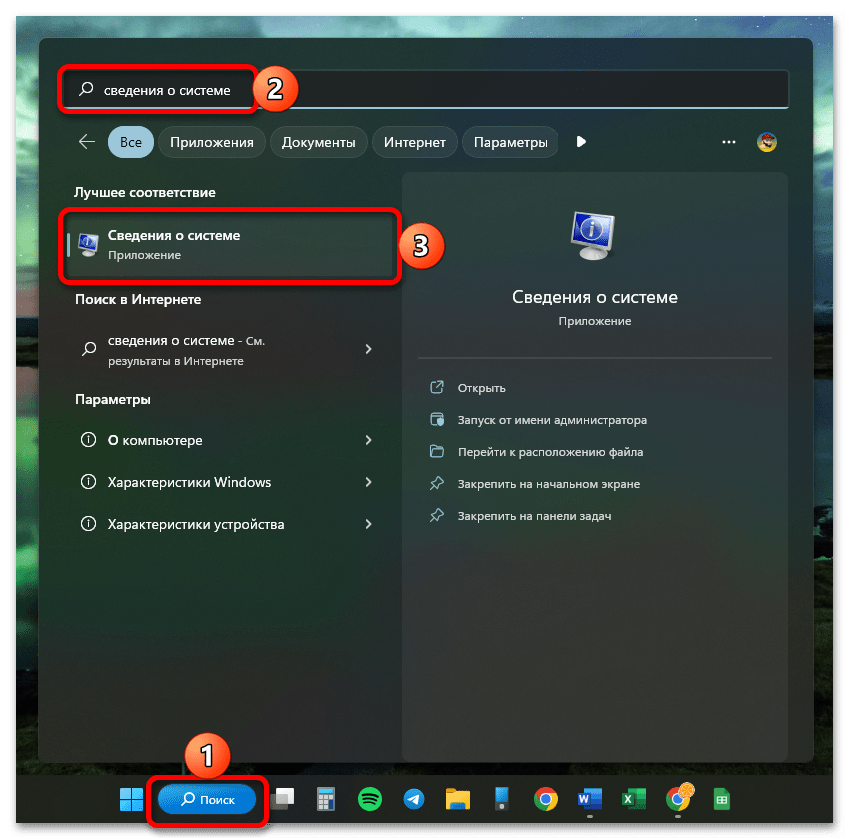
- Вызовите окно поиска, нажав на соответствующий элемент в панели задач или воспользовавшись клавишами «Win+S», и начните вводить запрос
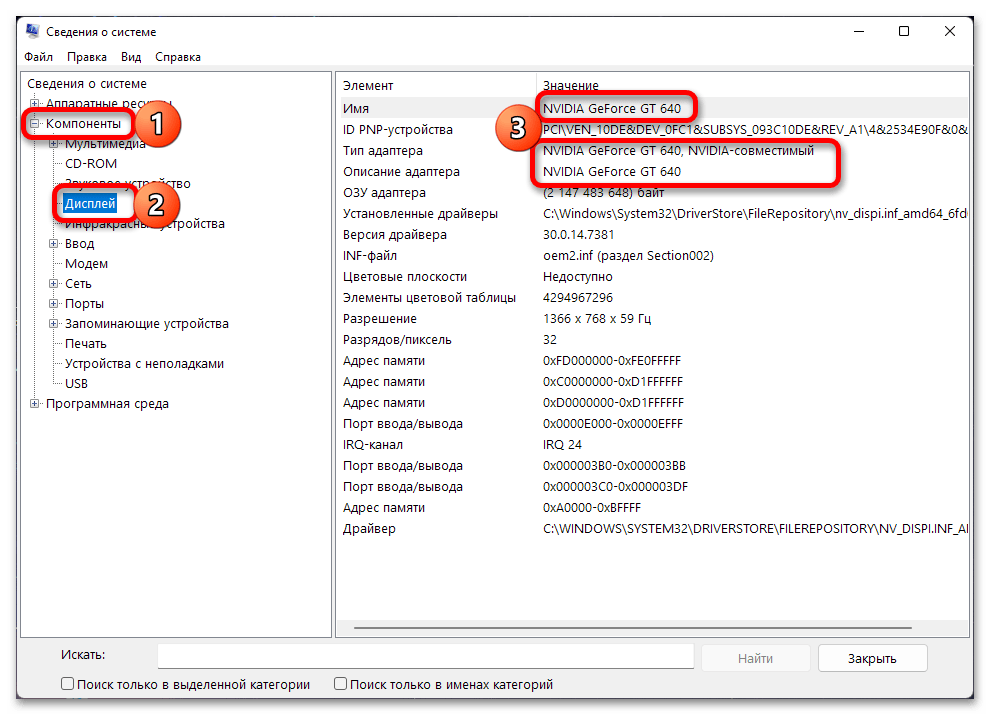
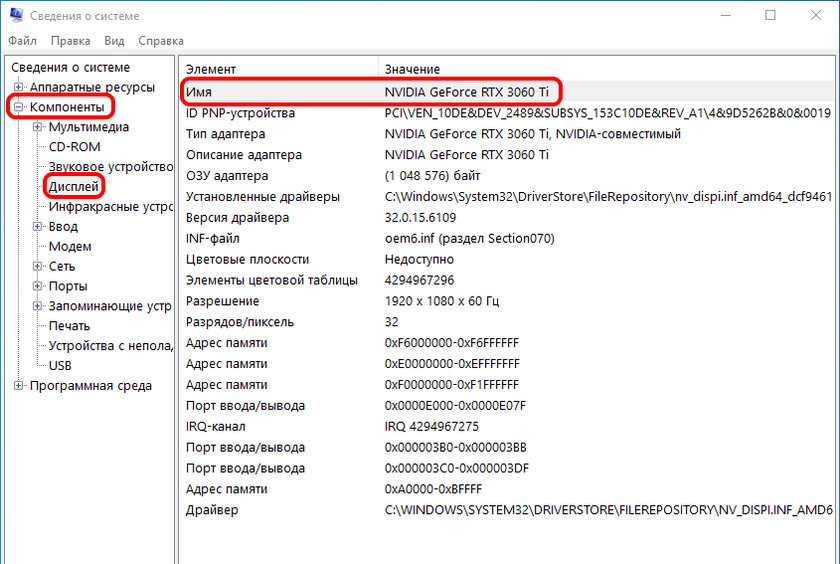
«Сведения о системе». Когда искомый компонент появится в блоке «Лучшее соответствие», откройте его. - Разверните расположенный слева перечень опций «Компоненты», затем выделите «Дисплей» и ознакомьтесь с информацией в первой, третьей и четвертой строках основной области – это и будет производитель и модель видеокарты.
Вариант 2: Софт производителя видеокарты
Фирменное программное обеспечение от двух конкурирующих производителей графических адаптеров также позволяет узнать интересующие нас сведения.
NVIDIA
Для обладателей «зеленой» видеокарты доступно сразу два варианта просмотра видеокарты – через панель управления NVIDIA и приложение GeForce Experience. Конечно, при условии, что они установлены на компьютере или ноутбуке.
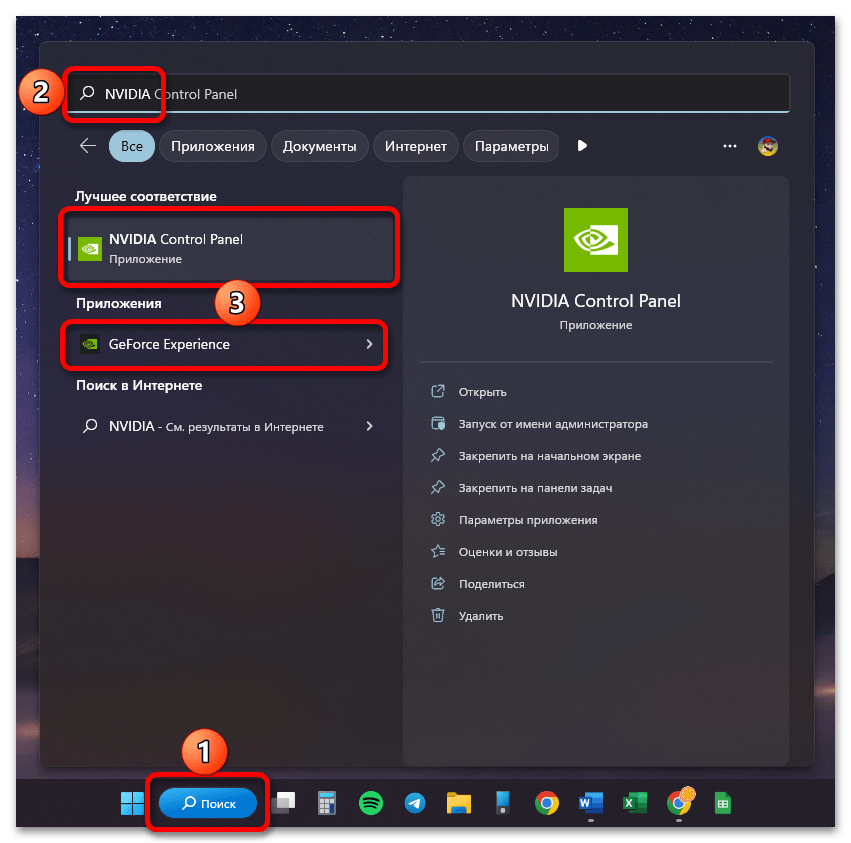
- Введите в поиск по системе запрос
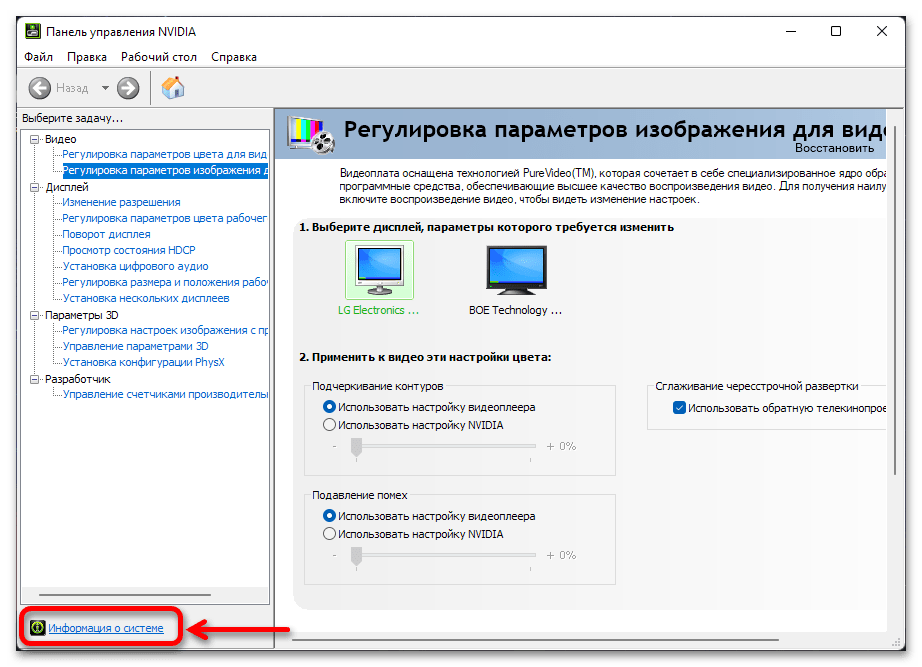
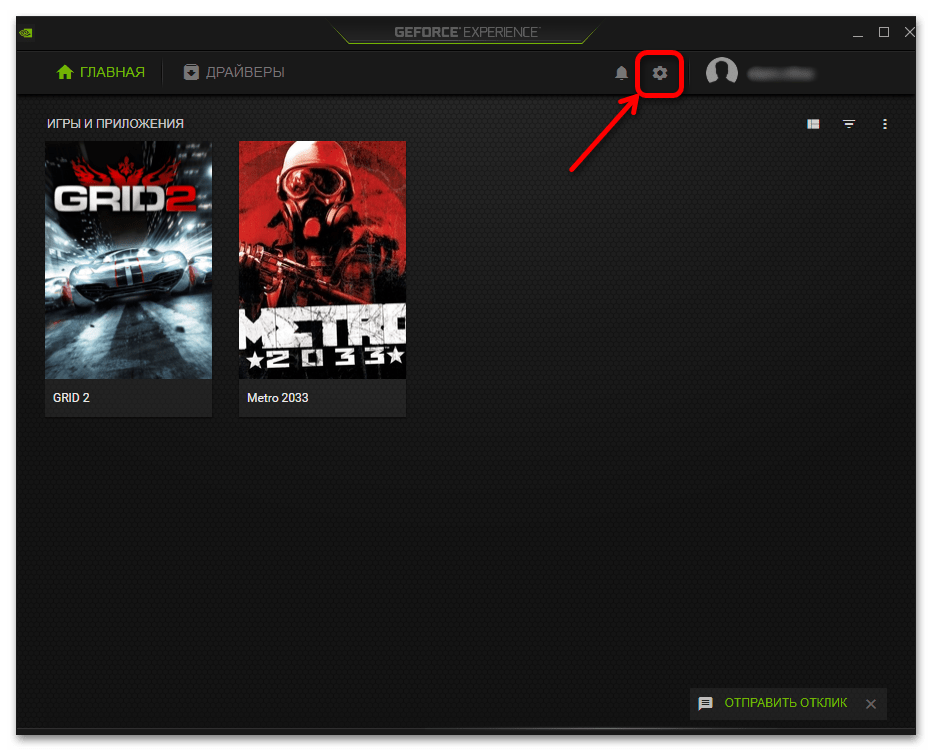
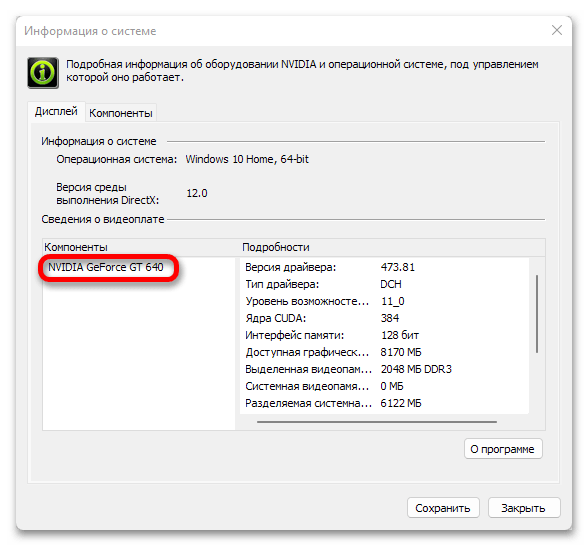
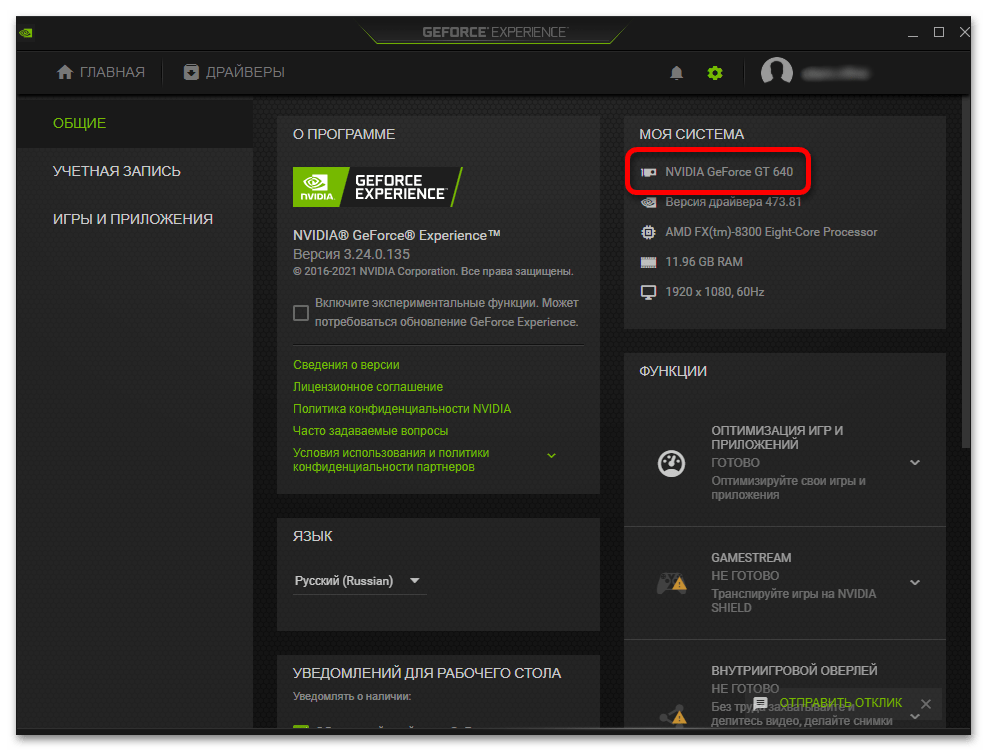
«NVIDIA»и откройте любое из представленных в выдаче приложений. - В «NVIDIA Control Panel» кликните по расположенной в нижнем левом углу ссылке «Информация о системе».

В GeForce Experience откройте «Настройки», кликнув по значку с изображением шестеренки вверху.
- Данные о графическом адаптере будут указаны в областях,

обозначенных нами на этих изображениях.
Примечание: Запустить любое из рассмотренных в данной части статьи приложений можно и через системный трей – достаточно кликнуть по значку NVIDIA правой кнопкой мышки и выбрать предпочтительный вариант.
AMD
Если в вашем ПК или ноутбуке установлена «красная» видеокарта, чтобы узнать ее название, выполните следующее:
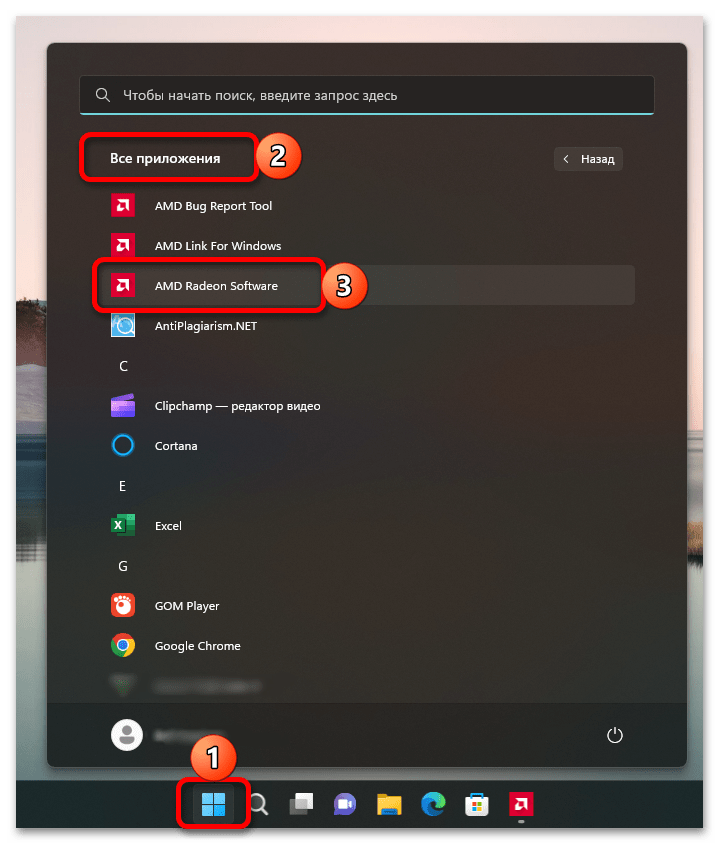
- Используя поиск или список «Все приложения» в меню «Пуск», откройте «AMD Radeon Software».
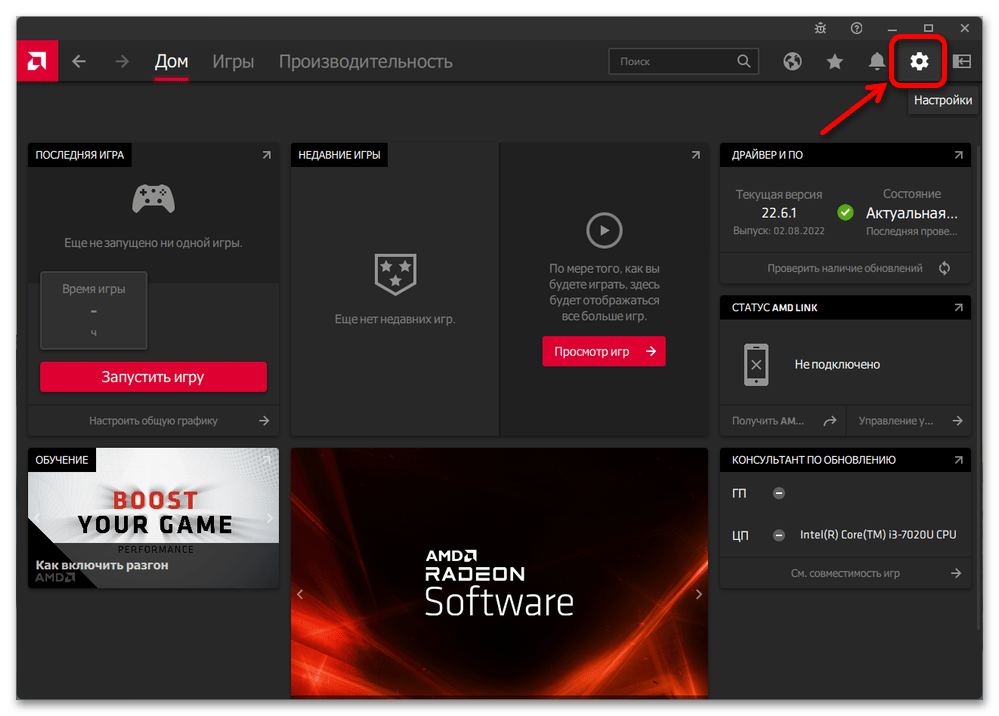
- Когда программа будет запущена, перейдите в ее настройки, нажав для этого по кнопке с изображением шестеренки, расположенной в правом верхнем углу.
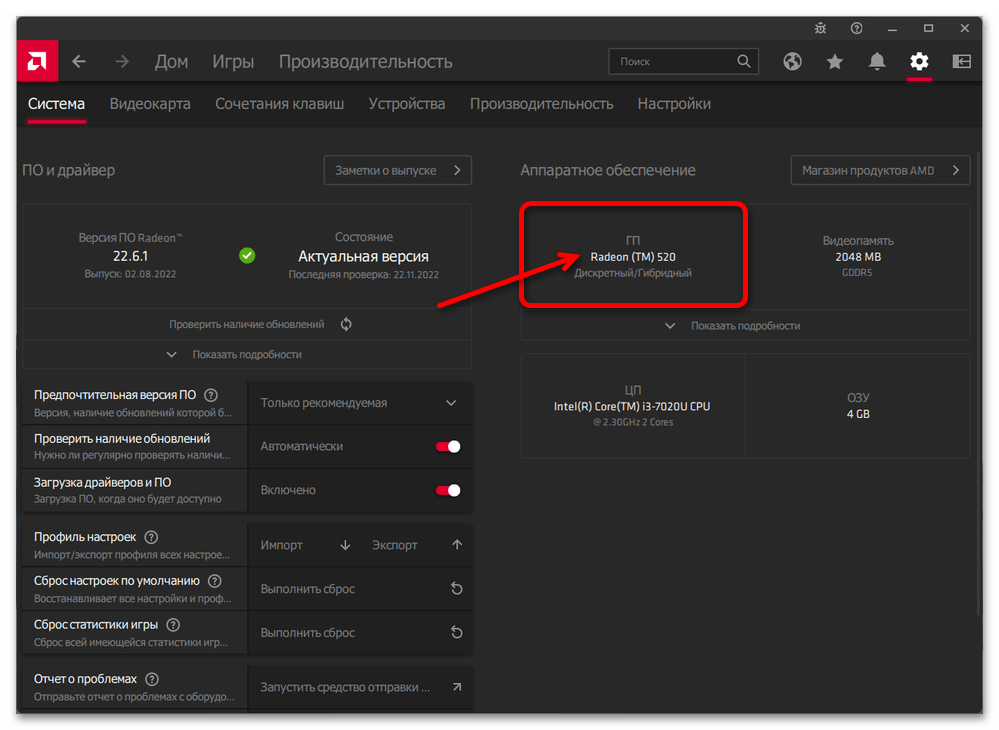
- Сведения о графическом адаптере будут представлены в блоке «Аппаратное обеспечение», его подразделе «ГП».
Вариант 3: Сторонние программы
Существует довольно много популярных программ от сторонних разработчиков, позволяющих узнать технические характеристики компьютера. Одним из наиболее популярных представителей данного сегмента является платное решение AIDA64, но есть и другие – бесплатные и более простые в использовании. Именно их мы и рассмотрим далее.

Читайте также: Программы для определения железа ПК
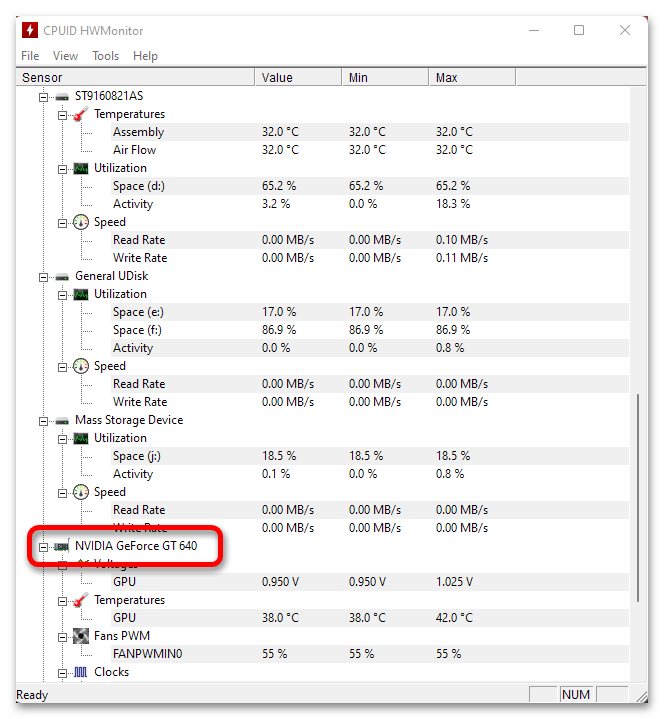
Способ 1: HWMonitor
Приложение для мониторинга состояния аппаратных компонентов компьютера, которое помимо сведений о нагрузке, температуре и потреблении энергии, также отображает и общие данные.
Скачать CPUID HWMonitor
Скачайте программу по указанной выше ссылке, установите и запустите ее. Пролистайте перечень доступных в основном окне разделов и найдите тот, что обозначен значком видеокарты – справа от него будут указаны производитель и модель устройства.
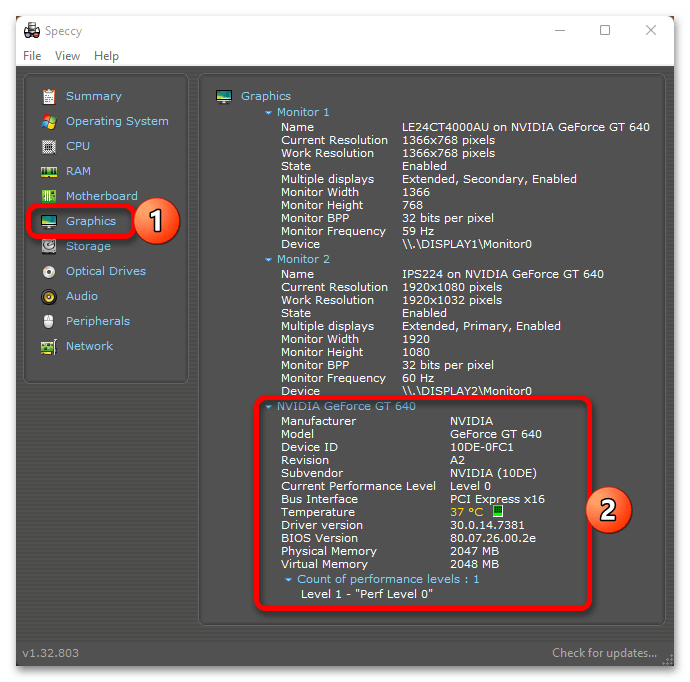
Способ 2: Speccy
Приложение от разработчиков популярного чистильщика CCleaner также позволяет получить информацию об операционной системе и аппаратных компонентах ПК.
Скачать Speccy
Установите и запустите программу, подождите несколько секунд, пока она проанализирует ОС, после чего ознакомьтесь со сведениями под строкой «Graphics» — первым(и) в ней будет указано название монитора, а ниже – объем графической памяти, производитель и модель адаптера.
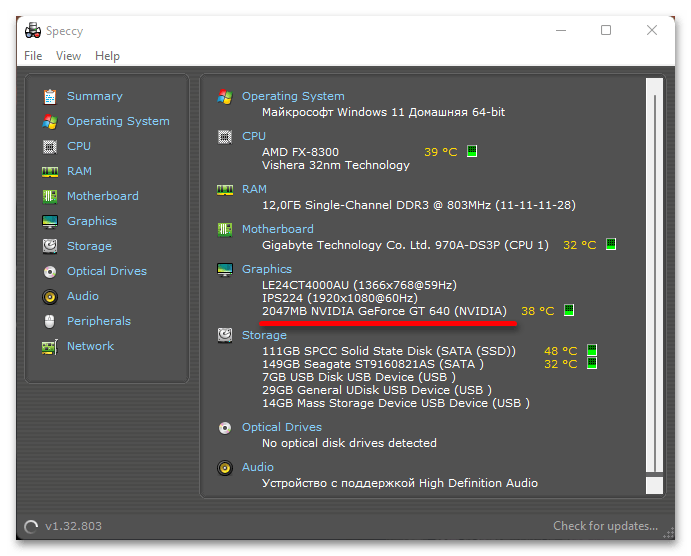
Если же перейти в одноименную вкладку на боковой панели, можно узнать более детальные сведения и о дисплее, и о видеокарте.
Читайте также:
Как узнать герцовку монитора в Виндовс 11
Как узнать модель материнской платы в Виндовс 11
Наша группа в TelegramПолезные советы и помощь
Иногда у пользователей ПК может возникать необходимость узнать точную модель своей видеокарты — например, чтобы обновить драйверы в ручном режиме или удостовериться, что система, купленная на вторичном рынке, соответствует заявленным характеристикам. И, к счастью, получить эту информацию крайне легко.
Как посмотреть видеокарту системными средствами
Операционная система Windows предоставляет сразу несколько инструментов, которые позволяют в несколько шагов определить модель видеокарты в ПК. Их преимущество в том, что загружать какой-то дополнительный софт не придётся (очень полезно, если доступа к сети у компьютера нет).
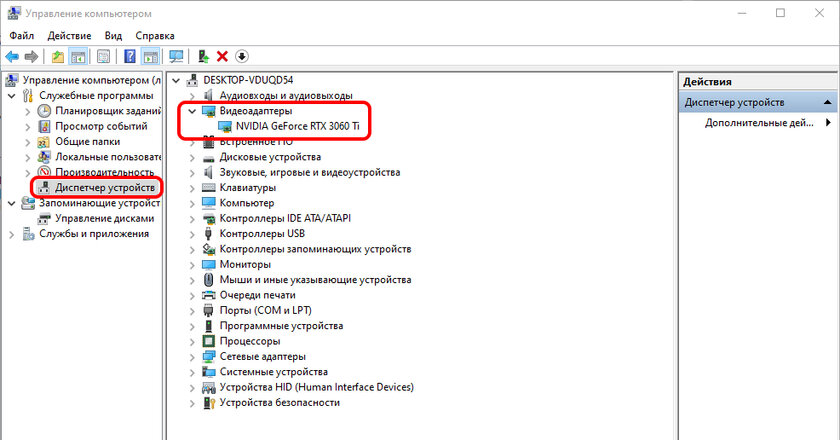
Диспетчер устройств
- Кликните правой кнопкой мыши по иконке «Этот компьютер» (или «Мой компьютер»).
- Выберите вкладку «Управление».

- Перейдите в «Диспетчер устройств».

- Раскройте вкладку «Видеоадаптеры».

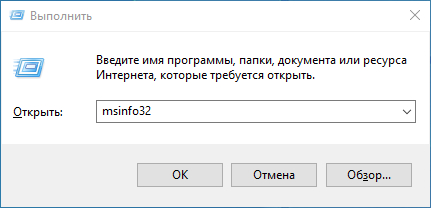
Сведения о системе
- Нажмите Win + R на клавиатуре для вызова командной строки «Выполнить».
- Введите команду msinfo32 и нажмите Enter.

- Раскройте вкладку «Компоненты» и кликните по «Дисплей» — в окне справа в пункте «Имя» указано название видеокарты.

Средство диагностики DirectX — dxdiag
- Нажмите Win + R на клавиатуре для вызова командной строки «Выполнить».
- Введите команду dxdiag и нажмите Enter.
- Перейдите во вкладку «Экран» — в разделе «Устройство» напротив «Название» указано название видеокарты.

Как узнать название видеокарты сторонними программами
Также узнать модель видеокарты можно при помощи специального софта — он абсолютно бесплатен и в определённой мере даже более удобен.
GPU-Z
- Загрузите GPU-Z с официального сайта и установите программу на ПК.
- При запуске софта в первой же вкладке (Graphics Card) в строке Name будет указана модель видеокарты.
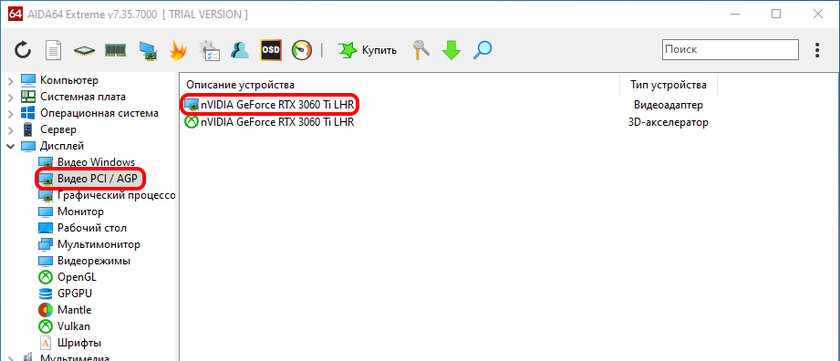
AIDA64
- Загрузите AIDA64 с официального сайта и установите программу на ПК.
- В главном меню раскройте вкладку «Дисплей» и кликните по пункту «Видео PCI / AGP» — в окне «Описание устройства» будет указана модель видеокарты.

Как узнать модель видеокарты, если компьютер не включается
В случае, если система неисправна и, соответственно, запустить штатный или сторонний софт не представляется возможным, узнать модель графического ускорителя можно по специальной наклейке на ней.
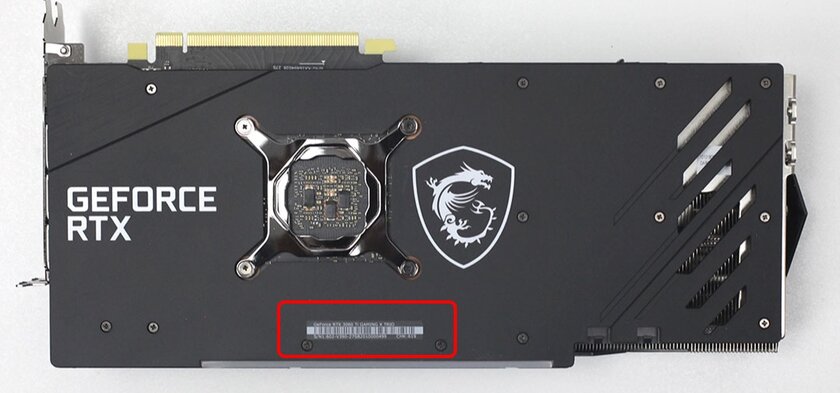
Чаще всего она расположена на тыльной стороне видеокарты на бэкплейте, либо же нужная информация промаркирована на печатной плате.
(Image credit: Future)
On Windows 11, a graphics card (GPU (graphics processing unit) or video card) is a hardware component responsible for rendering images, videos, and animations on a computer screen. Graphics cards come in different models and specifications for specific purposes, some designed for gaming and others for professional use, such as video editing or 3D modeling.
Usually, you don’t have to think about the details of the card you have installed on your computer. However, sometimes, you may need to know at least some of the specifications since if the device doesn’t have a powerful GPU, it may be impossible to use specific applications or run games as intended.
If you have to know the details of your graphics card, Windows 11 includes various tools to complete the task. The only caveat is that each method includes more information than the others.
This how-to guide will walk through the steps to determine the make, model, and other specs of your graphics card on Windows 11.
How to determine your video card info from Settings
To find out the video card make and model on Windows 11, use these steps:
- Open Settings.
- Click on System.
- Click the Display page on the right side.
- Under the «Related settings» section, click on the Advanced display setting.
- Under the «Display information» section, determine the manufacturer and model of the graphics.
Once you complete the steps, the Settings app will show the make and model of the graphics card installed on your computer.
How to determine your video card info from Device Manager
To check the graphics card basic information through Device Manager, use these steps:
All the latest news, reviews, and guides for Windows and Xbox diehards.
- Open Start.
- Search for Device Manager and click the top result to open the tool.
- Open the Display adapters branch.
- Check the vendor and model of the video card.
After you complete the steps, Task Manager will show you the manufacturer and model of your video card installed on Windows 11.
How to determine your video card info from System Information
To find out the graphics details through the System Information app, use these steps:
- Open Start.
- Search for System Information and click the top result to open the app.
- Open the Components branch and click on Display.
- Under the «Adapter Description» field, find the graphics card information.
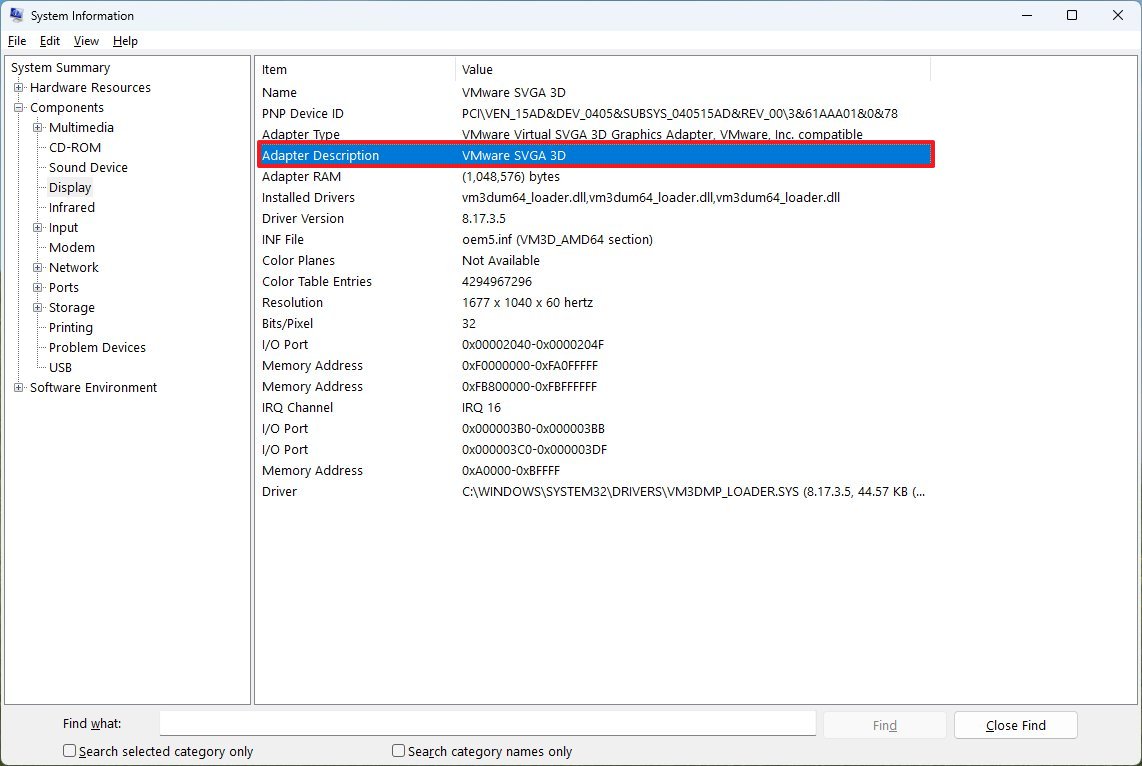
Once you complete the steps, System Information will reveal the basic information about your device’s graphics card, including make and model, driver version, adapter type, and more.
How to determine your video card info from Task Manager
To find the graphics card basic details through Task Manager, use these steps:
- Open Start.
- Search for Task Manager and select the top result to open the app.
- Click the Performance tab.
- Click on GPU.
- Determine the manufacturer and model of the graphics card.
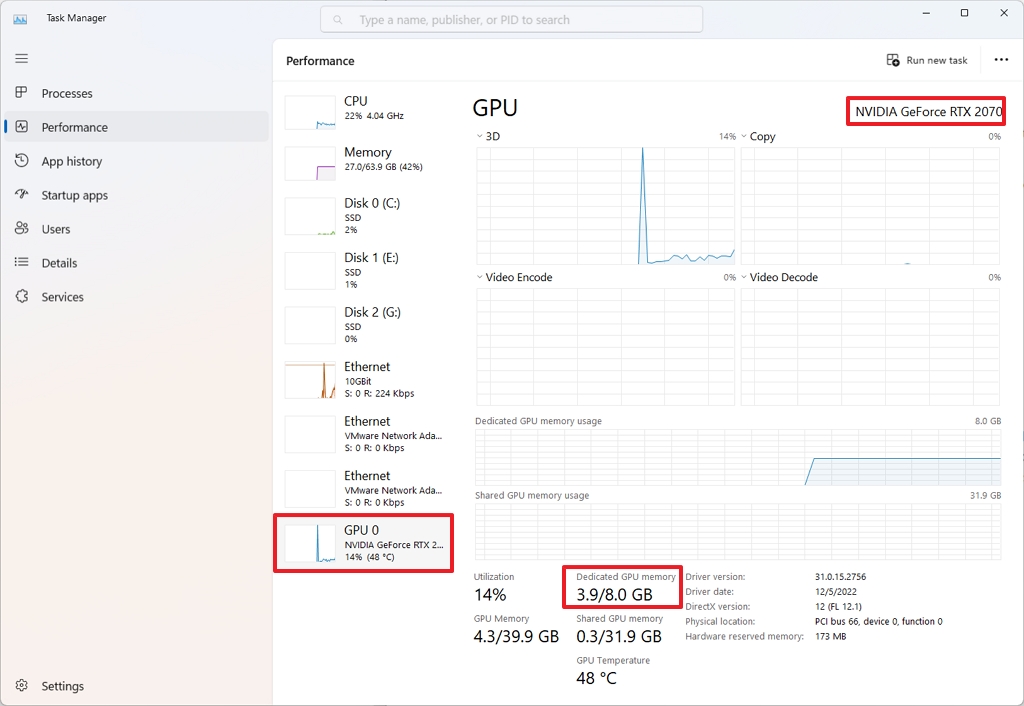
After you complete the steps, Task Manager will surface various pieces of information, including make and model, memory details, slot location in the motherboard, and current system resources information.
How to determine your video card info from DirectX
To determine the graphics information through DirectX Diagnostic Tool on Windows 11, use these steps:
- Open Start.
- Search for dxdiag and click the top result to open the app.
- Click the Yes button (if applicable).
- Click the Display tab.
- Under the «Device» section, check the manufacturer and processor type of the graphics card.
Once you complete the steps, the DirectX Diagnostic Tool will reveal the model, manufacturer, and other information (such as memory) about the graphics card.
How to determine your video card info from Control Panel
You can also use the control panel application available through each manufacturer (NVidia, AMD, and Intel) to determine some of the specs for your graphics card. In addition, you can use the app to adjust various settings.
To check the spec details of your graphics card using the NVIDIA Control Panel, use these steps:
- Open Control Panel.
- Click on Hardware and Sound.
- Click on NVIDIA Control Panel.
- Click the System Information option from the bottom-left corner.
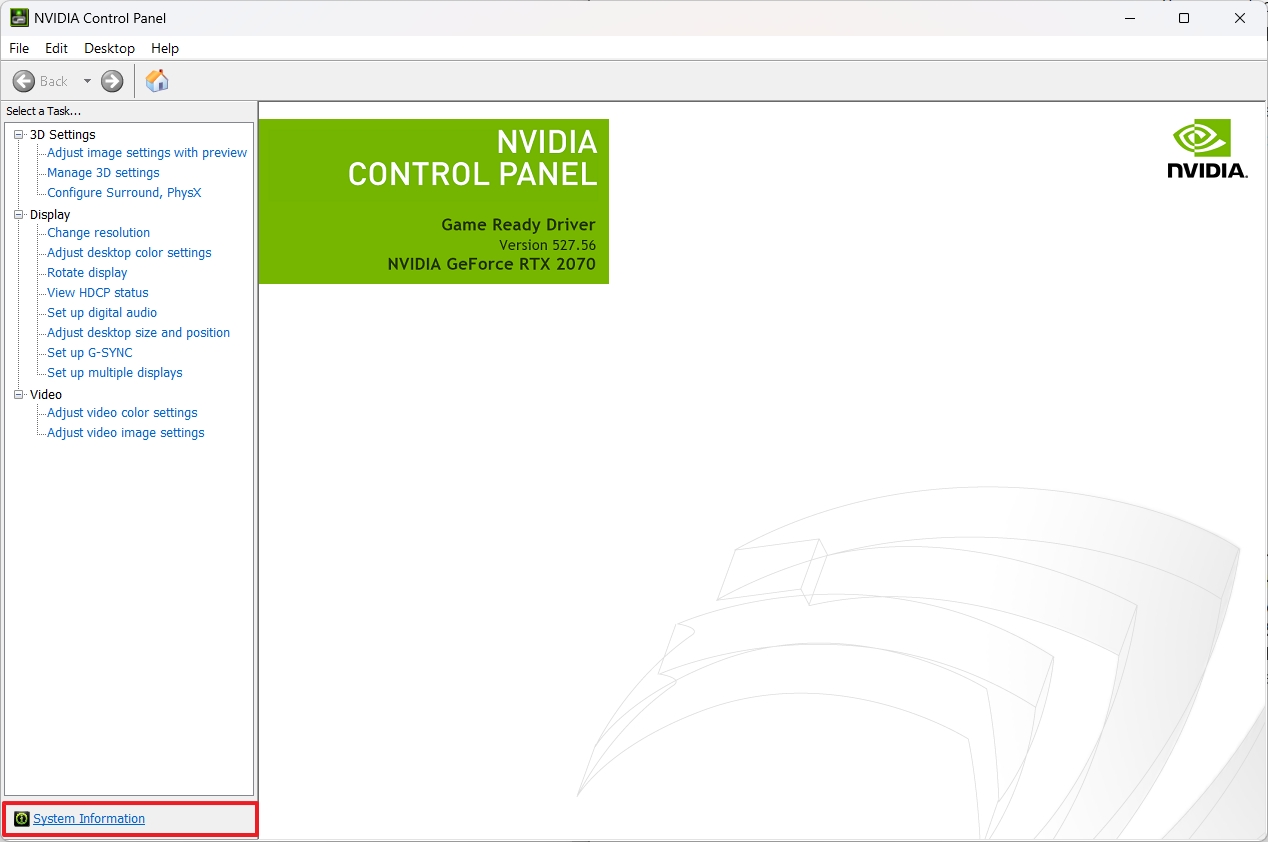
- Click the Display tab.
- Under the «Graphics card information» section, check the graphics model on the left side.
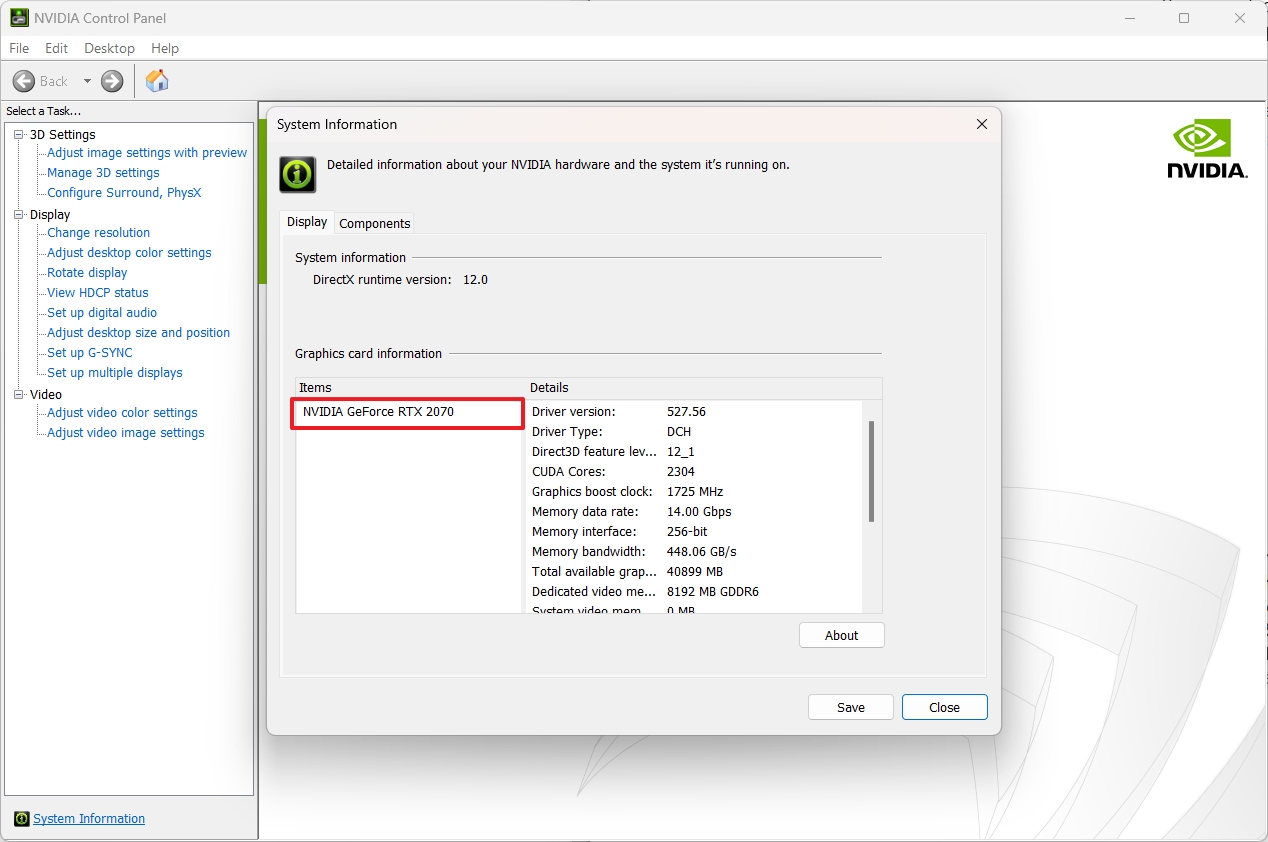
After you complete the steps, the control panel will display the model of the video card and some additional specs, including the clock speed of the GPU, firmware version, amount of CUDA cores, and more.
More resources
For more helpful articles, coverage, and answers to common questions about Windows 10 and Windows 11, visit the following resources:
- Windows 11 on Windows Central — All you need to know
- Windows 10 on Windows Central — All you need to know
Mauro Huculak has been a Windows How-To Expert contributor for WindowsCentral.com for nearly a decade and has over 15 years of experience writing comprehensive guides. He also has an IT background and has achieved different professional certifications from Microsoft, Cisco, VMware, and CompTIA. He has been recognized as a Microsoft MVP for many years.