
Если для тех или иных целей вам требуется посмотреть MAC-адрес в Windows 10, вы легко можете сделать это сразу несколькими способами: некоторые уникальны только для этой ОС, некоторые присутствовали и в предыдущих версиях Windows.
В этой инструкции подробно о том, как узнать MAC-адрес в Windows 10 и дополнительная информация, которая может быть полезной для начинающего пользователя. На близкую тему может быть полезным: Как изменить MAC-адрес компьютера.
- Как посмотреть MAC-адрес в параметрах Windows 10
- MAC-адрес в msinfo32
- Узнаем MAC-адрес в командной строке
- Просмотр MAC-адреса в свойствах подключения
- Видео инструкция
- Дополнительная информация
Как посмотреть MAC-адрес сетевой карты или Wi-Fi адаптера в параметрах Windows 10
Прежде всего обращаю внимание начинающих пользователей на следующий важный нюанс: MAC-адрес присутствует у сетевых адаптеров, у каждого свой, то есть не единственный для «всего компьютера». И если у вас на компьютере или ноутбуке есть как проводной Ethernet, так и беспроводной Wi-Fi адаптер, то MAC-адреса у них будут разные.
Как правило, требуется адрес для активного подключения. Вы можете посмотреть MAC-адрес активного Wi-Fi адаптера в интерфейсе «Параметры» с помощью следующих простых шагов:
- Откройте «Параметры» (для этого можно нажать клавиши Win+I на клавиатуре или использовать соответствующий элемент в меню Пуск).
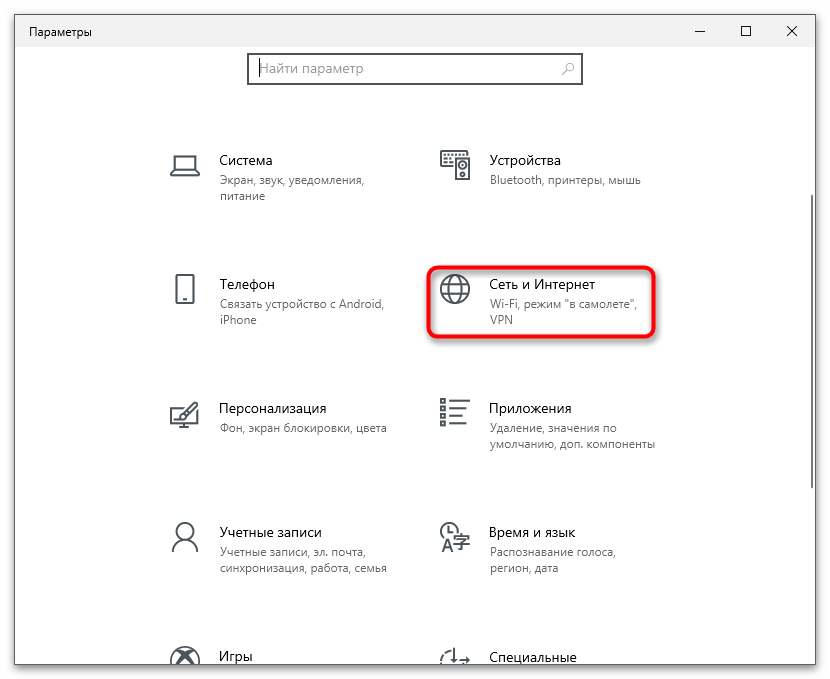
- Перейдите в раздел «Сеть и Интернет».
- Справа выберите адаптер (Wi-Fi или Ethernet) для которого нужно определить MAC-адрес.

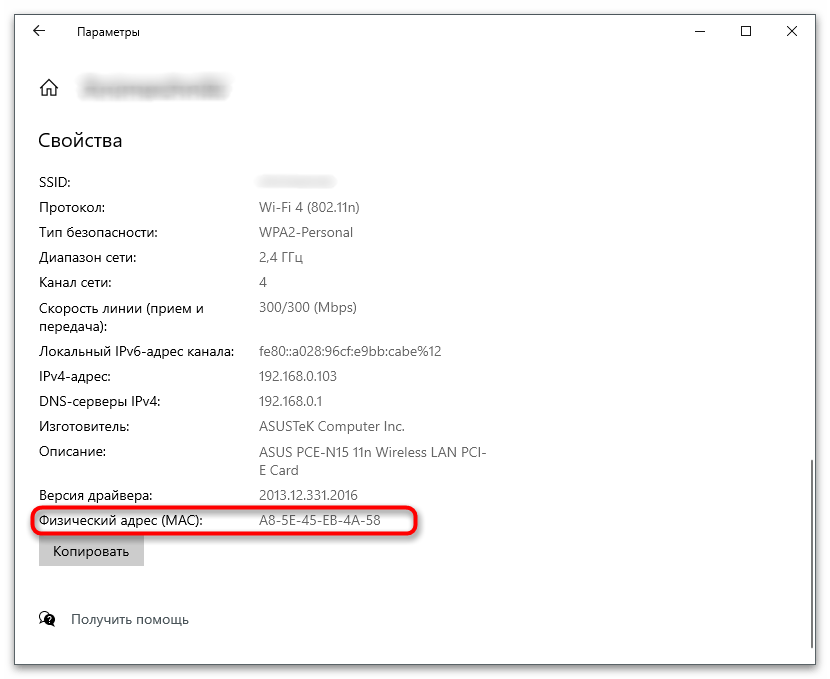
- Нажмите по «Свойства оборудования» и на следующем экране вы увидите сведения о вашем подключении и свойствах адаптера. Последний пункт «Физический адрес (MAC)» — это и есть MAC-адрес соответствующего сетевого адаптера.


Также обратите внимание на тот момент, что в свойствах подключений в параметрах Windows 10 последних версий есть пункт «Использовать случайные аппаратные адреса». Если этот пункт включен, то MAC-адреса будут автоматически меняться при каждом новом подключении.
MAC-адрес в утилите «Сведения о системе» (msinfo32)
В Windows 10 есть встроенная утилита «Сведения о системе», позволяющая ознакомиться с основной информацией о компьютере, в том числе узнать MAC-адрес:
- Нажмите клавиши Win+R на клавиатуре, введите msinfo32 и нажмите Enter.
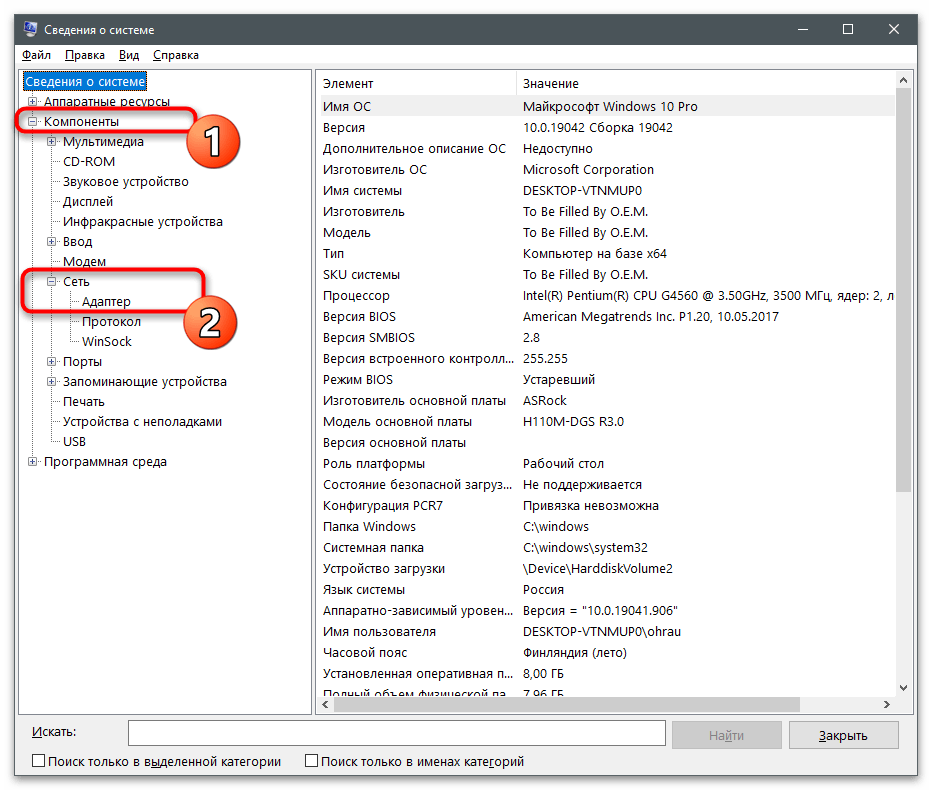
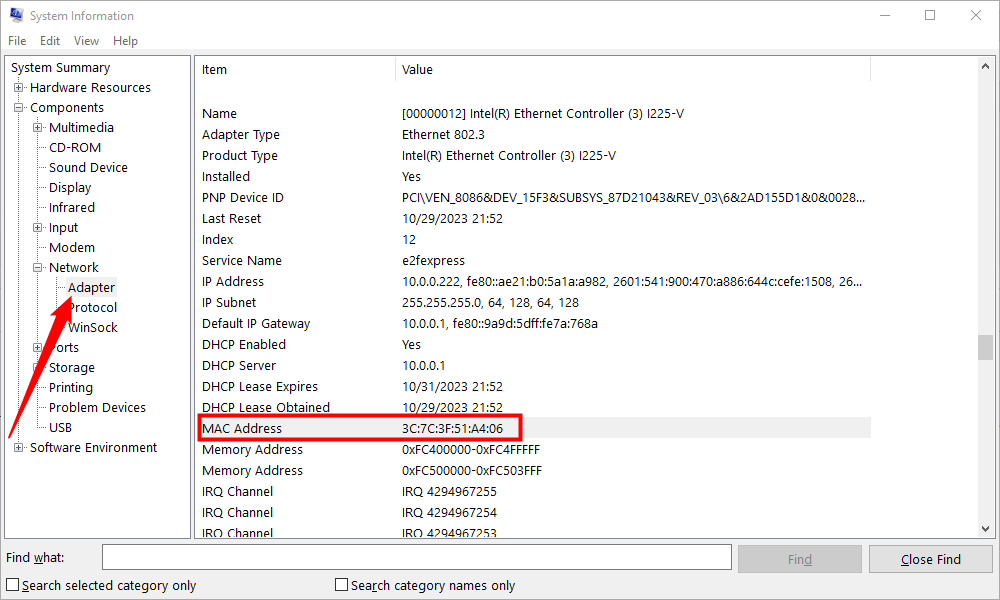
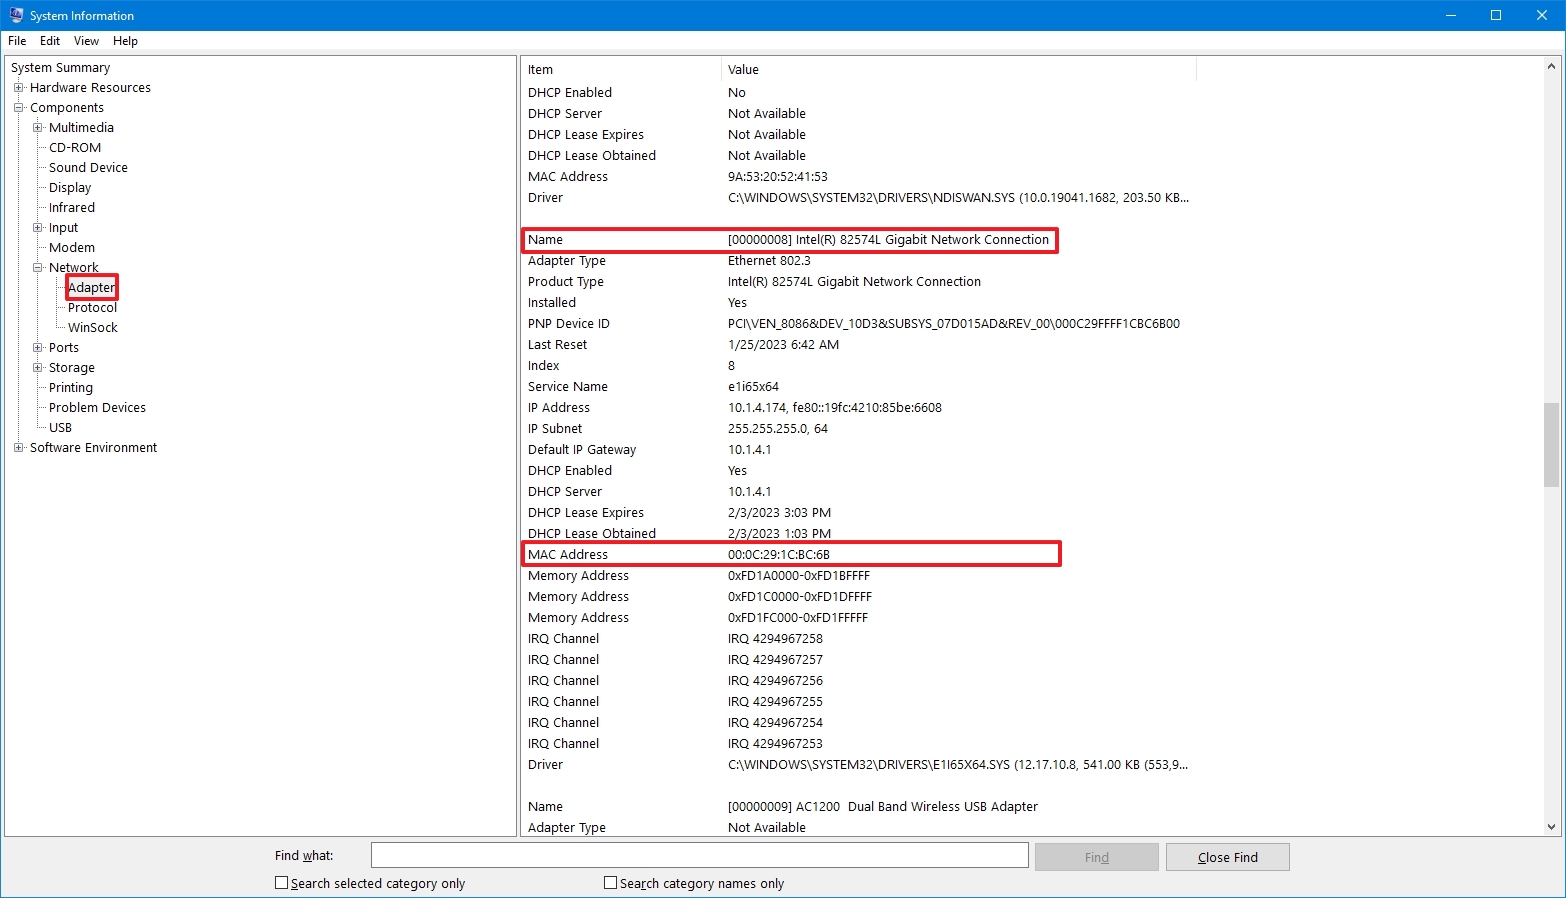
- В открывшемся окне перейдите в раздел «Компоненты» — «Сеть» — «Адаптер». Найдите в списке адаптеров нужный вам и посмотрите его MAC-адрес.


MAC-адрес в командной строке Windows 10
Еще один способ посмотреть MAC-адрес для любого сетевого адаптера в Windows 10 — командная строка:
- Запустите командную строку. Быстрее всего это сделать, используя поиск в панели задач.
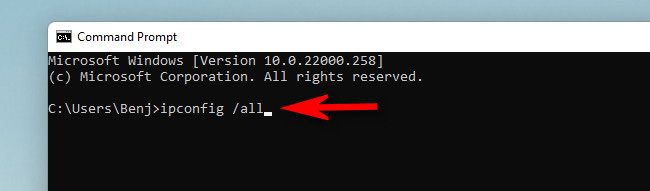
- Введите команду ipconfig /all и нажмите Enter.
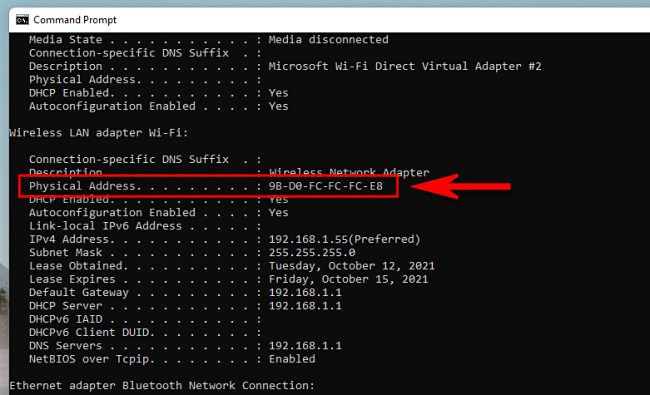
- Вы увидите список сетевых адаптеров (включая виртуальные при их наличии) с информацией о MAC-адресе для них в разделе «Физический адрес».

- В более удобном виде список MAC-адресов можно увидеть с помощью команды getmac /v /fo list

Просмотр MAC-адреса в свойствах подключения
Вы можете зайти в свойства Интернет-подключения и быстро посмотреть MAC-адрес адаптера там:
- Нажмите клавиши Win+R на клавиатуре, введите ncpa.cpl и нажмите Enter.
- В списке подключений нажмите правой кнопкой мыши по подключению и выберите пункт «Свойства» в контекстном меню.
- Подведите указатель мыши к имени сетевого адаптера в верхней части окна — в результате в сплывающем окне отобразится MAC-адрес устройства.
Также, если вы откроете не свойства, а «Состояние» активной сети (2-й шаг), а затем нажмете кнопку «Сведения», вы увидите следующее окно:
В нем также отображается MAC-адрес сетевой карты или Wi-Fi адаптера в строке «Физический адрес».
Видео инструкция
Дополнительная информация
В завершение два нюанса, которые могут оказаться полезными для начинающего пользователя:
- Если вам требуется MAC-адрес для предоставления его провайдеру, то учитывайте, что при подключении через роутер провайдер может «видеть» другой MAC-адрес — тот, который имеет сам Wi-Fi роутер. Его можно посмотреть в настройках роутера, также он обычно указывается на наклейке сзади (внизу) маршрутизатора.
- Если вам требуется ввести куда-либо ваш MAC-адрес, учитывайте, что в Windows 10 в качестве разделителей между каждыми двумя символами при просмотре могут выступать символы «-», а при вводе нужно использовать двоеточие или вводить MAC-адрес вообще без разделителей.
- В настройках роутера в списке подключенных клиентов вы можете посмотреть список устройств, которые подключены по Wi-Fi и LAN. Для них также указываются MAC-адреса.
Все способы:
- Способ 1: Свойства подключения
- Способ 2: Окно «Сведения о системе»
- Способ 3: «Диспетчер устройств»
- Способ 4: «Редактор реестра»
- Способ 5: «Командная строка»
- Способ 6: Мониторинг в веб-интерфейсе роутера
- Способ 7: Программа Find MAC Address
- Вопросы и ответы: 0
MAC-адрес имеет сетевая карта, а не сам ПК, поэтому под определением «узнать MAC-адрес компьютера» подразумевается поиск физического адреса упомянутого устройства. В Windows 10 есть много способов, позволяющих получить желаемую информацию.
Способ 1: Свойства подключения
В Windows 10 присутствует отдельное меню, где отображаются параметры текущей сети. Среди списка всех данных находится и MAC-адрес, а для его просмотра понадобится только перейти в соответствующий раздел с настройками и найти нужную строчку.
- Откройте меню «Пуск» и перейдите в «Параметры», нажав по значку в виде шестеренки.
- Выберите раздел «Сеть и Интернет».
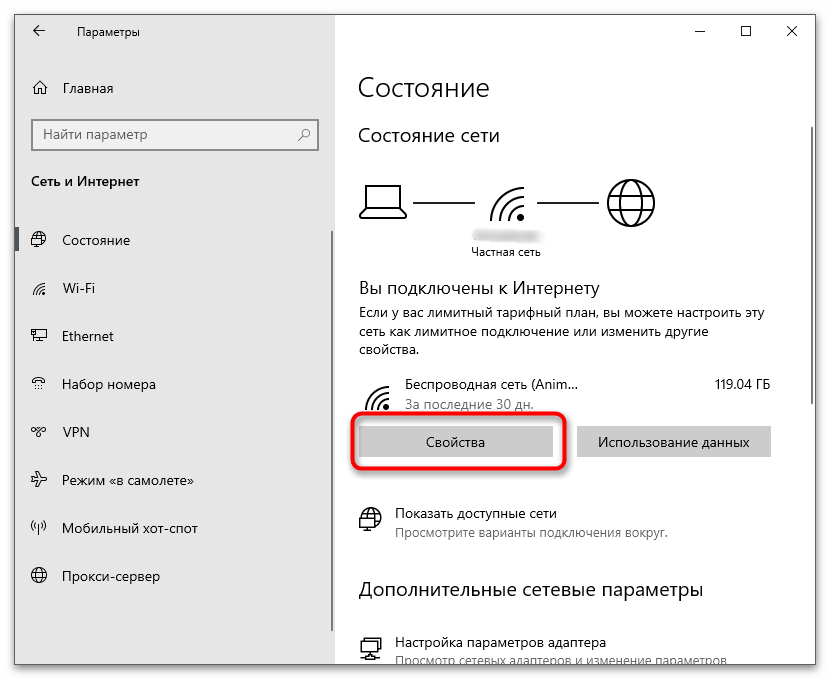
- Новое окно отобразится в категории «Состояние». Под названием текущей сети нажмите кнопку «Свойства».
- Последняя строка называется «Физический адрес (MAC):», и после двоеточия как раз написан интересующий вас набор символов.
Способ 2: Окно «Сведения о системе»
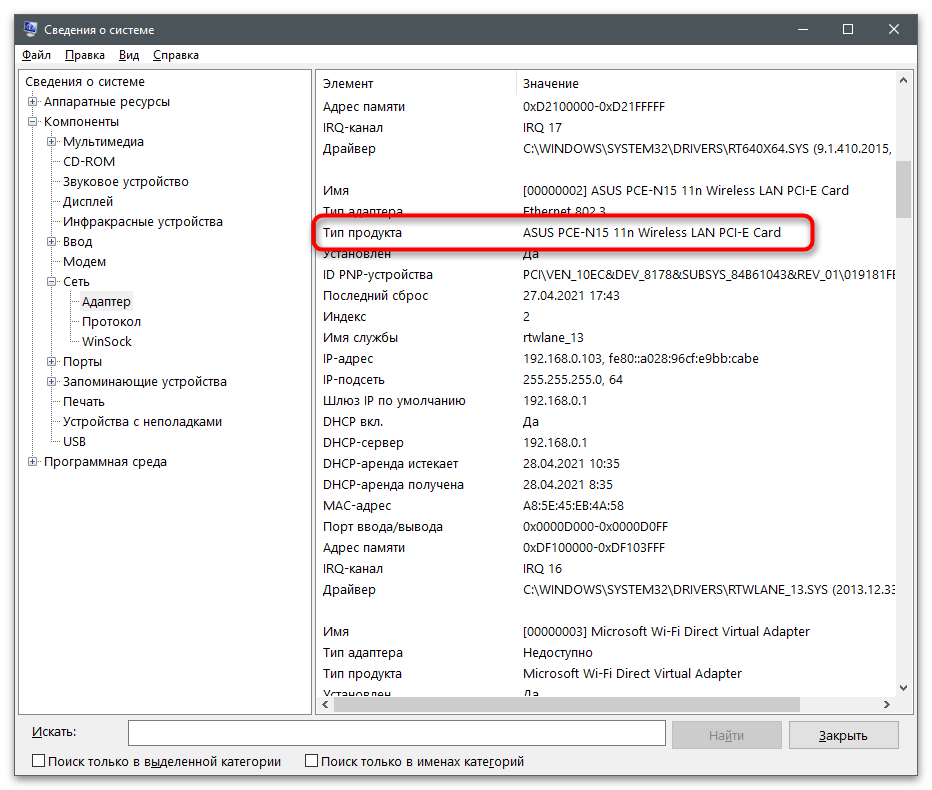
«Сведения о системе» — встроенный в операционную систему компонент, предоставляющий пользователю развернутые данные о Windows. Если вы раньше никогда не сталкивались с данным приложением, разобраться в составляющих самостоятельно будет сложно, поэтому мы рекомендуем следовать инструкции.
- Откройте утилиту «Выполнить», используя для этого сочетание клавиш Win + R, и введите в поле
msinfo32, после чего нажмите Enter для перехода в приложение. - В нем разверните раздел «Компоненты», затем «Сеть». Найдите пункт «Адаптер» и кликните по нему левой кнопкой мыши.
- В списке отыщите тип продукта с названием используемой сетевой карты.
- Ниже найдите строку «MAC-адрес» и узнайте ее значение.


Способ 3: «Диспетчер устройств»
Этот способ не всегда работает, поскольку в параметрах сетевой карты иногда отсутствует прописанный Network Address. Однако его реализация займет меньше минуты, поэтому все желающие могут попробовать перейти в свойства рассматриваемого устройства для поиска нужного содержимого.
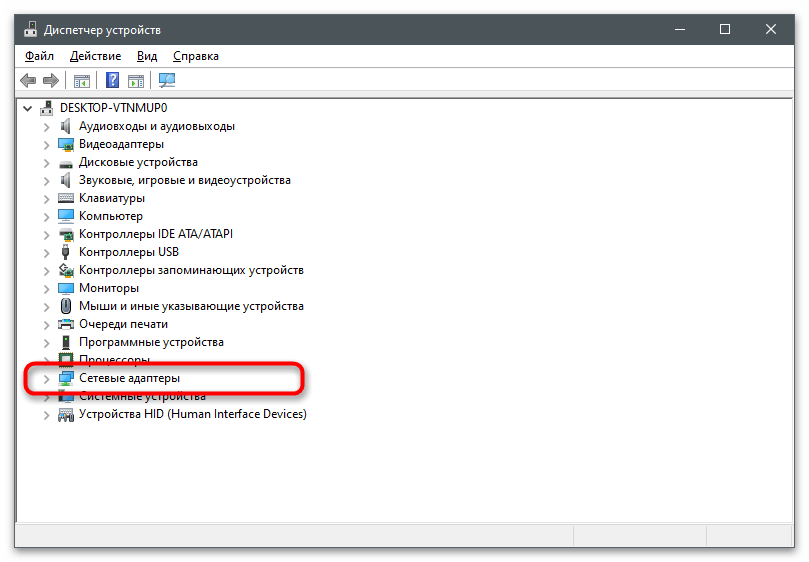
- Щелкните правой кнопкой мыши по «Пуску» и из появившегося контекстного меню выберите пункт «Диспетчер устройств».
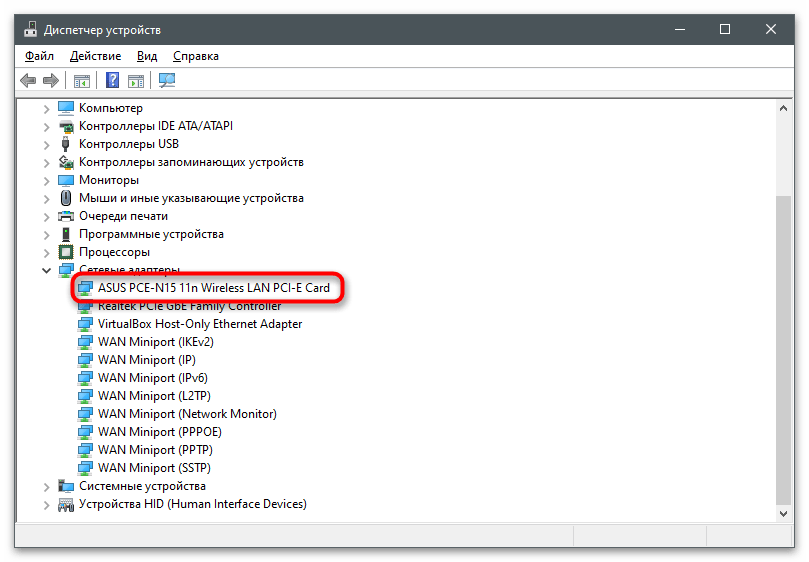
- Разверните блок «Сетевые адаптеры».
- Среди списка доступных устройств найдите используемое и дважды кликните по нему ЛКМ.
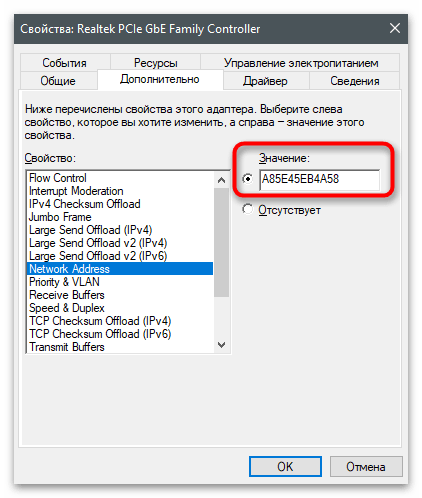
- Перейдите на вкладку «Дополнительно» и выделите «Network Address».
- Если маркер установлен возле пункта «Значение», значит, в поле отображается MAC-адрес без дефисов после каждой пары чисел.

Способ 4: «Редактор реестра»
Рассмотренный в предыдущем методе параметр имеет свою запись в реестре, хранящуюся в папке с другими параметрами сетевой карты. Это нужно, чтобы другие программы быстро получали доступ к необходимой информации и обрабатывали ее. Вы можете просмотреть значение этого параметра, если хотите узнать MAC-адрес компьютера через «Редактор реестра».
- Откройте утилиту «Выполнить» (Win + R) и в поле напишите
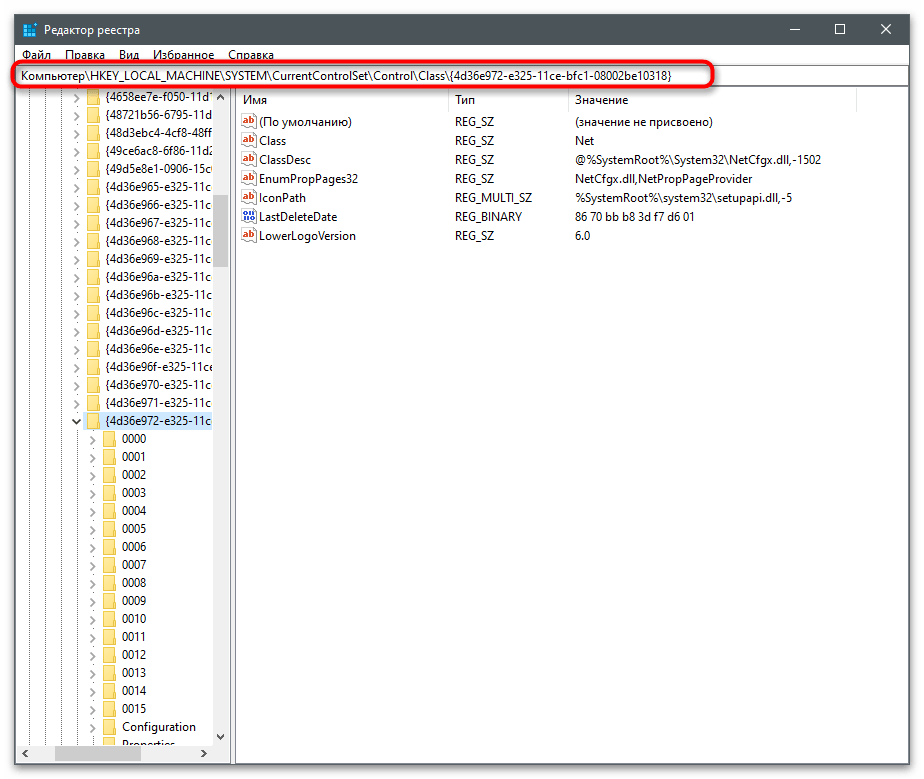
regedit. - Перейдите по пути
HKEY_LOCAL_MACHINE\SYSTEM\CurrentControlSet\Control\Class\{4D36E972-E325-11CE-BFC1-08002BE10318}(его можно просто скопировать и вставить в адресную строку). - В корне папки вы найдете еще несколько каталогов с последовательной нумерацией. Откройте их по очереди, чтобы найти тот, в котором хранятся данные используемого сетевого оборудования.
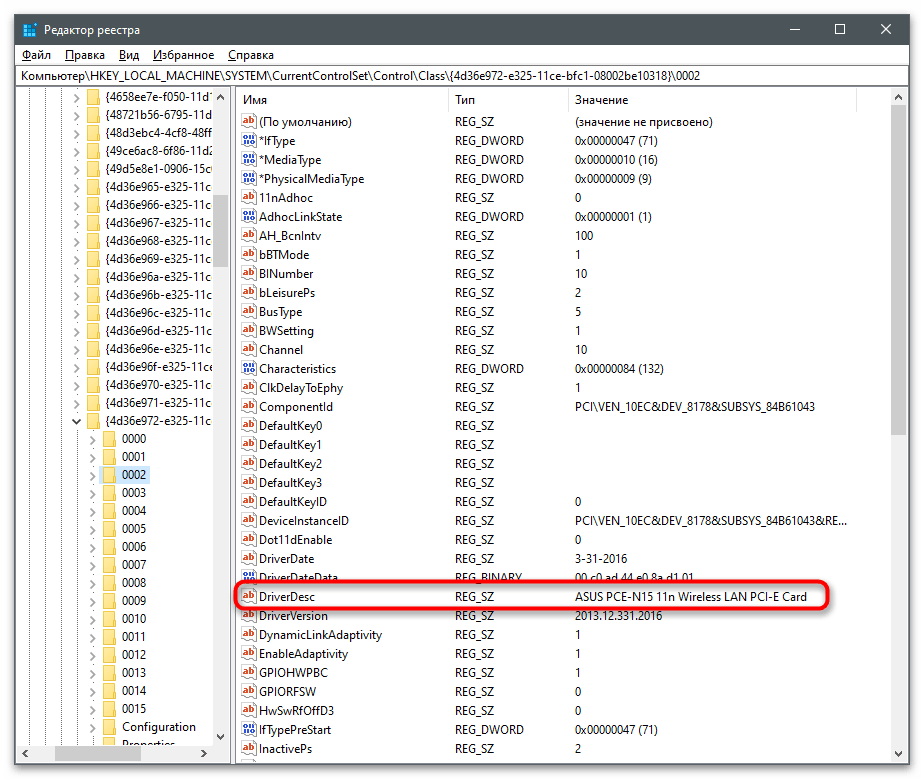
- Узнать название устройства можно по значению параметра «DriverDesc».
- В папке с параметрами выбранного сетевого адаптера найдите файл «NetworkAddress», кликните по нему дважды и узнайте MAC-адрес из поля «Значение».


Способ 5: «Командная строка»
В операционной системе есть две разные команды, предназначенные для получения информации о состоянии сети и подключенных устройствах. Они подойдут и для определения физического адреса компьютера по параметрам сетевой карты. Преимущество данного метода заключается в том, что вам не понадобится переходить по разным окнам и искать файлы со значениями, достаточно будет ввести консольную команду и выполнить ее.
- Для этого найдите «Командную строку» через «Пуск» и запустите ее.
- Введите команду
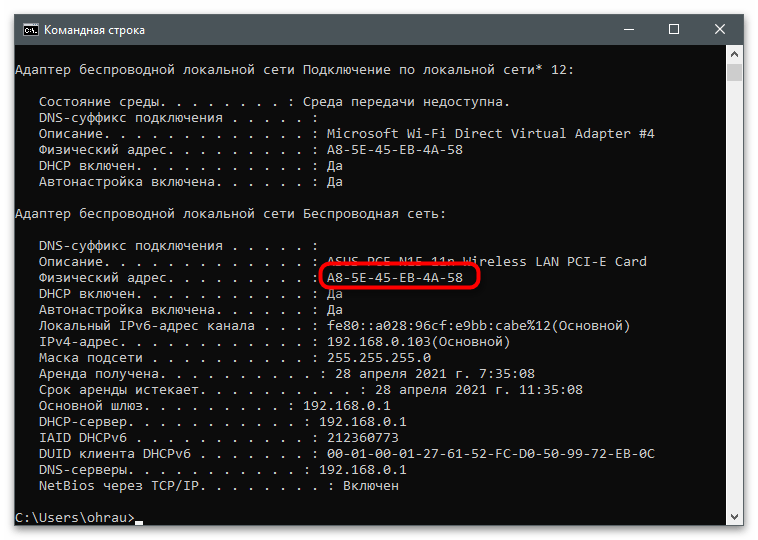
ipconfig/allдля получения данных об адаптерах локальной сети. - Среди списка доступных устройств отыщите то, чье описание соответствует названию сетевой карты.
- Ниже найдите пункт «Физический адрес» и используйте MAC для своих дальнейших целей.


Вторая команда, позволяющая добиться того же самого результата, выводит на экран немного другое содержимое, что может быть полезно для некоторых пользователей, занимающихся диагностикой сети и изменением ее параметров.
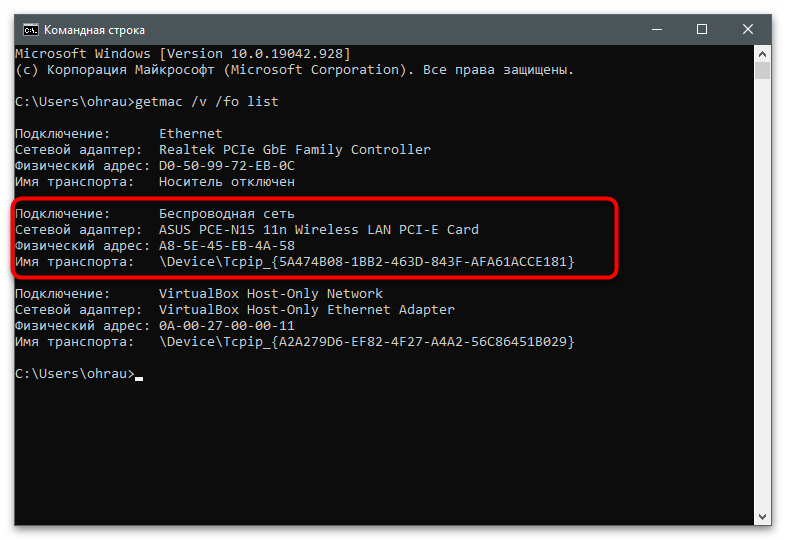
- Для ее выполнения введите
getmac /v /fo listи нажмите Enter. - Найдите активное подключение и физический адрес устройства.
- Если используется несколько сетевых карт, неактивная сейчас имеет маркер «Носитель отключен», что и поможет не запутаться в параметрах.


Консольные команды используются для определения и других параметров, например MAC-адреса по известному IP. Конечно, сработает это только для локальных устройств, но зато поможет обнаружить комбинацию и использовать ее в своих целях.
Подробнее: Определение MAC-адреса через IP
Способ 6: Мониторинг в веб-интерфейсе роутера
Принцип реализации этого метода тесно связан с моделью используемого роутера и типом подключения компьютера к нему. К примеру, в TP-Link (этот бренд и будем рассматривать как пример) есть только средство для диагностики клиентов беспроводной сети, что не работает для LAN. Среди списка всех значений отображается и MAC-адрес, поэтому остается только определить сам ПК.
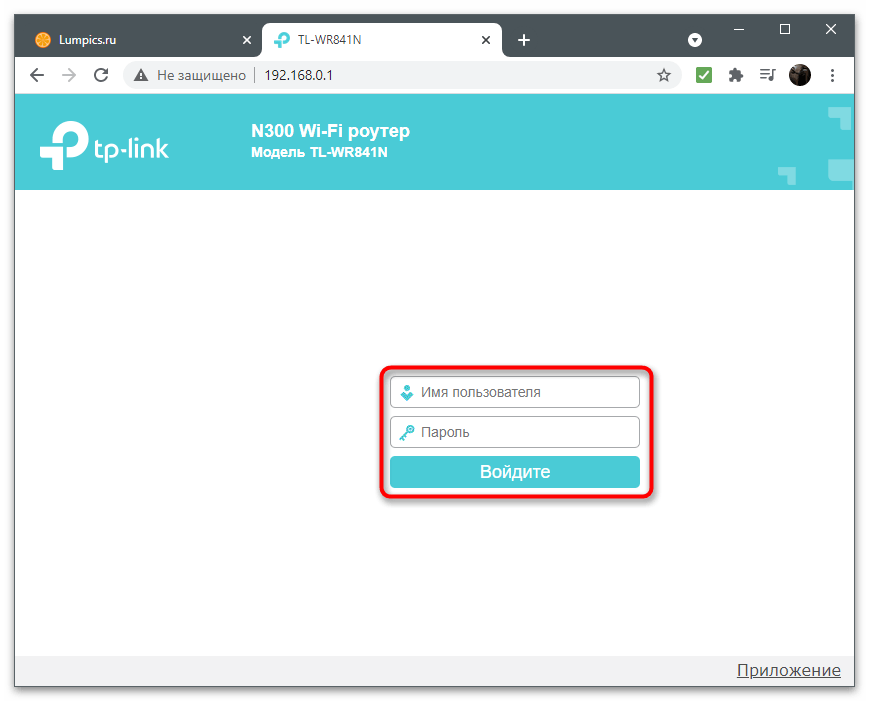
- Авторизуйтесь в веб-интерфейсе роутера, открыв его через любой удобный браузер. Детальнее об этом читайте в другой статье на нашем сайте по ссылке ниже.
Подробнее: Вход в веб-интерфейс роутеров
- На панели слева выберите раздел «Беспроводной режим».
- Откройте категорию настроек «Статистика беспроводного режима». В других прошивках веб-интерфейса она может называться «Клиенты».
- Осталось только определить, какой из компьютеров является вашим, чтобы узнать его MAC-адрес. Для этого можно отключить остальные устройства или полагаться на количество отправленных и полученных пакетов.


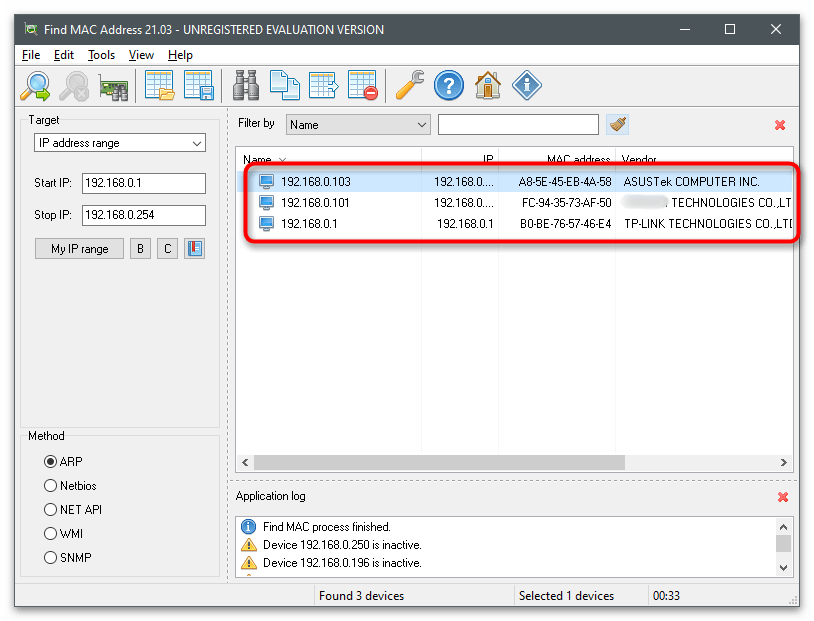
Способ 7: Программа Find MAC Address
В качестве последнего метода предлагаем программу Find MAC Address, функциональность которой как раз сосредоточена на поиске MAC-адресов локальных и удаленных компьютеров, подключенных к одной сети. В ней есть удобный графический интерфейс, а грамотная реализация необходимых инструментов поможет максимально быстро собрать необходимую информацию и использовать ее в своих целях.
Скачать Find MAC Address с официального сайта
- Кликните по ссылке выше и скачайте установщик Find MAC Address на свой компьютер.
- Следуйте простым инструкциям по установке и откройте программу для работы.
- Подтвердите использование бесплатного периода на протяжении десяти дней. Никаких функциональных ограничений тестовый режим не привносит.
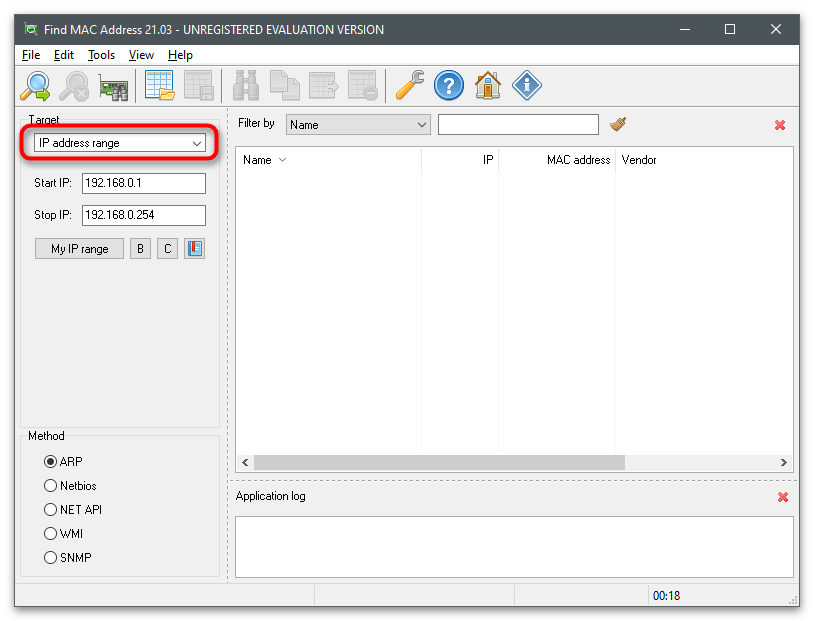
- Выберите метод поиска MAC-адреса из соответствующего списка. По умолчанию стоит прослушивание указанного диапазона IP-адресов.
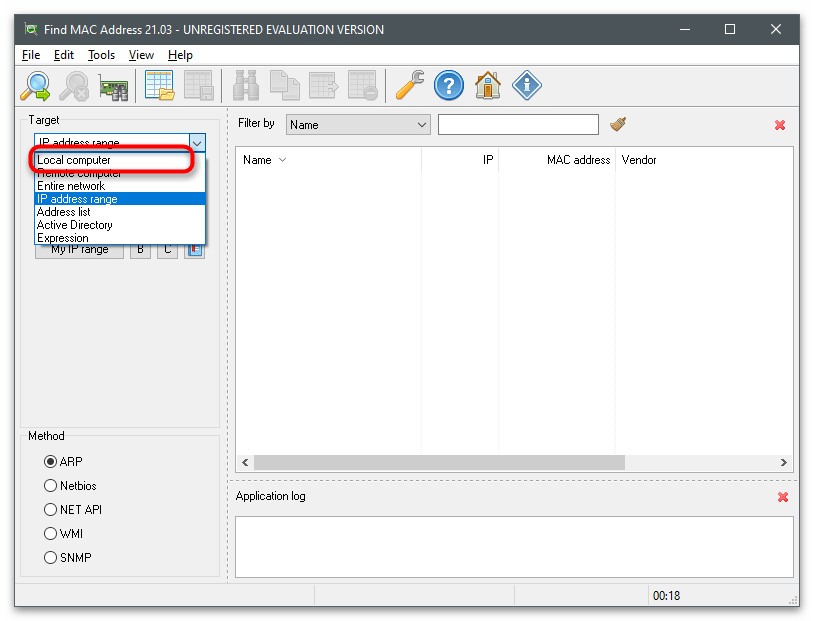
- Вместо этого вы можете выбрать вариант «Local Computer», если нужно узнать физический адрес собственного устройства.
- В этом случае никаких параметров поиска изменять не надо — можно сразу запустить выполнение задания.
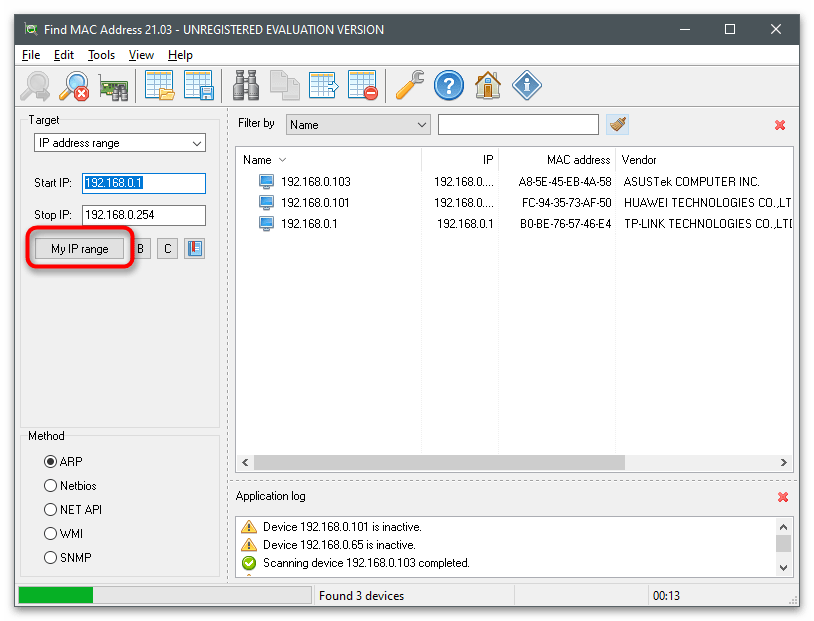
- Для прослушивания IP-адресов нажмите «My IP range», чтобы узнать в каком диапазоне находится используемая сетевая карта.
- Выберите ее из списка, чтобы программа автоматически изменила параметры.
- Ознакомьтесь с результатами в правой части окна и скопируйте требуемый адрес.


Наша группа в TelegramПолезные советы и помощь
- To find the MAC address on Windows 10, open “Command Prompt,” run the “ipconfig /all” command, and confirm the “Physical Address” information.
- You can also open Settings > Network & Internet > Wi-Fi or Ethernet, open the active network connection, and determine the MAC address on Windows 10 without Command Prompt.
- It’s also possible to use the Control Panel and the System Information app.
UPDATED 12/18/2023: On Windows 10, the MAC (Media Access Control) address is a unique hardware identifier available on every network adapter, and in this guide, I’ll outline the steps to find this information for your Wi-Fi or Ethernet adapter. The “MAC” is a 48-bit address (often referred to as “hardware address” or “physical address”) divided into six octets represented by hexadecimal numbers (for example, 00-0C-29-E4-D8-90), and it’s used for communication at the data link layer.
Usually, you don’t have to worry about this information, but sometimes, you may need to find the MAC address assigned to your network adapter on your computer for various reasons. For example, when you want to set up network access filtering on the router, track down a specific device in the network, and troubleshoot networking problems.
In this guide, I’ll teach you the different ways to find the MAC address of your network adapter on Windows 10.
On Windows 10, you can determine the physical MAC address of a network adapter from the Command Prompt, Settings app, Control Panel, and the System Information app. Here’s how.
- 1. Locate MAC address using Command Prompt
- 2. Locate MAC address using Settings app
- 3. Locate MAC address using Control Panel
- 4. Locate MAC address using System Information
1. Locate MAC address using Command Prompt
To find the MAC address from Command Prompt on Windows 10, use these steps:
-
Open Start on Windows 10.
-
Search for Command Prompt and click the top result to open the app.
-
Type the following command to view the current network configuration and press Enter:
ipconfig /all

-
Check the “Physical Address” field to find the MAC address of the Wi-Fi or Ethernet adapter.

Once you complete the steps, the output of the command will display all the information available of every network adapter on your computer, including the MAC address information.
2. Locate MAC address using Settings app
To find the MAC address for your network adapter from the Settings app, use these steps:
-
Open Start.
-
Search for Settings and click the top result to open the app.
-
Click on Network & Internet.
-
Click on Wi-Fi (or Ethernet).
-
Click on the network connection.

-
Check the “Physical address (MAC)” field to view the Media Access Control address.


After you complete the steps, the network properties will help you determine the physical address.
3. Locate MAC address using Control Panel
To find the MAC address on Windows 10 from Control Panel, use these steps:
-
Open Start.
-
Search for Control Panel and click the top result to open the app.
-
Click on Network and Internet.
-
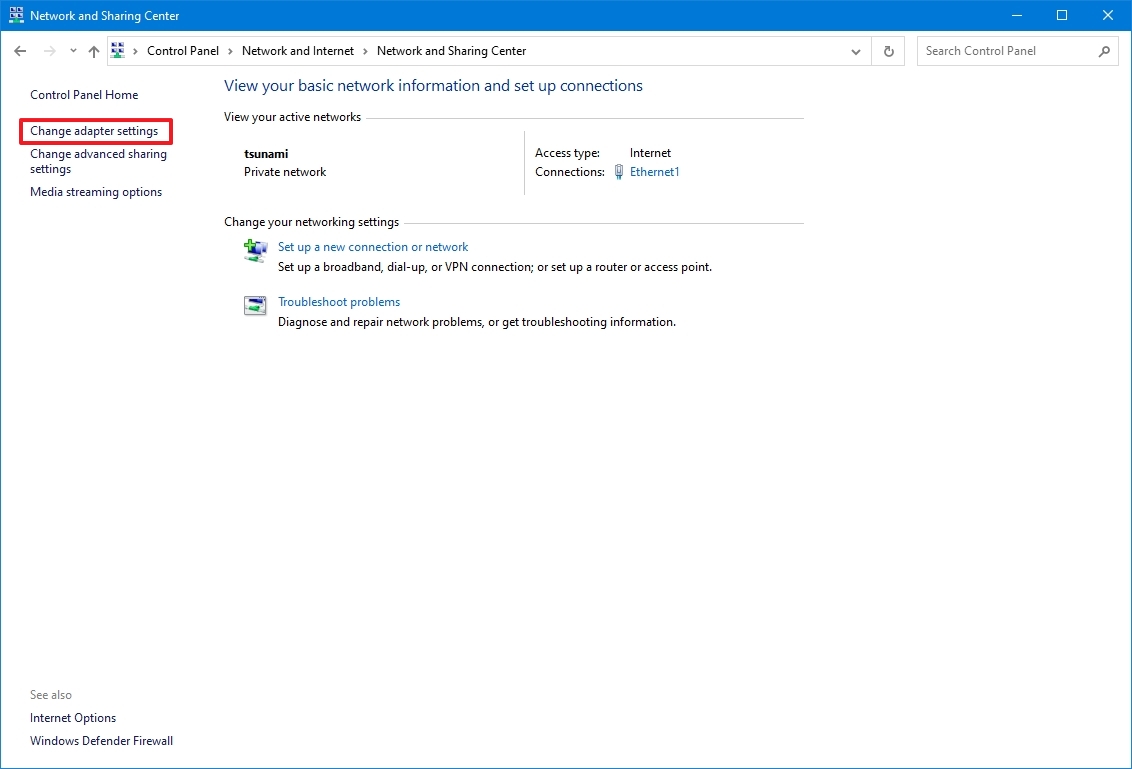
Click on Network and Sharing Center.
-
Click the “Change adapter settings” option on the left pane.

-
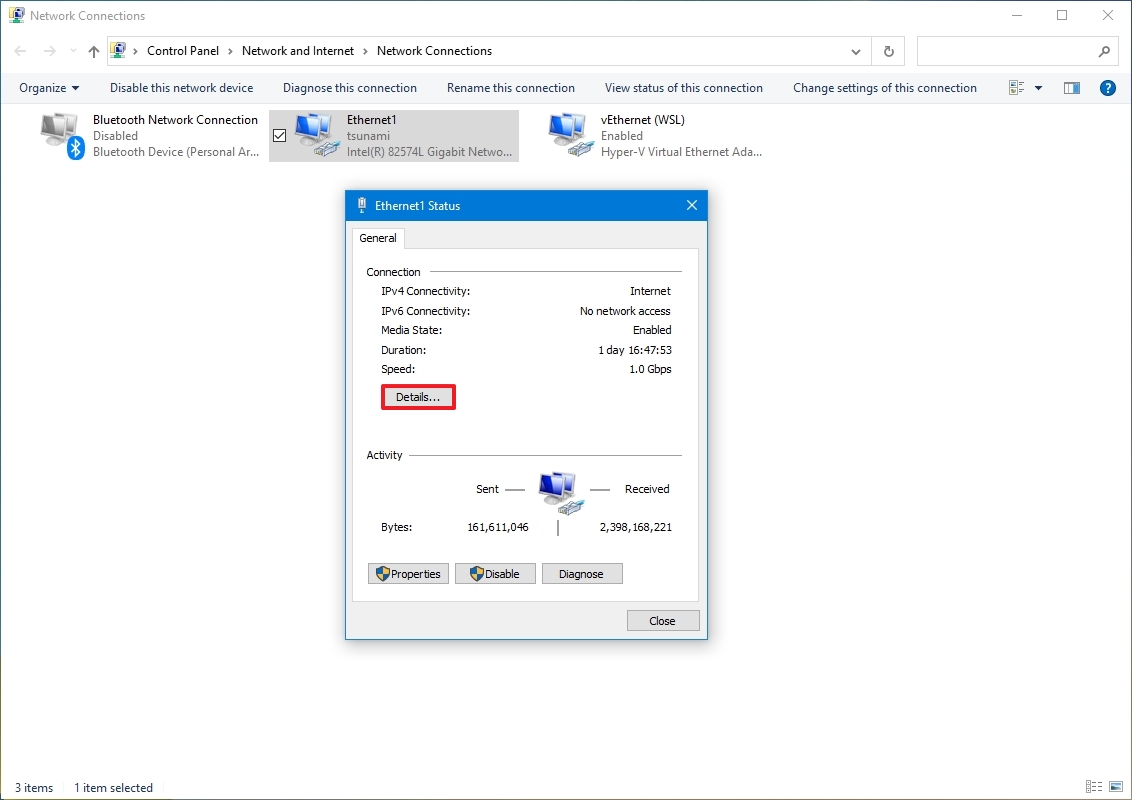
Right-click the Wi-Fi or Ethernet adapter and choose the Status option.

-
Click the Details button.
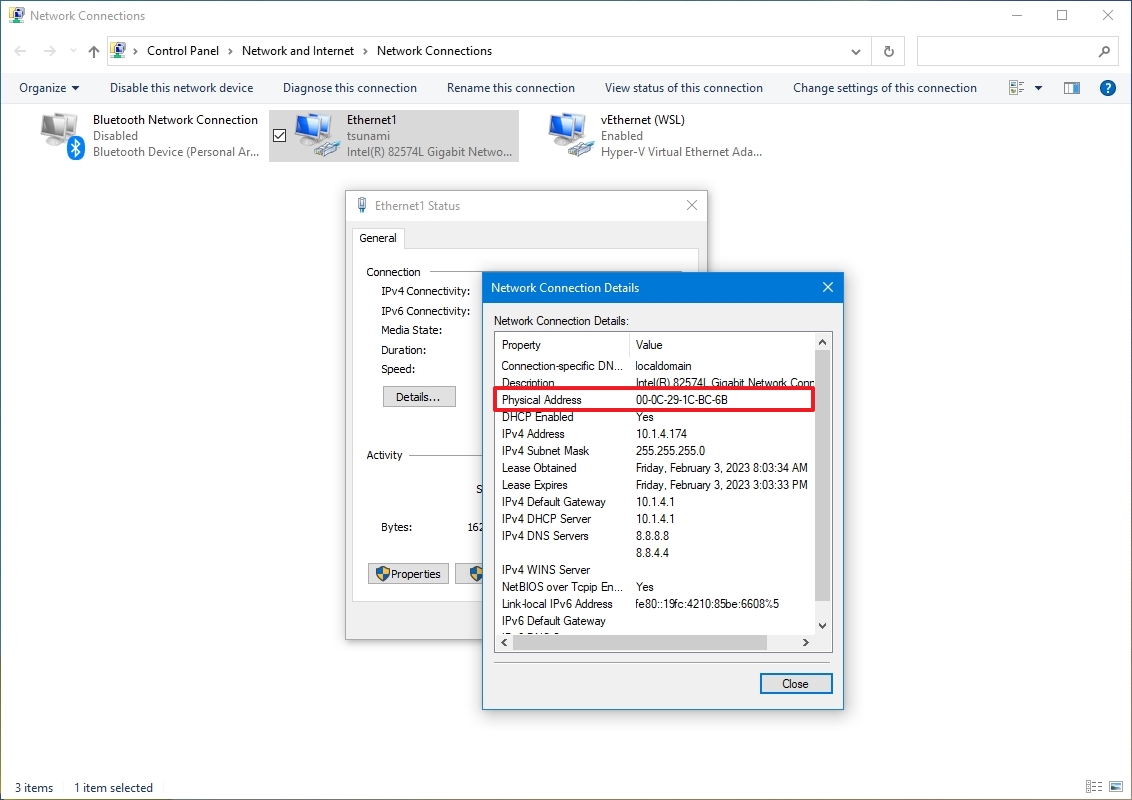
-
Confirm the MAC address in the “Physical Address” field.


Once you complete the steps, the Control Panel will display the physical address for the network adapter.
4. Locate MAC address using System Information
To view the MAC address assigned to the laptop or desktop computer from System Information, use these steps:
-
Open Start.
-
Type System Information and press Enter to open the app.
-
Browse the following path:
Components > Network > Adapter


After you complete the steps, Windows 10 will populate the network adapters’ information on your computer, including virtual networks, Wi-Fi, and Ethernet adapters, and the MAC address will be available from the “MAC Address” field.
Quick Links
-
Each Network Adapter Has its Own MAC Address
-
Find Your MAC Address Using Settings
-
Find Your MAC Address Using Control Panel
-
Find Your MAC Address Using a Command
-
Find Your MAC Address in System Information
Sometimes you need to know the physical hardware address, or MAC address (short for «Media Access Control»), of your network adapter on a Windows 10 or Windows 11 PC. Here are several ways to find it.
Each Network Adapter Has its Own MAC Address
Here’s a basic refresher: A network adapter is a device in your PC that connects to a network—either through Ethernet, Wi-Fi, or another method. In some PCs, a network adapter is a separate card installed in a machine, and in others, it’s built into the hardware. Even so, Windows still considers each adapter as a separate device.
Before locating your MAC address, it’s important to know that different network adapters have their own unique MAC addresses. So if your PC has both an Ethernet port (handled by an Ethernet adapter) and a Wi-Fi connection (handled by a Wi-Fi adapter), each one of those connection methods will have its own MAC address.
Find Your MAC Address Using Settings
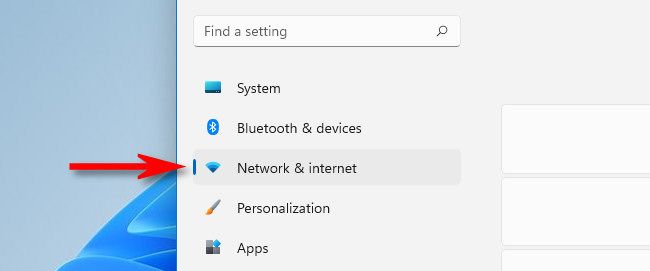
To find your MAC address in Windows 10 or 11, open Settings by pressing Windows+i on your keyboard. When it opens, navigate to Network & Internet.
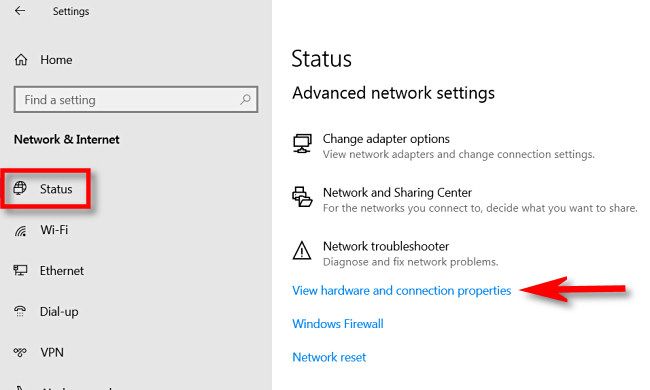
In Network & Internet settings on Windows 10, click «Status» in the sidebar, then select «View hardware and connection properties.»
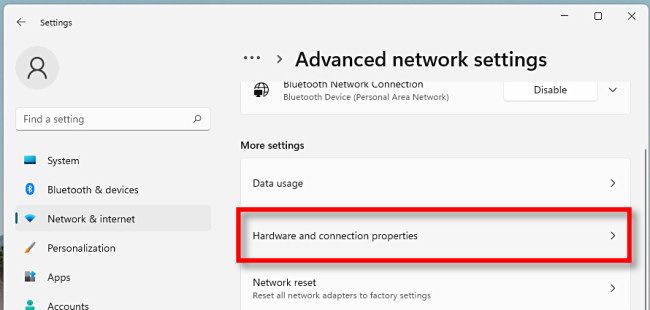
In Network & Internet settings on Windows 11, click «Advanced Network Settings,» and then select «Hardware and Connection Properties.»
In Hardware and Connection Properties, you’ll see a list of information about every network adapter installed on your PC.
Locate the adapter you want to find the MAC address for in the list (such as «Wireless Network Adapter» for your Wi-Fi connection). You’ll see the MAC address listed beside «Physical Address (MAC).» For example, the MAC address here is «2b:fc:f3:f3:f3:2b». Yours will be different.
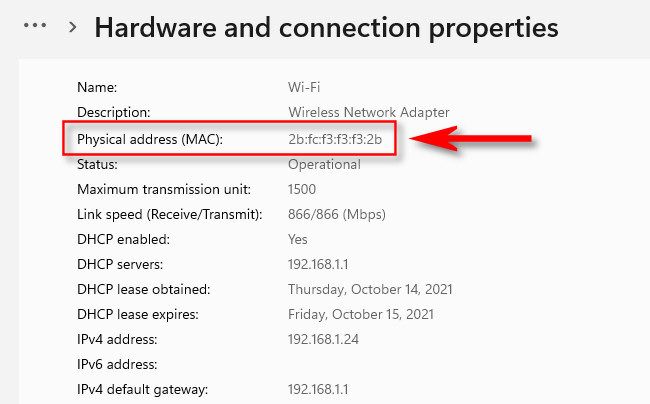
If necessary, you can select and copy the MAC address (Ctrl+c) and paste it (Ctrl+v) to a text file or a messaging app. After that, close Settings, and you’re good to go.
Find Your MAC Address Using Control Panel
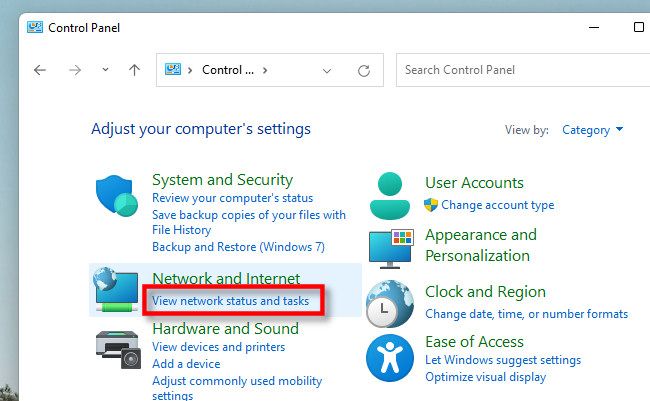
The Control Panel utility in Windows 10 or Windows 11 also lets you locate your network adapter MAC addresses, but it takes a few more clicks than the Settings app. To get started, launch Control Panel, then click «View Network Status and Tasks.»
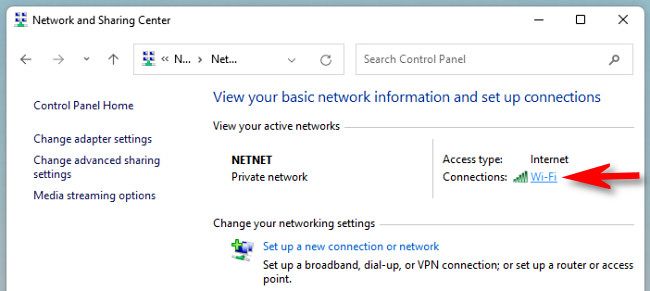
In Network and Sharing center, you’ll see a list of your active network connections. Locate the adapter you’d like to find the MAC address for, then click the link beside «Connections.» The link will vary depending on connection type, but will typically read «Ethernet» or «Wi-Fi.»
In the status window (such as «Ethernet Status» or «Wi-Fi Status») that appears, click the «Details» button.
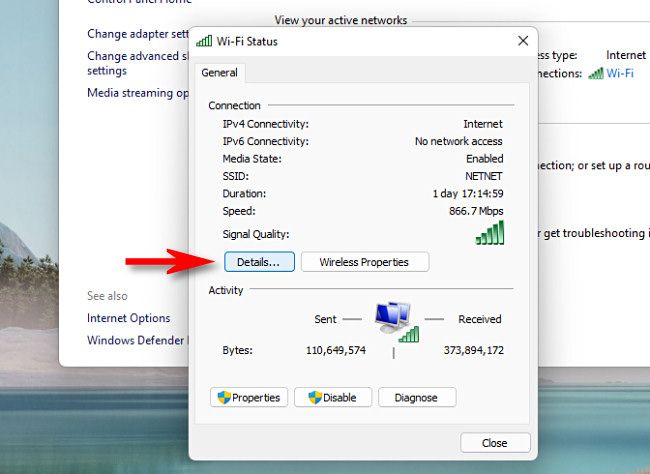
In the «Network Connection Details» window, you’ll find the adapter’s MAC address listed beside «Physical Address.»
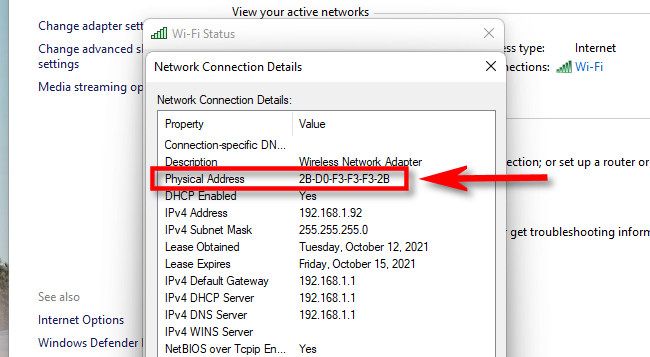
When you’re done, click «Close» twice, then close Control Panel.
Find Your MAC Address Using a Command
You can also find your network adapter’s MAC address by running the «ipconfig» command via the Command Prompt, Windows Terminal, or Windows PowerShell in Windows 10 or 11. To use it, open a Command Prompt or Windows Terminal window and type ipconfig / all .
(To quickly open a command-line window, you can either right-click your Start button or press Windows+X. On Windows 11, click «Windows Terminal» in the menu that appears. On Windows 10, click either «Windows PowerShell» or «Command Prompt» in the menu that appears.)
Depending on your PC, you might see a long list of adapters and information for each one of them. To find the MAC address, locate the name of the adapter you’d like to find (such as «Wireless LAN» or «Ethernet») and look a the entry beside «Physical Address.»
When you’re done, close Command Prompt. You can repeat the ipconfig /all command any time you need it.
Find Your MAC Address in System Information
Your network adapters’ MAC addresses are also available in System Information. Open up a Run box by pressing Windows + R and running «msinfo32» or search «System Information» in the Start Menu search bar to launch System Information.
Once you have it open, navigate to Components > Network > Adapter.
You’ll need to scroll through the list until you find the adapter you’re looking for. Also keep in mind that any virtual network adapters you have (like those created by VPNs or some virtual machines) will also show up here, so don’t be too surprised if it is a bit cluttered.
(Image credit: Future)
A Windows 10 computer and pretty much any device that connects to a network has a unique identification number known as the Media Access Control (MAC) address embedded on the physical network adapter (Ethernet, Wi-Fi, and Bluetooth), and it’s a necessary component, alongside the Internet Protocol (IP) address, to allow communication between devices inside a local network.
Although you usually don’t have to worry about this information, sometimes you may need to find out the MAC address of the network adapter. For example, to identify the device or configure networking permissions on a router.
Regardless of the reason, Windows 10 includes several ways to determine the hardware address using the Settings app, PowerShell, Command Prompt, Control Panel, and even using System Information.
This how-to guide will walk you through five days to find the MAC address on the network adapters available on Windows 10.
How to find MAC address from Settings on Windows 10
To find the MAC address on Windows 10 through the Settings app, use these steps:
- Open Settings.
- Click on Network & Internet.
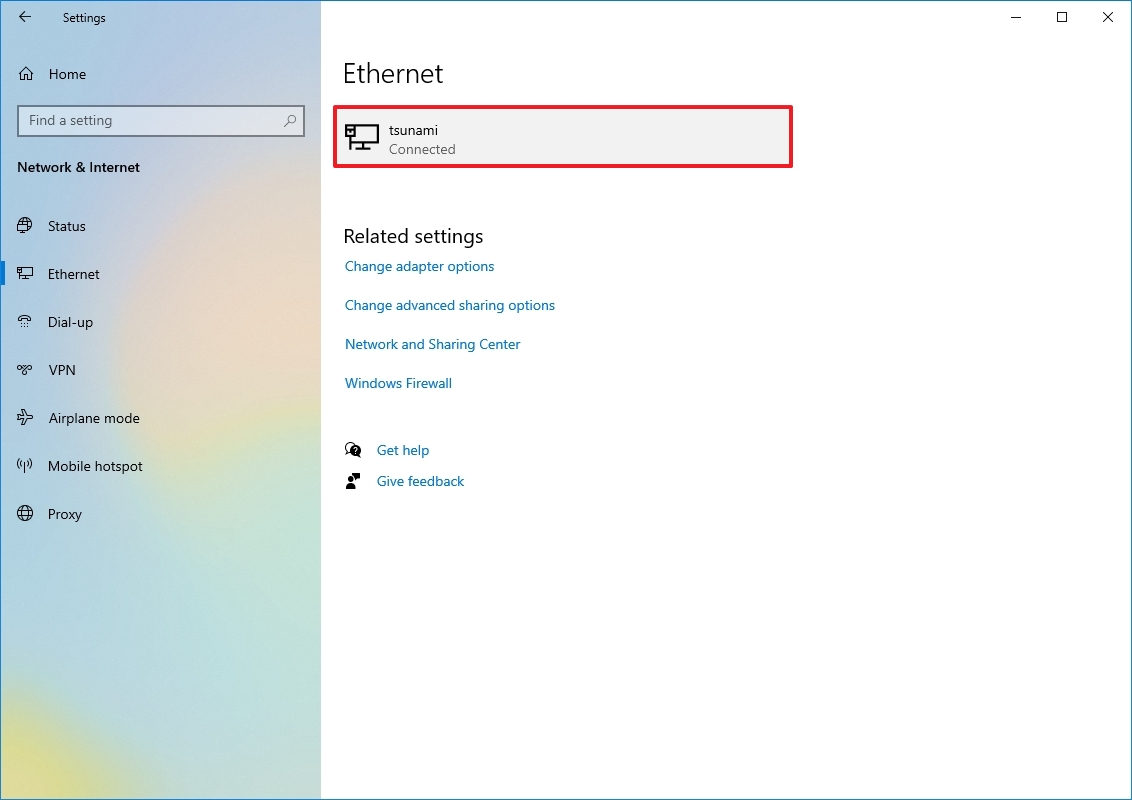
- Click on Ethernet or Wi-Fi depending on your network connection.
- Select the connection.
- Under the «Properties» section, confirm the physical address (MAC) of the device.
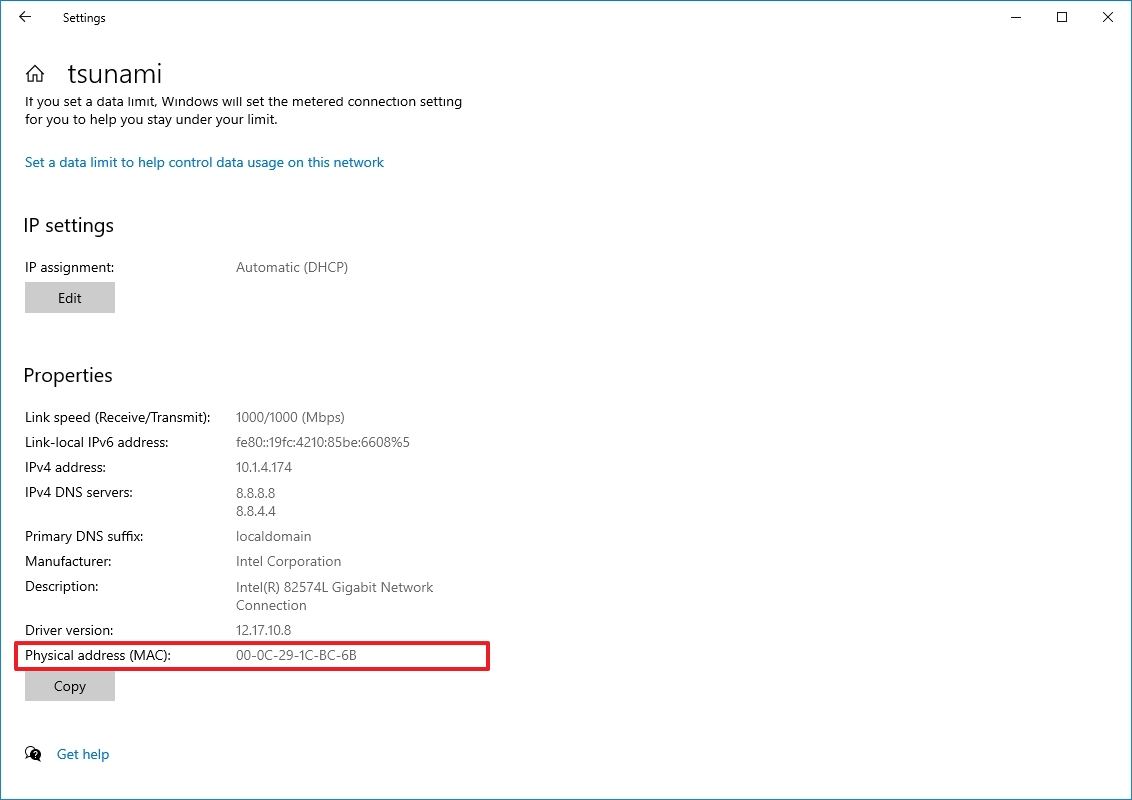
Once you complete the steps, you’ll have an understanding of the MAC address for the network adapter installed on your computer.
How to find MAC address from Control Panel on Windows 10
To determine the physical address of a network card on Windows 10 from Control Panel, use these steps:
All the latest news, reviews, and guides for Windows and Xbox diehards.
- Open Control Panel.
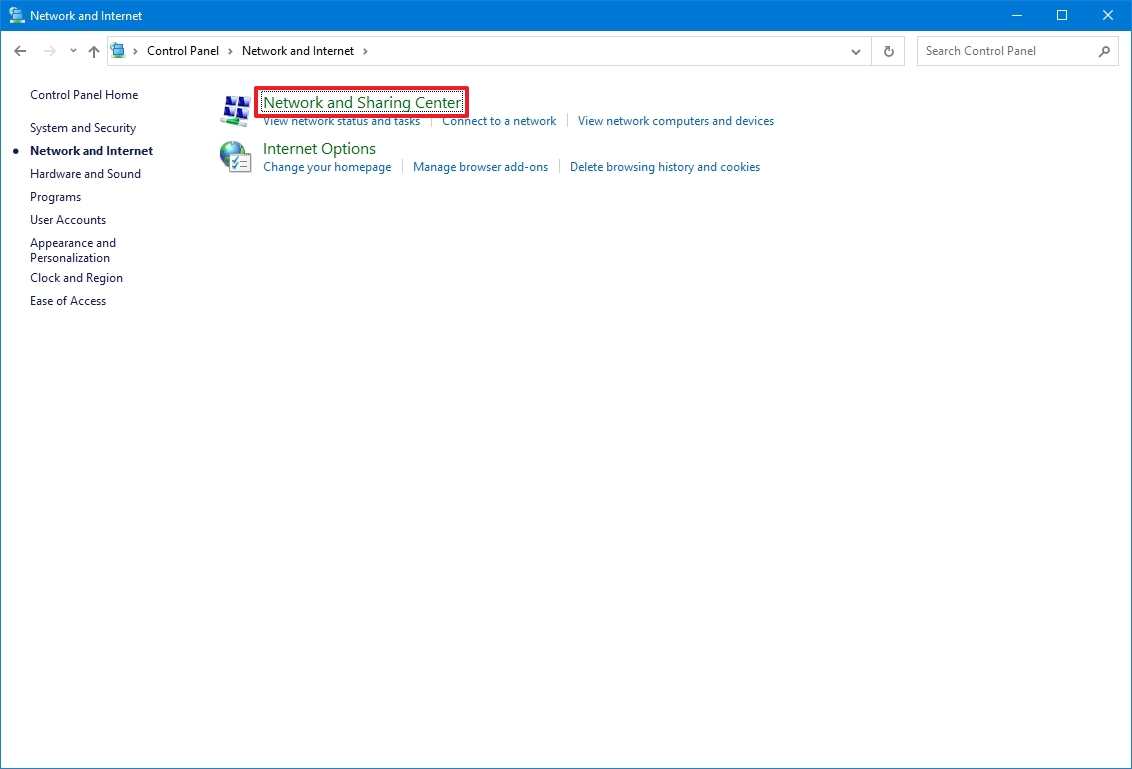
- Click on Network and Internet.
- Click on Network and Sharing Center.
- Click the «Change adapter settings» from the left pane.
- Double-click the Ethernet or Wi-Fi adapter depending on your connection.
- Click the Details button.
- Confirm the MAC address of the network adapter.
After you complete the steps, you’ll know the physical address of the network card, which you can use filter access in the network settings or to identify a device on the router.
How to find MAC address from System Information on Windows 10
To view the MAC address through the System Information app, use these steps:
- Open Start.
- Search for System Information and click the top result to open the app.
- Expand the Components branch.
- Expand the Network branch.
- Select the Adapter option.
- Scroll down to the network adapter you want.
- Confirm the PC’s MAC address.
Once you complete the steps, you’ll be able to determine the media access control address of the network adapter.
How to find MAC address from Command Prompt on Windows 10
To find the MAC address from Command Prompt, use these steps:
- Open Start.
- Search for Command Prompt and click the top result to open the app.
- Type the following command to determine the MAC of your computer’s network connection and press Enter: ipconfig /all
- The MAC will be listed in the «Physical Address» setting.

- (Optional) Type the following command to check the MAC address of the active network adapters and press Enter: getmac /v
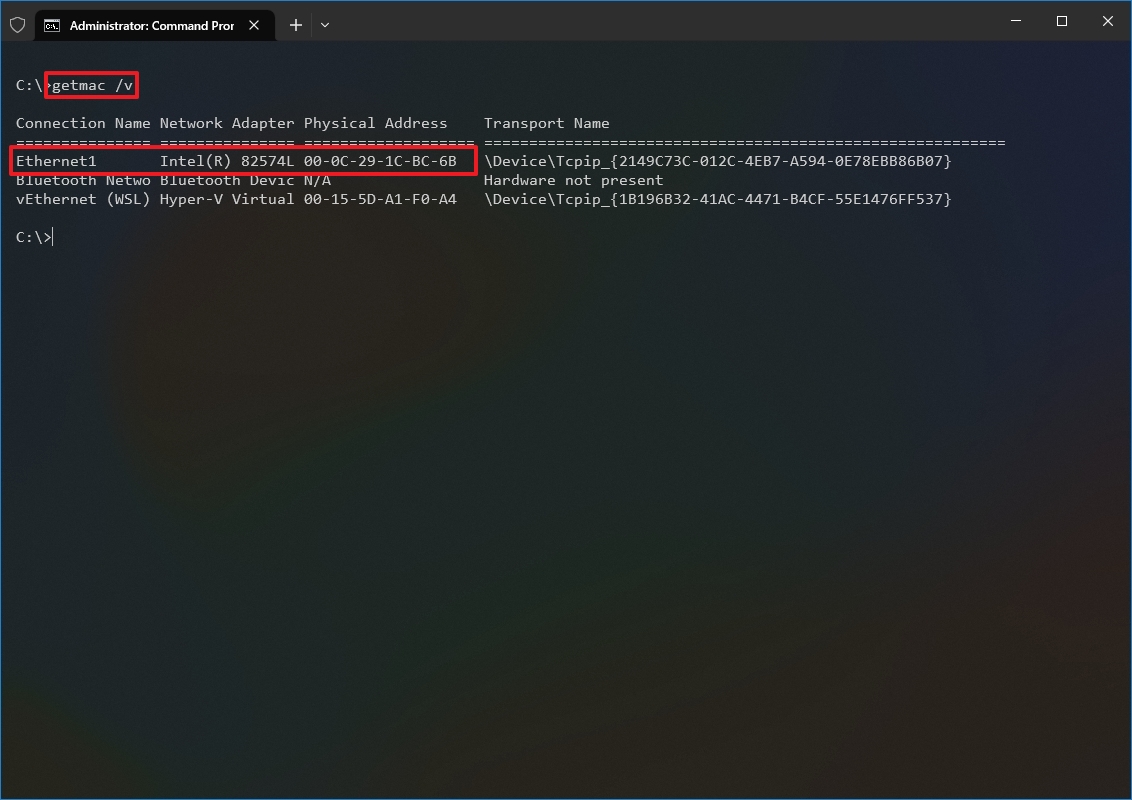
After you complete the steps, Command Prompt will display the hardware address of all the network adapters installed on Windows 10.
How to find MAC address from PowerShell on Windows 10
To find the MAC address from PowerShell on Windows 10, use these steps:
- Open Start.
- Search for PowerShell and click the top result to open the app.
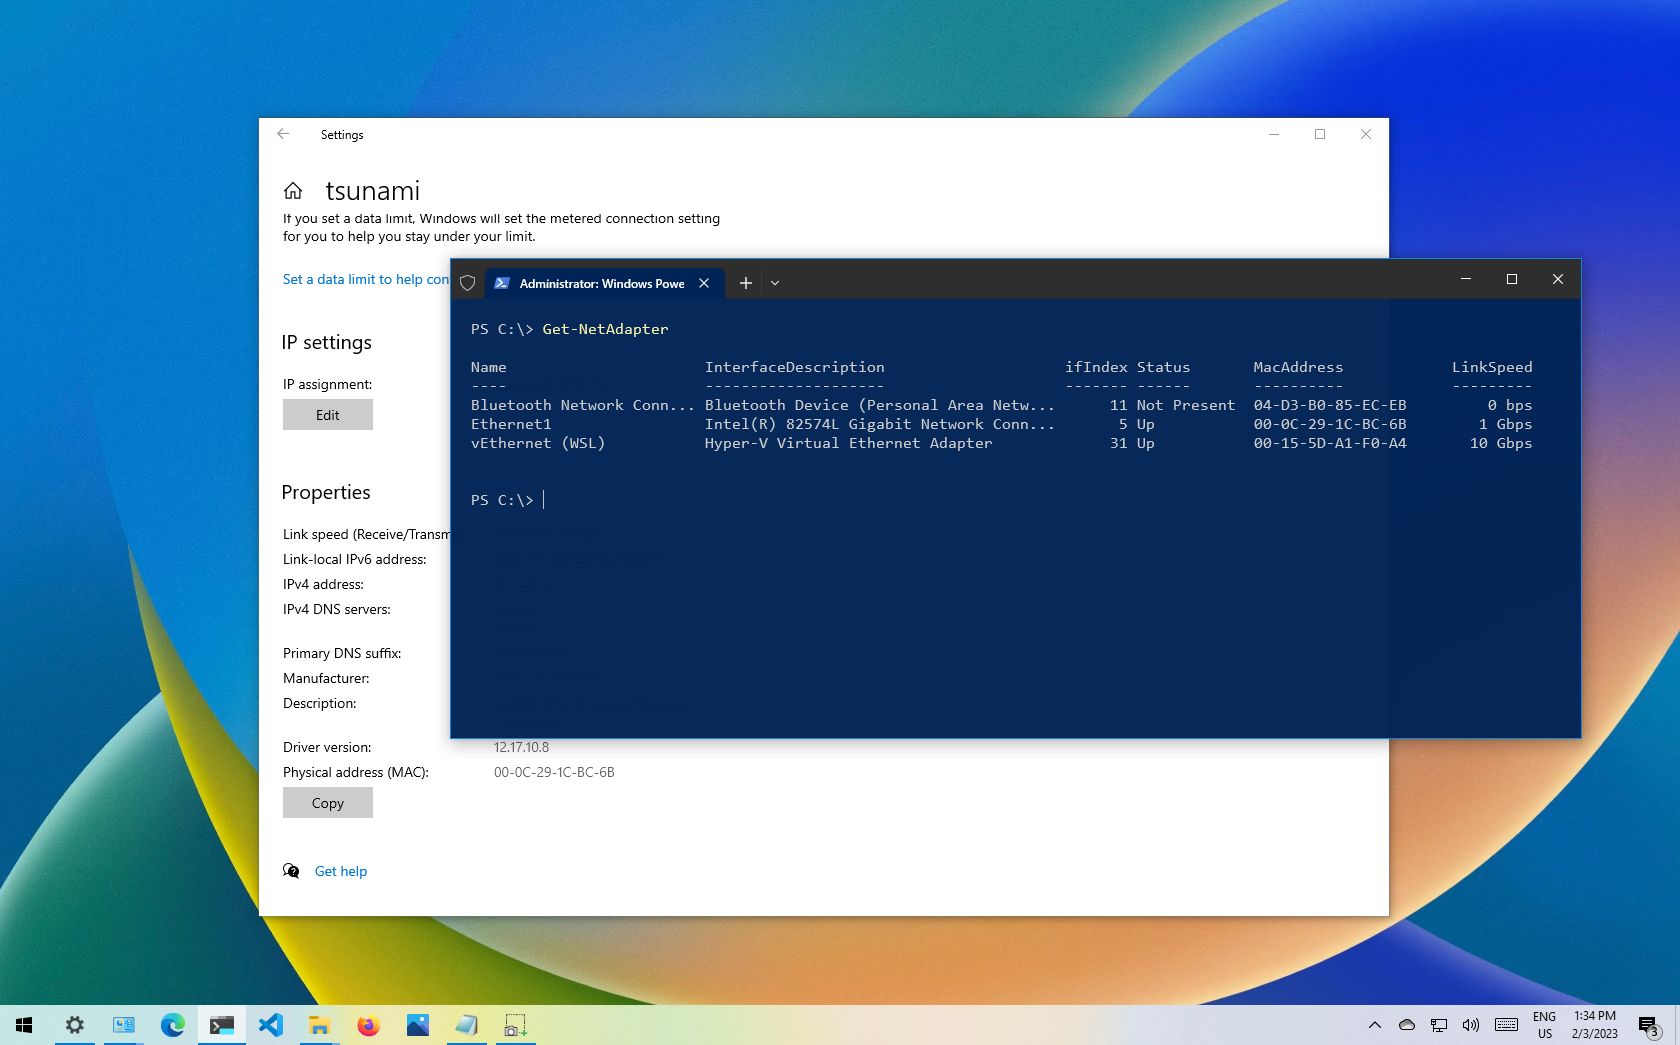
- Type the following command and press Enter: Get-NetAdapter
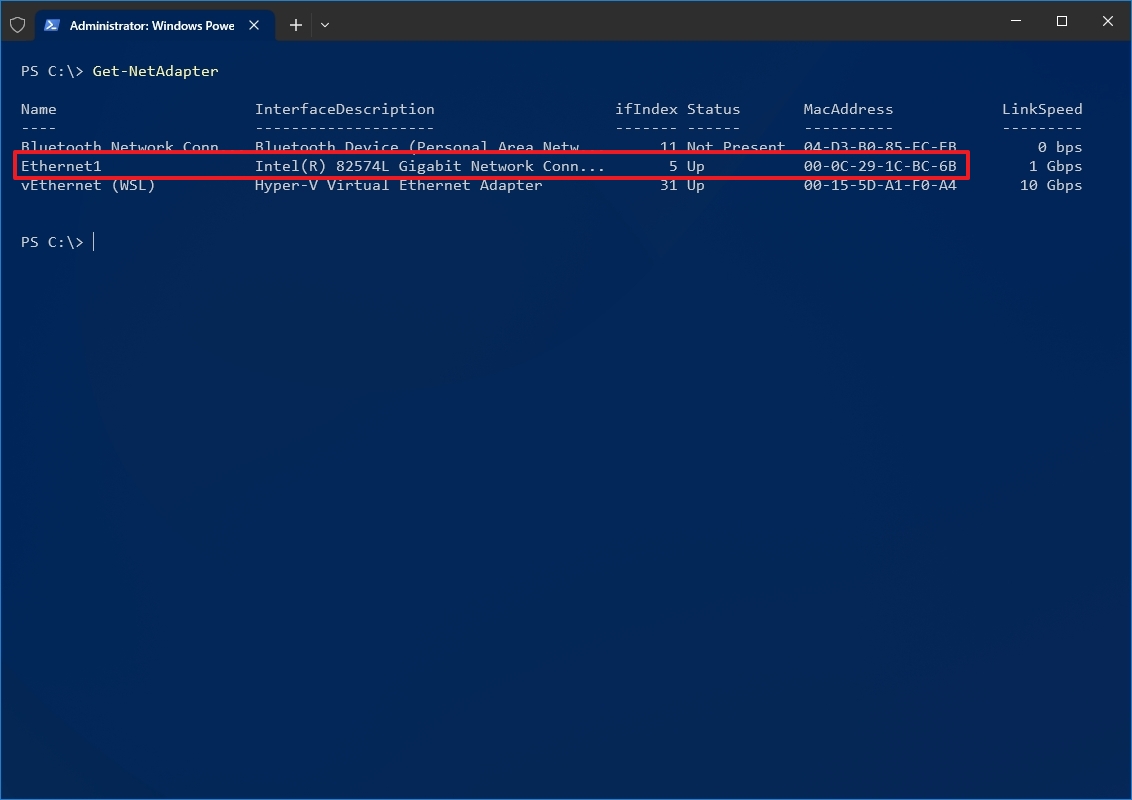
- Confirm the MAC address of the adapter install on Windows 10.
Once you complete the steps, PowerShell will list the MAC address for every network adapter configured on your Windows 10 device.
More resources
For more helpful articles, coverage, and answers to common questions about Windows 10 and Windows 11, visit the following resources:
- Windows 11 on Windows Central — All you need to know
- Windows 10 on Windows Central — All you need to know

Cutting-edge operating system
A refreshed design in Windows 11 enables you to do what you want effortlessly and safely, with biometric logins for encrypted authentication and advanced antivirus defenses.
Mauro Huculak has been a Windows How-To Expert contributor for WindowsCentral.com for nearly a decade and has over 15 years of experience writing comprehensive guides. He also has an IT background and has achieved different professional certifications from Microsoft, Cisco, VMware, and CompTIA. He has been recognized as a Microsoft MVP for many years.