
As technology continues to evolve, the need for hardware communication through COM (communication) ports remains relevant, especially for developers, engineers, and those working with various peripherals. Windows 11 accommodates a variety of connectivity options, including serial and USB COM ports. This comprehensive guide will outline how to find COM ports on Windows 11, discussing various methods and tools available to users.
Understanding COM Ports
Before delving into how to find COM ports, it’s essential to understand what they are. COM ports are interfaces that enable devices to communicate with a computer. They are commonly used in applications involving serial communication, such as connecting a computer to modems, printers, or embedded devices like Arduino. Each COM port is designated with a unique identifier (e.g., COM1, COM2), and multiple devices can be connected through different COM ports.
Reasons for Finding COM Ports
- Device Communication: Knowing which COM ports are assigned to connected devices is crucial for troubleshooting connection issues.
- Software Development: Developers need to access specific COM ports when programming applications that interact with hardware.
- Configuration: Configuring devices often requires knowing the assigned COM port to set appropriate communication parameters.
- Troubleshooting: Identifying the correct COM port can help diagnose communication issues between devices and computers.
Methods for Finding COM Ports on Windows 11
1. Using Device Manager
Device Manager is a built-in Windows tool that provides information about your computer’s hardware. To find COM ports using Device Manager, follow these steps:
-
Accessing Device Manager:
a. Right-click the Start button or pressWin + Xon your keyboard.
b. Select Device Manager from the context menu. -
Locating COM Ports:
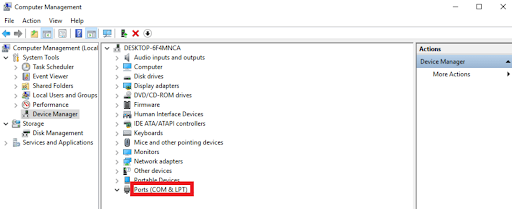
a. In the Device Manager window, look for the section labeled Ports (COM & LPT). You may need to expand this section by clicking the arrow next to it.
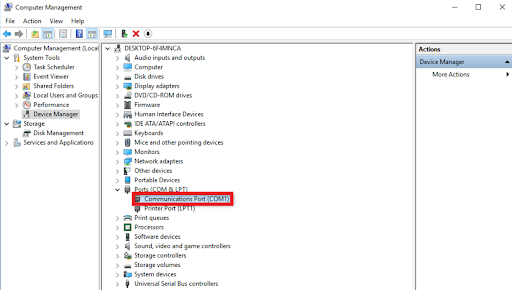
b. You will see all connected COM ports listed here, identified as COMx (e.g., COM1, COM2). -
Verifying Device Properties:
a. Right-click on the desired COM port and select Properties.
b. Under the Port Settings tab, you can view and configure properties such as Baud rate, Data bits, and Stop bits.
2. Using Windows Settings
Windows provides an interface in the Settings app to manage devices, including COM ports. To check for connected COM ports through Windows Settings:
-
Opening Settings:
a. Click on the Start button and select the Settings gear icon, or pressWin + I. -
Navigating to Devices:
a. In the Settings window, click on Devices (or Bluetooth & devices in some versions).
b. Look for the More devices section to view connected devices. -
Reviewing COM Port Information:
a. While not as detailed as Device Manager, you can find information on USB devices and their assigned COM ports under their respective categories.
3. Using Command Prompt
Command Prompt is a powerful utility that allows users to execute various commands directly. You can find COM ports with the following steps:
-
Opening Command Prompt:
a. PressWin + Rto open the Run dialog box.
b. Typecmdand hit Enter. -
Using the Mode Command:
a. Type the commandmodeand press Enter.
b. The output will display a list of all connected COM ports along with their current configuration.
4. Using PowerShell
PowerShell is another versatile tool in Windows that can provide detailed information about hardware configuration. To find COM ports using PowerShell:
-
Opening PowerShell:
a. PressWin + Xand select Windows Terminal (Admin) or Windows PowerShell. -
Running a Query:
a. Type the following command and press Enter:
Get-WmiObject Win32_SerialPort- Interpreting the Output:
a. The command will return a list of all serial ports, their names, and device IDs. Look for properties likeDeviceID(shows COM number) andDescriptionto identify the devices.
5. Checking through System Information
Windows includes a System Information tool that collects and displays important information about your computer’s hardware. To find COM ports using this utility:
-
Opening System Information:
a. PressWin + R, typemsinfo32, and hit Enter. -
Navigating to the Components:
a. Once in the System Information window, navigate to Components > Ports. -
Reviewing Port Details:
a. Here, you will find details about the COM ports along with their respective devices.
6. Using Third-Party Software
If you prefer a more user-friendly approach and additional features, several third-party applications can help you find and configure COM ports. Some popular ones include:
- PuTTY: A free and open-source terminal emulator that supports serial communication. When you select the serial option, it will list available COM ports.
- Tera Term: Another terminal emulation program that allows for serial communication and displays COM ports in its connection settings.
- Serial Monitor: A more advanced tool designed for monitoring and debugging serial communication, providing more in-depth information about connected devices.
7. Understanding COM Port Assignment
When connecting devices, Windows assigns COM ports dynamically unless configured otherwise. USB devices are generally assigned COM ports upon connection, while traditional serial devices may have fixed assignments. If you notice COM ports changing after reboots or disconnecting devices, consider the following:
-
Manual Assignment: In Device Manager, you can assign a specific COM port to a device:
a. Right-click the device under Ports (COM & LPT).
b. Select Properties, then the Port Settings tab.
c. Click on Advanced, where you can define a COM port number manually. -
Reserving Resources: Sometimes, issues arise from conflicts with other devices. Ensuring that your COM ports are reserved and correctly assigned can enhance stability.
8. Identifying Issues with COM Port Detection
Detecting and managing COM ports can sometimes result in unexpected issues. Here are some common challenges and troubleshooting steps:
-
Device Not Recognized: If a connected device does not appear in Device Manager:
- Check physical connections (cables, ports).
- Ensure drivers are installed and up to date. You can update drivers in Device Manager.
-
Incorrect Port Settings: Improper baud rates or settings can cause communication failures. Verify device documentation or software requirements to ensure compatibility.
-
Conflicts with Other Devices: Multiple devices may attempt to use the same COM port, leading to conflicts. Change the COM port number for one of the devices to resolve this.
-
COM Port Exhaustion: If you have a large number of devices connected, you may run out of available COM ports. Disconnecting unused devices or reconfiguring existing ones may free up ports.
Conclusion
Finding COM ports on Windows 11 is essential for effective communication between your computer and various devices. Whether using built-in features like Device Manager and PowerShell or opting for third-party tools, identifying and managing COM ports can significantly streamline your device interactions. Understanding the methods outlined above, along with best practices for troubleshooting and configuration, will empower users to tackle any challenges they might face regarding COM ports effectively.
By mastering these techniques, you can ensure seamless hardware communication, whether for personal projects, software development, or professional use. Remember to keep your device drivers updated, and always refer to device documentation for optimal configuration settings. Through diligence and knowledge, you can mitigate issues and enhance your computing experience on Windows 11.
If you need to check which COM port a device is using in Windows 11, it’s pretty straightforward. You can accomplish this by accessing the Device Manager and locating the Ports section. Here’s a step-by-step guide to help you navigate this process.
This section will guide you through checking which COM port a device is assigned to in Windows 11. By following these steps, you’ll be able to identify the COM port number quickly and efficiently.
Step 1: Open Device Manager
Click the Start button, type “Device Manager,” and press Enter.
The Device Manager is a control panel in the operating system that allows you to view and manage the hardware attached to your computer. Finding it is the first step in identifying your COM port.
Step 2: Expand the Ports Section
In the Device Manager window, locate “Ports (COM & LPT)” and click the arrow next to it.
This action will expand a list of all the ports currently in use on your computer. If your device is connected and recognized, it will show up here.
Step 3: Identify Your Device
Look for your device name followed by a COM port number in parentheses.
For example, it might say “USB Serial Device (COM3).” The number in the parentheses is the COM port assigned to your device.
Step 4: Double-Click the Device
Double-click the device name to open its properties.
This step allows you to view more detailed information about the device, such as the driver it’s using and its current status.
Step 5: Check the Port Settings Tab
Click the “Port Settings” tab to view and adjust the port settings if necessary.
If you need to change the port number or other settings, you can do so here. However, be cautious when making changes unless you’re sure of what you’re doing.
After following these steps, you’ll know exactly which COM port your device is using. You can now use this information for troubleshooting, configuring software, or any other needs.
Tips to Check COM Port in Windows 11
- Stay Organized: Label your devices and their corresponding COM ports to avoid confusion.
- Use a USB Hub: If you have multiple devices, consider using a USB hub to make connecting and identifying them easier.
- Update Drivers: Always ensure your device drivers are up-to-date to avoid any connection issues.
- Restart If Needed: Sometimes a quick restart of your computer can resolve unrecognized devices.
- Check Compatibility: Make sure your device is compatible with Windows 11 to avoid any issues.
Frequently Asked Questions
How do I know which COM port my device is connected to?
You can find this information in the Device Manager under “Ports (COM & LPT).”
Why can’t I see my device in Device Manager?
Make sure the device is properly connected and that its drivers are installed. Also, try restarting your computer.
Can I change the COM port number?
Yes, you can change it in the “Port Settings” tab within the device’s properties.
What if there are no “Ports (COM & LPT)” listed?
This usually means no devices using COM ports are currently connected. Try plugging in your device again.
Is it safe to change port settings?
Yes, but be careful. Incorrect settings can cause your device to malfunction.
Summary
- Open Device Manager
- Expand the Ports Section
- Identify Your Device
- Double-Click the Device
- Check the Port Settings Tab
Conclusion
Knowing how to check the COM port in Windows 11 can save you a lot of headaches, especially when dealing with hardware issues or setting up new devices. By following the simple steps outlined above, you can quickly determine which COM port your device is using and make necessary adjustments. Don’t forget to keep your drivers updated and label your devices for future reference.
If you found this guide useful, be sure to check out other tutorials on our site to help you navigate more Windows 11 features. Understanding your system better will not only make you more efficient but also help you troubleshoot issues more effectively. Happy computing!
Matt Jacobs has been working as an IT consultant for small businesses since receiving his Master’s degree in 2003. While he still does some consulting work, his primary focus now is on creating technology support content for SupportYourTech.com.
His work can be found on many websites and focuses on topics such as Microsoft Office, Apple devices, Android devices, Photoshop, and more.
How to check the COM port in Windows 10/11? If you wish to know which COM ports are currently installed and being used in your device, then you can take the help of this simple guide. Spoiler alert, there is a bonus tip for you as well.
There are a few other names for a communications port, including a serial port or COM port. A communications port is a hardware interface on a computer that enables you to connect external devices for the purpose of data transmission. It acts as a connection point between your computer and various peripherals, such as printers, modems, and scanners, making it possible for these devices to communicate with one another.
In contrast to audio and video transmission, the primary purpose of communications ports is to facilitate the movement of data. Dedicated audio/video ports, high-definition multimedia interface (HDMI), DisplayPort, and universal serial bus (USB) connections are the most prevalent types of connections used for audio and video applications.
Your computer and any connected devices may send and receive data using a communications port, which is a group of pins that allows for this. The control lines, ground (GND), receive (RX), transmit (TX), and others are all parts of these pins. In the process of sending data from your computer, the data is transformed into a stream of bits and then sent via the TX pin. Through its RX pin, the linked device is able to receive these bits and then interpret them in the appropriate manner.
So, knowing all that you know now, you may be wondering how to check the COM port in Windows 11/10. Thankfully, we have the most optimum solution for you. Let’s check the same out.
How to See What COM Ports are in Use on Windows 10/11?
One of the best ways to figure out the type or title of a COM port in Windows 10/11 is to take the help of the Device Manager.
Through the use of Device Manager, it is possible to manage various hardware devices that are installed in a computer. These devices include hard disk drives, keyboards, sound cards, USB devices, and many more.
Take into consideration that this tool is the fundamental list of hardware that Windows is able to comprehend. It is possible to configure all of the hardware on your computer with this single software. Device Manager is a Windows integrated tool that comes from the house of the Microsoft Management Console that offers a centralized and organized view of all the hardware that is recognized by Microsoft Windows and is installed on a computer.
In addition to a great deal of other capabilities, it allows you to adjust the configuration choices of your hardware, manage drivers, deactivate and enable hardware, and find conflicts between different hardware devices. Additionally, you can also use this tool to view the COM ports in Windows 11/10.
Process to Check the COM Port on Windows 11/10
The process to check the COM port on Windows, using the Device Manager, is quite simple. All you need to do is take the help of the set of steps and instructions listed and explained below. Do not fare aside and follow the steps closely as listed. You will not face any problems in knowing the type of COM port you are currently using. Here are the steps:
1. Firstly, you need to bring up the Device Manager. And for this, you need to firstly right-click on the Start button and select the appropriate result. Alternatively, you can also press the combination of the Windows + S keys, type the Device Manager in the space, and press the Enter key.
2. Wait for a couple of seconds for the tool to come up. When the tool comes up, look for the device category named Ports. To proceed, double click on it.
3. Now, you will find a list of devices or ports that are currently in use. Here, you will find each COM port. Taking the reference from the title, you can ascertain which COM ports are available on the device.
4. If you wish to get extensive details about the port, then you can take the help of the device Properties. Right-click on any COM port of your choice, and then select Properties. You will find all the necessary details there.
Summing Up: How to Check COM Ports?
So, that’s how you can check the COM port on your Windows 10/11 device. If you find an error mark on the port or are facing any errors in using the device, then you can tyring fixing the COM port errors and even follow some solutions if the COM port is missing.
We hope that once you have followed the above steps closely, you will get all the required information about the port. Additionally, you can get even further information about the port once you search for the same on any reliable search engine using your web browser.
So, that’s all from our side. If you need any further help in any way, feel free to contact us using the comments section below. We are all looking forward to reading your comments and helping you in every possible way. Also, you can bookmark this page if you wish to get more tech updates. Alternatively, follow our social media pages or subscribe to our newsletter.

Communication ports, commonly known as COM ports, are crucial PC components. They are responsible for maintaining and establishing external device connections using a system’s physical and emulated ports. When these ports malfunction or are not detected on a PC, error messages like Unable to open serial ports appear, which is not good news.
Some users have also shared that they cannot find the drivers on the system. These missing ports can also cause multiple problems on your PC. Hence, finding and fixing all the issues related to the COM port is crucial.
Wondering how to get rid of missing COM port errors in the Device Manager? Well, you are at the right place! check out the methods below that will allow you to fix the error instantly!
How to Fix Missing COM Ports in Device Manager Issue?
The COM ports not appearing on your PC can mean multiple things. Usually, to fix the error, you need to restore the COM ports on your PC. However, many users have shared that they are unable to find the drivers to perform troubleshooting. Check out the list of fixes below, as they will allow you to find and fix the errors easily.
Fix 1 – Enable Show Hidden Devices
Sometimes, a configuration changes the COM ports into hidden devices in the Device Manager. This is also the reason why users are unable to find these drivers. Here are some steps to reveal hidden drivers in the device manager.
Step 1 – Press Win+R to open the Run search.
Step 2 – In the Run search box, use the command devmgmt. msc to open Device Manager.

Step 3 – In the Device Manager, click on View from the top bar to find options.
Step 4 – Click on Show Hidden Devices to unveil the drivers usually hidden from the user.
With these simple steps, you can access all the hidden devices, including the COM ports on your PC.
Fix 2- Update COM Port Drivers
Sometimes, these ports are temporarily unavailable because of their outdated definition. The best way to ensure that these drivers are working properly is to keep them updated. Most of you may think, “How do you update the COM port driver when it is not visible?”. Well, you have two options here –
- Use the steps mentioned in Fix 1 to find COM ports and then update them using the Windows Driver Update utility.
– After you have found the drivers, simply select and right-click on it to find the update driver option.
– Follow the steps on the screen, and initiate the process by selecting the Search Automatically for drivers.
– Let the updates install, and restart your PC manually once the process finishes. - Use Advanced Driver Updater that finds all the drivers irrespective of their hidden nature and updates them instantly.
– Download and install the Advanced Driver Updater on Your PC.
– Click on Start Scan Now to initiate a search for all the outdated drivers on your PC.
– Check the results to see if the COM ports were detected in the result.
– Click on Update All to instantly update the drivers.
– Once the installation is over, the software will automatically restart.


Since finding the COM port driver can be challenging, let the tool handle the updates.
Please note that you can also use your motherboard driver disc to update these drivers, as they are directly connected with the same. Updating motherboard drivers is also a way to fix the missing COM port error on Windows, depending on your device.
Fix 3 – Add COM Port to Device Manager
If showing the hidden drivers or updating them does not work, you can manually add these devices to your PC. Here’s the complete process of how to add the COM port on your PC –
Step 1 – Press Win+R to open the Run search.
Step 2 – In the Run search box, use the command devmgmt. msc to open Device Manager.

Step 3 – Click Action from the top menu bar in the Device Manager.
Step 4 – Click on Add Legacy Hardware from the Action menu.

Step 5 – A pop will appear asking you to choose the legacy hardware you want to add; click next to initiate the process.
Step 6 – On the next page, choose Install the Hardware that I Manually Select and click Next.

Step 7 – After clicking Next, you may find options related to the device drivers you want to install.

Step 8 – Look for COM & LPT ports from the list. Select and click on next to move ahead with the process.
Step 9 – Choose your motherboard manufacturer so the best drivers can be fetched to support the same.

Step 10 – Click on the Finish button and voila! You have successfully added the drivers to your PC.
COM Ports Missing on Your PC? NOT ANYMORE!
Simply implementing the above three fixes should do the job for you. If you are facing driver issues while using the USB ports or any other connectivity issue, updating all the drivers on your PC can be helpful. Hence, installing the Advanced Driver Updater is recommended to finish the job for you.
And with that being said, we have reached the end of this post. Hope you find the steps shared clear and helpful for any further product-related queries; you can email support@systweak.com or leave comments.
We are glad we could help you with COM ports missing errors. Good luck!
Recommended :
‘PAGE FAULT IN NONPAGED AREA’ Error On Windows – FIXED
A D3D11 Compatible GPU is Required to Run the Engine – FIXED!
Как посмотреть COM порты Windows 11. Магия COM-портов в Windows 11: Полное руководство
👈🏼Раскрыть👆В мире современных технологий, где царит беспроводная связь, COM-порты, казалось бы, ушли в прошлое. 🐭 Однако, они по-прежнему активно используются в различных устройствах, от старых принтеров до специализированного оборудования. 🧰 Иногда возникает необходимость узнать, какой именно COM-порт использует подключенное устройство, или открыть доступ к нему через брандмауэр. 🛡️ В Windows 11, как и в предыдущих версиях, существует несколько способов получить эту информацию и управлять портами. Давайте разберемся во всех нюансах!
Перейдите к нужной части, нажав на соответствующую ссылку:
⚡ Как найти COM-порт устройства в Windows 11
⚡ Диспетчер устройств: еще один путь к COM-портам
⚡ Как узнать, какие порты заняты в Windows 11
⚡ Проверка COM-порта на работоспособность: проверка и диагностика
⚡ Открытие COM-порта в Windows 11: доступ к ресурсу
⚡ Открытие портов в брандмауэре Windows 11
⚡ Что делать, если COM-порты не отображаются в Windows 11
⚡ Выводы и советы
⚡ Часто задаваемые вопросы
✌️🏻 Комментировать
Как найти COM-порт в Windows 11 для USB-устройства?
Иногда для работы с различными устройствами, подключенными через USB, требуется определить их COM-порт. Это особенно актуально для программирования микроконтроллеров, работы с GPS-модулями и других задач. В Windows 11 найти нужный COM-порт довольно просто.
Вот пошаговая инструкция, как это сделать:
1. Откройте меню «Пуск» 🖱️ на вашем компьютере. Это можно сделать, щелкнув по логотипу Windows в левом нижнем углу экрана.
2. Перейдите в «Устройства и принтеры». В меню «Пуск» найдите и откройте это подменю. Оно может называться по-разному в зависимости от версии Windows 11, но суть одна — управление подключенными устройствами.
3. Найдите устройство STMicroelectronics Virtual Com Port. Среди списка подключенных устройств вам нужно найти именно его.
4. Обратите внимание на скобки. Рядом с названием устройства в скобках будет указан номер COM-порта, который вам необходим. Например, (COM3).
💻 Важно! Если вы не видите устройство STMicroelectronics Virtual Com Port в списке, убедитесь, что оно правильно подключено к компьютеру и установлены все необходимые драйверы.
Пример:
Представьте, что вы подключили к компьютеру модуль GPS, который использует виртуальный COM-порт. После подключения, вы переходите в «Устройства и принтеры» и находите «STMicroelectronics Virtual Com Port (COM5)». Это значит, что ваш GPS-модуль использует COM5 порт.
Теперь вы знаете, как легко и быстро найти COM-порт для вашего USB-устройства в Windows 11. Эта информация поможет вам настроить программы и приложения, которые работают с COM-портами, и начать работу с вашим устройством без лишних проблем.
Успехов! 🍀
Как найти COM-порт устройства в Windows 11
Представьте ситуацию: вы подключили новое устройство через USB, и оно использует COM-порт для связи с компьютером. Как узнать, какой именно порт ему назначен? 🧐 В Windows 11 это делается очень просто!
- Пуск в помощь: Начните с главного меню «Пуск». 🖱️ Это отправная точка для большинства действий в Windows.
- Устройства и принтеры: В меню «Пуск» найдите и откройте подменю «Устройства и принтеры». Здесь хранится информация о всех подключенных устройствах. 🖨️
- Поиск виртуального порта: В списке устройств поищите строку, которая содержит «STMicroelectronics Virtual Com Port». 🔎 Обратите внимание на скобки — именно там указан номер COM-порта, который использует ваше устройство. Например, «(COM3)». 🎉
Важно! 💡 Если вы подключаете устройство через Bluetooth, то вместо «STMicroelectronics Virtual Com Port» вам нужно искать «Bluetooth».
Пример: Подключили к компьютеру 💻 микроскоп 🔬, который использует COM-порт для передачи изображения. В списке «Устройства и принтеры» вы найдете запись «STMicroelectronics Virtual Com Port (COM5)». Значит, микроскоп использует COM5 для связи с компьютером.
Диспетчер устройств: еще один путь к COM-портам
Диспетчер устройств — это мощный инструмент, позволяющий управлять всеми устройствами, подключенными к компьютеру. 🖥️ Он также предоставляет информацию о COM-портах.
- Пуск и поиск: Зайдите в меню «Пуск» и введите в поисковую строку «Диспетчер устройств». 🔎 Выберите найденный результат, чтобы открыть окно диспетчера.
- Вкладка «Порты»: В окне диспетчера устройств найдите и раскройте вкладку «Порты (COM и LPT)». 🖱️ Здесь отображаются все доступные COM-порты.
- Поиск устройства: В списке портов найдите устройство, которое вас интересует (например, «Bluetooth»). 🔍 В скобках будет указан номер порта, который оно использует.
Например: Вы хотите узнать, какой COM-порт использует ваш GPS-навигатор 🧭, подключенный через Bluetooth. В диспетчере устройств, в разделе «Порты (COM и LPT)», вы найдете «Bluetooth-устройство (COM10)». Это значит, что навигатор использует COM10 для связи с компьютером.
Как узнать, какие порты заняты в Windows 11
Иногда нужно понять, какие порты используются в данный момент другими программами или службами. 🔄 Для этого можно воспользоваться встроенной утилитой командной строки.
- Вызов командной строки: Нажмите сочетание клавиш Win + R, чтобы открыть окно «Выполнить». ⌨️
- Ввод команды: В окне «Выполнить» введите команду «CMD» и нажмите Enter.
- Запуск команды netstat: В открывшемся окне командной строки введите команду «netstat -a» и нажмите Enter. Эта команда отобразит список всех открытых портов и служб, которые их используют.
- Анализ результатов: Командная строка выведет список портов, их состояние (ESTABLISHED, LISTENING, и т.д.) и использующие их службы. 🔍 Вы сможете увидеть, какие порты заняты, а какие свободны.
Например: Вы видите в списке, что порт 8080 находится в состоянии LISTENING и используется службой HTTP. Это значит, что веб-сервер 🌐 использует этот порт для обработки запросов.
Важно! 💡 Команда «netstat -a» выводит информацию о всех портах, включая TCP и UDP. Если вам нужна информация только о TCP-портах, используйте команду «netstat -an».
Проверка COM-порта на работоспособность: проверка и диагностика
Как удостовериться, что COM-порт исправен и готов к работе? 🧐 Есть несколько способов проверить его работоспособность.
Простой тест с мышью: Самый простой способ — подключить к COM-порту USB-мышь. 🖱️ Если мышь работает, значит, порт, скорее всего, исправен. Однако, это не самый надежный метод. Мышь использует лишь часть сигнальных линий порта, поэтому такая проверка не даст полной картины.
Полная проверка с COM-заглушкой: Для более тщательной проверки можно использовать специальную COM-заглушку и программу CheckIt. 🔌 Заглушка имитирует нагрузку на линии порта, а программа CheckIt позволяет проверить состояние всех 8 сигнальных линий. Это поможет выявить неисправности, которые могут быть незаметны при подключении мыши.
Важно! 💡 COM-заглушка и CheckIt — это специализированные инструменты, которые используются профессионалами в области электроники. Если вы не уверены в своих силах, лучше обратиться к специалисту.
Открытие COM-порта в Windows 11: доступ к ресурсу
Для работы с COM-портом в программах необходимо получить к нему доступ. 🔑 Это делается через специальный интерфейс, который определен в операционной системе.
GUID_DEVINTERFACE_COMPORT: Идентификатор GUID для класса интерфейса устройства COM-порта — это GUID_DEVINTERFACE_COMPORT. Этот идентификатор определен в файле ntddser.h.
Интерфейс UART 16550: Для взаимодействия с COM-портом используется интерфейс, совместимый с UART 16550. Этот интерфейс также определен в ntddser.h.
Пример: Представьте, что вы пишете программу для управления промышленным роботом 🤖 через COM-порт. Вам нужно использовать интерфейс, совместимый с UART 16550, для отправки команд роботу.
Открытие портов в брандмауэре Windows 11
Если вы хотите, чтобы программы могли подключаться к определенным портам на вашем компьютере через сеть, вам нужно открыть эти порты в брандмауэре Windows. Firewall 🛡️ не позволяет проходить через него нежелательным соединениям, но иногда нужно дать разрешение на доступ к определенным портам.
- Панель управления: Откройте «Панель управления» и найдите там «Брандмауэр Windows». 🖱️
- Исключения: В окне брандмауэра Windows перейдите на вкладку «Исключения».
- Добавление порта: Нажмите кнопку «Добавить порт». ➕
- Настройка исключения: В появившемся окне введите имя исключения (например, «HTTP») и номер порта (например, 80).
- Сохранение изменений: Нажмите «ОК», чтобы сохранить изменения.
Важно! 💡 Будьте осторожны при открытии портов в брандмауэре. Открытие ненужных портов может повысить риски безопасности вашего компьютера.
Что делать, если COM-порты не отображаются в Windows 11
Иногда COM-порты могут не отображаться в диспетчере устройств или в списке «Устройства и принтеры». 😫 Это может быть связано с различными причинами, например, с неправильными настройками драйверов или с неисправностью самого порта.
Изменение номера порта:
- Дополнительные настройки: В меню «Настройки порта» выберите «Дополнительно».
- Выбор доступного номера: Измените номер порта на другой доступный.
- Сохранение изменений: Нажмите «ОК».
- Отключение и включение устройства: Щелкните правой кнопкой мыши на «Контроллер Medit (COM #)» и выберите «Отключить». Затем снова включите устройство.
Переустановка драйверов: 🔄 Попробуйте переустановить драйверы для вашего устройства. Это может помочь решить проблему с отображением COM-портов.
Обновление Windows: 🔄 Убедитесь, что ваша система Windows 11 обновлена до последней версии. Обновления часто содержат исправления ошибок, которые могут влиять на работу COM-портов.
Выводы и советы
COM-порты, несмотря на свою «старину», по-прежнему актуальны в определенных сферах. 🕰️ Windows 11 предоставляет удобные инструменты для работы с ними: поиск используемых портов, проверка их работоспособности, открытие в брандмауэре.
Полезные советы:
- Перед подключением нового устройства, убедитесь, что у вас установлены правильные драйверы.
- При работе с COM-портами в программах, используйте проверенные библиотеки и функции.
- Будьте осторожны при открытии портов в брандмауэре.
- Если у вас возникли проблемы с COM-портами, попробуйте переустановить драйверы или обновить Windows.
Часто задаваемые вопросы
- Как узнать, какой COM-порт использует принтер? Найдите принтер в списке «Устройства и принтеры» или в диспетчере устройств. Номер порта будет указан в скобках.
- Что такое LPT-порт? LPT-порт — это параллельный порт, который раньше использовался для подключения принтеров.
- Можно ли использовать COM-порты в современных компьютерах? Да, COM-порты можно использовать в современных компьютерах, но для этого может потребоваться специальный адаптер USB-to-COM.
- Как проверить, работает ли COM-порт? Самый простой способ — подключить к нему мышь. Для полной проверки используйте COM-заглушку и программу CheckIt.
- Что делать, если COM-порт не определяется Windows? Попробуйте переустановить драйверы или обновить Windows.
Надеемся, что эта статья помогла вам разобраться с COM-портами в Windows 11! Успехов в работе с ними! 💻🎉
📍 Как включить 443 порт
📍 Как назначить COM-порт в Windows 10
📍 Как узнать TCP порт принтера
📍 Какой порт устанавливать на принтере