
Способ 1: «Проводник»
Чтобы самостоятельно перейти к папке «AppData» в системном «Проводнике», потребуется сначала активировать отображение скрытых файлов. Для этого:
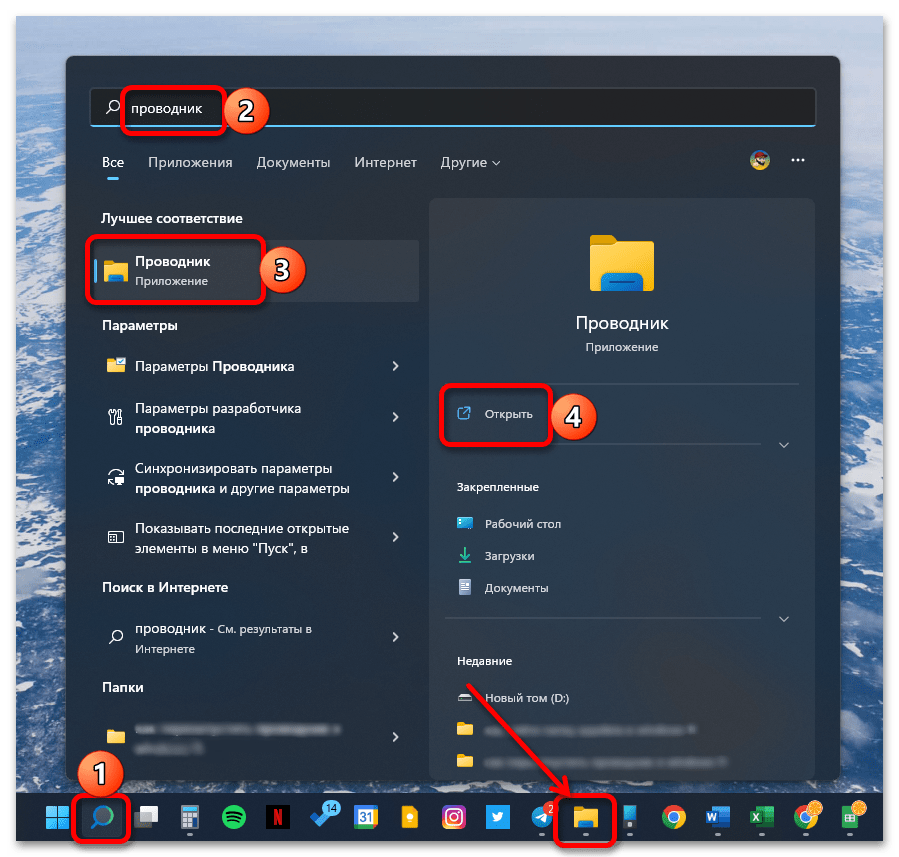
- Любым удобным способом откройте «Проводник» (например, воспользовавшись сочетанием клавиш «Win+E», ярлыком на панели задач или поиском по системе).

Читайте также: Как открыть «Проводник» в Виндовс 11
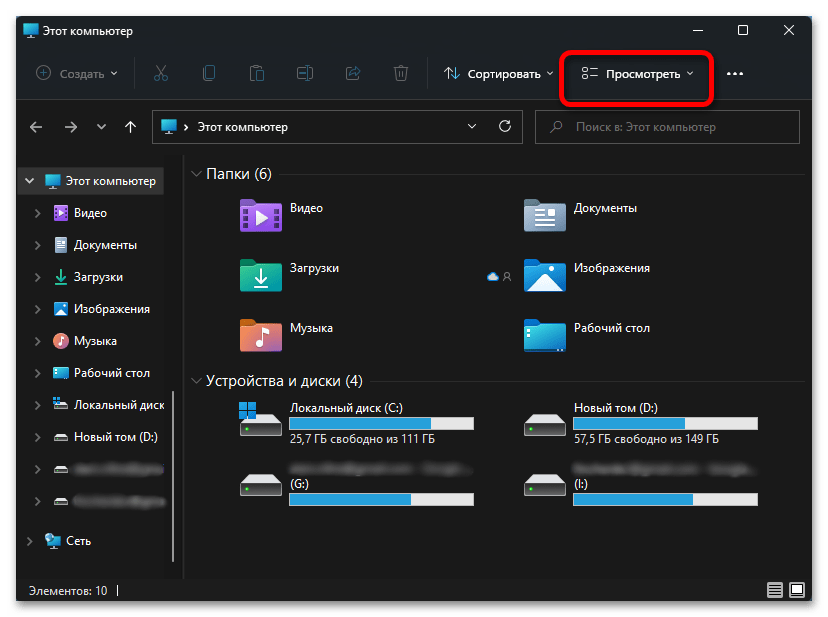
- Разверните расположенное на верхней панели меню «Просмотреть».
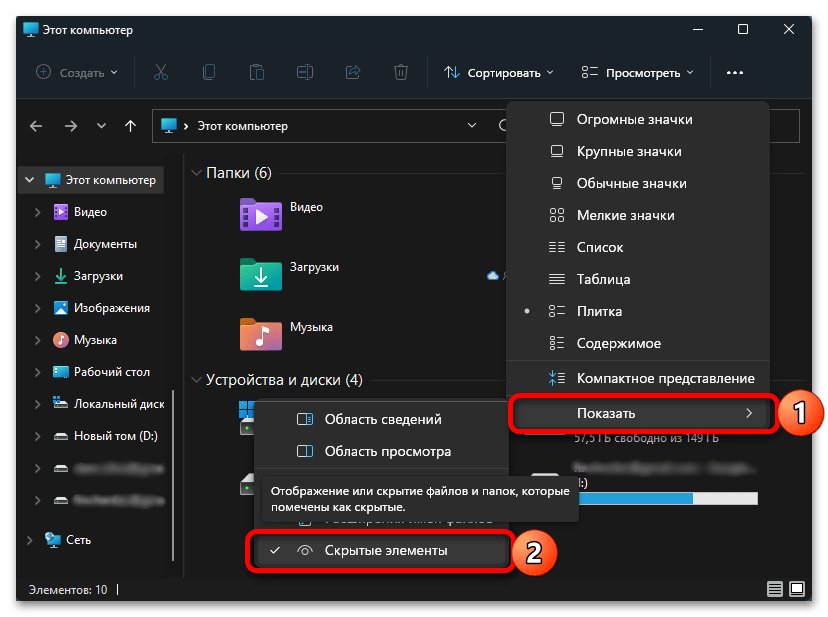
- Наведите указатель курсора на пункт «Показать» и установите галочку напротив «Скрытые элементы».
Читайте также: Как включить отображение скрытых файлов в Windows 11
C:\Users\user_name\AppData
C:\Пользователи\имя_пользователя\AppData
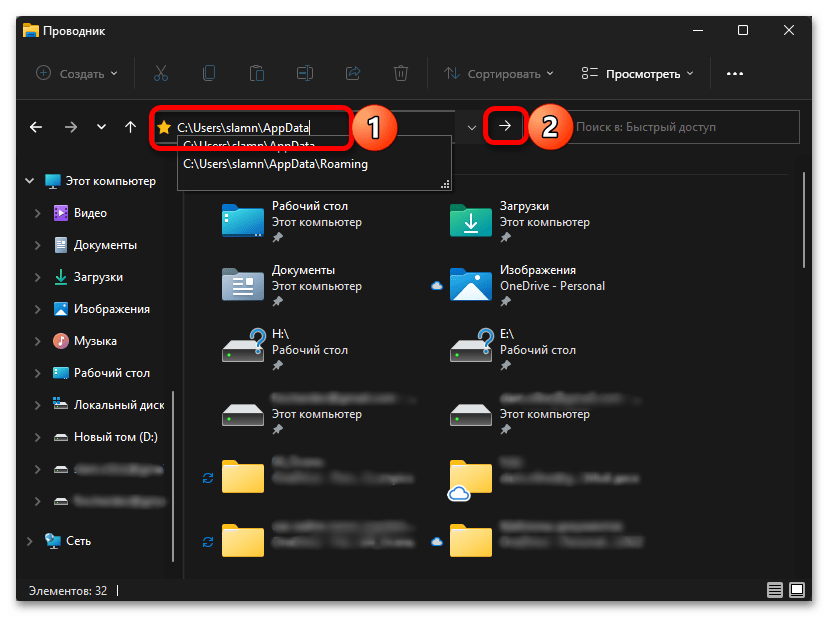
Все что от вас требуется далее для решения нашей задачи – перейти по указанному выше пути, последовательно открывая папки, либо скопировать это значение, вставить его в адресную строку «Проводника» и нажать клавишу «Enter» или указывающую вправо стрелку.
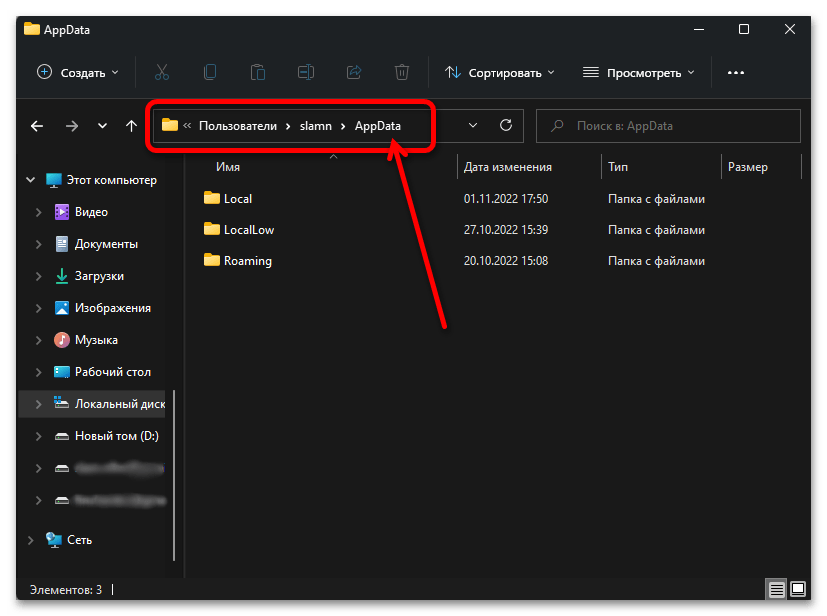
Важно! Для перехода к нужному расположению вы можете использовать любой из двух вышеуказанных адресов, но «user_name» или «имя_пользователя» потребуется заменить на имя вашей учетной записи в Виндовс 11.
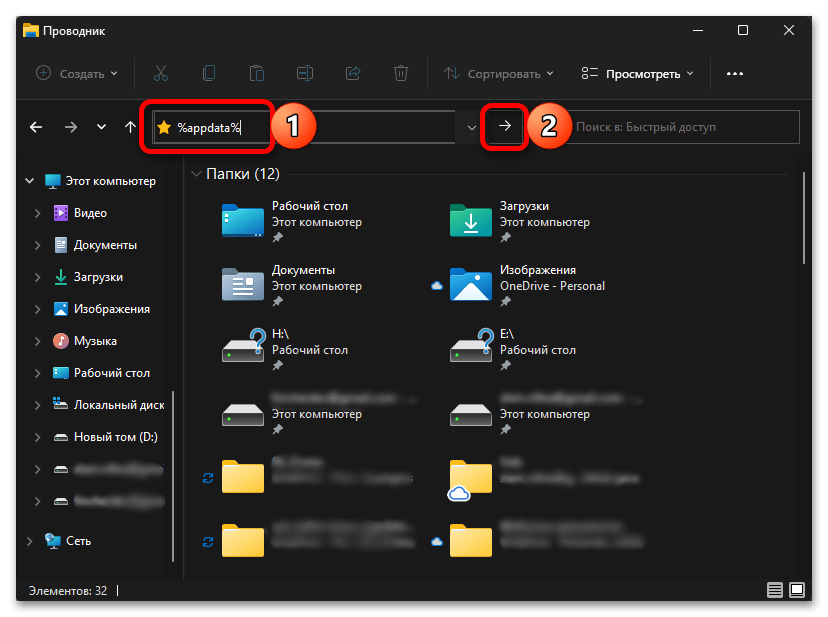
Существует и более простой способ решения нашей задачи, не требующий включения отображения скрытых объектов в системе и подстановки имени пользователя в вышеуказанный путь. Просто скопируйте представленную ниже команду, вставьте ее в адресную строку «Проводника» и нажмите «Enter» либо на стрелку.
%appdata%
Способ 2: «Выполнить»
Оснастка «Выполнить» позволяет быстро запускать различные компоненты Windows 11 и встроенные приложения. Ее же можно задействовать и для перехода к интересующему нас расположению.
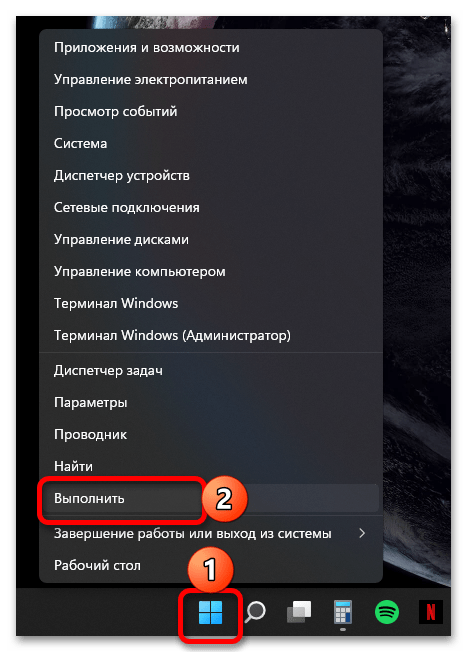
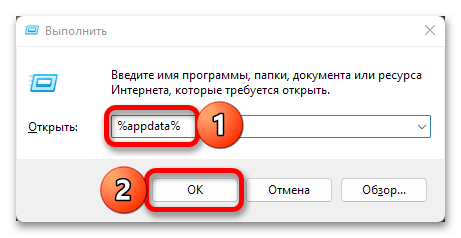
- Используя сочетание клавиш «Win+R» или дополнительное меню «Пуск» (вызывается нажатием правой кнопки мышки по ней), откройте окно «Выполнить».
- Вставьте представленную ниже команду или полный путь к папке (
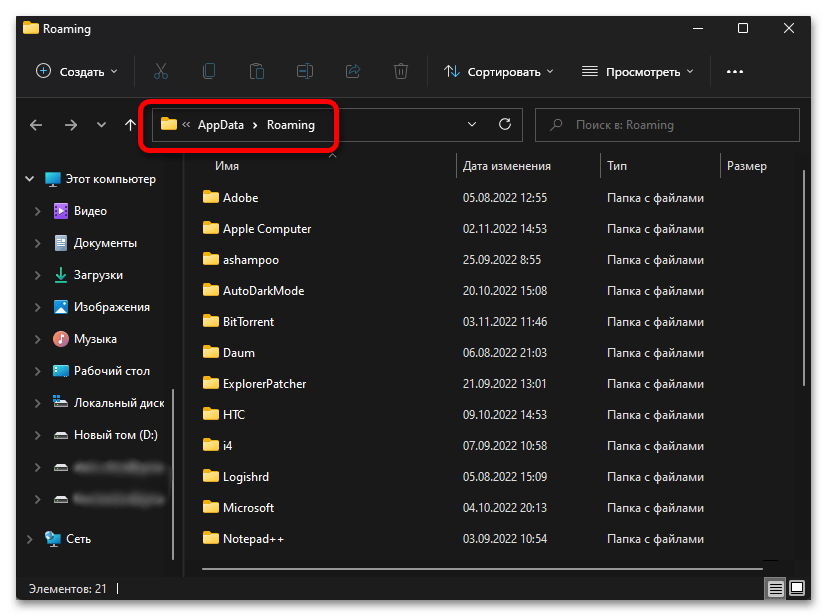
C:\Users\user_name\AppData), предварительно заменив в нем «user_name» на собственное имя пользователя. Нажмите «ОК» или «Enter» для перехода.%appdata% - Если вами использовалась именно команда, а не полный адрес, будет открыта не «AppData», а вложенная в нее папка «Roaming». Поэтому если потребуется, вернитесь на шаг назад.
Способ 3: Поиск
Используя стандартную для Виндовс 11 функцию поиска, можно также быстро перейти в искомую директорию, а точнее, к ее содержимому, показанному на изображении выше.

Просто нажмите на значок лупы на панели задач или задействуйте клавиши «Win+S» и введите уже знакомую по предыдущим методам команду:
%appdata%
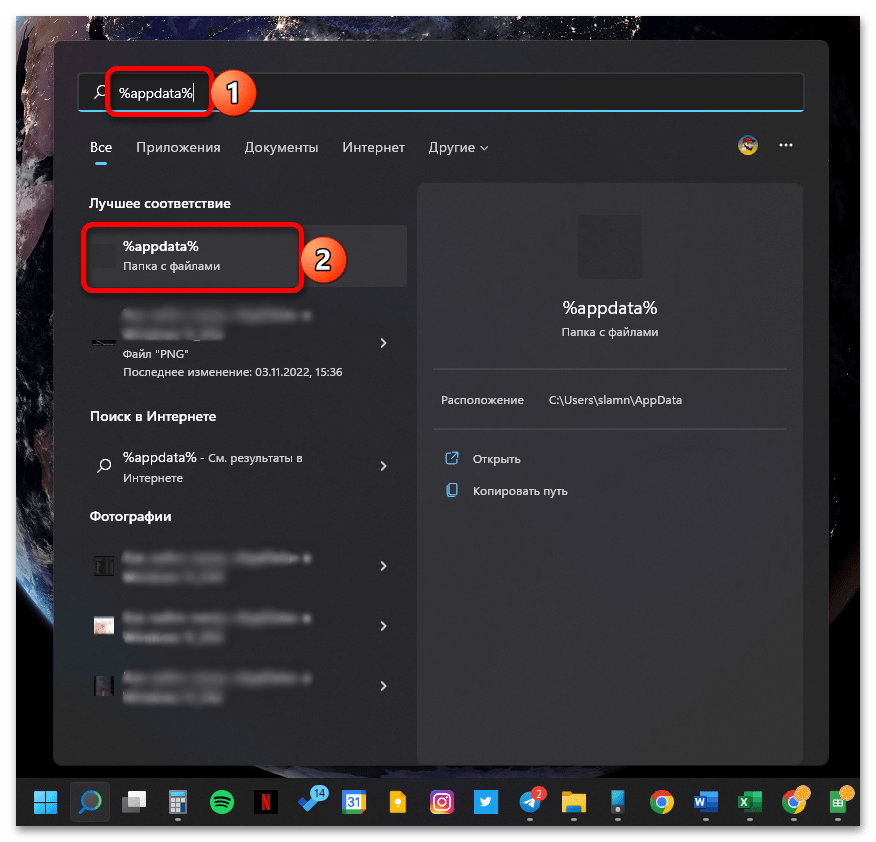
Кликните по первому результату в списке «Лучшее соответствие», подписанному как «Папка с файлами».
Как и в предыдущем случае, будет открыта вложенная в «AppData» директория «Roaming».
Наша группа в TelegramПолезные советы и помощь
For those new to Windows, a user profile is a directory containing settings and information related to a user. The profile directory includes a lot of folders, including Desktop, Documents, Contacts, and personal data such as Windows and application preferences. Since files and settings for each profile are private to that particular user, other users on the same computer can’t view another user’s profile unless that user is an administrator or member of the Administrators group.
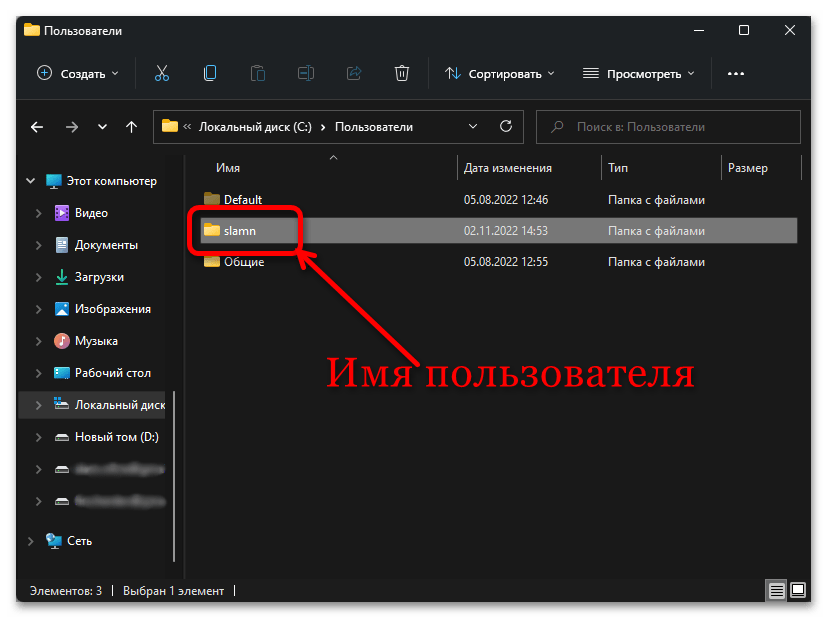
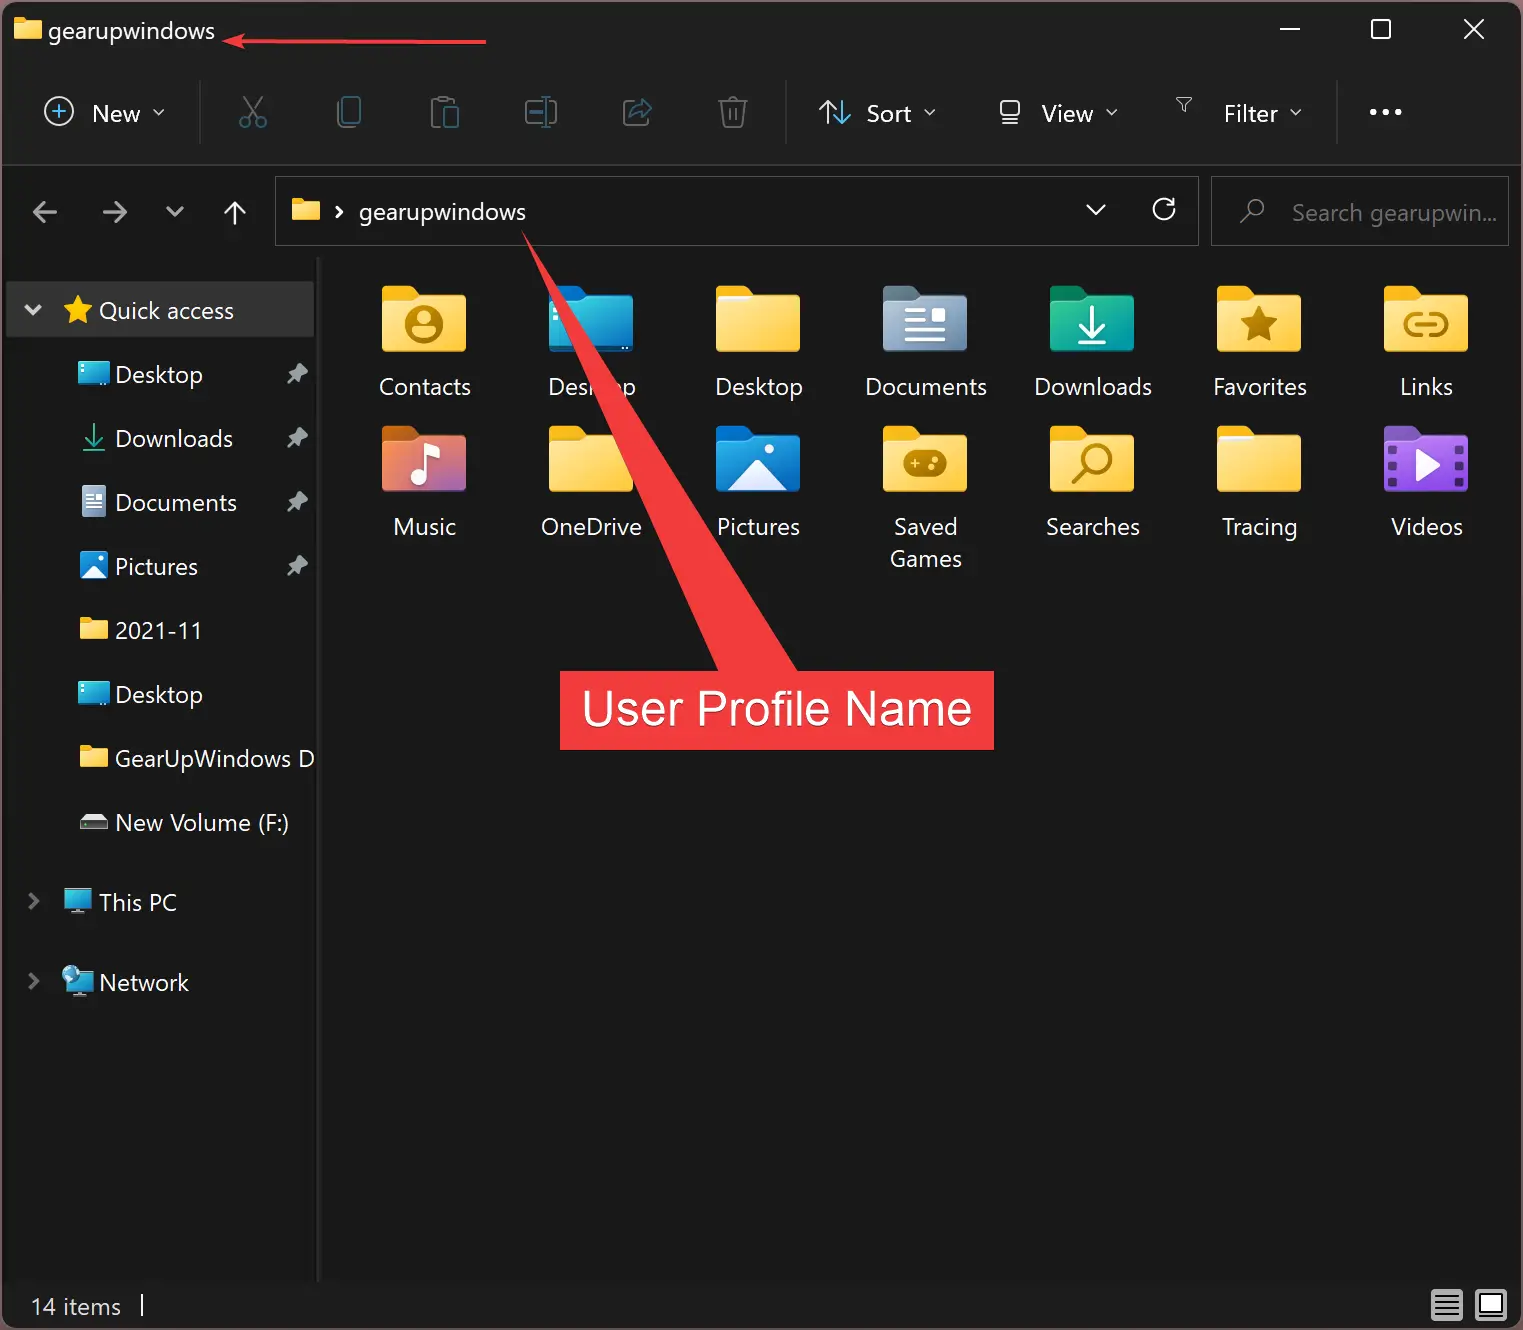
Each user created on your PC will carry a profile folder in the “Users” folder on Windows system drive “C.” Each account will have a profile folder name similar to the account name in that User folder. Suppose we create a user account on our Windows 11 system with the username gearupwindows; Windows will automatically generate a profile folder in the “C:\Users” directory called “C:\Users\gearupwindows.”
How to Find a User Profile Name on Windows 11?
Suppose you have a lot of users on your computer, and after login, you forget which account you have logged in to. In such a case, you will get into trouble finding the user profile folder because it is the same as the user profile name. To find a user profile name on Windows 11, use the following steps:-
Step 1. First, bring up the Run command box by pressing Windows + R keys on the keyboard.
Step 2. After that, in the Run box, type the following and hit the Enter key on the keyboard:-
%USERPROFILE%
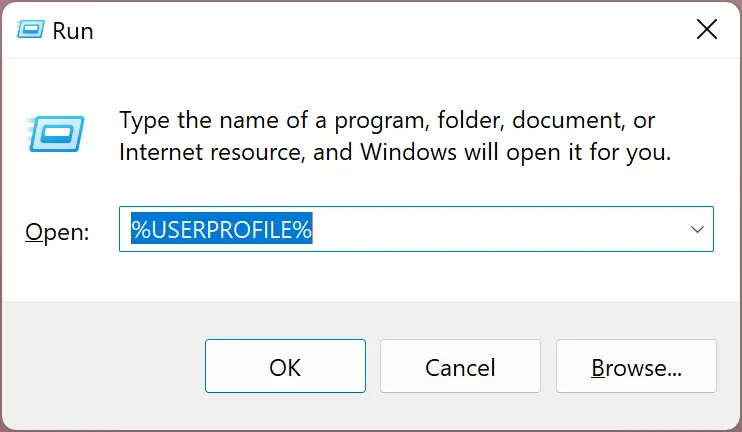
After completing the above steps, the current user profile folder will open up. You can read the user profile name in the title of the File Explorer address bar.
How to Open a User Profile Folder in Windows 11?
To open a user profile folder in Windows 11, do the following:-
Step 1. Very first, open File Explorer by pressing the Windows + E keys on the keyboard.
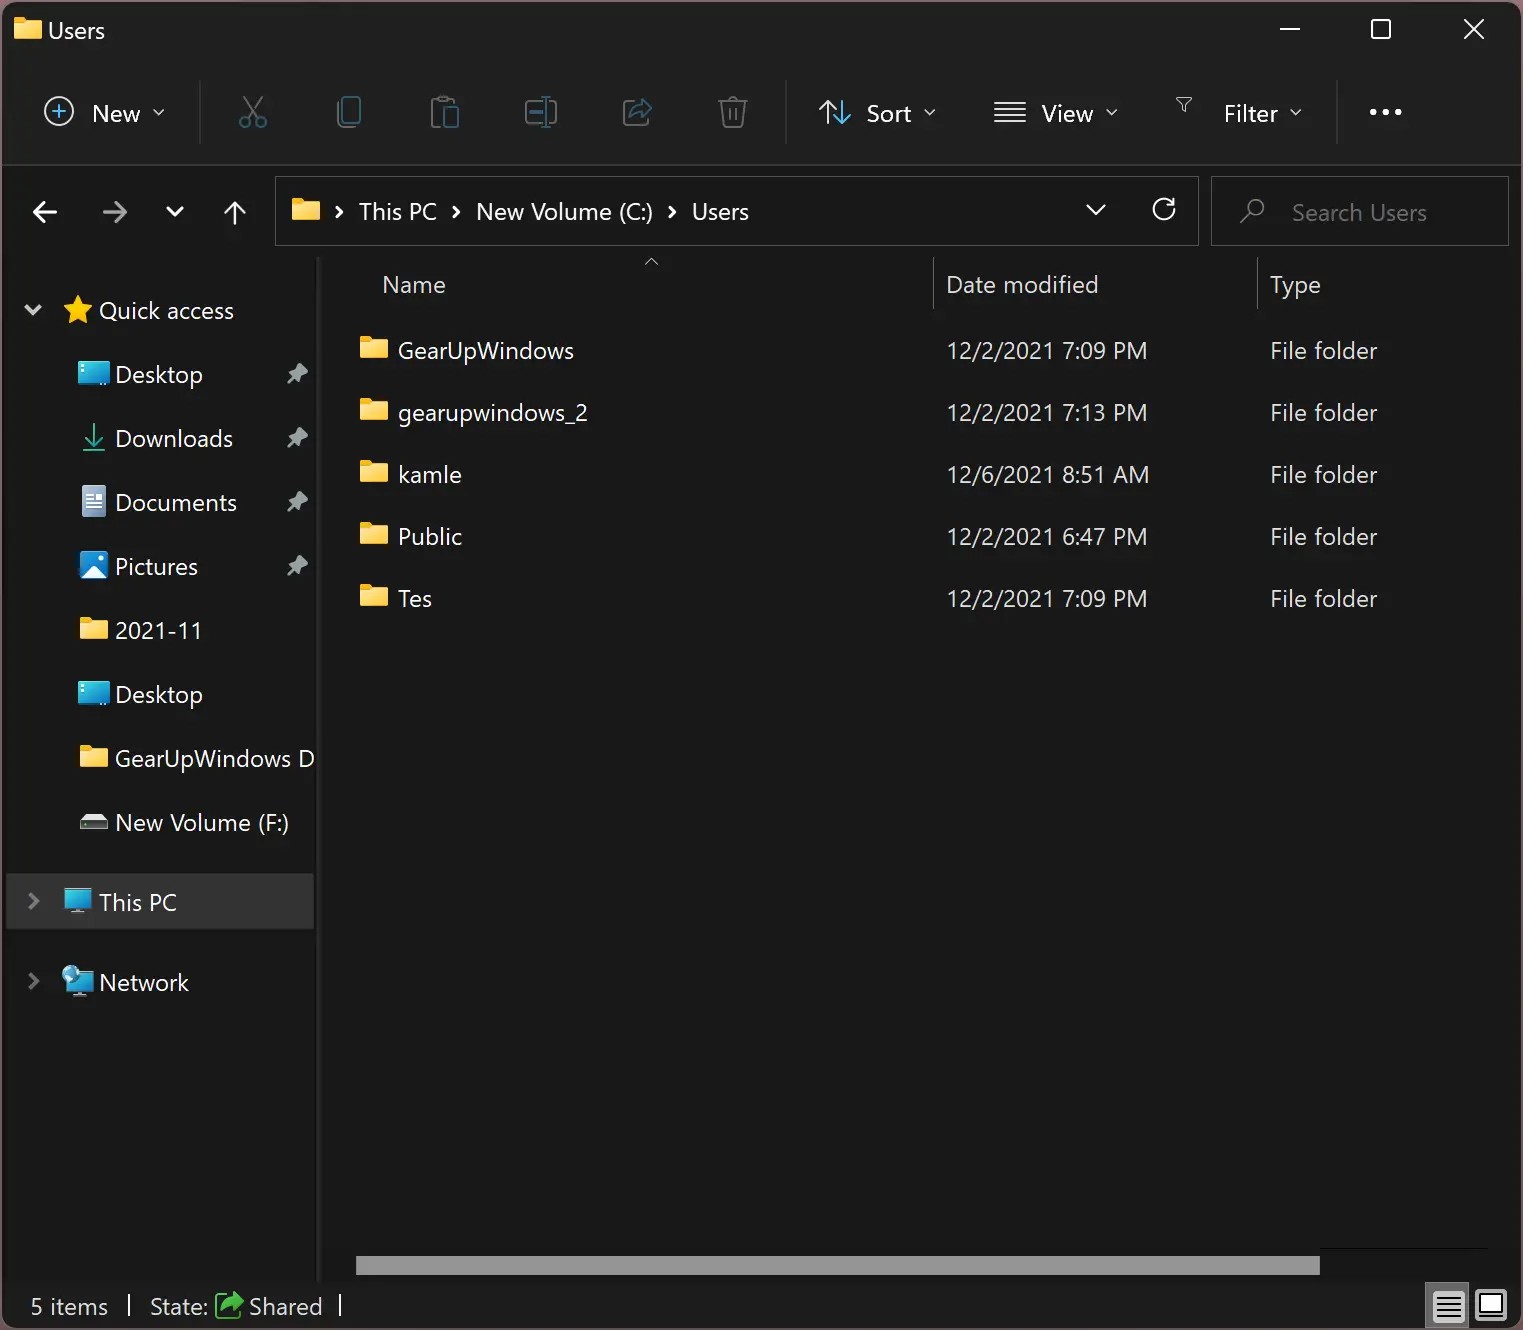
Step 2. After that, navigate to the “This PC > Local Disk (C:)> Users” folder. In this “Users” folder, you will find all users’ profiles are available in separate folders.
If you’re unsure what your username is, you can always get to your profile folder by doing the following:-
First, open the Run box by pressing Windows + R and then type %USERPROFILE% in the box. After that, hit the Enter key on the keyboard. Now, the current user account profile folder will open up.
Good luck.
Conclusion
In conclusion, user profiles are essential directories that contain various settings and information related to a user on a Windows system. These profiles are private and cannot be accessed by other users unless they have administrative privileges. Each user on a Windows system has a profile folder in the “Users” directory, with a name similar to the account name. Finding a user profile name and opening a user profile folder in Windows 11 is crucial to managing user data on the system. By following the steps outlined in this guide, users can easily locate and access their user profile folders in Windows 11.
Многие инструкции, касающиеся Windows 11 или Windows 10 затрагивают действия в системной папке AppData и вложенных папках — Local, Roaming и других. Не все начинающие пользователи могут найти нужную папку, также у них порой возникают вопросы, связанные с тем, что на диске нет расположения C:\Users при просмотре в проводнике.
В этой простой инструкции о том, как найти папку AppData в Windows разных версий несколькими способами: очень быстрый метод открыть это расположение в проводнике, а также простой переход к нужной папке.
Быстрое открытие папки AppData в проводнике
Папка AppData находится на системном диске C в папке Пользователи (или Users)\Имя_пользователя\ и по умолчанию является скрытой. Однако, не обязательно включать показ скрытых файлов и папок, чтобы перейти к этой папке.
В Windows есть очень быстрый способ открыть папку AppData с помощью проводника и короткого пути:
- Откройте проводник, введите %appdata% в адресной строке проводника и нажмите Enter.

- Вы автоматически окажетесь в папке AppData/Roaming.
- Если вам нужен верхний уровень (сама папка AppData, а не вложенная Roaming), нажмите по AppData в адресной строке проводника или нажмите по кнопке перехода на уровень вверх.


Включение показа скрытых папок и переход к папке AppData
Второй способ — включить отображение скрытых папок и файлов в Windows, а затем перейти к папке AppData в проводнике.
Для первого шага используйте одну из инструкций:
- Как показать скрытые и системные папки и файлы Windows 11
- Как включить показ скрытых и системных папок и файлов Windows 10
После этого останется открыть проводник и зайти в C:\Пользователи (или C:\Users\), открыть папку с вашим именем пользователя и уже в ней вы увидите нужную папку AppData.

Случается, что в какой-то инструкции пользователи видят, что нужно перейти к папке C:\Users\Имя\AppData\Local или C:\Users\Имя\AppData\Roaming, но не находят папку Users на диске C. Причина в том, что в Проводнике русскоязычных версий Windows она отображается как папка «Пользователи».
Сама папка содержит различные данные установленных программ, некоторые из этих данных создаются при установке и настройке программ, другие (например, временные файлы) могут создаваться при работе программ. Не следует удалять файлы из этой папки, если вы не знаете, что именно вы удаляете и не уверены в том, что это безопасно.
Users folder is missing? How to recover the missing Users folder in Windows 11/10? In this post on MiniTool, we introduce several proven ways to help you get the Users folder back. Besides, we show you some useful tips to prevent data from being lost.
Users Folder Is Missing in Windows 11/10
Folders, also called directories, are spaces on your computer that store files, other folders, and shortcuts. However, folder loss is a common problem in Windows, such as the Windows Pictures folder being missing, the DCIM folder being missing, and so on. Today we are going to talk about another folder missing issue – Users folder is missing.
When your Users folder in C drive is missing, you may wonder “why is my Users folder not showing”?
In general, the Users folder may be missing due to accidental deletion, or it was not deleted, but hidden and therefore invisible.
The Users folder in C drive contains a home folder and a Public folder. The home folder has the same name as your username and generally contains Downloads, Documents, Desktop, Pictures, Music, etc. The Public folder can be used to share files with other people who use the same computer or are connected to the computer through the same network.
It can be seen that the Users folder is very important. How to recover the missing Users folder in Windows 11/10? Keep reading to find out the answers.
How to Recover the Missing Users Folder
Way 1. Recover the Missing Users Folder by Showing Hidden Folders
As said before, when the Users folder is hidden, you cannot view it. Therefore, to get the missing Users folder back, you need to configure it to show hidden folders. How to unhide the Users folder in Windows 10/11? You can do it as follows.
Step 1. Type Show hidden files and folders in the Windows search box and then click it from the best match result.
Step 2. Tick the option of Show hidden files, folders, and drives in the pop-up window. Then click the OK button to save your change.
After that, check whether you can view the Users folder in the C drive now. If it is still not showing up on your computer, the Users folder may get lost. In this situation, you need to use professional data recovery software to recover the missing Users folder.
Way 2. Recover the Missing Users Folder Using MiniTool Power Data Recovery
MiniTool Power Data Recovery, a piece of reliable and free data recovery software, is designed to recover deleted folders and files from computer hard drives (C drive and other drives), external hard drives, USB disks, SD cards, CDs/DVDs, and more.
MiniTool Power Data Recovery supports recovering almost all types of files. For instance, it can recover Sticky Notes, Word/Excel/PowerPoint files, pictures, audio, videos, and so on without bringing any damage to the original data.
To recover the missing Users folder and subfolders/files on it, you can click the button below to download MiniTool Power Data Recovery and have a try.
MiniTool Power Data Recovery FreeClick to Download100%Clean & Safe
After getting MiniTool Power Data Recovery installed, you can follow the steps below to rescue your Users folder.
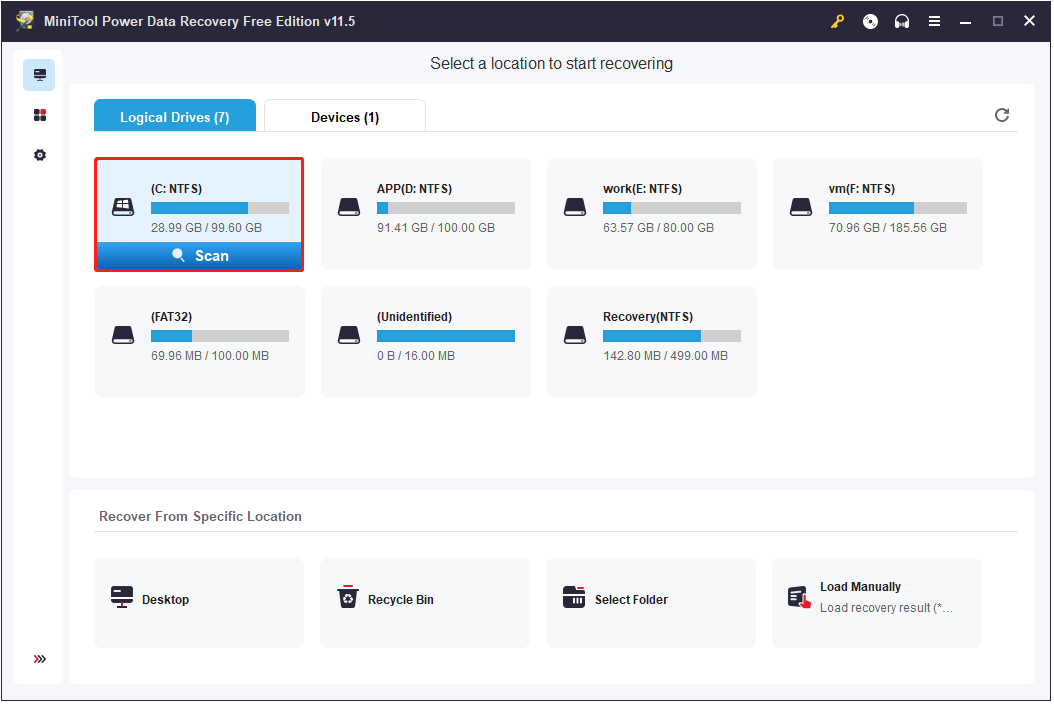
Step 1. Launch MiniTool Power Data Recovery to enter its main interface. Then select the C drive to scan because the Users folder is located in the C drive by default.
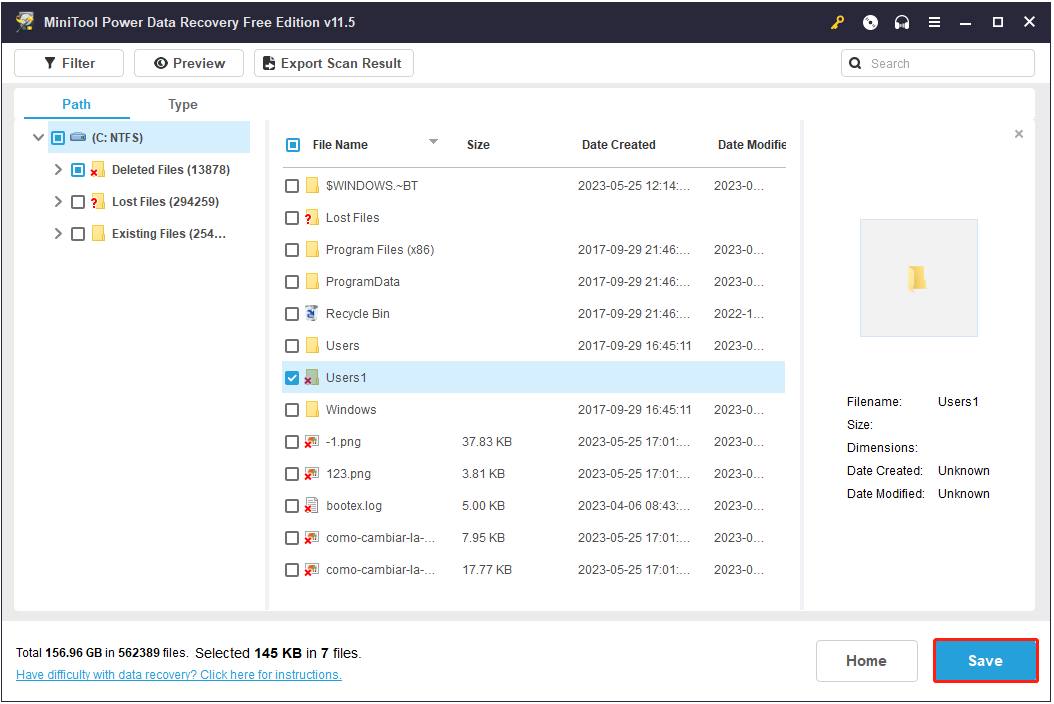
Step 2. Wait for the scanning process to complete. Then you can see all found files on the C drive are listed. Now you can select the Users folder, or other folders/files and click the Save button to choose an appropriate location to store them.
Tips:
Tip: You had better not store found folders or files in the location where they exist before, because doing this may cause data overwriting, and overwritten files cannot be recovered by any data recovery tools.
After all operations have been done, the Users folder should be recovered successfully.
Tips:
Tip: MiniTool Power Data Recovery Free supports recovering up to 1 GB of files totally for free. To restore unlimited files, you need to choose a full edition.
Top Recommendation
If you want to retrieve the Users folder from an unbootable computer, you can use MiniTool Power Data Recovery Personal Ultimate. It can help to make a bootable data recovery disk so that you can boot your computer from the bootable disk and perform data recovery.
You can download the free edition to make sure the needed folders/files can be found, and then you are able to upgrade it to a Personal Ultimate edition to create a bootable disk. For a more comprehensive guide to performing data recovery without booting Windows, you can refer to: How to Recover Data When PC Won’t Boot (Works 100%).
MiniTool Power Data Recovery FreeClick to Download100%Clean & Safe
My Users folder is missing. I used MiniTool Power Data Recovery to recover my missing Users folder effectively.Click to Tweet
Way 3. Recover the Missing Users Folder Using Windows File Recovery
Another effective way to recover the missing Users folder is to use the Windows built-in data recovery tool – Windows File Recovery.
Tips:
Tip: Windows File Recovery requires Windows 10 build 19041 or later Windows versions. You can read this post to check which Windows version you are using: What Version of Windows Do I Have?
Windows File Recovery is a command line app available from the Microsoft Store. It can help to restore files deleted from your local HDDs, SSD drives, USB flash drives, memory cards (SD cards), and external hard drives.
If you are familiar with the command line, you may restore your Users folder by using Windows File Recovery easily.
To get the major steps to carry out data recovery with Windows File Recovery, you can read this article: How to Use Microsoft’s Windows File Recovery Tool.
How to Prevent Data From Loss in Windows
1. Back up your files regularly.
Better safe than sorry. Backing up important files is the most effective and safe way to protect your data. You can back up your files with File History, or transfer them to another external hard drive or the cloud drive like OneDrive or Google Drive.
If you are looking for a piece of professional third-party data backup software, you can try MiniTool ShadowMaker. It is the best data backup tool that is used to back up folders, files, Windows systems, disks, etc.
More importantly, MiniTool ShadowMaker provides you with a 30-day free trial that lets you enjoy all its features (data backup, file/folder sync, system backup, partition/disk backup, disk clone, etc.) for 30 days without paying a penny.
MiniTool ShadowMaker TrialClick to Download100%Clean & Safe
2. Enable the delete confirmation box.
To reduce the chance of mistaken deletion, you can enable the delete confirmation box. Have this feature enabled, whenever you try to delete a file, a window will pop up, saying “Are you sure you want to move this folder to the Recycle Bin?” as shown in the figure below.
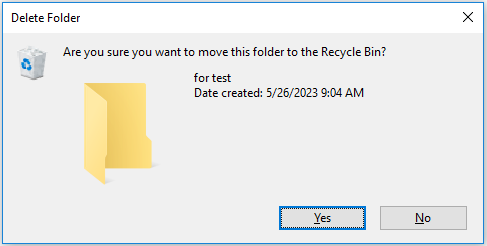
To enable the delete confirmation dialog, you need to right-click the Recycle Bin icon on your desktop and select Properties. In the new window, check the Display delete confirmation dialog option and then click OK to save this setting.
3. Scan for viruses frequently.
Viruses can corrupt data stored on the hard drive, resulting in “Users folder is missing” or other data loss situations. To avoid a complicated data recovery process, you’d better enable the antivirus software that comes with Windows – Windows Defender to scan your device for viruses and protect your files.
Bottom Line
Reading here, you should know what should you do when the Users folder disappeared in Windows 11/10. Feel free to use MiniTool Power Data Recovery to recover the missing Users folder.
Also, always remember to protect your files by backing up them, enabling the delete confirmation box, and think twice before removing any files.
If you have any questions when using MiniTool software, please let us know by sending your emails to [email protected] or leaving them in the comment zone.
How to Open Local Users and Groups on Windows 11/10
Introduction
Windows operating systems, particularly Windows 10 and 11, provide users with a wealth of features and tools to customize and manage their local environment. One such feature is the Local Users and Groups management console, which allows for the administrative management of user accounts and groups on a local machine. Managing users and groups is vital for networked environments and individual users alike, as it ensures security, flexibility, and proper access control over files and applications. This article serves as a comprehensive guide on how to open Local Users and Groups on Windows 11 and 10, and it will delve into various methods, the significance of user account management, and tips for effective usage.
Understanding Local Users and Groups
Local Users and Groups is a management console that comes with the Microsoft Management Console (MMC). This feature enables administrators to create and manage user accounts and groups on their local Windows machines. Learning how to access and utilize this tool is essential for performing various tasks, such as:
-
Creating User Accounts: Adding new users to the computer and assigning them specific access rights.
-
Managing Group Policies: Organizing users into groups to facilitate permission management.
-
Modifying User Properties: Updating settings such as user passwords, home folders, and account expiration dates.
-
Monitoring User Activity: Gaining insights into user logons and account status.
-
Account Security: Implementing security measures by disabling accounts and managing passwords effectively.
Why Manage Local Users and Groups?
In any Windows environment, managing local users and groups is crucial for maintaining security and effective resource allocation. Here are some reasons why this management is essential:
Improved Security
By managing users and groups, you can guarantee that only authorized individuals have access to specific files, folders, and applications. This is particularly important in multi-user environments, where sensitive information could be improperly accessed.
Streamlined Access
Creating groups can save time and effort when managing permissions. Instead of adjusting settings for each user individually, you can create a group, set its permissions, and then add users as needed.
Accountability and Control
Through user account management, you have the ability to track user activity and interactions with the system. This aids in identifying unauthorized access and maintaining an audit trail.
Methods to Open Local Users and Groups
Opening the Local Users and Groups management console can be done in several ways. Below are the most effective methods to access this useful tool on Windows 11 and Windows 10.
Method 1: Using the Run Dialog
The Run dialog is a straightforward method for accessing the Local Users and Groups console.
-
Open the Run Dialog: Press the
Windows Key + Ron your keyboard. -
Enter the Command: Type
lusrmgr.mscand hit Enter.
Upon doing this, the Local Users and Groups management console should open, allowing you to navigate through users and groups easily.
Method 2: Using the Computer Management Console
Computer Management is a versatile tool in Windows that encompasses various system management features, including Local Users and Groups.
-
Open Computer Management: Right-click on the Start button (or press
Windows Key + X) and select Computer Management. -
Navigate to Local Users and Groups: In the Computer Management window, expand the Local Users and Groups option in the left-hand sidebar.
-
Access Users and Groups: Here, you will find the «Users» and «Groups» folders where you can manage accounts and groups accordingly.
Method 3: Using Windows PowerShell
For more advanced users, PowerShell provides a powerful command-line tool for managing users and groups.
-
Open PowerShell: Right-click the Start button and select Windows Terminal or Windows PowerShell.
-
Execute the Command: In the PowerShell window, type
lusrmgr.mscand press Enter.
This command opens the Local Users and Groups management console, just as the methods above do.
Method 4: Through the Control Panel
Another way to manage user accounts is through the Control Panel, although it may not provide direct access to Local Users and Groups.
-
Open Control Panel: Type «Control Panel» in the Windows search bar and hit Enter.
-
Navigate to User Accounts: Click on User Accounts and then Manage another account.
This method, however, may not provide direct access to local groups but can still be used for limited user management.
Method 5: Using the Windows Search Function
The Windows taskbar search function can also quickly direct you to the Local Users and Groups console.
-
Open the Search Bar: Click on the Search icon in the taskbar or press
Windows Key + S. -
Type the Command: Enter
lusrmgr.mscin the search bar and press Enter.
This will launch the Local Users and Groups console immediately.
Additional Note on Access Permissions
It’s essential to bear in mind that Local Users and Groups is primarily accessible to users with administrative privileges on Windows. If you find yourself unable to open the console using any of the above methods, check your user permissions or log in as an administrator.
Managing Users in Local Users and Groups
Once you have successfully opened the Local Users and Groups management console, you will notice two main sections: Users and Groups. Here’s how to manage users effectively.
Creating a New User
-
Right-click on Users: In the Local Users and Groups window, right-click on the Users folder.
-
Select New User: Click on New User from the dropdown menu.
-
Fill in User Information: Enter the required fields such as username, full name, and description. Additionally, set a password and choose whether the user must change their password at the next logon.
-
User Properties: Once the new user is created, you can right-click on the user account to access further properties, such as account expiration and group memberships.
Deleting a User Account
To delete an account that is no longer needed:
-
Select the User Account: Right-click on the user account you wish to delete.
-
Choose Delete: Select the Delete option from the context menu, followed by confirmation of the action.
Modifying User Properties
Editing an existing user account can involve changing the username, password, and group memberships.
-
Right-click the User: In the Users list, right-click the user account you want to modify.
-
Select Properties: Choose Properties from the dropdown menu.
-
Make Necessary Changes: Here, you can change details like the user’s description or copy the user’s properties to another account.
Managing Passwords
Setting password policies for your users is crucial for maintaining security. This can be done through user properties.
-
Open User Properties: Right-click on the user and select Properties.
-
Set Password Policies: Under the “General” tab, you will find options for User must change password at next logon and Password never expires among others.
-
Save Changes: Be sure to save any changes you make.
Viewing User Accounts
To view the details of user activity, right-click on Users and select Refresh to view updates on account statuses conveniently.
Managing Groups in Local Users and Groups
Groups serve as essential classification units that help simplify user management.
Creating a New Group
-
Right-click on Groups: In the right panel, right-click on Groups and select New Group.
-
Define Group Attributes: Enter the group name and description. You can add users to this group by clicking on the Add button.
-
Create the Group: Once you’re done, click on Create to finalize the new group.
Adding Users to a Group
-
Right-click on the Group: Select the group you want to add users to and right-click.
-
Select Add to Group: Choose the Add to Group option.
-
Select Users: In the dialog box, type the name of the users you want to add or click on Advanced to search for them.
-
Confirm the Addition: Click on OK to add the selected users to the group.
Deleting a Group
To delete an existing group, simply right-click the group in the Groups section and select Delete. Remember, you can’t delete groups that have active user accounts associated with them.
Modifying Group Properties
-
Right-click on the Group: Choose the group you want to modify and right-click.
-
Select Properties: Click on Properties in the context menu.
-
Make Changes: Change the group name or description as needed, and hit OK to save your changes.
User Account Control Settings
User Account Control (UAC) is integral to Windows security. It helps control permissions and prompt users for approval when actions require administrative privileges. To adjust UAC settings related to user accounts:
-
Open Control Panel: Launch the Control Panel and select User Accounts.
-
Manage User Account Control Settings: Click on Change User Account Control settings.
-
Adjust Your Settings: Move the slider to adjust the level of notification you wish to receive regarding account activities.
-
Save Changes: Click OK when finished.
Conclusion
Managing local users and groups in Windows 10/11 not only sharpens your ability to control access but also bolsters your security posture. With administrative access, you can leverage the Local Users and Groups management console to efficiently create, modify, and delete user accounts and groups, ensuring that security measures are aligned with your operational needs. By learning how to access and utilize this vital tool, you’ve gained an essential skill that will enhance your Windows experience and understanding of user management.
With practice, managing local users and groups will become an intuitive part of your routine, empowering you to navigate the complexities of user access effectively. Whether you’re a seasoned IT professional or a casual user looking to enhance your Windows environment, mastering these skills is invaluable in today’s digital landscape.