
Opening the Nvidia Control Panel in Windows 11 is a straightforward task that enables you to customize your GPU settings with ease. First, right-click on your desktop and locate the “Nvidia Control Panel” option in the context menu. If it is not directly visible, find it through the Windows search bar by typing “Nvidia Control Panel.” Once launched, you can adjust various graphics settings to optimize performance or visual quality according to your needs.
Step-by-Step Tutorial on Opening Nvidia Control Panel in Windows 11
To make sure your graphics settings are tailored to your needs, the following steps will guide you through opening the Nvidia Control Panel on a Windows 11 system.
Step 1: Right-click on the Desktop
Right-click on any empty space on your desktop.
This action will bring up a context menu that includes various options related to display settings and personalization.
Step 2: Select “Nvidia Control Panel”
In the context menu, locate and click on “Nvidia Control Panel.”
If you don’t see the option, it might be hidden; in such a case, proceed to the next step to find it using a different method.
Step 3: Use the Windows Search Bar
Click on the Windows search bar and type “Nvidia Control Panel.”
The search bar is a handy tool that swiftly locates apps and settings on your computer. This method is particularly useful if the control panel is not directly accessible from the desktop.
Step 4: Open the Nvidia Control Panel
From the search results, click on the “Nvidia Control Panel” application.
This will launch the Nvidia Control Panel, where you can tweak your GPU settings for better performance or enhanced visuals.
Step 5: Adjust Your Settings
Once the Nvidia Control Panel is open, explore and adjust the various settings according to your preferences.
You can alter display settings, manage 3D settings, or customize specific programs’ graphics settings, giving you control over your computer’s GPU performance.
After completing these steps, you’ll gain access to a world of customization options for your graphics card. Whether you’re looking to boost performance or enhance the visual quality of your games and applications, the Nvidia Control Panel provides you the tools you need.
Tips for Opening Nvidia Control Panel in Windows 11
- Ensure your Nvidia drivers are up to date to avoid potential issues when accessing the control panel.
- If you can’t find the Nvidia Control Panel, check if it’s installed through the Control Panel or Microsoft Store.
- Restart your computer if the Nvidia Control Panel doesn’t open after following the steps.
- Make sure you’re logged in as an administrator, as some settings may require admin privileges.
- Remember that changes in the Nvidia Control Panel can affect system performance and power consumption.
Frequently Asked Questions
Why can’t I find the Nvidia Control Panel?
You may need to update your Nvidia drivers or reinstall the Nvidia Control Panel from the Microsoft Store.
Is the Nvidia Control Panel the same as Nvidia GeForce Experience?
No, they are different applications. The Nvidia Control Panel is for GPU settings, while GeForce Experience focuses on game optimization and driver updates.
Can I access the Nvidia Control Panel without a dedicated Nvidia GPU?
No, the Nvidia Control Panel is specifically for systems with Nvidia graphics cards.
How do I reset the Nvidia Control Panel to default settings?
Within the Nvidia Control Panel, navigate to “Manage 3D settings” and click “Restore Defaults.”
Do changes in the Nvidia Control Panel affect all users on the computer?
Yes, changes typically affect the entire system and all user accounts.
Summary
- Right-click on the desktop.
- Select “Nvidia Control Panel.”
- Use the Windows search bar (if needed).
- Open the Nvidia Control Panel.
- Adjust your settings.
Conclusion
In conclusion, knowing how to open the Nvidia Control Panel in Windows 11 is a valuable skill for anyone looking to get the most out of their Nvidia graphics card. With just a few clicks, you can access a suite of settings that allow you to tailor your computer’s performance to suit your individual needs, whether you’re a gamer aiming for higher frame rates or a creative professional seeking the best visual fidelity.
The Nvidia Control Panel provides a user-friendly interface packed with options that can seem overwhelming at first, but once you get the hang of it, you’ll enjoy the power it unlocks. Remember, technology is like a toolbox; the more you know about each tool, the better you can use them to build your ideal experience. So, go ahead and explore what your Nvidia Control Panel has to offer.
If you’re keen on diving deeper, consider looking into Nvidia’s online resources or forums where enthusiasts share tips and tricks. By taking control of your GPU settings, you’ll not only enhance your computing experience but also gain a deeper appreciation for the hardware that drives your digital world.
Matthew Burleigh has been writing tech tutorials since 2008. His writing has appeared on dozens of different websites and been read over 50 million times.
After receiving his Bachelor’s and Master’s degrees in Computer Science he spent several years working in IT management for small businesses. However, he now works full time writing content online and creating websites.
His main writing topics include iPhones, Microsoft Office, Google Apps, Android, and Photoshop, but he has also written about many other tech topics as well.
Read his full bio here.
Все способы:
- Способ 1: Обновление драйвера графического адаптера
- Способ 2: Выключение контейнерных процессов
- Способ 3: Перезапуск служб
- Способ 4: Удаления кеша данных
- Способ 5: Консоль
- Способ 6: Отключение «Быстрого запуска»
- Способ 7: Удаление сторонних антивирусов
- Способ 8: Переустановка фирменного софта
- Дополнительные причины
- Вопросы и ответы: 0
Способ 1: Обновление драйвера графического адаптера
Если «Панель управления NVIDIA» не запускается, то в первую очередь стоит вручную обновить драйвер графического адаптера, используя встроенные возможности. Вероятно, предыдущая версия программного обеспечения была повреждена, а функции ОС позволят установить базовое ПО для компонента, после чего получится скачать актуальный фирменный софт через панель управления:
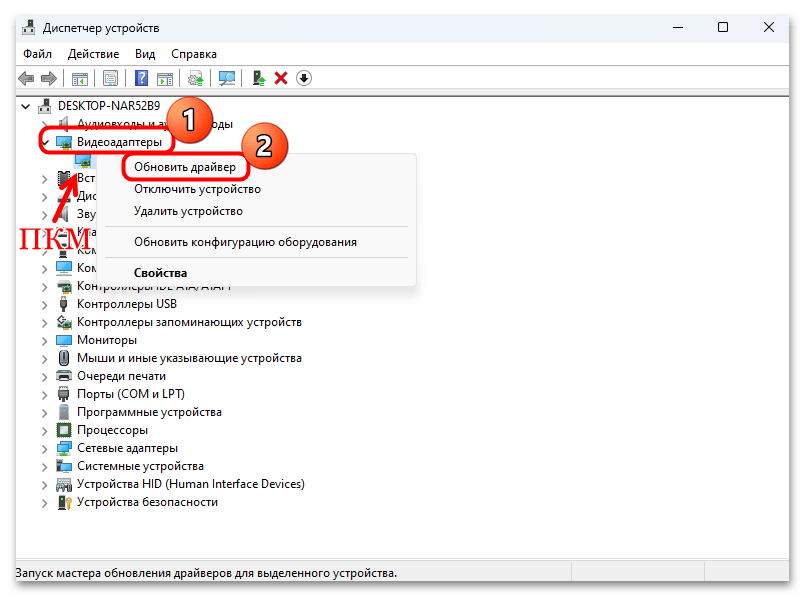
- Нажмите правой кнопкой мыши по «Пуску» и в появившемся меню выберите запуск «Диспетчера устройств».
- Разверните меню «Видеоадаптеры» и, если у вас две видеокарты (например, интегрированная от Intel и дискретная NVIDIA, что чаще всего встречается в ноутбуках), то найдите проблемный адаптер, кликните по его названию правой кнопкой мыши и из контекстного меню выберите опцию «Обновить драйвер».
- В новом окне кликните по строке «Автоматический поиск драйверов».
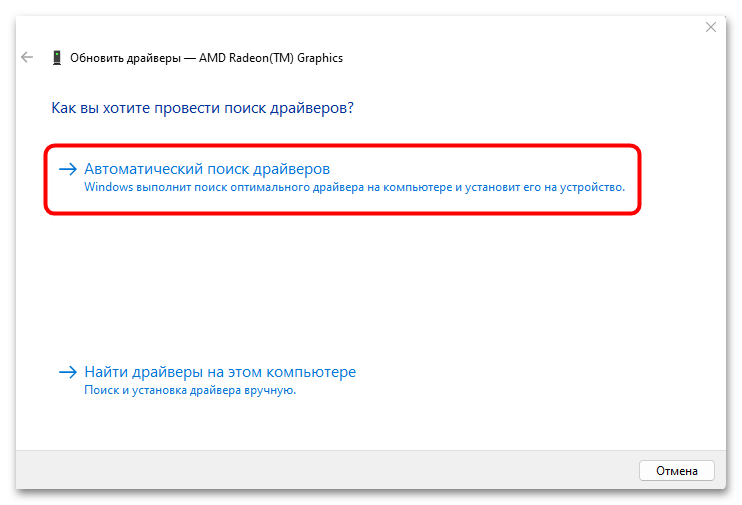
Следует отметить, что для обновления ПО потребуется доступ в интернет. Если актуальные и неповрежденные драйверы будут найдены на официальных серверах Microsoft, то вы увидите соответствующее уведомление. Останется скачать и установить софт, после чего пробовать запустить «Панель управления NVIDIA».
Способ 2: Выключение контейнерных процессов
Для эффективной работы приложения от НВИДИА в фоновом режиме работают контейнерные процессы. Если в их функционировании произошел сбой, тогда панель управления может вовсе не запуститься. Попробуйте перезапустить такие процессы вручную:
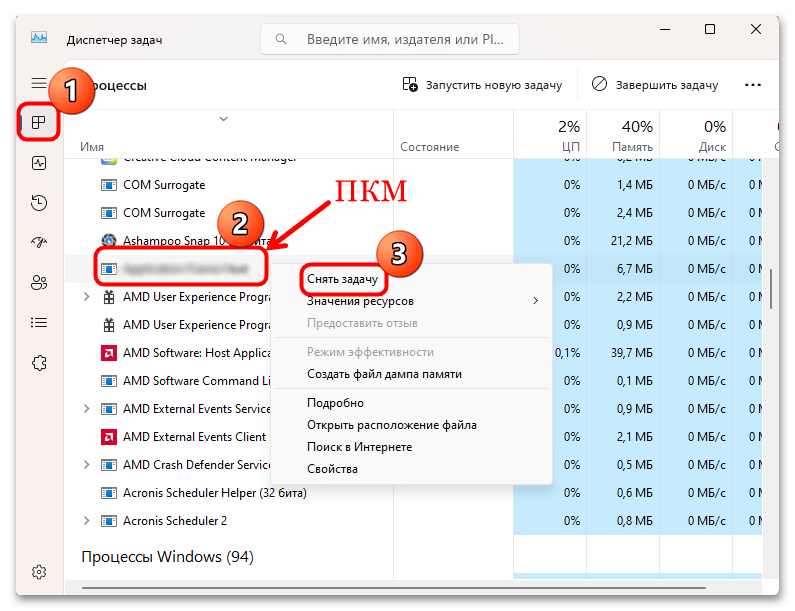
- Щелкните правой кнопкой мыши по панели задач и запустите «Диспетчер задач».
- На вкладке «Процессы» найдите все процессы, которые связаны с NVIDIA. В названии должно быть слово «Container». Выделите строку и нажмите на кнопку «Снять задачу».
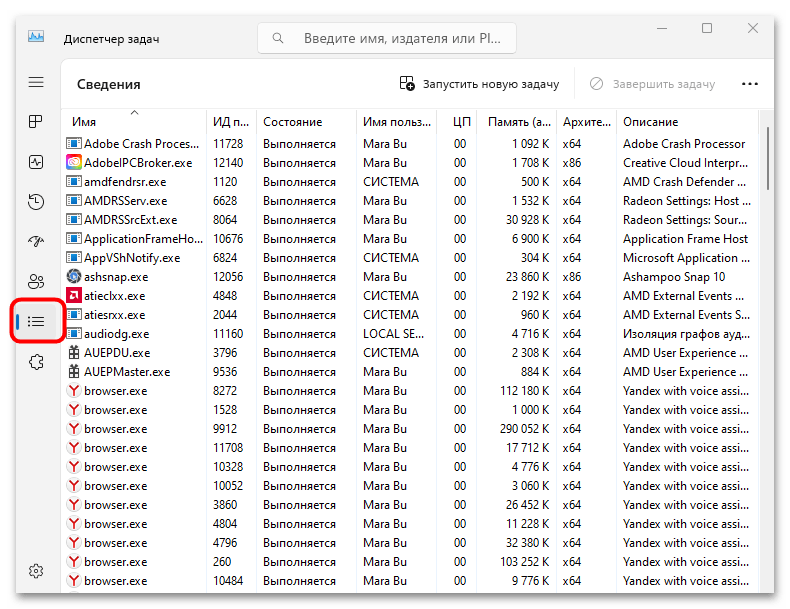
- Для удобства при поиске процесса можете переключиться на вкладку «Сведения».
Запускать вручную фоновые процессы не нужно – если проблема была действительно связана с ними, то они будут запущены самостоятельно, а «Панель управления NVIDIA» начнет стабильно работать.
Способ 3: Перезапуск служб
Как известно, за работу приложений и процессов отвечают специальные службы в Windows 11. «Панель управления NVIDIA» – не исключение, поэтому есть смысл вручную перезапустить работу связанных с ней служб:
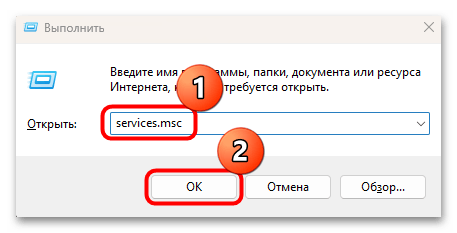
- Одновременно нажмите на клавиши «Win + R», чтобы вызвать диалоговое окно «Выполнить», затем введите команду
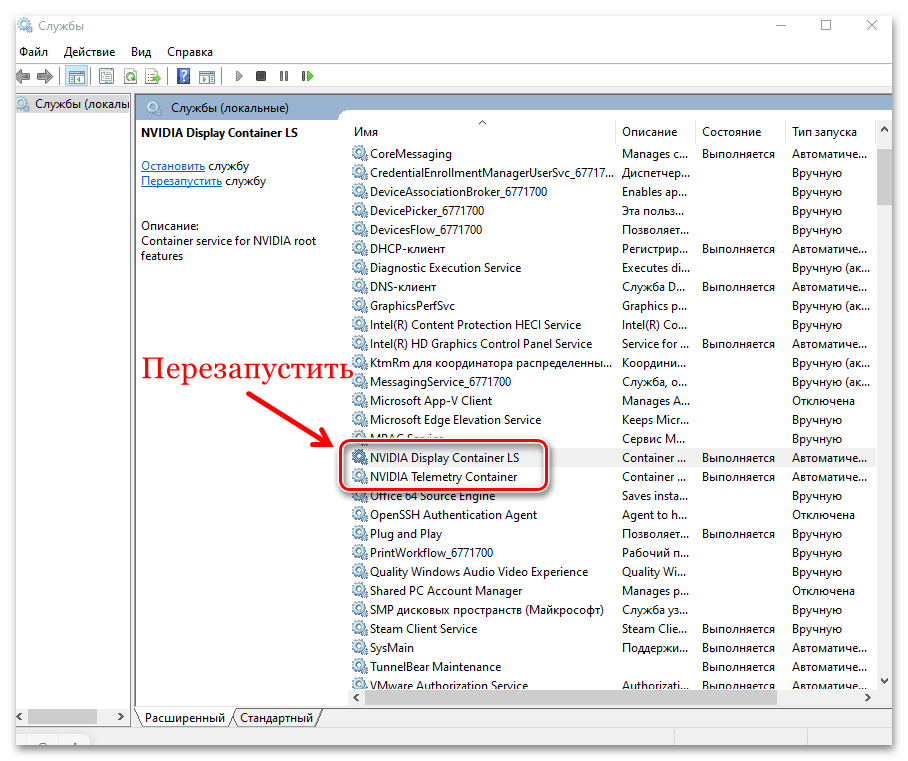
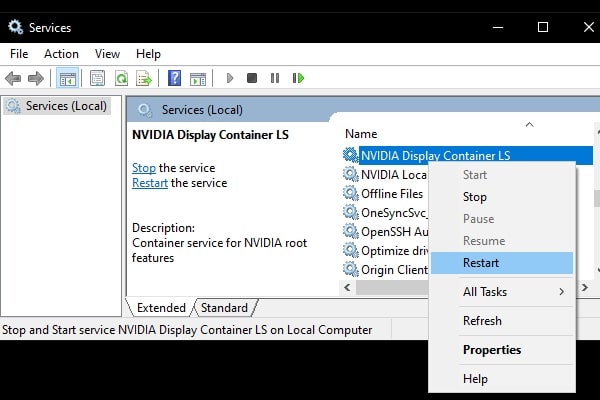
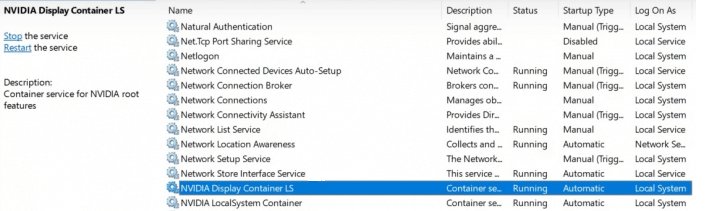
services.mscи кликните по кнопке «ОК». - В центральной части окна оснастки найдите службу «NVIDIA Display Container LS» и щелкните по ней правой кнопкой мыши, затем из меню выберите опцию «Перезапустить». Также следует аналогичным образом перезапустить службы под названием NVIDIA LocalSystem и «NVIDIA Telemetry Container».
Как только важные серверные службы перезапущены, можете закрывать оснастку и запустить панель управления.
Способ 4: Удаления кеша данных
Иногда переполненный кеш приводит к конфликту программного обеспечения, в частности к проблемам в работе самого фирменного софта NVIDIA. В случае с этой программой можно попытаться вручную удалить временные данные в кеше, отыскав их на локальном диске, куда она установлена.
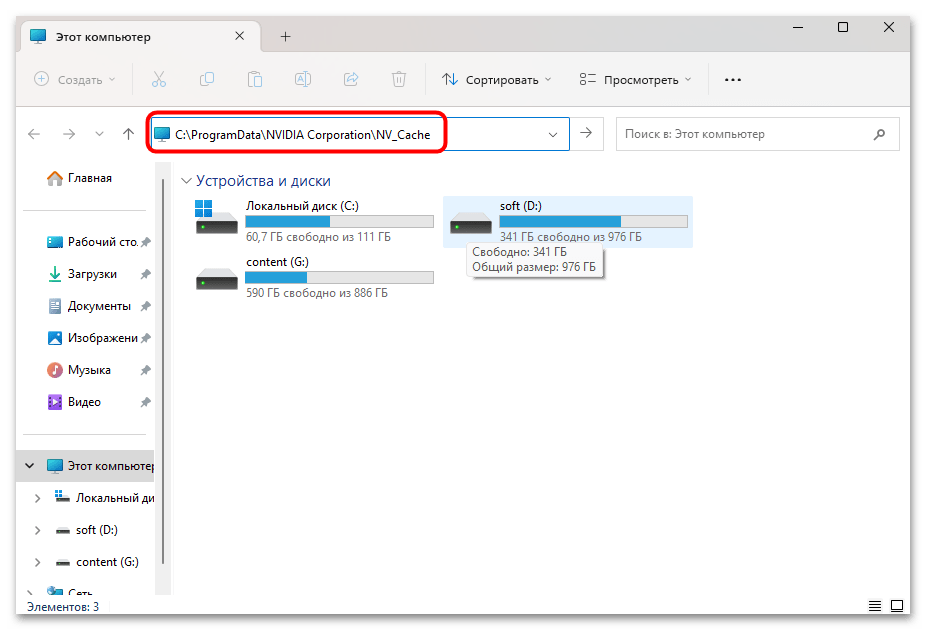
- Как правило, ПО от НВИДИА инсталлируется на системный локальный диск, поэтому рассматривать инструкцию будем с учетом этого. Запустите «Проводник», а в адресную строку скопируйте следующий путь:
C:\ProgramData\NVIDIA Corporation\NV_Cache. - Если каталог «NV_Cache» отсутствует, тогда можете его поискать по другому адресу —
C:\Users\UserName\AppData\Local\NVIDIA Corporation, где под UserName подразумевается имя пользователя.
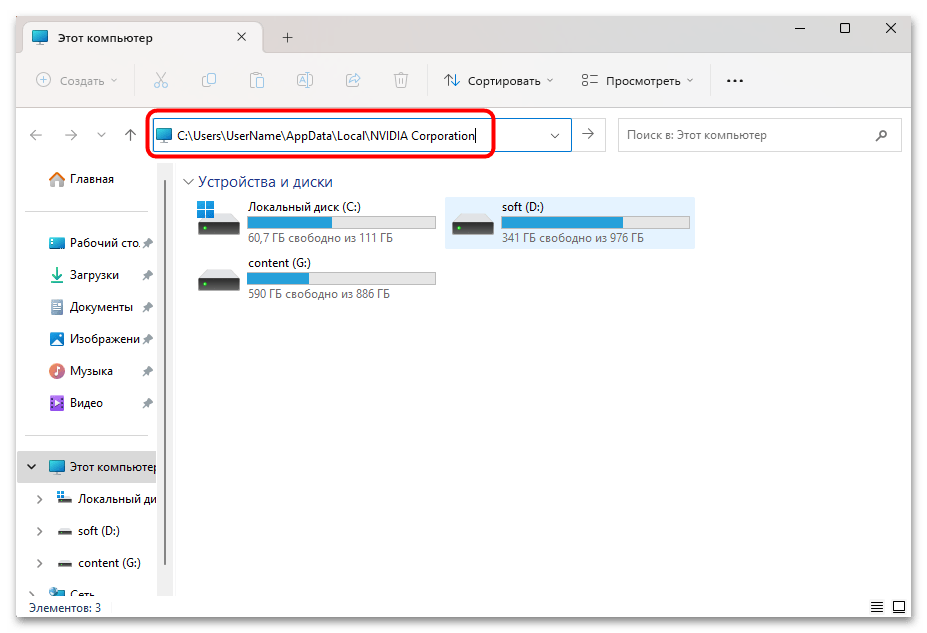
Если здесь есть искомая папка с кешем, то все ее содержимое нужно удалить. Для этого выделите все файлы (одновременно нажав клавиши «Ctrl + A») и воспользоваться контекстным меню и соответствующей функцией или клавишей «Delete». Чтобы удалить данные безвозвратно, можете использовать сочетание «Shift + Delete».
Способ 5: Консоль
С помощью «Командной строки» или «Терминала» можно создать альтернативную ссылку в виде исполняемого файла, который будет отвечать за запуск «Панели управления NVIDIA». Этот вариант мы также разберем на примере пути к корневой директории приложения, выбранного по умолчанию. Сразу следует отметить, что если каталог был выбран вручную, то в консольной команде нужно использовать его:
- Запустите «Терминал» от имени администратора. Для этого в Windows 11 можно щелкнуть правой кнопкой мыши по «Пуску» и выбрать соответствующий пункт.
- Введите команду
mklink c:\WIndows\System32\nvcplui.exe "c:\program files\nvidia corporation\control panel client\nvcplui.exe"и нажмите на клавишу «Enter», чтобы ее выполнить.
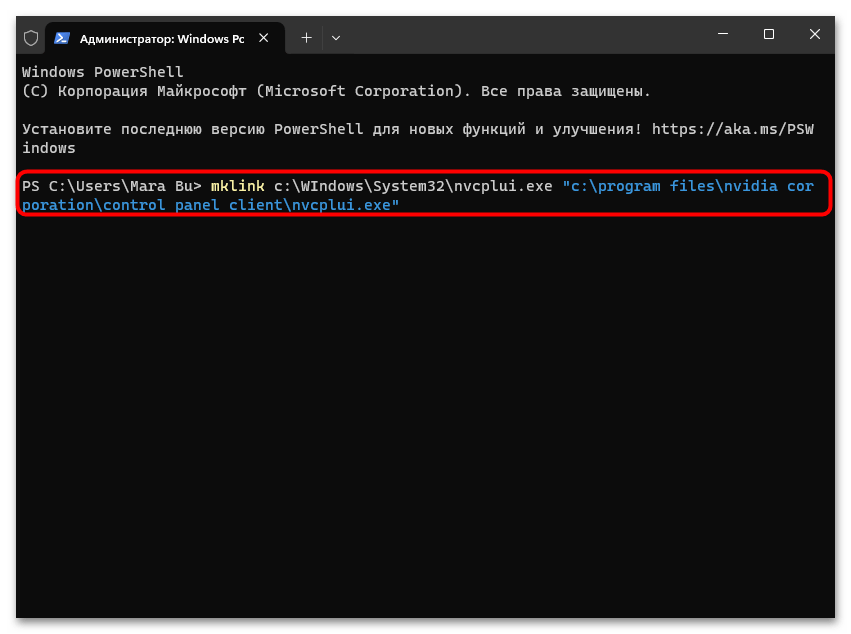
Если в окне консоли отобразилось уведомление об успешном создании символической ссылки, то можно попытаться получить доступ к «Панели управления NVIDIA» через нее. Для этого запустите штатный «Проводник», затем перейдите по пути C:\Windows\System32. В списке содержимого отыщите файл «nvcplui.exe» и попытайтесь запустить его, дважды кликнув по нему левой кнопкой мыши.
Если открыть панель управления удалось, тогда в дальнейшем можете использовать созданную символическую ссылку для открытия приложения. Для более быстрого доступа к ней можете создать ярлык и поместить его на панель задач или на рабочий стол.
Способ 6: Отключение «Быстрого запуска»
Не исключено, что проблема с запуском софта является следствием работы «Быстрого запуска». Вообще функция предназначена для ускорения загрузки Windows при включении ПК, но замечено, что ввиду особенностей ее реализации иногда происходит негативное влияние на некоторые системные и сторонние процессы. Попробуйте отключить «Быстрый запуск» в Windows 11:
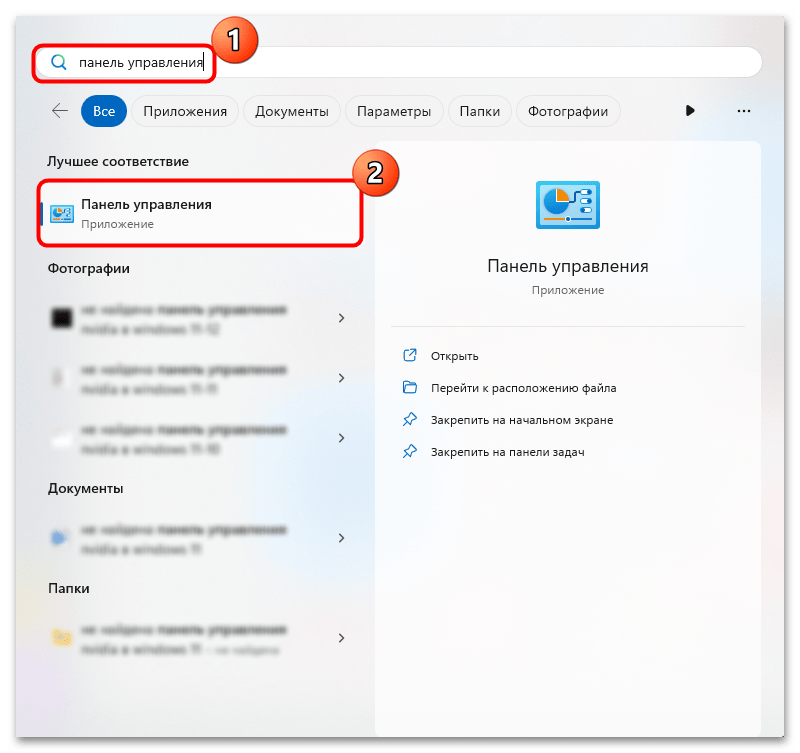
- Через поиск или «Пуск» найдите и вызовите классическую «Панель управления».
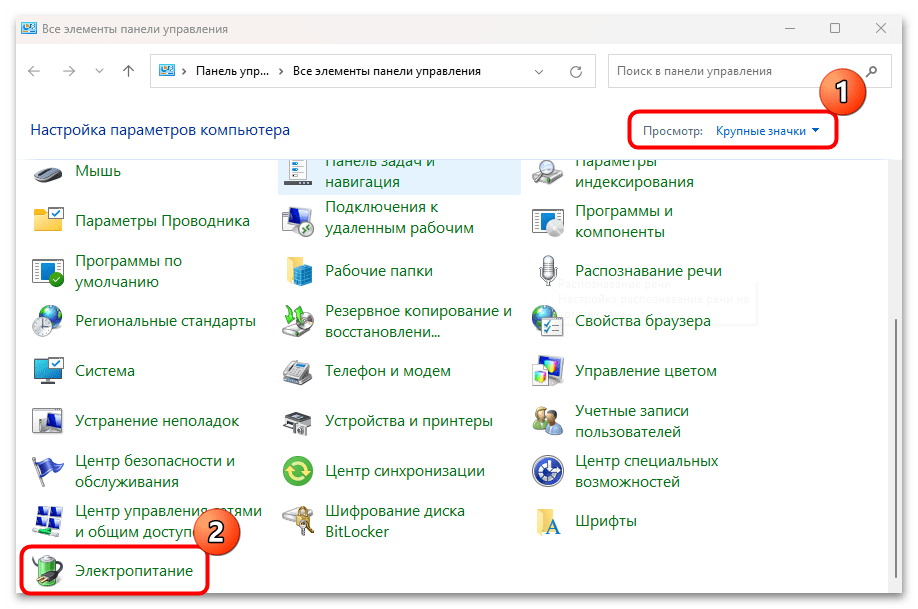
- В меню «Просмотр» выберите способ отображения разделов как крупные или мелкие значки для удобства. Перейдите в раздел «Электропитание».
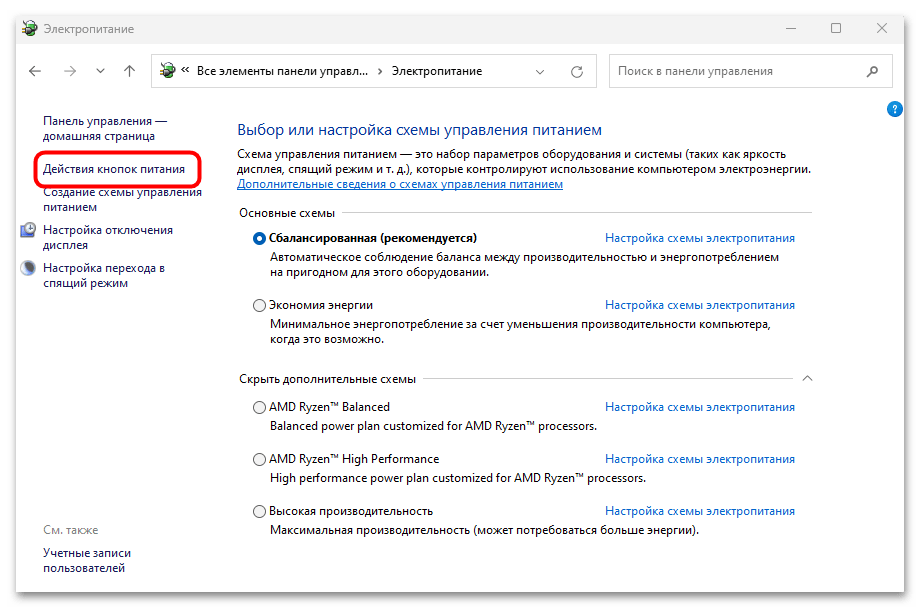
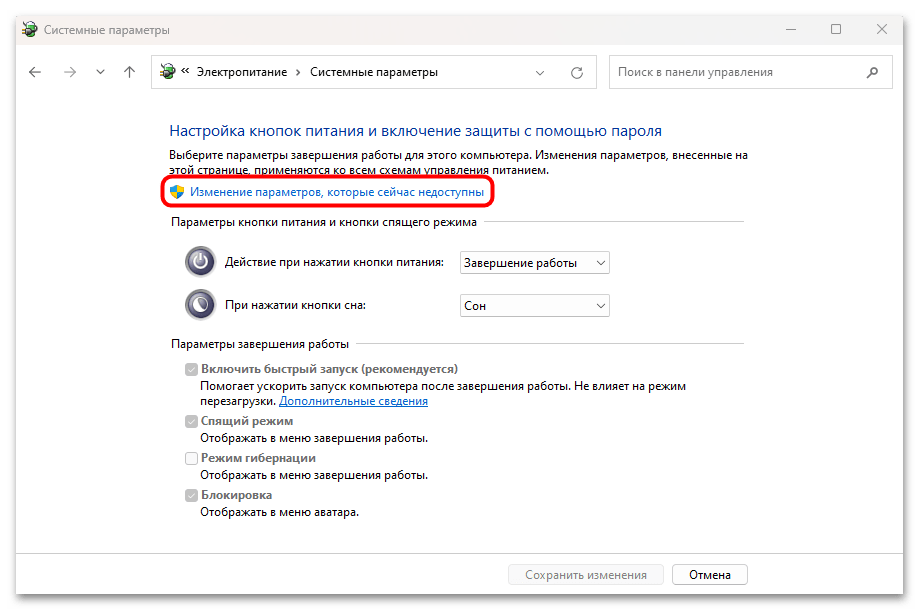
- На панели слева кликните по ссылке «Действия кнопок питания».
- Щелкните по строке «Изменение параметров, которые сейчас недоступны».
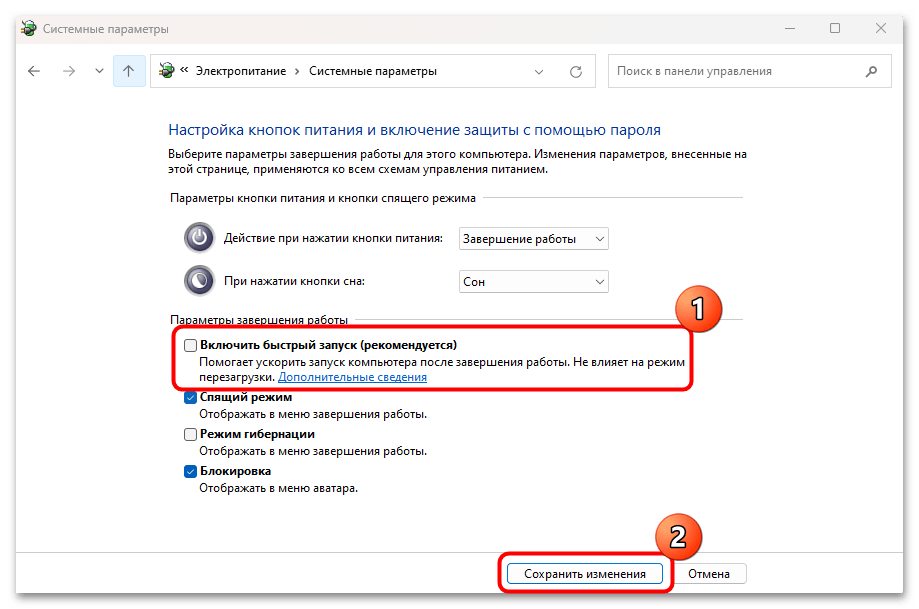
- Ниже станут активны несколько дополнительных возможностей, среди которых есть функция «Быстрого запуска». Снимите у нее отметку и нажмите на кнопку «Сохранить изменения».
Способ 7: Удаление сторонних антивирусов
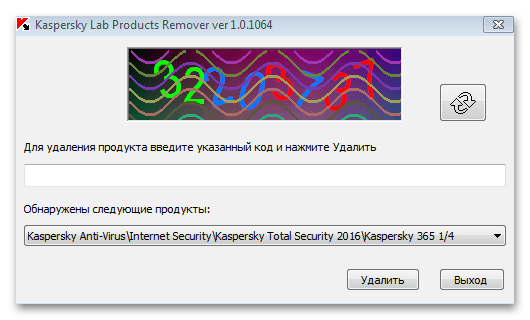
Некоторые пользователи утверждают, что решить проблему с запуском «Панели управления NVIDIA» помогает удаление сторонних антивирусов. Чаще всего рассматриваемая ошибка возникала при использовании таких программ, как AVG или Avast. Даже если вы используете другое антивирусное решение от сторонних разработчиков, можете полностью удалить такой софт с компьютера и проверить, ушла ли проблема. В нашем отдельном материале есть алгоритмы действий на примере наиболее популярных антивирусных продуктах.
Подробнее: Удаление антивируса с компьютера
Способ 8: Переустановка фирменного софта
Если ничего не помогло, то вполне вероятно, что ошибка связана с самим программным обеспечением, например с повреждением его файлов в результате системных сбоев или вирусных атак. Тогда может помочь переустановка фирменного софта с предварительным удалением старых файлов.
В Windows 11 удаление программ осуществляется несколькими способами, в том числе и через классическую «Панель управления» и соответствующий раздел в «Параметрах»:
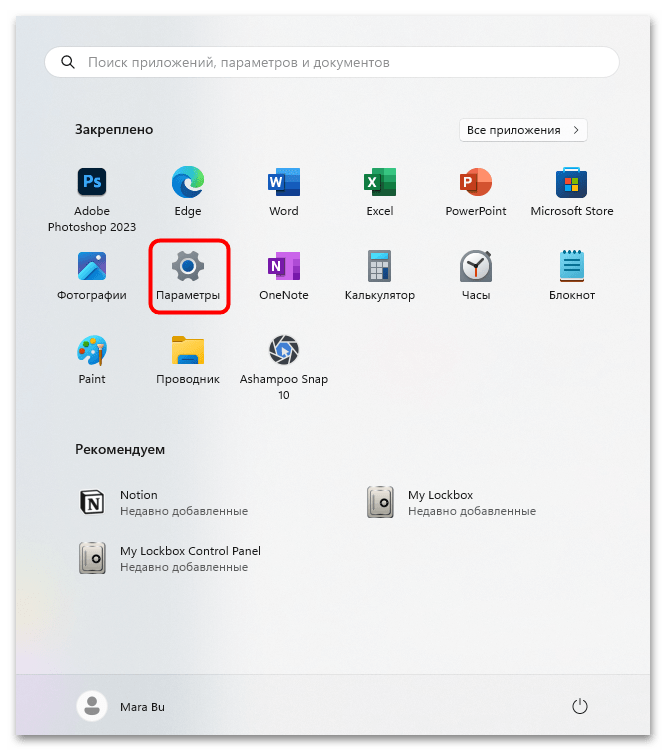
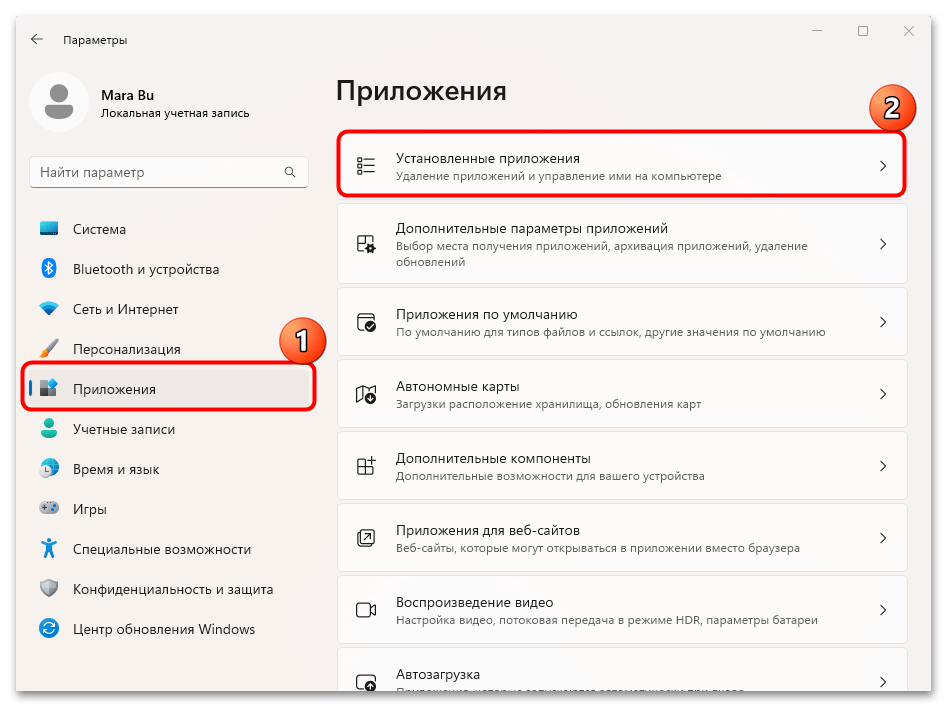
- Нажмите на кнопку «Пуск» и выберите «Параметры».
- На панели слева переключитесь в «Приложения», а в центральной части окна нажмите по строке «Установленные приложения».
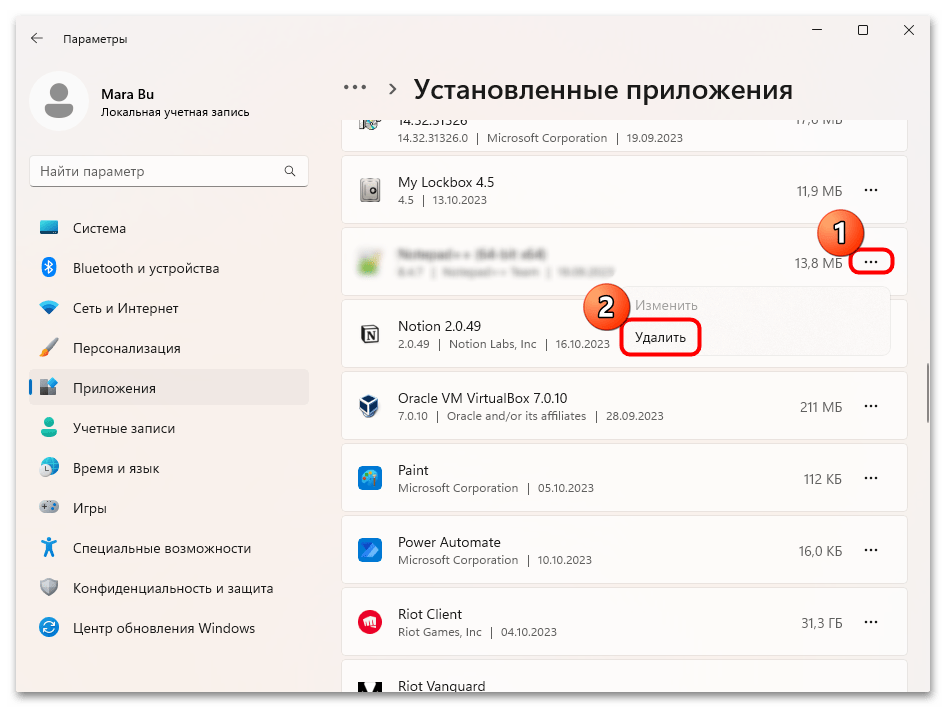
- Останется в списке программ отыскать ПО от NVIDIA, кликнуть по трем горизонтальным точкам и выбрать пункт «Удалить», после чего действуйте согласно инструкциям пошагового мастера удаления.
Как только все файлы программы будут удалены, скачайте актуальную версию программного обеспечения с официального сайта. О том, как это сделать, наш автор писал более подробно в отдельном материале. Несмотря на то что инструкция предназначена для предыдущей операционной системы («десятки»), она подойдет и для Windows 11.
Подробнее: Установка NVIDIA GeForce Experience
Дополнительные причины
Существует еще несколько дополнительных причин, которые могут препятствовать корректной работе «Панели управления NVIDIA». Приведем в качестве примера наиболее распространенные:
- Использование сразу нескольких мониторов может затруднить запуск фирменного софта от НВИДИА, в особенности если также применяется и стороннее программное обеспечение для организации их работы. Чтобы исправить проблему, попробуйте выключить все дисплеи кроме основного, перезагрузить компьютер.
- Обратите внимание, что в «Диспетчере устройств» в меню «Видеоадаптеры» не должно быть пункта с базовыми видеоадаптерами Майкрософт. Даже если у вас две видеокарты, например одна из них интегрированная, то обновите программное обеспечение и для нее.
- Некоторые сторонние инструменты, которые непосредственно связаны с работой графического адаптера, также могут приводить к рассматриваемой проблеме. К таким инструментам относятся средства для использования планшета в качестве второго монитора (тогда устанавливаются дополнительные драйверы, а саму программу можно отыскать в разделе с приложениями в «Параметрах», после чего удалить такой софт).
Наша группа в TelegramПолезные советы и помощь
After the recent Windows 11 update, many NVIDIA Graphics Card users have reported that their NVIDIA control panel missing. NVIDIA control panel is quite useful because with it you can change your display settings. Also, can manage 3D settings, and can configure Surround, PhysX. Yes, it is quite annoying, when NVIDIA Control Panel not showing in the context menu, start menu, or even not appears on the Desktop.
What Causes this issue in Windows?
Unfortunately, there isn’t any single cause behind this error. So here are the most common causes of the NVIDIA Control Panel not showing on Windows 10 and Windows 11.
- Graphics Card Driver – Outdated, Corrupted, or Incompatible Graphics card driver can cause such issues. Re-Installation of a compatible driver can be a reliable solution.
- Windows Update – If you don’t check for NVIDIA Graphics Card driver update through the NVIDIA GeForce Experience. Then, maybe you are using an outdated graphics card driver. And, if you have updated Windows 11 recently, then the driver might not be compatible with your new Windows 11 version.
- Incorrect or missing registry entries – In Windows, Registry stores low-level settings of the OS and applications that opt to use the registry. NVIDIA Control Panel also opts to use registry settings. So, If any related registry entries are missing, then it can cause the Control Panel missing issue.
- Other Causes – It might be possible that due to some third-party software interference, the NVIDIA control panel got corrupted or hidden.
Well, whatever the cause, this issue can be resolved. Because I had experienced the same issue. So, if you can’t find the NVIDIA control panel on your PC, then give the following solutions a try.
You don’t have to try all solutions, just try until you find the solution that works for you. From basic to advanced, I have added all solutions to fix the missing NVIDIA Control Panel issue. Don’t hesitate in trying the advanced or complex solution if the basic doesn’t seem to work.
Solutions: NVIDIA Control Panel Missing
Solution 1: Unhide NVIDIA Control Panel.
If the NVIDIA Control Panel is installed on your Windows PC. But it’s not showing on the desktop context menu and notification tray. Then, there is a slight possibility that it might get hidden. This usually happens mostly after the NVIDIA Graphics Card Driver update. Let’s see, how you can get back the NVIDIA Control Panel, by following these steps.
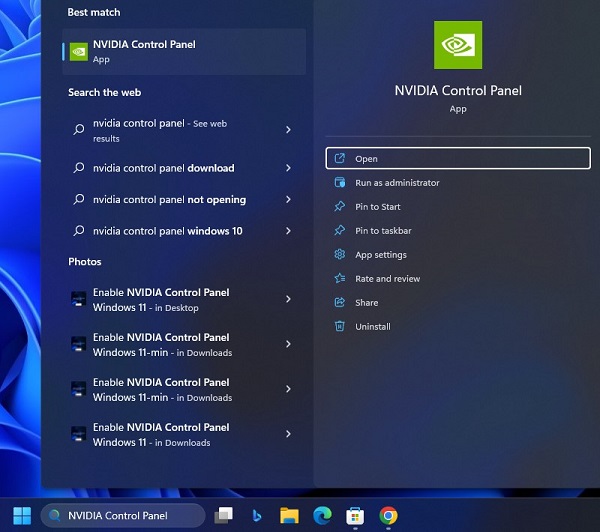
1. Click on the Search icon on Windows 11 and search for “NVIDIA Control Panel”. Click on Open from search results.
Alternative Method for Windows 10 users.
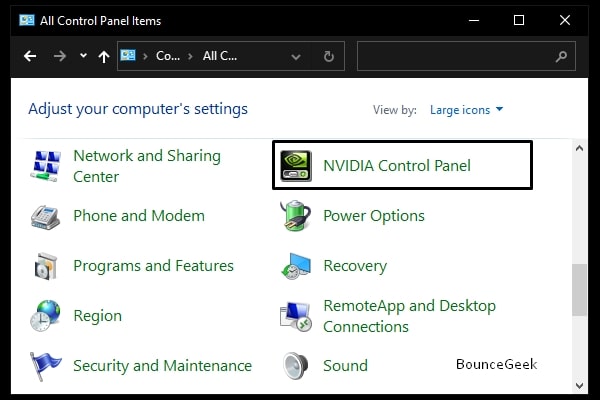
- Click on the start menu, and search for Control Panel. Launch the Application from the search results by clicking on Open.
- Now, to easily access NVIDIA Control Panel, change the Control Panel view. So, In the control panel, under view, select “Large icons”.
- Scroll down a little, look for “NVIDIA Control Panel”, and click on it to open.
Note: Is NVIDIA Control Panel is not showing in Control Panel. Don’t worry, check out the next solution.
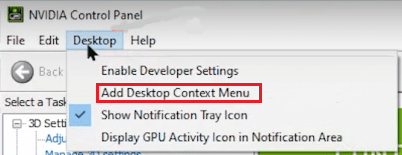
2. Once, NVIDIA Control Panel opens up, click on the Desktop menu, and enable these two options.
- Add Desktop Context Menu
- Show Notification Tray Icon
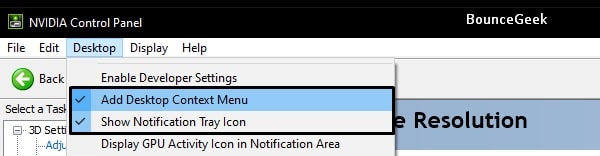
3. That’s it, Close the NVIDIA Control Panel. Now, you can access the NVIDIA Control Panel by right-clicking anywhere on the desktop or using the system tray.

4. In Windows 11, you have to click on “Show more options”.
Solution 2: Open NVIDIA Control Panel manually.
On my PC, NVIDIA Control Panel is not showing after setting up a view to Large Icons. But, On the laptop, it is showing. Ok, so if you’re facing the same issue, then no need to worry. Still, you can open the NVIDIA Control Panel and enable the context menu and notification tray options. (For context, I am using NVIDIA GeForce GTX 1060 6GB Graphics Card, and Windows 11 Pro version in my PC.)
1. Do open the following directory in File Explorer.
C:\Program Files\NVIDIA Corporation\NvContainer
Note: If you can’t find the NVIDIA Corporation folder in Program Files, then look for the same inside the Program Files (x86) Folder.
2. Now, In the NvContainer folder, you will see nvcontainer executable file. Right-click on it and then click on “Run as Administrator”.

3. You” ll now see the “NVIDIA Settings” icon in the notification/system tray.
4. Right-Click on it, and then click on “NVIDIA Control Panel”.

5. That’s it, once NVIDIA Control Panel gets open, enable those two options from the desktop menu. (Check the 4th step of the above solution.)
Solution 3: Use Task Manager.
If you’re not able to find out the NVIDIA Corporation folder inside Program Files and Program Files (x86). Then, you can take the help of the Task Manager.
1. Press Ctrl + Shift + Esc Keyboard shortcut to open Task Manager. (Or, you can right-click on the start menu, and from the WinX menu you can do open task manager.)
2. In Task Manager, under the processes tab, look for NVIDIA Container. (There might be multiple processes, it’s normal.)
3. Right-Click on NVIDIA Container and then click on File Location.
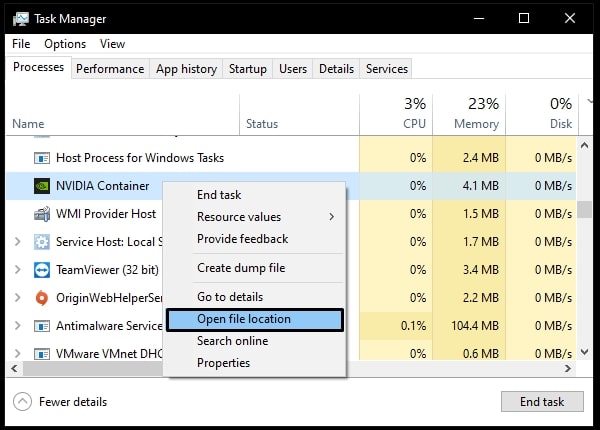
4. This option will open the NvContainer folder. And, from there you can execute the nvcontainer file, and then from NVIDIA settings, you can easily open the NVIDIA Control Panel.
Solution 4: Access NVIDIA Control Panel in Old Laptop.
If NVIDIA Control Panel missing issue occurs on your old laptop. Then, chances are you’re using an old NVIDIA driver. In that case, you have to access the Control Panel Client folder to open the NVIDIA Control Panel.
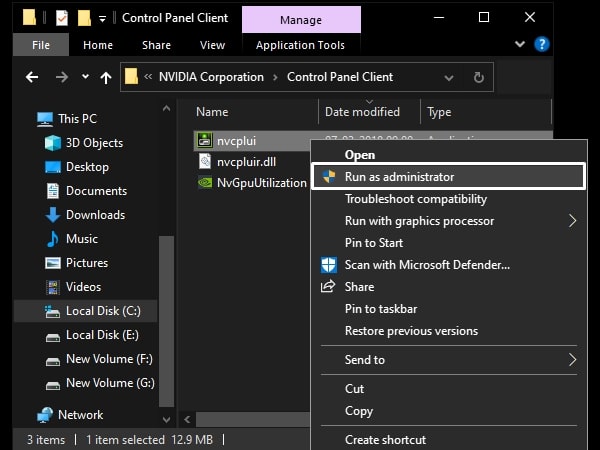
1. Do open the following Directory.
C:\Program Files\NVIDIA Corporation\Control Panel Client
2. Inside the Control Panel Client folder you will see the nvcplui file, right-click on it. And click on “Run as administrator”. NVIDIA Control Panel will get open.
3. You can now pin it to the taskbar. Or, you can create a shortcut for it.
Solution 5: Restart NVIDIA Services.
To keep Apps and Features running in Windows, a huge number of services keep running in the background. And, each Windows program comes with a batch of services. Which launch automatically when you run that program. So, it might be possible that NVIDIA Control Panel-related services have become unresponsive or disabled. Well, in both cases, you have to restart all NVIDIA services in order for the Control Panel to re-appear.
1. Press Windows + R keyboard shortcut, Run window will get open.
2. Type services.msc in it and press the enter key.
3. Services Window will get open, now, you have to restart the following NVIDIA services. (It might be possible that only the first two appear in the services window. Which is ok.)
NVIDIA Display Container LS
NVIDIA LocalSystem Container
NVIDIA NetworkService Container
NVIDIA Telemetry Container
4. Right-Click on the service and then choose the restart option. Do the same with all four services.
5. After restarting all four services, see if you can see the NVIDIA Control Panel in your system tray or in the context menu. If not, then you might need to update Graphics Driver.
Solution 6: Install Nvidia Control Panel App from Microsoft Store
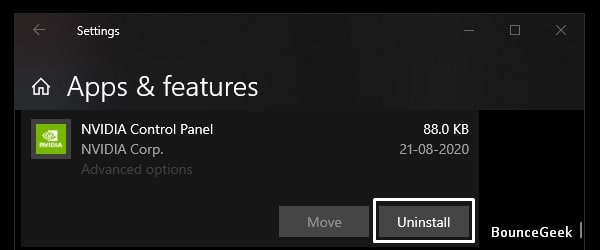
It might be possible that NVIDIA Control Panel App got corrupted. In that case, uninstall it from Windows 11 Settings. And, installing it again from Microsoft Store, can solve the NVIDIA Control Panel not showing the issue.
1. Press the Windows + I keyboard shortcut to open Windows 11 Settings App.
2. Click on Apps > Installed Apps.
3. Scroll down and find NVIDIA Control Panel. Click on the three-dots icon next to the App name, and then click on uninstall.
4. Now, open Microsoft Store App, search for NVIDIA Control Panel, and install the App. Or, open the following link.
Get NVIDIA Control Panel Microsoft Store
5. That’s it, you can now add an App in the context menu and system tray from the Desktop Menu.
Solution 7: Add NVIDIA Control Panel in Startup Folder
This solution is suggested by the NVIDIA Support team. If the control panel is missing from the system tray after restarting Windows. Then, this solution might be useful for you. Basically, in this solution, we will add the NvContainer file in the startup folder. So that, it will automatically appear in the system tray whenever you restart Windows next time.
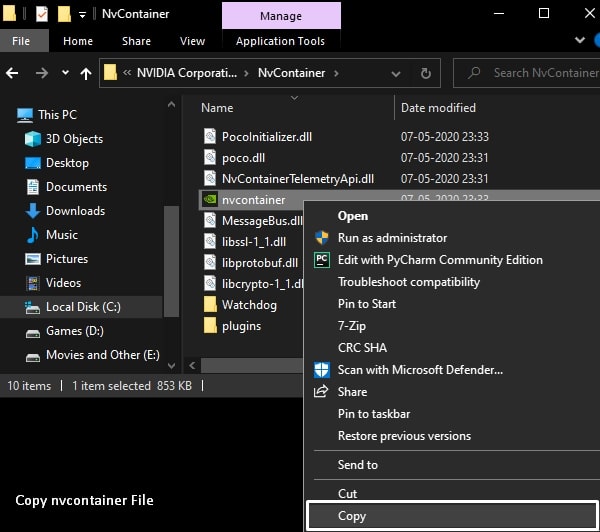
1. First, open the following directory and copy the nvcontainer file.
C:\Program Files\NVIDIA Corporation\NvContainer
For Old Laptop Users – If you’re using an old Windows laptop, then you have to copy NVDisplay.Container file from the following directory.
C:\Program Files (x86)\NVIDIA Corporation\Display.NvContainer
2. Now, Press Windows + R keyboard shortcut.
3. Type shell:startup in the Run window and press the enter key.
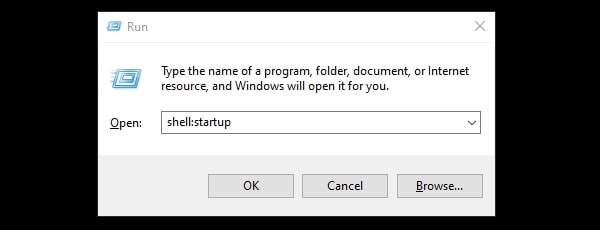
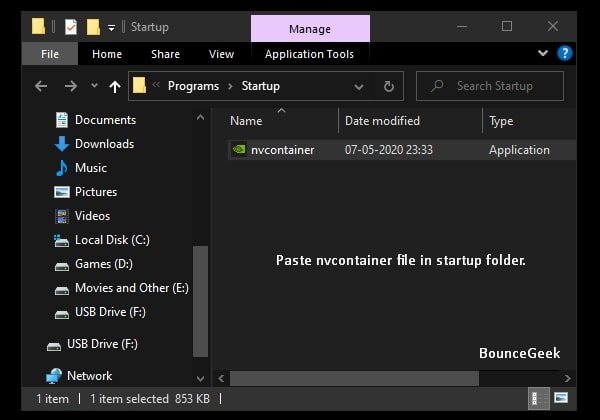
4. Startup folder will get open, paste the copied NvContainer file into it. (And, if you’re using an old laptop or old NVIDIA driver, then you have to paste NVDisplay.Container file in it.)
5. Now, From the startup folder, right-click on the NvContainer file and then click on properties.
6. In the Properties window, click on compatibility, and enable the “Run this program as an administrator” option. Click on Apply then click on ok.
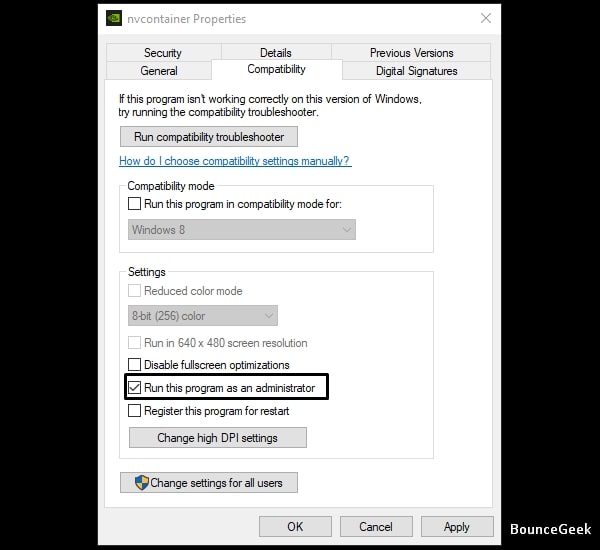
7. That’s it, now, restart your Windows, and hopefully, the issue got resolved now.
Solution 8: Install Latest NVIDIA Graphics Driver.
It could be possible that you’re using an outdated NVIDIA Driver. And, for NVIDIA Control Panel to work, Graphics Driver needs to be up-to-date. Personally, as I mentioned, on my PC, I am using NVIDIA GeForce GTX 1060 Graphics Card. So, to update its graphics driver, I use NVIDIA GeForce Experience software. (Don’t use third-party driver updater software.)
Manually Download and Update NVIDIA Drivers.
1. By going to the official website of NVIDIA Drivers, you can download the latest driver. You have to select your graphics card details and Windows version, in order to download the driver file.
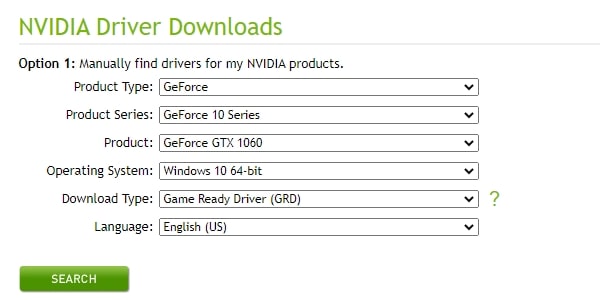
2. Once, you select all the details, you will get the graphics card driver download option. Download and install it on your PC.

Find out Graphics Card Info.
If you don’t know which graphics card you’re using on your Windows PC or laptop. Then, to find out you can either use CPU-Z software. Or, you can use the following method.
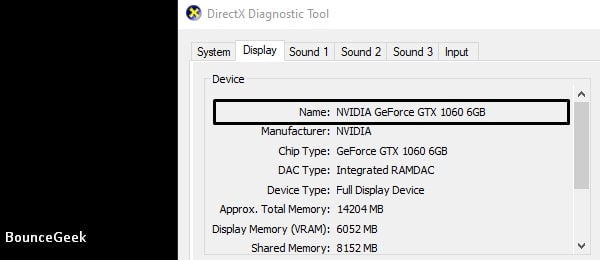
1. Open the Run (Press Windows + R Key) Window, and type dxdiag in it.
2. DirectX Diagnostic Tool will get open with your system information.
3. Click on the Display tab, and under device details, you can find out your Graphics Card Information.
Once, you got all the required information, go to the NVIDIA Driver Download site. Enter all information and download the driver file.
Update Driver using Device Manager.
Important: Most of the time, the Device Manager doesn’t seem to work. That’s why I suggest you download and install the driver manually using the above-mentioned method.
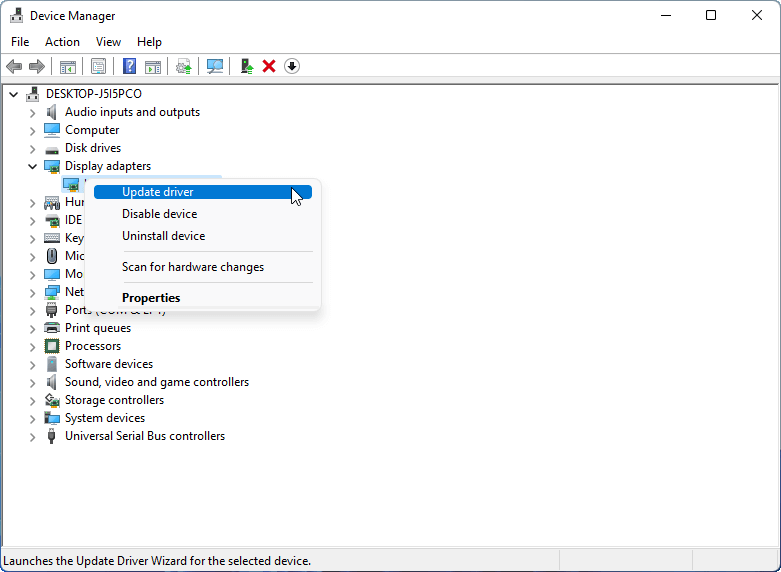
1. Right-Click on the start button and then click on Device Manager.
2. In Device Manager, extend Display Adaptors.
And, you will see your Graphics Card. Right-Click on it, and then click on update driver.
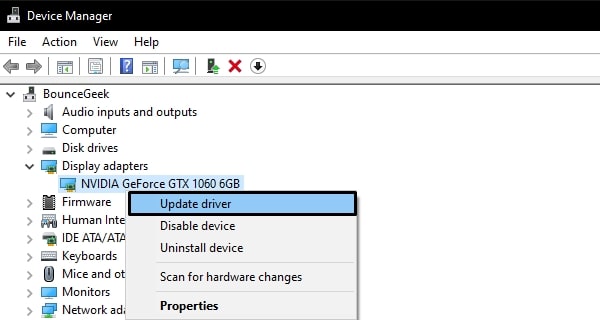
3. After that, click on “Search Automatically for Drivers“.
That’s it, Windows will now check the driver update and will install if found.
So, these were the solutions to fix the “NVIDIA Control Panel is missing” issue. If you face any trouble while trying out any solution, feel free to comment. And, If after getting the NVIDIA Control Panel, it’s showing the “NVIDIA Display settings are not available” error, then you can read my article on it.
Opening the NVIDIA Control Panel in Windows 11 is a straightforward task that lets you manage your graphics settings. Below, I’ll walk you through the steps you need to take to access this powerful tool. Don’t worry; it’s easier than it sounds.
Following these steps will help you open the NVIDIA Control Panel on your Windows 11 machine. The Control Panel is where you can tweak your display settings, manage 3D settings, and optimize your graphics performance.
Step 1: Right-click on the Desktop
Right-click on any empty space on your desktop to open the context menu.
This is the simplest way to access the NVIDIA Control Panel. By right-clicking on the desktop, you’ll see a list of options that includes the NVIDIA Control Panel if it’s installed on your system.
Step 2: Select «NVIDIA Control Panel» from the List
In the context menu, click on «NVIDIA Control Panel.»
If you see «NVIDIA Control Panel» in the menu, that means the software is already installed and you have an NVIDIA graphics card. Clicking it will open the control panel window.
Step 3: Use the Start Menu Search (If Necessary)
If you don’t see the option in the context menu, click on the Start menu and type «NVIDIA Control Panel,» then select it from the search results.
Sometimes the context menu might not display the option due to various reasons like updates or customization. Using the Start menu search is a reliable alternative.
Step 4: Access Through Taskbar Icons
Locate the NVIDIA icon in the system tray on your taskbar and double-click it.
The system tray often houses the NVIDIA icon for quick access. This method is helpful if you frequently need to open the control panel.
Step 5: Check Installation
If you can’t find the Control Panel, you might need to reinstall the NVIDIA drivers from the NVIDIA website.
Sometimes the Control Panel doesn’t show up because the drivers are outdated or improperly installed. Downloading and installing the latest drivers can solve this issue.
After completing these steps, you’ll have the NVIDIA Control Panel open, and you can start tweaking your settings to improve your graphics performance or customize your display to your liking.
Tips for Opening NVIDIA Control Panel Windows 11
- Ensure your graphics drivers are up-to-date to avoid missing features.
- Restart your system if the Control Panel doesn’t open immediately.
- Use the NVIDIA GeForce Experience app for additional settings and driver updates.
- Customize the context menu to include the Control Panel for quick access.
- Check your system tray regularly for the NVIDIA icon for easy access.
Frequently Asked Questions
How do I find the NVIDIA Control Panel if it’s not in the context menu?
You can use the Start menu search or check the system tray for the NVIDIA icon.
Why can’t I open the NVIDIA Control Panel?
This could be due to outdated drivers or a problem with the installation. Reinstalling the drivers can help.
Is the NVIDIA Control Panel necessary?
Yes, if you want to customize your graphics settings and optimize your performance.
Can I access the NVIDIA Control Panel through the Control Panel in Windows?
Yes, you can find it under Hardware and Sound if it’s installed.
Do I need an NVIDIA graphics card to use the NVIDIA Control Panel?
Yes, the Control Panel is specifically for managing NVIDIA graphics cards.
Summary
- Step 1: Right-click on the Desktop.
- Step 2: Select «NVIDIA Control Panel» from the List.
- Step 3: Use the Start Menu Search (If Necessary).
- Step 4: Access Through Taskbar Icons.
- Step 5: Check Installation.
Conclusion
Opening the NVIDIA Control Panel in Windows 11 is a simple task that can significantly improve your computing experience by allowing you to fine-tune your graphics settings. It’s as easy as right-clicking on your desktop or searching through your Start menu. If you encounter issues, reinstalling your drivers usually does the trick.
Keeping your drivers updated not only ensures that the Control Panel is accessible but also keeps your system running smoothly. So, make it a habit to check for updates regularly. If you’re a gamer or someone who uses graphically intensive programs, the NVIDIA Control Panel is your best friend.
Now that you know how to open the NVIDIA Control Panel, you can dive into customizing your settings to get the most out of your system. Whether you’re optimizing for gaming, video editing, or just everyday use, the Control Panel offers a wealth of options. Happy tweaking!
Matt Jacobs has been working as an IT consultant for small businesses since receiving his Master’s degree in 2003. While he still does some consulting work, his primary focus now is on creating technology support content for SupportYourTech.com.
His work can be found on many websites and focuses on topics such as Microsoft Office, Apple devices, Android devices, Photoshop, and more.
This article commented by MiniTool Software Ltd mainly helps you fix various Nvidia Control Panel problems like not opening, not finding, not working, not showing, etc. Read the below details for the best solution.
What Is NVIDIA Control Panel?
Nvidia Control Panel is a software developed by NVIDIA designed to manage Nvidia graphics card settings on computers. It is especially useful for gamers or other computer enthusiasts to overclock their GPU for better performance.
However, you may encounter some problems while using Nvidia Control Panel. This article provides some common fixes for some common errors related to Nvidia Control Panel.
Nvidia Control Panel on Windows 11 Shows Windows 10
While running Windows 11 operating system (OS) and updated to the latest version of the Nvidia GeForce driver, some users may find that the system information in NVIDIA Control Panel displays Windows 10.
For this conflict, you do not have to worry. Windows 11 and Windows 10 drivers are included in the same installation package and you don’t install the wrong driver. Microsoft usually makes OS versions tricky to determine in code.
Just check your DirectX Diagnostic Tool or winver details for system information. If they all say your OS is Windows 11, nothing needs to be worried about. Technically, Windows 11 is just a feature update of Windows 10.
NVIDIA Control Panel Not Opening Windows 11
You may also come across a problem that you can’t see the Nvidia control panel when you right-click on your desktop. If so, you can try the following methods.
#1 Restart NVIDIA Display Container LS
To start/restart the Nvidia Display Container LS service, just follow the below steps.
- Open Windows 11 Services app.
- Scroll down the list to find Nvidia Display Container LS, right-click on it and select Start.
- If the Nvidia Display Container service is already started, choose Restart.
- Then, right-click on it again and select Properties.
- In its Properties window, under the default General tab, set the Startup type to Automatic and click Apply > OK.
#2 Copy Nvcontainer File to the Startup Folder
If the above method fails to deal with can’t open the Nvidia control panel Windows 11 problem, you can manually move the Nvidia Container file to the system startup folder.
- Navigate to C:\Program Files(x86)\NVIDIA Corporation\Display.NvContainer. If you can’t find the NVIDIA folder in the Program Files (x86) folder, just switch to the Program Files folder to look for it.
- Copy Container file.
- Open Windows 11 Startup folder. Usually, its location in Windows 11 is C:\Users\Username\AppData\Roaming\Microsoft\Windows\Start Menu\Programs\Startup.
- Paste Container file into the Startup folder.
- Right-click on the Container file in the Startup folder and set the file to run as administrator.
- Restart your PC.
#3 Dive Deep the Context Menu or Start Menu
The context menu of Windows 11 is a little bit different from that of Windows 10. When you right-click, there are fewer options in the Win11 context menu than that of Win10. To see more complete options in Win 11 context menu, just click Show more options and you will see your graphics card manager panel.
If you still can’t find Nvidia Control Panel there, just seek it in Windows 11 Start Menu or search it in Windows Search.
If Nvidia Control Panel does be installed on your computer and you just can’t see it in your context menu, then, you can add it there.
- Go to Windows 11 Control Panel to find and open Nvidia Control Panel.
- In Nvidia Control Panel, click on the Desktop menu and select Add Desktop Context Menu option.
- Close Nvidia Control Panel and restart the machine.
Then, you should see the Nvidia Control Panel in your right-click context menu.
#4 Update NVIDIA Graphics Drivers
Nvidia control panel not found Windows 11 problem may be caused by GPU driver issues. Thus, you can try to solve it by updating the graphics card driver. To achieve that, do as below.
- Open Windows 11 Device Manager.
- Expand the Display adapters section.
- Right-click your Nvidia graphics driver and select Update driver.
- Then, follow the on-screen instruction to complete the task.
You can also receive the possible GPU card driver by directly updating your system.
#5 Reinstall NVIDIA Graphics Drivers
If updating the GPU driver can’t handle your problem or your current driver is the newest. You may try to uninstall the current driver and reinstall it to fix the Nvidia control panel not showing Windows 11 issue. To do that, just choose Uninstall device in the above picture and restart the PC to let Windows automatically reinstall the missing Nvidia control panel driver.
Or, you can directly go to NVIDIA’s official website to manually search and download the Nvidia graphics driver package for Windows 11. Then, extract the downloaded executable file to install the driver.
#6 Remove Certain Files
Some users claimed that removing “nvdrsdb0.bin” and “nvdrsdb1.bin” from the Nvidia folder and restarting the computer fix the issue. Maybe you can have a try.
Nvidia Control Panel Not Working Windows 11
If your problem is Windows 11 Nvidia control panel crashing instead of no Nvidia control panel Windows 11, in addition to most of the above solutions, you can also try these ways.
#1 Update the .NET Framework and VC++ Redistributable
Both the .net framework and Visual C++ play are important to the security of Windows and compatibility for other apps to run. So, it is vital to keep them up-to-date. If you don’t know whether those files on your computer are of the latest version or not, just check for the system update. If there is a new update, just install the Windows update.
#2 Manually Open Nvidia Control Panel
Just go to the installation folder of the Nvidia Control Panel and double-click on its loader .exe file to launch the Nvidia Control Panel.
#3 Reinstall Nvidia Control Panel
If none of the above methods work, your last resort should be reinstalling the Nvidia Control Panel app. Just uninstall the current program. Then, go to Microsoft Store or the NVIDIA official website to download the application and reinstall it on your computer.
Nvidia Control Panel Windows 11 downlaod >>
Windows 11 Assistant Software Recommended
The new and powerful Windows 11 will bring you many benefits. At the same time, it will also bring you some unexpected damages such as data loss. Thus, it is strongly recommended that you back up your crucial files before or after upgrading to Win11 with a robust and reliable program like MiniTool ShadowMaker, which will assist you to protect your increasing data automatically on schedules!
MiniTool ShadowMaker TrialClick to Download100%Clean & Safe