
Если вам требуется получить стандартные обои рабочего стола Windows 11 или изображения с экрана блокировки, вы легко можете найти их на системном диске.
Далее в статье — обо всех расположениях обоев рабочего стола, экрана блокировки и даже файлов фона сенсорной клавиатуры.
Расположение папки и файлов обоев Windows 11
Большинство обоев Windows 11 собраны во вложенных папках системной папки C:\Windows\Web\

Чтобы перейти в любую из далее указанных папок вы можете открыть проводник, скопировать и вставить путь к папке в поле адреса и нажать Enter. В C:\Windows\Web\ вы можете найти:
- C:\Windows\Web\4K\Wallpaper\Windows — стандартные обои стандартной темы Windows 11

- C:\Windows\Web\Screen — обои, используемые на экране блокировки, но не те, которые загружаются с серверов Майкрософт при выборе «Windows: интересное» в параметрах персонализации экрана блокировки, а только стандартные предустановленные обои. Про обои Windows интересное читаем в следующем разделе статьи.
- C:\Windows\Web\Wallpaper — обои из некоторых тем Windows 11 (некоторые из папок могут не содержать обоев).
- C:\Windows\Web\touchkeyboard — фоны сенсорной клавиатуры.


Помимо указанных папок, вам могут пригодиться (также копируем путь и вставляем в проводник):
- Папка, где расположены текущие обои рабочего стола
%localappdata%\Microsoft\Windows\Themes\RoamedThemeFiles\DesktopBackground
- Еще одно расположение с обоями —
%localappdata%\Microsoft\Windows\WallpaperBackup
- Папка (может отсутствовать) с кэшированными обоями рабочего стола —
%AppData%\Microsoft\Windows\Themes\CachedFiles
- Ещё две папки (из комментариев) —
%LocalAppData%\Packages\MicrosoftWindows.Client.CBS_cw5n1h2txyewy\LocalCache\Microsoft\IrisService\6001846111790098305\
C:\Windows\SystemApps\MicrosoftWindows.Client.CBS_cw5n1h2txyewy\DesktopSpotlight\Assets\Images
Обои экрана блокировки Windows 11 (Windows: интересное)
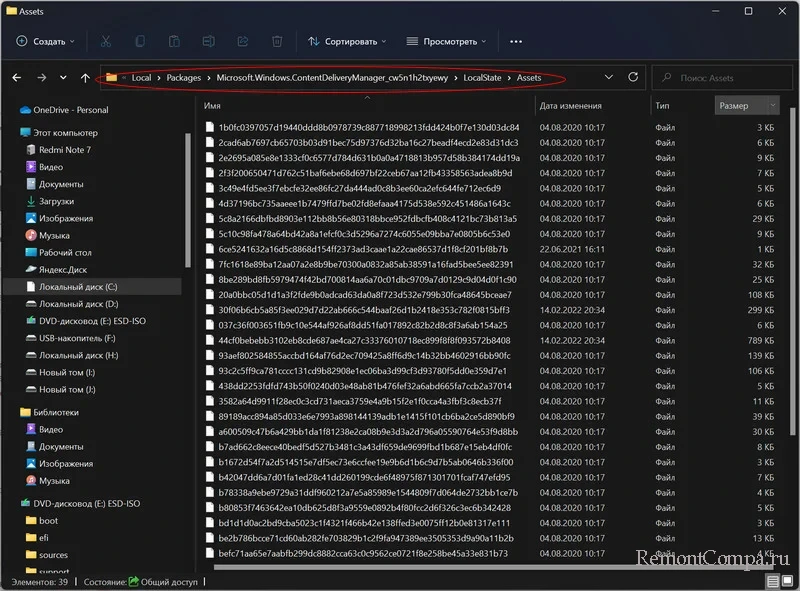
Если в качестве обоев для экрана блокировки в параметрах персонализации вы выбрали Windows: интересное, то можете встретить действительно интересные фото (они загружаются с серверов Майкрософт), которые захотите сохранить. Найти их можно, зайдя в папку (скопируйте и вставьте в адресную строку проводника):
%LocalAppData%\Packages\Microsoft.Windows.ContentDeliveryManager_cw5n1h2txyewy\LocalState\Assets
В этой папке вы найдете множество файлов без расширения, но по факту среди них есть обычные JPEG фото, используемые в качестве обоев экрана блокировки (ориентируйтесь на размер файла: те, которые занимают сотни Кб — это и есть нужные обои), достаточно скопировать файл в удобное расположение, добавить расширение JPEG и это будет обычный файл фото.

При желании вы можете использовать bat-файл (как создать файл bat) со следующим кодом, чтобы автоматически сохранить все обои экрана блокировки в папку Изображения\LockScreen и переименовать их в JPEG:
cd /D %userprofile%\AppData\Local\Packages\Microsoft.Windows.ContentDeliveryManager_cw5n1h2txyewy\LocalState\Assets
mkdir "%userprofile%\Pictures\LockScreen\" 1>nul 2>&1
copy * "%userprofile%\Pictures\LockScreen\*.jpg"
There are times when you may find a wallpaper you really love and want to use it elsewhere or edit it a bit. Well, if it’s a wallpaper that you’ve manually saved before, you should know where it is. But if it’s part of a slideshow or a random wallpaper selected by Windows, finding its location is not that easy. It can be a very time consuming task if you try to look through tons of folders just to find that one wallpaper.
In this guide, we’ll show you some useful workarounds to quickly find the current wallpaper location and name in Windows 11.

Where is the current wallpaper stored in Windows 11?
In Windows 11, you have a few ways to find out where your current wallpaper is kept. You can use a PowerShell command, add a special option to the context menu, look in the Desktop Background settings, or check the Registry Editor. Each option has its pros and cons, so pick the one that seems easiest for you.
Method 1: Use PowerShell command
One of the simplest ways is to use a PowerShell command. You can execute only one line of code to quickly reveal where your wallpaper is actually stored. This is good for those who like using commands or want to automate things in a batch script or something.
To use PowerShell to find your wallpaper, do this:
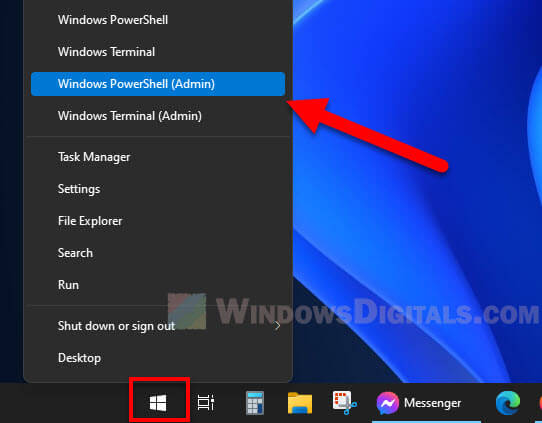
- Open PowerShell with admin rights by pressing Win + X and picking “Windows PowerShell (Admin).” You need admin rights to do certain things.

- Type in this command:
$TIC=(Get-ItemProperty 'HKCU:\Control Panel\Desktop' TranscodedImageCache -ErrorAction Stop).TranscodedImageCache

[System.Text.Encoding]::Unicode.GetString($TIC) -replace '(.+)([A-Z]:[0-9a-zA-Z\\])+','$2'
This pulls the folder path of your wallpaper from the Windows Registry and shows it. If you get an error, try typing the command line by line.

- Hit Enter, and the location of your wallpaper will pop up.
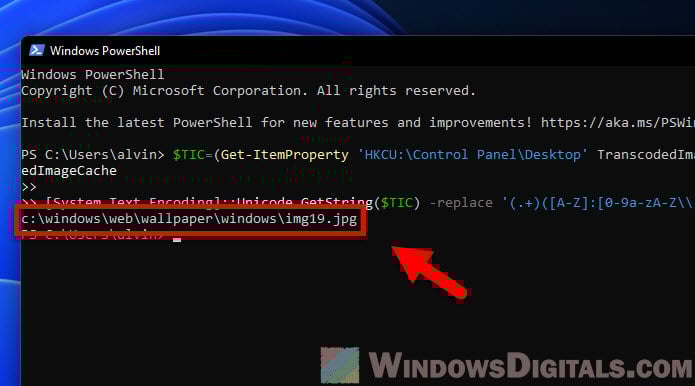
This way, you can skip the folder hunt and find your wallpaper’s location easily. But, you’ll need to be okay with using command-line tools.
Pro tip: How to Set Animated Wallpaper in Windows 11
Method 2: Add a “Find Wallpaper Location” option to the context menu
For an even easier method, you can add a “Find Wallpaper Location” option to the right-click menu in Windows 11. This will allow you to execute the PowerShell command mentioned earlier without actually opening PowerShell. You can just right-click the desktop, choose “Find Wallpaper Location,” and the script will do the rest and show you where your wallpaper file is.
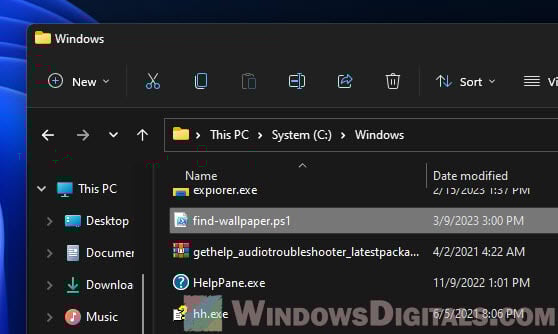
- Grab our “find-wallpaper-location-Windows-11.zip” file which has the PowerShell script and a registry file in it from here.
- Unzip it and move the “find-wallpaper.ps1” script to “C:\Windows”.

- Run the “find-wallpaper-location.reg” file to add the option to your right-click menu.

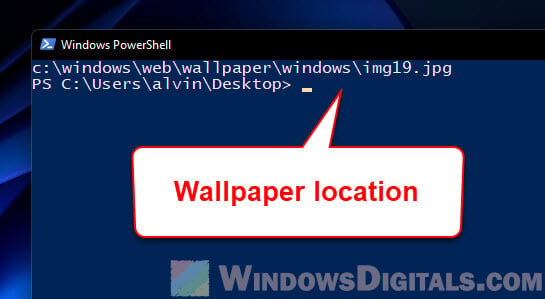
- After that, right-click on your desktop, select “Show more options,” then “Find Wallpaper Location”.

- The script will run and show you your wallpaper’s location in a PowerShell window.


Having trouble with different wallpapers on each monitor? Check this out: Windows 11 Different Wallpaper on Each Monitor Not Working
Remove the “Find Wallpaper Location” option from the context menu
If you decide you don’t need the “Find Wallpaper Location” option anymore, removing it is easy with the Registry Editor. Or, for more details on cleaning up your context menu, have a look at How to remove items from right-click menu in Windows 11.
Be careful with the Registry Editor though, as mistakes can cause big problems. Always back up your system first.
Here’s how to remove it:
- Open Registry Editor by hitting Win + R, type “regedit,” and click OK.

- Go to this part of the registry:
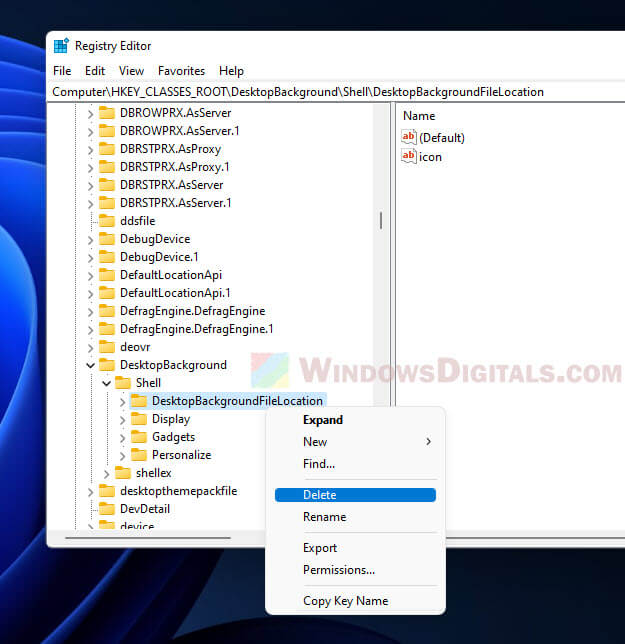
Computer\HKEY_CLASSES_ROOT\DesktopBackground\Shell
- Find the “DesktopBackgroundFileLocation” key.
- Right-click it and choose “Delete.”

- Click “Yes” to confirm.

After this, the option won’t show up in the context menu anymore. If you ever want it back, just run the “find-wallpaper-location.reg” file again.
Method 3: Find your wallpaper using Desktop Background settings
Here’s another easy way to see where your current wallpaper is located on your Windows 11 computer, using the Desktop Background settings. You don’t need to know any fancy commands or dig into the Registry Editor for this one.
To get to the Desktop Background settings, just do this:
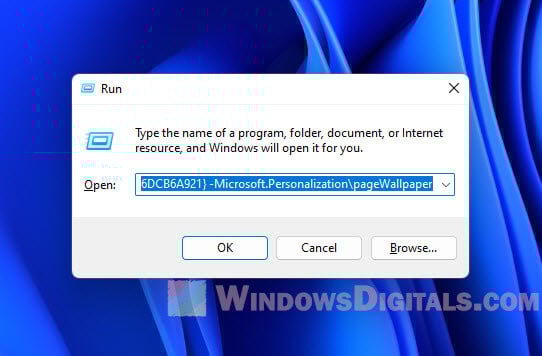
- Hit Windows + R to bring up the Run box.
- Type this in:
shell:::{ED834ED6-4B5A-4bfe-8F11-A626DCB6A921} -Microsoft.Personalization\pageWallpaper - Hit Enter.

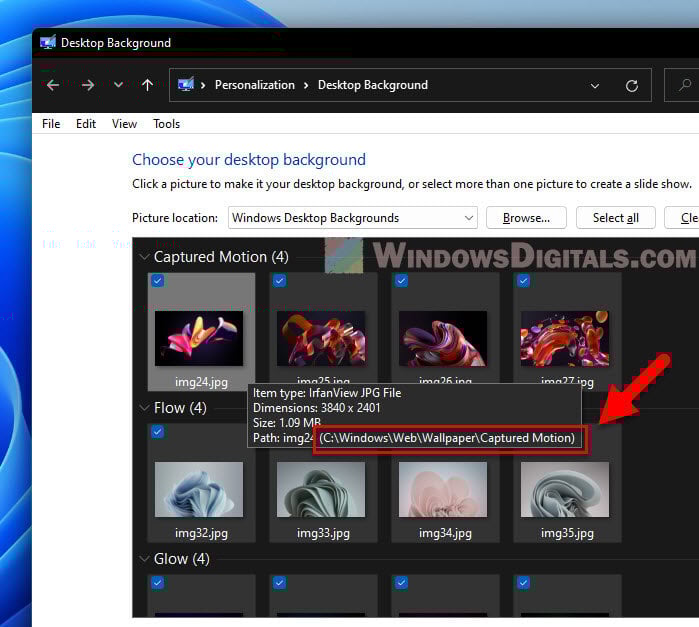
- Once the Desktop Background window pops up, hover your mouse over the current wallpaper. You’ll see its file location pop up in a little tip.

This method is nice for those who are not confident and good with typing commands. But, it might take a few more steps compared to using the PowerShell.
Method 4: Find your wallpaper through the Registry Editor
The Windows Registry is a huge database that holds all sorts of settings for Windows. It also stores information such as where your wallpaper is saved. You can look for the information about the location of a wallpaper through Registry Editor.
Warning: Messing with the Registry can be very risky and might cause serious problems like bricking your PC entirely if you’re not careful. Always create a system restore point before you change anything. This way, you can go back to how things were if something doesn’t go right.
- Press Windows + R to open the Run box.
- Type “regedit” and hit OK to open the Registry Editor.
- Go to this spot:
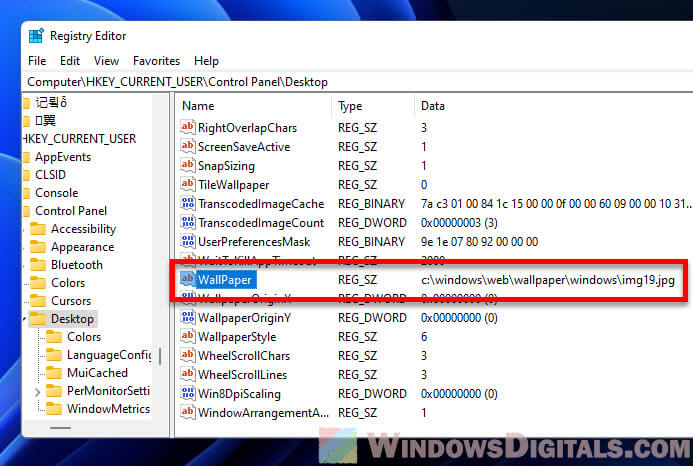
HKEY_CURRENT_USER\Control Panel\Desktop
- Look for the “Wallpaper” entry on the right. It will show you where your current wallpaper is saved.

And if you’re curious about the wallpapers you’ve used before, check this key: HKEY_CURRENT_USER\Software\Microsoft\Windows\CurrentVersion\Explorer\Wallpapers. This keeps a history of all your desktop backgrounds.
This way is a bit more technical. If you’re not comfortable with the Registry Editor, you might want to stick with the first or second method, or at least try them first.
Some final words
If you often find yourself looking for your wallpaper’s location, the best method would be to add a “Find Wallpaper Location” option to the right-click menu can be a big time-saver. This way, you won’t have to go through menus or type commands just to see where your wallpaper is.
Хотите поменять фон Windows 11, но не знаете, где располагаются изображения? Рассмотрим в инструкции каталоги (папки), где находятся обои. Речь о присутствующих в ОС обоях и фоновых изображениях для экранной клавиатуры из коробки.
В каких папках искать обои Windows 11
Содержание
- В каких папках искать обои Windows 11
- Как переместить обои Windows: интересное в одну папку с расширением jpg
- Как перенести фоны экрана блокировки в одну папку с помощью BAT-файла
Фоновые изображения Windows 11 находятся на диске, куда установлена ОС. Такой виртуальный раздел называют системным диском. В большинстве конфигураций — диск C:.
Значительная часть фоновых изображений находится в различных подкаталогах каталога C:\Windows\Web.
Откройте Проводник Windows 11. В адресной строке файлового менеджера введите путь: C:\Windows\Web\
Нажмите Enter для быстрого перехода в данную папку.

Основные папки с обоями и фоновыми изображениями Windows 11:
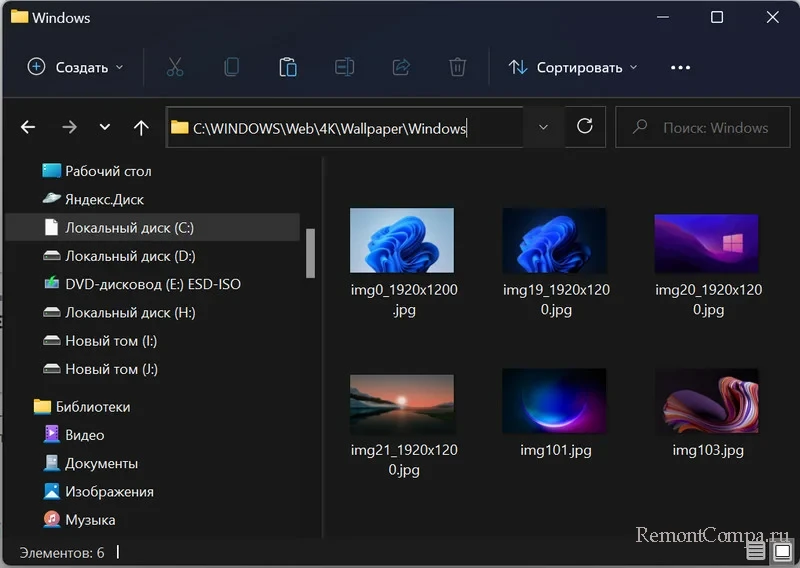
C:\Windows\Web\4K\Wallpaper\Windows содержит базовые для стандартной темы ОС.
C:\Windows\Web\Screen — каталог с файлами фоновых изображений экрана блокировки. Речь о файлах на локальном диске, а не скачиваемых дополнительно с серверов Microsoft через «Windows: интересное» из Параметров экрана блокировки.
C:\Windows\Web\Wallpaper содержит обои ряда тем операционной системы. Часть каталогов не содержат файлов.
C:\Windows\Web\touchkeyboard — расположение фонов сенсорной клавиатуры.
%localappdata%\Microsoft\Windows\Themes\RoamedThemeFiles\DesktopBackground — установленный в данный момент фон.
%localappdata%\Microsoft\Windows\WallpaperBackup —
фоновые изображения экрана блокировки Windows 11 (Windows: интересное).
Как переместить обои Windows: интересное в одну папку с расширением jpg
Если вам необходима более широкая подборка фоновых изображения, скачате файлы обоев с серверов Microsoft. Перейдите в параметры персонализации. Выберите «Windows: интересное».
Сохраните понравившиеся обои. Введите или скопируете в адресную строку Проводника путь:
%LocalAppData%\Packages\Microsoft.Windows.ContentDeliveryManager_cw5n1h2txyewy\LocalState\Assets

Данный каталог содержит файлы без расширений. Часть содердимого папки — файлы изображений в формате JPEG. Но не все. Ориентируйтесь по объему файла. Вам нужны сравнительно «массивные» — 100 и более килобайт. Таковые обычно и являются файлами JPEG.
Чтобы пользоваться, такому файлу нужно добавить разрешение. То есть переименовать с добавлением «.jpg» к имени файла.
В Windows 11 у вас может быть несколько рабочих столов и у каждого — собственные обои.
Читайте в «Блоге системного администратора» как создавать, удалять и кастомизировать виртуальные рабочие столы Windows 11:
Как перенести фоны экрана блокировки в одну папку с помощью BAT-файла
Автоматизируйте перенос файлов экрана блокировки. Откройте текстовый редактор Блокнот (Notepad). Скопируйте в пустой файл нижеприведенный код:
cd /D %userprofile%\AppData\Local\Packages\Microsoft.Windows.ContentDeliveryManager_cw5n1h2txyewy\LocalState\Assets
mkdir «%userprofile%\Pictures\LockScreen\» 1>nul 2>&1
copy * «%userprofile%\Pictures\LockScreen*.jpg»
Сохраните новый файл с произвольным именем и расширением .bat

После запуска данного BAT-файла коллекция фоновых изображений окажется в каталоге Изображения\LockScreen, где каждому файлу будет добавлено расширение «.jpg».

После перехода на новую ОС многих пользователей интересует не добавление нужного, а удаление ненужного софта. Пользователи часто спрашивают: «Как удалить OneDrive, поскольку не использую облако Microsoft?»
Читайте методы удаления и отключения OneDrive в Windows 11:
Вы поменяли обои Windows 11 или оставили стандартные? Напишите в комментариях.
В настройках Windows 11 отображено только пять последних картинок, которые служат обоями рабочего стола, но многие даже не знают, что стандартных обоев в системе существенно больше. Вся проблема заключается в том, что их трудно найти, если не знать как, сейчас и рассмотрим, как это сделать.
Где находятся обои Windows 11
Первым делом, конечно, необходимо открыть проводник. А тут уже перейти по пути:
C:\Windows\Web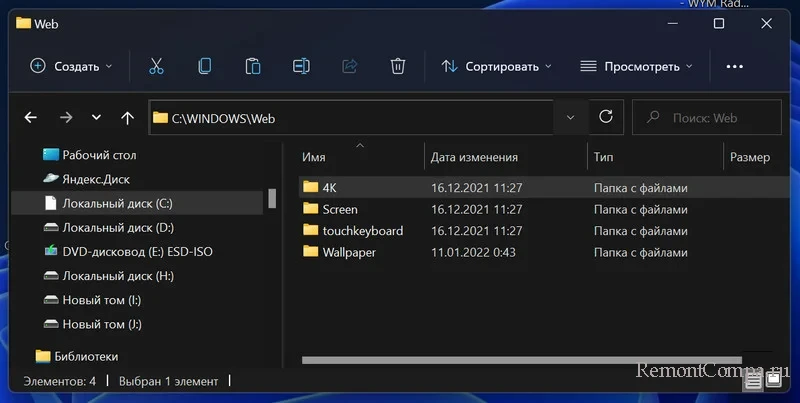
Большая часть изображений находится именно в этой папке. В ней обои тоже расфасованы по папкам. Например, чтобы найти обои, которые применяются в теме по умолчанию необходимо перейти по маршруту:
C:\Windows\Web\4K\Wallpaper\WindowsЗдесь вы обнаружите обои, которые используются как со светлой, так и с темной темой. Называются они «Gloom».
Помимо этих изображений, которые всем знакомы, есть еще несколько довольно неплохих картинок в высоком разрешении и качестве. Найти их можно в соседней папке и имеют они такой адрес:
C:\Windows\Web\Wallpaper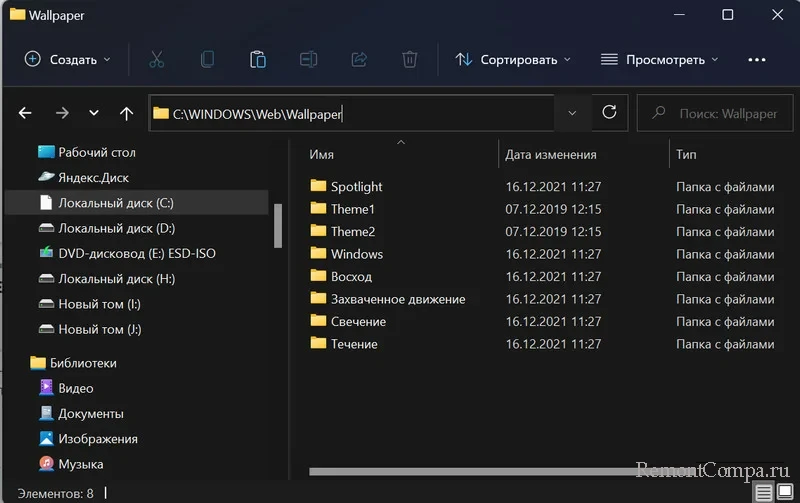
Для экрана блокировки используются отдельные обои и находятся они тут:
C:\Windows\Web\Screen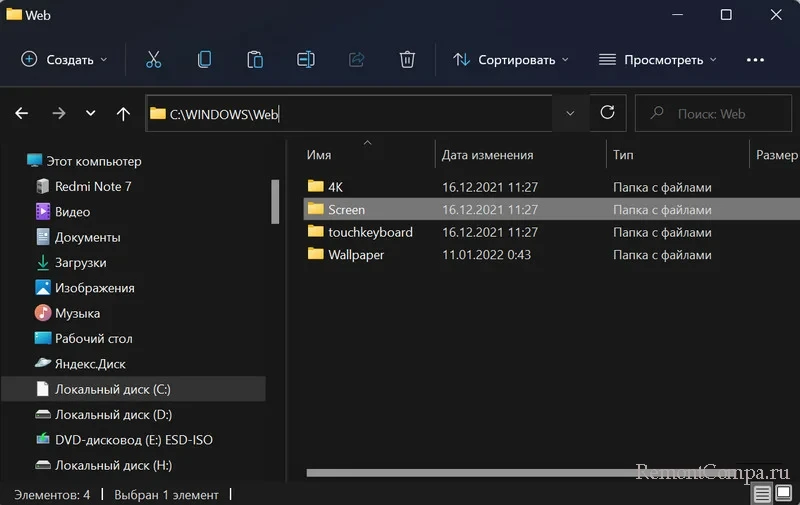
Не путайте с обоями, которые активируются при включении настройки «Windows: интересное». В этом случае изображения будут скачаны с серверов Microsoft. Их также можно найти, если вы их выбирали, так как они сохраняются тут:
%userprofile%\AppData\Local\Packages\Microsoft.Windows.ContentDeliveryManager_cw5n1h2txyewy\LocalState\Assets
В этом случае нужно иметь немного наблюдательности, так как почти все файлы в папке не имеют расширений. Мы же выбираем те, размер которых несколько сотен килобайт и даем им расширение JPEG. Файл превратится в обычное изображение и мы теперь можем поставить его на обои.
С относительно недавних пор Windows можно установить на планшеты, ноутбуки с сенсорными экранами и т.д. Поэтому в системе предусмотрена функция установки обоев на сенсорную клавиатуру. Большинство родных изображений в этом случае абстрактные. Найти их можно здесь:
C:\Windows\Web\touchkeyboard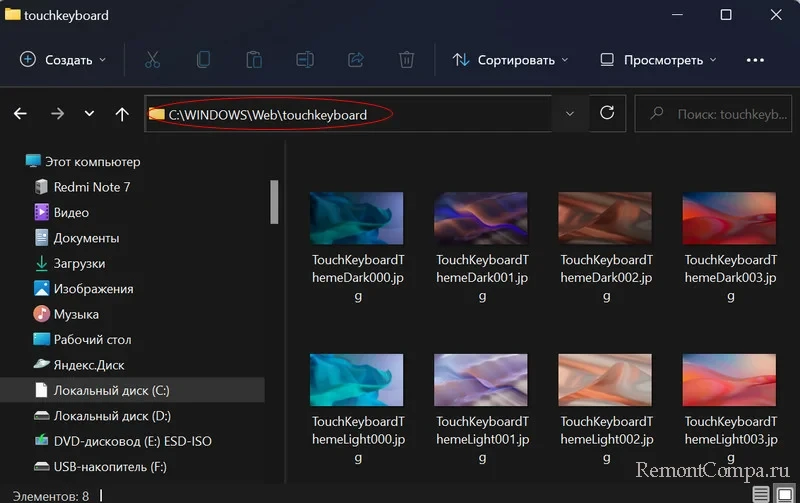
Найти обои, которые установлены в данный момент на рабочем столе можно по маршруту:
%userprofile%\AppData\Local\Microsoft\Windows\Themes\RoamedThemeFiles\DesktopBackgroundТаким образом мы теперь знаем где находятся все стандартные изображения, которые мы легко можем установить в качестве обоев рабочего стола.
Sign in to your MUO account

Some users may like to customize Windows 11 desktop wallpapers with editing software. However, the Personalization section of the Settings app doesn’t show you the folder paths for wallpapers in themes downloaded from Microsoft’s site. Nor can you find the directory locations for Windows 11’s default backgrounds from there.
You can’t edit a desktop wallpaper when you don’t know what folder it’s in. So, here we’re going to look at some different ways you can find your current desktop wallpaper. This is how you can find the wallpaper file for your current desktop background in Windows 11.
How to Find Your Desktop Wallpaper’s Location With Run Commands
Run is a command dialog app with which you can access folders and files in Explorer. You can find the file for the wallpaper currently on your Windows desktop with a couple of alternative commands. One command will bring up the folder that includes the background, and the other will enable you to open the image in editing software. This is how you can find your desktop wallpaper with both Run commands:
- Click the Windows Start button icon on the taskbar with the right button on your mouse and select Run.
-
To open your current wallpaper’s folder, input this command and click OK:
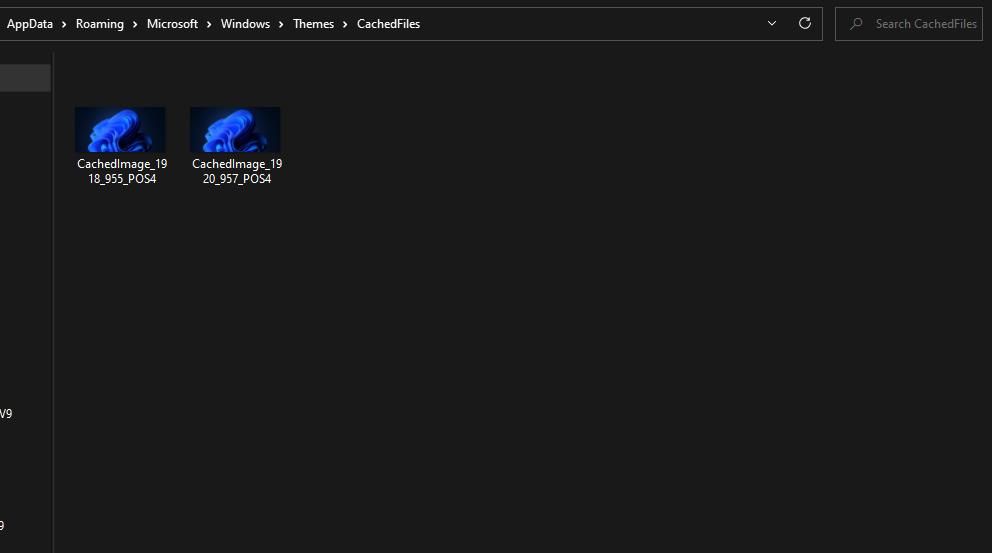
%AppData%\Microsoft\Windows\Themes\CachedFiles -
A CachedFiles folder including your current wallpaper’s file will open. Double-click the wallpaper there to open it in the default image viewer (probably Photos).

-
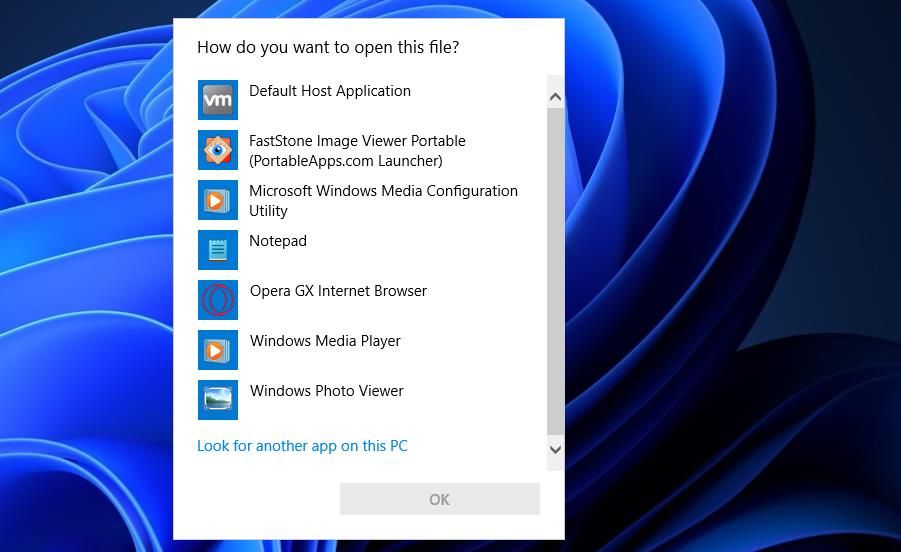
Alternatively, input this Run command and press Return to open your current wallpaper file:
%AppData%\Microsoft\Windows\Themes\TranscodedWallpaper -
Then choose an image editor with which to open the wallpaper file inside the software selection menu and select OK. If you can’t see the software you want to utilize, click Look for another app on this PC, select an editor, and click Open.

How to Find the Folder That Includes All Your Current Theme’s Desktop Wallpaper
The Run commands above will only find the wallpaper currently on your desktop. However, Windows slideshow themes have multiple wallpapers. If you have a wallpaper slideshow theme set, you can find all its background image files by opening the folder that includes them as follows:
- Bring up the file and folder manager with Explorer’s Win + E keyboard shortcut.
-
Delete the current location in the folder address bar and enter this replacement path:
C:\Users\<user folder>\AppData\Local\Microsoft\Windows\Themes -
Click your theme’s folder to open it.

-
Then open the DesktopBackground subfolder that includes all the theme’s image files.

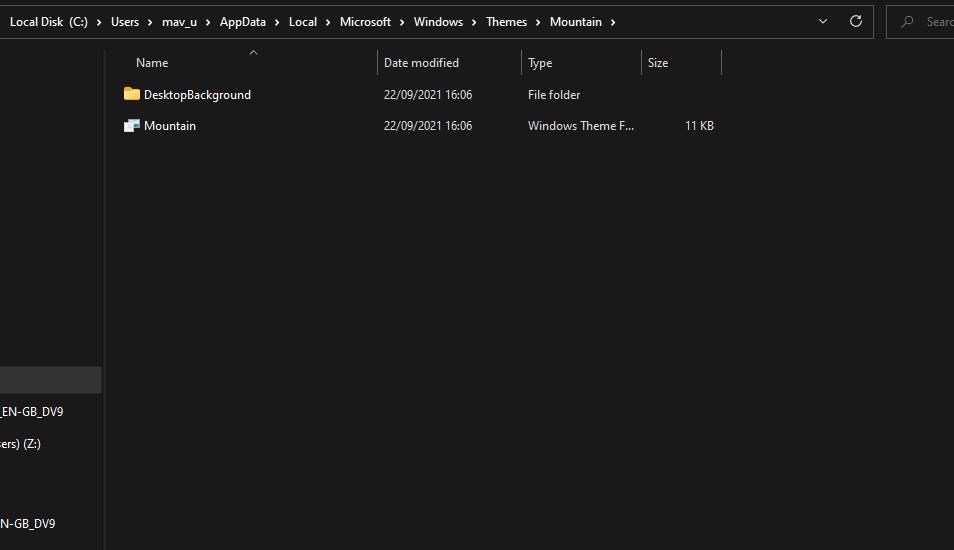
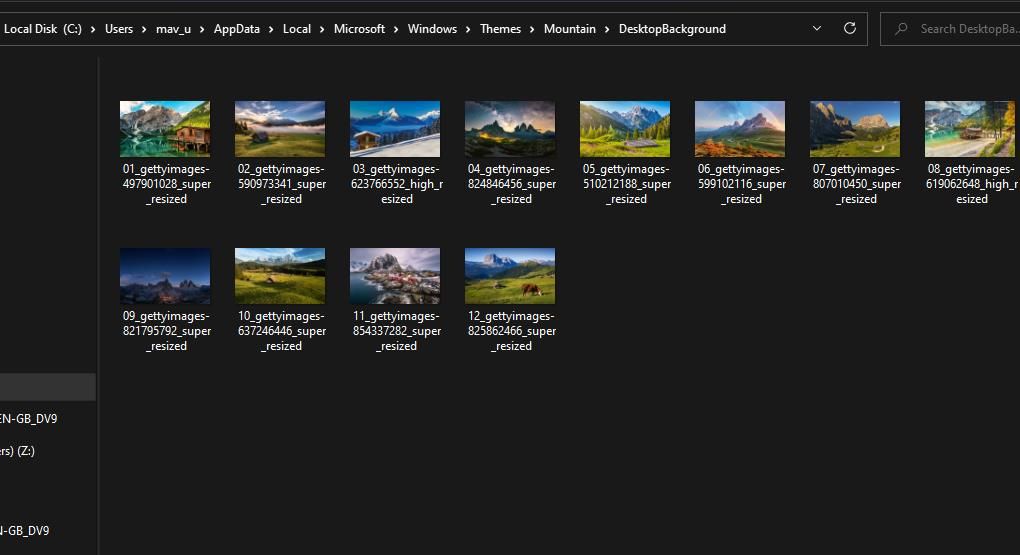
Now you can open all your Windows theme’s background images from that folder. Note that you’ll need to change <user folder> in the specified path above to your real user folder’s name. The Themes folder that the path opens includes directories for all Windows themes you’ve downloaded.
How to Find Your Desktop Wallpaper’s Location With PowerShell
PowerShell is a useful command-line shell app for many things. You can find your wallpaper within PowerShell by executing a joint command that shows its full folder path. This is how you can find your wallpaper with that command:
- Open Windows Search with Win + S.
- Enter the PowerShell search phrase.
- Start PowerShell with elevated permissions by clicking Run as administrator for that app’s search result.
-
Next, copy this joint PowerShell command by selecting the text for it and pressing Ctrl + C:
$TIC=(Get-ItemProperty 'HKCU:\Control Panel\Desktop' TranscodedImageCache -ErrorAction Stop).TranscodedImageCache[System.Text.Encoding]::Unicode.GetString($TIC) -replace '(.+)([A-Z]:[0-9a-zA-Z\\])+','$2'
-
Paste that command into PowerShell by pressing Ctrl + V.

- Then press your Enter key to execute the command.
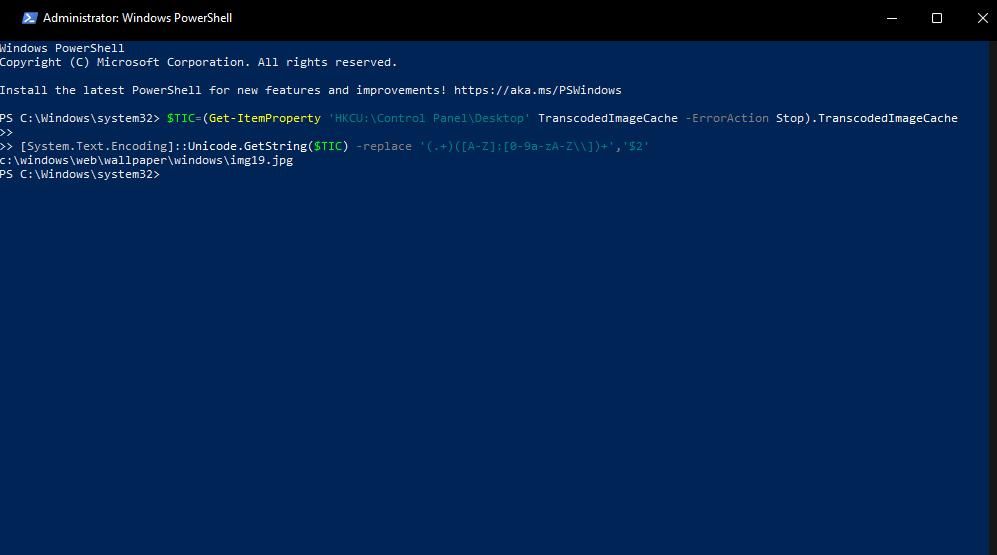
Now you’ll see a folder path for your desktop wallpaper in PowerShell just below the executed command. Copy that location and open File Explorer. Then paste the path into Explorer’s address bar and press Enter to open the file in your default image viewer software.
Or you can open the file’s folder instead. Delete the file’s name at the end of the path within Explorer. Pressing Enter will then bring up the folder from which you can open the file. Right-click the wallpaper file to select Open with and choose a suitable app.
How to Find Your Desktop Wallpaper’s Location With the Registry Editor
A wallpaper string within the registry includes the full path of your current desktop background. So, you can find your wallpaper’s location by looking at the Value data box for that string. These are the steps for finding your desktop wallpaper’s path with the Registry Editor app:
- First, find Registry Editor by opening the Windows search box and typing in regedit.
- Open Registry Editor by selecting the app found.
-
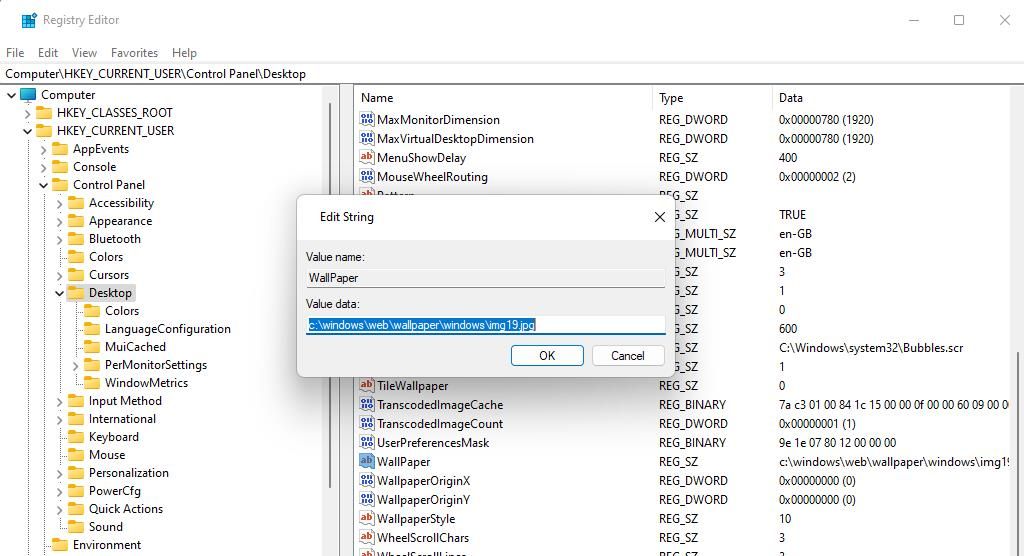
Input this Desktop registry key path within the address bar:
Computer\HKEY_CURRENT_USER\Control Panel\Desktop - Double-click the WallPaper string within the Desktop key.
-
Copy the wallpaper’s path within the Value data box.

- Click OK to exit the string’s window and close Registry Editor.
- Open Explorer and input the copied folder path to bring up the wallpaper’s file.
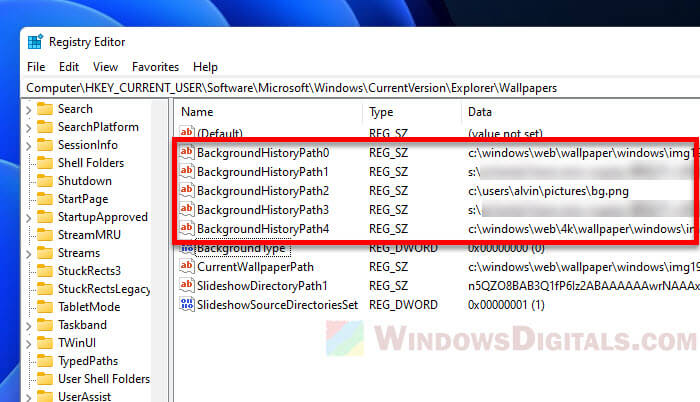
The registry also includes some strings that store the path locations of previously set desktop wallpapers. So, you can find the locations of previously set backgrounds with those strings. To do so, go to the wallpaper registry key:
HKEY_CURRENT_USER\Software\Microsoft\Windows\CurrentVersion\Explorer\Wallpapers
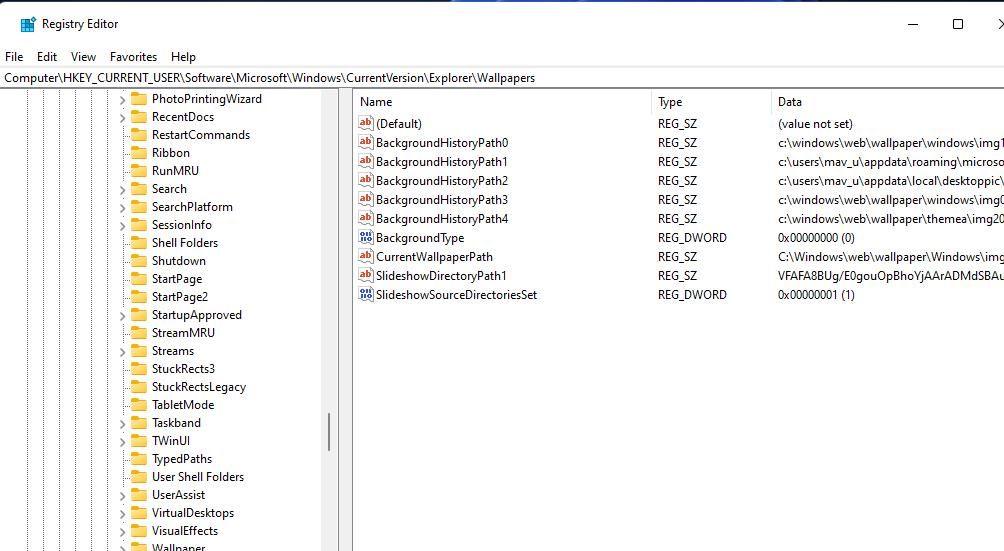
That registry key includes five numbered BackgroundHistoryPath strings. Double-click the BackgroundHistoryPath0, 1, 2, 3, or 4 string to view its Value data box. Then copy and paste the wallpapers’ paths into the File Explorer address bar.
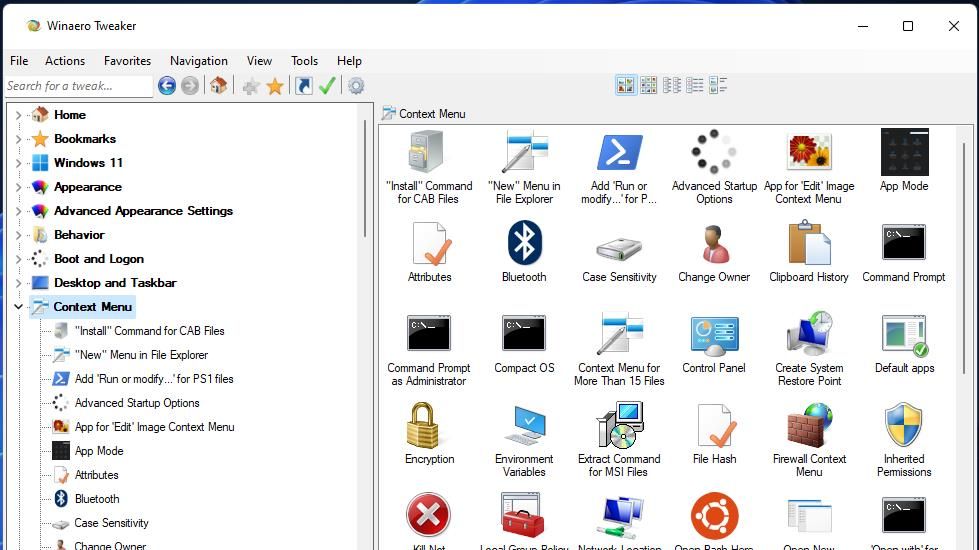
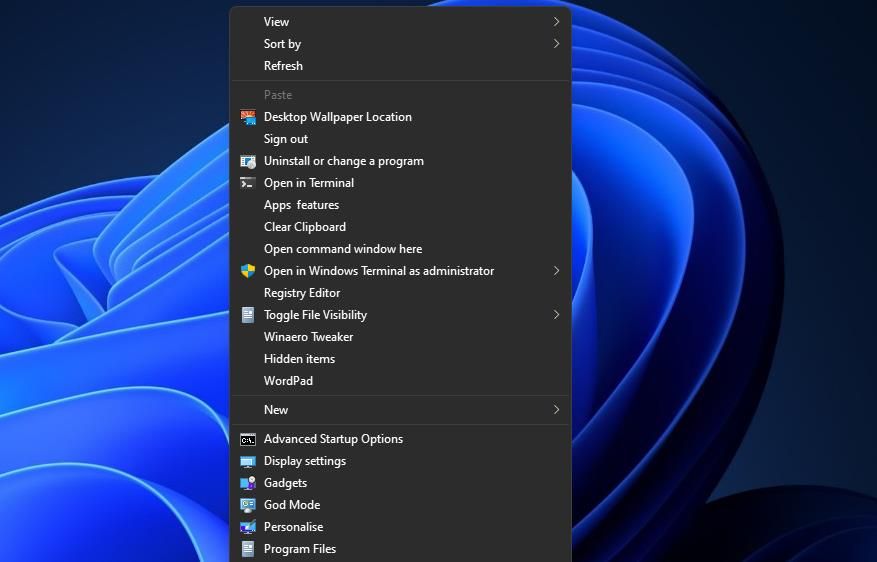
A context menu option for opening the folder that includes your current desktop wallpaper will give you more direct access to backgrounds. Of course, Windows 11’s right-click menu doesn’t have such a shortcut, but you can add a handy Desktop Wallpaper Location context menu option with the freeware Winaero Tweaker. This is how to add a Desktop Wallpaper Location shortcut to the context menu with that software:
- Open this download page for Winaero Tweaker.
- Click Download Winaero Tweaker to obtain the ZIP archive for that software.
- Check out our how to customize Windows 11 with Winaero Tweaker guide for instructions about how to extract, install, and launch that software.
-
Double-click the Context Menu settings category inside Winaero Tweaker’s window.

- Select the Wallpaper Location setting.
-
Click the Add “Desktop Wallpaper Location” context menu checkbox.

- Close the Winaero Tweaker software.
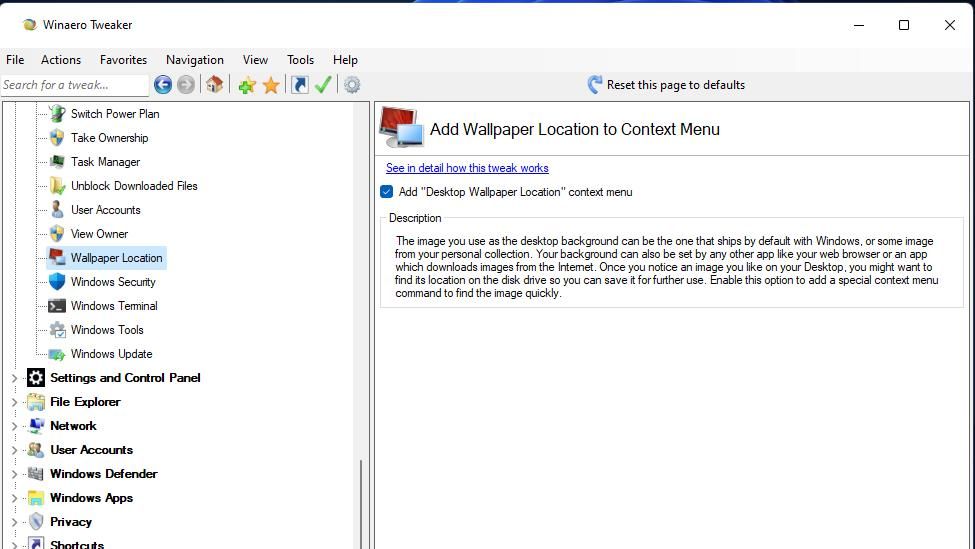
Try out the new Desktop Wallpaper Location option on the right-click menu. Click an area of your Windows 11 desktop with the right mouse button and select Show more options. Select the Desktop Wallpaper Location option on the classic menu. That shortcut with bring up the DesktopBackground directory for your theme or one of the subfolders within the Wallpaper folder.
Edit Your Current Windows 11 Desktop Wallpaper
When you’ve found your current Windows 11 desktop wallpaper with any of the methods above, you can edit it to your heart’s content. You can enhance your wallpaper with the filter, cropping, and adjustment tools in the Photos app included with Windows. Or spruce up your desktop’s background with the best freeware image editors, such as GIMP, Paint.NET, PhotoScapeX, and Pixlr E.