
Knowing which DLL files are registered on your Windows 10 system isn’t just for tech geeks; it’s essential for anyone serious about maintaining a smooth-running, secure computer. This guide provides four easy ways to view all registered DLLs in Windows 10, making it easier than ever to get your system back on track.
How to View All Registered DLLs in Windows 10
To view all registered DLLs in Windows 10 and other versions as well, all you need to do is either run some commands, search for them manually, or use a third-party tool.
- Use Command Prompt
- Apply the ‘regsvr32’ Command
- Navigate to the Registry Editor
- Use Third-Party Software
1. Use Command Prompt
1. Open Command Prompt as Administrator
Press Win + S to open the search bar and then type “Command Prompt” or “cmd”.
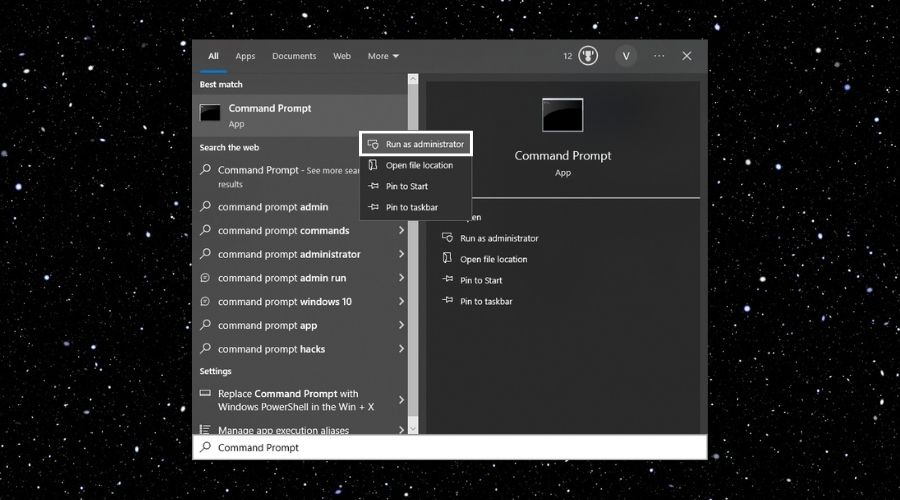
Right-click on the Command Prompt from the search results and select “Run as administrator”.
2. Execute the Command
In the Command Prompt window, type the following command and press Enter: reg query HKLM\SOFTWARE\Classes /s /f *.dll
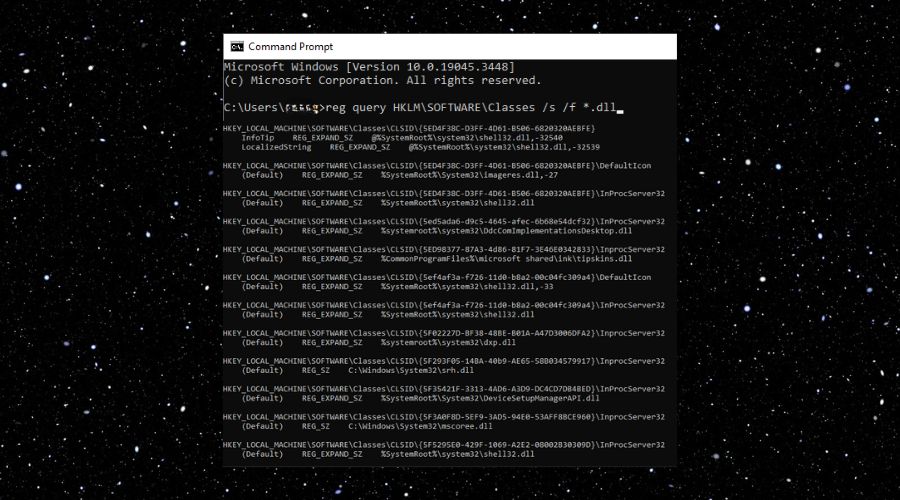
This command will search the Registry for all registered DLL files and display them. It should look a bit like the example above.
2. Apply the ‘regsvr32’ command
In the Command Prompt window, type regsvr32 /u [DLL file name] and press Enter.
Exemple: I will use a common .dll and this command. If you did this step correctly, you should receive a similar message containing the name of the .dll that you unregistered.
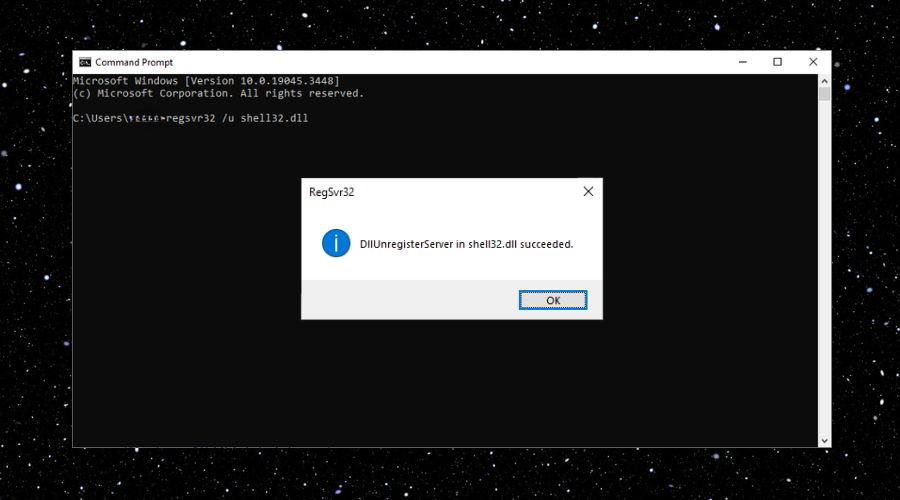
If you want to revert the previous action or to register a .dll do not add the /u and leave the command as regsvr32 [DLL file name]. You will receive a similar message, but instead of DllUnregisterServer you will get DllRegisterServer.
Learn more: This command uses the service interface to run and manage services, and it is also known as a command-line utility. It registers and unlists Object Linking and Embedding controls like DLLs files.
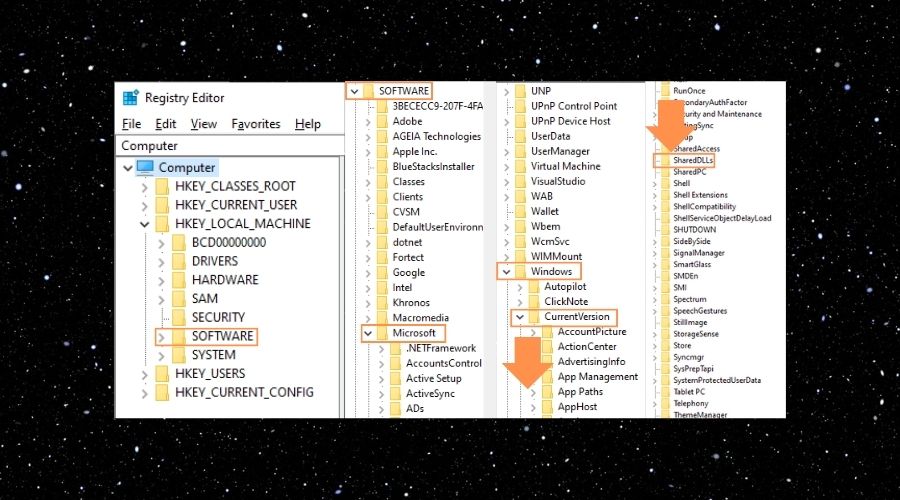
3. Navigate to the Registry Editor
Attention: Before editing anything into the Registry editor, make sure that you create a System Backup.
→ Type Regedit in the Windows search bar and open the Registry Editor.
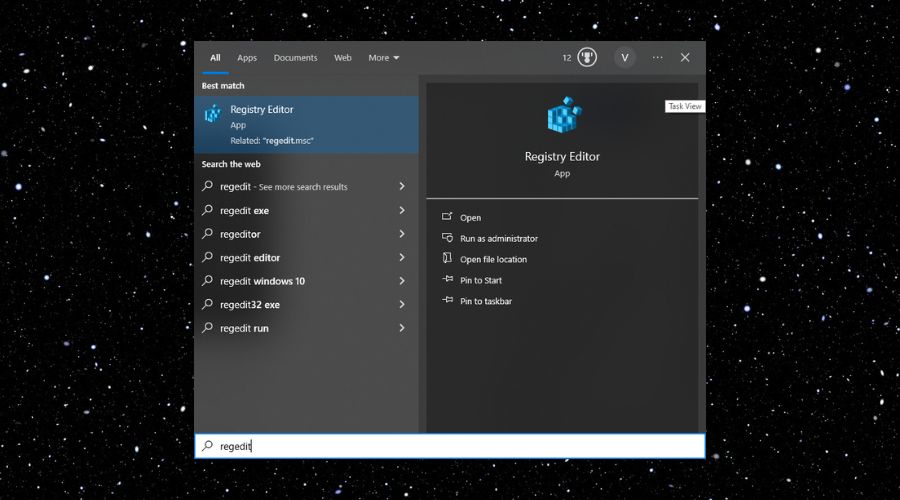
→ Navigate to: HKEY_LOCAL_MACHINE\SOFTWARE\Microsoft\Windows\CurrentVersion\SharedDLLs.
4. Use Third-Party Software
If you prefer, you can also use specialized software to manage DLL files, as we explained in our guide on best DLL fixers.
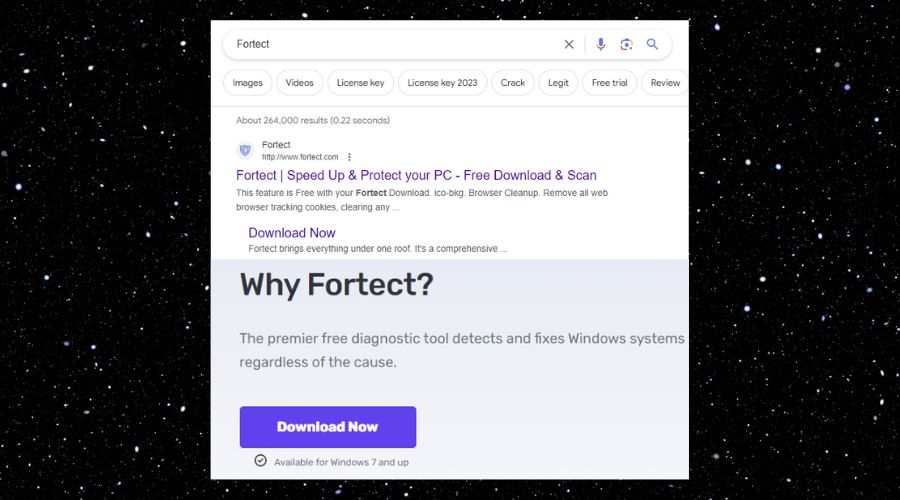
1. Download Fortect
2. Visit the Fortect website and download the software.
3. Install and Run Fortect
Once Fortect is installed, Right-click on the application and select Properties.
4. Navigate to the Compatibility Tab and tick the box next to Run this program as an administrator.
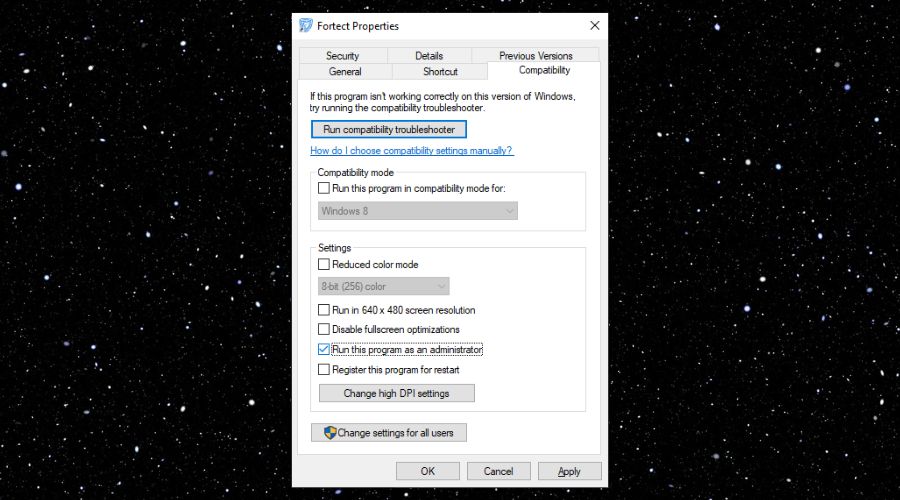
From now on you will open Fortect as an administrator.
5. View Registered DLLs
The software will automatically list all registered DLLs on your system.
Final Thoughts
By following this guide, you’ll gain a complete understanding of how to view all registered DLLs in Windows 10, allowing you to manage your system more effectively. Keep in mind that before you modify Registry files or use commands in the Command Center, you should create a system restore point just to make sure that you don’t mess anything up.
When it comes to installing DLL files in Windows 10, there are several recommended locations depending on the purpose and usage of the DLL file. Here are the steps to determine the appropriate location for installing DLL files:
1. System32 folder: If the DLL file is intended to be used by the operating system or critical system components, it should be installed in the System32 folder. The path to this folder is typically «C:\Windows\System32\«. However, be cautious and ensure that the DLL file is from a trusted source to avoid any security risks.
2. Program folder: For DLL files used by specific programs or applications, it is generally recommended to place them in the program’s installation folder. This helps ensure that the program can easily locate and access the DLL when needed. The program installation folder’s path usually varies depending on the software and can be found in the «Program Files» or «Program Files (x86)» directory.
3. SysWOW64 folder: If you have a 64-bit version of Windows 10, you might encounter 32-bit DLL files. In such cases, these DLL files should be installed in the SysWOW64 folder, which can be found at «C:\Windows\SysWOW64\«. This enables compatibility with 32-bit applications running on a 64-bit system.
4. Shared DLLs folder: Windows offers a shared DLL folder known as the WinSxS (Windows Side-by-Side) folder. It is primarily used for system libraries and shared components, ensuring multiple applications can utilize the same DLL without conflicts. It is not recommended to manually place DLL files in this folder unless specifically instructed by software developers.
Remember to exercise caution while installing DLL files and ensure they originate from trustworthy sources. Improper installation or utilization of DLL files can cause system instability or security vulnerabilities.
Video Tutorial: Where is DLL folder in Windows 10?
How do I install a missing DLL in Windows 10?
To install a missing DLL file in Windows 10, you can follow these steps:
1. Identify the missing DLL: Firstly, determine the specific DLL file that is missing. It is important to have the correct information to perform the installation accurately. You can typically identify the missing DLL by the error message displayed when you try to run a particular program or application.
2. Check the Recycle Bin: Sometimes, DLL files may be accidentally deleted and end up in the Recycle Bin. If that is the case, simply restore the DLL file from the Recycle Bin to its original location on your computer.
3. Use the System File Checker (SFC) tool: Windows has a built-in utility called the System File Checker that scans the system for corrupted or missing system files, including DLL files.
a. Open the Command Prompt as an administrator: Press the Windows key, type «cmd,» right-click on «Command Prompt,» and select «Run as administrator.«
b. In the Command Prompt window, type the following command and press Enter: `sfc /scannow`
c. Wait for the scan to complete: The System File Checker will automatically scan your system for missing or corrupted DLL files and other system files. It may take some time to finish the scan and repair any issues it finds.
4. Update Windows: Keeping your Windows operating system up to date is vital as updates often fix known issues and provide necessary DLL files. Make sure your Windows 10 is updated with the latest patches and updates by following these steps:
a. Press the Windows key, type «Settings,» and open the «Settings» app.
b. Click on «Update & Security.«
c. In the Windows Update section, click on «Check for updates» and allow Windows to install any available updates.
5. Download the missing DLL file from trusted sources: If the above methods didn’t resolve the issue, you can download the specific DLL file from reliable sources. Be cautious and ensure you only download DLL files from trustworthy websites to avoid malware or other security risks.
a. Search for the specific DLL file: Use a search engine to find a trusted website that offers the DLL file you need.
b. Download the DLL file: Locate the appropriate DLL file, download it, and save it to a specific folder on your computer.
c. Place the DLL file in the correct system directory: Once downloaded, locate the folder where the missing DLL should be stored (often the System32 folder), and copy the downloaded DLL file into that directory.
6. Register the DLL file: Finally, you may need to register the DLL file with Windows using the regsvr32 command. To do this:
a. Open the Command Prompt as an administrator.
b. In the Command Prompt window, type the following command and press Enter: `regsvr32 `
c. Replace « with the actual file path of the DLL file you downloaded, including the file extension.
After performing these steps, restart your computer and check if the program or application that previously displayed the missing DLL error is now working correctly. Remember to exercise caution when dealing with DLL files and only download them from reputable sources.
How do I run a DLL file in Windows 10?
To run a DLL (Dynamic Link Library) file in Windows 10, follow these steps:
1. Identify the DLL file: Confirm that you have the specific DLL file you want to run. DLL files contain functions and resources that multiple programs can use. Check if the DLL file is compatible with your version of Windows. Ensure that you have obtained the DLL file from a reputable source.
2. Place the DLL file in the appropriate location: DLL files usually need to be placed in specific folders for applications or the operating system to access them. The most common locations for DLL files are the application folder (where the program is installed) and the Windows system folder (typically C:\Windows\System32 or C:\Windows\SysWOW64 for 64-bit systems).
3. Register the DLL file (if necessary): Some DLL files require registration to work properly. To register a DLL file, you can use the regsvr32 command in the Command Prompt. Open the Command Prompt as an administrator, navigate to the folder containing the DLL file using the «cd» command, and then use the following command: regsvr32 .dll
4. Run an application that uses the DLL file: Once the DLL file is in place and registered (if needed), you can run an application that relies on it. Launch the application as you normally would, and it should automatically access and utilize the DLL file.
Note: Be cautious when working with DLL files, as incorrect handling can potentially cause system errors or compromise your computer’s security. It’s advisable to back up your system and exercise caution when obtaining and using DLL files from external sources.
Remember, running DLL files should be done cautiously and preferably with guidance from an experienced professional or trusted sources.
How do I put DLL files on my computer?
To put DLL files on your computer, you can follow these steps:
1. Identify the DLL file: First, ensure you have the DLL file you want to install on your computer. DLL files are dynamic link library files that contain code and data that multiple programs can utilize.
2. Check compatibility: Make sure the DLL file is compatible with your operating system. DLL files are specific to the version of the operating system and the software they are designed for.
3. Determine the appropriate directory: Identify the appropriate directory on your computer where the DLL file needs to be placed. Typically, DLL files are stored in the System32 or SysWOW64 folders within the Windows directory.
4. Copy the DLL file: Copy the DLL file from its current location. You can either use Windows File Explorer or the command prompt to perform this action. Ensure you have the necessary permissions to copy files in the destination folder.
5. Paste the DLL file: Navigate to the appropriate directory where you want to put the DLL file. Right-click on an empty space within the folder and select «Paste» to place the DLL file.
6. Register the DLL file (optional): In some cases, you may need to register the DLL file to make it usable by programs. To register a DLL file, open the command prompt with administrative privileges, navigate to the directory where the DLL file is located, and use the «regsvr32» command followed by the DLL file name.
7. Restart your computer: After placing the DLL file, it is recommended to restart your computer. This ensures that any changes related to the DLL file can take effect properly.
Note: It is essential to be cautious when dealing with DLL files. Ensure you download DLL files from trusted sources and always keep an updated backup of your files in case any unexpected issues arise.
How do I manually install a DLL in Windows 10?
Manually installing a DLL file in Windows 10 involves a few steps. Here’s a guide to help you through the process:
1. Identify the DLL file: Ensure you have the correct DLL file that you want to install. It’s crucial to obtain it from a reliable source or from the software’s official distribution.
2. Place the DLL file in the appropriate directory: The DLL file needs to be placed in the correct location for it to work properly. The typical directory for system DLL files is the System32 folder, located in the Windows installation folder (usually C:\Windows\System32). If it’s a user-specific DLL, you may need to put it in the corresponding application folder or in the Program Files directory.
3. Open the File Explorer: Press the Windows key + E or navigate to it via the taskbar.
4. Locate the DLL file: Use the File Explorer to navigate to the folder where you placed the DLL file.
5. Copy the DLL file: Right-click on the DLL file and select «Copy» from the context menu.
6. Navigate to the target directory: Open another File Explorer window and go to the folder where you want to install the DLL file. For system DLLs, navigate to C:\Windows\System32.
7. Paste the DLL file: Right-click inside the target directory and choose «Paste» from the context menu.
8. Administrator privileges: If prompted, grant administrative privileges to confirm the file transfer.
9. Register the DLL (optional): Certain DLL files require registration to function properly. To register a DLL, open the Command Prompt with administrative rights (press Windows key, type «Command Prompt,» right-click on it, and choose «Run as administrator«) and enter the command «regsvr32 filename.dll» (replace «filename» with the actual name of the file).
10. Confirm registration (optional): A dialog box should appear confirming that the DLL was successfully registered.
Remember that manual installation of DLL files can carry risks. It’s essential to exercise caution and ensure the file is obtained from a trusted source. If you’re unsure or want to be on the safer side, it’s advisable to consult professional assistance or use software provided by trusted developers to handle DLL installations.
How do I know if a DLL is loaded in Windows?
To determine if a DLL (Dynamic Link Library) is loaded in Windows, you can follow these steps:
1. Open the Task Manager: You can do this by right-clicking on the taskbar and selecting «Task Manager» from the menu that appears.
2. Navigate to the «Processes» or «Details» tab: This section will display a list of all the processes currently running on your system.
3. Locate the process of the application you suspect is using the DLL: Scroll through the list or use the search function to find the specific process associated with the application.
4. Check the «Modules» or «DLLs» column: In the Task Manager, you will usually find a column labeled «Modules» or «DLLs» that shows the modules loaded by each process. It displays the filenames of the DLLs that are currently loaded by the process.
5. Look for the DLL you are interested in: Scan through the DLL names in the Modules or DLLs column to find the DLL you want to check. If the DLL is present in the list, it means it is loaded by the corresponding process.
Please note that if a DLL is being dynamically loaded and unloaded by an application during its execution, it may not appear in the list of loaded modules at all times. In such cases, you might need to resort to additional tools or techniques to investigate the dynamic loading behavior of the application.
Remember, the steps provided here are based on general knowledge of Windows systems and the Task Manager interface. Depending on your specific Windows version or configuration, there could be slight variations in the steps or the names of the options presented.
How do I run a DLL directly?
Running a DLL (Dynamic Link Library) directly involves a few steps. Here’s a guide on how to do it:
1. Identify the purpose of the DLL: DLLs contain reusable code and resources that can be utilized by multiple applications. Before running a DLL, you need to determine its purpose and ensure it matches your requirements.
2. Check if the DLL is compatible: DLLs are designed to work with specific operating systems and applications. Verify if the DLL is compatible with the operating system you are using and the program you intend to use it with. Ensure you have the necessary software dependencies installed.
3. Place the DLL in the appropriate directory: Most DLLs need to be placed in specific directories for them to be detected and used by applications. These directories include the application’s working directory, system directories, or the directory where the specific application expects the DLL to be located. Consult the DLL’s documentation or the application’s documentation to determine the correct directory.
4. Register the DLL: In some cases, DLLs need to be registered before they can be used. This process involves adding the DLL’s information to the system registry. To register a DLL, open a command prompt with administrative privileges, navigate to the DLL’s location, and use the regsvr32 command followed by the DLL’s name. For example: regsvr32 mydll.dll.
5. Load the DLL in an application: Once you have ensured compatibility and placed the DLL in the correct directory, you can load and use it in an application that supports DLL integration. This typically involves writing code to import and access the functions or resources provided by the DLL. The process for loading a DLL varies depending on the programming language and framework being used.
It’s important to note that running DLLs directly should be done with caution. Ensure you obtain DLLs from trusted sources to avoid potential security risks or conflicts with your system. Additionally, be aware of any licensing restrictions or terms of use associated with the DLL you are using.
Remember to consult official documentation, relevant forums, or seek professional advice specific to the DLL you are working with for a more detailed and accurate procedure.
Вы знали, что в каждой операционной системе существует множество небольших, но очень важных файлов, которые играют ключевую роль в его работе? Один из таких файлов называется DLL, или Dynamic Link Library. Сегодня мы поговорим о том, что такое DLL и как они влияют на работу вашего компьютера.
Что такое DLL в Windows
DLL (Dynamic Link Library) в Windows — это файл, содержащий код и данные, которые могут быть использованы несколькими программами одновременно. Он является важной частью операционной системы Windows и позволяет программам пользоваться одними и теми же функциями и ресурсами.
Зачем нужны библиотеки
DLL-файлы представляют собой наборы функций и процедур, которые могут быть вызваны программами для выполнения определенных задач. Они обеспечивают модульность и повторное использование кода, позволяя программистам разрабатывать программы, используя уже существующие функции, вместо того чтобы писать их с нуля.
Один из основных преимуществ DLL-файлов заключается в том, что они позволяют экономить память и дисковое пространство. Вместо создания собственной копии кода для каждого приложения в Виндовс программист может подключить к своему приложению библиотеки DLL. Это упрощает управление программами и улучшает производительность системы в целом.
Еще одна задача библиотек DLL для Windows — обеспечение модульности программ. Суть в том, что создание нескольких DLL библиотек позволяет загружать их по мере запроса пользователем тех или иных функций приложения. Подобный подход обеспечивает работу программы на устаревшем оборудовании и в целом ускоряет общее время ее загрузки. Кроме того, модульность позволяет обновлять отдельные компоненты приложения, не затрагивая остальные ее элементы. Хороший пример — обновление ставок налога в программе заработной платы. Их можно обновлять каждый год, внося изменения в модуль, не пересобирая и не переустанавливая программу.
DLL-файлы играют важную роль в работе операционной системы Windows. Они содержат функции, необходимые для выполнения различных операций, таких как работа с сетью, вывод на экран, обработка звука и многое другое. Благодаря DLL-файлам, операционная система может эффективно управлять ресурсами и обеспечивать совместимость между различными программами.
Плюсы и минусы использования DLL файлов
Резюмируем преимущества использования файлов DLL:
- Экономия пространства. DLL-файлы позволяют уменьшить размер программ и операционной системы, так как они содержат общие функции и ресурсы, которые могут использоваться несколькими приложениями одновременно.
- Легкость обновления. При обновлении программы или операционной системы достаточно заменить только соответствующий DLL-файл, не трогая остальные компоненты.
- Разделение функциональности. DLL-файлы позволяют разделять функциональность между различными компонентами программы или операционной системы. Это позволяет повысить эффективность разработки.
- Ускорение загрузки программ за счет модульности.
Подобная система очень удобна, однако и с ней иногда возникают проблемы. Одна из довольно известных ситуаций, которая возникла с появлением библиотек кода носит название DLL HELL (DLL-ад). Основная проблема заключалась в том, что Windows позволяла программам устанавливать свои файлы и удалять их. В итоге могло получиться так, что одна программа устанавливала DLL, а другая — ее перезаписывала на более новую версию, что вызывало ошибки в первом приложении.
Кроме того, при удалении некоторые программы затирали DLL, которые использовались в другом ПО. И, конечно, случались обновления системных DLL. Если разработчик использовал функции системных библиотек в своей программе, но не учел возможность обновления (а это практически невозможно), то его приложение начинало работать с ошибками.
Решением ситуации стало хранение вообще всех версий DLL: старых, новых, измененных, обновленных и так далее. Программы все также могут использовать одну библиотеку, но при запросе разработчик четко определяет версию и особенности DLL-файла. Решение, однако, породило проблему: в Windows теперь может храниться несколько гигабайт неиспользуемых библиотек, избавиться от которых без риска что-то сломать можно разве что переустановкой операционной системы.
Где находится библиотека DLL
Обычно DLL-файлы хранятся в определенных папках, доступных операционной системе. Одно из мест, где можно найти DLL-файлы, — это папка System32 (SysWOW64 для 32-битных библиотек в 64-битной ОС). Она находится внутри папки Windows, которая, в свою очередь, находится на системном диске (обычно это диск C).
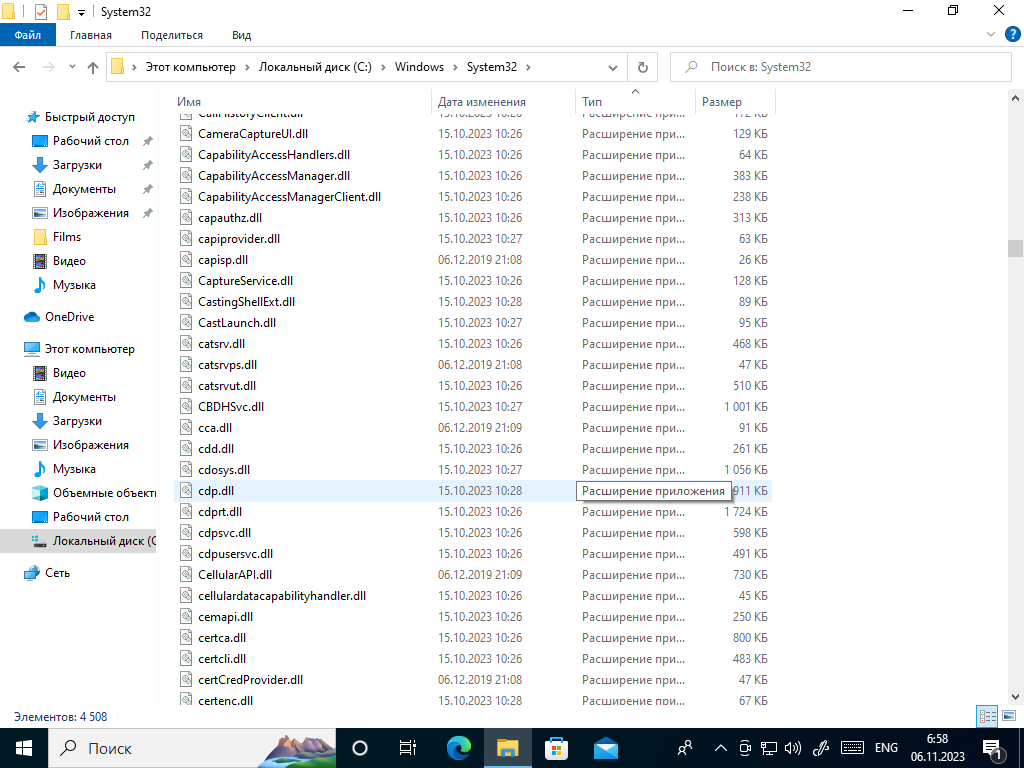
Разнообразные DLL-файлы в системной папке
Чтобы найти библиотеку DLL в папке System32, вам потребуется выполнить несколько простых шагов. Вот они:
- Откройте проводник, чтобы просмотреть содержимое вашего компьютера.
- Перейдите на системный диск (обычно это диск C).
- Найдите папку с названием Windows и откройте ее.
- Внутри папки Windows найдите папку System32 и откройте ее.
- Теперь вы находитесь в папке System32, где хранятся множество системных файлов, включая DLL-файлы.
В некоторых случаях нужные файлы лежат не в System32, а в папке WinSxS. Чтобы ее найти на четвертом шаге выберите название другой папки.
Важно понимать, что в описанных папках находятся множество DLL-файлов, и найти конкретный файл может быть сложно. Если вам известно название нужной DLL-библиотеки, вы можете воспользоваться функцией поиска в проводнике, чтобы упростить процесс.
Интересный момент. Разработчик может положить собственную библиотеку в DLL файле практически куда угодно, включая папки программы.
Как установить библиотеку DLL
Теперь перейдем к процессу установки файла DLL на компьютер. Установка и регистрация библиотеки DLL может потребоваться в двух случаях. Первый — это отсутствие нужного файла. Выяснить, что какой-то библиотеки не хватает, можно, прочитав сообщение об ошибке в той или иной программе.
Вторая ситуация, когда нужно поставить DLL, — разработка собственной программы или установка чужой библиотеки для собственного пользования. Это требуется программистам, включая студентов, которые только учатся разработке.
Для некоторых библиотек требуется регистрация в реестре. Если вы не хотите разбираться, нужна регистрация или нет, можно выполнять ее для всех DLL-файлов.
Как найти нужный файл библиотеки
Если вы не программист и не пишете собственную библиотеку, то для установки DLL вам нужно скачать файл. Обычно они предоставляются разработчиками программ или сторонними поставщиками. Вы можете искать их на официальных веб-сайтах или специализированных ресурсах. Помимо официальных источников, также полезно обратиться к сообществам и форумам, где пользователи обсуждают и рекомендуют различные библиотеки DLL. Они могут поделиться своим опытом и предложить вам наиболее подходящие варианты. Однако будьте осторожны с непроверенными источниками, вместе с подходящей библиотекой на компьютере у вас может оказаться вирус.
Кроме того, необходимо знать разрядность и версию вашей операционной системы Windows. Расскажем, как определить эти параметры, чтобы вы могли скачать и установить правильную DLL.
Определить эти данные можно следующим образом:
- Щелкните пункт «Параметры» в меню «Пуск».
- Найдите раздел «Система» и перейдите на вкладку «О программе».
- В открывшемся окне вы увидите информацию о вашей операционной системе. Посмотрите раздел «Система» или «О программе» и найдите строку «Тип системы». Здесь будет указано, является ли ваша система 32-битной или 64-битной.
- Далее найдите раздел «Основные сведения о системе» или «Характеристики Windows». Здесь вы увидите информацию о версии вашей операционной системы Windows, например, «Windows 10» или «Windows 7».
Теперь, когда вы знаете разрядность и версию вашей операционной системы Windows, вы можете перейти к поиску и скачиванию правильной DLL. Уделите внимание этому вопросу, т. к. библиотеки для разных операционных систем могут быть несовместимы.

Раздел о системе в параметрах компьютера
Как выполнить регистрацию DLL
Операционная система сама распознает большую часть библиотек. Она записывает их в реестр, где хранятся данные о DLL-файлах, включая то, какие программы и для чего их используют. Но если Windows ваша библиотека не известна, ее нужно регистрировать.

Пример записи о DLL-файле в реестре
Приведем инструкцию, как зарегистрировать библиотеку DLL:
- Скачайте библиотеку DLL на свой компьютер. Обратите внимание на версию библиотеки, чтобы она соответствовала вашей операционной системе.
- Разместите библиотеку DLL в правильном месте. Обычно это папка System32 в системном диске (обычно C:\Windows\System32). Также можно разместить библиотеку в папке, где находится исполняемый файл программы.
- Зарегистрируйте библиотеку DLL. Для этого откройте командную строку с правами администратора и выполните команду «regsvr32 «имя_библиотеки.dll»» (вводите без кавычек-елочек). Если у вас возникнут проблемы с регистрацией, проверьте правильность имени файла и доступность библиотеки. Вместо имени библиотеки можно написать полный путь к файлу.
На этом регистрация выполнена. В некоторых случаях для установки требуется перезагрузка компьютера, поэтому, если файл не работает, перезагрузитесь. Если у вас возникнут дополнительные вопросы или проблемы, не стесняйтесь обратиться за помощью к специалисту или в сообщества, посвященные вашей операционной системе.

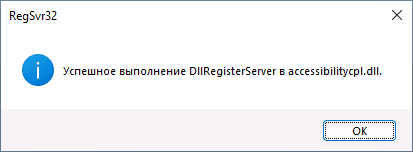
Регистрация dll и подтверждение успешной регистрации
Установка DLL при ошибке программы
Самая частая проблема с файлами библиотек — отсутствие некоторых данных Microsoft Visual C++. Обычно в таких случаях во всплывающем окне пишется следующий текст ошибки: «Приложение не было запущено, поскольку оно некорректно настроено. Повторная установка приложения может решить данную проблему». В этой ситуации необходимо установить последнюю версию «Распространяемого компонента Visual C++».
Теперь вы знаете, что такое библиотека DLL и что означает это сокращение. Надеемся, что материал был вам полезен. Также напоминаем, что любые изменения в подобных файлах необходимо вносить, только если вы точно знаете, что делаете. В противном случае возможны ошибки в программах, которые используют исправленные библиотеки, и даже в самой операционной системе.
Среди частых вопросов пользователей, особенно после того, как они сталкиваются с тем, что какая-то из библиотек DLL отсутствует в Windows 10, Windows 11 или других версиях системы — как зарегистрировать DLL в соответствующей версии ОС.
В этой инструкции подробно о способах регистрации библиотек DLL в Windows x64 и x86 (32-бит) с помощью regsvr32.exe (и кратко о regasm.exe), о возможных нюансах и проблемах, которые могут возникнуть в процессе.
Регистрация библиотеки DLL в Windows 10, Windows 11 и предыдущих версий системы
Дальнейшие шаги описаны в предположении, что DLL, которую нужно зарегистрировать, уже находится в нужном расположении: папке C:\Windows\System32, C:\Windows\SysWOW64 или, в некоторых случаях — отдельных папках программ, к которой относится соответствующая библиотека, например, для 1С — C:\Program Files\1cv8\номер_версии\bin (или Program Files x86 в случае 32-битной версии).
Прежде чем приступить к регистрации библиотеки, учитывайте следующие моменты:
- В x64 версиях Windows 64-битные DLL хранятся в System32, а 32-битные — в SysWOW64 (у некоторых начинающих пользователей бывает обратное предположение исходя из имён папок).
- Файлы DLL x64 и x86 (32-бит) — это разные файлы. И если прямого указания на разрядность в месте загрузки файла нет, то чаще это 32-битный файл (что не мешает ему работать в x64 системе), но это не всегда так.
- Для регистрации библиотеки DLL используется системный инструмент regsvr32.exe, который также доступен в двух версиях, которые лежат в папках System32 и SysWOW64 (в случае 64-битных систем). По умолчанию при описываемых далее действиях запускается x64 версия.
- 32-битным программам и играм (по умолчанию устанавливаются в Program Files x86 в 32-битных системах) для работы нужны 32-битные DLL, не зависимо от разрядности Windows.
Сам процесс регистрации в общем случае состоит из следующих шагов:
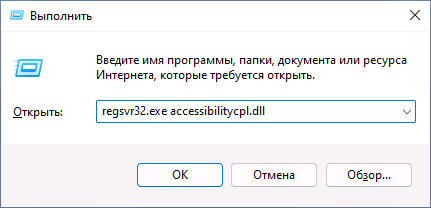
- Нажмите клавиши Win+R на клавиатуре (Win — клавиша с эмблемой Windows). Также можно нажать правой кнопкой мыши по кнопке «Пуск» в Windows 11 или Windows 10 и выбрать пункт контекстного меню «Выполнить».
- Введите команду regsvr32.exe путь_к_файлу (если путь к файлу содержит пробелы, возьмите весь путь в кавычки), например, для регистрации библиотеки DLL COMCNTR.DLL в 1С (для 64-бит) команда может иметь вид:
regsvr32.exe "C:\Program Files\1cv8\8.3.19.1150\bin\comcntr.dll"
Если DLL находится в System32, полный путь указывать не обязательно, достаточно простого имени файла, как на изображении ниже.

- Нажмите Ок или Enter.
- При успехе вы получите сообщение вида «Успешное выполнение DllRegisterServer в имя_файла.dll» или «Успешное выполнение DllRegisterServer и DllInstall в имя_файла.dll».

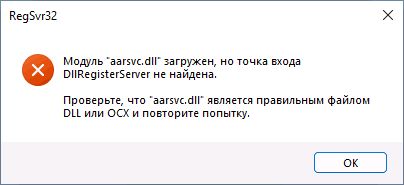
Возможна и неудача — сообщение об ошибке «Модуль dll загружен, но точка входа DllRegisterServer не найдена. Проверьте, что файл является правильным файлом DLL или OCX и повторите попытку». Подробнее об ошибке — в следующем разделе статьи.
Дополнительно: для регистрации классов из библиотек DLL .NET Framework в COM с созданием необходимых записей в реестре используется regasm.exe из .NET SDK, причем базовая команда регистрации DLL выглядит тем же образом, что и в случае с regsvr32.exe. Подробнее по использованию regasm — https://docs.microsoft.com/ru-ru/dotnet/framework/tools/regasm-exe-assembly-registration-tool.
Почему не удается зарегистрировать DLL
Ошибка при регистрации с помощью regsvr32 вида «Точка входа DllRegisterServer не найдена» говорит о том, что эта библиотека DLL не поддерживает регистрацию описанным методом. Можно попробовать использовать вариант команды:
regsvr32 /i /n путь_к_файлу.dll
но с большой вероятностью и это не поможет.
У большинства домашних пользователей такая проблема возникает при регистрации файлов DLL для игр и программ, часто не вполне лицензионных, которые сообщили, что нужный файл DLL не обнаружен или отсутствует. Причем сами библиотеки DLL обычно скачаны со сторонних сайтов (и чаще всего имеют имена начинающиеся с «vc», «msvc» или «d3d»). А решение, как правило, простое — выяснить, частью какого набора компонентов является эта DLL и установить эти компоненты с помощью их собственного установщика. Более подробно проблема и подходы к решению описаны в инструкции Точка входа DllRegisterServer не найдена — причины и возможные решения.
Видео
Надеюсь, цель достигнута, а количество вопросов, связанных с регистрацией DLL в Windows, уменьшилось.