
Диспетчер учетных данных Windows (Credential Manager) позволяет безопасно хранить учетные записи и пароля для доступа к сетевым ресурсам, веб сайтам и приложениям. Благодаря сохраненным в Credential Manager паролям вы можете подключаться без ввода пароля к сетевым ресурсам, которые поддерживаются проверку подлинности Windows (NTLM или Kerbersos), аутентификацию по сертификату, или базовую проверку подлинности.
Содержание:
- Используем диспетчер учетных данных Windows для хранения паролей
- Управление сохраненными учетными данными Windows из командной строки
- Доступ к менеджеру учетных данных Windows из PowerShell
Используем диспетчер учетных данных Windows для хранения паролей
Диспетчер учетных данных встроен в Windows и позволяет безопасно хранить три типа учетных данных:
- Учетные данные Windows (Windows Credentials) — учетные данные доступа к ресурсам, которые поддерживаются Windows аутентификацию (NTLM или Kerbersos). Это могут быть данные для подключения сетевых дисков или общим SMB папкам, NAS устройствам, сохраненные пароли для RDP подключений, пароли к сайтам, поддерживающих проверку подлинности Windows и т.д;
- Учетные данные сертификатов (Certificate-Based Credentials) – используются для доступа к ресурсам с помощью сертификатов (из секции Personal в Certificate Manager);
- Общие учетные данные (Generic Credentials) – хранит учетные данные для доступа к сторонним приложениям, совместимым с Credential Manager и поддерживающим Basic аутентификацию;
- Учетные данные для интернета (Web Credentials) – сохранённые пароли в браузерах Edge и Internet Explorer, приложениях Microsoft (MS Office, Teams, Outlook, Skype и т.д).
Например, если при доступе к сетевой папке вы включите опцию “Сохранить пароль”, то введенный вами пароли будет сохранен в Credential Manager.

Аналогично пароль для подключения к удаленному RDP/RDS серверу сохраняется в клиенте Remote Desktop Connection (mstsc.exe).
Открыть диспетчер учетных данных в Windows можно:
- из классической панели управления (Control Panel\User Accounts\Credential Manager, Панель управления -> Учетные записи пользователей -> Диспетчер учетных данных);
- изкоманднойстроки:
control /name Microsoft.CredentialManager
На скриншоте видно, что в Credential Manager хранятся два пароля, которые мы сохранили ранее.
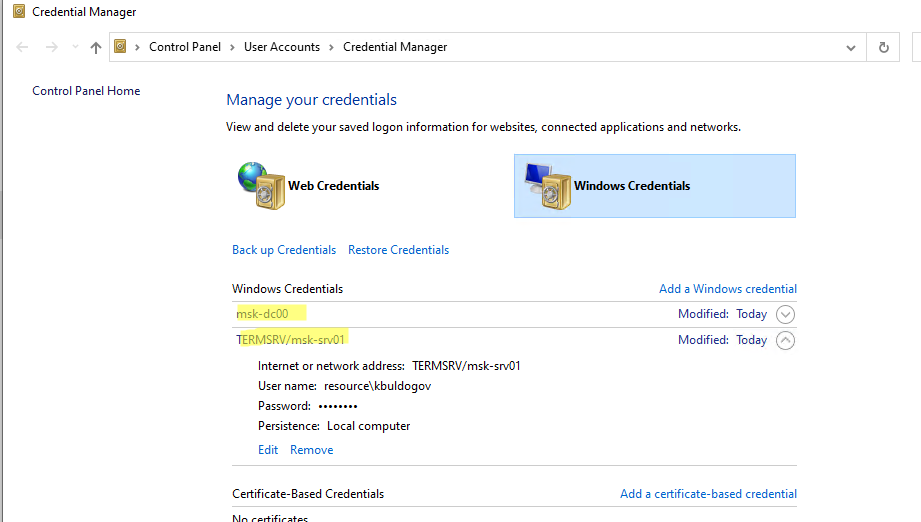
Сохраненный пароль для RDP подключения сохраняется в формате
TERMSRV\hostname
.
Здесь вы можете добавить сохранённый пароль, отредактировать (просмотреть сохраненный пароль в открытом виде из графического интерфейса нельзя) или удалить любую из записей.
Для управления сохраненными паролями можно использовать классический диалоговый интерфейс Stored User Names and Password. Для его запуска выполните команду:
rundll32.exe keymgr.dll,KRShowKeyMgr
Здесь вы также можете управлять сохраненными учетными данными, а также выполнить резервное копирование и восстановление записей в Credential Manager (можно использовать для переноса базы Credential Manager на другой компьютер).
Управление сохраненными учетными данными Windows из командной строки
Вы можете добавить удалить и вывести сохраненные учетные данных в Credentil Manager из командной строки с помощью утилиты cmdkey.
Добавить в диспетчер учетные данные для доступа к серверу FS01:
cmdkey /add:FS01 /user:kbuldogov /pass:Passw0rdd1
Если нужно сохранить доменную учетную запись:
cmdkey /add:fs01.winitpro.local /user:[email protected] /pass:Passw0rdd1
Сохранить учетные данные для доступа к RDP/RDS серверу:
cmdkey /generic:termsrv/MSKRDS1 /user:kbuldogov /pass:Passw0rdd1
Вывести список сохраненных учетных данных:
cmdkey /list
Вывести список хранимых учетных данных для указанного компьютера:
cmdkey /list:fs01.winitpro.local
Удалить ранее сохраненные учетные данные:
cmdkey /delete:FS01
Удалить из Credential Manager все сохраненные пароли для RDP доступа:
For /F "tokens=1,2 delims= " %G in ('cmdkey /list ^| findstr "target=TERMSRV"') do cmdkey /delete %H
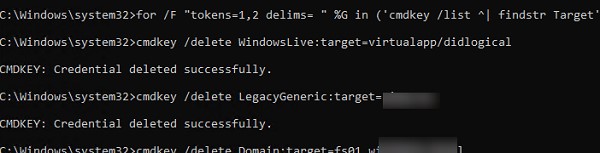
Полностью очистить пароли в Credential Manager:
for /F "tokens=1,2 delims= " %G in ('cmdkey /list ^| findstr Target') do cmdkey /delete %H
Также для управления сохраненными учетными данными можно использовать утилиту vaultcmd.Вывести список сохраненных учетных данных типа Windows Credentials:
vaultcmd /listcreds:"Windows Credentials"

Все сохраненные пароли хранятся в защищенном хранилище Windows Vault. Путь к хранилищу можно получить с помощью команды:
vaultcmd /list

По умолчанию это
%userprofile%\AppData\Local\Microsoft\Vault
. Ключ шифрования хранится в файле Policy.vpol. Клю шифровани используется для рашировки паролей в файлах .vcrd.
Для работы Credential Manager должна быть запущена служба VaultSvc:
Get-Service VaultSvc
Если служба отключена, при попытке получить доступ к Credential Manager появится ошибка:
Credential Manager Error
The Credential Manager Service is not running. You can start the service manually using the Services snap-in or restart your computer to start the service.
Error code: 0x800706B5
Error Message: The interface is unknown.
Если вы хотите заблокировать пользователям возможность сохранения сетевых паролей в Credential Manager, нужно включить параметр Network access: Do not allow storage of passwords and credentials for network authentication в разделе GPO Computer Configuration -> Windows Settings -> Security Settings -> Local Policies -> Security Options.
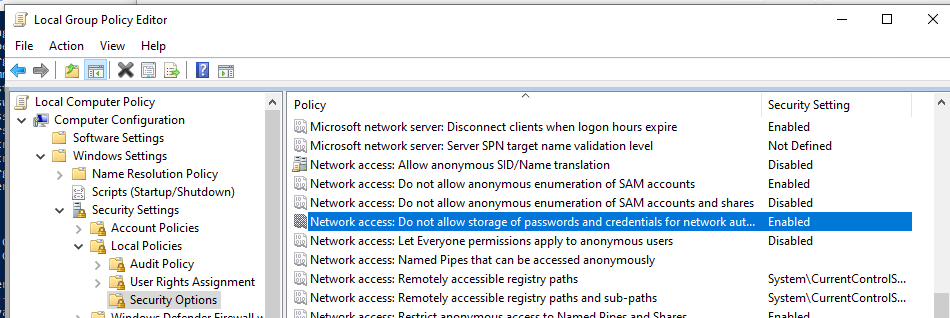
Теперь, если пользователь попытается сохранить пароль в хранилище, появится ошибка:
Credential Manager Error
Unable to save credentials. To save credentials in this vault, check your computer configuration.
Error code: 0x80070520
Error Message: A specified logon session does not exist. It may already have been terminated.
Доступ к менеджеру учетных данных Windows из PowerShell
В Windows нет встроенных командлетов для обращения к хранилищу PasswordVault из PowerShell. Но вы можете использовать модуль CredentialManager из галереи PowerShell.
Установите модуль:
Install-Module CredentialManager

В модуле всего 4 командлета:
- Get-StoredCredential – получить учетные данные из хранилища Windows Vault;
- Get-StrongPassword – сгенерировать случайный пароль;
- New-StoredCredential – добавить учетные данные в хранилище;
- Remove-StoredCredential – удалить учетные данные.
Чтобы добавить новые учетные данные в хранилище CredentialManager, выполните команду:
New-StoredCredential -Target 'contoso' -Type Generic -UserName '[email protected]' -Password '123qwe' -Persist 'LocalMachine'
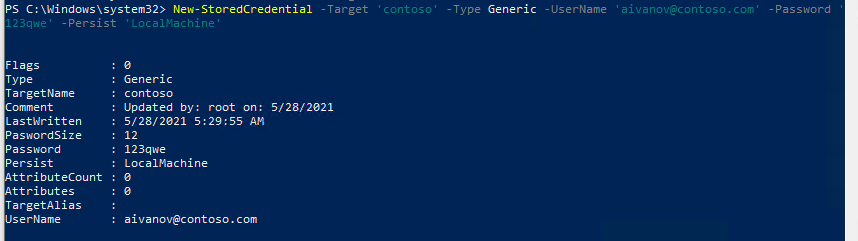
Проверить, есть в хранилище сохраненные данные:
Get-StoredCredential -Target contoso
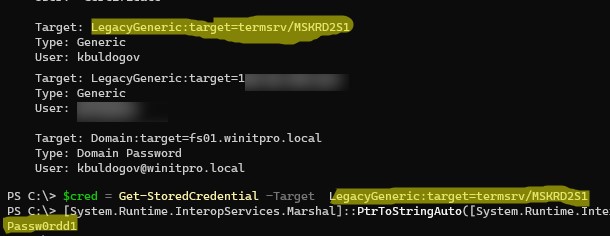
С помощью командлета Get-StoredCredential вы можете вывести сохраненный пароль, хранящийся в диспетчере учетных данных в отрытом виде.
Выведите список сохраненных учетных данных:
cmdkey.exe /list
Скопируйте значение Target для объекта, пароль которого вы хотите извлечь и вставьте его в следующую команду:
$cred = Get-StoredCredential -Target  LegacyGeneric:target=termsrv/MSKRD2S1
[System.Runtime.InteropServices.Marshal]::PtrToStringAuto([System.Runtime.InteropServices.Marshal]::SecureStringToBSTR($cred.Password))
Команда выведет сохраненный пароль в открытом виде.
Также для получения сохраненных паролей из credman в открытом виде можно использовать утилиты типа Mimikatz (смотри пример).
Сохраненные пароли из Credential Manager можно использовать в ваших скриптах PowerShell. Например, в следующем примере я получаю сохраненные имя и пароль в виде объекта PSCredential и подключаюсь с ними к Exchange Online из PowerShell:
$psCred = Get-StoredCredential -Target "Contoso"
Connect-MSolService -Credential $psCred
Также вы можете использовать Get-StoredCredential для безопасного получения сохранённых учетных данных в заданиях планировщика.
Также обратите внимание на модуль PowerShell Secret Management, который можно использовать для безопасного хранения паролей в Windows (поддерживает различные хранилища паролей: KeePass, LastPass, HashiCorp Vault, Azure Key Vault, Bitwarden.
Чтобы удалить сохраненные учетные данные из Windows Vault, выполните:
Remove-StoredCredential -Target Contoso
Время на прочтение7 мин
Количество просмотров92K
Про взлом паролей windows было написано немало статей, но все они сводились к использованию какого-либо софта, либо поверхностно описывали способы шифрования LM и NT, и совсем поверхностно описывали syskey. Я попытаюсь исправить этот неодостаток, описав все подробности о том где находятся пароли, в каком виде, и как их преобразует утилита syskey.
Существует 2 возможности получения пароля — через реестр, или получив прямой доступ к файлам-кустам реестра. В любом случае нужны будут либо привелегии пользователя SYSTEM, либо хищение заветных файлов, например, загрузившись из другой ОС. Здесь я не буду описывать возможности получения доступа, но в целях исследования нагляднее будет выбрать первый вариант, это позволит не заострять внимание на структуре куста реестра. А запуститься от системы нам поможет утилита psExec от sysinternals. Конечно, для этих целей можно использовать уязвимости windows, но статья не об этом.
V-блок
Windows до версии Vista по умолчанию хранила пароль в двух разных хэшах — LM и NT. В висте и выше LM-хэш не хранится. Для начала посмотрим где искать эти хэши, а потом разберемся что из себя они представляют.
Пароли пользователей, а так же много другой полезной информации хранится в реестре по адресу HKLM\SAM\SAM\Domains\Account\users\[RID]\V
, известном как V-блок. Раздел SAM находится в соответствующем файле c:\Windows\System32\config\SAM. RID — уникальный идентификатор пользователя, его можно узнать, например заглянув в ветку HKLM\SAM\SAM\Domains\Account\users\names\<имя пользователя> (параметр Default, поле — тип параметра). Например, RID учетной записи «Администратор» всегда 500 (0x1F4), а пользователя «Гость» — 501 (0x1f5). Доступ к разделу SAM по умолчанию возможен только пользователю SYSTEM, но если очень хочется посмотреть — запускаем regedit c правами системы:
PsExec.exe -s -i -d regedit.
Чтобы наблюдать V-блок в удобном виде можно, например, экспортировать его в текстовый файл (File-Export в Regedit).
Вот что мы там увидим:

От 0x0 до 0xCC располагаются адреса всех данных, которые находятся в V-блоке, их размеры и некоторая дополнительная информация о данных. Чтобы получить реальный адрес надо к тому адресу, что найдем прибавить 0xCC. Адреса и размеры хранятся по принципу BIG ENDIAN, т.е понадобится инвертировать байты. На каждый параметр отводится по 4 байта, но фактически все параметры умещаются в одном-двух байтах. Вот где искать:
Адрес имени пользователя — 0xС
Длина имени пользователя — 0x10
Адрес LM-хэша — 0x9с
Длина LM-хэша — 0xa0
Адрес NT-хэша — 0xa8
длина NT-хэша — 0xac
В данном случае имя пользователя найдется по смещению 0xd4 + 0xcc и его длина будет 0xc байт.
NT-хэш будет располагаться по смещению 0x12c + 0xcc и его размер (всегда один и тот же) = 0x14.
Еще одна деталь, касающаяся хранения паролей — как к NT- так и к LM-хэшу всегда добавляются спереди 4 байта, назначение которых для меня загадка. Причем 4байта будут присутствовать даже если пароль отключен. В данном случае видно, что длина LM хэша =4 и если посмотреть на его адрес, можно эти 4 байта увидеть несмотря на то что никакого LM-хэша нет.
Поэтому при поиске смещений хэшей смело прибавляем 4 байта к адресу, а при учете размеров — вычитаем. Если удобнее читать код — вот примерно так будет выглядеть поиск адресов с учетом инверсии, лишних четырех байтов и прибавления стартового смещения 0xcc (код C#)
 int lmhashOffset = userVblock[0x9c] + userVblock[0x9d] * 0x100 + 4 + 0xcc;

int nthashOffset = userVblock[0xa8] + userVblock[0xa9] * 0x100 + 4 + 0xcc;

int lmhashSize = userVblock[0xa0] + userVblock[0xa1] * 0x100 - 4;

int nthashSize = userVblock[0xac] + userVblock[0xad] * 0x100 - 4;

int usernameOffset = userVblock[0xc] + userVblock[0xd] * 0x100 + 0xcc;

int usernameLen = userVblock[0x10] + userVblock[0x1a] * 0x100;
userVblock — значение HKLM\SAM\SAM\Domains\Account\users\\V в виде массива байт.
Еще про V-блок можно почитать тут.
Алгоритмы
Теперь разберемся в алгоритмах шифрования.
Формирование NT-хэша:
1. Пароль пользователя преобразуется в Unicode-строку.
2. Генерируется MD4-хэш на основе данной строки.
3. Полученный хэш шифруется алгоритмом DES, ключ составляется на основе RID пользователя.
Формирование LM-хэша:
1. Пароль пользователя преобразуется в верхний регистр и дополняется нулями до длины 14 байт.
2. Полученная строка делится на две половинки по 7 байт и каждая из них по отдельности шифруется алгоритмом DES. В итоге получаем хэш длиной 16 байт (состоящий из двух независимых половинок длиной по 8 байт).
3. Полученный хэш шифруется алгоритмом DES, ключ составляется на основе RID пользователя.
4. В windows 2000 и выше оба полученых хэша дополнительно шифруются алоритмом RC4 с помощью ключа, известного как «системный ключ» или bootkey, сгенерированого утилитой syskey, и шифруются довольно хитрым образом.
Рассмотрим общую последовательность действий для получения исходного пароля и каждый шаг в отдельности
1. Получаем bootkey, генерируем на его основе ключи для RC4, расшифровываем хэши с помощью RC4
2. Получаем ключи для DES из RID’ов пользователей, расшифровываем хэши DES’ом
3. Полученые хэши атакуем перебором.
Bootkey
Системный ключ (bootkey) разбит на 4 части и лежит в следующих разделах реестра:
HKLM\System\CurrentControlSet\Control\Lsa\JD
HKLM\System\CurrentControlSet\Control\Lsa\Skew1
HKLM\System\CurrentControlSet\Control\Lsa\GBG
HKLM\System\CurrentControlSet\Control\Lsa\Data
Раздел system находится в файле c:\Windows\System32\config\system
Следует отметить, что раздел CurrentControlSet является ссылкой на один из разделов controlset и создается в момент загрузки системы. Это значит что не получится его найти в файле system, если система неактивна. Если вы решили искать ключ в файле — необходимо узнать значение ContolSet по умолчанию в HKLM\SYSTEM\Select\default.
например если HKLM\SYSTEM\Select\default = 1 — вместо HKLM\System\CurrentControlSet\ ищем в HKLM\System\controlset001\
У каждого ключа реестра есть некий скрытый атрибут, известный как «class». Regedit его так просто не покажет, однако его можно увидеть, например, если экспортировать эти ключи реестра в текстовые файлы. В winapi для получения этого атрибута есть функция RegQueryInfoKey.
Фрагменты хранятся в строковом представлении шестнадцатеричных чисел, причем по принципу BIG ENDIAN (т.е не строка задом наперед, а число).
Например мы обнаружили вот такие записи:
Key Name: HKEY_LOCAL_MACHINE\SYSTEM\CurrentControlSet\Control\Lsa\JD

Class Name: 46003cdb = {0xdb,0x3c,0x00,0x46}

Key Name: HKEY_LOCAL_MACHINE\SYSTEM\CurrentControlSet\Control\Lsa\Skew1

Class Name: e0387d24 = {0x24,0x7d,0x38,0xe0}

Key Name: HKEY_LOCAL_MACHINE\SYSTEM\CurrentControlSet\Control\Lsa\GBG

Class Name: 4d183449 = {0x49,0x34,0x18,0x4d}

Key Name: HKEY_LOCAL_MACHINE\SYSTEM\CurrentControlSet\Control\Lsa\Data

Class Name: 0419ed03 = {0x03,0xed,0x19,0x04}
Собраный из четырех частей ключ будет массивом байт:
scrambled_key = {0xdb,0x3c,0x00,0x46,0x24,0x7d,0x38,0xe0,0x49,0x34,0x18,0x4d,0x03,0xed,0x19,0x04};
Далее элементы этого массива переставляются на основе некоторого константного массива p
int[] p = { 0xb, 0x6, 0x7, 0x1, 0x8, 0xa, 0xe, 0x0, 0x3, 0x5, 0x2, 0xf, 0xd, 0x9, 0xc, 0x4 };
Элементы в этом массиве определяют позиции для перестановок, т.е.
key[i] = scrambled_key[p[i]];
В нашем примере получится массив:
key[] = {0x4d,0x38,0xe0,0x3c,0x49,0x18,0x19,0xdb,0x46,0x7d,0x00,0x04,0xed,0x34,0x03,0x24 };
этот массив и есть так называемый bootkey. Только в шифровании паролей будет учавствовать не он а некий хэш на основе bootkey, фрагментов f-блока и некоторых констант. Назовем его Hashed bootkey.
Hashed bootkey
для получения Hashed bootkey нам понадобятся 2 строковые константы (ASCII):
 string aqwerty = "!@#$%^&*()qwertyUIOPAzxcvbnmQQQQQQQQQQQQ)(*@&%\0";

string anum = "0123456789012345678901234567890123456789\0";
Также понадобится F-блок пользователя (HKLM\SAM\SAM\Domains\Account\users\\F), а именно его 16 байт: F[0x70:0x80]
На основе этих значений, склееных в один большой массив формируем MD5 хэш, который будет являться ключем для шифрования RC4
rc4_key = MD5(F[0x70:0x80] + aqwerty + bootkey + anum).
Последним шагом для получения hashed bootkey будет rc4 шифрование( или дешифрование — в rc4 это одна и та же функция) полученым ключем фрагмента F-блока F[0x80:0xA0];
hashedBootkey = RC4(rc4_key,F[0x80:0xA0])
Hashed bootkey у нас в руках, осталось научиться с ним правильно обращаться.
Дешифруем пароли с помощью Hashed Bootkey
для паролей LM и NT нам понадобятся еще 2 строковые константы —
string almpassword = "LMPASSWORD";

string antpassword = "NTPASSWORD";
а так же RID пользователя в виде 4х байт (дополненый нулями) и первая половина Hashed Bootkey (hashedBootkey[0x0:0x10]);
Все это склеивается в один массив байт и считается MD5 по правилам:
rc4_key_lm = MD5(hbootkey[0x0:0x10] +RID + almpassword);

rc4_key_nt = MD5(hbootkey[0x0:0x10] +RID + antpassword);
полученый md5 хэш — ключ для rc4, которым зашифрованы LM и NT хэши в V-блоке пользователя
userLMpass = RC4(rc4_key_lm,userSyskeyLMpass);

userNTpass = RC4(rc4_key_lm,userSyskeyNTpass);
На этом этапе мы получили пароли пользователя в том виде в каком они хранились бы без шифрования syskey, можно сказать, что самое сложное позади. Переходим к следующему шагу
DES
На основе четырех байт RID’а пользователя с помощью некоторых перестановок и побитовых операций создаем 2 ключа DES. Вот функции, которые осуществляют обфускацию (С#):
private byte[] str_to_key(byte[] str) {

byte[] key = new byte[8];

key[0] = (byte)(str[0] >> 1);

key[1] = (byte)(((str[0] & 0x01) << 6) | (str[1] >> 2));

key[2] = (byte)(((str[1] & 0x03) << 5) | (str[2] >> 3));

key[3] = (byte)(((str[2] & 0x07) << 4) | (str[3] >> 4));

key[4] = (byte)(((str[3] & 0x0F) << 3) | (str[4] >> 5));

key[5] = (byte)(((str[4] & 0x1F) << 2) | (str[5] >> 6));

key[6] = (byte)(((str[5] & 0x3F) << 1) | (str[6] >> 7));

key[7] = (byte)(str[6] & 0x7F);

for (int i = 0; i < 8; i++) {

key[i] = (byte)(key[i] << 1);

}

des_set_odd_parity(ref key);

return key;

}
private byte[] sid_to_key1(byte[] rid) {
byte[] s = new byte[7];
s[0] = (byte)(rid[0] & 0xFF);
s[1] = (byte)(rid[1] & 0xFF);
s[2] = (byte)(rid[2] & 0xFF);
s[3] = (byte)(rid[3] & 0xFF);
s[4] = s[0];
s[5] = s[1];
s[6] = s[2];
return str_to_key(s);
}
private byte[] sid_to_key2(byte[] rid) {
byte[] s = new byte[7];
s[0] = (byte)((rid[3]) & 0xFF);
s[1] = (byte)(rid[0] & 0xFF);
s[2] = (byte)((rid[1]) & 0xFF);
s[3] = (byte)((rid[2]) & 0xFF);
s[4] = s[0];
s[5] = s[1];
s[6] = s[2];
return str_to_key(s);
}
Ну здесь особо комментировать нечего, кроме функции des_set_odd_parity(ref key) — это одна из функций библиотеки openssl, задача которой добавить некоторые «биты нечетности», используется для повышения стойкости ключа к атакам.
Далее разбиваем NT (или LM) хэш на 2 части по 8 байт и дешифруем DES’ом -одна половина зашифрована ключем сформированым функцией sid_to_key1, вторая — sid_to_key2.
obfskey_l = userNTpass[0x0:0x7]

obfskey_r = userNTpass[0x8:0xF]

byte[] deskey1 = sid_to_key1(RID);

byte[] deskey2 = sid_to_key2(RID);

byte[] md4hash_l = DES(obfskey_l, deskey1);

byte[] md4hash_r = DES(obfskey_r, deskey2);
После склеивания двух половин мы получим md4 хэш -в случае NT, или LanMan (DES) — в случае LM. Полученый хэш полностью готов к атаке перебором.
Кстати, md4 Хэш от пустого пароля — 31d6cfe0d16ae931b73c59d7e0c089c0
Исследование проведено на основе исходного кода ophcrack-3.3.1, а так же статьи Push the Red Button:SysKey and the SAM
“I’ve been looking everywhere for my saved passwords on my windows 10 PC. My PC seem to have a problem accepting my new passwords after I changed them. When I do manage to find my way to credential manager and manage passwords, it demands ID verification with a username and password, which I can’t even remember having set up in the first place. I could really use some help with this issue, before I end up in the nut house!” From Microsoft Community
There are some users have this problem. For this reason, we collated some of the most useful information and hence, have tailored this post specifically to make users understand where are passwords stored in windows 10/11 and how to find passwords on windows 10/11! So stay glued to the article and you’ll get the answers yourself.
- Part 1: Where Are Windows Passwords Stored
- Part 2: How to Reset Windows 10/11 Administrator Password
Basically, all your password or credentials are stored in Credentials Manager application of Windows 10. They are generally store in an encrypted form. Now, if in case, you require to view the saved passwords of websites, you surely can do that but it will require your identity verification. You’ll be asked to put in the Administrator password to achieve this. Please remember, you cannot change passwords of the existing user accounts from here except the guest account’s password (if any).
Now, since you’ve got your answer to where are passwords stored in windows 10, it’s now time to understand how to find passwords on windows 10. Here is the detailed step by step procedure to know where your Windows passwords are stored:
Method 1: Find Windows 10/11 Password with Control Panel
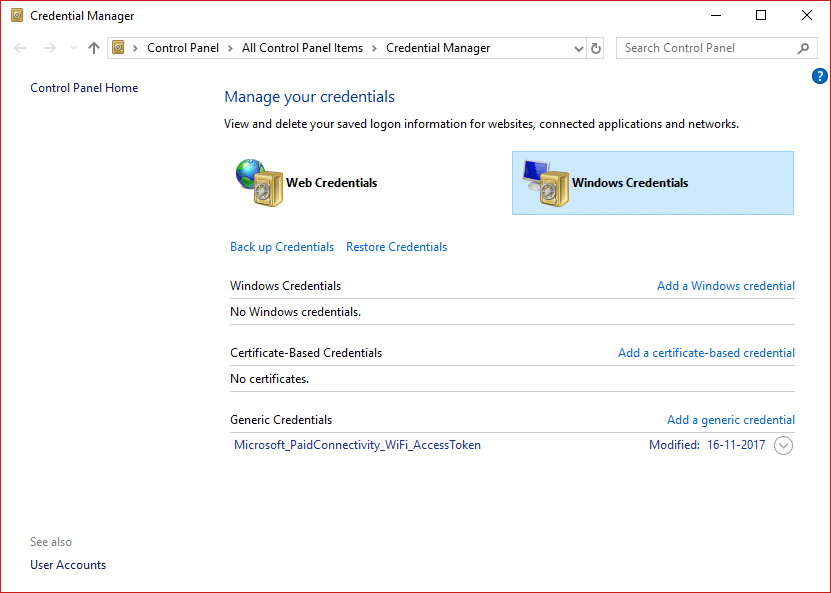
Step 1: Hit the “Windows” key on your keyboard to launch the Start Menu and then punch in the “Credential Manager”. On the results, select Credential Manager or simply hit “Enter” button.
Step 2: Credential Manager will now crop up over your screen. Now, under the Manage your Credentials section, you’ll have to choices “Web Credentials” and “Windows Credentials”.
Step 3: Then, opt for the one as per your preference, let’s opt for “Web Credentials” first. You’ll now be able to see all stored passwords of websites right here. Hit on “downward arrow” besides any one of them, followed by “Show”. You’ll be asked to punch in the Administrator password and voila! The encrypted password is now decrypted and displayed as plain text!
Step 4: Now, if you opt for “Windows Credentials”, you’ll be surprised to see very few credentials here.
Method 2: Find Windows 10/11 Password with Command Prompt
Step 1: Hit the “Windows + R” key combination over your keyboard to launch the Run box. Now, punch in the “cmd” command to launch Command Prompt.
Step 2: Over the Command Prompt window, you need to punch in the following command line and execute it.
- rundll32.exe keymgr.dll,KRShowKeyMgr
Step 3: Stored User Names and Passwords window will now pop up over your screen. You can now add, remove or edit the passwords stored as per your preference. But remember, you do need an Admin password to perform the desired activity here.
Note: The View and Edit rule mentioned in the former part of this section, applies in this method too!
Method 3: Find Windows 10/11 Password in Registry
The Windows registry stores your administrator passwords, Where you can find your stored password on Windows 10/11.
Step 1:Open Windows Command Prompt and type regedit. Press Enter.
Step 2:When the Registry Editor window appears, navigate to the following:
- HKEY_LOCAL_MACHINE\SOFTWARE\Microsoft\Windows NT\CurrentVersion\Winlogon.
Step 3:Scroll down to DefaultPassword and double-click it.
Step 4:The default password will be displayed.
Note: There are some risks associated with this method. Tampering with the Windows registry can damage your operating system. If you are not familiar with this process, please choose a professional password manager.
Now that you know well about how to find passwords on windows 10, you must be wondering how you can edit the Windows User account password when you don’t remember the Admin password. Well hop on to the next step and you’ll have your solution!
Part 2: How to Reset Windows 10/11 Administrator Password
Since, you no longer remember the Administrator password, you’re simply locked out of performing any sort of activities that requires it. In such a case, you’re only left with resetting the Admin account password. For this purpose we would like to introduce, PassFab 4WinKey. This powerful tool is highly recommended for its success rate and the ability reset not only the Admin account password, but it also can reset or remove or change the Microsoft account or local account password. And that too, without the need of an old password, interesting, isn’t it? Let’s understand how to use this tool.
Step 1: Downloaded and install on your computer. Launch PassFab 4WinKey, plug in an empty CD/DVD or USB drive and click “Burn”.
Step 2: Once process completes, reboot your PC. On the first boot screen, hit “F12/Esc” button to launch Boot Menu followed by selecting boot media as the USB drive.
Step 3: PassFab 4Winkey will now crop up on your screen. Now, select the OS that has your Admin account and hit “Next”.
Step 4: Finally, select the required “Admin account” and hit on “Next” button. Upon completion, the password will be removed from your Admin account. Get your PC rebooted and you’re done.
Bottom Line
While moving towards the end of the topic where are passwords stored in windows 10/11 registry, we can conclude that with the aforementioned tutorials, you sure no longer have to look for how to find stored passwords on windows 10/11. Moreover, you also have a powerful solution at hand in case you require resetting, removing or changing Admin account password.
How do I find saved passwords in Windows 10? A large number of programs and websites usually prompt its users’ to save their passwords for later use in their PCs and mobile phones. This gets usually stored on software like Instant Messenger, Windows Live Messengers and popular browsers like Google Chrome, Internet Explorer, Microsoft Edge, Mozilla Firefox, Opera (for both PCs and smart-phones) also provide this password saving feature. This password is usually stored in the secondary memory and can be retrieved even when the system is turned off. Specifically, these usernames, as well as their associated passwords, get stored in the registry, within the Windows Vault or within credential files. All such credentials get accumulated in an encrypted format, but can easily be decrypted just by entering your Windows password.
A frequent task that comes into play for all end-users is to uncover all the stored passwords on his/her computer. This eventually helps in recovering lost or forgotten access details to any specific online service or application. This is an easy task but depends on some of the aspects like the OS that the user is using or the application someone is using. In this article, we will show you different tools that can help you view different hidden encrypted passwords in your system.
Table of Contents
Method 1: Using Windows Credential Manager
Let us first get to know about this tool. It is a built-in Credential Manager of Windows that allows users to store their confidential username and passwords as well as other credentials that are entered in when a user logs on to any website or network. Storing these credentials in a manageable manner can help you automatically log you on to that site. This eventually reduces the time and effort of a user as they don’t have to type their login credentials every time they use this site. To see these usernames and passwords stored in the Windows Credential Manager, you have to go through the following steps –
1. Search for “Credential Manager” in the Start menu search box. Click on the search result to open.
Note: You’ll notice there are 2 categories: Web Credentials & Windows Credentials. Here your entire web credentials, as well as any passwords from sites which you saved during browsing using different browsers will be listed here.
2. Choose and Expand the link to see the password by clicking on the arrow button under the Web Passwords option and click on the “Show” button.
3. It will now prompt you to type your Windows password for decrypting the password and show it to you.
4. Again, when you click on Windows Credentials next to the Web Credentials, you will most likely see lesser credentials stored there unless you’re into a corporate environment. These are application and network-level credentials as and when you connect to network shares or network devices like the NAS.

Recommended: Reveal Hidden Passwords behind asterisk without any software
Method 2: Find Saved Passwords using Command Prompt
1. Press Windows Key + S to bring up search. Type cmd then right-click on Command Prompt and select Run as Administrator.
2. Now type the following command into cmd and hit Enter:
rundll32.exe keymgr.dll,KRShowKeyMgr
3. Once you hit Enter, stored Usernames and Passwords window will open.

4. You can now add, remove or edit the stored passwords.
Method 3: Using third-party tools
There are other 3rd party tools available that will help you view your passwords stored in your system. These are:
a) CredentialsFileView
1. Once downloaded, right-click on the “CredentialsFileView” application and choose Run as Administrator.
2. You will see the main dialog which will pop up. You will have to type in your Windows password at the bottom side and then press “OK”.
Note: Now it will be possible for you to see the list of different credentials stored on your computer. If you are on a domain, you will also see a lot more data in the form of a database having Filename, version modified time etc.

b) VaultPasswordView
This has the same functionality as that of CredentialsFileView, but it will look inside the Windows Vault. This tool is essential particularly for Windows 8 & Windows 10 users as these 2 OS stores the passwords of different apps like Windows Mail, IE, and MS. Edge, in the Windows Vault.

c) EncryptedRegView
1. Run this program, a new dialog box will pop up where the ‘Run as administrator’ box will be checked, press the “OK” button.
2. The tool will automatically scan the registry & decrypt your existing passwords it will fetch from the registry.

Also read: How to Create a Password Reset Disk
Using any of the three methods you will be able to view or find the saved passwords on Windows 10, but if you still have questions or doubts regarding this tutorial then feel free to ask them in the comment section.