
Like its predecessors, Windows 11 and Windows 10 also ship with a bunch of screensavers. 3D Text, Blank, Bubbles, Mystify, Photos, and Ribbons are the screensavers offered with Windows 10.
All screensavers offered with Windows 10/10 were part of Windows 7 and Windows 8/8.1 as well. That is, Windows 11/10 doesn’t come with new screensavers. Besides that, screensavers are turned off by default in Windows 11/10, and accessing screensaver settings is not a straight-forward task as well.

If you have installed one or more third-party screensavers in Windows 10, you might want to back up screensaver files while reinstalling Windows 11/10.
NOTE: These directions can also be used on Windows 7 and Windows 8/8.1 PCs.
Step 1: Open the drive where Windows 11/10 is installed and then navigate to the Windows > System32 folder. That is, for instance, if Windows 11/10 is installed on the “C” drive, then you need to navigate to the C:\Windows\System32 folder.
Step 2: Here, you will find Bubbles.scr, Mystify.scr, Ribbons.scr, ssText3d.scr (3D Text screensaver), and PhotoScreensaver.scr files. You can also use the File Explorer search functionality to find screensaver files quickly.

Most of the third-party screensavers show up in the System32 folder. If you cannot find a third-party or OEM screensaver, search in the Program Files and Program Files (x86) folders by using the screensaver name as the keyword.
Note that you need to configure the File Explorer to show file extensions to view the screensaver file extension. To do that, click the View tab and then select the File name extensions option.
You can double-click on any of them (.scr files) to launch that screensaver. You can also create a desktop shortcut for a screensaver to quickly start a screensaver. To do that, right-click on a screensaver file, click the Send to option, and then click the Desktop (create shortcut) option.
To change screensaver settings, refer to our how to change screensaver settings in Windows 10 guide.
If you are having trouble finding your screensavers on Windows 10, you are not alone. Microsoft has hidden the Screen Saver Settings rather obscurely at the bottom of the «Lock Screen» panel. However, once you know how to find it, you will get used to it soon enough.
View the short video walkthrough or follow the steps written further below to learn how to access the Screen Saver Settings panel on Windows 10.
Video walkthrough
(Please note that once you have the Anniversary Update of Windows 10, you will only see the cogwheel icon in the Start menu; the «Settings» text has been removed.)
Step-by-step instructions
- Click on the Windows logo at the bottom left of the screen;
- Click «Settings» (with a cogwheel icon). If there is no such link, try this instead:
- Right-click on the taskbar at the bottom of the screen;
- Click «Show desktop»;
- Right-click on an empty part of the desktop;
- Click «Personalize» and skip to step 4.
- Click the «Personalization» tile;
- Click «Lock Screen» on the left side of the window;
- Scroll to the bottom of the window and click «Screen Saver Settings».
You have now learned to open the Screen Saver Settings panel on Windows 10!
Need help? Have questions?
We’re here to help. Post your question or problem on our message board.
Search the help pages
The Windows lock screen is the first thing you see when you turn on your PC or wake it up from sleep mode. It displays stunning images from around the world and useful information like the date, time, and notifications. If you want to use these images as wallpaper or admire them in all their glory, this guide will show you how to find the Windows 10 or 11 lock screen images folder location and the actual location of the images in the world.
Also see: How to Find Current Wallpaper Location in Windows 11
Finding the Windows 11 or 10 lock screen images folder location
If you want to extract or copy the lock screen images and use them somewhere else, here’s where you can find them:
- Press the Windows + R to open the Run dialog box.
- Type in the following command and press Enter:
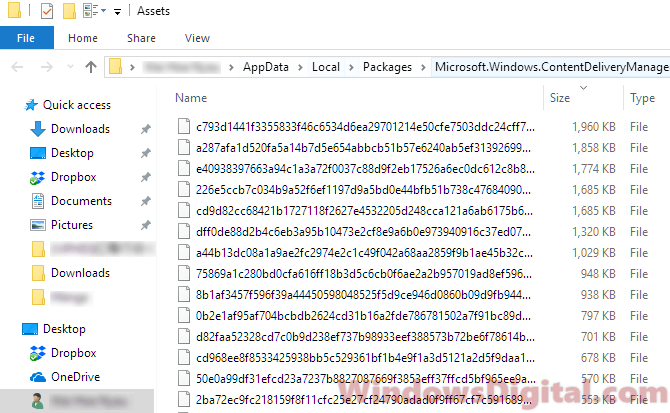
C:\Users\yourusername\AppData\Local\Packages\Microsoft.Windows.ContentDeliveryManager_cw5n1h2txyewy\LocalState\Assets
Replace “yourusername” with your actual username in Windows 11 or 10.
- In the folder, you should see a list of files with random characters and no extensions.

- Sort the list of files by size. Copy files that are at least 500KB in size to any folder you like.
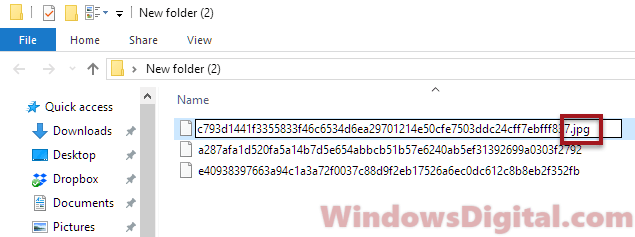
- Right-click each file and select Rename. Add .jpg extension to their names.

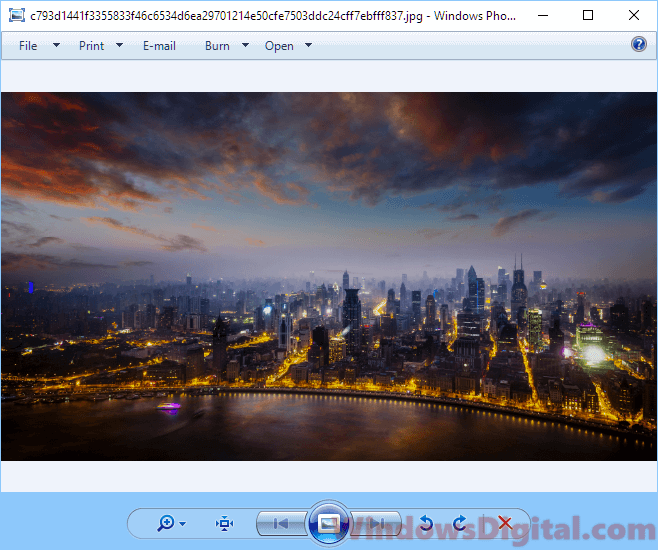
- After adding the JPG extension, you should be able to view the images in any photo app.
Note: Before being able to add any extension to any file, make sure you’ve enabled the option to view file extensions by going to File Explorer > View > Options > Change folder and search options > View > uncheck “Hide extensions for known file types“.
The Windows 10 or 11 lock screen images folder location contains only spotlight images that have already been downloaded and viewed at least once on your PC. Any new spotlight photos you see in the Windows lock screen will be added to this folder. Alternatively, you can find the Windows 10 or 11 spotlight images collection online and add them to the folder to allow them to also appear in your lock screen.
Finding the actual location of the Windows 10 or 11 lock screen images in the world
If you are astounded by the stunning photos that appear in the Windows 10 or 11 lock screen and want to find out the actual location of where these photos were taken in the world, here are a few methods to do so:
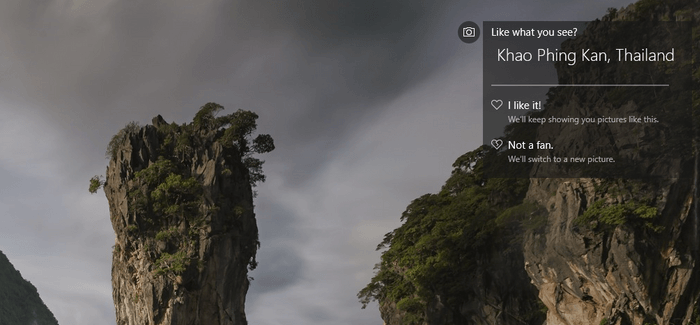
View image location info from Windows lock screen
When you’re on the Windows 10 or 11 lock screen, on the top right corner of the screen, there should be actual location info of the current photo with a Like what you see title and options of either I like it or Not a fan. This feature becomes available since Windows 10 v1607 update. If you don’t see the info panel, you may want to run Windows Update to update your Windows 11 or 10.
Check the image file properties
Another method to view the actual location of the lock screen images taken is by viewing the file properties. Locate the image files and change the extension to JPG. Right-click the image you want to check the actual location of, select Properties, and then go to the Details tab. You should be able to see the actual location info about the photo under Description.
However, not all images have the location info in the description properties. Some will show an empty description in the Details tab.
Use Google Reverse Image Search
If none of the methods above work to show the location info of the image, you can try to use Google Reverse Image search. Using Google reverse image search can help to find related photos from all around the web and extract the info from relevant websites where the photo was hosted. It works most of the time. To do a reverse search, follow the steps below:
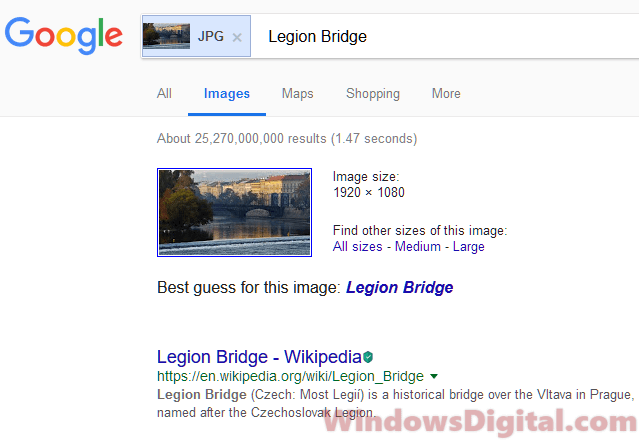
- Locate the image you want to search and add the JPG extension to the image file.
- Go to images.google.com (or see: How to Google Reverse Image Search on Windows 11).
- Upload the image.
- Click on Show matches.
- It should then show relevant info of the uploaded image in a search result.
There are also other reverse image search engines available, such as TinEye and Bing Visual Search, which you can try if Google doesn’t yield the desired results.
One last thing
Keep in mind that while these methods usually give accurate location info about lock screen images, there might be exceptions. Some images are artistically enhanced or might blend elements from different places. So, the data you get might sometimes be more about general inspiration than an exact location. Always double-check the information if you really need to know the precise spot.
Содержание статьи:
- Настройка оформления Windows
- Как открыть параметры экранной заставки
- Где загрузить новые заставки и как их установить в систему
- Изменение других настроек оформления Windows
- Вопросы и ответы: 0
Доброго времени всем!
Эту заметку хочу начать с одного небольшого воспоминания…
Раньше на Windows XP по умолчанию был включен хранитель экрана*: если ПК простаивал 10+ мин. — то экран становился черным и по нему начинала прыгать символика «Windows XP».
Кстати, подтверждено, что такая фишка позволяла продлить ресурс монитора* (+ никто не увидит, над чем вы работали).
* Для справки!
Заставка (хранитель экрана, Screensaver) — это динамичный рисунок, который появл. во время простоя ПК (т.е. когда пользователь не нажимает клавиши / не двигает мышку).
Предназначена чтобы снизить износ оборудования, интенсивность его работы и энергопотребление (в некоторых случаях!). За счет устранения статичности рабочего изображения — удается продлить срок службы мониторов на основе электронно-лучевой трубки, плазменных, и OLED/AMOLED — экранов (которым свойственно выгорание).
*
Собственно, ниже хочу показать, как можно установить заставку в свою систему, и как ее настроить. Думаю, 2-3 мин. потраченного времени на такую весьма полезную вещь (особенно, если у вас OLED-монитор) — окупятся с лихвой! 👌
*
Настройка оформления Windows
Как открыть параметры экранной заставки
Способ 1
Итак… В современных Windows 10/11 достаточно 📌открыть параметры системы и перейти во вкладку «Персонализация / Экран блокировки / Заставка». См. скрин ниже. 👇
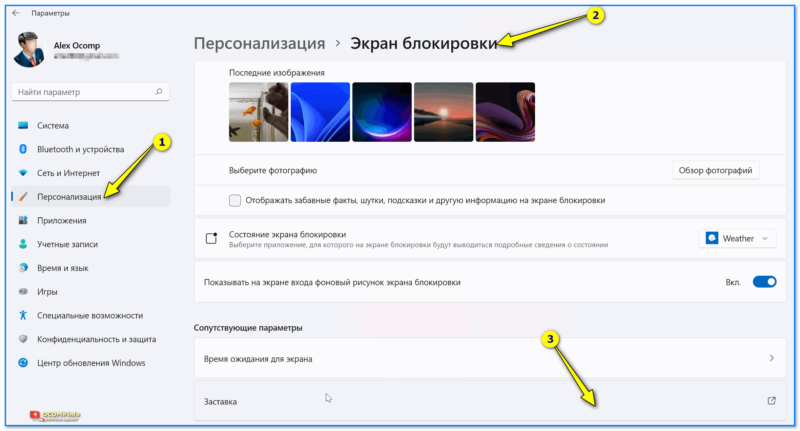
Персонализация — экран блокировки — заставки — Windows 11
Далее из списка можно будет выбрать одну из заставок (Вальс, ленты, пузыри, объемный текст, фотографии) и задать параметры к ней (у разных заставок свои настройки!).
Кстати, обратите внимание на параметр «Интервал» — это время бездействия, после которого заставка сработает. Например, если у вас установлена 1 мин. — значит, если никто за 1 мин. не сделает нажатия на клавиатуре/мышки — компьютер автоматически запустит заставку.
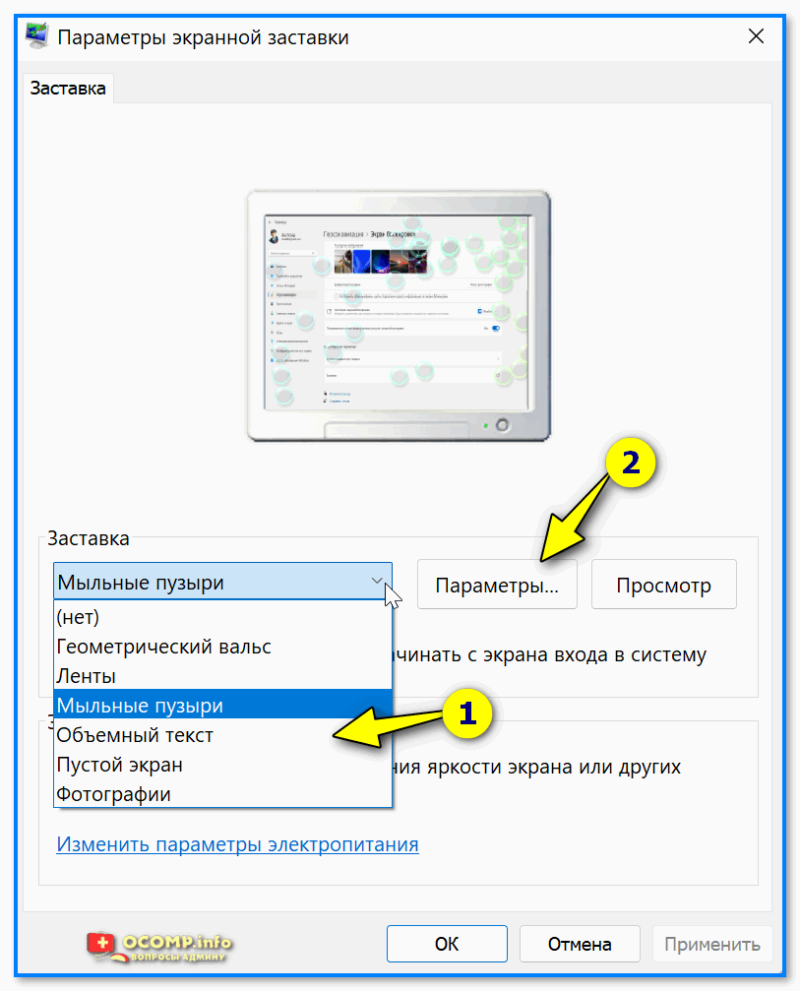
Выбираем одну из доступных доставок
Настройка заставки
*
Пароль для отключения заставки
Если вы хотите, чтобы после заставки появлялось окно с требованием ввести пароль (такое же, которое появл. после загрузки Windows) — не забудьте поставить галочку напротив пункта «Начинать с экрана входа в систему». См. скрин ниже. 👇
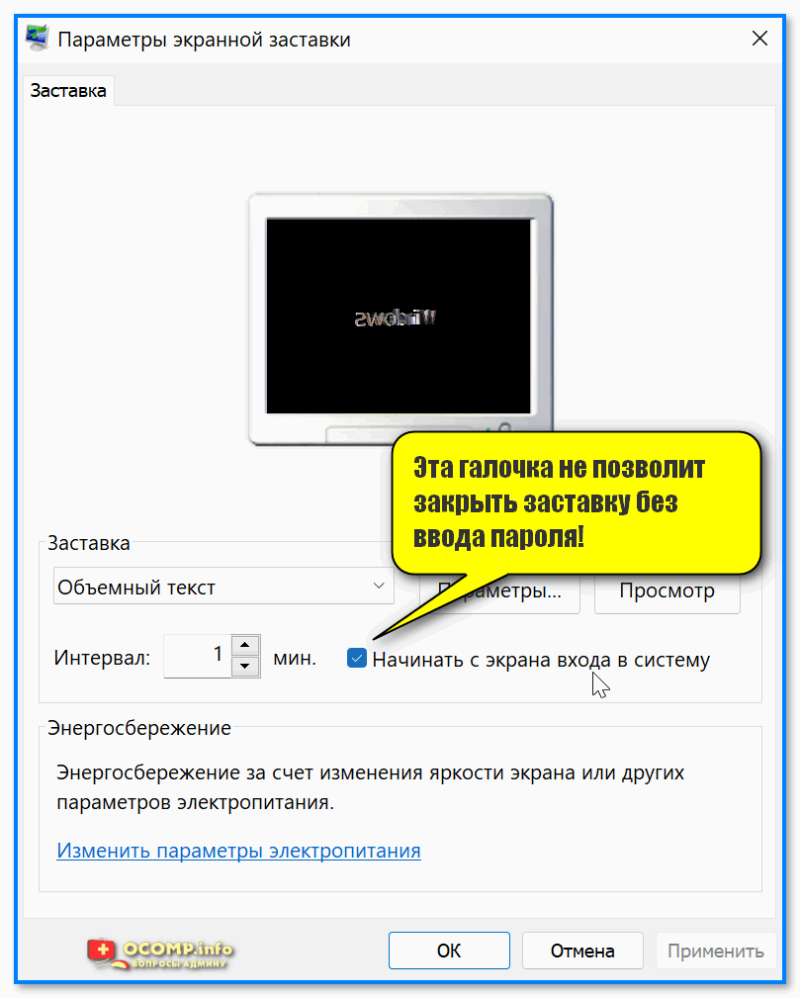
Начинать с экрана входа в систему
В итоге сразу же после заставки — появится окно с вводом ПИН-кода (фото с моего ПК приведено ниже). 👇
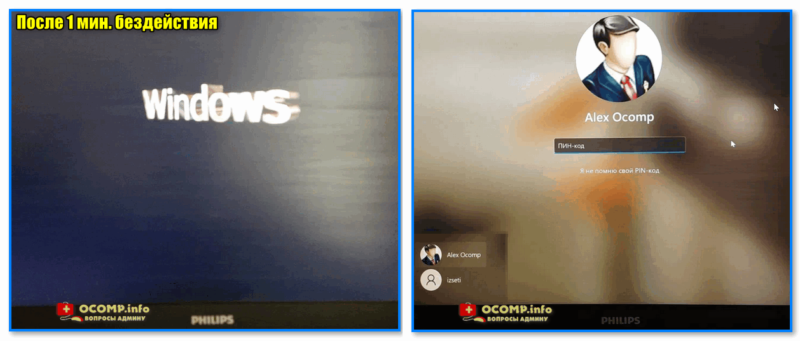
После 1 мин бездействия
*
Способ 2
Чтобы не заходить в параметры системы — можно нажать Win+R (чтобы появилось окно «Выполнять») и использовать одну из нижеприведённых команд:
control desk.cpl,,@screensaver
control desk.cpl,,1
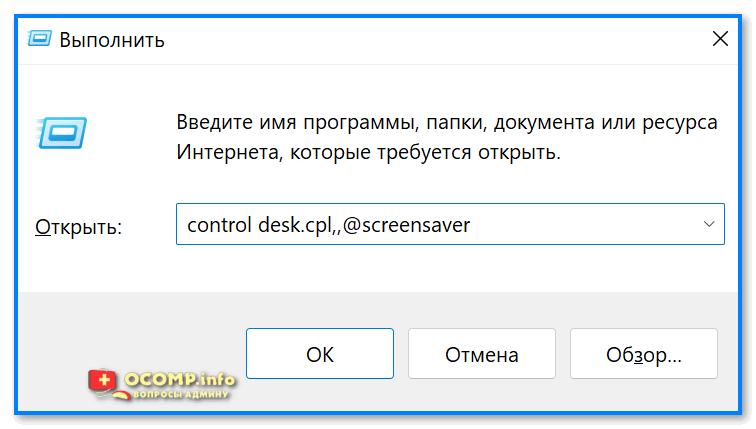
control desk.cpl,,@screensaver — открываем параметры заставок
Далее появится окно с параметрами экранной заставки. Настройки выполняется аналогично, как в п.1 выше…
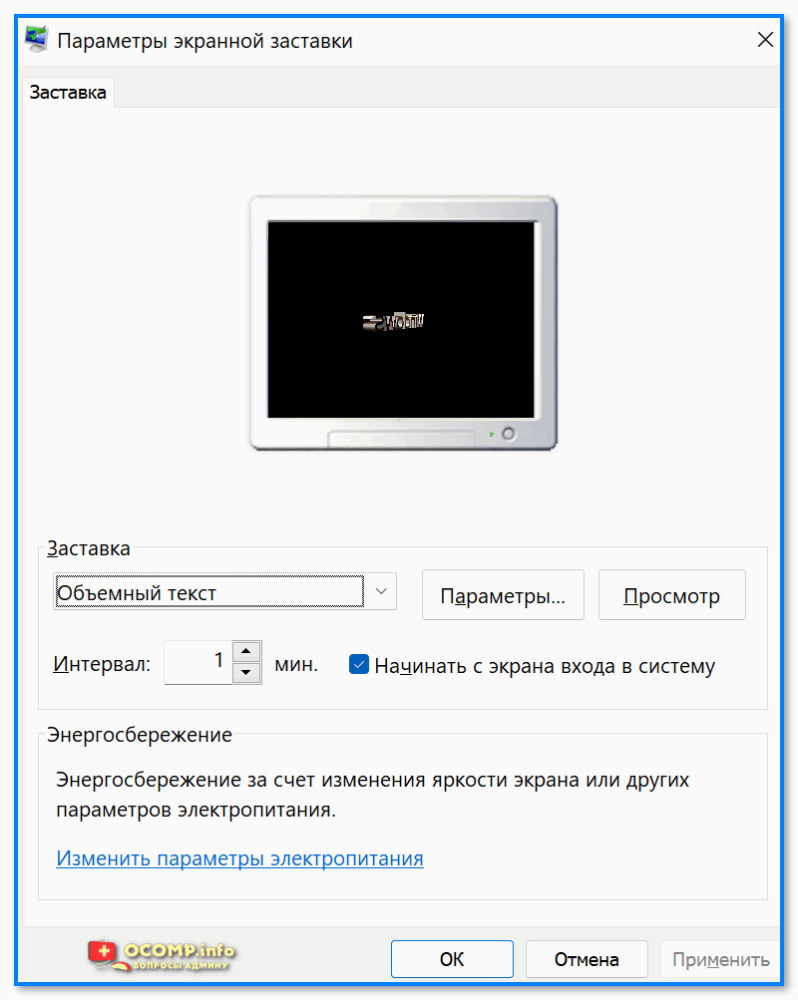
Параметры (то же окно, что и в первом способе)
*
Где загрузить новые заставки и как их установить в систему
Разумеется, в сети есть сотни спец. сайтов, на которых можно найти десятки и сотни скринсейвов (хранителей экранов). Например:
- 👍 www.screensaversplanet.com — по-моему, один из лучших сайтов с огромной коллекцией скринсейвов. Сайт, правда, на англ., но это не страшно, все понятно из контекста!
- www.vsthemes.org — русскоязычный сайт с коллекцией разных «украшалок» для Windows.
- www.windows10screensavers.net — аналогичный сайт, большая коллекция всякой всячины…
- Важно: после загрузки заставок с подобных сайтов — проверяйте их антивирусом (в помощь: подборка онлайн-антивирусов, работают без установки в систему).
*
Покажу на примере первого сайта, как можно загрузить к себе новую заставку (аквариумные рыбки 🙂).
1) Для начала нужно найти эту заставку в списке, открыть ее и загрузить. Меню сайта сделано удобно, по рейтингу можно быстро найти всё самое лучшее! 👇
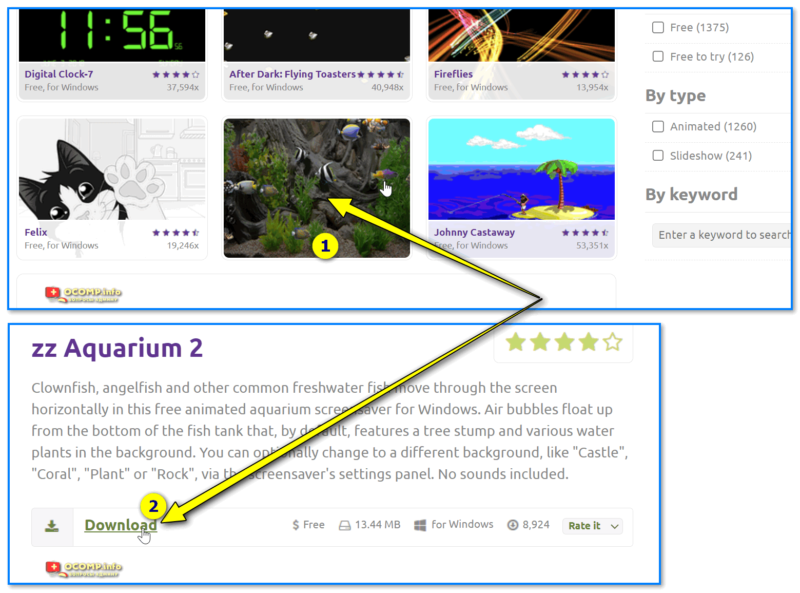
Выбираем заставку и загружаем ее
2) Большинство заставок распространяется в архиве, который требуется извлечь (внутри должен быть файл в формате SCR, он и нужен).
Примечание: некоторые заставки идут в формате EXE, их как правило достаточно запустить — установщик далее автоматически всё добавит куда нужно…

Извлекаем заставку из архива (иногда заставки могут устанавливаться в систему)
3) Затем нужно перенести файл SCR в папку C:\Windows\System32 — она системная, в ней как раз и хранятся все заставки.
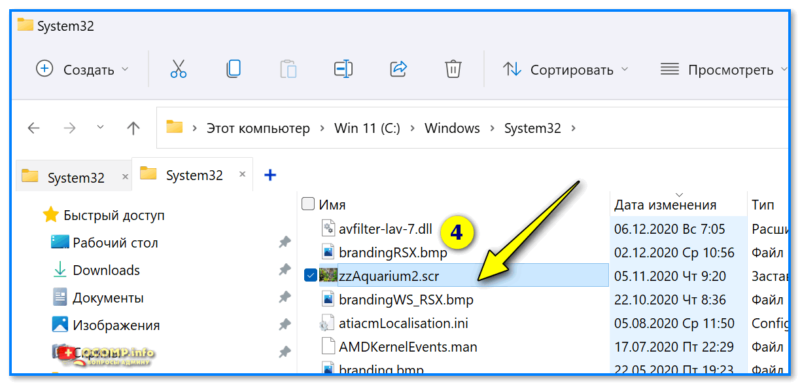
Windows — System32 — копируем заставку в системную папку
4) Затем нужно вновь открыть параметры экранной заставки (Win+R, и команда: control desk.cpl,,@screensaver) и выбрать ее из списка (при необходимости изменить настройки).
Всё! Должно работать! 👌
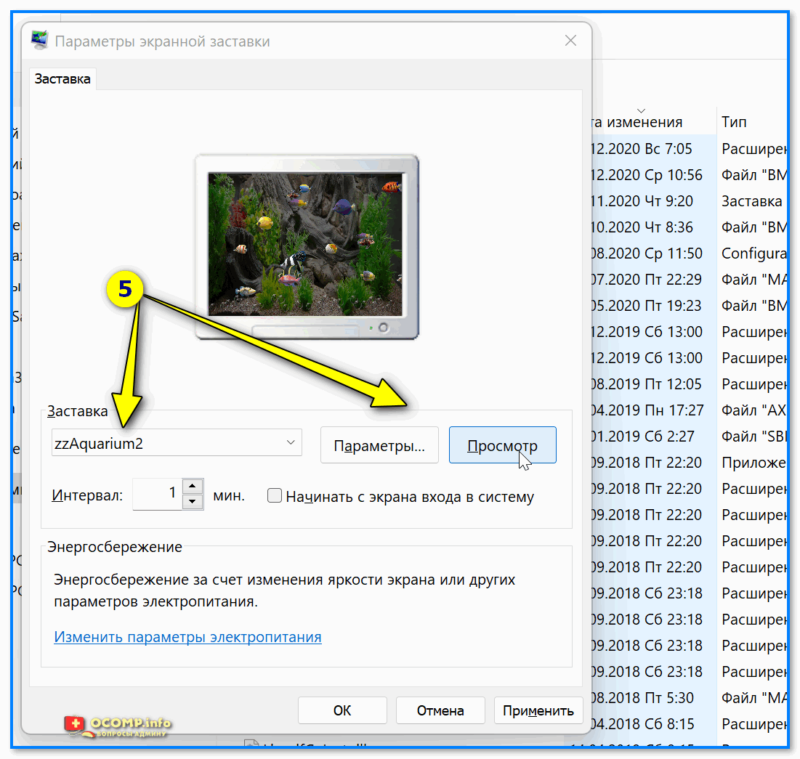
Выбираем загруженную заставку в параметрах
*
Изменение других настроек оформления Windows
Свой копию Windows можно изменить до неузнаваемости, если изменить фон, курсоры мышки, значки, и т.д.
Ну и так как сегодняшняя заметка касается оформления — я не мог не порекомендовать здесь другую свою заметку, где собрана целая коллекция ссылок и рекомендаций по украшению Windows. Рекомендую к ознакомлению! 👇
https://ocomp.info/izmenit-oformlenie-win.html
*
За сим откланяюсь, всем успехов!
👋
Applies ToWindows 11 Windows 10
Support for Windows 10 will end in October 2025
After October 14, 2025, Microsoft will no longer provide free software updates from Windows Update, technical assistance, or security fixes for Windows 10. Your PC will still work, but we recommend moving to Windows 11.
Learn more
Screen savers have been a staple feature in Windows for decades. Originally designed to prevent burn-in on CRT monitors, they have evolved into a customizable feature that adds a personal touch to your Windows device. However, with modern advancements, it’s now recommended to put your display to sleep to save energy.
What’s a screen saver?
A screen saver is an animated image or pattern that appears on your screen when your computer is idle for a specified period. While modern LCD and LED monitors are less susceptible to burn-in, screen savers remain a popular way to personalize your device and add an extra layer of security.
Why use a screen saver?
While screen savers are no longer essential for preventing burn-in, they offer several benefits:
-
Personalization: Customize your screen with animations or photos that reflect your style
-
Security: Automatically lock your computer when you’re away, protecting your data
-
Aesthetics: Add a visually pleasing element to your idle screen
-
Prevent Burn-In on OLED Displays: Screen savers can help prevent burn-in on OLED displays by ensuring that static images are not displayed for prolonged periods
Tip: To save energy and reduce wear on your display, it’s recommended to put your computer into sleep mode when it’s idle. Sleep mode consumes significantly less power than running a screen saver and allows your computer to quickly resume where you left off. To learn more, see How to adjust power and sleep settings in Windows.
Configure a screen saver
-
In the Settings app on your Windows device, open Personalization > Lock screen or use the following shortcut:
Lock screen
-
Select Screen saver
-
In the Screen Saver Settings window, select a screen saver from the drop-down list. Options include 3D Text, Blank, Bubbles, Mystify, Photos, and Ribbons
-
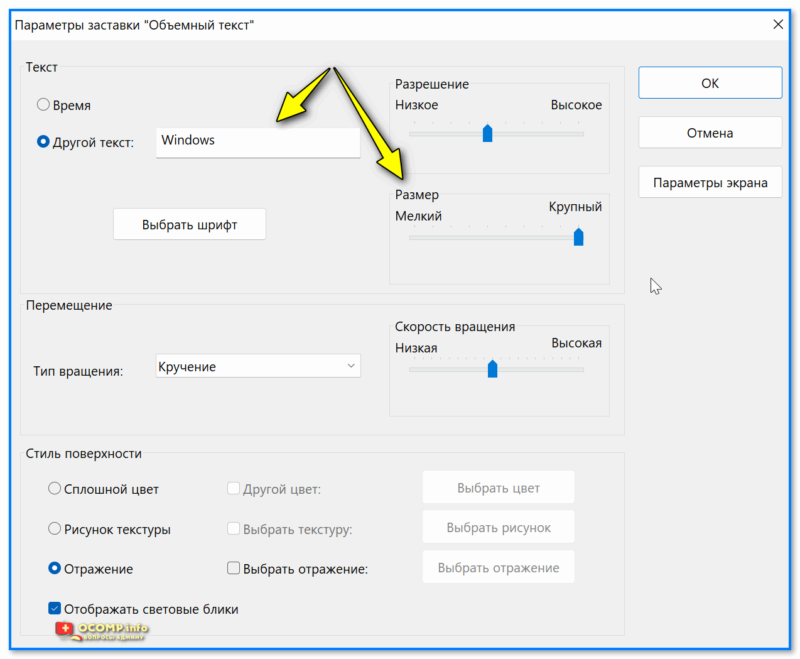
Customize Your Screen Saver: if available, select Settings… to customize the selected screen saver. For example, you can create a custom message in the 3D Text screen saver or choose a folder of pictures for the Photos screen saver
-
Set the Wait Time: use the Wait option to specify the number of minutes of inactivity before the screen saver activates
-
Enable Security: (Optional) Check the On resume, display logon screen option to require a password when resuming from the screen saver
Need more help?
Want more options?
Explore subscription benefits, browse training courses, learn how to secure your device, and more.