
В этой статье
Эта статья содержит решения, если вы можете синхронизировать (отправлять и получать) сообщения, но получать сообщения медленно или сообщения отсутствуют.
-
Сообщение не было получено вовремя: Вы не получаете сообщения электронной почты в течение часа после отправки или вам нужно вручную синхронизировать их для отправки или получения новых сообщений.
-
Сообщения электронной почты отсутствуют: Сообщения, которые раньше были доступны в приложении «Почта», больше не доступны.
Сообщение не было получено вовремя
Если получение сообщения занимает более 5–10 минут, проверьте параметры синхронизации, чтобы сообщения отправляллись сразу же после их поступления на сервер. Чтобы изменить время скачивания новых сообщений электронной почты, выполните следующие действия:
-
В меню Пуск выберите Почта.
-
В нижней части левой панели навигации выберите .
-
Щелкните Управление учетными записями и выберите свою учетную запись электронной почты.
-
Выберите «Изменить параметры синхронизации почтового ящика».
-
Чтобы получать сообщения как можно раньше, в области «Загрузка новогоконтента» выберите пункт «По мере поступления элементов».
Сообщения электронной почты отсутствуют
Изменение количество сообщений в приложении «Почта»
По умолчанию при первой настройки учетной записи приложение «Почта» скачивает сообщения электронной почты за последние две недели. Все ваши старые сообщения по-прежнему доступны в Интернете, например в https://www.outlook.com.
Чтобы изменить количество сообщений, скачаемых в приложение «Почта» (также называется длительностью синхронизации), с помощью следующих действий:
-
В меню Пуск выберите Почта.
-
В нижней части левой панели навигации выберите .
-
Щелкните Управление учетными записями и выберите свою учетную запись электронной почты.
-
Выберите «Изменить параметры синхронизации почтового ящика».
-
Чтобы просмотреть старые сообщения, в разделе Загружать сообщения, полученные с выберите любое время.
Проверка папки нежелательной почты
Иногда сообщения могут переходить в папку нежелательной почты. Выполните эти действия, чтобы проверить папку нежелательной почты и при необходимости переместить пропавшее сообщение в папку «Входящие».
-
В меню Пуск выберите Почта.
-
В меню «Учетная запись» в левой области выберите свою учетную запись.
-
Если папки нежелательной почты нет в списке «Папки», выберите «Еще».
-
Если вы нашли пропавшее сообщение в папке нежелательной почты, щелкните его правой кнопкой мыши и выберите «Переместить в папку «Входящие».
Проверьте вкладку «Другие»
Почта разделяет почту на две вкладки: «Относящиеся» и «Другие», чтобы вы могли сосредоточиться на сообщениях, которые наиболее важны для вас. Если включена вкладка «Отсланные», некоторые сообщения, отправленные вам, могут оказаться на вкладке «Другие». Щелкните правой кнопкой мыши любое сообщение, которое вы хотите отобрать на вкладке «Отображки», и выберите «Переместить в «Отсеяно» или «Всегда перемещать в «Отсеяно». После этого вы узнаете, какие сообщения всегда следует переходить на вкладку «Отсеяна».
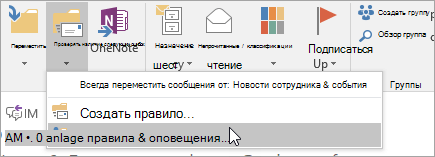
Проверка правил
Возможно, сообщение было перемещено или удалено правилом. Хотя приложение «Почта» напрямую не поддерживает правила, все правила на почтовом сервере будут применяться. Чтобы проверить, не созданы ли правила на почтовом сервере, и, если да, временно отключить правила, которые могут двигаться или удалять электронную почту, выполните инструкции ниже.
Outlook.com или Outlook в Интернете
-
Во sign in to your Outlook.com or Outlook в Интернете account.
Если вы используете учетную запись Microsoft 365, вопишитездесь.
-
Выберите «Параметры» > «Почта».
-
В меню «Параметры» слева выберите «Правила для входящих и счисток».
-
Выберите правило, чтобы узнать, когда оно применяется и что оно делает.
Удалите все правила, которые могут перемещать или удалять сообщения.
Outlook 2016
-
На вкладке «Главная» выберите «Правила > Управление правилами и оповещениями».

-
Выберите правило, чтобы узнать, когда оно применяется и что оно делает.
Удалите все правила, которые могут перемещать или удалять сообщения.
Для всех остальных типов учетных записей обратитесь к поставщику услуг электронной почты, чтобы определить, поддерживаются ли они правила и как ими управлять.
Примечания:
-
Если у вас есть правила для перемещения сообщений, проверьте папки, в которые они были перемещены, чтобы определить, перемещены ли в них недостающие сообщения.
-
Если у вас есть правила, которые удаляют сообщения, может потребоваться повторно отправить сообщение.
Проверка списка заблокированных отправителей
Некоторые поставщики услуг электронной почты позволяют блокировать определенных отправителей или отправлять сообщения от них в папку нежелательной почты. Чтобы проверить список заблокированных отправителей и при необходимости удалить его из него, выполните инструкции ниже.
Outlook.com или Outlook в Интернете
-
Во sign in to your Outlook.com or Outlook в Интернете account.
Если вы используете учетную запись Microsoft 365, вопишитездесь.
-
Выберите «Параметры» > «Почта».
-
В меню «Параметры» слева выберите «Заблокированные отправитые» или «Заблокировать и разрешить».
-
Если пропавшее сообщение было отправлено с любого адреса электронной почты в списке заблокированных отправителей или адрес отправлен из того же домена (например, @hotmail.com), выберите адрес электронной почты или домен и .
Outlook 2016
-
На вкладке «Главная» выберите «Параметры > нежелательной почты».
-
Выберите вкладку «Заблокированные отправитые».
Если пропавшее сообщение было отправлено с любого адреса электронной почты в списке заблокированных отправителей или адрес отправлен из того же домена (например, @hotmail.com), выберите адрес электронной почты или домен и выберите «Удалить».

Для всех остальных типов учетных записей обратитесь к поставщику услуг электронной почты, чтобы определить, поддерживаются ли они правила и как ими управлять.
Свяжитесь с отправителем
Если вы попробовали все эти решения, но по-прежнему не получаете сообщений от отправитель, обратитесь к его отправителю. Сообщите ему, что:
-
его письма не доставляются в Outlook.com;
-
ему нужно обратитесь в службу поддержки Майкрософт на странице postmaster.live.com.
Finding the Windows Mail Store Folder
Locate the POP3 email store folder on your computer
You can see your Windows Mail emails in your Mail inbox and other folders, but these messages also live somewhere else on your drive. Locating the folder where Windows Mail keeps its folders and messages is not immediately apparent. Still, it’s not difficult to find if you use the POP3 protocol. After you locate the folder, you can back up your email.
The instructions in this article apply to older versions of Windows Mail that were released prior to Windows 10.
Identify Your Windows Mail Store Folder Location
The Windows Mail store folder can only be located if you use POP3 with Windows Mail. POP3 is designed to save .eml files on your computer. If you use IMAP with Windows Mail, the mail isn’t downloaded and stored as .eml files, so you can’t back up email in this manner.
To find the Windows Mail store folder:
-
In Windows Mail, select Tools > Options from the menu.
-
Go to the Advanced tab and select Maintenance.
-
Click the Store Folder button.
-
Highlight the full folder location by clicking the location with the right mouse button and choosing Select All from the pop-up menu.
-
Press Ctrl+C to copy the string.
Open the Windows Mail Store Folder in Windows Explorer
Now that you have the path to your Windows Mail store folder in the clipboard, it’s easy to go to that folder in Windows Explorer.
-
Press Windows+R.
-
Press Ctrl+V to paste the folder location in the Open box.
-
Click OK to open the store folder in a Windows Explorer window.
-
After you open the store folder, go back to Windows Mail and close the Store Location and Options dialogs with the Cancel buttons and close the Maintenance dialog using Close.
If You Can’t Launch Windows Mail
If you can’t launch Windows Mail to identify the store folder in use, follow these steps:
-
Make sure Windows is set to show hidden files and folders.
-
Look in this standard location: C:\Users\username\AppData\Local\Microsoft\Windows Mail.
-
Locate the Mail folder and open it to see the .eml files inside. The folders that have these files correspond to their folder names in Windows Mail: Inbox, Deleted Items, Drafts, Junk E-Mail, Outbox, and Sent Items.
Thanks for letting us know!
Get the Latest Tech News Delivered Every Day
Subscribe
How to Find Where Windows 10/11 Mail Files Are Stored
[Archived] Have you ever wondered where Windows Mail stores email? Want to remove all traces of an old account? Find here the Mail app data folder location on Windows 11 and Windows 10 where mail files (message texts, attachments, and pictures) are stored.
First, Playing Ball with Chocolate Pudding Mud
Baseballs are dangerously slippery. For an easier and safer grip, every ball before every MLB game is rubbed in mud.
The special mud has been described to have “the look and feel of chocolate pudding” and comes from a mile-long strip along the Delaware River. The exact spot is, of course, a secret.
Before we ponder whether somebody has tried to replace something that is just like chocolate pudding with chocolate pudding, let’s find the exact spot where Mail keeps emails under Windows—or at least something that has the look and feel of emails:
How to Find the Location Where Windows Mail Files Are Stored (Windows 10 and Windows 11)
This is an archived article.
Time needed: 5 minutes
To find the folder where Mail for Windows does store emails (as well as the folders for attachments and inline images):
- Open Windows Explorer.
Windows keyboard shortcut: Press Windows E to open Explorer quickly.
- Click in the folder path in the address bar so it highlights.
- Type
%LocalAppData%\Packages. - Press Enter.
- Now navigate to microsoft.windowscommunicationsapps_[random string]\LocalState\Files\S0.
- Here, you will find one folder for each account.
- Inside each account folder, you will find up to three folders for email:
EFMData: the email text saved as HTML data,
Attachments: attached files in their native format and
Photos: images from emails saved as PNG files.
How to Find the Location Where Windows Mail Files Are Stored: FAQ
What format are the .DAT files in the EMFData folder?
The .DAT files you find in the EMFData folder for each Windows Mail account contain the following:
- HTML-only versions of email bodies.
No headers: They do not include any email header information (such as the sender or recipient, except for the email subject as the document title).
How can I open the .DAT files?
You can copy the .dat files to any other location, then rename them to have an .html extension.
The HTML files will open in any browser.
(How to find the Mail data folder location where email files are stored tested with Windows 11 Version 23H2 and Windows 10 Version 21H2; first published October 2020, last updated September 2024)
Home » Email Tips and Resources » How to Find Where Windows 10/11 Mail Files Are Stored
How to Find Outlook PST File Location and Locate Them?
Outlook PST files are stored in a default location on your local system. However, the Outlook PST file location can also vary based on the versions of Windows, and Outlook you are using. If you are confused about where are Outlook data files stored in Windows 10, 11, and all earlier editions, Don’t worry! This comprehensive guide will help you locate PST files in Windows 10 and 11. We will provide you with several techniques to easily locate Outlook PST file in all the versions of Windows OS. Let’s get started.
When a user sets up their account with Windows Outlook, it stores all email data for each tab in a personal storage table (PST file), but figuring out Outlook PST file location Windows 11, 10, etc depends on the version of Outlook you’re using.
Also, the data will be saved in OST file format if you are connected to the Microsoft Exchange server. Both OST and PST files include all meta items, including Inbox, Drafts, Sent Items, Contacts, Calendars, Notes, and many other things.
The following blog section will get four different methods to help you locate Outlook PST file in Windows 11, 10, and other versions. Additionally, users will learn how to see hidden app data from MS Outlook profiles. So, continue with the blog until the end.
Outlook PST files are typically located in the user’s AppData folder on Windows. The PST file paths in Windows 10 and 11 are C:\Users\[YourUsername]\AppData\Local\Microsoft\Outlook. Hence in earlier editions like Windows 7 and 8, Outlook PST file location is the same as in Windows 10 and 11. Moreover, if the user has upgraded from an older version of Windows then the PST file can be found in C:\Users\[YourUsername]\Documents\Outlook Files. These are the default locations where are Outlook PST files stored Windows 11, 10, and earlier. Hence users can change these storage paths via Outlook settings. To access the AppData folder, enable the hidden files in File Explorer.
The following details will help you to understand how to locate Outlook PST file in Windows 11, 10, 8, 8.1, 7, XP, Vista in a better way:
1. Outlook 2000, 2003, 2007
- Windows XP:
C:\Documents and Settings\[UserName]\Local Settings\Application Data\Microsoft\Outlook
2. Outlook 2007
- Windows Vista, 7, 8, 8.1, 10, 11:
C:\Users\[UserName]\AppData\Local\Microsoft\Outlook
3. Outlook 2010
- Windows XP:
My Documents\Outlook Files - Windows Vista, 7, 8, 8.1, 10, 11:
Documents\Outlook Files
4. Outlook 2013, 2016, 2019, 2021
- Windows Vista, 7, 8, 8.1, 10, 11:
C:\Users\[UserName]\AppData\Local\Microsoft\Outlook
How to Locate Outlook PST File? Multiple Solutions
Multiple manual solutions are available to find where are Outlook data files stored Windows 10 and 11. Here, users will learn some default solutions available in Outlook and Windows OS.
1. Find Outlook PST File Location Windows 10 and 11 Using Open File Location
The Open file location is the most straightforward technique to find PST file location Windows 10, 11, etc in Outlook 2013. Users need to follow the steps mentioned below:
- Start Outlook.
- In the left pane of Outlook, select the configured mail Id.
- Then right-click and select “Open File Location.”

- Now, your file explorer will start flashing, and click on it to see Outlook PST file location Windows 11, 10.

2. Locate Outlook PST File Path Using Outlook Account Settings
- Launch Outlook and navigate to “File Menu.”
- Now, click on “Account and Networking Settings” >> “Account Settings.”

- In the “Account Settings Tab,” click on the “Data Files” tab, and click on “Open File Location.”


For older editions of windows, users have to follow these sequences:
drive: \Documents and Settings\\Local Settings\Application Data\Microsoft\Outlook.
If you are unable to get the Outlook PST file location using the above steps, then you can continue with the Control Panel.
3. Find Outlook PST File Path Using Control Panel
The Control Panel of Windows allows users to view and change system settings and know where are Outlook PST files stored Windows 10, 11. It consists of features to change accessibility and other networking settings.
So, let’s check out the steps to find the Outlook PST file location Windows 11 and 10 using the control panel.
- Click “Search Tab” in Windows 10 or 11 and open “Control Panel” from there.
- Now click on the “Users Accounts” >> “Mail 32-bit.”

- In the next pop-up, you will see “Mail Setup” settings and click on the “Data Files.”

- Now, Click on the “Data Files Tab” and “Open file location” to locate PST file Windows 10 and 11.


That’s how you can find Outlook data file in Windows 10 and 11 using the Control Panel. However, this solution has some limitations. It doesn’t allow you to see Outlook AppData because it’s hidden. So, let’s explore how to view hidden app data in MS Outlook 2013, and 2016.
MS Outlook also stores OST files in an exact location, depending on which Outlook edition you use. The manual solution to locate where are Outlook data files stored Windows 10, 11, etc is quite a lengthy procedure. Thus, we have an expert solution to locate Outlook PST file Windows 10 and 11 to deal with it.
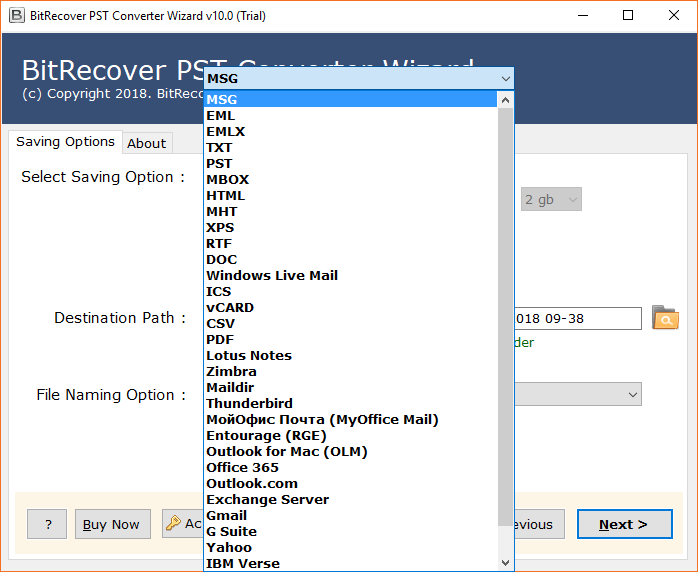
4. Automated Way to Find Outlook PST File Location in Windows All Versions
If you don’t want to waste your time on a manual solution, we have an automated solution for you, i.e., BitRecover PST Converter Wizard. It is an advanced PST finder approach that automatically detects the Outlook PST file location Windows 11, 10, and all other versions from the source. Moreover, users will get the location of all configured accounts in MS Outlook.
Not only this, the software is helpful when your Outlook is not responding or crashes due to some other reasons. In such scenarios, the automated solution will be the perfect solution as it allows you to export Outlook PST data files to across multiple platforms without any failure.
Steps of Automated Solution to Locate PST File Windows 11, 10 & Earlier
- Once you successfully install the software on your system, you will encounter the welcome Window. Click “Next” to continue.

- Now, you will see solution will automatically locate Outlook PST file location Windows 11, 10, etc. Else you can use the “Add file” or “add folder” option.
- Note: If you want to transfer PST data filer to any other platform, continue with the following steps.
- Next, the software will begin to scan your account and quickly generate a directory of data stored in the account.
- Finally, Users can select the multiple saving options per requirement in the next Window, fill up the necessary data fields, and click on the “Next” button.


That’s all about the automated solution to locate PST file Windows 10 and 11 for good. Now, let’s explore some Frequently asked question by users.
People Also Ask Questions
In the above post, we have covered most users’ queries on “How to Find Outlook PST file location Windows 10 or 11.” Also, this post is helpful for those users who want a solution for the following questions:
- Where can I find Outlook data file?
- How to find outlook data file (.pst)
- Where do I find my Outlook PST file?
- Outlook can’t find data file. What to do?
- Where are Outlook PST Files Stored in Windows 10 or 11?
- Where are PST Files stored on Windows 10 & 11?
So There You Have It
In summary, The procedure to find Outlook PST file location Windows 11, 10, and earlier versions is a straightforward process. If you let BitRecover Solutions help you. With the help of an automated solution, users can easily view where are Outlook PST files stored Windows 10 and 11. Also, If you opt for the automated solution to locate Outlook PST file, users will get the power to store their PST files to across multiple platforms for good.
Similar Read:
- Guide to Import PST File in Outlook 365
- Easy solution to Open PST file in Office 365 Account