
Windows 11 (including earlier version), when, encounter a Blue Screen of Death (or BSOD), accumulates all the memory information into a file. Holding Dump file as name it further helps users to identify and debug the cause of the crashes. The files also allow writing the debugging details in different file formats in order to simplify the readability of the data.
Dump file may be of various types depending on the nature of crash and bug check values. These are “Small memory dump (Minidump)”, “Kernel memory dump”, “Complete memory dump”, “Automatic memory dump”, and “Active memory dump”. However, among all these, Windows 10/11 generates Automatic memory dump all by itself as its name suggests. The following section will deal with everything related to Dump File Location Windows 11 or 10.
Dump File Location Windows 10 or 11
Here is the Dump File Location Windows 11 or 10 –
Dump File Location
Instead, you can say Dump file locations so see the following paths to find out the data –
%SystemRoot%memory.dmp which means
C:\Windows\memory.dmp
This is the default location and here, C: refers to the system drive where Windows is installed.
Windows 11/10 can also capture memory dumps that consume a small amount of space. These are created at –
%SystemRoot%Minidump.dmp i.e.,
C:\Window\Minidump.dump
Change Dump File Location Windows 11 or 10
- Go to desktop and right-click on This PC icon. From the available options, choose Properties.
- Click Advanced system settings link that shows up on the top left of the subsequent window.
- Click Settings beneath Startup and Recovery section.
- Locate the Dump File text field and insert the location of the file.
Configure the Type of Memory Dump File
As aforementioned, Windows generates Automatic memory dump files but users can choose to configure the settings as per need. Thankfully, there are certain ways using which a user can change the type of memory dump file that Windows creates.
1]Through Startup and Recovery
- Press “Win logo+R” hotkey to open Run dialog box. System properties wizard will become visible, switch to Advanced tab.
- Here, click Settings just below Startup and Recovery section.
- Click the drop-down under Write debugging information. From the list of dump file types, choose the type that you wish Windows to generate when Windows crashes.
- To apply the changes, click OK.
Note – In case the system crashes a lot, it’s better to deselect the checkbox against the option Overwrite any existing file. Doing this will eventually create incremental dump files that will have a memory dump file for each crash that occurs.
2] Use Elevated Command Prompt
- Fire up taskbar search using Win+S combination of keys. Type in cmd.exe, right-click ok Command Prompt and choose Run as administrator.
- Click Yes on the prompt of UAC to access elevated Command Prompt.
- Once into the black window, insert the applicable command from the list below to change the type of dump file and hit Enter.
| Memory Type | Command Line |
| No memory | wmic RECOVEROS set DebugInfoType = 0 |
| Small memory dump | wmic RECOVEROS set DebugInfoType = 3 |
| Kernel memory dump | wmic RECOVEROS set DebugInfoType = 2 |
| Complete memory dump | wmic RECOVEROS set DebugInfoType = 1 |
| Automatic memory dump | wmic RECOVEROS set DebugInfoType = 7 |
| Active memory dump | wmic RECOVEROS set DebugInfoType = 1 |
- Finally, close the prompt window and Restart Windows 10 PC to make the changes effective.
Note – The Command Prompt also lets you view the current memory dump file. Just open Command Prompt as Administrator and run the following command-line –
wmic RECOVEROS get DebugInfoType
Types of Memory Dump Files
It is important to know the types after finding Dump File Location Windows 11 or 10 –
Small memory dump – It is the type that contains a minimal amount of details. Basically, the file includes the stop code, list of device drivers, parameters. Furthermore, it also contains the current process and informs which kernel thread or process crashed.
Kernel memory dump – This is the most useful and comprehensive one with respect to the kernel. Moreover, this type contains information in connection with programs and drivers in kernel mode. However, the dimension of this dump file completely depends on the amount of kernel-mode memory specified by Windows and drivers. Now, in case a second crash occurs and a kernel memory dump file is generated, the earlier content gets overwritten.
Complete memory dump – A remarkably large file type which is equal to the RAM of the system. It incorporates physical memory allocation that is basically left out in other kernel dumps.
Automatic memory dump – When compared to the kernel memory option, this is quite similar to it in terms of information. The only difference between them is the size of the paging file that Windows sets for them.
Active memory dump – It is comparatively smaller than complete memory dump. This type refines the items that are not influential in spotting the cause of a crash.
That’s all!!!
Статья обновлена: 07 июля 2022
ID: 3055
Статья неприменима к Windows Vista SP1 и ниже.
После установки продукта «Лаборатории Касперского» могут возникнуть ситуации, при которых операционная система «зависает». Например, при загрузке компьютера или при запуске сторонней программы. Причиной может быть конфликт программы «Лаборатории Касперского» со сторонним программным обеспечением, либо с драйверами комплектующих вашего компьютера.
При возникновении такой проблемы:
- Настройте запись полного дампа памяти в операционной системе.
- Получите полный дамп памяти.
- Отправьте полный дамп памяти в «Лабораторию Касперского».
Как настроить запись полного дампа памяти в Windows 7, 8, 8.1, 10
Как настроить запись полного дампа памяти в Windows 11
Как получить полный дамп памяти
Как отправить дамп в техническую поддержку «Лаборатории Касперского»
Спасибо за ваш отзыв, вы помогаете нам становиться лучше!
Спасибо за ваш отзыв, вы помогаете нам становиться лучше!
Дамп памяти (снимок состояния оперативной, содержащий отладочную информацию) — то, что часто оказывается наиболее полезными при возникновении синего экрана смерти (BSoD) для диагностики причин возникновения ошибок и их исправления. Дамп памяти сохраняется в файл C:\Windows\MEMORY.DMP, а мини дампы (малый дамп памяти) — в папку C:\Windows\Minidump (подробнее об этом далее в статье).
Автоматическое создание и сохранение дампов памяти не всегда включено в Windows 10, и в инструкциях на тему исправления тех или иных ошибок BSoD мне время от времени приходится описывать и путь включения автоматического сохранения дампов памяти в системе для последующего просмотра в BlueScreenView и аналогах — потому и было решено написать отдельное руководство именно о том, как включить автоматическое создание дампа памяти при ошибках системы, чтобы в дальнейшем ссылаться на него.
Настройка создания дампов памяти при ошибках Windows 10
Для того, чтобы включить автоматическое сохранение файла дампа памяти системных ошибок достаточно выполнить следующие простые шаги.
- Зайдите в панель управления (для этого в Windows 10 вы можете начать набирать «Панель управления» в поиске на панели задач), если в панели управления в поле «Просмотр» включено «Категории», установите «Значки» и откройте пункт «Система».

- В меню слева выберите пункт «Дополнительные параметры системы».

- На вкладке «Дополнительно» в разделе «Загрузка и восстановление» нажмите кнопку «Параметры».

- Параметры создания и сохранения дампов памяти находятся в разделе «Отказ системы». По умолчанию включены опции записи в системный журнал, автоматической перезагрузки и замены существующего дампа памяти, создается «Автоматический дамп памяти», хранящийся в %SystemRoot%\MEMORY.DMP (т.е. файл MEMORY.DMP внутри системной папки Windows). Параметры для включения автоматического создания дампов памяти, используемые по умолчанию вы также можете увидеть на скриншоте ниже.


Опция «Автоматический дамп памяти» сохраняет снимок памяти ядра Windows 10 с необходимой отладочной информацией, а также память, выделенную для устройств, драйверов и ПО, работающего на уровне ядра. Также, при выборе автоматического дампа памяти, в папке C:\Windows\Minidump сохраняются малые дампы памяти. В большинстве случаев этот параметр оптимален.
Помимо «Автоматический дамп памяти» в параметрах сохранения отладочной информации есть и другие варианты:
- Полный дамп памяти — содержит полный снимок оперативной памяти Windows. Т.е. размер файла дампа памяти MEMORY.DMP будет равен объему используемой (занятой) оперативной памяти на момент появления ошибки. Обычному пользователю обычно не требуется.
- Дамп памяти ядра — содержит те же данные что и «Автоматический дамп памяти», по сути это одна и та же опция, за исключением того, как Windows устанавливает размер файла подкачки в случае выбора одной из них. В общем случае вариант «Автоматический» подходит лучше (подробнее для интересующихся, на английском — здесь.)
- Малый дамп памяти — создание только мини дампов в C:\Windows\Minidump. При выборе данной опции сохраняются файлы по 256 Кб, содержащие базовую информацию о синем экране смерти, списке загруженных драйверов, процессах. В большинстве случаев при непрофессиональном использовании (например, как в инструкциях на этом сайте по исправлению ошибок BSoD в Windows 10), используется именно малый дамп памяти. Например, при диагностике причины синего экрана смерти в BlueScreenView используются файлы мини дампов. Однако в некоторых случаях может потребоваться и полный (автоматический) дамп памяти — часто службы поддержки ПО при возникновении неполадок (предположительно вызванных этим ПО) могут просить предоставить именно его.
Дополнительная информация
В случае, если вам нужно удалить дамп памяти, вы можете сделать это вручную, удалив файл MEMORY.DMP в системной папке Windows и файлы, содержащиеся в папке Minidump. Также можно использовать утилиту «Очистка диска» Windows (нажать клавиши Win+R, ввести cleanmgr и нажать Enter). В «Очистке диска» нажмите кнопку «Очистить системные файлы», а затем в списке отметьте файла дампа памяти для системных ошибок, чтобы удалить их (при отсутствии таких пунктов можно предположить, что дампы памяти пока не создавались).
Ну и в завершение о том, почему может быть отключено создание дампов памяти (или отключаться само после включения): чаще всего причиной являются программы для очистки компьютера и оптимизации работы системы, а также софт для оптимизации работы SSD, который также может отключать их создание.
-
Home
-
Partition Magic
- How to Read and Analyze Memory Dump Files on Windows 10/11
By Ariel | Follow |
Last Updated
Dump files can help find what causes the system crashing error. However, a lot of users are unclear about where and how to read dump files on Windows 10/11. In this post, MiniTool will explain the definition, location, and analyzer tools of the .dmp files.
What Are Memory Dump Files
What are memory dump files? On Windows computers, the system will automatically generate a file named “.dmp/dump/minidump” file each time your computer experiences a system crashing like BSOD. These files can help you identify why your system crashes and prevent it from happening again.
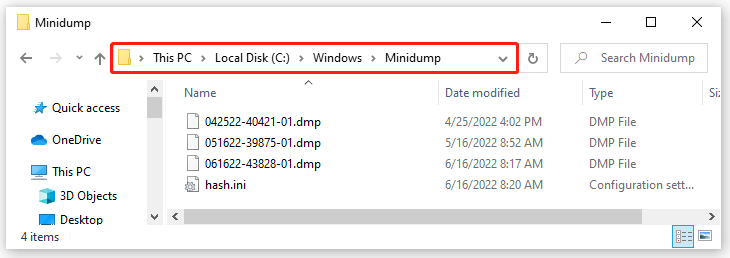
The small .dmp files contain the memory information, the stop error code, kernel mode, processor details, a list of loaded drivers, and so forth. Usually, the Windows 10 dump file location is usually in either the directory of C:, C:minidump, C:Windowsminidump, or %SystemRoot%Minidump.
However, the problem is that there’s no Windows built-in tool to read and analyze minidump files. If you want to read .dmp files, you need to install a memory dump analyzer like WinDbg, NirSoft BlueScreenView, etc.
How to Change the Memory Dump File Type on Windows 10/11
As you might know, there are different types of memory dump files that you can set on Windows 10/11. Moreover, different memory dump file types take up different hard drive spaces. If your hard disk space is running out or limited, you can change the file type to the small memory dump.
Here’s how to change the memory dump file type on Windows 10/11.
Step 1. Press the Win + E keys to open the File Explorer, and then right-click This PC entry and select Properties.
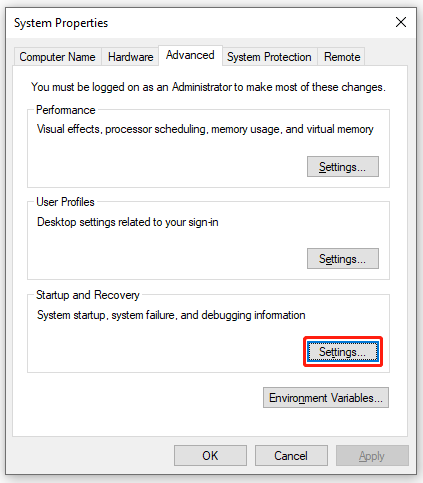
Step 2. Click on the Advanced system settings on the left side of the window.
Step 3. Go to the Advanced tab and click on the Settings button under the Startup and Recovery section.
Step 4. Go to the Write debugging information section and select Small memory dump (256 KB) from the drop-down menu.
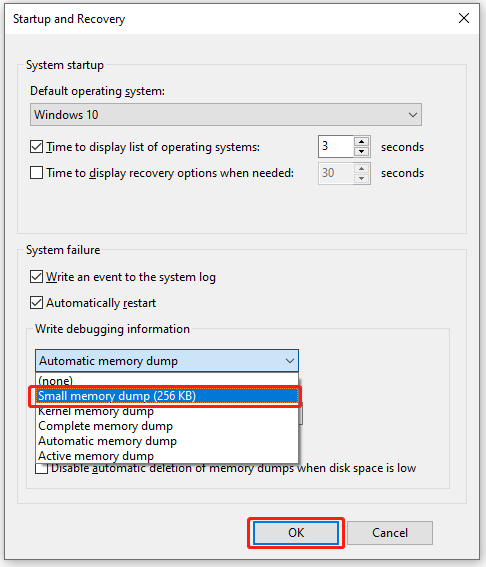
Step 5. If you want to change the Windows 10 dump file location, you can type a new path in the Small dump directory box and click on OK to save the change. After that, restart your computer to make the changes take into effect.
How to Read and Analyze Memory Dump Files on Windows 10/11
How to read dmp files on Windows 10/11? The easiest and fastest way to analyze minidump is to use WinDbg. It is a Microsoft-developed minidump analyzer that can to read .dmp file easily. Here’s how to read dmp files using WinDbg.
Step 1. Install the WinDbg memory dump analyzer on Windows 10/11.
- Click here to open the WinDbg Preview download page and click on Get in Store app. Also, you can search for WinDbg in Microsoft Store directly.
- Click on Get or Install button to start downloading WinDbg.

Step 2. Once installed, click on Open to run this dmp file viewer.
Tips:
If you can’t analyze minidump files, you need to right-click the WinDbg tool and select Run as administrator to grant it enough access right.
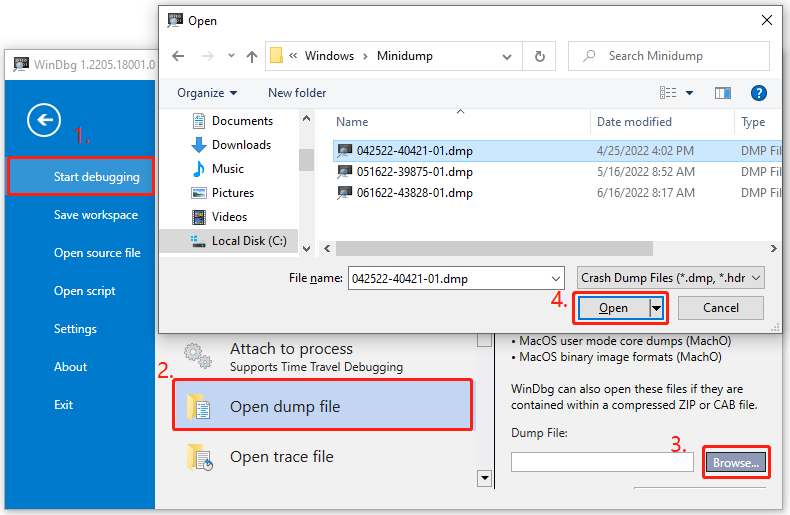
Step 3. In the main interface of WinDbg, click on File > Start debugging > Open dump file in order. Then click on Browse to locate the minidump files, select the .dmp file that you want to analyze, and click on Open.
Step 4. Then the WinDbg minidump analyzer will start loading the dump file. This process may take a while depending on the file size and the level of the dump file, so please wait patiently.
Step 5. Once opened, type “!analyze -v” into the command box at the bottom of the window and click on Enter. This command will start analyzing the .dmp file created by the BSOD issue. When the analysis of the dump file is complete, you can find the possible reasons for the crashing issue and take corresponding solutions to fix it.
Of course, you can use other third-party .dmp file viewers like BlueScreenView, WinCrashReport, and WhoCrashed to analyze minidump files on Windows 10/11. If you are still troubled by the BSOD errors, you can refer to the following several guides:
- 8 Solutions to Fix Critical Process Died Stop Code in Windows 10
- 7 Quick Fixes to Kernel Security Check Failure (Guide 2022)
- Quickly Solve – Your PC Ran into a Problem and Needs to Restart
- Top 10 Methods to Fix Reference by Pointer BSOD (2022 Updated)
- How to Fix Atikmpag.sys BSOD Error Windows 10 in 2022
About The Author
Position: Columnist
Ariel has been working as a highly professional computer-relevant technology editor at MiniTool for many years. She has a strong passion for researching all knowledge related to the computer’s disk, partition, and Windows OS. Up till now, she has finished thousands of articles covering a broad range of topics and helped lots of users fix various problems. She focuses on the fields of disk management, OS backup, and PDF editing and provides her readers with insightful and informative content.

What is Memory Dump?
According to techopedia, a memory dump is a process where the contents of memory are displayed and stored in case of an emergency such as system crash. Memory dumps are mainly for software developers; they use the data’s stored in the system to diagnose the problem.
Developers use the dumps to fix the problem that caused the system crash. They are also known as core dump and sometimes BSOD (Blue screen of death).
To fix various Windows 10/11 problems, we recommend Outbyte PC Repair:
This software will repair common computer errors, protect you from file loss, malware damage, hardware failure, and optimise your computer for peak performance. In three simple steps, you can resolve PC issues and remove virus damage:
- Download Outbyte PC Repair Software
- Click Start Scan to detect Windows 10/11 issues that may be causing PC issues.
- Click Repair All to fix issues with your computer’s security and performance.
This month, Outbyte has been downloaded by 23,167 readers.
It primarily identifies the problem of the operating system or any application that has failed. It mainly is the information of the last state of the program or application or operating system. The last state before the program crashes can bring out the problem it had faced.
On the other hand, all the information consists of memory locations, program counters, program state and much more. Memory dump also has on-screen log files for viewing and sorting later.
You have to reboot the computer after the memory dump, or else it will be unavailable. Sometimes memory leak can cause memory dumps, and it’s not okay.
You will see memory dumps when you’ll encounter a blue screen of death error. Usually, a BSOD will give you some basic suggestion of where the problems occurred. Those suggestions or information’s are memory dumps.
So, when you reboot the system, you’ll be able to look into that information for further analysis. The memory dumps can contain passwords or any hidden key. So, beware of any potential hackers as they can easily find out your private info’s and hack the system.
Different Types of Memory Dumps and their Location
There are mainly five types of memory dumps stored in Windows 10. Each type is different and stores various information about the system crash. Let’s see what they are.
1. Automatic Memory Dump
Location: %SystemRoot%Memory.dmp
Size: Size of OS kernel
This one is the default option when you install Windows 10 for the first time. The setting is to support the System Managed page file configurations. Though it has been updated to reduce the size all over, it’s mainly for small SSDs.
But the large servers also benefit highly from it. Especially the automatic memory dump gives an output of Kernel memories. But the main difference is that the automatic process reduces the page file making it smaller than the size of the RAM.
You can also check or even edit the system paging file size. So for that just go to the following path, and you’ll be able to change it according to your desire.
Control Panel -> System and Security -> System -> Advanced system settings -> Performance -> Settings -> Advanced -> Change
2. Active Memory Dump
Location: %SystemRoot%Memory.dmp
Size: Triple the size of a kernel or automatic dump file
Microsoft did add the Active Memory Dump recently. Though it’s smaller than the complete memory dump, it’s three times bigger than the size of the kernel dump. It happens because it has both the kernel and the user space together.
So, overall the size gets bigger than the kernel dump. The dump files size can be up to 1.5 GB or even more. But you can try to compress it and reduce it to a more acceptable size for transportation.
3. Complete Memory Dump
Location: %SystemRoot%Memory.dmp
Size: Installed RAM plus 1MB
This one is the largest dump files that will take your spaces. As it includes the physical memory of the computer, the overall size gets too big. You can assume that the size can be less or equal to the installed RAM.
And with all other systems taking up GBs of the system this can become a serious issue if you are having too much of crashes of programs or systems. So, I would suggest that you would stick to the automatic dump file instead of this one.
4. Kernel Memory Dump
Location: %SystemRoot%Memory.dmp
Size: Size of physical memory owned by kernel-mode components
These dumps are equal to the size of the RAM that gets occupied by the Windows 10 kernel.
It can be up to 700MB in size, but if you want to compress it, then you can bring it down to 150MB. This dump contains the information for analysis. So, it can be helpful for developers.
The automatic dump setting creates a dump file saving only the recent one by default.
5. Small Memory Dump
Location: %SystemRoot%Minidump
Size: At least 64K on x86 and 128k on x64
It is also known as the mini dump. They include memory pages pointed to them by registers by their values at the point of the fault.
They are quite small as they don’t contain any binary or executable files from the time of the system crash. Moreover, these data are vital for the coders or debuggers to find out what happened.
Why are Memory Dumps Created?
You are wondering about now that why are Memory dump created. Are they essential? Or who uses these files? Well, they are mainly for developers developing a program or a system.
As I said before these files are solely here for giving you the additional information about the crash or system failure that occurred. So, if you are a developer who is working on the hardware drivers, then these pieces of information would come in handy.
As you can easily find out what is causing your system to crash, it becomes easier to solve.
But if you are not a developer then you can still use the information to know why your system is crashing all on a sudden. You just have to send it to a developer, and he will let you know what the problem is.
If any driver is causing the problem you can send them to that driver developers or if it’s with windows than you can send it to Microsoft for further analysis.
Hopefully, the developers will find out what the problem was and can assist you with further procedures.
Is it safe to Delete Memory Dumps?
Though with all its perks, these files seem to take up a lot of space on the disk. So, if you don’t have an issue with the crashes or don’t want these unnecessary files to clog your system, then you can go ahead and delete them.
They will be in the form of a .dmp file and can take a significant portion of resources. And if you have ever experienced a BSOD you will surely have a minimum of 800MB or even more files taking up space on your system.
You can quickly clean the memory dump by disk cleanup. Disk cleanup seems to clean the dumps without a fuss. Or you can also use CCleaner to detect and delete those dumps. So, you don’t have to delete them one by one manually.

To sum it all up, Memory dumps can be useful if you are a developer but can be a headache for the average users too. So, if you don’t want unnecessary files on your computer then clean it up. It shouldn’t be a problem at all.
Hasib is a born geek and loves tweaking his computer and gadgets for effectiveness and productivity. At WindowsChimp, he specializes in writing Tutorial guides and discovering new hacks to share.