
Дамп памяти (снимок состояния оперативной, содержащий отладочную информацию) — то, что часто оказывается наиболее полезными при возникновении синего экрана смерти (BSoD) для диагностики причин возникновения ошибок и их исправления. Дамп памяти сохраняется в файл C:\Windows\MEMORY.DMP, а мини дампы (малый дамп памяти) — в папку C:\Windows\Minidump (подробнее об этом далее в статье).
Автоматическое создание и сохранение дампов памяти не всегда включено в Windows 10, и в инструкциях на тему исправления тех или иных ошибок BSoD мне время от времени приходится описывать и путь включения автоматического сохранения дампов памяти в системе для последующего просмотра в BlueScreenView и аналогах — потому и было решено написать отдельное руководство именно о том, как включить автоматическое создание дампа памяти при ошибках системы, чтобы в дальнейшем ссылаться на него.
Настройка создания дампов памяти при ошибках Windows 10
Для того, чтобы включить автоматическое сохранение файла дампа памяти системных ошибок достаточно выполнить следующие простые шаги.
- Зайдите в панель управления (для этого в Windows 10 вы можете начать набирать «Панель управления» в поиске на панели задач), если в панели управления в поле «Просмотр» включено «Категории», установите «Значки» и откройте пункт «Система».

- В меню слева выберите пункт «Дополнительные параметры системы».

- На вкладке «Дополнительно» в разделе «Загрузка и восстановление» нажмите кнопку «Параметры».

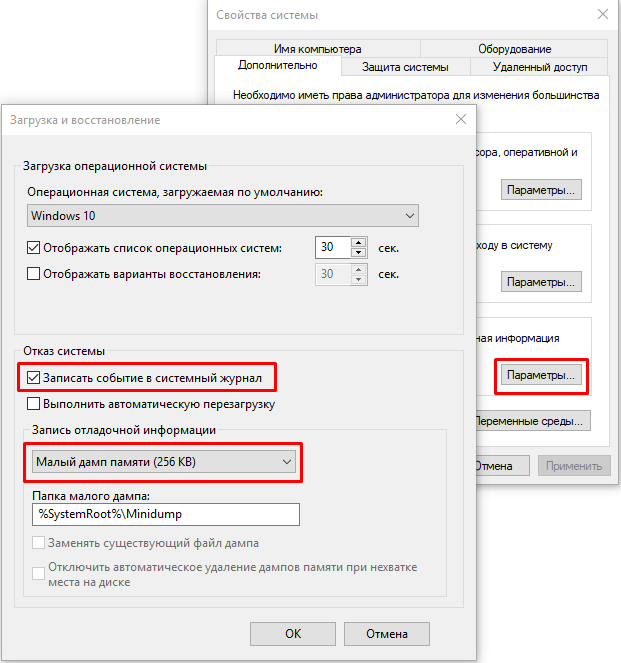
- Параметры создания и сохранения дампов памяти находятся в разделе «Отказ системы». По умолчанию включены опции записи в системный журнал, автоматической перезагрузки и замены существующего дампа памяти, создается «Автоматический дамп памяти», хранящийся в %SystemRoot%\MEMORY.DMP (т.е. файл MEMORY.DMP внутри системной папки Windows). Параметры для включения автоматического создания дампов памяти, используемые по умолчанию вы также можете увидеть на скриншоте ниже.


Опция «Автоматический дамп памяти» сохраняет снимок памяти ядра Windows 10 с необходимой отладочной информацией, а также память, выделенную для устройств, драйверов и ПО, работающего на уровне ядра. Также, при выборе автоматического дампа памяти, в папке C:\Windows\Minidump сохраняются малые дампы памяти. В большинстве случаев этот параметр оптимален.
Помимо «Автоматический дамп памяти» в параметрах сохранения отладочной информации есть и другие варианты:
- Полный дамп памяти — содержит полный снимок оперативной памяти Windows. Т.е. размер файла дампа памяти MEMORY.DMP будет равен объему используемой (занятой) оперативной памяти на момент появления ошибки. Обычному пользователю обычно не требуется.
- Дамп памяти ядра — содержит те же данные что и «Автоматический дамп памяти», по сути это одна и та же опция, за исключением того, как Windows устанавливает размер файла подкачки в случае выбора одной из них. В общем случае вариант «Автоматический» подходит лучше (подробнее для интересующихся, на английском — здесь.)
- Малый дамп памяти — создание только мини дампов в C:\Windows\Minidump. При выборе данной опции сохраняются файлы по 256 Кб, содержащие базовую информацию о синем экране смерти, списке загруженных драйверов, процессах. В большинстве случаев при непрофессиональном использовании (например, как в инструкциях на этом сайте по исправлению ошибок BSoD в Windows 10), используется именно малый дамп памяти. Например, при диагностике причины синего экрана смерти в BlueScreenView используются файлы мини дампов. Однако в некоторых случаях может потребоваться и полный (автоматический) дамп памяти — часто службы поддержки ПО при возникновении неполадок (предположительно вызванных этим ПО) могут просить предоставить именно его.
Дополнительная информация
В случае, если вам нужно удалить дамп памяти, вы можете сделать это вручную, удалив файл MEMORY.DMP в системной папке Windows и файлы, содержащиеся в папке Minidump. Также можно использовать утилиту «Очистка диска» Windows (нажать клавиши Win+R, ввести cleanmgr и нажать Enter). В «Очистке диска» нажмите кнопку «Очистить системные файлы», а затем в списке отметьте файла дампа памяти для системных ошибок, чтобы удалить их (при отсутствии таких пунктов можно предположить, что дампы памяти пока не создавались).
Ну и в завершение о том, почему может быть отключено создание дампов памяти (или отключаться само после включения): чаще всего причиной являются программы для очистки компьютера и оптимизации работы системы, а также софт для оптимизации работы SSD, который также может отключать их создание.
Windows 11 (including earlier version), when, encounter a Blue Screen of Death (or BSOD), accumulates all the memory information into a file. Holding Dump file as name it further helps users to identify and debug the cause of the crashes. The files also allow writing the debugging details in different file formats in order to simplify the readability of the data.
Dump file may be of various types depending on the nature of crash and bug check values. These are “Small memory dump (Minidump)”, “Kernel memory dump”, “Complete memory dump”, “Automatic memory dump”, and “Active memory dump”. However, among all these, Windows 10/11 generates Automatic memory dump all by itself as its name suggests. The following section will deal with everything related to Dump File Location Windows 11 or 10.
Dump File Location Windows 10 or 11
Here is the Dump File Location Windows 11 or 10 –
Dump File Location
Instead, you can say Dump file locations so see the following paths to find out the data –
%SystemRoot%memory.dmp which means
C:\Windows\memory.dmp
This is the default location and here, C: refers to the system drive where Windows is installed.
Windows 11/10 can also capture memory dumps that consume a small amount of space. These are created at –
%SystemRoot%Minidump.dmp i.e.,
C:\Window\Minidump.dump
Change Dump File Location Windows 11 or 10
- Go to desktop and right-click on This PC icon. From the available options, choose Properties.
- Click Advanced system settings link that shows up on the top left of the subsequent window.
- Click Settings beneath Startup and Recovery section.
- Locate the Dump File text field and insert the location of the file.
Configure the Type of Memory Dump File
As aforementioned, Windows generates Automatic memory dump files but users can choose to configure the settings as per need. Thankfully, there are certain ways using which a user can change the type of memory dump file that Windows creates.
1]Through Startup and Recovery
- Press “Win logo+R” hotkey to open Run dialog box. System properties wizard will become visible, switch to Advanced tab.
- Here, click Settings just below Startup and Recovery section.
- Click the drop-down under Write debugging information. From the list of dump file types, choose the type that you wish Windows to generate when Windows crashes.
- To apply the changes, click OK.
Note – In case the system crashes a lot, it’s better to deselect the checkbox against the option Overwrite any existing file. Doing this will eventually create incremental dump files that will have a memory dump file for each crash that occurs.
2] Use Elevated Command Prompt
- Fire up taskbar search using Win+S combination of keys. Type in cmd.exe, right-click ok Command Prompt and choose Run as administrator.
- Click Yes on the prompt of UAC to access elevated Command Prompt.
- Once into the black window, insert the applicable command from the list below to change the type of dump file and hit Enter.
| Memory Type | Command Line |
| No memory | wmic RECOVEROS set DebugInfoType = 0 |
| Small memory dump | wmic RECOVEROS set DebugInfoType = 3 |
| Kernel memory dump | wmic RECOVEROS set DebugInfoType = 2 |
| Complete memory dump | wmic RECOVEROS set DebugInfoType = 1 |
| Automatic memory dump | wmic RECOVEROS set DebugInfoType = 7 |
| Active memory dump | wmic RECOVEROS set DebugInfoType = 1 |
- Finally, close the prompt window and Restart Windows 10 PC to make the changes effective.
Note – The Command Prompt also lets you view the current memory dump file. Just open Command Prompt as Administrator and run the following command-line –
wmic RECOVEROS get DebugInfoType
Types of Memory Dump Files
It is important to know the types after finding Dump File Location Windows 11 or 10 –
Small memory dump – It is the type that contains a minimal amount of details. Basically, the file includes the stop code, list of device drivers, parameters. Furthermore, it also contains the current process and informs which kernel thread or process crashed.
Kernel memory dump – This is the most useful and comprehensive one with respect to the kernel. Moreover, this type contains information in connection with programs and drivers in kernel mode. However, the dimension of this dump file completely depends on the amount of kernel-mode memory specified by Windows and drivers. Now, in case a second crash occurs and a kernel memory dump file is generated, the earlier content gets overwritten.
Complete memory dump – A remarkably large file type which is equal to the RAM of the system. It incorporates physical memory allocation that is basically left out in other kernel dumps.
Automatic memory dump – When compared to the kernel memory option, this is quite similar to it in terms of information. The only difference between them is the size of the paging file that Windows sets for them.
Active memory dump – It is comparatively smaller than complete memory dump. This type refines the items that are not influential in spotting the cause of a crash.
That’s all!!!
Статья обновлена: 07 июля 2022
ID: 3055
Статья неприменима к Windows Vista SP1 и ниже.
После установки продукта «Лаборатории Касперского» могут возникнуть ситуации, при которых операционная система «зависает». Например, при загрузке компьютера или при запуске сторонней программы. Причиной может быть конфликт программы «Лаборатории Касперского» со сторонним программным обеспечением, либо с драйверами комплектующих вашего компьютера.
При возникновении такой проблемы:
- Настройте запись полного дампа памяти в операционной системе.
- Получите полный дамп памяти.
- Отправьте полный дамп памяти в «Лабораторию Касперского».
Как настроить запись полного дампа памяти в Windows 7, 8, 8.1, 10
Как настроить запись полного дампа памяти в Windows 11
Как получить полный дамп памяти
Как отправить дамп в техническую поддержку «Лаборатории Касперского»
Спасибо за ваш отзыв, вы помогаете нам становиться лучше!
Спасибо за ваш отзыв, вы помогаете нам становиться лучше!
В момент критического сбоя операционная система Windows прерывает работу и показывает синий экран смерти (BSOD). Содержимое оперативной памяти и вся информация о возникшей ошибке записывается в файл подкачки. При следующей загрузке Windows создается аварийный дамп c отладочной информацией на основе сохраненных данных. В системном журнале событий создается запись о критической ошибке.
Внимание! Аварийный дамп не создается, если отказала дисковая подсистема или критическая ошибка возникла на начальной стадии загрузки Windows.
Содержание:
- Типы аварийных дампов памяти Windows
- Как включить создание дампа памяти в Windows?
- Установка WinDBG в Windows
- Настройка ассоциации .dmp файлов с WinDBG
- Настройка сервера отладочных символов в WinDBG
- Анализ аварийного дампа памяти в WinDBG
Типы аварийных дампов памяти Windows
На примере актуальной операционной системы Windows 10 (Windows Server 2016) рассмотрим основные типы дампов памяти, которые может создавать система:
- Мини дамп памяти (Small memory dump) (256 КБ). Этот тип файла включает минимальный объем информации. Он содержит только сообщение об ошибке BSOD, информацию о драйверах, процессах, которые были активны в момент сбоя, а также какой процесс или поток ядра вызвал сбой.
- Дамп памяти ядра (Kernel memory dump). Как правило, небольшой по размеру — одна треть объема физической памяти. Дамп памяти ядра является более подробным, чем мини дамп. Он содержит информацию о драйверах и программах в режиме ядра, включает память, выделенную ядру Windows и аппаратному уровню абстракции (HAL), а также память, выделенную драйверам и другим программам в режиме ядра.
- Полный дамп памяти (Complete memory dump). Самый большой по объему и требует памяти, равной оперативной памяти вашей системы плюс 1MB, необходимый Windows для создания этого файла.
- Автоматический дамп памяти (Automatic memory dump). Соответствует дампу памяти ядра с точки зрения информации. Отличается только тем, сколько места он использует для создания файла дампа. Этот тип файлов не существовал в Windows 7. Он был добавлен в Windows 8.
- Активный дамп памяти (Active memory dump). Этот тип отсеивает элементы, которые не могут определить причину сбоя системы. Это было добавлено в Windows 10 и особенно полезно, если вы используете виртуальную машину, или если ваша система является хостом Hyper-V.
Как включить создание дампа памяти в Windows?
С помощью Win+Pause откройте окно с параметрами системы, выберите «Дополнительные параметры системы» (Advanced system settings). Во вкладке «Дополнительно» (Advanced), раздел «Загрузка и восстановление» (Startup and Recovery) нажмите кнопку «Параметры» (Settings). В открывшемся окне настройте действия при отказе системы. Поставьте галку в чек-боксе «Записать события в системный журнал» (Write an event to the system log), выберите тип дампа, который должен создаваться при сбое системы. Если в чек-боксе «Заменять существующий файл дампа» (Overwrite any existing file) поставить галку, то файл будет перезаписываться при каждом сбое. Лучше эту галку снять, тогда у вас будет больше информации для анализа. Отключите также автоматическую перезагрузку системы (Automatically restart).
В большинстве случаев для анализа причины BSOD вам будет достаточно малого дампа памяти.
Теперь при возникновении BSOD вы сможете проанализировать файл дампа и найти причину сбоев. Мини дамп по умолчанию сохраняется в папке %systemroot%\minidump. Для анализа файла дампа рекомендую воспользоваться программой WinDBG (Microsoft Kernel Debugger).
Установка WinDBG в Windows
Утилита WinDBG входит в «Пакет SDK для Windows 10» (Windows 10 SDK). Скачать можно здесь.
Файл называется winsdksetup.exe, размер 1,3 МБ.
WinDBG для Windows7 и более ранних систем включен в состав пакета «Microsoft Windows SDK for Windows 7 and .NET Framework 4». Скачать можно здесь.
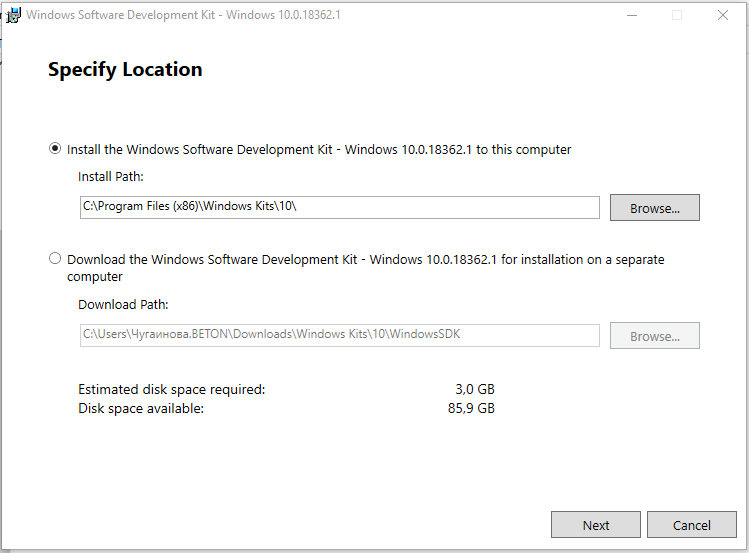
Запустите установку и выберите, что именно нужно сделать – установить пакет на этот компьютер или загрузить для установки на другие компьютеры. Установим пакет на локальный компьютер.
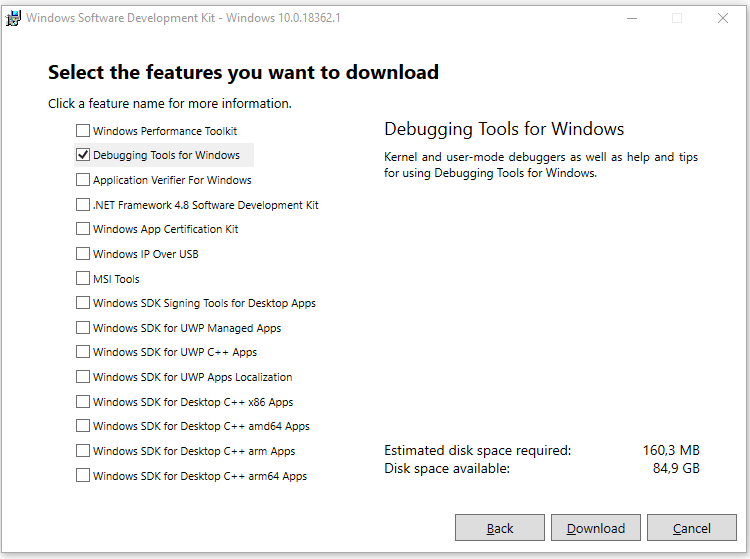
Можете установить весь пакет, но для установки только инструмента отладки выберите Debugging Tools for Windows.
После установки ярлыки WinDBG можно найти в стартовом меню.
Настройка ассоциации .dmp файлов с WinDBG
Для того, чтобы открывать файлы дампов простым кликом, сопоставьте расширение .dmp с утилитой WinDBG.
- Откройте командную строку от имени администратора и выполните команды для 64-разрядной системы:
cd C:\Program Files (x86)\Windows Kits\10\Debuggers\x64
windbg.exe –IA
для 32-разрядной системы:
C:\Program Files (x86)\Windows Kits\10\Debuggers\x86
windbg.exe –IA - В результате типы файлов: .DMP, .HDMP, .MDMP, .KDMP, .WEW – будут сопоставлены с WinDBG.
Настройка сервера отладочных символов в WinDBG
Отладочные символы (debug-символы или symbol files) – это блоки данных, генерируемые в процессе компиляции программы совместно с исполняемым файлом. В таких блоках данных содержится информация о именах переменных, вызываемых функциях, библиотеках и т.д. Эти данные не нужны при выполнении программы, но полезные при ее отладке. Компоненты Microsoft компилируются с символами, распространяемыми через Microsoft Symbol Server.
Настройте WinDBG на использование Microsoft Symbol Server:
- Откройте WinDBG;
- Перейдите в меню File –> Symbol File Path;
- Пропишите строку, содержащую URL для загрузки символов отладки с сайта Microsoft и папку для сохранения кэша:
SRV*E:\Sym_WinDBG*http://msdl.microsoft.com/download/symbols
В примере кэш загружается в папку E:\Sym_WinDBG, можете указать любую. - Не забывайте сохранить изменения в меню File –> Save WorkSpace;
WinDBG произведет поиск символов в локальной папке и, если не обнаружит в ней необходимых символов, то самостоятельно загрузит символы с указанного сайта. Если вы хотите добавить собственную папку с символами, то можно сделать это так:
SRV*E:\Sym_WinDBG*http://msdl.microsoft.com/download/symbols;c:\Symbols
Если подключение к интернету отсутствует, то загрузите предварительно пакет символов с ресурса Windows Symbol Packages.
Анализ аварийного дампа памяти в WinDBG
Отладчик WinDBG открывает файл дампа и загружает необходимые символы для отладки из локальной папки или из интернета. Во время этого процесса вы не можете использовать WinDBG. Внизу окна (в командной строке отладчика) появляется надпись Debugee not connected.
Команды вводятся в командную строку, расположенную внизу окна.
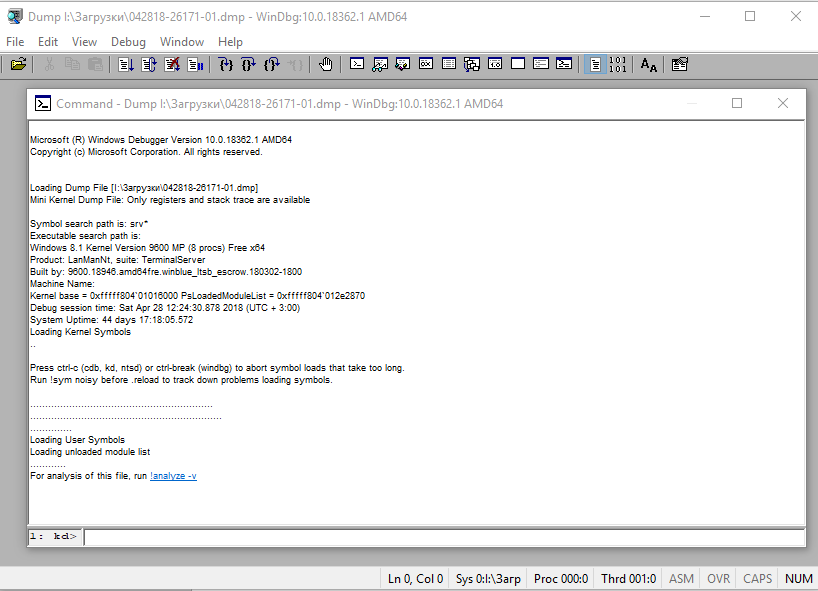
Самое главное, на что нужно обратить внимание – это код ошибки, который всегда указывается в шестнадцатеричном значении и имеет вид 0xXXXXXXXX (указываются в одном из вариантов — STOP: 0x0000007B, 02.07.2019 0008F, 0x8F). В нашем примере код ошибки 0х139.
Полный справочник ошибок можно посмотреть здесь.
Отладчик предлагает выполнить команду !analyze -v, достаточно навести указатель мыши на ссылку и кликнуть. Для чего нужна эта команда?
- Она выполняет предварительный анализ дампа памяти и предоставляет подробную информацию для начала анализа.
- Эта команда отобразит STOP-код и символическое имя ошибки.
- Она показывает стек вызовов команд, которые привели к аварийному завершению.
- Кроме того, здесь отображаются неисправности IP-адреса, процессов и регистров.
- Команда может предоставить готовые рекомендации по решению проблемы.
Основные моменты, на которые вы должны обратить внимание при анализе после выполнения команды !analyze –v (листинг неполный).
1: kd>
!analyze -v
*****************************************************************************
* *
* Bugcheck Analysis *
* *
*****************************************************************************
Символическое имя STOP-ошибки (BugCheck)
KERNEL_SECURITY_CHECK_FAILURE (139)
Описание ошибки (Компонент ядра повредил критическую структуру данных. Это повреждение потенциально может позволить злоумышленнику получить контроль над этой машиной):
A kernel component has corrupted a critical data structure. The corruption could potentially allow a malicious user to gain control of this machine.
Аргументы ошибки:
Arguments:
Arg1: 0000000000000003, A LIST_ENTRY has been corrupted (i.e. double remove).
Arg2: ffffd0003a20d5d0, Address of the trap frame for the exception that caused the bugcheck
Arg3: ffffd0003a20d528, Address of the exception record for the exception that caused the bugcheck
Arg4: 0000000000000000, Reserved
Debugging Details:
------------------
Счетчик показывает сколько раз система упала с аналогичной ошибкой:
CUSTOMER_CRASH_COUNT: 1
Основная категория текущего сбоя:
DEFAULT_BUCKET_ID: FAIL_FAST_CORRUPT_LIST_ENTRY
Код STOP-ошибки в сокращенном формате:
BUGCHECK_STR: 0x139
Процесс, во время исполнения которого произошел сбой (не обязательно причина ошибки, просто в момент сбоя в памяти выполнялся этот процесс):
PROCESS_NAME: sqlservr.exe
CURRENT_IRQL: 2
Расшифровка кода ошибки: В этом приложении система обнаружила переполнение буфера стека, что может позволить злоумышленнику получить контроль над этим приложением.
ERROR_CODE: (NTSTATUS) 0xc0000409 - The system detected an overrun of a stack-based buffer in this application. This overrun could potentially allow a malicious user to gain control of this application.
EXCEPTION_CODE: (NTSTATUS) 0xc0000409 - The system detected an overrun of a stack-based buffer in this application. This overrun could potentially allow a malicious user to gain control of this application.
Последний вызов в стеке:
LAST_CONTROL_TRANSFER: from fffff8040117d6a9 to fffff8040116b0a0
Стек вызовов в момент сбоя:
STACK_TEXT:
ffffd000`3a20d2a8 fffff804`0117d6a9 : 00000000`00000139 00000000`00000003 ffffd000`3a20d5d0 ffffd000`3a20d528 : nt!KeBugCheckEx
ffffd000`3a20d2b0 fffff804`0117da50 : ffffe000`f3ab9080 ffffe000`fc37e001 ffffd000`3a20d5d0 fffff804`0116e2a2 : nt!KiBugCheckDispatch+0x69
ffffd000`3a20d3f0 fffff804`0117c150 : 00000000`00000000 00000000`00000000 00000000`00000000 00000000`00000000 : nt!KiFastFailDispatch+0xd0
ffffd000`3a20d5d0 fffff804`01199482 : ffffc000`701ba270 ffffc000`00000001 000000ea`73f68040 fffff804`000006f9 : nt!KiRaiseSecurityCheckFailure+0x3d0
ffffd000`3a20d760 fffff804`014a455d : 00000000`00000001 ffffd000`3a20d941 ffffe000`fcacb000 ffffd000`3a20d951 : nt! ?? ::FNODOBFM::`string'+0x17252
ffffd000`3a20d8c0 fffff804`013a34ac : 00000000`00000004 00000000`00000000 ffffd000`3a20d9d8 ffffe001`0a34c600 : nt!IopSynchronousServiceTail+0x379
ffffd000`3a20d990 fffff804`0117d313 : ffffffff`fffffffe 00000000`00000000 00000000`00000000 000000eb`a0cf1380 : nt!NtWriteFile+0x694
ffffd000`3a20da90 00007ffb`475307da : 00000000`00000000 00000000`00000000 00000000`00000000 00000000`00000000 : nt!KiSystemServiceCopyEnd+0x13
000000ee`f25ed2b8 00000000`00000000 : 00000000`00000000 00000000`00000000 00000000`00000000 00000000`00000000 : 0x00007ffb`475307da
Участок кода, где возникла ошибка:
FOLLOWUP_IP:
nt!KiFastFailDispatch+d0
fffff804`0117da50 c644242000 mov byte ptr [rsp+20h],0
FAULT_INSTR_CODE: 202444c6
SYMBOL_STACK_INDEX: 2
SYMBOL_NAME: nt!KiFastFailDispatch+d0
FOLLOWUP_NAME: MachineOwner
Имя модуля в таблице объектов ядра. Если анализатору удалось обнаружить проблемный драйвер, имя отображается в полях MODULE_NAME и IMAGE_NAME:
MODULE_NAME: nt
IMAGE_NAME: ntkrnlmp.exe
Если кликнете по ссылке модуля (nt), то увидите подробную информацию о пути и других свойствах модуля. Находите указанный файл, и изучаете его свойства.
1: kd>
lmvm nt
Browse full module list
Loaded symbol image file: ntkrnlmp.exe
Mapped memory image file: C:\ProgramData\dbg\sym\ntoskrnl.exe\5A9A2147787000\ntoskrnl.exe
Image path: ntkrnlmp.exe
Image name: ntkrnlmp.exe
InternalName: ntkrnlmp.exe
OriginalFilename: ntkrnlmp.exe
ProductVersion: 6.3.9600.18946
FileVersion: 6.3.9600.18946 (winblue_ltsb_escrow.180302-1800)
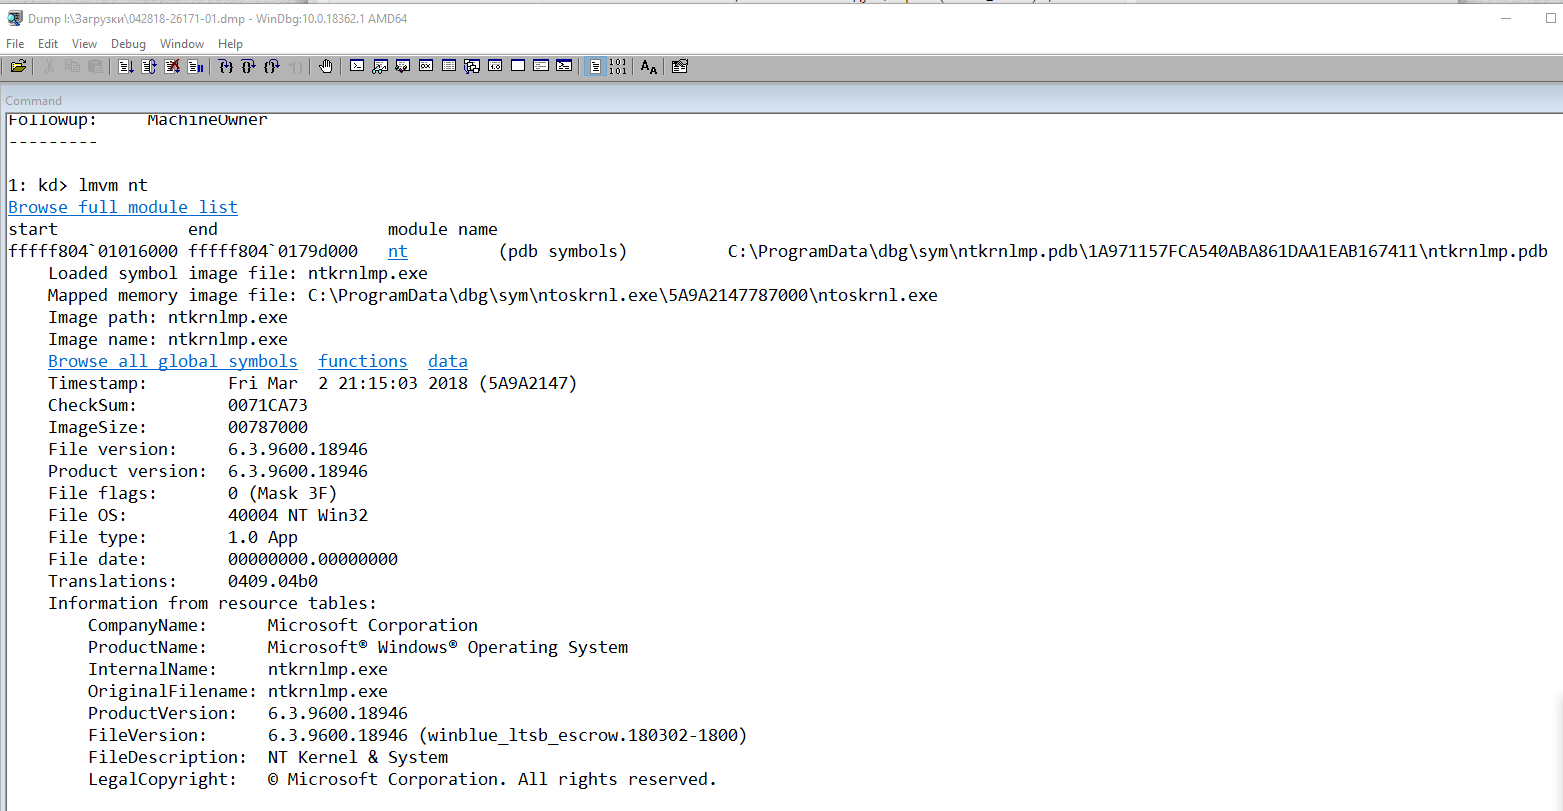
В приведенном примере анализ указал на файл ядра ntkrnlmp.exe. Когда анализ дампа памяти указывает на системный драйвер (например, win32k.sys) или файл ядра (как в нашем примере ntkrnlmp.exe), вероятнее всего данный файл не является причиной проблемы. Очень часто оказывается, что проблема кроется в драйвере устройства, настройках BIOS или в неисправности оборудования.
Если вы увидели, что BSOD возник из-за стороннего драйвера, его имя будет указано в значениях MODULE_NAME и IMAGE_NAME.
Например:
Image path: \SystemRoot\system32\drivers\cmudaxp.sys
Image name: cmudaxp.sys
Откройте свойсва файла драйвера и проверьте его версию. В большинстве случаев проблема с драйверами решается их обнвовлением.

What is Memory Dump?
According to techopedia, a memory dump is a process where the contents of memory are displayed and stored in case of an emergency such as system crash. Memory dumps are mainly for software developers; they use the data’s stored in the system to diagnose the problem.
Developers use the dumps to fix the problem that caused the system crash. They are also known as core dump and sometimes BSOD (Blue screen of death).
To fix various Windows 10/11 problems, we recommend Outbyte PC Repair:
This software will repair common computer errors, protect you from file loss, malware damage, hardware failure, and optimise your computer for peak performance. In three simple steps, you can resolve PC issues and remove virus damage:
- Download Outbyte PC Repair Software
- Click Start Scan to detect Windows 10/11 issues that may be causing PC issues.
- Click Repair All to fix issues with your computer’s security and performance.
This month, Outbyte has been downloaded by 23,167 readers.
It primarily identifies the problem of the operating system or any application that has failed. It mainly is the information of the last state of the program or application or operating system. The last state before the program crashes can bring out the problem it had faced.
On the other hand, all the information consists of memory locations, program counters, program state and much more. Memory dump also has on-screen log files for viewing and sorting later.
You have to reboot the computer after the memory dump, or else it will be unavailable. Sometimes memory leak can cause memory dumps, and it’s not okay.
You will see memory dumps when you’ll encounter a blue screen of death error. Usually, a BSOD will give you some basic suggestion of where the problems occurred. Those suggestions or information’s are memory dumps.
So, when you reboot the system, you’ll be able to look into that information for further analysis. The memory dumps can contain passwords or any hidden key. So, beware of any potential hackers as they can easily find out your private info’s and hack the system.
Different Types of Memory Dumps and their Location
There are mainly five types of memory dumps stored in Windows 10. Each type is different and stores various information about the system crash. Let’s see what they are.
1. Automatic Memory Dump
Location: %SystemRoot%Memory.dmp
Size: Size of OS kernel
This one is the default option when you install Windows 10 for the first time. The setting is to support the System Managed page file configurations. Though it has been updated to reduce the size all over, it’s mainly for small SSDs.
But the large servers also benefit highly from it. Especially the automatic memory dump gives an output of Kernel memories. But the main difference is that the automatic process reduces the page file making it smaller than the size of the RAM.
You can also check or even edit the system paging file size. So for that just go to the following path, and you’ll be able to change it according to your desire.
Control Panel -> System and Security -> System -> Advanced system settings -> Performance -> Settings -> Advanced -> Change
2. Active Memory Dump
Location: %SystemRoot%Memory.dmp
Size: Triple the size of a kernel or automatic dump file
Microsoft did add the Active Memory Dump recently. Though it’s smaller than the complete memory dump, it’s three times bigger than the size of the kernel dump. It happens because it has both the kernel and the user space together.
So, overall the size gets bigger than the kernel dump. The dump files size can be up to 1.5 GB or even more. But you can try to compress it and reduce it to a more acceptable size for transportation.
3. Complete Memory Dump
Location: %SystemRoot%Memory.dmp
Size: Installed RAM plus 1MB
This one is the largest dump files that will take your spaces. As it includes the physical memory of the computer, the overall size gets too big. You can assume that the size can be less or equal to the installed RAM.
And with all other systems taking up GBs of the system this can become a serious issue if you are having too much of crashes of programs or systems. So, I would suggest that you would stick to the automatic dump file instead of this one.
4. Kernel Memory Dump
Location: %SystemRoot%Memory.dmp
Size: Size of physical memory owned by kernel-mode components
These dumps are equal to the size of the RAM that gets occupied by the Windows 10 kernel.
It can be up to 700MB in size, but if you want to compress it, then you can bring it down to 150MB. This dump contains the information for analysis. So, it can be helpful for developers.
The automatic dump setting creates a dump file saving only the recent one by default.
5. Small Memory Dump
Location: %SystemRoot%Minidump
Size: At least 64K on x86 and 128k on x64
It is also known as the mini dump. They include memory pages pointed to them by registers by their values at the point of the fault.
They are quite small as they don’t contain any binary or executable files from the time of the system crash. Moreover, these data are vital for the coders or debuggers to find out what happened.
Why are Memory Dumps Created?
You are wondering about now that why are Memory dump created. Are they essential? Or who uses these files? Well, they are mainly for developers developing a program or a system.
As I said before these files are solely here for giving you the additional information about the crash or system failure that occurred. So, if you are a developer who is working on the hardware drivers, then these pieces of information would come in handy.
As you can easily find out what is causing your system to crash, it becomes easier to solve.
But if you are not a developer then you can still use the information to know why your system is crashing all on a sudden. You just have to send it to a developer, and he will let you know what the problem is.
If any driver is causing the problem you can send them to that driver developers or if it’s with windows than you can send it to Microsoft for further analysis.
Hopefully, the developers will find out what the problem was and can assist you with further procedures.
Is it safe to Delete Memory Dumps?
Though with all its perks, these files seem to take up a lot of space on the disk. So, if you don’t have an issue with the crashes or don’t want these unnecessary files to clog your system, then you can go ahead and delete them.
They will be in the form of a .dmp file and can take a significant portion of resources. And if you have ever experienced a BSOD you will surely have a minimum of 800MB or even more files taking up space on your system.
You can quickly clean the memory dump by disk cleanup. Disk cleanup seems to clean the dumps without a fuss. Or you can also use CCleaner to detect and delete those dumps. So, you don’t have to delete them one by one manually.

To sum it all up, Memory dumps can be useful if you are a developer but can be a headache for the average users too. So, if you don’t want unnecessary files on your computer then clean it up. It shouldn’t be a problem at all.
Hasib is a born geek and loves tweaking his computer and gadgets for effectiveness and productivity. At WindowsChimp, he specializes in writing Tutorial guides and discovering new hacks to share.