
Windows gaming Services are provided by Microsoft and include Xbox Live, Xbox Game Pass, and Xbox Play Anywhere. These services allow users to play games online, install and play Xbox Game Pass games, and play games across different devices. Uninstalling the Gaming Service may prevent users from playing games online and installing games from the Microsoft Store.
Why do I need gaming services?
Gaming services eliminate the need to install games on your hard drive and ensure that your hardware meets the requirements for playing certain titles. They also allow you to play games across different devices and resume your progress, which is saved in the cloud.
What does Windows gaming do?
Windows gaming offers a game mode that optimizes the system for maximum performance while gaming. It is especially useful for lower-powered systems that have multiple programs running in the background, as it can help make games playable.
Can I turn off gaming services Windows 10?
Yes, you can turn off gaming services in Windows 10 by going to the Settings app, selecting Gaming, and then disabling the Game Mode. This will allow you to disable the gaming services and improve performance or address any issues you may have.
What should I disable in Windows for gaming?
There are several Windows features and services that can be disabled to optimize your gaming experience. Some of these include disabling automatic updates, turning off the display of certain services, and disabling unnecessary background services. Disabling these features can help improve your gaming performance.
Windows 10 vs Windows 11 for Gaming in 2023 – Newer and Older Games Tested
There is currently no specific information available regarding Windows 10 vs Windows 11 for gaming in 2023. It is recommended to refer to reliable sources or consult with experts for the most up-to-date information on gaming performance and compatibility with these operating systems.
Should I enable or disable Windows Game Mode?
Disabling Game Mode can be a viable troubleshooting step if you are experiencing stability or performance issues, regardless of the application you are using. While Game Mode is designed to reserve resources for games, it can sometimes hinder productivity when enabled. It is recommended to test the performance of your specific system with and without Game Mode to determine the optimal setting for your needs.
Why do you need Windows 10 for gaming?
Windows 10 features an application programming interface called DirectX 12, which is used by games to communicate with your computer’s hardware. DirectX 12 brings various new features and advantages, including the ability for graphics cards to use multiple cores of a computer’s CPU simultaneously. This can result in improved performance and enhanced gaming experiences.
Why Windows 10 for gaming?
Windows 10 is a mature operating system that has been optimized for gaming. Most games are designed to run smoothly on Windows 10, and it offers various features to enhance the gaming experience. These features include Game Mode, which can improve performance in certain games, and compatibility with a wide range of hardware and software.
What is gaming services?
Gaming services refer to the services provided by gaming platforms and companies, such as Microsoft’s Xbox Live, Game Pass, and Play Anywhere. These services allow users to play games online, access a library of games, and play games across different devices.
What do gaming services workers do?
Gaming services workers serve customers in gambling establishments, such as casinos or racetracks. They may operate slot machines, deal cards, take bets, and pay out winnings. Some gaming services workers also supervise or manage gaming operations and workers.
What is gaming and why is it important?
Gaming refers to playing electronic games, whether on a computer, console, or mobile device. Gaming is important as it provides entertainment, promotes social interaction, and stimulates cognitive abilities. Studies have shown that playing video games can increase brain connectivity and improve problem-solving skills.
How do I know which programs are unnecessary?
To determine which programs are unnecessary, you can go to the Control Panel in Windows and click on Programs and then Programs and Features. This will display a list of installed programs on your computer. Evaluate each program and consider whether you actually need it for your daily use. If a program is not essential and you rarely use it, it may be unnecessary and can potentially be removed.
What happens if we disable all services in Windows 10?
If you disable all services in Windows 10, it can potentially cause the login process to malfunction. On the third start of Windows, the system will boot into the Recovery Environment, where you can access system repair options, safe mode, or
GamingServices.exe and GamingServicesNet.exe are parts of what make gaming with Xbox on Windows 11 and Windows 10 work. They are responsible for all the tasks from getting your games onto your computer and keeping them running properly, specifically those you download from the Microsoft Store or Xbox app.
Also see: How to remove Xbox Game Bar from Windows 11
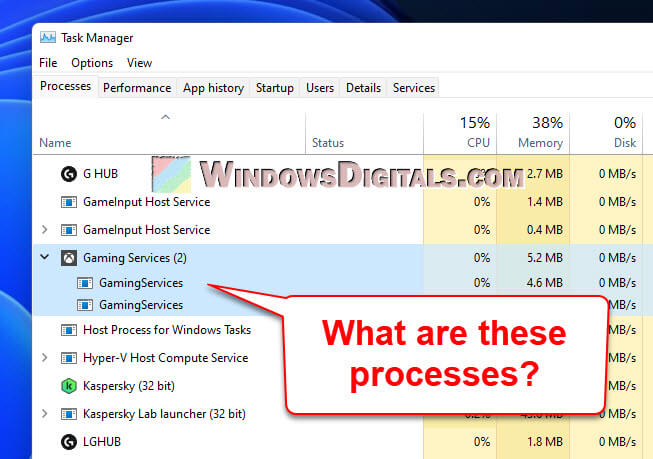
Gaming services in Windows 11 or 10
Think of GamingServices.exe and GamingServicesNet.exe as the backstage crew for Microsoft’s gaming show on Windows. They’re there to make sure your games are set up right, well updated, and that you have all the game-related features you want.
GamingServices.exe
GamingServices.exe is like a game manager for Windows, making sure your games from the Microsoft Store and Xbox app are installed and up-to-date. If it wasn’t around, you might have trouble getting your games to start or update properly.
GamingServicesNet.exe
And GamingServicesNet.exe looks after the online side of things, helping your online multiplayer games run without issues, managing streaming, and syncing your game saves onto the cloud.
Useful tip: How to know which app is using the internet in Windows 11
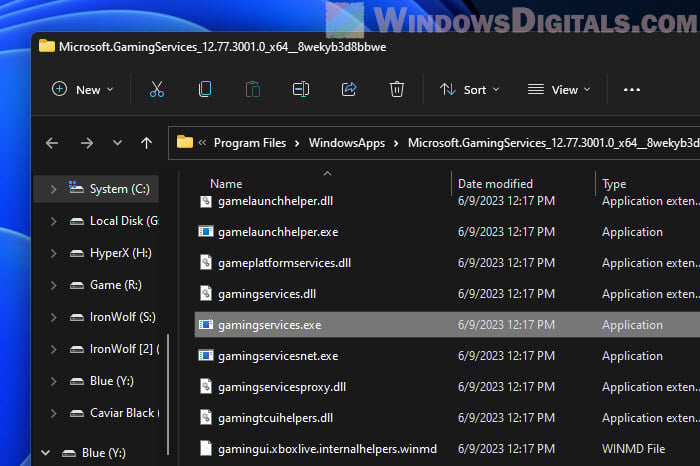
Locating GamingServices.exe and GamingServicesNet.exe
Knowing if these processes are running is easy using Task Manager:
- Right-click on the taskbar and pick “Task Manager”.
- Hit the “Details” tab.
- Look down the list for
GamingServices.exeandGamingServicesNet.exe.
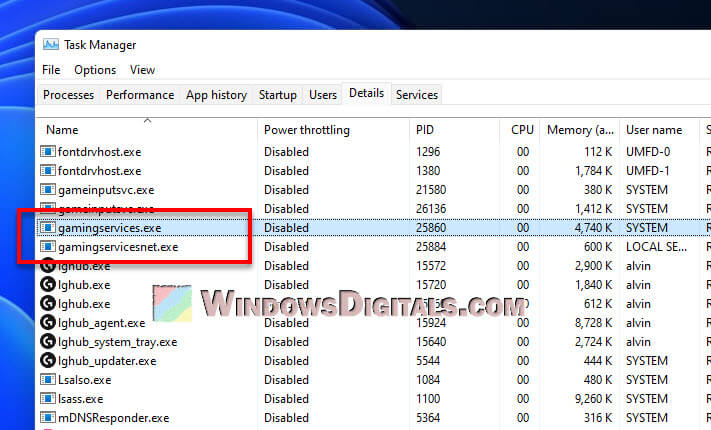
These processes should be running if you’re on Windows 10 or 11, especially if you’ve got games from the Xbox app installed.
Related resource: How to delete a service in Windows 11 or 10 using CMD
Is GamingServices.exe a virus?
Normally, GamingServices.exe and GamingServicesNet.exe are legit and safe. But it’s still important to check they’re the real deal and not bad software in disguise.
Follow the steps below to check where these files are located:
- Open “Task Manager” the way you did before.
- Hit the “Details” tab again.
- Find
GamingServices.exeorGamingServicesNet.exe, right-click, and choose “Open file location”.
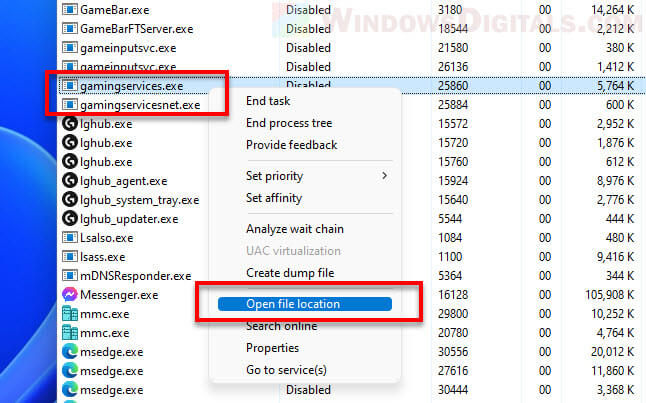
If they’re not in C:\Program Files\WindowsApps\Microsoft.GamingServices_..., something might be up. And, running a virus scan every so often is a common practice to keep malware away from your PC.
Pro tip: 30+ Windows 11 services to disable for better performance
Potential issues and solutions
Even though these processes are usually quiet, sometimes they might cause issue. The following are some common issues and how to fix them:
Gaming services high CPU or disk usage
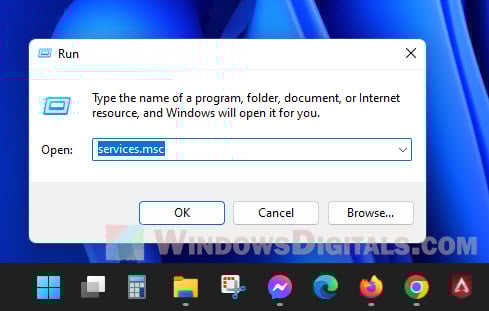
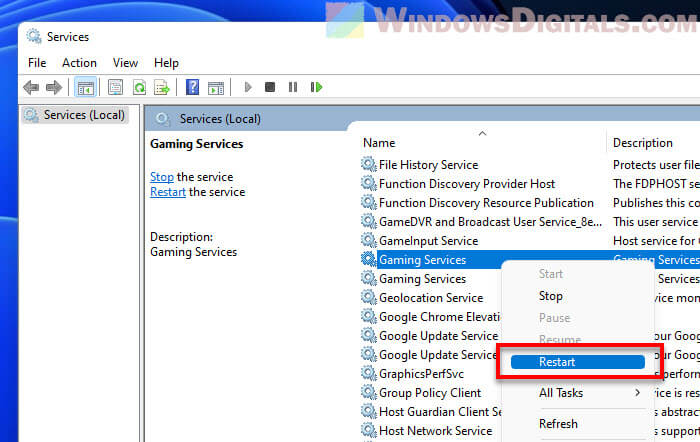
If your computer is slowing down because these services are working too hard and consuming too much CPU and disk resources, especially during game updates, try restarting the service:
- Hit Win + R, type “services.msc”, and press Enter.

- Scroll to “GamingServices”, right-click it, and click “Restart”.

Linked issue: High CPU usage after Windows 11/10 update (Fix)
Failure to launch games
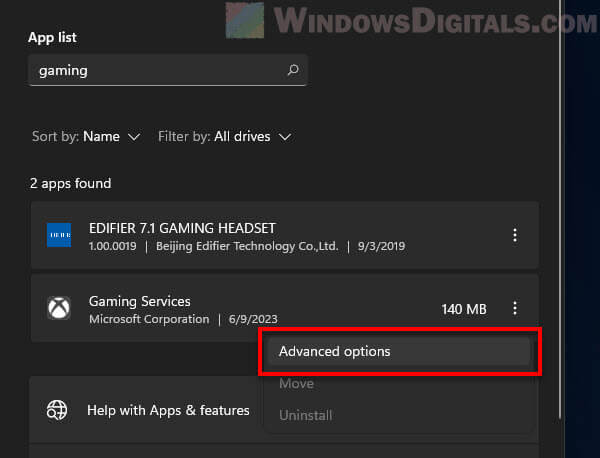
If you can’t get a Xbox or MS Store game to start correctly, It might be a random problem with the Gaming Services. Try the following steps to fix it:
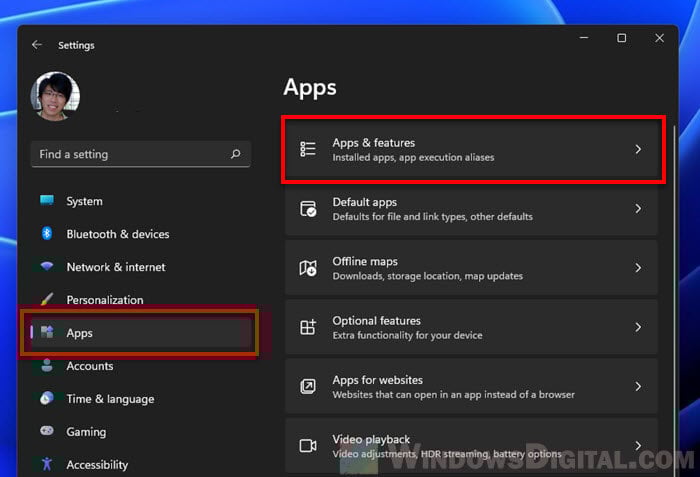
- Press Win + i to open Settings.
- Go to “Apps” then “Apps & features”.

- Find “Gaming Services” in the list. Use the search bar to find it fast. Click the menu next to it and choose “Advanced options“.

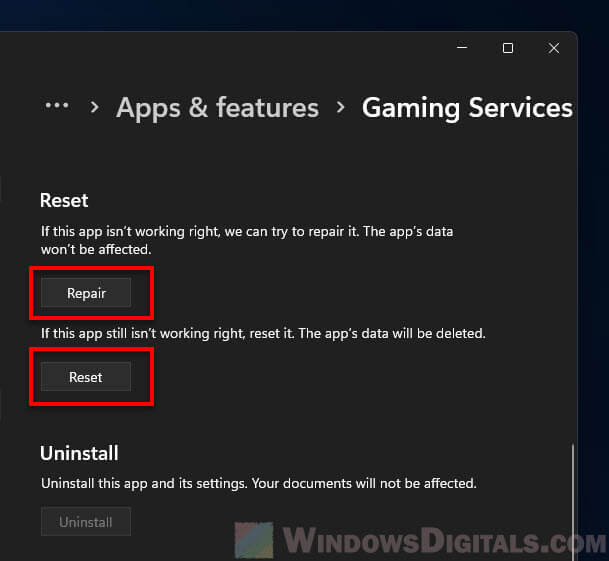
- Hit “Repair” to let Windows try fixing it. If your game still won’t start, hit “Reset“.

Similar problem: Xbox PC Game Pass stuck on syncing data in Windows 11
How to disable or uninstall GamingServices.exe
While GamingServices.exe and GamingServicesNet.exe are important for Xbox games on Windows, there might be times you want to turn them off. But, it’s not as simple as you’d hope. The system protects them because they’re so important.
For example, trying to stop them from starting up via services.msc won’t work; the option is greyed out. And, you can’t just uninstall Gaming Services the regular way either.

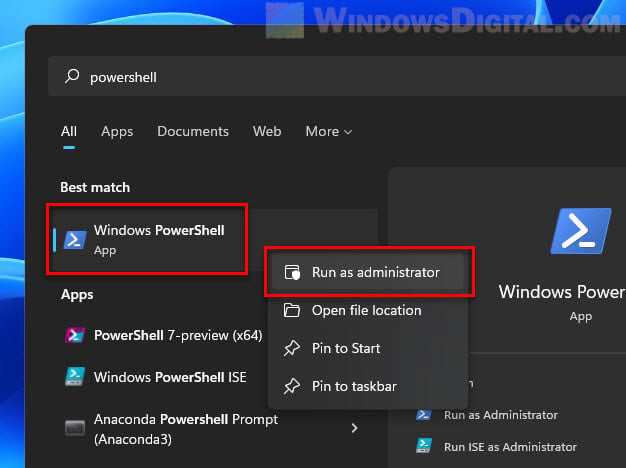
However, you can use PowerShell to remove them, though be aware this might affect your ability to play games from the Microsoft Store or Xbox app. Follow the steps below to do it:
- Open the Start menu, type “PowerShell”, right-click “Windows PowerShell” and pick “Run as administrator”.

- Type the following and press Enter after each line:
Get-AppxPackage *gamingservices* | Remove-AppxPackage -allusers

- Restart your computer to finish.
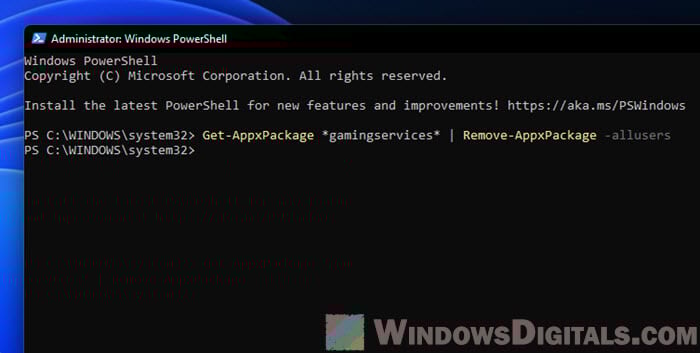
Check Task Manager under Services after rebooting. Gaming Services should be gone.
If you change your mind, installing any game from the Microsoft Store or Xbox app will bring Gaming Services back.

What have we learned?
GamingServices.exe and GamingServicesNet.exe are both very crucial processes if you do play games through the Xbox app or Microsoft Store on Windows 11 and 10. They are responsible for things like game installations, updates, and network stuff for games from the Microsoft Store and Xbox app.
While usually, they don’t cause issue, they can sometimes make your computer slow or not let games start right. Fixing these issues can be as simple as restarting or resetting the service. And, even though they’re safe, always keep an eye out for imposters pretending to be these services (just scan the files when in doubt).
Disabling them is possible but think twice before you do so, as it could break your games and cause issues with them. If you know what you’re doing and you really need to disable them, the steps above can help you out. Just be ready for the effects it might have on your games.
Disabling gaming services on Windows 10 can free up resources on your computer, allowing it to run smoother, especially if you’re not a gamer or if you want to prioritize other applications. To disable gaming services, open the Services app, locate ‘Gaming Services’ in the list, right-click it to access the properties, and then change the startup type to ‘Disabled.’ Apply the changes and restart your computer. This process will stop gaming-related background processes, reducing CPU and RAM usage.
Step-by-Step Tutorial on Disabling Gaming Services Windows 10
Here’s how you can disable gaming services on your Windows 10 computer. The following steps will guide you through the process to ensure that unnecessary gaming-related services are turned off, optimizing your system’s performance.
Step 1: Open the Services App
Press the Windows key + R to open the Run dialog, type “services.msc,” and hit Enter.
The Services app is where you’ll find all the background services running on your computer. By opening this, you can view and manage what runs automatically in the background.
Step 2: Locate ‘Gaming Services’
Scroll down through the list until you find ‘Gaming Services.’
These services are designed to enhance the gaming experience, but if you’re not using them, they can be a resource drain. Finding them is crucial for the process.
Step 3: Access Properties
Right-click on ‘Gaming Services’ and select ‘Properties’ from the context menu.
The properties window allows you to change how the service behaves. This is where you can stop it from starting up automatically.
Step 4: Disable the Service
In the properties window, change the startup type to ‘Disabled’ and click ‘OK’ to apply the changes.
By disabling the startup type, you’re telling Windows not to start this service automatically when the computer boots up, which can save on resources.
Step 5: Restart Your Computer
Reboot your computer to apply the changes.
Restarting ensures that any changes you made are fully implemented. It also checks if your computer runs better with fewer services hogging the power.
Once you’ve completed these steps, gaming services will no longer run in the background, freeing up resources for other tasks. You might notice your computer running more efficiently, especially if it was previously bogged down by unnecessary processes.
Tips on Disabling Gaming Services Windows 10
- Consider why you’re disabling these services. If you’re not a gamer or need better performance for other applications, it’s probably a good move.
- Keep in mind that disabling these can affect gaming features if you decide to game later.
- Regularly check which services are running to keep your system optimized.
- Turn off other unnecessary startup programs for even better performance.
- You can always reverse these changes by setting the startup type back to ‘Automatic’ if needed.
Frequently Asked Questions
What are Gaming Services in Windows 10?
Gaming Services are background processes in Windows 10 designed to enhance gaming performance by managing game installations and updates.
Will disabling Gaming Services improve my computer’s performance?
Yes, if you don’t use them, disabling Gaming Services can free up system resources, potentially improving performance.
Can I re-enable Gaming Services if needed?
Absolutely! Just follow the same steps and set the startup type back to ‘Automatic.’
Will disabling these services affect game performance?
If you’re a gamer, it might negatively impact features like game updates or Xbox Live services, so weigh the pros and cons.
Are there any risks to disabling Gaming Services?
Generally, no major risks are involved, but it may limit certain gaming functionalities if you decide to play games later.
Summary
- Open the Services app.
- Locate ‘Gaming Services.’
- Access Properties.
- Disable the Service.
- Restart Your Computer.
Conclusion
Disabling gaming services on Windows 10 is a straightforward way to potentially boost your computer’s performance by freeing up resources that might otherwise be devoted to gaming functions. If you’re not using your PC for gaming, those services can become like a car idling in your driveway, consuming gas but not getting you anywhere. By shutting them off, you’ll have more resources available for other applications, making everything run a bit smoother.
Once you’ve gone through this process, keep an eye on how your computer performs. You might find that everything loads a bit quicker or that you’re not experiencing as many slow-downs when running multiple applications. If you ever decide to dive back into gaming, you can easily switch those services back on.
For further reading, consider exploring other performance-enhancing tweaks available in Windows 10. Always remember, maintaining your computer’s health is an ongoing process, much like taking care of a garden. Regular maintenance can keep things running smoothly and efficiently. If you’re looking to dive deeper into Windows management, look for guides on managing startup programs or optimizing system settings.
Matt Jacobs has been working as an IT consultant for small businesses since receiving his Master’s degree in 2003. While he still does some consulting work, his primary focus now is on creating technology support content for SupportYourTech.com.
His work can be found on many websites and focuses on topics such as Microsoft Office, Apple devices, Android devices, Photoshop, and more.
Windows 10 1903 coming out in May 2019 adds two new Gaming services namely GamingService and GamingServiceNet. You know Microsoft is testing new features of the upcoming version in 19H1 through Insiders. With the Installation of new build, these services will start automatically and stay in the device thereafter.
WalkingCat ran down a new app in Microsoft Store named Gaming Services for Windows 10 18262.0 or higher. In reality, this is not an app rather will install the two more new services in the devices having Windows 10 1903 and 20H1 insiders. Both of these are set to automatic inclusion and you cannot actually make them manual. The app contains everything including the app folder named GamingServices.exe. along with Drivers. To cite an example- the xvdd.inf and * .cat, as well as the gameflt.inf and * .cat.
Windows 10 1903 Adds two new Gaming services and an app in Microsoft Store
We are not sure what actually the main intention behind the launching of this application. Rumors spreading all around that it has a significant link up with the development of xCloud project that Microsoft is planning to launch as public tests in later part of this year.
Though most of the information are literally unknown, you can yet go for installing the App in the device. Few reports are coming that this cannot be installed using the right click option only rather needs to work in PowerShell. With all the detailed descriptions yet to come, this is going to be another game-changing Achievement for the Tech Giants, pin that.
How to Uninstall Gaming Services Windows 10
Uninstalling Gaming Services on Windows 10 is a straightforward process that you can complete in just a few minutes. This article will provide step-by-step instructions on how to do it. Essentially, you’ll be using the Settings app and PowerShell to remove these services from your system. By following this guide, you can free up space and potentially improve your PC’s performance.
In this section, you’ll learn how to completely remove Gaming Services from your Windows 10 machine. These steps involve accessing your Settings and running a simple PowerShell command.
Step 1: Open Settings
First, click on the Start menu and select the «Settings» icon.
Navigating to the Settings app is easy; just look for the gear icon in your Start menu. This is your control hub for most system configurations.
Step 2: Go to Apps
Once you’re in Settings, click on «Apps.»
In the Apps section, you’ll find a list of all installed programs and features on your computer. This is where you can uninstall various software.
Step 3: Search for Gaming Services
In the search bar within the Apps section, type «Gaming Services.»
This helps to quickly filter through the list of installed apps so you can find Gaming Services without scrolling endlessly.
Step 4: Uninstall Gaming Services
Click on Gaming Services and select «Uninstall.»
A prompt will appear asking for confirmation. Confirm to proceed with the uninstallation. This removes the main chunk of Gaming Services from your system.
Step 5: Open PowerShell as Admin
Right-click the Start menu and choose «Windows PowerShell (Admin).»
PowerShell is a powerful tool, and running it as an admin gives you the necessary permissions to make system changes.
Step 6: Run the Removal Command
Type the following command into PowerShell and hit Enter: Get-AppxPackage *gamingservices* -allusers | remove-appxpackage
This command sweeps out any remaining traces of Gaming Services that might not have been removed during the usual uninstallation process.
After completing these steps, Gaming Services will be entirely removed from your system. You should notice a slight increase in available space and possibly an uptick in performance.
Tips for How to Uninstall Gaming Services Windows 10
- Backup Your System: Before making any changes, it’s always a good idea to create a system restore point.
- Check for Dependencies: Ensure no other apps rely on Gaming Services before removing it.
- Use PowerShell with Care: Be cautious when using PowerShell commands as they can significantly alter your system.
- Stay Updated: Ensure your Windows updates are current to avoid any potential issues post-uninstallation.
- Reinstall if Needed: If you find you need Gaming Services later, you can always reinstall it from the Microsoft Store.
Frequently Asked Questions
What are Gaming Services?
Gaming Services are components of Windows 10 that manage installation and updates for games, particularly those from the Microsoft Store.
Will uninstalling Gaming Services affect my games?
Uninstalling Gaming Services may affect games that rely on it for updates or installation. Make sure to check if your games need it.
Is it safe to use PowerShell for this?
Yes, but use it carefully. PowerShell commands can make significant changes to your system.
Can I reinstall Gaming Services if needed?
Yes, you can reinstall Gaming Services from the Microsoft Store if you find you need it later.
How much space will I save by uninstalling Gaming Services?
The space saved varies, but you could potentially free up around 100 MB.
Summary
- Open Settings.
- Go to Apps.
- Search for Gaming Services.
- Uninstall Gaming Services.
- Open PowerShell as Admin.
- Run the removal command.
Conclusion
Uninstalling Gaming Services on Windows 10 is a task that anyone can tackle with a bit of guidance. This guide has walked you through each step, from accessing the Settings app to running a PowerShell command. It’s a pretty straightforward process that doesn’t take much time but can free up space and resources on your computer.
If you’ve followed along, you’ve successfully removed Gaming Services from your system. This might not seem like a huge change, but every bit of freed-up space and processing power can help improve your computer’s performance. For those who don’t game much or use alternative platforms, this is a handy tweak.
Remember, technology is always changing, and staying informed about how to manage your system is crucial. If you’re interested in learning more about how to optimize your Windows 10 experience, there are countless resources available online. From forums to video tutorials, never hesitate to dive deeper. Happy computing!
Kermit Matthews is a freelance writer based in Philadelphia, Pennsylvania with more than a decade of experience writing technology guides. He has a Bachelor’s and Master’s degree in Computer Science and has spent much of his professional career in IT management.
He specializes in writing content about iPhones, Android devices, Microsoft Office, and many other popular applications and devices.
Read his full bio here.