
System Monitor II
для Windows
System Monitor II — гаджет для боковой панели ОС Windows Vista/7/8/8.1/10, который в реальном времени наглядно отображает загрузку и температуру процессора (для многоядерных ЦП информация предоставляется для каждого ядра в отдельности) и использование оперативной памяти (как физической, так и виртуальной). Также утилита предоставляет быстрый доступ к диспетчеру задач или монитору ресурсов.
Что нового в System Monitor II 31.5?
- Улучшения в работе программы
ТОП-сегодня раздела «Мониторинг»
MSI Afterburner 4.6.5
MSI Afterburner — настоящая находка для истинного оверклокера, с помощью которой можно…
SpeedFan 4.52
SpeedFan — бесплатный и удобный в использовании инструмент для контроля за температурой и…
Speccy 1.33.079
Speccy — небольшая бесплатная программа, позволяющая узнать массу полезной информации об…
HWMonitor 1.57
HWMonitor — бесплатная утилита для мониторинга параметров работы различных компонентов ПК,…
Quick CPU 4.10.0
Бесплатная, но очень мощная программа, разработанная для настройки и мониторинга…
Отзывы о программе System Monitor II
1 про System Monitor II 27.0 [05-08-2019]
не удаляются dll файлы в папке C:\Users\****\AppData\Local\Microsoft\Windows Sidebar\Gadgets\SystemMonitorII.gadget возможно заразно, плока не разобрался как удалить
7 | 14 | Ответить
DOG666 про System Monitor II 20.8 [26-01-2015]
Гаджет очень помогает,жаль только что здесь на сайте обновления появляются с запоздание,
а на оф. сайте очень сложно скачать без вирусов
20 | 17 | Ответить
гаджет температуры процессора и видеокарты для windows 7, windows 10
Проблема перегрева грозит любому компьютеру или ноутбуку. А как известно длительный перегрев может обернуться куда более серьезными последствиями и затратами. Два компонента компьютера наиболее подверженных перегреву это процессор и видеокарта. Чтобы не допустить этого советуем вам установить гаджеты, отображающие температуры процессора и видеокарты прямо на рабочем столе. С их помощью вы всегда сможете контролировать температуры ваших компьютеров и своевременно выполнять им чистку и замену термопасты. Работоспособность гаджетов проверена на windows 7, windows 8.1 и windows 10.
All CPU Meter — Гаджет температуры процессора для windows 7, Windows 10 и Windows 8.1
Представляем вашему вниманию лучший гаджет рабочего стола, который отображает массу полезной информации в реальном времени о вашем процессоре, включая его температуру! Также All Cpu Meter показывает название процессора, его логотип, частоту, на которой он работает, имя компьютера, общий и свободный объем оперативной памяти, загрузку каждого ядра процессора и их температуру. Работоспособность данного гаджета температуры процессора проверена на windows 7, windows 8.1 и windows 10. Для корректной работы гаджета требуется PCMeter.
Скачать гаджет
Скачать PC Meter
Настройка гаджета отображения температуры процессора All Cpu Meter
1.Скачиваем и устанавливаем гаджет All Cpu Meter;
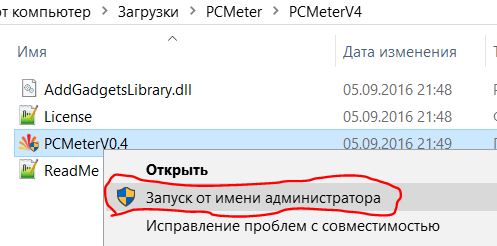
2.Скачиваем и запускаем программу PC Meter от имени администратора;
3. Вызываем окно программы PC Meter;
4. Проверяем, чтобы стояли все галочки в настройках;
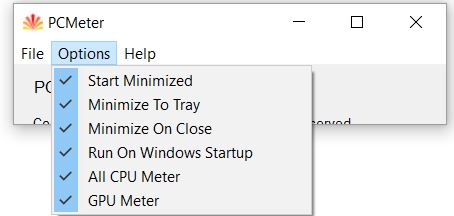
С такими настройками программа будет сама запускаться вместе с Windows и вам не придется ее запускать каждый раз вручную, чтобы отображалась температура процессора и видеокарты.
5.Заходим в настройки гаджета;
6.На вкладке «Options» в строке «Show CPU temperatures» выбираем «ON(PC Meter)»;
7.Применяем настройки, нажатием на кнопку Ok;
GPU Meter — Гаджет температуры видеокарты для windows 7, Windows 10 и Windows 8.1
GPU Meter это лучший гаджет рабочего стола Windows для отображения температуры видеокарты в реальном времени! Благодаря ему вы в любой момент времени можете отслеживать температуру вашей видеокарты. Помимо этого гаджет показывает производителя и наименование видеокарты, ее тактовую частоту, общий и использованный объем видеопамяти, скорость вращения вентилятора. Если вам нужен гаджет температуры видеокарты, то GPU Meter это лучшее решение данного вопроса.
Скачать гаджет
Скачать PC Meter
Настройка гаджета отображения температуры видеокарты GPU Meter
1.Скачиваем и устанавливаем гаджет GPU Meter;
2.Скачиваем и запускаем программу PC Meter от имени администратора;
3. Вызываем окно программы PC Meter;
4. Проверяем, чтобы стояли все галочки в настройках;
С такими настройками программа будет сама запускаться вместе с Windows и вам не придется ее запускать каждый раз вручную, чтобы отображалась температура процессора и видеокарты.
5.Заходим в настройки гаджета;
6.На вкладке «Options» в строке «Select Method» выбираем «ON(PC Meter)»;
7.Применяем настройки, нажатием на кнопку Ok;
Расскажите о нас в социальных сетях. Помогите нашему сайту!
When it comes to keeping your Windows 10 computer running smoothly, monitoring the temperature of your CPU is crucial. Did you know that high CPU temperatures can lead to system instability, reduced performance, and potentially even hardware damage? This is where the CPU Temp Widget for Windows 10 comes in. By providing real-time temperature readings, this widget allows you to keep a close eye on your CPU’s temperature and take necessary actions to prevent overheating and maintain optimal performance.
CPU Temp Widget for Windows 10 is a powerful tool that not only displays the current CPU temperature but also allows you to track temperature fluctuations over time. With its user-friendly interface, you can easily monitor the health of your CPU and make informed decisions about cooling solutions. The widget also offers customizable temperature alerts, so you can be notified when the temperature reaches a critical level. By using this widget, you can effectively prevent overheating issues and prolong the lifespan of your Windows 10 computer, ensuring smooth and efficient performance for all your tasks and activities.
Keep your CPU running smoothly with a temperature widget on your Windows 10 desktop. Monitoring your CPU temperature is crucial to prevent overheating and ensure optimal performance. There are several CPU temp widgets available for Windows 10 that provide real-time temperature readings, customizable alerts, and system optimization features. Simply download and install a trusted widget like Core Temp, HWMonitor, or SpeedFan, and keep an eye on your CPU temperature at all times. Don’t let your CPU get too hot — protect it with a reliable CPU temp widget on Windows 10.
Understanding CPU Temperature Monitoring Widgets for Windows 10
In the world of computer hardware, it is crucial to keep an eye on the temperature of your CPU (Central Processing Unit). Overheating can cause performance issues, system instability, and even permanent damage to your processor. To prevent these problems, many Windows 10 users turn to CPU temperature monitoring widgets, which provide real-time temperature monitoring and help users make informed decisions about their device’s cooling needs. In this article, we will explore the benefits, features, and installation process of CPU temp widgets for Windows 10.
1. Benefits of CPU Temp Widgets
The use of a CPU temperature monitoring widget offers several advantages to Windows 10 users:
- Real-time Temperature Monitoring: CPU temp widgets provide real-time temperature readings, allowing users to monitor their CPU’s temperature at all times. This information is crucial for identifying overheating issues promptly.
- Prevent Overheating: By keeping a constant eye on your CPU’s temperature, you can take proactive measures to prevent overheating. This includes adjusting cooling fan speeds, optimizing airflow, or installing additional cooling solutions.
- Optimize Performance: Overheating can cause performance degradation and throttling. By monitoring the temperature, you can ensure that your CPU operates at optimal temperatures, maximizing its performance potential.
- Extend Hardware Lifespan: High temperatures can shorten the lifespan of your CPU. With a CPU temp widget, you can actively manage and maintain safe operating temperatures, potentially extending the longevity of your hardware.
1.1. Real-time Temperature Monitoring
One of the primary benefits of CPU temp widgets is the ability to monitor the temperature of your processor in real-time. These widgets provide live updates, allowing you to see the temperature fluctuations as you perform various tasks on your computer. This feature is essential for identifying sudden increases, excessive spikes, or persistently high temperatures that may indicate cooling issues or inadequate hardware ventilation.
With real-time temperature monitoring, you can keep track of your CPU’s temperature and take necessary actions immediately. If you notice the temperature rising too high, you can adjust fan speeds, check for dust buildup in the cooling system, or optimize your cooling setup to avoid overheating-related performance problems or hardware damage.
Moreover, by having access to real-time temperature data, you can experiment with different cooling configurations or cooling solutions and observe their impact on CPU temperatures. This allows you to fine-tune your cooling setup to achieve the best balance between performance, temperature, and noise levels.
1.2. Preventing Overheating
Overheating is a common problem among computer systems and can lead to various issues such as system crashes, performance degradation, and even permanent damage to your hardware components. A CPU temp widget is an invaluable tool for preventing overheating as it provides continuous temperature monitoring, ensuring that you can catch and address any overheating concerns before they become severe.
With the help of a CPU temp widget, you can keep a close eye on your CPU’s temperature and set thresholds for temperature alerts. If the temperature goes beyond the specified threshold, the widget can trigger an alarm or a notification, alerting you to the potential heating problem. This prompt warning system enables you to take immediate action, such as adjusting fan speeds, installing additional cooling measures, or cleaning the cooling system to eliminate any thermal throttling issues.
By proactively preventing overheating, you can ensure the stability and longevity of your system, as well as maintain optimal performance during demanding tasks such as gaming, video editing, or running resource-intensive applications.
1.3. Performance Optimization
CPU temperature is closely linked to performance. As your CPU temperature rises, the performance can start to suffer due to thermal throttling. When a CPU reaches a certain temperature threshold, it automatically reduces its clock speed to generate less heat, which lowers performance to prevent overheating.
By using a CPU temp widget, you can monitor your CPU temperature and make the necessary adjustments to maintain optimal performance. For example, if you notice your CPU running at higher temperatures during resource-intensive tasks, you can identify potential cooling issues and take corrective actions such as adjusting fan speeds, applying new thermal paste, or ensuring proper airflow within your computer case.
Optimizing your CPU temperature can help prevent performance degradation due to thermal throttling, allowing your processor to deliver its maximum potential during demanding workloads or gaming sessions.
1.4. Hardware Longevity
Excessive heat is one of the leading causes of hardware failure. Continuous exposure to high temperatures can significantly reduce the lifespan of your CPU and other components. By using a CPU temp widget, you can actively monitor and manage the temperature of your CPU, ensuring it operates within safe limits and promoting the longevity of your hardware.
By maintaining optimal operating temperatures, you can reduce stress on sensitive components and mitigate the risks of thermal damage. This includes ensuring proper cooling, adequate airflow, and appropriate thermal paste application. A CPU temp widget serves as a valuable tool in this regard, notifying you of any potential temperature issues so you can take preventative actions and preserve the health and lifespan of your CPU.
Overall, CPU temp widgets offer numerous benefits, including real-time temperature monitoring, preventing overheating, optimizing performance, and extending the lifespan of your hardware. By utilizing these widgets, Windows 10 users can ensure their CPU operates effectively and reliably.
2. Installing CPU Temp Widgets on Windows 10
Installing a CPU temp widget on your Windows 10 system is a straightforward process. Here’s a step-by-step guide to help you get started:
| Steps | Instructions |
|---|---|
| Step 1 | Open your preferred web browser and search for CPU temp widget software compatible with Windows 10. |
| Step 2 | Select a reliable and trusted source to download the CPU temp widget software. |
| Step 3 | Once downloaded, open the installation file. |
| Step 4 | Follow the on-screen prompts to complete the installation process. |
| Step 5 | Launch the CPU temp widget software after installation. |
| Step 6 | The widget should now be visible on your desktop or taskbar. |
It’s worth noting that there are several CPU temp widget software options available for Windows 10 users, each with its own unique features and interface. Some popular choices include Core Temp, HWiNFO, and Rainmeter. Researching and selecting the right software for your needs is essential.
2.1. Core Temp
Core Temp is a widely used and highly regarded CPU temp monitoring software for Windows. It provides accurate temperature readings for individual CPU cores, as well as additional information such as CPU model, frequency, load, and more. To install Core Temp:
- Visit the official Core Temp website or a trusted software download site.
- Download the latest version of Core Temp compatible with Windows 10.
- Run the installation file and follow the on-screen instructions to complete the installation.
- Launch Core Temp after installation, and the widget will appear on your desktop or taskbar.
With Core Temp, you can customize the widget’s appearance, set temperature thresholds, and receive temperature alerts when the CPU reaches dangerous levels.
2.2. HWiNFO
HWiNFO is a comprehensive hardware monitoring utility that includes CPU temperature monitoring. It provides detailed information about your hardware components, along with real-time temperature updates and other system metrics. To install HWiNFO:
- Visit the official HWiNFO website or a trusted software download site.
- Download the correct version of HWiNFO for your Windows 10 architecture (32-bit or 64-bit).
- Run the installation file and follow the on-screen prompts to install the software.
- Launch HWiNFO after installation, and you will find CPU temperature information displayed within the application’s interface.
While HWiNFO doesn’t have a dedicated desktop widget, it offers a wealth of information and customization options for monitoring various aspects of your system’s hardware, including CPU temperature.
Remember to choose a CPU temp widget that aligns with your specific needs and preferences. Ensure that you download and install software from reputable sources to minimize the risk of malware or other security issues.
3. Maximizing the Use of CPU Temp Widgets
To make the most of your CPU temp widget, consider the following tips:
- Keep an Eye on Temperature Trends: Observe temperature trends over time to identify recurring patterns, potential performance bottlenecks, or cooling inefficiencies.
- Set Thresholds and Alerts: Configure your CPU temp widget to notify you when temperatures exceed predefined thresholds, ensuring prompt action.
- Compare Temperatures under Different Workloads: Run various applications or perform resource-intensive tasks to assess how CPU temperatures fluctuate under different workloads.
- Monitor Cooling System Performance: Regularly check the performance of cooling fans, heatsinks, and other cooling components to ensure they are functioning optimally.
Additionally, it is crucial to keep your system clean and free of dust to prevent airflow restrictions. Dust buildup can impede cooling efficiency and cause temperatures to rise. Therefore, periodic cleaning of your computer’s cooling system is highly recommended.
3.1. Overclocking Considerations
If you engage in CPU overclocking, it is essential to pay close attention to temperatures. Overclocking increases the CPU’s operating frequency, generating more heat. As a result, the temperature of an overclocked CPU can rise significantly. A CPU temp widget becomes even more crucial in this scenario, allowing you to monitor temperature levels and adjust cooling solutions accordingly to maintain stability.
During the overclocking process, it may be necessary to increase cooling capacity, such as using a more robust CPU cooler or adding additional cooling fans. The ability to monitor temperature changes in real-time using a CPU temp widget helps ensure the system remains stable during overclocked operations.
4. Exploring Advanced Features of CPU Temp Widgets
CPU temp widgets come with various advanced features and customization options, allowing users to tailor the widget to their specific requirements. Some of these features include:
- Temperature Alerts: Set custom temperature thresholds and receive alerts or notifications when the CPU temperature exceeds the predetermined limits.
- Graphical Displays: Display real-time temperature data in an easily understandable graphical format, such as line graphs or thermometer-style indicators.
- Logging and Data Analysis: Log temperature data over time to analyze trends, identify patterns, and troubleshoot recurring temperature issues.
- Customization Options: Customize the appearance of the widget, including color schemes, transparency levels, and widget placement on the desktop or taskbar.
- Compatibility: Ensure compatibility with your specific CPU model, as some CPU temp widgets may offer enhanced features or support for specific processors.
Exploring these advanced features can help you make the most of your CPU temp widget and tailor it to your monitoring needs.
Conclusion
CPU temp widgets are invaluable tools for Windows 10 users, providing real-time temperature monitoring and helping prevent overheating, optimize performance, and extend hardware lifespans. By using CPU temp widgets such as Core Temp or HWiNFO, users can keep track of their CPU temperatures and take necessary actions to maintain stability and performance. With the advanced features and customization options these widgets offer, monitoring and managing CPU temperatures has never been easier. So, get started with a CPU temp widget and ensure the optimal performance and longevity of your Windows 10 system.
CPU Temperature Widget for Windows 10
A CPU temperature widget for Windows 10 provides real-time information about the temperature of your computer’s central processing unit. This widget is a useful tool for monitoring the CPU temperature to ensure that it stays within safe operating limits.
The CPU temperature can affect the overall performance and lifespan of your computer. If it gets too hot, it can lead to system instability, component damage, and even system failure. By using a CPU temperature widget, you can keep an eye on the temperature and take appropriate measures to prevent overheating.
There are various CPU temperature widgets available for Windows 10 users. They come with different features and customization options. Some widgets provide a simple temperature reading, while others offer additional information such as fan speed and CPU load.
Installing a CPU temperature widget is relatively easy. Most widgets can be downloaded and installed from the Microsoft Store or other trusted sources. Once installed, you can place the widget on your desktop or taskbar for easy access. Some widgets also allow you to set temperature thresholds, so you receive notifications when the temperature exceeds a certain limit.
Monitoring your CPU temperature using a widget is an essential step in maintaining your computer’s health and performance. Make sure to choose a reliable and accurate widget that meets your needs and preferences.
Key Takeaways: CPU Temp Widget Windows 10
- A CPU temp widget for Windows 10 is a tool that displays the temperature of your computer’s processor.
- Monitoring the CPU temperature can help you ensure that your computer is running optimally and prevent overheating.
- Installing a CPU temp widget on Windows 10 can provide real-time temperature readings for your processor.
- Some CPU temp widgets also offer additional features such as fan speed monitoring and CPU performance optimization.
- Using a CPU temp widget can help you identify any potential issues with your computer’s cooling system.
Frequently Asked Questions
Here are some commonly asked questions about CPU temperature widgets for Windows 10:
1. How can I monitor CPU temperature on Windows 10?
To monitor CPU temperature on Windows 10, you can use a CPU temp widget. These widgets are small programs that provide real-time information about the temperature of your CPU. They can be installed on your desktop or added to your taskbar for easy access.
To install a CPU temp widget, you can search for one online or visit popular software download websites. Once you find a suitable widget, simply download and install it on your Windows 10 system. The widget will then display the current CPU temperature and may also provide additional features like temperature alerts and historical temperature data.
2. Are there any recommended CPU temp widgets for Windows 10?
Yes, there are several recommended CPU temp widgets for Windows 10. One popular option is Core Temp, which provides accurate temperature readings for each CPU core in real-time. Another well-known widget is HWMonitor, which displays the CPU temperature along with other hardware information.
Other notable CPU temp widgets include Open Hardware Monitor, SpeedFan, and Rainmeter (with appropriate plugins). It’s recommended to read user reviews and check the system requirements before downloading and installing a CPU temp widget to ensure compatibility with your Windows 10 system.
3. Can a CPU temp widget help prevent overheating?
A CPU temp widget alone cannot prevent overheating, but it can assist in monitoring and preventing potential overheating issues. By continuously monitoring the CPU temperature, a widget can provide real-time feedback on whether the CPU is operating within safe temperature ranges. It can also alert you if the temperature exceeds a certain threshold.
To prevent overheating, you should also ensure proper airflow within your computer case, clean dust from fans and heatsinks regularly, apply thermal paste correctly, and consider additional cooling solutions such as installing additional case fans or using liquid cooling systems. A CPU temp widget can be a helpful tool in this overall strategy.
4. Can I customize the appearance of a CPU temp widget in Windows 10?
Yes, many CPU temp widgets for Windows 10 allow customization of their appearance. You can usually change the widget’s size, color, transparency, and position on your desktop or taskbar. Some widgets may also offer different themes or skins to match your personal preferences or desktop theme.
However, the extent of customization options may vary depending on the specific CPU temp widget you choose. It’s advisable to explore the settings and options provided by the widget to customize its appearance according to your liking.
5. Can a CPU temp widget impact the performance of my computer?
A well-designed and lightweight CPU temp widget should have minimal impact on the performance of your computer. These widgets are designed to run in the background and consume very little system resources. Therefore, you can use a CPU temp widget without worrying about significant performance degradation.
However, it’s important to download CPU temp widgets from trusted sources to ensure that they do not contain any malicious code or adware that can negatively impact your computer’s performance. It’s also recommended to regularly update the widget to benefit from any performance optimizations or bug fixes provided by the developer.
In conclusion, a CPU Temp Widget for Windows 10 is a useful tool that allows you to monitor the temperature of your computer’s CPU in real-time. With this widget, you can keep track of your CPU’s temperature to ensure optimal performance and prevent overheating.
By installing a CPU Temp Widget, you can easily view your CPU’s temperature at a glance without the need for complex software or manual monitoring. This can help you identify any potential issues with overheating and take appropriate measures to protect your computer’s hardware.
Worried about the CPU temperature? Well, here is the list of the best CPU temperature monitor tools for Windows 11 and 10 PC or Laptop. Generally, most people don’t care about CPU temperature. But, do you know that too much temperature can damage the CPU? That’s why you should monitor the resources of your PC or Laptop.
So, always monitor the CPU Utilization (usage), CPU temperature, RAM usage, and fan speed. However, you can see the Real-time CPU usage and RAM usage from the task manager.
Press Ctrl + Shift + Esc from the keyboard to open the task manager and after that click on the More Detail option from the bottom. You’ll see the real-time CPU, Memory (RAM), Disk, Network, and Power usage.
Also, click on the Performance tab to see the CPU, Memory, and Disk activity in detail. The task Manager Performance tab gives information about clock speed, Processes, Threads, and Handles.
Sadly, the task manager doesn’t give any option to see the system temperature. Also, there is no inbuilt option in Windows OS to get this information. Don’t worry; some software and tools available for Windows 10, 8, and 7 to monitor the CPU temperature will discuss in this post.
What is CPU Temperature?
Well, the Processor works by enabling or disabling the electric signals. So, the electricity passes through its transistors and generates heat.
Generally, the temperature depends on the CPU load. The processor generates more heat in a heavy load. While rendering the videos or playing the games, the heat will spike. Because heavy load requires more power and more power generates more heat.
When you turn on the PC or Laptop, the idle temperature is 30° C to 65° C, depending on the background processes. The ideal or normal temperature varies from PC to PC and manufacturer to manufacturer.
Nowadays, the max temperature of processors is 100 to 110. So, in most cases, you don’t need to worry about it. Also, all PCs and Laptops have a cooling system to reduce heat. The fan speed automatically increases when the CPU generates more heat.
What happens when the CPU temperature is high?
Nowadays, computers are smarter and the system automatically decreases the performance to maintain the specific temp. Also, the system shuts down automatically, when the temperature goes to the specified limit.
However, most of the processors can handle temperatures up to 100 C. But, it doesn’t mean you can use the system with high temperatures for a long time. It negatively impacts the processor’s performance.
So, you need to know the temperature of the CPU of your system. However, you’ll see the temp in BIOS, but it may be an intricate process for you. Below is the list of the best tools available to monitor CPU temp.
List of Best CPU Temperature Monitor Tools for Windows 11/10
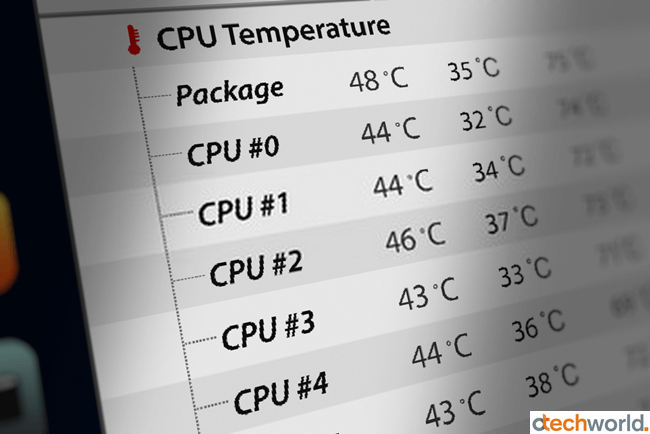
Modern processors can report the temperature of each core because all processors have an inbuilt “Digital Thermal Sensor”. So, these tools read the sensors of Intel and AMD processors and show the information.
1. SpeedFan
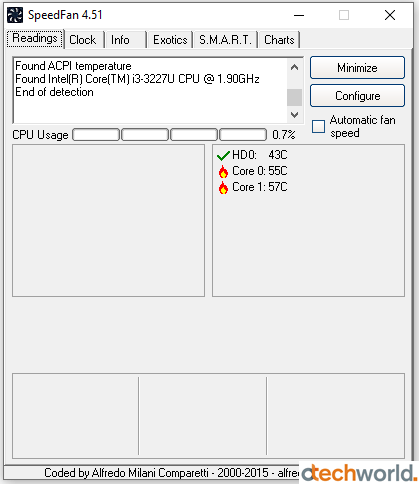
Speedfan is one of the most popular tools to monitor temperature, fan speed, and voltages in computer systems. It can access all temperature sensors that exist on the CPU, motherboard, and Video card. Well, the best thing about Speedfan is, it works on all Windows OS versions, including Windows 10, 8, 8.1, 7, Windows Vista, Windows XP, 2003, 2000, NT, ME, and 95.
When you open the Speedfan, you’ll see all CPU cores temp and CPU usage. The user interface of this tool is quite friendly. Also, it gives some advanced features too.
It also shows the hard disk temperature because it can read S.M.A.R.T information. Like processors, hard disks can also report their health and other data. Also, it supports SCSI hard disks.
Speedfan is also able to change fan speed by accessing inbuilt digital temperature sensors. You just need to enable the “Automatic fan speed” option from the tool. After that, it controls the fan speed smartly. It increases the fan speed only when required. However, nowadays, this feature is inbuilt into all Laptops and PCs.
Speedfan can handle any number of hardware monitor chips, temperature readings, South Bridges, fan speed readings, hard disks, PWMs, and voltage readings.
2. HWMonitor
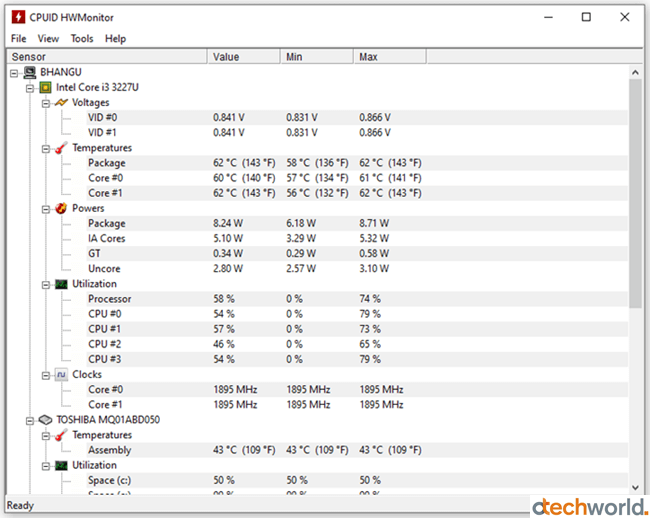
HWMonitor is another popular and simple temperature, voltage, and fan speed monitor tool that accesses and shows the information from systems sensors. The software is developed by CPUID Software which developed the CPU-Z software.
The software is lightweight and gives results fast. However, it shows the fan speed, but you can’t control the fan speed with it.
The tool shows the values of CPU (voltages, temperatures, powers, clocks, and utilization), GPU (temperatures, clocks, and utilization), Hard disk (temperature and utilization), and Battery (voltages, capacities, and levels). It provides the detailed values of sensors like the IT87 series and most Winbond ICs.
The UI of HWMonitor is user-friendly. After opening the tool, you’ll see all sensor’s values on the window. It also shows the minimum and maximum values.
Well, it supports both 32-bit and 64-bit OS versions. So, you don’t need to worry about installation. Also, both installable and non-installable files are available to download.
However, the HWMonitor tool is free, but the pro version also exists with additional features. In the pro version, you’ll get Remote Monitoring, Data logging with Graph Generator, Firewall consideration, and a customizable interface. Using the Remote Monitoring feature, you can see the values from any computer or Android smartphone. With Graph Generator, you can save the monitoring data.
3. Core Temp
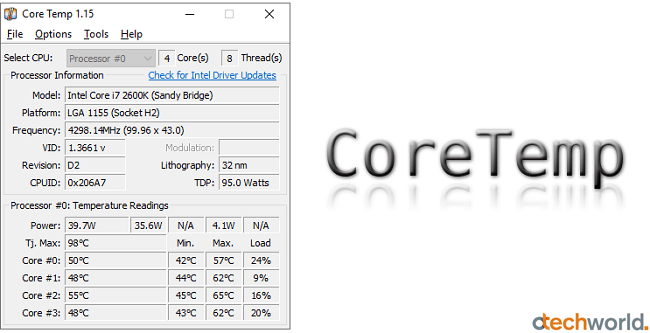
The Core Temp is next on our list. The software is simple, compact, lightweight, and comes with a user-friendly interface. Well, its name says its functionality. It gives the temperature information of each core of the processor.
Moreover, it gives more imperative information about the CPU like Power, TDP, VID, and Frequency. After opening the tool, you’ll see all the real-time information.
You can install this tool on any version of Windows OS. It supports Windows 10, 8, 7, Vista, XP, 2016 server, 2012 server, 2008 server, and 2003 server. Moreover, it also supports all x86 processors of all manufacturers – Intel, AMD, and VIA.
However, CoreTemp gives you text information. But, it also provides an add-on for a graph view. You need to download the Core Temp Gadget, and after that, you’ll be able to see the CPU load, temp, and utilization information in a graph.
The graph is resizable and its colors are customizable. You can change the colors from the options.
Apart from this, the CoreTempMC add-on (Windows Media Center Add-on) is also available which allows you to see the CoreTemp information from the Windows Media Center. Also, you can see this information remotely.
To expand its features, you can add more add-ons that are provided by CoreTemp developers. Core Temp Remote Server, Core Temp Grapher Beta, Core Temp mIRC Script, and VC Temp add-ons available.
4. Open Hardware Monitor
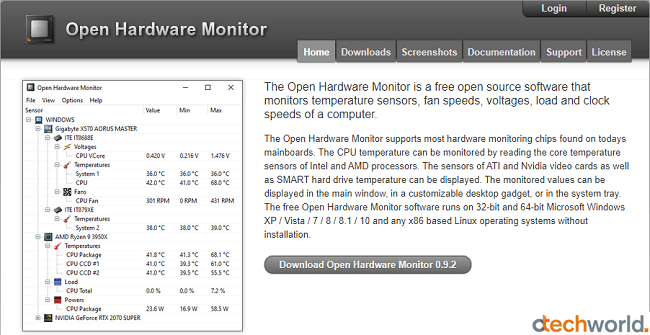
Open Hardware Monitor is another best, free, lightweight, and open-source tool to monitor the processor’s temperature. Moreover, it gives information about fan speed, voltages, clock speed, and CPU load.
It supports all core sensors of Intel and AMD processors, hard disks S.M.A.R.T temperature sensors, and SSD wear level and host reads/writes. This tool reads the GPU sensors and shows Nvidia, ATI, and AMD GPU information.
The user interface is user-friendly and simple, almost the same as the HWMonitor. But, it offers some more features than HWMonitor. Open Hardware Monitor supports fan controllers, that are not available in HWMonitor. The available fan controllers are T-Balancer bigNG and Alphacool Heatmaster.
The Open Hardware Monitor tool can run on all 32-bit and 64-bit Windows versions including Windows 10, 8, 8.1, 7, XP, and Vista. Moreover, you can use it on any x86-based Linux OS.
Well, to use this software, you don’t need to install this software on your machine. Just download the ZIP file and extract the files and open it.
The software shows the sensor’s information on an active window or in the system tray.
5. Real Temp
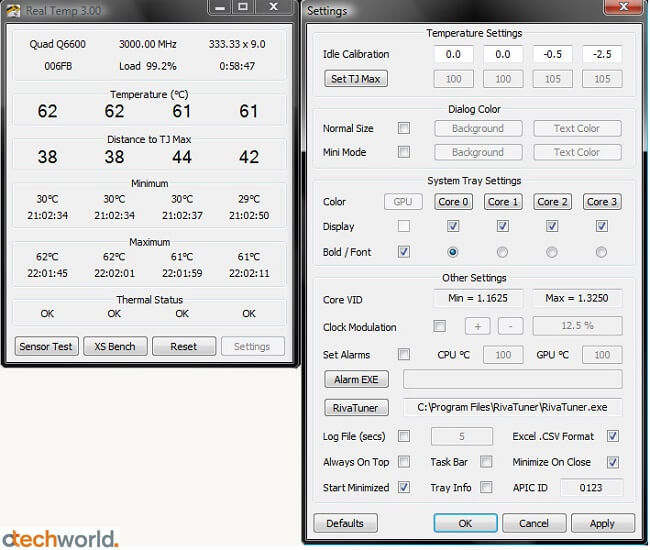
Well, Real Temp gives detailed information, but it only supports the processors from Intel manufacture. The software is generally designed for Intel Core based processors. It can read the sensors of only Intel processors – single-core, dual-core, quad-core, core i7.
Note that, it doesn’t support Intel Pentium and AMD processors.
Like other popular tools, it shows the real temperature of all cores. Moreover, it also records and shows the minimum and maximum temperature of each core.
Well, you can use this tool without installing it on your machine. Just download the ZIP file and you’ll see the program. The program is one of the lightweight in this category, with only about 323KB of a ZIP file.
The best feature of the Real Temp is, it comes with a “High-temperature alarm” and an “Auto shutdown” feature. So, you don’t need to worry about the system’s health after running this program.
You can run this tool on 32-bit and 64-bit Windows OS versions 10, 8, 7, Vista, XP, and 2000.
After opening the program, you will see the values about Temperature, Distance to TJ Max, Minimum and Maximum temp values of each core, and Thermal status. It also shows the MHz, CPUID, APIC ID, and Calibration settings.
6. CPU Thermometer
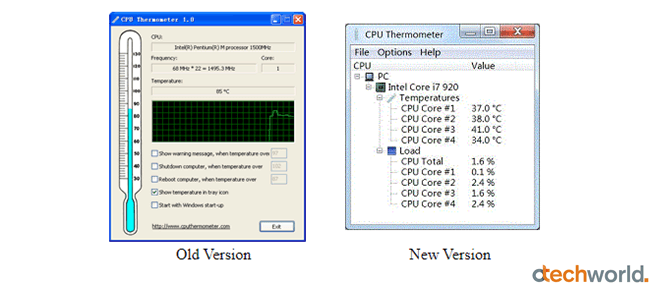
CPU Thermometer is another free and lightweight real-time temperature monitor program. The program size is just 613KB.
You need to install this software on your PC, because, there is no non-installable version available. But, it comes with an “Auto-start” feature. With this feature, the program can run automatically when you turn on your PC and Windows start-up. After that, it shows the information in the system tray.
So, you don’t need to open the program every time you start up your PC or laptop.
The software supports Windows OS (32bit and 64bit) versions 10, 8, 7, and Vista. But, you must have a .NET framework installed on your PC. Without .NET Framework, you can’t install a CPU-Thermometer on your machine.
Well, it supports almost all Intel and AMD processors and shows information about temp, CPUID, Frequency, and load.
The program can show the warnings and shut down or restart the system, when needed, to protect the system from overheating.
The old version of this program shows the graphic thermometer on the active window, but the old version doesn’t work with new versions of Windows OS. Also, the new CPU-Thermometer program is based on Open Hardware Monitor.
The new version of the CPU-Thermometer is similar to the Open Hardware Monitor tool.
7. AIDA64 Extreme
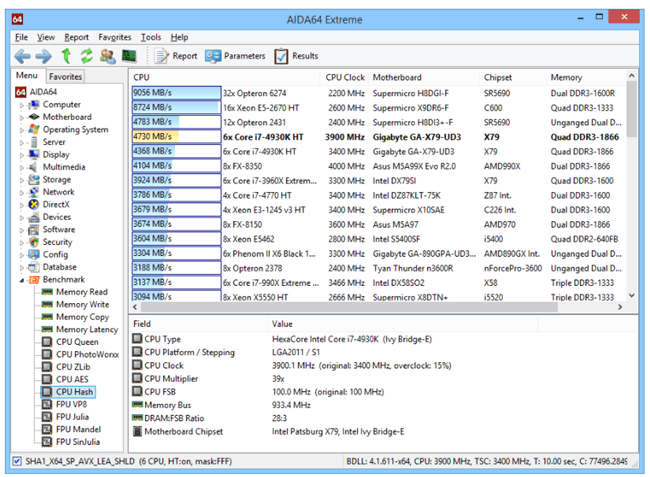
AIDA64 Extreme is a hardware detection engine and system information tool that gives detailed information about hardware and softwares. It also gives the benchmarks to check the machine’s performance. You can also measure the performance of hardware components with its benchmark information.
AIDA64 is an advanced program that supports overclocking. Overclockers are always finding the best tools to monitor CPU information. So, this is the best software for overclockers, because it offers diagnostic functions that help to detect and prevent hardware problems.
Well, the software is not free. It costs $39.95. However, it gives 30 days trial period. So, you can use and check the functionality of the advanced tool for free. But, it limits its features in the trial version.
With this tool, you can get real-time sensor values about fan speed, temperature, and voltage.
You can run AIDA64 Extreme on any version of Windows OS (from Windows 95 to Windows 10). The program is not as lightweight as other free tools, because it gives some advanced functions.
Some of its key features are Diagnostic (information on hardware configuration, softwares, and settings), Stress Testing (Multi-threaded, hard drive, and SSD testing), Accuracy, Benchmarking, Software audit, SensorPanel, External display support, and Measurements information from more than 250 sensors.
8. Speccy
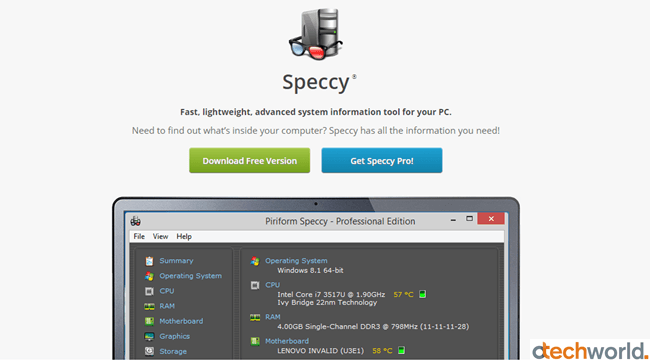
Speccy is a free tool from CCleaner developers. It gives information about all hardware components individually. You’ll see the detailed figures for CPU, Motherboard, RAM, GPU, and Storage.
The user interface of Speccy is user-friendly and when you open the software, you’ll see the summary of all hardware components. However, you can get detailed reports of all components.
The program shows the CPU and Motherboard temperature as well. Moreover, it is not as lightweight as other open-source projects. But, because it is from CCleaner developers, most people have trust in it.
However, the software is free to use with limited features. But, paid versions are also available with advanced PC insights and Premium support.
9. HWInfo
HWInfo is a freeware comprehensive hardware analytic tool. For this advanced and professional information system software, you don’t need to pay anything. The tool is even used by NASA to monitor computer system failures in high-radiation areas.
It gives in-depth hardware information including CPU temperature. Also, it works on all Windows OS versions from Windows 95 to Windows 10.
Well, HWInfo is the best tool to get real-time system monitoring. It can monitor all components of the system like CPU, GPU, Motherboard, Hard Drives, etc.
It helps to prevent system failure by detecting the overheating issue.
The user interface of HWInfo is customizable. There are a lot of options available to customize its interface. Also, it offers a customizable alert feature that helps to set the alert by the desired action.
The software also supports add-ons and extensions to expand its features. There are 12 add-ons available for additional features.
The available extensions are RivaTuner/MSI Afterburner/EVGA Precision On-Screen Display, Rainmeter plug-in, HWiNFOMonitor, Samurize plug-in, LCDHost plug-in, HWiNFO Sidebar Gadget, GenericLogViewer, LCD Smartie plug-in, HWiNFO Portable, Online Report Converter/Viewer, Remote Sensor Monitor, and Aquasuite.
10. Enhanso
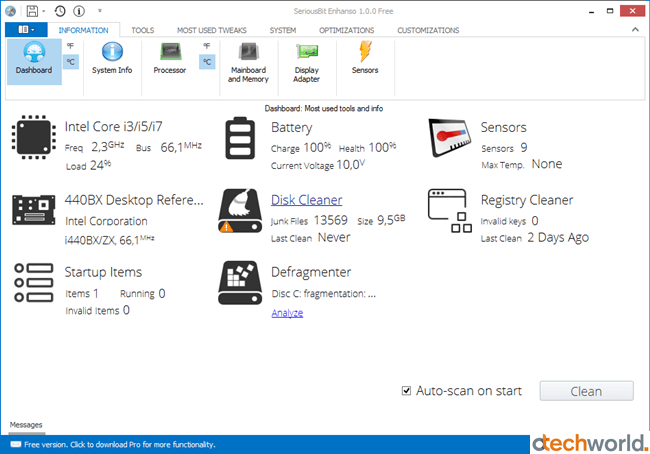
Enhanso is tweaking software for Windows OS to tweak the hardware and software of the system. Well, Enhanso helps you to maintain Windows machines efficiently.
The tool shows information about all components of the system. For temperature monitoring, it detects all sensors and gives the results.
Apart from showing the system information, it offers some other tools that help to make Windows 10 faster.
Its free and paid versions are available with different functionalities. You can get the advanced tools in the paid version which costs you $29.95.
It has inbuilt tools like Disk Defragmenter, Disk Cleaner, Registry Cleaner, Security Tweaks, System Info, and Startup Items.
Enhanso offers detailed information on all components. You’ll see the processor, motherboard, Display Adapter, and Hard Disk.
11. NZXT CAM
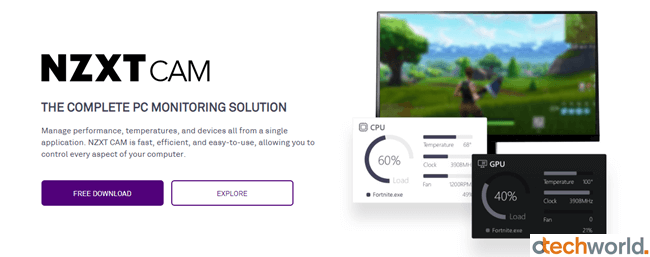
If you’re looking for a complete system monitoring package, then NZXT CAM is best for you. With NZXT CAM, you can easily monitor and manage the temperature and performance of your system.
Well, this tool is designed for gamers. With its In-Game Overlay feature, you can monitor real-time resource usage and processor heating. While playing the games, it shows the real-time FPS, CPU, GPU, and RAM usage.
With this software, you can get the best performance from your PC, because you can keep an eye on all issues.
Moreover, if you have NZXT products in your system, you can control the fan speed, case lights, and PSU voltages.
12. SIW
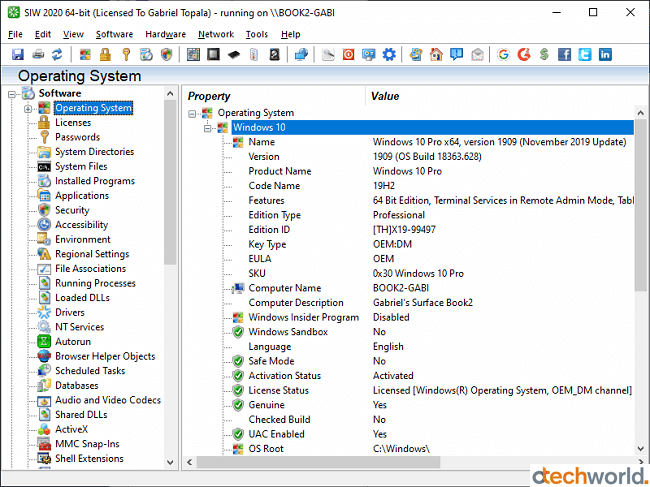
SIW stands for system information for Windows. The tool that reports all information about the system includes software, hardware, network, and tools. Generally, it provides a detailed report about your machine.
SIW also reads and displays the values from system sensors. So, you can get the real-time processor temperature with this tool. Also, you can see the CPU fan speed.
Well, the program is non-installable (portable program) and you can run it directly. Also, you can run it on all Windows OS versions. It supports both client and server platforms.
SIW displays statics in different categories. So, you can see the sensor figures in the Hardware section.
13. Moo0 System Monitor
Moo0 System Monitor is a free software to see the real-time detailed report of system resources. It shows the usage and other statics of CPU, RAM, HDD, and Network. So, the software lets you find the system problems and you can easily diagnose your PC.
It supports Intel and AMD processors to show the temperature. However, some processors are still not supported by it and it shows blank values.
The UI of Moo0 System Monitor is simple and also provides more than 84 skins with different colors. After installing, you’ll see all the details in vertical orders. By default, its auto-hide feature is enabled. You can disable auto-hide from the keyboard by pressing the shift key.
Well, this is the best and simple tool to see the CPU, GPU, and Disk temperature.
14. Game Assistant 2
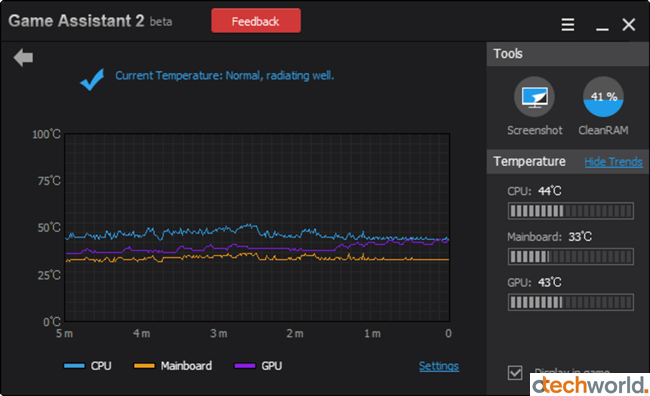
Game Assistant 2 software is specially designed for gamers to monitor the CPU, GPU, and Motherboard temperature while playing the games. The software is simple and comes with an inbuilt RAM cleaner feature. RAM cleaner also helps gamers.
You can also take the screenshot of the reports at any time by clicking on the screenshot option.
Well, its Display in Game feature is the best in class. So, if you’re worried about the CPU overheating, and want to keep an eye on the CPU temp while playing the games on PC, then this program is best for you.
15. Asus AI Suite
If you have an ASUS system, you must have the Asus AI Suite on your machine. It monitors the system status and integrates the ASUS software.
With the Asus AI Suite, you can easily monitor the CPU frequency, temperature, voltage, and fan speed.
The UI of the ASUS AI Suite is quite impressive. Also, you’ll see detailed reports about every component of the system.
The software comes with 4-way optimization and automatically optimizes your PC. Well, the software is designed only for ASUS users.
16. Rainmeter
Rainmeter is a desktop customization tool. But, you can also use it to monitor the CPU temperature.
There are a lot of Rainmeter skins available with different functionality. Some skins provide the system information about CPU, RAM, HDD, and GPU. These skins use CoreTemp tool functionality.
Rainmeter is free to use and you can also create your skins with it. You can add a Core Temp plugin in your custom skin to show the temperature on the desktop.
However, Rainmeter uses few resources, but it is not lightweight as other programs like Open hardware programs, etc. Also, it uses core temp functionality to show the system information.
How to Reduce CPU Temperature
Well, CPU Temp monitor tools only show the temperature values and don’t give any option to reduce them. Don’t worry; there are some tips available to keep your system cool.
- Avoid OverClocking: You should avoid overclocking the CPU until required.
- Clean your system: You should clean the system’s parts (especially fans) regularly. CPU fan plays a major role to keep the CPU cool.
- Boost Airflow: You can reduce the heat in the system case by boosting the airflow.
- Use a Better Cooling System: Fans play the main role to keep the system cool. If you have a low-quality cooling system, you need to upgrade it. If required, go for the liquid cooling system.
- Change the Location of the system: Yes, the location of the system also matters. You should keep placing your PC in a cool place.
- Apply the thermal paste on the CPU.
- Use cooling Pads for laptops.
- Uninstall unused software and programs.
Final Words
So, in this article, I covered the best CPU temperature monitor tools. The processor is indeed the heart of the computer system and you should keep it cool. You can use any tool to prevent overheating issues.
Well, we discussed different types of software from lightweight to advance. So, it depends on you which tool is best for you. If you’re a gamer, you may try NZXT CAM or Game Assistant 2. Otherwise, Sppedfan, CoreTemp, and HWMonitor are best for you.
- 19
- 8
Простое мини-приложение рабочего стола, показывающее уровень использования
Memory Usage
- 10
- 5
Простое приложение, предназначенное для определения текущего уровня загрузки
CPU & RAM Meter
- 10
- 6
Данный гаджет представляет собой модифицированную версию плеера SLAG, который
SLAG-FS Music Player
- 10
- 6
Beat Music Player — это полнофункциональный mp3-плеер, проигрывающий
Beat Music Player
- 13
- 6
Простенькое мини-приложение для просмотра видеофайлов на рабочем столе Windows
Video Player
- 65
- 39
Данный гаджет является дополнением к медиа плееру AIMP, которое позволяет легко
AimpX Gadget
- 31
- 15
Оригинальная модификация стандартного индикатора загрузки процессора и
Imp’s CPU Meter
- 17
- 5
Гаджет для мониторинга процессора (в том числе и по ядрам), оперативной памяти,
CPU Anorexia
- 9
- 2
Еще один индикатор загрузки процессора и ОЗУ из фруктовой серии, на этот раз
Fruity Orange CPU
- 15
- 6
Фруктовый индикатор загрузки ЦП и памяти компьютера, выполненный в стиле
Fruity Apple CPU
- 21
- 12
Отличный гаджет, показывающий в реальном времени уровень загрузки ЦПУ (в том
CPU-V Monitor Test
- 8
- 4
Данный гаджет позволяет с рабочего стола следить за количеством занятого и
Glass Onedrive
- 30
- 11
Оригинальный индикатор загрузки процессора (ЦП) и памяти (ОЗУ), сделанный в
CPU Dial
- 6
- 3
Симпатичный гаджет-индикатор загрузки центрального процессора (CPU), дизайн
CPU Gauge
- 22
- 5
Простой и лаконичный гаджет для Windows 7, показывающий уровень загрузки
CPU Monitor