
В этой статье мы рассмотрим пошаговую установку и настройку GLPI. GLPI (Gestionnaire Libre de Parc Informatique — франц.) – это полноценная open-source ITSM система для управления процессами, инвентаризации оборудования и софта, а также для управления заявками и инцидентами. GLPI это большой комбайн, в котором заложено большое количество функционала по управлению ИТ на предприятии. Некоторые из возможностей GLPI:
- Инвентаризация компьютеров, серверов, оргтехники (принтеры, мониторы, МФУ, картриджи и прочее)
- Инвентаризация установленных на компьютерах программ и лицензий
- Управление заявками и инцидентами (регистрация обращений пользоватетелей, HelpDesk)
- База знаний
- Ведение проектов
- Управление бюджетом
Содержание:
- Установка и настройка стека LAMP в Linux
- Установка GLPI
- Базовая настройка GLPI
- Обзор интерфейса GLPI
- Плагин FusionInventory — автоматическая инвентаризация серверов и компьютеров
- Статистика и отчеты в GLPI
Установка и настройка стека LAMP в Linux
GLPI это обычное веб приложение с базой данных, поэтому на сервере нужно развернуть LAMP стек (в данной статье GLPI будет установлен на apache, но возможна также установка на nginx).
Совет. В этом примере мы покажем, как установить GLPI на Ubuntu. Однако инструкция полностью подходит для развертывания GLPI на любом другом дистрибутиве Linux. Например, для CentOS используйте пакетный менеджер yum, вместо apt (или dnf в CentOS 8).
apt update
apt install mysql-server mysql-client apache2 php php-mysql libapache2-mod-php php-json php-gd php-curl php-mbstring php-cas php-xml php-cli php-imap php-ldap php-xmlrpc php-apcu
Создайте новую mysql базу данных (можно использовать и mariadb) и пользователя для GLPI:
mysql -u root -p
CREATE DATABASE glpi;
CREATE USER 'glpi'@'localhost' IDENTIFIED BY 'password';
GRANT ALL PRIVILEGES ON glpi.* TO 'glpi'@'localhost';
FLUSH PRIVILEGES;
exit;
Скачайте и распакуйте дистрибутив GLPI:
wget https://github.com/glpi-project/glpi/releases/download/9.4.5/glpi-9.4.5.tgz
tar xvf glpi-9.4.5.tgz
Примечание. На момент написания этой статьи, последняя версия GLPI была 9.4.5. Чтобы скачать последнюю версию, перейдите на GitHub https://github.com/glpi-project/glpi/releases/ и выберите последний релиз.
Скопируйте GLPI в веб директорию:
mkdir /var/www/glpi
cp -R glpi/* /var/www/glpi
chown -R www-data:www-data /var/www/glpi
Совет. Довольно часто при развертывании GLPI встречаются ошибки, связанные со стандартными настройками PHP, поэтому рекомендуем сразу увеличчить лимиты для PHP. Вставьте следующие параметры в конец файла /etc/php/7.2/apache2/php.ini:
max_execution_time = 120
memory_limit = 512M
post_max_size = 80M
 upload_max_filesize = 80M
Создайте файл виртуал хоста:
touch /etc/apache2/sites-available/glpi.conf
И вставляем следующую конфигурацию Virtual Host:
<VirtualHost *:80>
  ServerName glpi.local
  DocumentRoot /var/www/glpi
  <Directory /var/www/glpi>
    Options Indexes FollowSymLinks MultiViews
    AllowOverride All
    Order allow,deny
    allow from all
    AuthType Basic
  </Directory>
  LogFormat "%h %l %u %t \"%r\" %>s %b \"%{Referer}i\" \"%{User-agent}i\"" combined
  CustomLog ${APACHE_LOG_DIR}/glpi_access.log combined
  ErrorLog ${APACHE_LOG_DIR}/glpi_error.log
</VirtualHost>
Активируйте виртуалхост:
a2ensite glpi
service apache2 reload
Проверьте, что виртуалхост активен.
Откройте браузер и переходим по URL адресу, который вы указали в виртуал хосте. В моём случае это
glpi.local
.

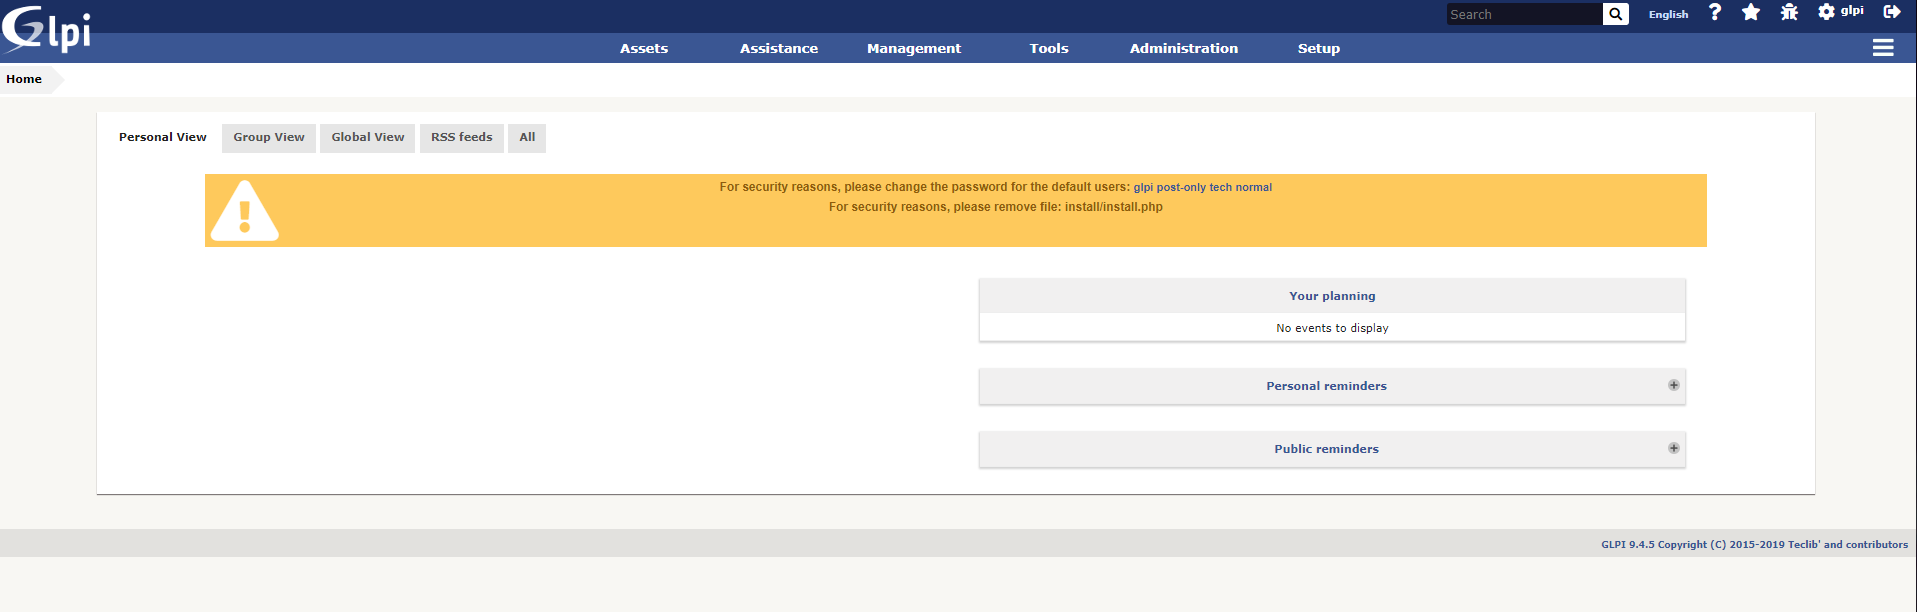
Перед вами должно появится окно веб-установщика GLPI.
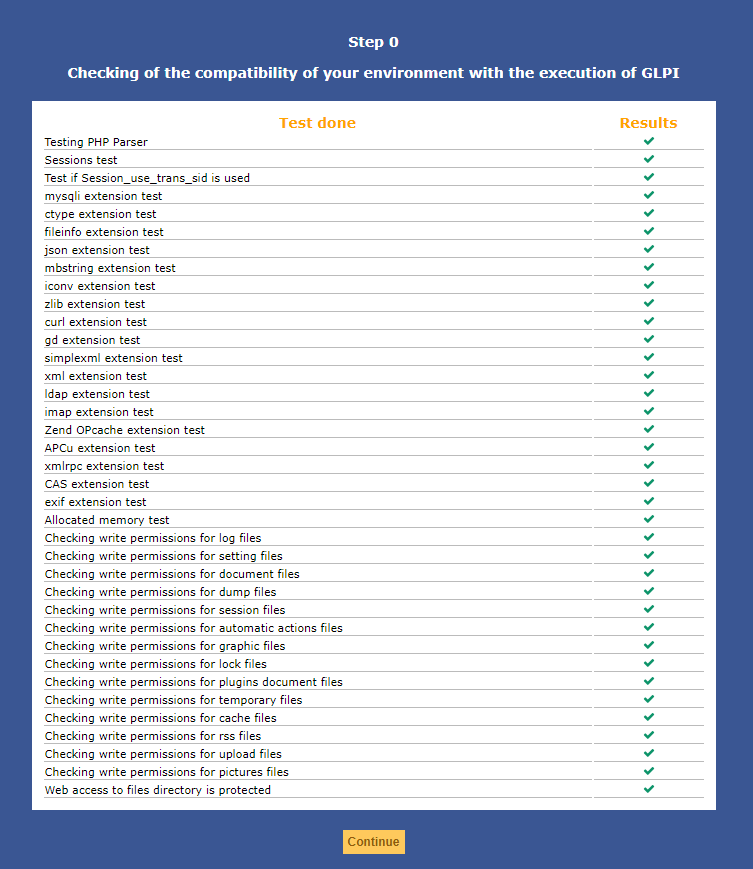
Установка GLPI
Сначала нужно выбрать язык интерфейса GLPI и принять лицензионное соглашение. На следующем шаге нажмите Install и убедитесь, чтобы все тесты прошли успешно.
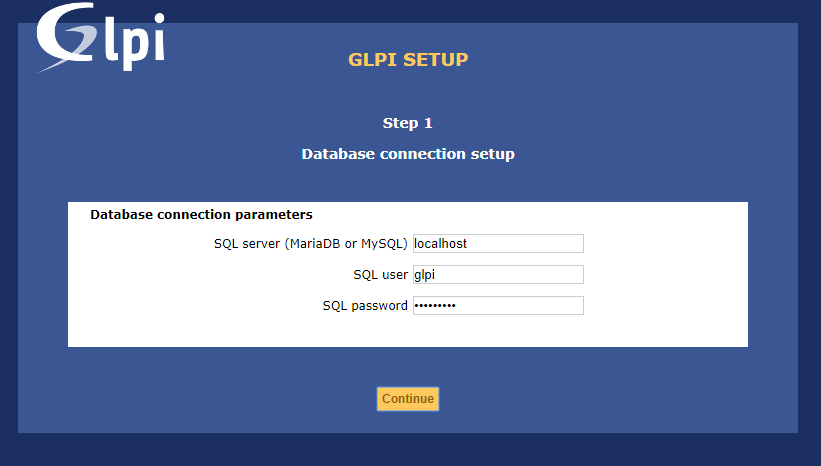
Укажите данные для подключения к базе данных.
Выберите ранее созданную базу данных:
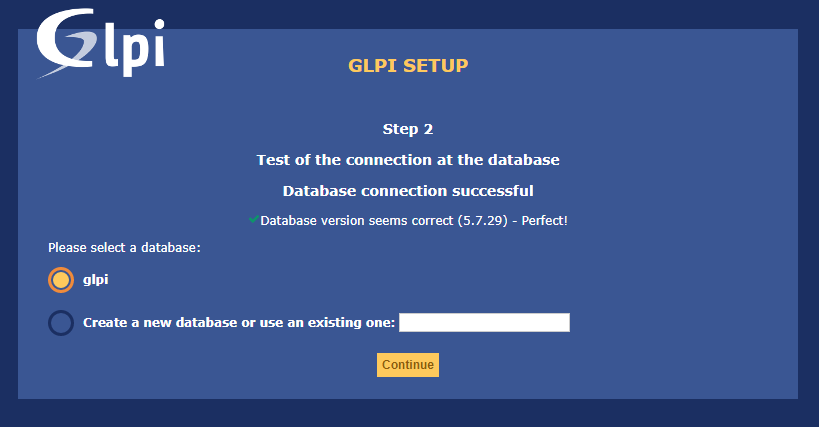
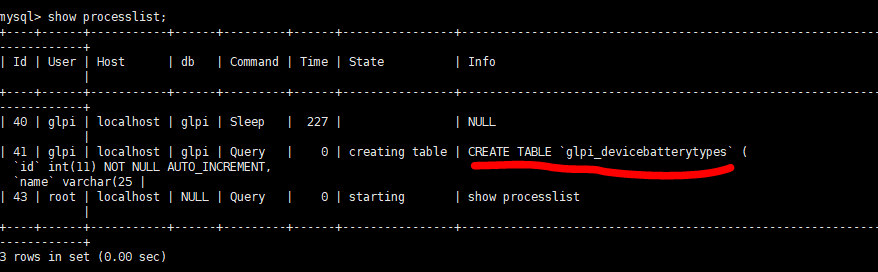
Нажмите Continue и дождитесь импорта данных. База данных может наполняться продолжительное время (несколько минут). Это можно проверить командой
show processlist;
в mysql.
После этого установка GLPI практически завершена. Зайдите в панель управления (по-умолчанию, логин и пароль – glpi).
Базовая настройка GLPI
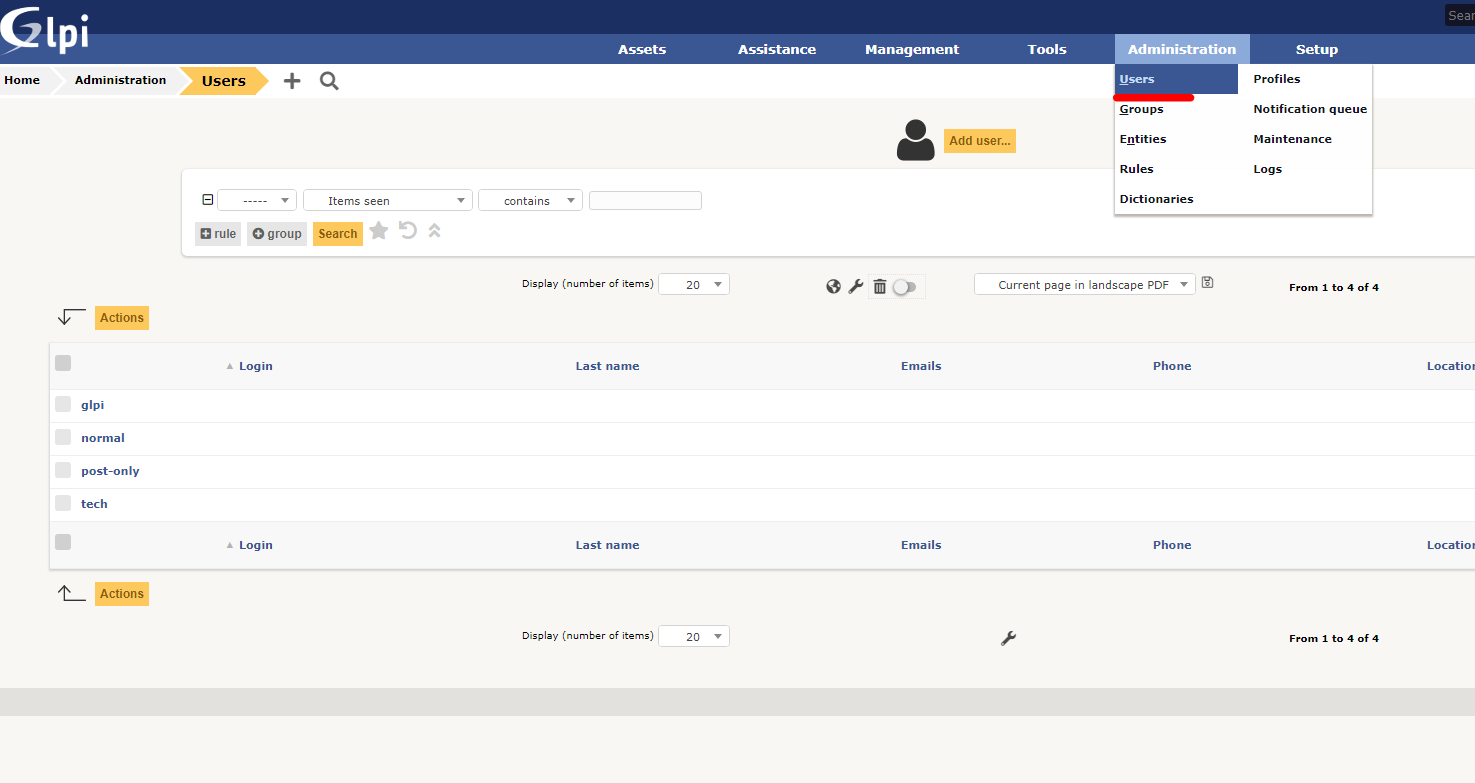
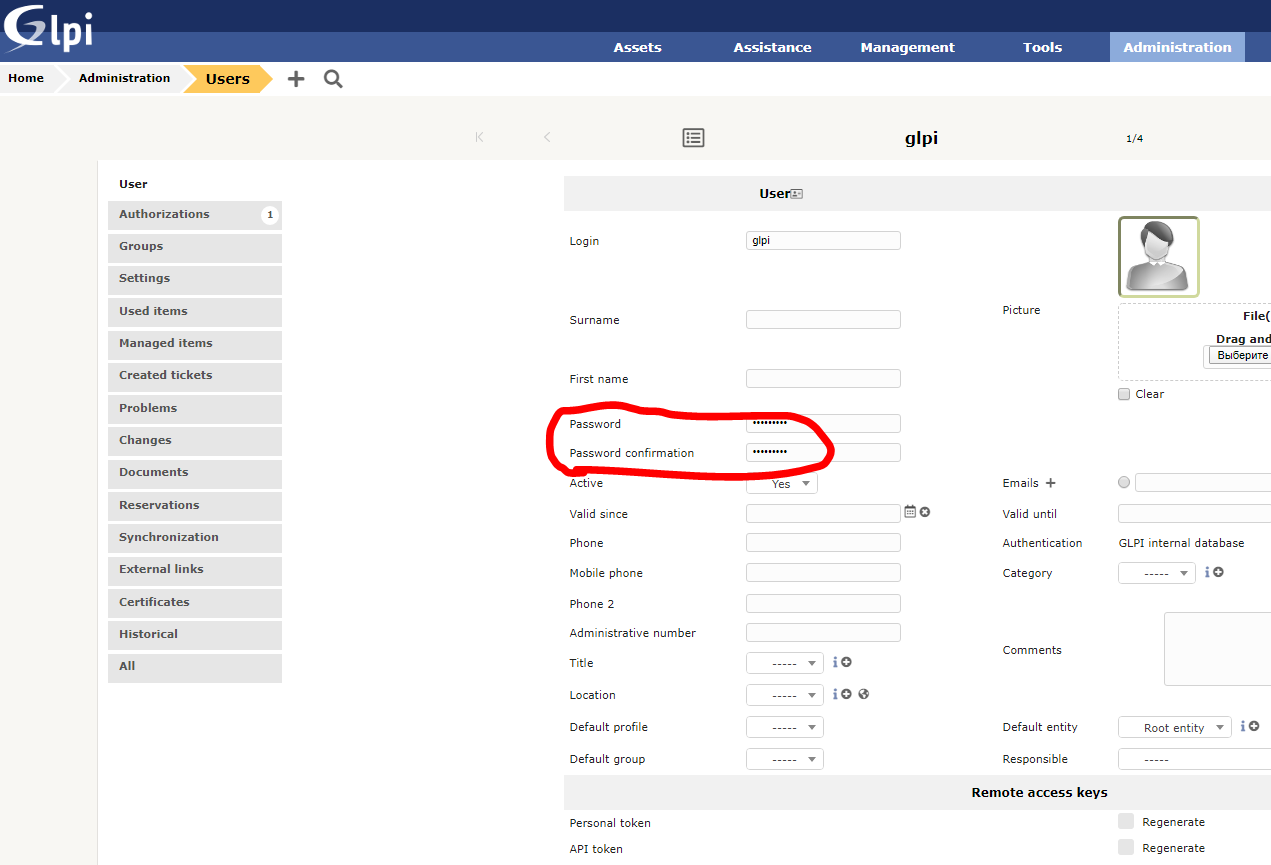
Для начала необходимо изменить пароли для встроенных пользователей, это можно сделать на вкладке Administration -> Users.
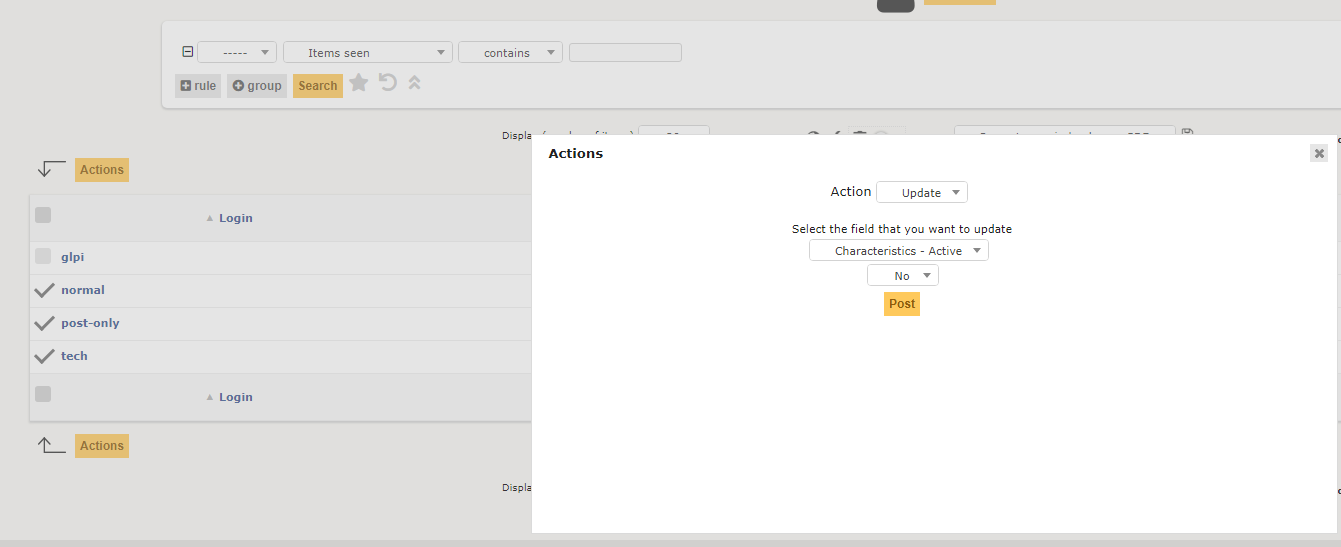
Если вы не хотите использовать встроенных пользователей, можно их разом отключить.
Примечание. GLPI рекомендует удалить файл install/install.php в целях безопасности. Сделайте командой: rm /var/www/glpi/install/install.php
Обзор интерфейса GLPI
Пробежимся по интерфейсу GLPI и рассмотрим некоторые из возможностей системы.
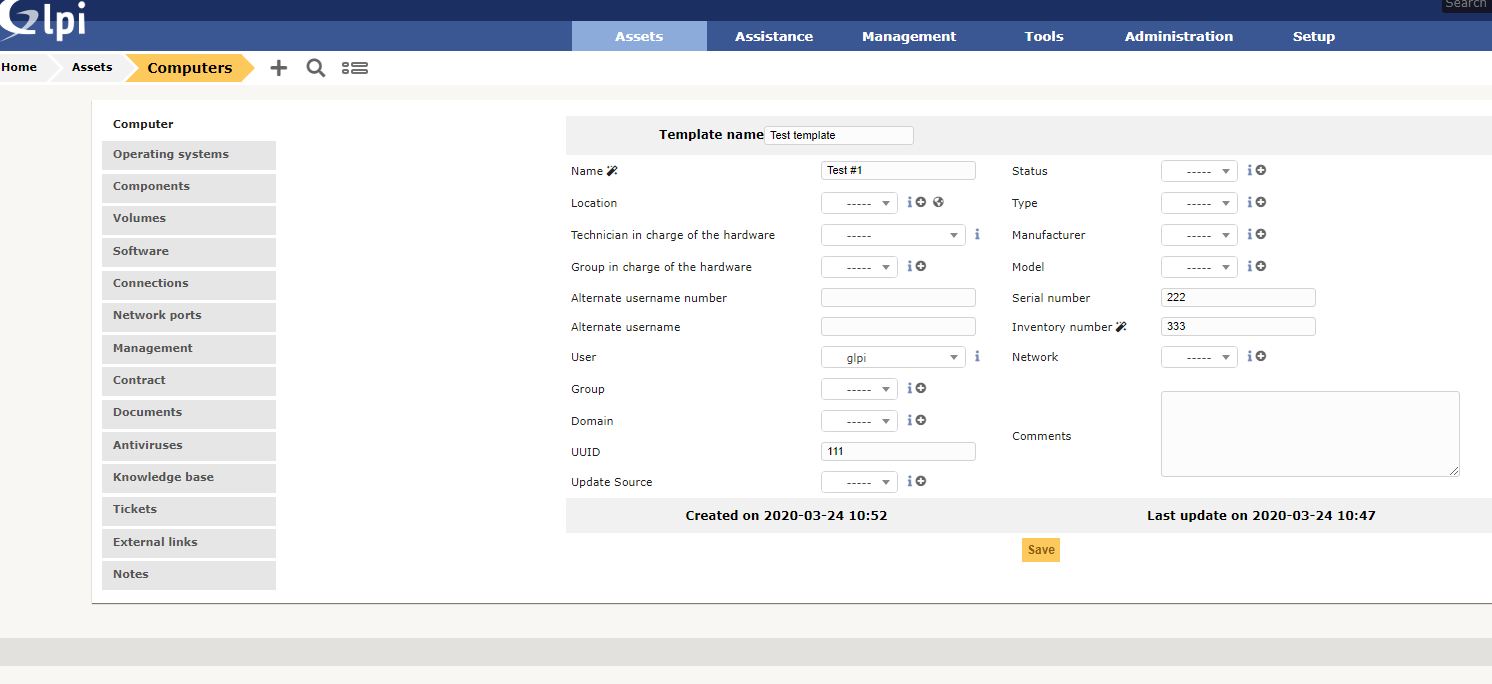
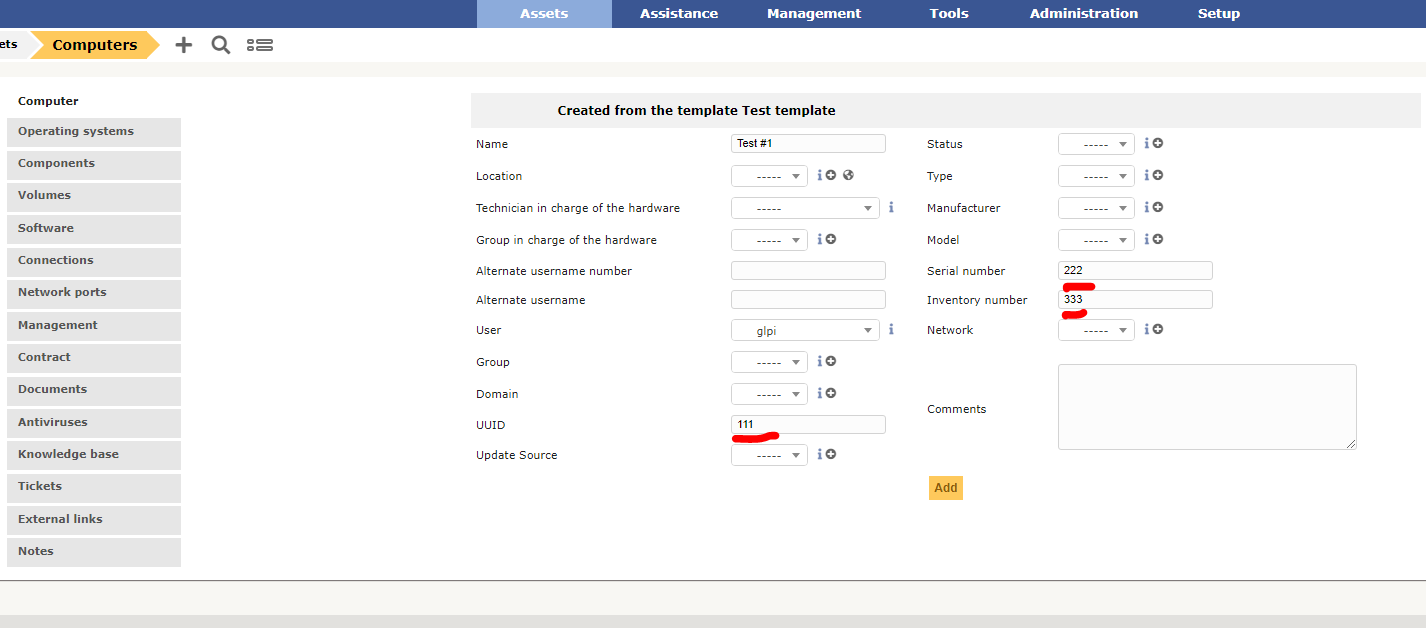
Вкладка Assets
Эта вкладка отвечает за инвентаризацию оборудования и софта. В GLPI есть возможность создавать шаблоны. Вы можете создавать различные шаблоны для разных устройств (компьютеров, роутеров, мониторов и т.д). Удобство в том, что при создании новых объектов вам не нужно заново заполнять статические данные (например, расположение или тип объекта).
Механизм шаблонов поддерживается и другими функциями, не только инвентаризацией.

Вкладка Assistance
Вкладка отвечает за управление задачами, инцидентами и проектами. Если вы знакомы с Jira, то здесь такой же принцип.

Есть возможность кастомизировать некоторые поля тикетов и создавать шаблоны для них (в Setup -> Dropdowns).
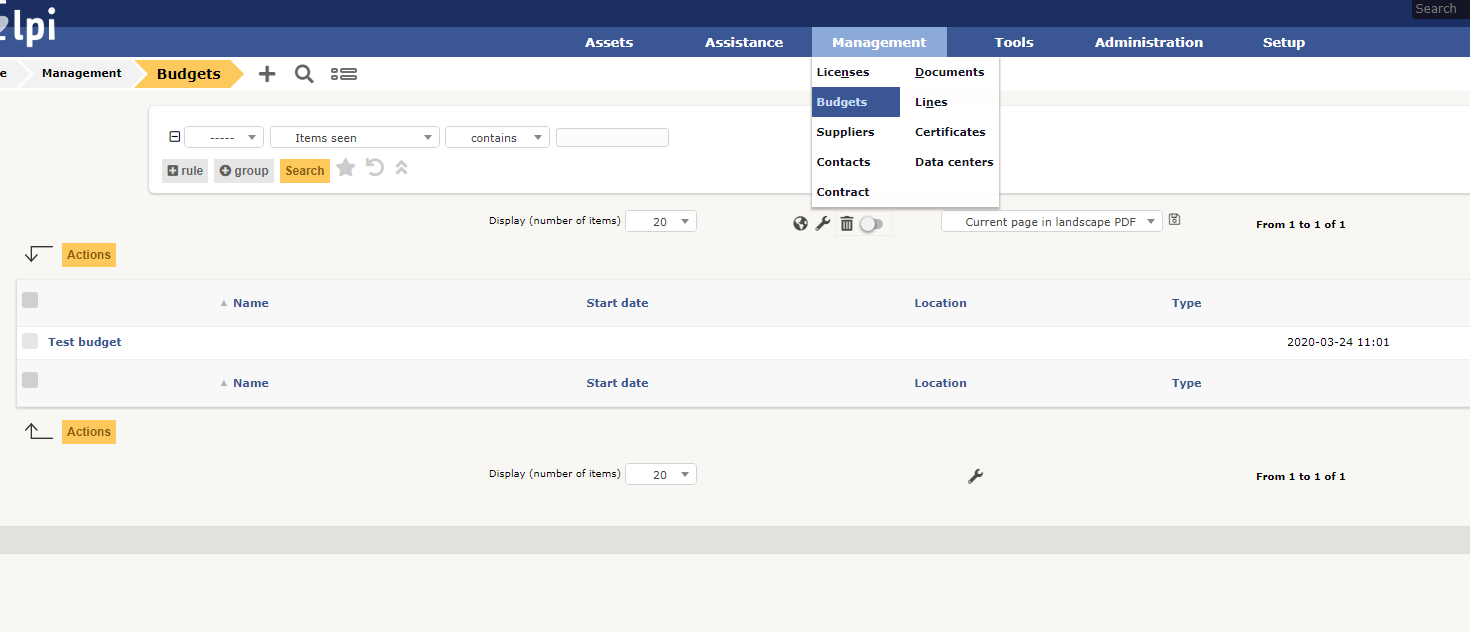
Вкладка Management
Также относится к инвентаризации – можно вести бюджет, учитывать лицензии, поставщиков и т.д.
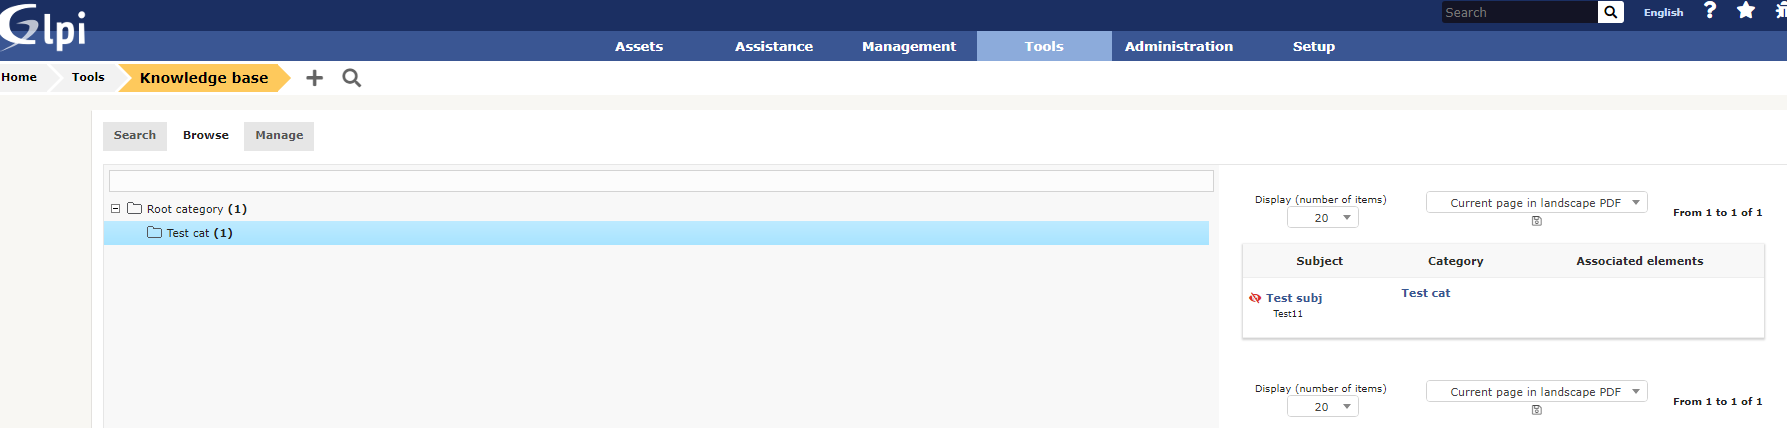
Вкладка Tools
Эта вкладка содержит в себе разные инструменты – проекты, напоминания, отчеты и базу знаний (wiki).
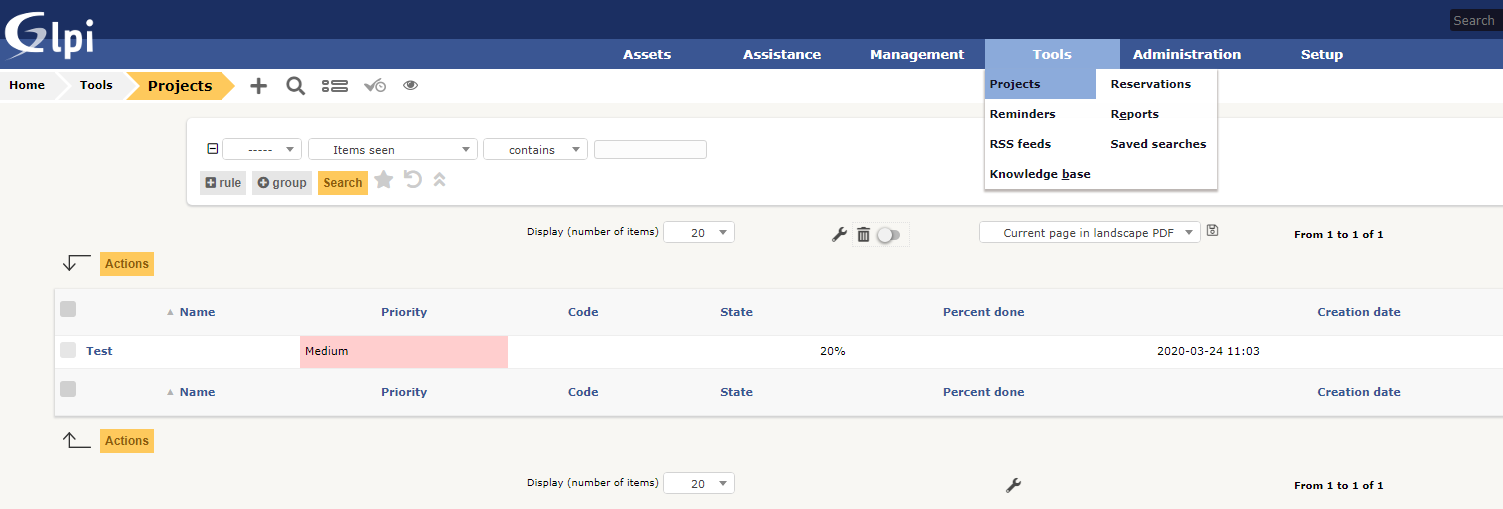
Управление базой знаний:
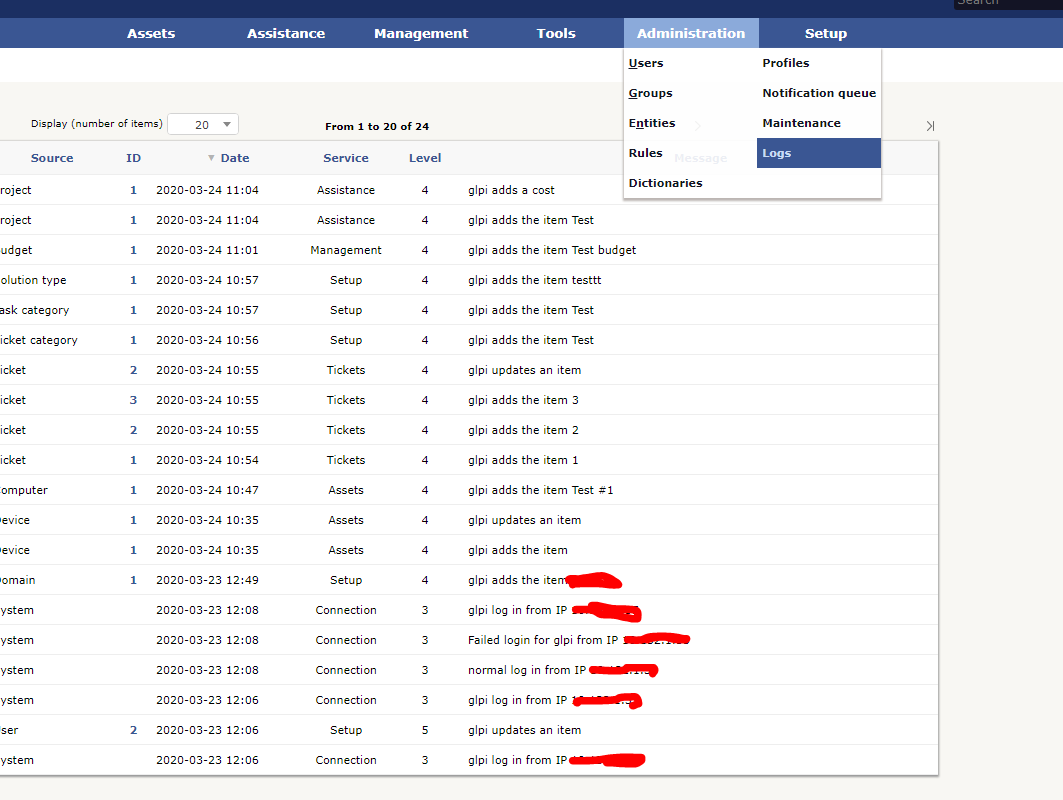
Вкладка Administration
Здесь вы можете управлять пользователями, группами и сущностями GLPI, также есть лог действий пользователей GLPi.
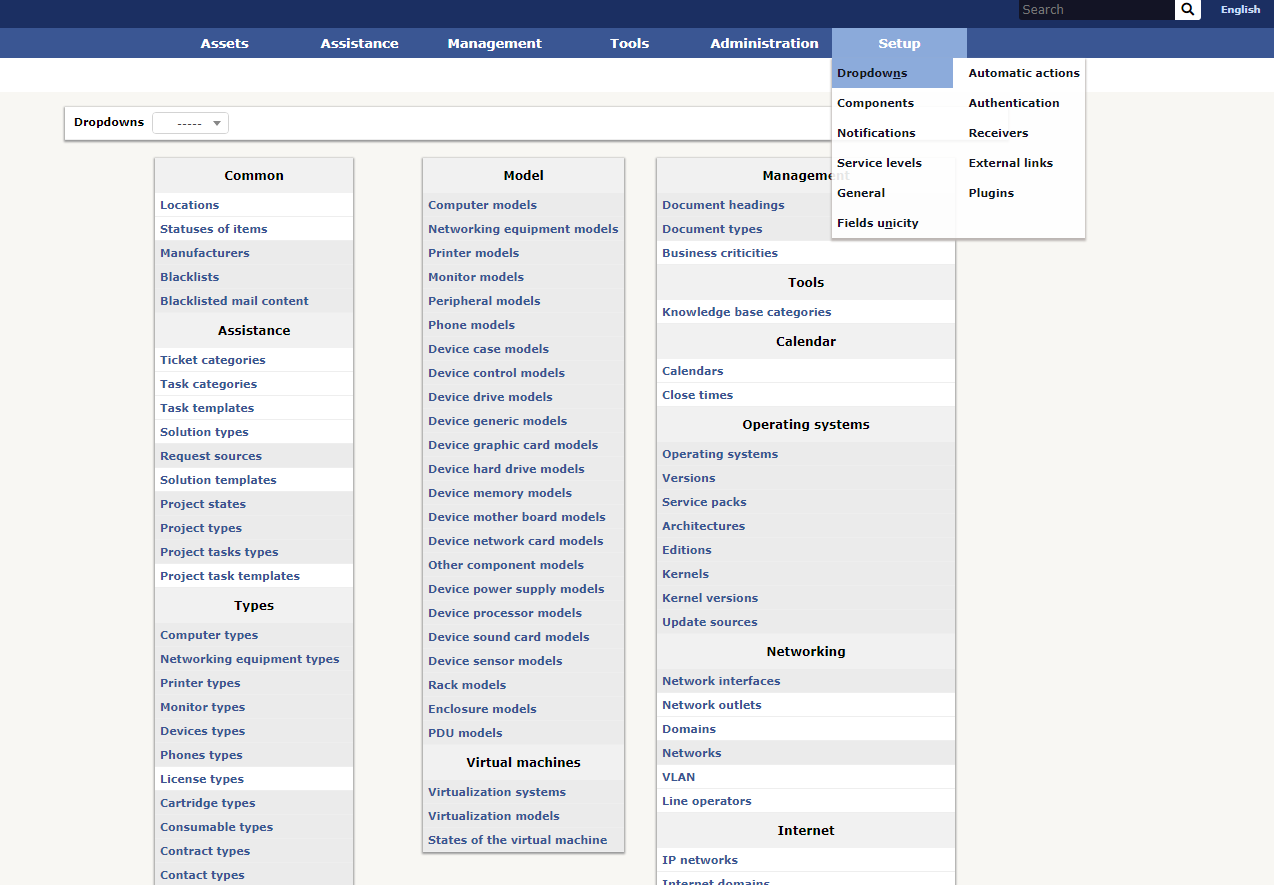
Вкладка Setup
Также отвечает за управление GLPI – настройка пунктов меню, изменение различных форм и полей.
Плагин FusionInventory — автоматическая инвентаризация серверов и компьютеров
Рассмотрим одно из применений GLPI в реальной жизни – обнаружение устройств в сети и автоматическое заполнение инвентаризационных данных по оборудованию и установленным программам.
В GLPI не предусмотрено автоматическое обнаружение, но с этим может помочь плагин FusionInventory.
Установка Fusion Inventory
- Скачайте плагин FusionInventory с GitHub https://github.com/fusioninventory/fusioninventory-for-glpi/releases . В моём случае это последняя версия fusioninventory-9.4+2.4.tar.bz2;
- Распакуйте архив (
tar xvf arch.tar.bz2
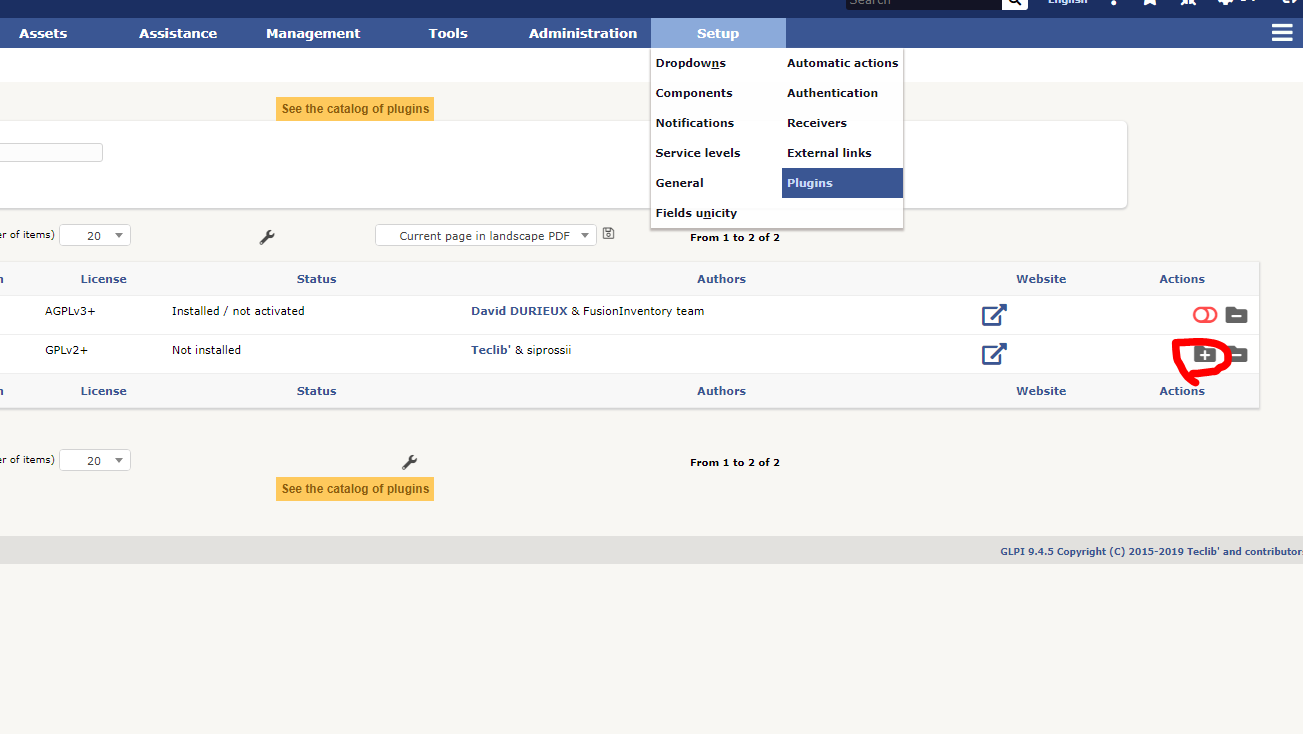
) в директорию plugins (в моём случае это /var/www/glpi/plugins); - На сайте GLPI перейдите в Setup -> Plugins и нажмите на иконку установки плагина;

- Активируйте плагин;
Теперь во вкладке Administration появился пункт FusionInventory.
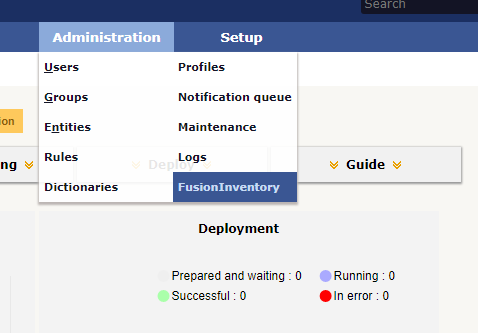
Перед установкой агентов на компьютеры и сервера нужно сразу включить нужные модули агентов.
Перейдите в Administration -> FusionInventory -> General -> General Configuration
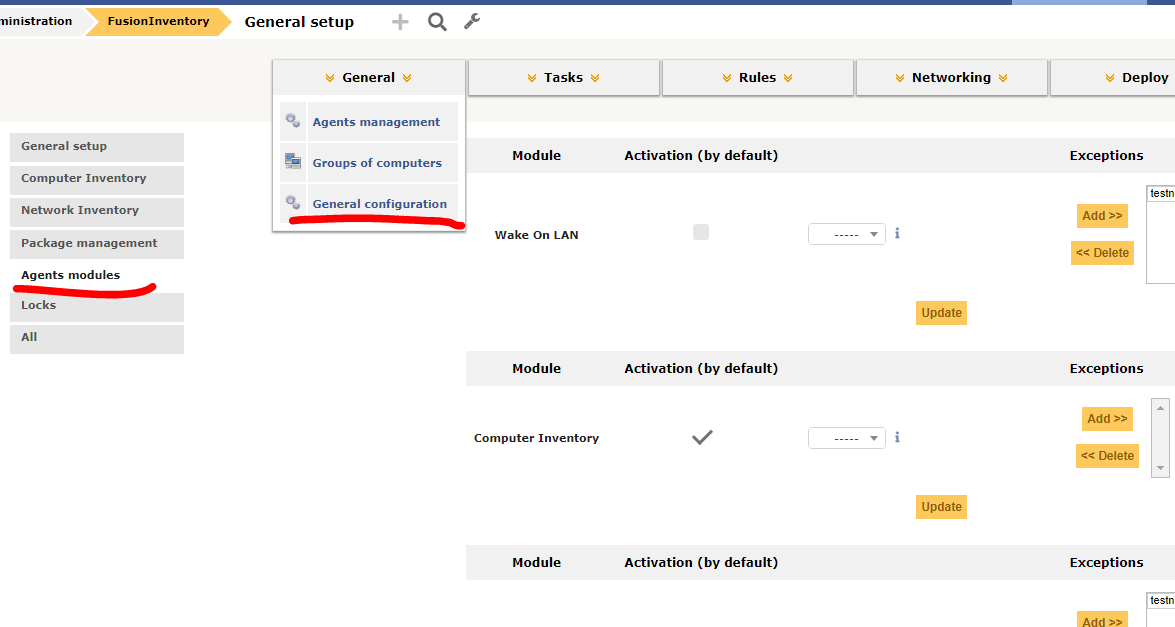
Включите модули:
- Computer Inventory
- Network inventory (SNMP)
- Network discovery
- Package deployment
- Collect data
Установка Fusion Agent в Windows
Установить Fusion Agent можно либо через графический интерфейс (инсталлятор), либо через командную строку. Мы будем рассматривать второй вариант, так как он легко масштабируется для разворачивания через групповые политики или SCCM.
- Скачайте агент https://github.com/fusioninventory/fusioninventory-agent/releases. В моём случае я качаю Windows 64-bit OS: fusioninventory-agent_windows-x64_2.5.2.exe (не портейбл);
- Скопируйте установочный .ехе файл fusioninventory на компьютер, с которого вы хотите собирать данные;
- Откройте командную строку с правами администратора и выполните:
fusioninventory-agent_windows-x64_2.5.2.exe /S /acceptlicense /add-firewall-exception /debug=2 /execmode=Service /installtasks=Full /timeout=30 /delaytime=5 /server="_http://glpi.local/plugins/fusioninventory/" /runnow
Рассмотрим основные параметры уставки
- /S – Silent установка, без графического интерфейса
- /debug=2 – для подробных логов. При боевых развертываниях убирайте этот ключ
- /execmode=Service – ставим агент как службу Windows
- /installtasks=Full – устанавливаем все возможные сборщики
- /delaytime=5 – Задержка перед первым обращения к серверу. Если разворачиваете на большое число компьютеров, ставьте число повыше
- /server – адрес сервера GLPI
Не забудьте отредактировать параметры под свои нужды. Полный список параметров можно найти тут https://documentation.fusioninventory.org/FusionInventory_agent/installation/windows/windows-installer-2.3.x-command-line/
Совет. После установки, в случае возникновения проблем, можно посмотреть лог агента по пути C:\Program Files\FusionInventory-Agent\logs. Параметры агента хранятся в реестре, по пути Computer\HKEY_LOCAL_MACHINE\SOFTWARE\FusionInventory-Agent.
Перейдите в Administration -> FusionInventory -> General -> Agent Management, здесь вы можете управлять агентами
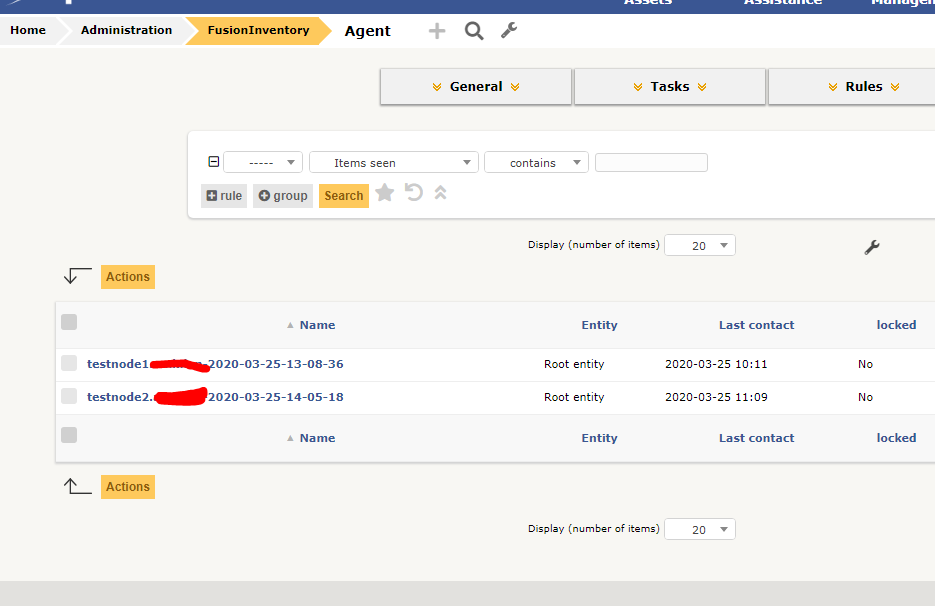
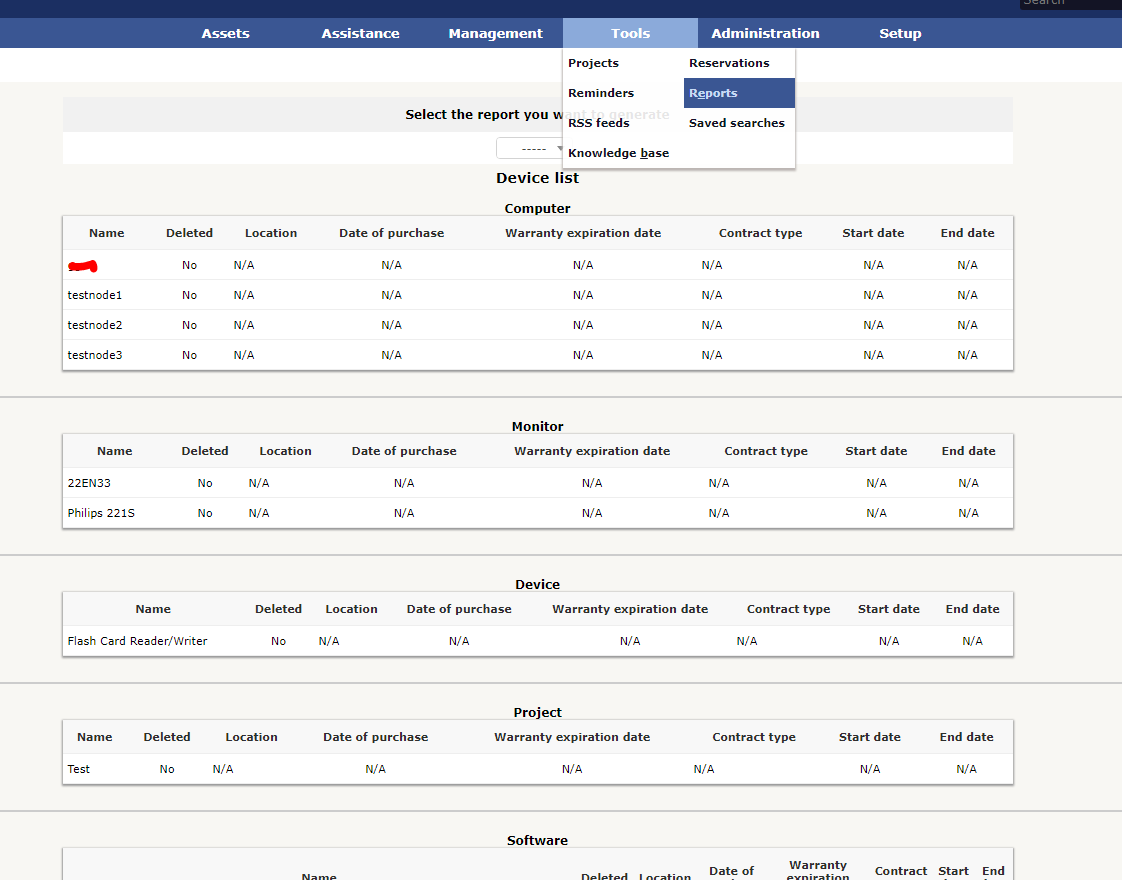
Убедитесь, что данные с данного компьютера появились в GLPI. Перейдите в Assets -> Computers.
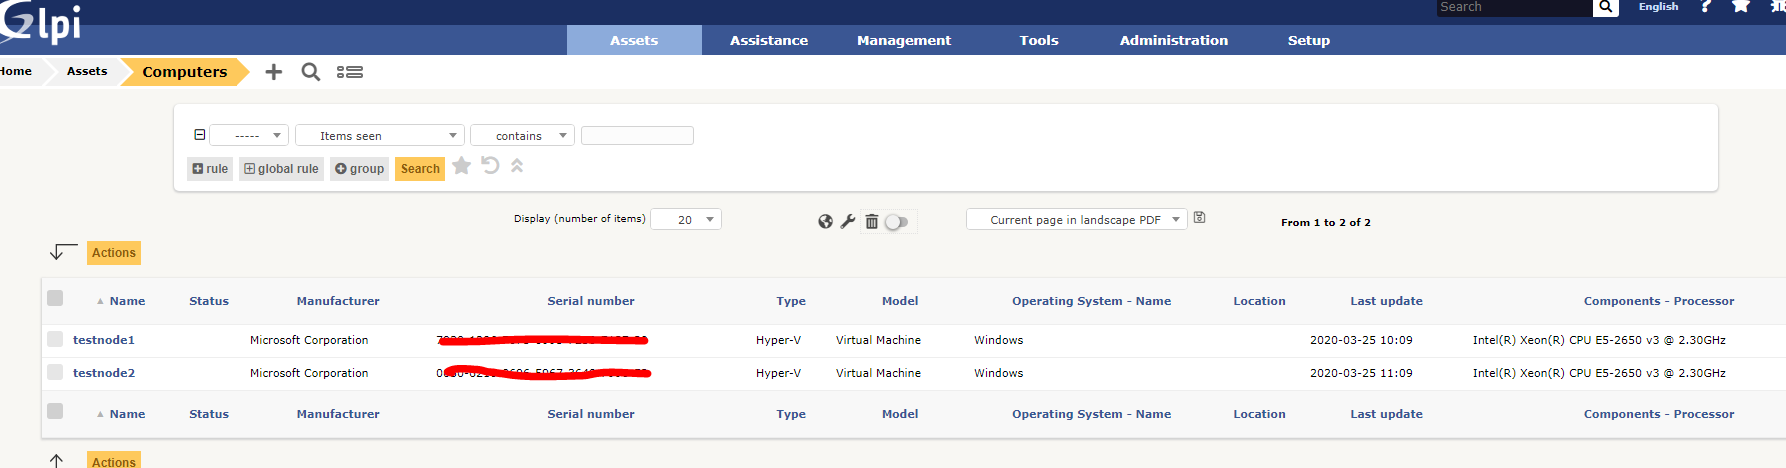
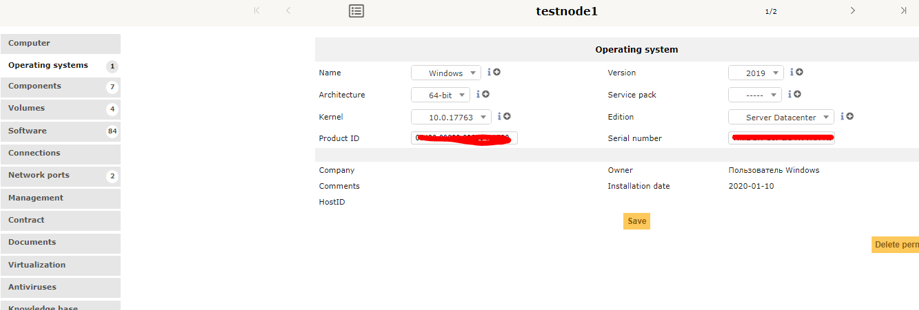
Здесь отображаются все компьютеры, на которые вы установили агенты FusionInventory с модулем Collect Data. Откройте один из компьютеров и посмотрите на собранные данные. Как вы видите, в базе данных GLPI появилась информация об версии и билде Windows с сервера с агентом.
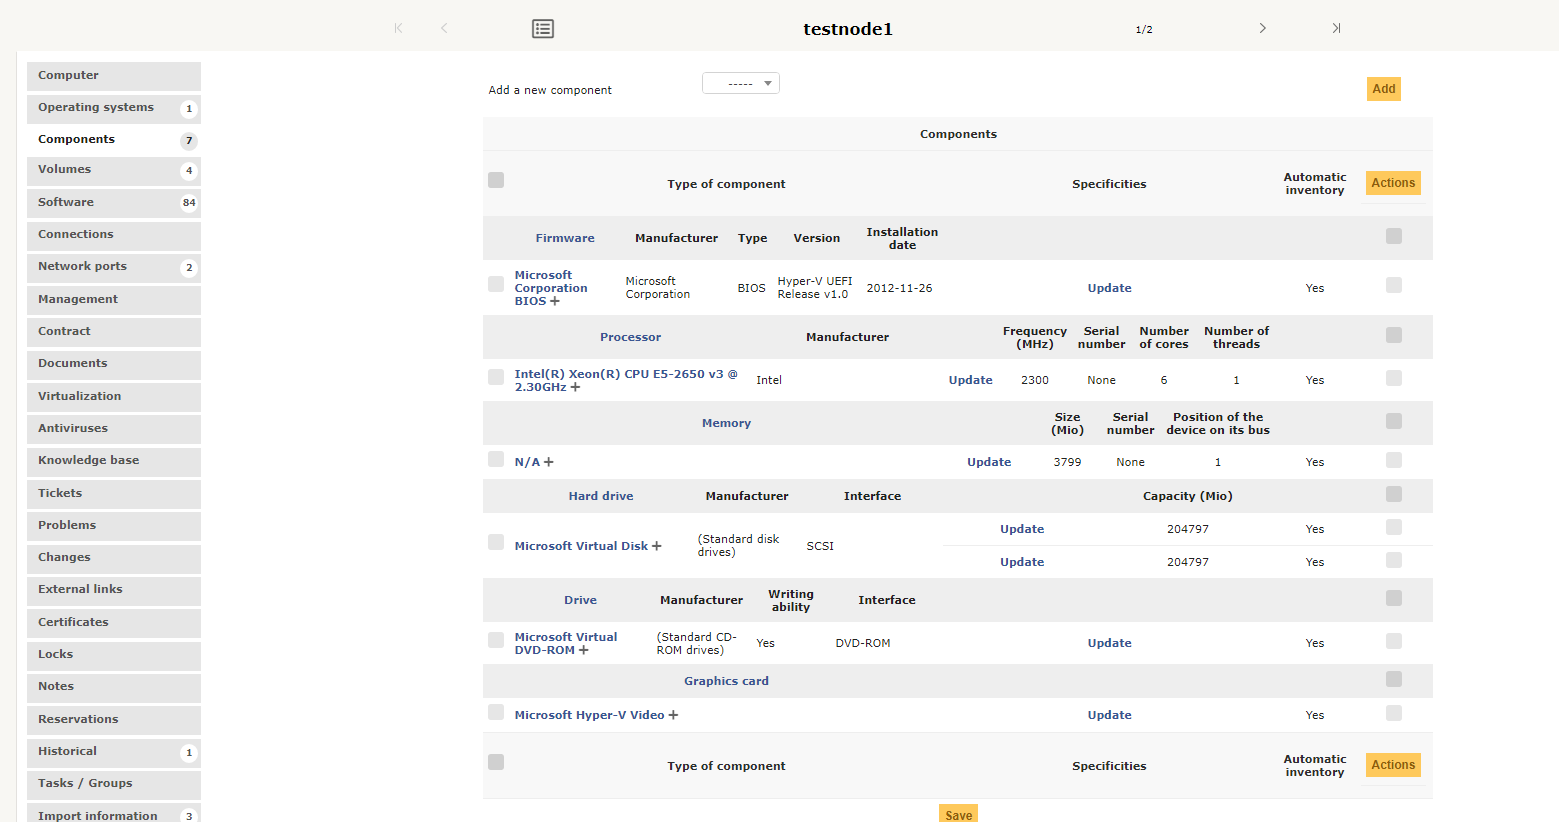
Вся информация заполняется автоматически из данных, которые приходят с агента. Также эта информация сортируется по категориям. Например, при установке агента на обычный ПК, можно получить информацию о периферийных устройствах. На скриншоте ниже информация о мониторах, подключенных к компьютеру где установлен агент.

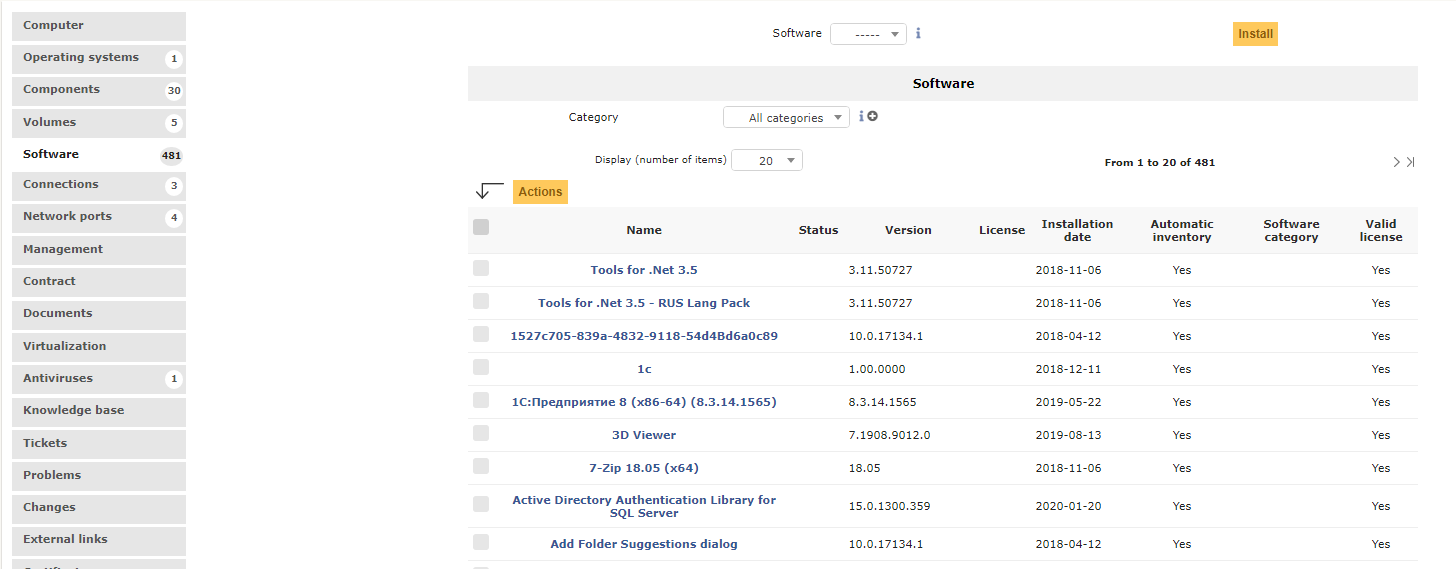
Также вы видит список установленного на компьютере ПО.
Установка Fusion Agent на Linux
Рассмотрим установку из пакета на Ubuntu Server 18.04. Установите необходимые зависимости
apt install dmidecode hwdata ucf hdparm perl libuniversal-require-perl libwww-perl libparse-edid-perl libproc-daemon-perl libfile-which-perl libhttp-daemon-perl libxml-treepp-perl libyaml-perl libnet-cups-perl libnet-ip-perl libdigest-sha-perl libsocket-getaddrinfo-perl libtext-template-perl libxml-xpath-perl libyaml-tiny-perl libnet-snmp-perl libcrypt-des-perl libnet-nbname-perl libdigest-hmac-perl libfile-copy-recursive-perl libparallel-forkmanager-perl
Скачиваем пакет
wget https://github.com/fusioninventory/fusioninventory-agent/releases/download/2.5.2/fusioninventory-agent_2.5.2-1_all.deb
Установите пакет:
dpkg -i fusioninventory-agent_2.5.2-1_all.deb
В конфигурационном файле агента (/etc/fusioninventory/agent.cfg) измените следующие параметры:
delaytime = 5
server = _http://glpi.local/plugins/fusioninventory/
Перезапустите агент:
systemctl restart fusioninventory-agent
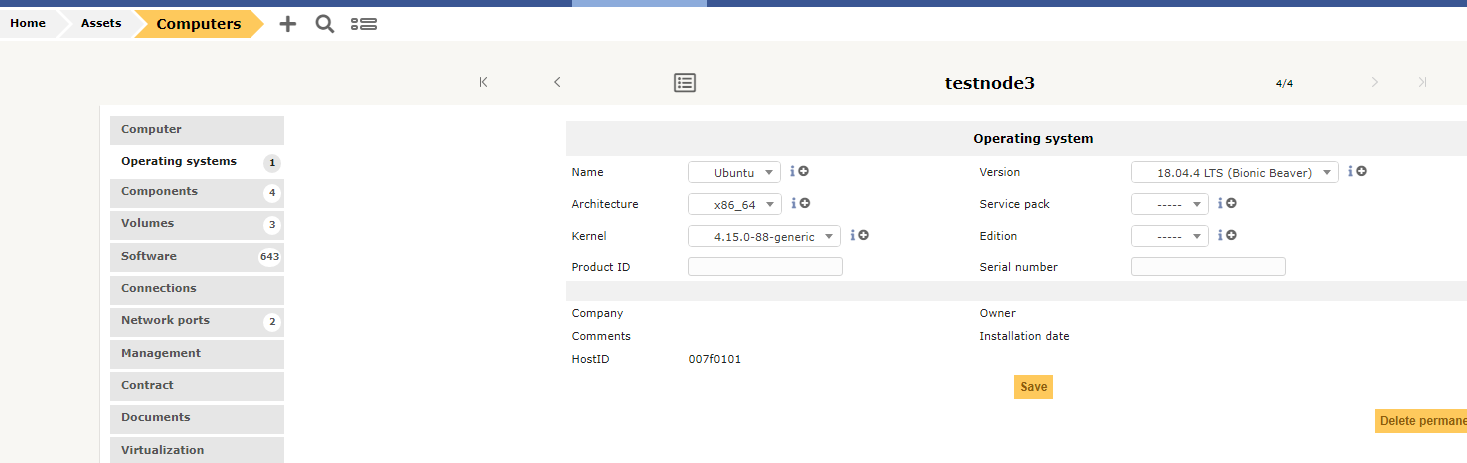
Если всё сделано правильно, вы увидите ваш Ubuntu компьютер/сервер в Assets-> Computers.
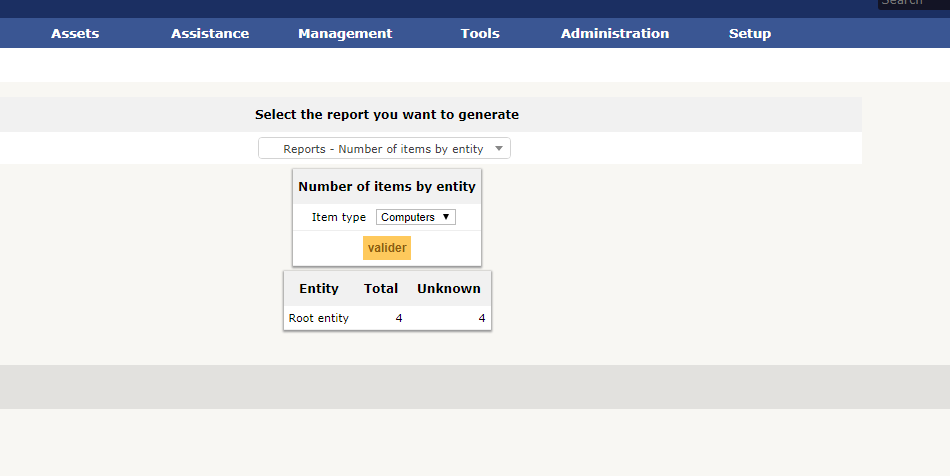
Статистика и отчеты в GLPI
В GLPI есть встроенные отчеты.
Но скорее всего вам потребуются отчеты по собственным параметрам. Для этого в GLPI есть плагины:
- https://plugins.glpi-project.org/#/plugin/reports — довольно просто позволяет создавать свои отчеты через PHP
- https://plugins.glpi-project.org/#/plugin/metabase — плагин для интеграции с https://www.metabase.com/
Пример встроенного отчета из плагина Reports:
GLPI развивается более 15 лет и содержит в себе огромное количество возможностей для управления ИТ инфраструктуры, а сообщество развивает и поддерживает плагины для различных интеграций и функционала. Система имеет огромные возможности модификации своих элементов, поэтому каждая компания настраивает GLPI под себя.
Средний рейтинг
5 из 5 звезд. 1 голосов.
Привет. Использую для инвентаризации GLPI + Fusion Inventory (plugin).
Требуется установить агента для автоматического сбора информации на клиентах.
Здесь рассмотрен способ установки для ОС Windows из командной строки.
Установка агента.
Новая установка из командной строки на удаленном ПК (Windows):
|
fusioninventory—agent_windows—x86_2.5.1.exe /S /acceptlicense /installtype=from—scratch /tag=‘kab.36’ /execmode=Service /installtasks=Full /httpd—ip=‘192.168.0.4’ /httpd—trust=‘192.168.0.0/24’ /server=‘http://glpi.test.local/plugins/fusioninventory’ /runnow |
fusioninventory-agent_windows-x86_2.5.1.exe — зависит от разрядности ОС. В данном случае у меня ОС — 32-х битная,
/S — тихий режим (без графики),
/acceptlicense — принятие лицензионного соглашения (по умолчанию: no),
/installtype= — тип установки: новая (дословно — с нуля),
/tag — тэг,
/execmode=Service — режим работы, в данном случае как сервис,
/installtasks=Full — вариант инвентаризации. Можно указывать отдельные задачи или выбрать один из трех вариантов, но в данном случае выбрал полный,
/httpd-ip=’192.168.0.4′ — какой IP будет использоваться для веб-сервиса агента,
/httpd-trust=’192.168.0.0/24′ — разрешенные IP-адреса для подключения,
/server=’http://glpi.test.local/plugins/fusioninventory’ — сервер с GLPI и плагином «FusionInventory»,
/runnow — запустить после установки.
Установка из консоли — обновление агента (сохранение текущей конфигурации):
-
<strong>fusioninventory-agent_windows-x64_2.5.1.exe</strong> /S /acceptlicense /installtype=from-current-config
fusioninventory-agent_windows-x64_2.5.1.exe — зависит от разрядности ОС. В данном случае у меня ОС — 64-х битная,
/S — тихий режим (без графики),
acceptlicense — принятие лицензионного соглашения (по умолчанию: no),
installtype= — тип установки:
— если сохраняется старый конфиг (обновление агента).
Т.к. у меня были установлены агенты ранее, то мне хватило этих параметров.
Еще конфиг хранится в реестре:
[HKEY_LOCAL_MACHINE\SOFTWARE\FusionInventory-Agent]
мои параметры подключения
Windows Registry Editor Version 5.00
[HKEY_LOCAL_MACHINE\SOFTWARE\FusionInventory-Agent]
«backend-collect-timeout»=»180»
«ca-cert-dir»=»»
«ca-cert-file»=»»
«conf-reload-interval»=»0»
«debug»=»2»
«delaytime»=»3600»
«html»=»1»
«httpd-ip»=»192.168.0.21»
«httpd-port»=»62354»
«httpd-trust»=»192.168.0.0/24,127.0.0.1/32»
«local»=»»
«logfile»=»C:\\Program Files\\FusionInventory-Agent\\logs\\fusioninventory-agent.log»
«logfile-maxsize»=»16»
«logger»=»File»
«no-category»=»»
«no-httpd»=»0»
«no-p2p»=»0»
«no-ssl-check»=»0»
«no-task»=»»
«password»=»»
«proxy»=»»
«server»=»http://glpi.test.local/plugins/fusioninventory»
«scan-homedirs»=»1»
«scan-profiles»=»1″ »
tag»=»my_room»
«tasks»=»»
«timeout»=»180»
«user»=»»
[свернуть]
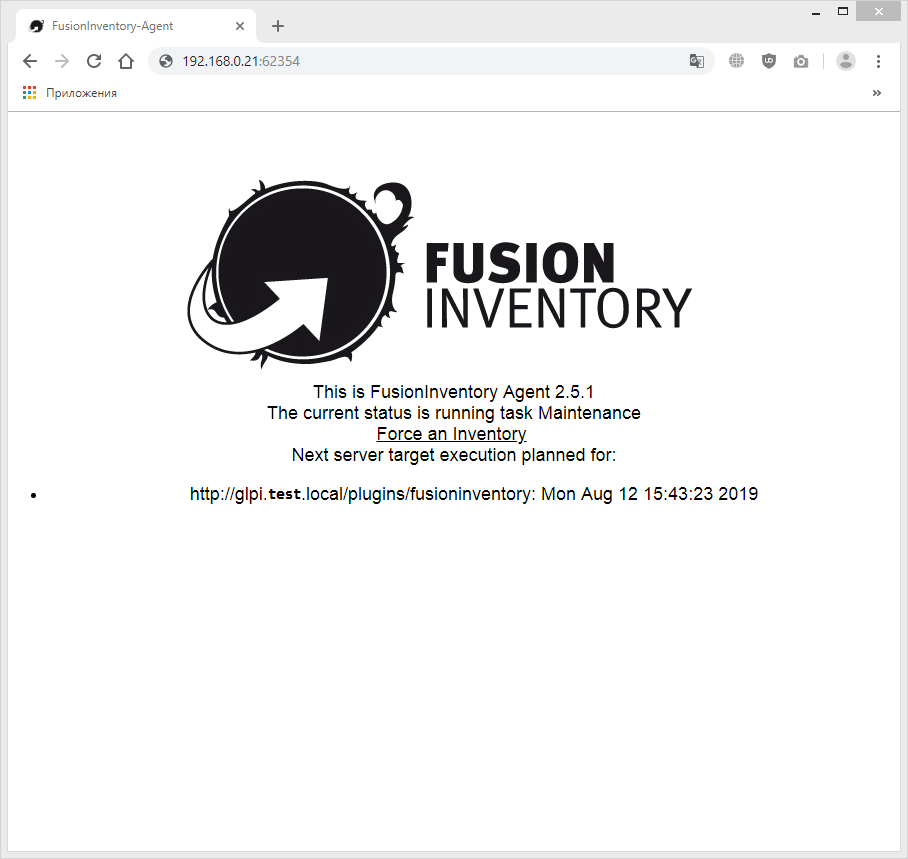
«httpd-ip»=»192.168.0.21» — ip-адрес для доступа к странице статуса агента.
«httpd-port»=»62354» — стандартный порт. Не меняел его.
В браузере можно набрать http://192.168.0.21:62354 и должна окрыться страница состояния плагина.
«httpd-trust»=»192.168.0.0/24,127.0.0.1/32» — ip-адреса, которым разрешен доступ к web-странце плагина,
«server»=»http://glpi.test.local/plugins/fusioninventory» — сервер с установленным GLPI и плагином FusionInventory.
Если по каким-то причинам недоступна страница:
- при наличии фаервола, проверьте, что он не блокирует порт. В противном случае сделайте правило, разрешающее подключение на данный порт,
- в реестре (как в примере выше) проверьте настройки: ip-адрес httpd, разрешенные ip-адреса, а так же порт, если вы ставили свой,
- проверьте, что служба агента запущена: а) через службы или б) из командной строки.
а) Пуск — Выполнить — cmd или WIN+R — cmd — если есть права администратора. Или же найти «Командная строка» и запустить от имени администратора. Расположение зависит от версии ОС. В консоли ввести services.msc. Далее, найти службу FusionInventoryAgent.
Либо: Панель управления — Администрирование — Службы. Так же необходимы права администратора.
Слева будет отображено состояние. Чтобы попасть в свойства надо 2 раза кликнуть на службе или ПравойКнопкой Мыши вызвать контекстное меню:
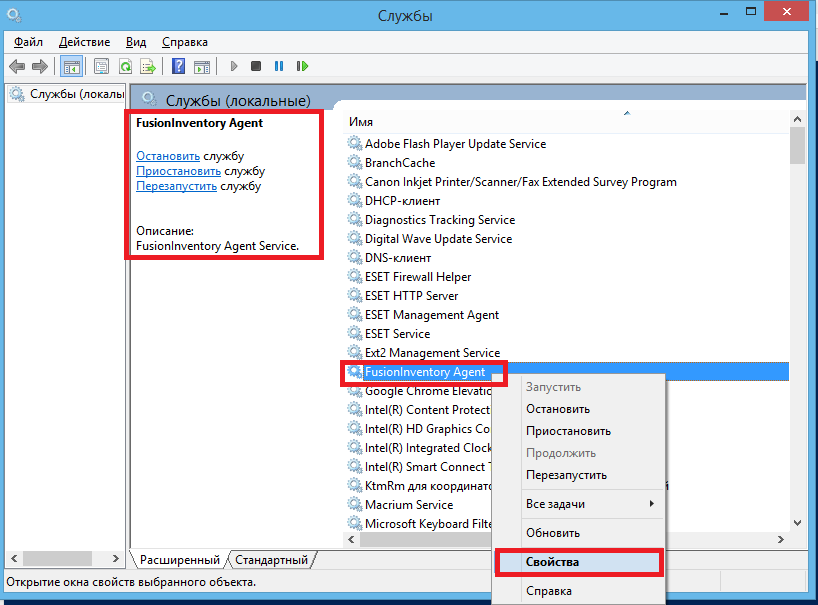
Убедитесь, что тип запуска установлен: Автоматически.
Т.к. я не сталкивался с проблемами при установке агента, то тут не будут описаны ошибки по причине того, что их не было.
б) sc query type= service | find «Fusion»
примерный вывод:
|
Имя_службы: FusionInventory-Agent Выводимое_имя: FusionInventory Agent |
Нас интересует имя службы. Посмотрим на состоние:
|
sc query FusionInventory-Agent Имя_службы: FusionInventory-Agent Тип : 10 WIN32_OWN_PROCESS Состояние : 4 RUNNING (STOPPABLE, PAUSABLE, ACCEPTS_SHUTDOWN) Код_выхода_Win32 : 0 (0x0) Код_выхода_службы : 0 (0x0) Контрольная_точка : 0x0 Ожидание : 0x0 |
Как видим — запущена.
Если у вас не так, то можно посмотреть в логи: C:\Program Files\FusionInventory-Agent\logs\fusioninventory-agent.log
Ссылки:
Home FUSION INVENTORY.
Documents.
HOW-TO Agent.
If you found an error, highlight it and press Shift + Enter or to inform us.
                            FusionInventory Agent
                         Microsoft Windows Installer
                         ---------------------------


Description
-----------
  The FusionInventory Agent Microsoft Windows Installer is an open source
project than has as goal to build the installer program of the FusionInventory
Agent and its tasks for Microsoft Windows operative systems. It makes use of
some others open source projects, like the Nullsoft Scriptable Install System
(in forward NSIS), Strawberry Perl, Curl, etcetera, to obtain its objective.

  It is born to cover a basic goal; be able to install new FusionInventory Agent
versions based on the previous configuration in the system, whether it exists.
In summary, it is born to be able to update the existing agent, and not only to
install a new version from scratch.

  It has more purposes, of course. The following are some of them.


Features
--------
   - Installs from scratch or from the current configuration.

   - Uninstalls the previous agent, whether it exists.

   - Prevents multiple installations simultaneously.

   - Supports visual installation in multiple languages.
        (English and Spanish. French in construction.)

   - Builds two different installers for x86 and x64 architectures.
        (Each platform uses its native distribution of Strawberry Perl)

   - Builds installers for stable or development versions.

   - Supports both installation methods; silent or unattended mode and
     graphical or visual mode.

   - Allows to select the agent tasks to install.

   - New visual appearance based on the NSIS Modern UI 2 plugin.

   - Migrates the depreciated options to the new options and removes completely
     the obsolete ones from the Microsoft Windows registry.

   - Now the Microsoft Windows registry used for agent configuration integrates
     all the options supported by the agent, and not only those that them
     values are different to the default.

   - Allows a complete customization of all the options supported for the
     agent, either from the the command line, or from the visual installation.

   - Each generated installer is identified uniquely by a BuildID.
        (Each architecture has its own BuildID sequence)

   - Allows to execute the agent as a Windows Service, to plan its execution
     through a Windows Task or, simply, not to execute the agent.

   - Allows to pull a SSL certificate from a URL at installation time. (ToDo)


What do you need
----------------
   This is than you need to build the installer

   - Whether you use Microsoft Windows OS
      * NSIS 2.46

      You can get NSIS 2.46 from http://nsis.sourceforge.net/Download

   - Whether you use a Unix OS
      * Curl
      * NSIS 2.46

      Check your distribution for more information about these packages

   - In all of cases
      * An Internet connection


Current state
-------------
   Nowadays, the contents of the project is:

      .- FusionInventory Agent v2.3.x
         .- FusionInventory Agent Task Deploy v2.0.4
         .- FusionInventory Agent Task ESX v2.2.1
         .- FusionInventory Agent Task Inventory v1.0
         .- FusionInventory Agent Task NetInventory v2.2.0
         .- FusionInventory Agent Task NetDiscovery v2.2.0
         .- FusionInventory Agent Task WakeOnLan v2.0

            Note than, nowadays, FusionInventory Agent 2.3.x is still in
            development (main branch).

   This is the current directory tree of the project.

.
|-- NSIS
|   |-- FusionInventory-Agent
|   |   |-- Contrib
|   |   |   |-- Graphics
|   |   |   |   `-- Icons
|   |   |   |-- ModernUI2
|   |   |   |   `-- Pages
|   |   |   |       `-- Templates
|   |   |   `-- Skins
|   |   |       `-- Default
|   |   |-- Include
|   |   `-- INI
|   `-- Plugins
|-- Perl
|   `-- Scripts
`-- Tools
    |-- 7zip
    |   |-- x64
    |   `-- x86
    |-- curl
    |   `-- x86
    |-- dmidecode
    |   `-- x86
    |-- hdparm
    |   `-- x86
    |-- sed
    |   `-- x86
    `-- setacl
        |-- x64
        `-- x86


   Inside of './NSIS/Perl/Scripts' directory there is a set of scripts for
download Strawberry Perl Portable Edition v5.16.3.1 (Mar 2013) for x64 and
x86 architectures, update and install all the Perl modules dependencies for
the previous FusionInventory Agent packages, and download them. Please, read
the file './Perl/Scripts/Readme.txt' for more information about these scripts.


How to generate the installers
------------------------------
   Download fusioninventory-agent-windows-installer from GitHub using this URL
pattern.

   https://github.com/tabad/fusioninventory-agent-windows-installer/tarball/<object>

where <object> may be a tag (or release) name, a branch name or a commit name.

   To know the available tags, branches and commits available, please, visit
these URL's in that order.

   https://github.com/tabad/fusioninventory-agent-windows-installer/tags
   https://github.com/tabad/fusioninventory-agent-windows-installer/branches
   https://github.com/tabad/fusioninventory-agent-windows-installer/commits

            Note that, in the last case, you should select after the wished
            branch name, or end up the URL with the name of that branch, like
            this '...-windows-installer/commits/<branch_name>'.

   This is an example using cURL to download the last commit of 'master'
branch.

   $ curl --location \
     --output fusioninventory-agent-windows-installer-master.tar.gz \
     https://github.com/tabad/fusioninventory-agent-windows-installer/\
     tarball/master

            Note than you can put it in a single line.

   Once you have the '*.tar.gz' file, uncompress and unpack it. This is an
example, continuing the previous one, using tar.

   $ mkdir fusioninventory-agent-windows-installer-master
   $ tar -C fusioninventory-agent-windows-installer-master \
     --strip-components 1 \
     -xf fusioninventory-agent-windows-installer-master.tar.gz

            Note than, like above, you can put it in a single line.

   You can also clone the repository whether do you prefer it using Git.

   $ git clone --branch <branch_name> \
     https://github.com/tabad/fusioninventory-agent-windows-installer.git

            Note that you should change <branch_name> for the name of branch
            you wish download.

            I'm sure you don't need much more explications about Git whether
            you have chosen this last option.

   The following steps depends of your operative system.


   Microsoft Windows
   -----------------
   From your Microsoft Windows command interpreter executes

   > cd fusioninventory-agent-windows-installer
   > cd Perl\Scripts
   > .\install-gnu-utilities-collection.bat
   > .\install-strawberry-perl-package-for-fusioninventory-agent.bat
   > .\install-fusioninventory-agent.bat
   > .\patch-fusioninventory-agent.bat
   > .\update-ids-repositories.bat
   > cd ..\..\NSIS
   > .\FusionInventory-Agent.bat

   You should be able to see the new installers in that directory.


   Unix OS
   -------
   $ cd fusioninventory-agent-windows-installer
   $ chmod 0744 NSIS/*.sh Perl/Scripts/*.sh
   $ cd Perl/Scripts
   $ ./install-strawberry-perl-package-for-fusioninventory-agent.sh
   $ ./install-fusioninventory-agent.sh
   $ ./patch-fusioninventory-agent.sh
   > ./update-ids-repositories.sh
   $ cd ../../NSIS
   $ ./FusionInventory-Agent.sh

   You should be able to see the new installers in that directory.


How to build the Strawberry Perl Portable Edition Package for
FusionInventory Agent
-------------------------------------------------------------
   This task can be done only from Microsoft Windows OS.


   Microsoft Windows
   -----------------
   From your Microsoft Windows command interpreter executes

   > cd fusioninventory-agent-windows-installer
   > cd Perl\Scripts
   > .\install-gnu-utilities-collection.bat
   > .\install-strawberry-perl.bat
   > .\install-perl-modules-and-dependencies.bat
   > .\delete-perl-modules-and-dependencies-temporary-files.bat
   > .\build-strawberry-perl-package-for-fusioninventory-agent.bat
   > .\uninstall-strawberry-perl.bat

   The script 'build-strawberry-perl-package-for-fusioninventory-agent.bat'
will show to you where is the built package.

   Please, read 'How to know whether is needed to build a new Strawberry Perl
Portable Edition Package for FusionInventory Agent' below for more
information.


How to upgrade the Strawberry Perl distribution
-----------------------------------------------
   Let's look at an example.

   Suppose has been released the new Strawberry Perl Nov 2012 Portable Edition
(5.16.2.1-32/64bits). Nowadays (Nov 09, 2012), the installers are run on
Strawberry Perl Aug 2012 Portable Edition (5.16.1.1-32/64bits) and you want to
upgrade it. These are the steps you should carry out.

    Update variables 'strawberry_version' and 'strawberry_release' of file
'./Perl/Scripts/load-perl-environment' to reflect the new values.

      -declare -r strawberry_version='5.16.1.1'
      -declare -r strawberry_release='Aug 2012'
      +declare -r strawberry_version='5.16.2.1'
      +declare -r strawberry_release='Nov 2012'

   Update constant 'STRAWBERRY_RELEASE' of file './NSIS/
/FusionInventory.nsi' to adapt it to its new value:

      -!define STRAWBERRY_RELEASE "5.16.1.1"
      +!define STRAWBERRY_RELEASE "5.16.2.1"

   And finally, rebuild the installers.

      Remember, probably you also will need to build a new Strawberry Perl
      Portable Edition Package for FusionInventory Agent.


How to upgrade the agent
------------------------
   Let's look at an example.

   Suppose you know there are new stable release for FusionInventory-Agent.
You have the builder ready to build the installers with FusionInventory-Agent
v2.3.0 (it is also an assumption) so you want to change it to get the
installers with the last releases.

   In GitHub you can find all releases of FusionInventory-Agent. In
https://github.com/fusinv are registered most of the projects of
FusionInventory but here we are only interested in one of them. It is,
with its URL, the following

      FusionInventory-Agent
         https://github.com/fusinv/fusioninventory-agent

   You can see the tag (or release) names, the branch names or the commit names
of this project the same way you see them of this one. For more information,
see section 'How to generate the installers' above.

   By taking a look at https://github.com/fusinv/fusioninventory-agent/tags you
see that new release is v2.3.1 (it is also an assumption). These are the
changes you should to carry out.

   Edit the './Perl/Scripts/load-perl-environment' file and change the value of
variable 'fusinv_agent_commit' to '2.3.1'. The other variables
(fusinv_agent_mod_name and fusinv_agent_repository) should maintain its values,
unless there are changes in GitHub.

      -declare +r fusinv_agent_commit='2.3.0'
      +declare +r fusinv_agent_commit='2.3.1'

            Note that, in these cases, '2.3.1' is a 'tag' in Git terminology;
            that is, in our case, stable releases. A tag makes reference, in
            last term, to a commit, therefore the name of the variable.

   An important thing to take into account is that, probably, this new release
require new, or simply different, Perl modules. Whether it is so, you should
build a new Strawberry Perl Portable Edition Package for FusionInventory Agent.
But before to do that, you should carry out two actions; a) to increase the
package build identifier and b) to update the list of required and recommended
Perl modules.

   To do the first one is easy, you only need to edit the '.\Perl\Script\load-
-perl-environment' and to increment it in a unit.

      -declare -r strawberry_pepfia_build_id='1'
      +declare -r strawberry_pepfia_build_id='2'

            Note that the variable 'strawberry_pepfia_branch' is not necessary
            to change it in this case since the branch 2.3.x match with the
            branch of FusionInventory-Agent release 2.3.1.

            Remember that you should reset 'strawberry_pepfia_build_id' to '1'
            whether you upgrade the Strawberry Perl distribution.

   The second one is, most of the times, more tedious. You should check whether
there is new requirements or recommendations comparing the file 'Makefile.PL'
of the FusionInventory-Agent package you want to update. Then, whether there
are changes, you must update the respective variable 'fusinv_agent_mod_depen-
dences' of './Perl/Scripts/load-perl-environment' file to reflect these changes.

      Remember that, probably, you also need to update these variables whether
      you have upgraded the Strawberry Perl distribution.

   Let's look at an example for FusionInventory-Agent.

   In https://github.com/fusinv/fusioninventory-agent/tags you can see all
stable releases of FusionInventory-Agent. In that, below '2.3.1.zip - 2.3.1 re-
lease' appears the sequence '6f67b7d6f6' (it is an assumption); the short form
for its SHA1 commit.  Do click on it, and after, do click on 'Browse code'
(up and right). In the list of files that appears, do click on file
'Makefile.PL' and write down the list of required and recommended Perl modules
(those lines started by 'requires ...' and 'recommends ...', but not those
lines started by 'text_requires ...') commons to all operative systems and
those specific for Microsoft Windows (those lines under the condition
'($OSNAME eq 'MSWin32')'). This list of Perl modules should be the new value
of the variable 'fusinv_agent_mod_dependences'. Like this list is different of
that for 2.3.0 release (repeat the previous process for '2.3.0.zip - 2.3.0
release') you need change the value of the variable
'fusinv_agent_mod_dependences'.

      -declare -r fusion_agent_mod_dependences='Archive::Extract Crypt::DES
       Compress::Zlib Digest::MD5 Digest::SHA File::Copy::Recursive
       File::Which HTTP::Daemon IO::Socket::SSL JSON LWP LWP::Protocol::https
       Net::IP Net::NBName Net::SNMP Parse::EDID POE::Component::Client::Ping
       Socket::GetAddrInfo Text::Template UNIVERSAL::require URI::Escape
       Win32::Daemon Win32::Job Win32::OLE Win32::TieRegistry XML::TreePP'
      +declare -r fusion_agent_mod_dependences='Archive::Extract Crypt::DES
       Compress::Zlib Digest::MD5 Digest::SHA File::Copy::Recursive
       File::Which HTTP::Daemon IO::Socket::SSL JSON LWP LWP::Protocol::https
       Net::IP Net::NBName Net::SNMP Net::Write::Layer2 Parse::EDID
       POE::Component::Client::Ping Socket::GetAddrInfo Text::Template
       UNIVERSAL::require URI::Escape Win32::Daemon Win32::Job Win32::OLE
       Win32::TieRegistry XML::TreePP'

            Note that they are only two lines.

   As the list of modules for FusionInventory-Agent has changed, it is necessary
to generate a new Strawberry Perl Portable Edition Package.

   You should start with a clean Strawberry Perl distribution too, so the
recommended steps are:

            Remember, this task can be done only from Microsoft Windows OS.

   > cd fusioninventory-agent-windows-installer
   > cd Perl\Scripts
   > .\install-gnu-utilities-collection.bat
   > .\uninstall-strawberry-perl.bat
   > .\install-strawberry-perl.bat
   > .\install-perl-modules-and-dependencies.bat
   > .\delete-perl-modules-and-dependencies-temporary-files.bat
   > .\build-strawberry-perl-package-for-fusioninventory-agent.bat
   > .\uninstall-strawberry-perl.bat

   Now you can load the new package and its associated files into your public
repository of Strawberry Perl Portable Edition Packages for FusionInventory
Agent. This can be a local repository; you only have to change the
'strawberry_pepfia_url' variable of the file './Perl/Scripts/load-perl-environment'.
For example, to leave the default directory as the default repository, you only
have to do the following:

   -declare -r strawberry_pepfia_url='https://sourceforge.net/projects/fiawi/fil
    es/strawberry-perl-packages
   +declare -r strawberry_pepfia_url='file://c/.../fusioninventory-agent-windows
    -installer/Perl/Strawberry'

            Note that they are only two lines.

            Remember, 'file://' is dependent of the OS and must be written as
            a absolute path. Make sure, in any case, that the value of the
            'strawberry_pepfia_url' variable is correct.

   Finally, you should change the following constants of the file './NSIS/
/FusionInventory.nsi' to adapt them to their new values:

      FIA_RELEASE
      FIA_TASK_DEPLOY_RELEASE
      FIA_TASK_ESX_RELEASE
      FIA_TASK_INVENTORY_RELEASE
      FIA_TASK_NETWORK_RELEASE
      FIA_TASK_NETDISCOVERY_RELEASE
      FIA_TASK_NETINVENTORY_RELEASE
      FIA_TASK_WAKEONLAN_RELEASE

      PRODUCT_VERSION_MAJOR
      PRODUCT_VERSION_MINOR
      PRODUCT_VERSION_RELEASE
      PRODUCT_VERSION_BUILD

   They are at the beginning of the file. Following the example,

   -!define FIA_RELEASE "2.3.0"
   +!define FIA_RELEASE "2.3.1"

   -!define PRODUCT_VERSION_RELEASE "0"
   +!define PRODUCT_VERSION_RELEASE "1"

            Note that you can find out these release numbers searching the
            'VERSION' variable inside './Perl/Strawerry/<arch>/cpan/sources/
            /FusionInventory-Agent-<fusinv_agent_commit>/lib/FusionInventory/
            /Agent/Task/*.pm' files.

   With the new Strawberry Perl Portable Edition Package for FusionInventory
Agent ready, and these last changes, you can continue as it were a normal
build process. See 'How to generate the installers' above.


How to know whether is needed to build a new Strawberry Perl Portable Edition
Package for FusionInventory Agent
-----------------------------------------------------------------------------
   Basically you should check whether there is new requirements or recommen-
dations comparing the file 'Makefile.PL' of the FusionInventory-Agent package
you want to update. Then, whether there are changes, you must update the
variable 'fusinv_agent_mod_dependences' of './Perl/Scripts/load-perl-environment'
file to reflect these changes.

   Probably you also will need to build a new Strawberry Perl Portable Edition
Package for FusionInventory Agent whether you have upgraded the Strawberry
Perl distribution.

   See 'How to upgrade the agent and its tasks' above for more information.


How to build the installers for a development version of FusionInventory-Agent
------------------------------------------------------------------------------
   The process is very similar to that described in 'How to upgrade the agent
and its tasks'. Then you chose a new stable release and, in this case, you
choose a branch name or a commit name.

   Let's look at an example about how to build the installers for the
development branch 'master' related with the 2.4.x series (it is an assumption)
supposing you have the builder ready to build the installer for
FusionInventory-Agent v2.3.1.

   Edit the './Perl/Scripts/load-perl-environment' file and carry out these
changes.

      -declare -r strawberry_pepfia_branch='2.3.x'
      +declare -r strawberry_pepfia_branch='2.4.x'
      -declare -r strawberry_pepfia_build_id='2'
      +declare -r strawberry_pepfia_build_id='1'
         ...
      -declare +r fusinv_agent_commit='2.3.1'
      +declare +r fusinv_agent_commit='master'
         ...

      -declare -r fusion_agent_mod_dependences='Archive::Extract Crypt::DES
       Compress::Zlib Digest::MD5 Digest::SHA File::Copy::Recursive
       File::Which HTTP::Daemon IO::Socket::SSL JSON LWP LWP::Protocol::https
       Net::IP Net::NBName Net::SNMP Net::Write::Layer2 Parse::EDID
       POE::Component::Client::Ping Socket::GetAddrInfo Text::Template
       UNIVERSAL::require URI::Escape Win32::Daemon Win32::Job Win32::OLE
       Win32::TieRegistry XML::TreePP'
      +declare -r fusion_agent_mod_dependences='Archive::Extract Crypt::DES
       Compress::Zlib Digest::MD5 Digest::SHA File::Copy::Recursive
       File::Which HTTP::Daemon IO::Socket::SSL JSON LWP LWP::Protocol::https
       Net::IP Net::NBName Net::SNMP Net::Write::Layer2 PAR::Parcker Parse::EDID
       POE::Component::Client::Ping Socket::GetAddrInfo Text::Template
       UNIVERSAL::require URI::Escape Win32::Daemon Win32::Job Win32::OLE
       Win32::TieRegistry XML::TreePP'

   As the list of modules for FusionInventory-Agent has changed, it is necessary
to generate a new Strawberry Perl Portable Edition Package.

   You should start with a clean Strawberry Perl distribution too, so the
recommended steps are:

            Remember, this task can be done only from Microsoft Windows OS.

   > cd fusioninventory-agent-windows-installer
   > cd Perl\Scripts
   > .\install-gnu-utilities-collection.bat
   > .\uninstall-strawberry-perl.bat
   > .\install-strawberry-perl.bat
   > .\install-perl-modules-and-dependencies.bat
   > .\delete-perl-modules-and-dependencies-temporary-files.bat
   > .\build-strawberry-perl-package-for-fusioninventory-agent.bat
   > .\uninstall-strawberry-perl.bat

   Now you can load the new package and its associated files into your public
repository of Strawberry Perl Portable Edition Packages for FusionInventory
Agent. This can be a local repository; you only have to change the
'strawberry_pepfia_url' variable of the file './Perl/Scripts/load-perl-environment'.

   Finally, you should change the following constants of the file './NSIS/
/FusionInventory.nsi' to adapt them to their new values:

      FIA_RELEASE
      FIA_TASK_DEPLOY_RELEASE
      FIA_TASK_ESX_RELEASE
      FIA_TASK_INVENTORY_RELEASE
      FIA_TASK_NETWORK_RELEASE
      FIA_TASK_NETDISCOVERY_RELEASE
      FIA_TASK_NETINVENTORY_RELEASE
      FIA_TASK_WAKEONLAN_RELEASE

      PRODUCT_VERSION_MAJOR
      PRODUCT_VERSION_MINOR
      PRODUCT_VERSION_RELEASE
      PRODUCT_VERSION_BUILD

   They are at the beginning of the file. Following the example,

   -!define FIA_RELEASE "2.3.1"
   +!define FIA_RELEASE "master"

   -!define PRODUCT_VERSION_MINOR "3"
   -!define PRODUCT_VERSION_RELEASE "1"
   +!define PRODUCT_VERSION_MINOR "4"
   +!define PRODUCT_VERSION_RELEASE "2013030702"

            Note that all PRODUCT_VERSION_* constants must have a numeric
            value. Here I have followed the pattern 'YYYYMMDD##', where
            'YYYYMMDD' is the date of creation of the installer and '##'
            is the sequence number of the Installer generated on that date
            (this value can take the values [01-99]). You can choose any
            other number or pattern you like.

   With the new Strawberry Perl Portable Edition Package for FusionInventory
Agent ready, and these last changes, you can continue as it were a normal
build process. See 'How to generate the installers' above.

   The branch 'master' and commit 'f3f9382a18659d1fff602ae04e816a1a4221c369'
(it is also an assumption) reflect the same state. The following example build
the same installer but choosing the commit 'f3f9382a18659d1fff602ae04e816a1-
a4221c369' instead of branch 'master'.

   Edit the './Perl/Scripts/load-perl-environment' file and carry out these
changes.

      -declare -r strawberry_pepfia_branch='2.3.x'
      +declare -r strawberry_pepfia_branch='2.4.x'
      -declare -r strawberry_pepfia_build_id='2'
      +declare -r strawberry_pepfia_build_id='1'
         ...
      -declare +r fusinv_agent_commit='2.3.1'
      +declare +r fusinv_agent_commit='f3f9382a18659d1fff602ae04e816a1a4221c369'
         ...

      -declare -r fusion_agent_mod_dependences='Archive::Extract Crypt::DES
       Compress::Zlib Digest::MD5 Digest::SHA File::Copy::Recursive
       File::Which HTTP::Daemon IO::Socket::SSL JSON LWP LWP::Protocol::https
       Net::IP Net::NBName Net::SNMP Net::Write::Layer2 Parse::EDID
       POE::Component::Client::Ping Socket::GetAddrInfo Text::Template
       UNIVERSAL::require URI::Escape Win32::Daemon Win32::Job Win32::OLE
       Win32::TieRegistry XML::TreePP'
      +declare -r fusion_agent_mod_dependences='Archive::Extract Crypt::DES
       Compress::Zlib Digest::MD5 Digest::SHA File::Copy::Recursive
       File::Which HTTP::Daemon IO::Socket::SSL JSON LWP LWP::Protocol::https
       Net::IP Net::NBName Net::SNMP Net::Write::Layer2 PAR::Parcker Parse::EDID
       POE::Component::Client::Ping Socket::GetAddrInfo Text::Template
       UNIVERSAL::require URI::Escape Win32::Daemon Win32::Job Win32::OLE
       Win32::TieRegistry XML::TreePP'

            Note that the installer always works with short commit names. See
            variable 'maximum_commit_length' to know what this length is (by
            default it is 10). All commit names will be truncated to this
            length.

   Like before, it is necessary to generate a new Strawberry Perl Portable
Edition Package. And like before, you should change the following constants
of the file './NSIS/FusionInventory.nsi' to adapt them to their new values:

   -!define FIA_RELEASE "2.3.1"
   +!define FIA_RELEASE "f3f9382a18"

   -!define PRODUCT_VERSION_MINOR "3"
   -!define PRODUCT_VERSION_RELEASE "1"
   +!define PRODUCT_VERSION_MINOR "4"
   +!define PRODUCT_VERSION_RELEASE "2013030702"

   With the new Strawberry Perl Portable Edition Package for FusionInventory
Agent ready, and these last changes, you can continue as it were a normal
build process. See 'How to generate the installers' above.


Contacts
--------
Project websites:
* main site: http://www.fusioninventory.org
* forge: http://forge.fusioninventory.org/projects/fusioninventory-agent-windows-installer

Project mailing lists:
* http://lists.alioth.debian.org/mailman/listinfo/fusioninventory-user
* http://lists.alioth.debian.org/mailman/listinfo/fusioninventory-devel

Project IRC channel:
* #FusionInventory on FreeNode IRC Network

Please report any issues on project forge bugtracker (see forge URL above).


Repositories
------------
Public Git repositories:
* https://github.com/tabad/fusioninventory-agent-windows-installer

Public Strawberry Perl Portable Package repositories:
* http://sourceforge.net/projects/fiawi/files/strawberry-perl-packages/

Public experimental intallers repositories:
* https://sourceforge.net/projects/fiawi/files/


Author
-------
* Tomás Abad <tabadgp@gmail.com>

Copyright 2012 FusionInventory Team


License
-------
This software is licensed under the terms of GPLv2+, see License.txt file for
details.


Other sources of this document
------------------------------
http://www.fusioninventory.org/documentation/agent/dev/experimental_windows_installer/
Время на прочтение3 мин
Количество просмотров100K
Понадобилось мне собрать инфу о конфигурации компьютеров в рабочей сети. В качестве базы была выбрана GLPI. Т.к. OCS Inventory уже описывали на хабре и в коментариях к той статье упоминалось про Fusion Inventroy, то его и будем устанавливать.
Основные задачи:
- прикрутить Fusion Inventory к GLPI, без использования OCS Inventory;
- скрипт сбора инфы запускать вручную, при необходимости (чтобы в памяти ничего лишнего не висело);
- собрать конфигурацию компьютеров, управляющих промышенным оборудованием (они не подключены к сети);
На сервере уже должен быть установлен и настроен LAMP( в моем случае — это FAMP).
Устанавливаем GLPI
# cd /usr/ports/www/glpi; make install cleanСоздаём базу и пользователя (USER и PASSWORD заменить на свои):
# mysqladmin -uroot -p create glpi
# mysql -uroot -p -e"GRANT ALL ON glpi.* TO USERNAME@localhost IDENTIFIED BY 'PASSWORD'" glpi
Добавляем в настройки апача (httpd.conf или httpd-vhosts.conf):
Alias /glpi "/usr/local/www/glpi"
<Directory /usr/local/www/glpi>
	 AllowOverride Options FileInfo
</Directory>
Перезагружаем апач:
# apachectl restartИдем на созданный сайт(http://{host.domain}/glpi/) и выбираем язык установки Russian, а дальше там всё понятно.
Устанавливаем FusionInventory (сервер)
Скачиваем FusionInventory плагин и распаковываем в папку плагинов GLPI:
# cd ~
# fetch http://forge.fusioninventory.org/attachments/download/120/fusioninventory-for-glpi-2.2.2-release.tar.gz
# cd /usr/local/www/glpi/plugins/
# rm remove.txt
# tar -xzvf /root/fusioninventory-for-glpi-2.2.2-release.tar.gz
Проверяем структуру папок, она должна выглядеть так:
        |--- glpi
              |--- plugins
                    |--- fusioninventory
                          |--- fusioninventory
                          |     |--- index.php
                          |     |--- hook.php
                          |     |--- front
                          |     |--- inc
                          |
                          |--- fusininventory
                          |     |--- ...
                          |
                          |--- fusinvsnmp
                          |--- ...
	etc...
Заходим в GLPI под админским аккаунтом, меню «настройки» -> «дополнения» -> в поле «FusionInventory» -> «обновить/установить» -> «включить». «Устанавливаем», а затем включаем все части плагина в таком порядке:
- FusionInventory
- FusionInventory INVENTORY
- FusionInventory SNMP
Устанавливаем FusionInventory (клиент)
Скачиваем и устанавливаем клиент:
forge.fusioninventory.org/projects/fusioninventory-agent/wiki/Agent_supportedplateforms
При установке указываем путь к серверу(у Win версии настройки задаются во время установки):
http://server_ip/glpi/plugins/fusioninventory/front/plugin_fusioninventory.communication.php
Если используется DNS, то:
http://glpi.mydomain/plugins/fusioninventory/front/plugin_fusioninventory.communication.php
Для Active Directory:
http://AD_DOMAIN\user:password@serverip/glpi/plugins/fusioninventory/front/plugin_fusioninventory.communication.php
Возможно придётся указать дополнительные настройки (proxy, etc) — чекбокс «Advanced» при установке.
После установки клиента, заходим в веб интерфейс GLPI -> «Дополнения» -> «FusionInventory» -> «Управление агентами» и смотрим появился ли компьютер в списке.
Чтобы агент не висел постоянно в памяти, то после установки:
Windows
- Скопировать папку установленного Fusion-Inventory
- В ней создать файл save_net.cmd с таким содержанием:
set PATH=%CD%\perl\;%CD%\perl\bin;%PATH%
perl.exe %CD%\perl\bin\fusioninventory-agent --debug -f --no-wakeonlan --scan-homedirs --logfile=%CD%agent-log.txt --share-dir=%CD%share —server=http://glpi.mydomain/plugins/fusioninventory/front/plugin_fusioninventory.communication.php
Не забываем изменить «glpi.mydomain» на свое имя/ip.
Для инвентаризации/обновления запускать созданный скрипт, а для сохранения конфигурации компьютера(на котором нет сети)в файл, создаём в папке с Fusion-Inventory каталог «xml» и файл save_local.cmd с таким содержанием:
set PATH=%CD%\perl\;%CD%\perl\bin;%PATH%
perl.exe %CD%\perl\bin\fusioninventory-agent --debug -f --no-wakeonlan --scan-homedirs --local=%CD%\xml --logfile=%CD%\agent-log.txt --share-dir=%CD%\share
После запуска этого скрипта конфигурация сохранится в каталог «xml». Для импорта конфигурации в базу — заходим в glpi -> «Дополнения» -> «FusionInventory» -> «Import agent XML file» и выбираем нужный файл из папки xml.
В итоге получим portable версию Fusion Inventory, которую можно запускать с флешки. Главное быть уверенным, что ни у кого нет какой либо живности на компьютере.
FreeBSD / Linux
- Скачиваем тарбол из раздела с пакетами (Для арча подходит тарбол от ubuntu) forge.fusioninventory.org/projects/fusioninventory-agent/wiki/Agent_supportedplateforms
- Правим конфиг agent.cfg,
- От root`a запускаем «fusioninventory-agent»
P.S. Если удалить оборудование/компьютер/etc из списка, а потом прислать агентом на сервер информацию о нём, то онa не появиться в соответствующем списке — нужно отменить удаление («Показать удалённые объекты» -> «Восстановить»)
Прочитано: 7 900
В рамках данной заметки, я покажу и предоставлю небольшой скрипт для ручной установки агента fusioninvetory на Windows системы используемые у меня на рабочем месте. Заметка опирается на ту где я рассмотрел в виде пошаговой заметки как развернуть сервис GLPI.
Скрипт представляет из себя обычный bat-файл и ресурс в сети на котором расшарен специализированный каталог (Может быть развернут как на Windows системах так и с использованием сервиса SAMBA на Ubuntu системах, как сделано у меня) с исполняемыми файлами агента (где взять файлы агента смотрите основную заметку на которую опирается эта, там приводятся ссылки, здесь у меня исполняемые файлы уже переименованы для моего удобства) и подготовленным под мой сервер glpi файлом реестра для импортирования настроек в систему.
На заметку: скрипт нужно запускать с правами локального Администратора или Администратора Домена на рабочих станциях где нужно установить агент.
И так содержимое reg файла:
Windows Registry Editor Version 5.00
[HKEY_LOCAL_MACHINE\SOFTWARE\FusionInventory-Agent]
"backend-collect-timeout"="180"
"ca-cert-dir"=""
"ca-cert-file"=""
"debug"="2"
"delaytime"="300"
"html"="0"
"httpd-ip"=""
"httpd-port"="62354"
"httpd-trust"=""
"local"=""
"logfile"="C:\\Program Files\\FusionInventory-Agent\\fusioninventory-agent.log"
"logfile-maxsize"="16"
"logger"="File"
"no-category"=""
"no-httpd"="1"
"no-p2p"="0"
"no-ssl-check"="0"
"no-task"=""
"password"="glpi"
"proxy"=""
"server"="http://10.7.8.154/glpi/plugins/fusioninventory/"
"scan-homedirs"="0"
"scan-profiles"="0"
"tag"=""
"timeout"="180"
"user"="glpi"
и собственно содержимое скрипта:
@echo off
ver | find "6.1" > nul
if %ERRORLEVEL% == 0 goto W7
ver | find "5.1" > nul
if %ERRORLEVEL% == 0 goto XP
:XP
rem help po install C:\666>agentx86.exe ?
rem uninstall "C:\Program Files\FusionInventory-Agent\Uninstall.exe" /S
sc query | findstr /i "FusionInventory-Agent"
rem если вывод не равен 0 тогда устанавливаем агент
if %ERRORLEVEL% == 0 goto (wxp) else (goto END)
:wxp
mkdir c:\666
xcopy /Y /Z /R \\10.9.9.1\file\glpi\agentx86.exe c:\666
xcopy /Y /Z /R \\10.9.9.1\file\glpi\winxpagent.reg c:\666
c:\666\agentx86.exe /acceptlicense /add-firewall-exception /execmode=Service /installtasks=Full /runnow /no-start-menu /S
regedit /S c:\666\winxpagent.reg
net stop FusionInventory-Agent
net start FusionInventory-Agent
rmdir /S /Q c:\666
:END
rmdir /S /Q c:\666
exit
:W7
IF EXIST "%PROGRAMFILES(X86)%" (GOTO 64BIT) ELSE (GOTO 32BIT)
:64BIT
rem help po install C:\666>agentx86.exe ?
rem uninstall "C:\Program Files\FusionInventory-Agent\Uninstall.exe" /S
sc query | findstr /i "FusionInventory-Agent"
rem если вывод не равен 0 тогда устанавливаем агент
if %ERRORLEVEL% == 0 goto (W7X64) else (goto END)
:W7X64
mkdir c:\666
xcopy /Y /Z /R \\10.9.9.1\file\glpi\agentx64.exe c:\666
xcopy /Y /Z /R \\10.9.9.1\file\glpi\winxpagent.reg c:\666
c:\666\agentx64.exe /acceptlicense /add-firewall-exception /execmode=Service /installtasks=Full /runnow /no-start-menu /S
regedit /S c:\666\winxpagent.reg
net stop FusionInventory-Agent
net start FusionInventory-Agent
rmdir /S /Q c:\666
:END
rmdir /S /Q c:\666
exit
:32BIT
rem help po install C:\666>agentx86.exe ?
rem uninstall "C:\Program Files\FusionInventory-Agent\Uninstall.exe" /S
sc query | findstr /i "FusionInventory-Agent"
rem если вывод не равен 0 тогда устанавливаем агент
if %ERRORLEVEL% == 0 goto (w7x86) else (goto END)
:w7x86
mkdir c:\666
xcopy /Y /Z /R \\10.9.9.1\file\glpi\agentx86.exe c:\666
xcopy /Y /Z /R \\10.9.9.1\file\glpi\winxpagent.reg c:\666
c:\666\agentx86.exe /acceptlicense /add-firewall-exception /execmode=Service /installtasks=Full /runnow /no-start-menu /S
regedit /S c:\666\winxpagent.reg
net stop FusionInventory-Agent
net start FusionInventory-Agent
rmdir /S /Q c:\666
:END
rmdir /S /Q c:\666
exit
Я специально не выкладываю скрипт как уже подготовленный в режиме просто взял и скачал, это уже на ваше усмотрение Вы сами под себя сделаете и конечно же дополните.
Вот собственно и все, чем я хотел поделиться с читателями моего блога. До встречи, с уважением автор блога – ekzorchik. Автоматизация установки агента fusioninventory на Windows системы