
In this tutorial we will learn how to use vsftpd on Linux to make Ubuntu machine run as ftp server and transfer files over wifi on local network.
On many occasion you need to copy and backup files locally from one computer to other. Using physical disk like flash drive or external hard drive is not always feasible due to many constraints such large file size, external drive availability.
- Setup
- Install VSFTP demon on Ubuntu
- Configure VSFTPD for uploads (Optional)
- Configure Ubuntu firewall for FTP
- Configure Windows Firewall
- Initiate FTP session using Windows command line
- Initiate FTP connection using ftp client on windows
- Understanding Security Aspects — Firewall and Services
Setup
We can take advantage of machines being on same network to achieve file transfer.
To follow this guide you should have access to following
- Ubuntu Machine
- Windows Machine
- Both machines connected over same network using ethernet or wifi
How to install VFTP on Ubuntu
Open Terminal to get and install vsftp demon from official ubuntu repository.
sudo apt-get install vsftpd
Above command will install vsftp demon which means it will always be running in background upon machine startup using init.
Use following commands to check vsftp service
sudo service vsftpd status
If service is running then above command will output status of service with all spawned vsftp process ids.
Alternatively you can also check vsftp process with grep
ps -ef | grep vsftp
How to configure VSFTP for Uploads
This step is optional but if you want to allow uploads from remote machine to your ubuntu server then follow below configuration.
After installation vsftp will create configuration file at path /etc/vsftpd.conf. This file should be owned by root and should have default vsftp configuration. By default VSFTP will not allow ftp uploads; to enable it uncomment line write_enable=YES
# Uncomment this to enable any form of FTP write command.
write_enable=YES
Note that /etc/vsftpd.conf would be owned by root, to make any changes in configuration do. sudo vim /etc/vsftpd.conf or sudo gedit /etc/vsftpd.conf
Restart vsftpd demon once configuration is completed.
sudo service vsftpd restart
Check status after restart.
sudo service vsftpd status
How to configure Ubuntu firewall for FTP
By default ubuntu shall be running firewall known as uncomplicated firewall (ufw). Default firewall rules will not allow any outside connection.
To open ftp port on this firewall use following commands.
Check firewall status using
sudo ufw status
Firewall should be active and running. If it’s not active then enable the same using following command to make your machine secure.
You can keep it disable if you have such requirement, however it’s recommended to keep it on. sudo ufw enable
To open ftp port 21 use following command
sudo ufw allow ftp or sudo ufw allow 21
This will add firewall rule to accept ftp connections from other machine on network. After adding ftp rule you should have following entries in your firewall. sudo ufw status
Status: active
To                         Action      From
--                         ------      ----
21/tcp                     ALLOW       Anywhere
21/tcp (v6)                ALLOW       Anywhere (v6)
Configure Windows Firewall
Firewall should permit you to initiate ftp session from windows machine. Search for Windows Firewall in start menu to open firewall configuration window.
Since we are going to use one time ftp we will disable firewall and reenable it once ftp is done. Depending upon which network you are connected to Home or Public you can disable firewall like below.
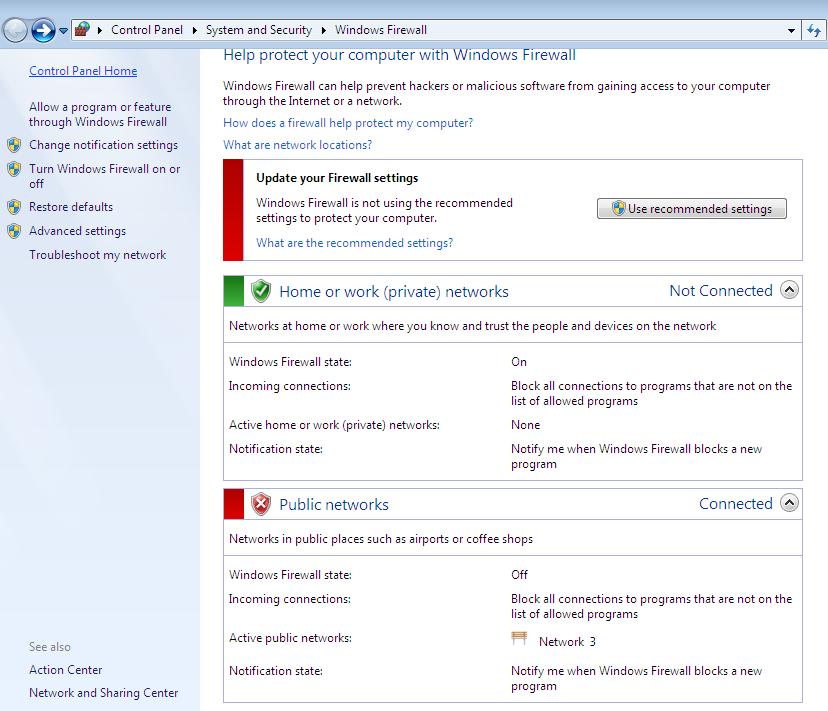
Note that disabling complete firewall is not recommended. If you are going to use ftp server regularly from windows machine then please create firewall rules under Windows Firewall with Advanced Security on Port 21
Initiate FTP session using Windows command line
Once we are done with required configurations we can initiate first ftp connection from windows command line. First get IP address of machine hosting FTP server using command ifconfig on ubuntu machine. Use eth0 inet address if you are connected with ethernet cable. For wireless connection use inet address of wlan0 interface. My ubuntu machine have following local IP 192.168.2.102.
ifconfig
eth0      Link encap:Ethernet
          UP BROADCAST MULTICAST  MTU:1500  Metric:1
          RX packets:0 errors:0 dropped:0 overruns:0 frame:0
          TX packets:0 errors:0 dropped:0 overruns:0 carrier:0
          collisions:0 txqueuelen:1000
          RX bytes:0 (0.0 B)  TX bytes:0 (0.0 B)

wlan0     Link encap:Ethernet
          inet addr:192.168.2.102  Bcast:192.168.2.255  Mask:255.255.255.0
          UP BROADCAST RUNNING MULTICAST  MTU:1500  Metric:1
          RX packets:24006 errors:0 dropped:0 overruns:0 frame:0
          TX packets:8312 errors:0 dropped:0 overruns:0 carrier:0
          collisions:0 txqueuelen:1000
          RX bytes:12996852 (12.9 MB)  TX bytes:1224374 (1.2 MB)
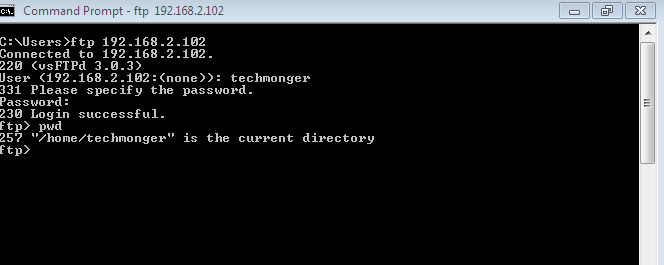
To initiate connection open command prompt on windows and use following command. ftp 192.168.2.102
It will ask for username and password. Username will be same name as the ubuntu user (techmonger in my case) and password will the ubuntu’s system password of user.
To get file from ubuntu ftp server, navigate to directory and use get command like below.
ftp>get filenameTo upload file from windows machine to ftp server, put command like below.
ftp>put filenameTo terminate ftp session use bye.
ftp>byeInitiate FTP connection usign ftp client on windows
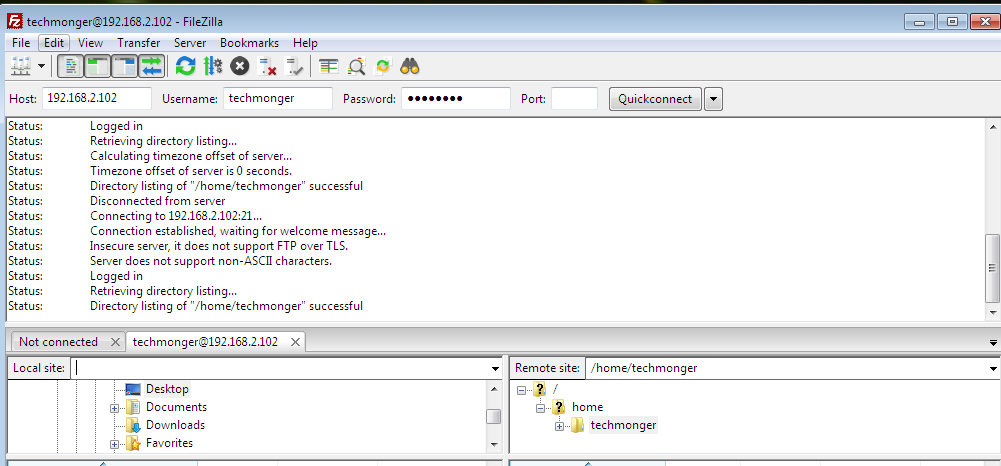
By now you would agree that doing ftp from windows command prompt is bit tedious. We can use ftp client such as winscp or filezilla to get GUI for ftp operations.
Use hostname as IP address of ftp server (192.168.2.102 in my case) and same credentials as those of ubuntu user.
Like below you can initiate connection from filezilla. You can use drag and drop to download and upload files from windows machine.
FTP Security Aspects — Firewall and Services
All ftp connections will be initiated in plain text. You should only use above method if you are in local network and have complete control over network. For encrypted connections use sftp or ftps.
-
Remove firewall rule from ubuntu once ftp requirement is over.
-
Enable Winows firewall once ftp requirement is over.
-
Stop vsftp demon if ftp is no longer needed to save system resources. It will also make your system less vulnerable.
sudo service vsftpd stop
sudo ufw deny ftp or sudo ufw deny 21
Conclusion : You can make your ubuntu machine to run as ftp server and can transfer files locally. You do not need SMB (server message block) for file transfer between linux machine and windows machine over network.
Transferring files between Windows and Linux systems can be a tricky task, but with the help of FTP (File Transfer Protocol), it becomes a seamless process. In this guide, we will walk you through the steps to FTP from Windows to Linux.
Step 1: Install an FTP Client on Windows
Before you can start transferring files, you need to have an FTP client installed on your Windows machine. Some popular FTP clients include FileZilla, WinSCP, and Core FTP.
Step 2: Connect to the Linux Server
Launch your FTP client and enter the FTP server details provided by your Linux administrator. This typically includes the server IP address, port number, and your login credentials.
Step 3: Navigate to the Desired Directory
Once connected to the Linux server, navigate to the directory where you want to upload the files. You can do this by using the FTP client’s interface.
Step 4: Upload Files from Windows to Linux
Now that you are in the correct directory, you can select the files you want to transfer from your Windows machine and upload them to the Linux server. Simply drag and drop the files from the local window to the remote window in your FTP client.
Step 5: Monitor the Transfer Progress
While the files are being transferred, you can monitor the progress in the FTP client. Once the transfer is complete, you will see a confirmation message.
Step 6: Verify the File Transfer
After the transfer is finished, it is a good practice to verify that the files were successfully uploaded to the Linux server. You can do this by navigating to the directory on the Linux server and checking if the files are there.
Conclusion
FTP is a reliable and efficient way to transfer files between Windows and Linux systems. By following the steps outlined in this guide, you can easily FTP from Windows to Linux with ease. #FTP #WindowsToLinux #FileTransferProtocol
FTP (File Transfer Protocol) представляет собой протокол удаленной передачи файлов. С его помощью можно загрузить на сервер и скачивать с него же данные любого типа и размера, создавать или удалять файлы и папки.
В Windows, Linux и macOS подключиться к FTP-серверу можно с помощью встроенных средств и сторонних программ разного назначения. Полноценная работа со всеми средствами возможна только через специальные приложения, называемые FTP-клиентами. Теперь подробнее расскажем обо всех этих способах.
Данные для доступа к FTP-серверу
При подключении к FTP-серверу очень важно вводить правильные данные. Возьмем в качестве примера Timeweb. После регистрации на почту приходят два письма. Письмо с данными выглядит вот так:

Теперь о том, какие данные необходимо иметь под рукой:
- логин,
- пароль,
- ссылка на FTP-сервер (указывается в том же письме),
- порт (по умолчанию устанавливается значение 21).

Комьюнити теперь в Телеграм
Подпишитесь и будьте в курсе последних IT-новостей
Подписаться
Как подключится к FTP через Проводник Windows
Сначала рассмотрим, как подключиться к FTP-серверу через программу «Проводник» в Windows 10. Здесь ничего дополнительно устанавливать не надо, просто открываем системный файловый менеджер. В левой панели находим значок «Этот компьютер» и жмем по нему правой кнопкой мыши для вывода контекстного меню. В списке выбираем элемент «Добавить новый элемент в сетевое окружение».

В результате откроется окно мастера добавления сетевого расположения. В начальном окне просто нажимаем «Далее».

Следом надо выбрать его дальнейшее местоположение, но в этом окне нам доступен только один вариант. Для продолжения снова нажимаем на кнопку «Далее».

В этом окне понадобится указать ссылку на сетевой ресурс, к которому планируется провести подсоединение. Важно соблюдать предписанный формат (чуть ниже есть несколько примеров). В поле вводим адрес/ссылку и вновь идем дальше.

Теперь понадобится ввести в поле имя пользователя. Пароль заранее вводить не нужно, он будет запрашиваться только при подключении. Если на вашем хосте есть такая возможность, вход можно осуществить анонимно, отметив соответствующую галочку.

В самом конце даем название новому сетевому окружению.

На этом настройка завершена. При необходимости можно поставить галочку, чтобы сразу после нажатия на кнопку «Готово» открыть указанный сервер и приступить к работе.

Новое подключение теперь находится в «Сетевых расположениях» в разделе «Этот компьютер».

Теперь подключаемся – открываем только что созданное соединение. Открывается маленькое окошко, где мы вводим пароль, затем жмем на кнопку «Вход».

Если все данные введены успешно, откроется папка сервера. Можно приступать к работе.

Читайте также


Подключение через командную строку Windows
Теперь расскажу, как подключиться к FTP-серверу в Windows с помощью командной строки. Этот способ многим может показаться не очень удобным, потому что вручную придется вбивать команды на загрузку документов, открытие папок и их скачивание. А для входа следуем указанной ниже последовательности.
- Вводим команду ftp и жмем на клавишу Enter для подтверждения.
- Задаем команду open наименование_ftp_хоста.
- Вводим логин пользователя. Можно осуществить анонимный вход, просто введя Anonymous.
- Вбиваем пароль. В случае с анонимом оставляем это поле пустым и жмем снова Enter.

Теперь подробнее по командам:
- dir – просмотр содержимого сервера.
- cd «имя_папки» – открытие указанной папки.
- put «путь_к_файлу» – загрузка этого документа с компьютера на сервер.
- get «наименование_файла.формат» – скачивание с хоста на компьютер.
- quit – отключение от FTP-сервера.
FTP-подключение через любой браузер
Подключиться к FTP-серверу можно и через браузер на любых операционных системах. В таком случае будет доступна лишь часть функций. Необходимо ввести в адресной строке IP-адрес хоста, только с добавлением приставки «ftp://». Нажимаем на клавишу Enter. Дальше потребуется ввести имя пользователя и пароль, а потом нажать на кнопку «Вход».

Как подключиться к FTP с помощью FileZilla
FileZilla – наиболее востребованный и рекомендуемый FTP-клиент, бесплатный и простой в использовании. Подключиться к FTP-серверу через FileZilla можно вне зависимости от операционной системы, установленной на компьютере.
Сперва потребуется скачать приложение на официальном сайте. Есть версии для Linux, Windows (портативная и установочная) и macOS. Просто выбираем нужный вариант и жмем по нему для начала закачки.

Устанавливаем приложение и открываем его. В верхней панели вводим следующую информацию:
- Хост. Это может быть IP-адрес или ссылка.
- Логин пользователя, предварительно высланный на почту сервисом.
- Пароль.
- Порт. Оставляем пустым или устанавливаем значение 21.
После того как все нужные поля будут заполнены, нажимаем на кнопку «Быстрое соединение».

После открытия каталога можно приступать к загрузке и скачиванию необходимых данных. Чтобы не вводить каждый раз данные для подключения, следует воспользоваться менеджером сайтов, который доступен в меню «Файл».
Подключаемся с помощью Total Commander
Вам потребуется скачать и установить приложение Total Commander. Рекомендуем делать это с официального сайта. После завершения установки открываем приложение. Переходим во вкладку «Сеть» и выбираем там пункт «Соединиться с FTP-сервером». Для этого действия, кстати, предусмотрена комбинация горячих клавиш – Ctrl + F.

В новом окне нажимаем на кнопку «Добавить». Дальше вводим имя нового соединения, адрес хоста, учетную запись и пароль. Нажимаем на кнопку ОК, чтобы сохранить всю введенную информацию.

Новое подключение отразится в списке. Остается только соединиться с сервером, нажав на соответствующую кнопку.

Как подключиться к FTP-серверу через терминал Linux
В Linux к FTP можно подключиться через системное приложение «Терминал». Это очень похоже на использование командной строки в Windows. Последовательность абсолютно та же – набираем команду ftp и активируем ее нажатием на кнопку Enter. Потом пишем open ссылка_на_хост. Не забываем, что затем надо указать логин и пароль.
Вот примеры доступных опций:
- Is – отображение списка файлов и папок.
- get – скачивание файла.
- mget – скачивание документов определенного формата. Например, mget * – все данные в каталоге, mget *, php – файлы формата php.
- put – загрузка файла на ресурс.
- mput – загрузка нескольких документов единого формата.
- mkdir – создание нового каталога.
- rmdir – удаление каталога.
- delete – удаление файла.
- bye – завершение работы.
- close – выход из текущего сеанса и возврат в контекст командной строки FTP.
- status – отображение статуса FTP клиента.
В Linux предусмотрен и другой вариант подключения к FTP. Сначала надо установить нужный пакет, дав вот такой запрос:
sudo apt-get install curlftpfs
Следом нужно предоставить права на определенную папку:
sudo chmod 777 ~/ftp
Теперь производится монтирование ftp-директории:
sudo curlftpfs -o allow_other ftp://user: password@server.ru /home/virtdiver/ftp/
Если работать необходимо от имени пользователя, то вводится вот такая опция:
-o allow_other
Для размонтирования FTP-папки используем такую команду:
sudo umount ~/ftp
Подключение к FTP через сайт хостинга
В этом случае достаточно лишь войти на сайт хостинга и перейти в соответствующий раздел. Покажу на примере Timeweb.
В правой части окна есть панель управления. Находим в ней пункт «Файловый менеджер» и жмем по нему. Перед нами предстанет веб-интерфейс FTP-сервера. Работать с ним очень просто, переносить файлы можно посредством drag-n-drop.

Заключение
Подключиться к FTP-серверу очень просто, и сделать это можно несколькими способами. Многие из них актуальны для всех популярных операционных систем. Но все зависит от цели, ведь функционал некоторых программ весьма ограничен.
Introduction
When using Linux machines, either as a Virtual Private Server or as a Virtual Machine on your local computer, one of the major problems that people encounter is to transfer their files from their host (main) machine to the Linux machine. This problem is generally resolved by a file transfer protocol client such as WinSCP and FileZilla. In this article, we shall learn how to transfer files and folders from Microsoft Windows to a Linux machine using the WinSCP software. WinSCP is a File Transfer Protocol client for Microsoft Windows. As said, it uses the FTP (File Transfer Protocol) and SFTP (Secure File Transfer Protocol) protocols to transfer files from a Windows machine to any other machine (Linux in this case).
Prerequisites
- Windows machine with WinSCP installed.
- Linux machine connected to the internet.
Transferring Files/Folders from Windows to Linux using WinSCP
Once you have the prerequisites, you can follow the following steps to transfer files and folders using WinSCP.
Step 1: Get the Public IP Address of your Linux Machine
The first thing we need is the IP address of the target Linux machine. To get this, open a terminal and then, type the curl command in the terminal:
curl ipinfo.io/ip
Here, we are sending an HTTP request to the ipinfo.io/ip website which is a utility that returns the Public IP address of the client machine. Thus, you will get an IPv4 address on your machine.

Step 2: Allowing FTP in the firewall
Now, if you are using a firewall, it is important to allow the FTP in your firewall otherwise the WinSCP will not be able to connect to your machine. Generally, Linux machines use the ufw firewall. To allow the FTP service, type the following command in your Linux terminal.
ufw allow ftp
On success, you will see a message like the following:
If you use some other firewall manager, use its corresponding commands to allow FTP.
Step 3: Connecting WinSCP to the Linux machine using the IP address
Now, open the WinSCP application on your windows machine. You will get a login prompt as follows:

Here, we will leave the File protocol to SFTP (Secure File Transfer Protocol), which means it will use port 22 for connecting to our Linux machine.
- In the hostname, enter the Public IP address of the Linux machine found in step 1.
- Then, enter the username which you want to connect using the machine and its password.
- (Optional) You can also save the connection settings if you desire.
Once all the fields are filled, click on ‘Login‘ and you will be given a warning about whether you want to connect to the unknown target machine or not, like the following:

Allow it by clicking on the ‘yes‘ button and it will be added to your trusted sources, which means that the next time you connect to this same machine, you will not be given such a warning again. Now, you have an active connection between the Windows and the target Linux machine. The WinSCP will now show you files from both your host machine and the remote Linux machine as well like below:
.png)
On the left split window, we have the host machine and on the right, we have the remote Linux machine.
Step 4: Copying Files and Folders from host to remote machine.
Now, to transfer any files/folders all you have to do is copy them from the right window and paste it in the left window.
To copy, right-click on a file or folder and click on copy to clipboard. We are taking the dummy_tranfer.txt file and dummy_folder directory for copying in this example.

Then, in the remote machine, navigate to the folder you want to save the file/folder and right-click in it then, choose ‘Paste From Clipboard‘. In this example, we are copying the files into the /home/transfers/ directory in our Linux machine but, you are free to choose any directory However, be cautious of using the same later in the article as well.

The contents of the transfers folder will now look like:

We have now successfully learned how to transfer files and folders from Windows to a Linux machine using WinSCP.
Note: There is no difference between transferring a file and a folder. You copy and paste them both in the same manner as shown above.
Step 5: Verifying the copied files
Now, to verify whether we have the files in our Linux machine, open a terminal on your Linux machine and type the following ls command:
ls <path to the directory used in WinSCP transfer (Step 4)>
This will give us the contents of the /home/transfers directory in which we copied our files.

As we can see, we have got the folder and the file we copied to our Linux machine.
Step 6: Closing the connection
Once you are done transferring files/folders, always close the connection properly as an unclosed connection might lead to unexpected errors sometimes. To close the connection, navigate to the Tabs option in the toolbar then, choose Disconnect Session. Now, the session is successfully logged out.

Conclusion
In this article, we learned how to fetch the public IP address of a Linux machine and then, use that IP address to set up a login session in WinSCP using the SFTP protocol to transfer files and folders. Then, we ended the tutorial by learning how to close the connection. The WinSCP provides other protocols, such as FTP, SCP, etc. to transfer files. It depends on the user’s need to choose the appropriate one. However, in most general cases you would use the SFTP protocol, which is also recommended due to security reasons.
Transferring files between Windows and Linux systems may seem daunting due to their different operating systems and file systems. However, there are several methods to accomplish this task securely and efficiently.
This article will explore four simple ways to transfer files from Windows to Linux, ensuring seamless data exchange.
4 Ways to Transfer Files From Windows to Linux
This section will explore four straightforward and efficient methods to transfer files from Windows to Linux. These methods offer practical solutions for seamless data exchange between the two operating systems. Let’s dive in and discover how to make file transfers hassle-free!
Securely Copy Files via SSH
Secure Shell (SSH) is a cryptographic network protocol that allows secure data communication between two devices. You can use SSH for remote access and file transfer. To securely transfer a file from Windows to Linux, you can use the SSH protocol with the scp command.
Example:
Let’s say you have a file called data.txt on your Windows machine, and you want to transfer it to your Linux server with the IP address 192.168.1.100. Open the Command Prompt on your Windows machine and use the following command:
Replace C:\path\to\data.txt with the actual path to your file and username with your Linux username. When you initiate the transfer, the system will prompt you to enter your Linux password for authentication. After providing the correct password, the system securely copies the file to the specified location on the Linux server.
Windows to Linux File Transfer with FTP
With File Transfer Protocol (FTP), you can conveniently transfer a file from Windows to Linux using an FTP client connected to the Linux FTP server. In this method, one device acts as an FTP server, and the other connects to it as an FTP client to exchange files.
Example:
First, set up an FTP server on your Linux machine. Install vsftpd, a widely used FTP server for Linux:
Next, start the FTP server:
Now, on your Windows machine, use an FTP client like FileZilla to connect to the Linux FTP server using its IP address, username, and password. Once connected, you can transfer files by dragging and dropping them between the Windows and Linux systems.
Utilize sync software like Resilio Sync to keep specific directories up-to-date when you transfer a file from Windows to Linux. Sync software enables seamless synchronization of files and folders between multiple devices. This method helps you keep specific directories up-to-date between your Windows and Linux systems.
Example:
One popular sync software is Resilio Sync (formerly known as BitTorrent Sync). Install it on both your Windows and Linux machines. Set up a sync folder on your Windows machine and share it with your Linux machine using a secret key. Once both devices are connected, any changes made to the shared folder on Windows will automatically sync to the Linux machine and vice versa.
The key to seamlessly transferring a file from Windows to Linux is to share the secret key for synchronization using sync software.
Use Shared Folders in Your Linux Virtual Machine
When running Linux as a virtual machine on your Windows PC, you can easily transfer a file from Windows to Linux using shared folders. It enables seamless file sharing between Windows and Linux.
Example:
Imagine you have Oracle VirtualBox running a Linux VM on your Windows PC. In VirtualBox settings, set up a shared folder that directs to a directory on your Windows host. Once the shared folder is set up within your Linux virtual machine, you can effortlessly transfer a file from Windows to Linux as needed.
Use these four methods to transfer and share files between Windows and Linux systems. Whether using the secure SSH protocol, the traditional FTP method, sync software, or shared folders in a virtual machine, these techniques provide flexible solutions for your data exchange needs. Choose the method that suits your requirements and start transferring files with ease.
Moving files between Windows and Linux through a network share is indeed possible and can be an effective method for file transfer. Network shares allow folders on one system to be accessed by another over the network, enabling seamless data exchange between the two operating systems.
To set up file sharing between Windows and Linux, follow these steps:
-
Configure File Sharing on Windows:
- Select the folder or directory you want to share on your Windows machine.
- Right-click on the folder, choose Properties, and navigate to the Sharing tab.
- Click Advanced Sharing and check the box for Share this folder.
- Optionally, you can modify the share name for easier identification.
-
Access the Shared Folder from Linux:
- On your Linux machine, open the file manager or use the mount command to access the shared folder.
- In the file manager’s address bar, type the Windows machine’s IP address or hostname in the following format:
The command smb://<windows-ip-or-hostname>/<share-name> is a URI used in Linux to access a shared folder on a Windows machine. It requires the Windows machine’s IP address or hostname and the name of the shared folder. By entering this command in the Linux file manager’s address bar, users can connect to the specified Windows machine’s shared folder and seamlessly transfer files between Windows and Linux systems using the SMB protocol.
- Alternatively, use the mount command to mount the network share to a specific directory on your Linux system.
-
Transfer Files Between Windows and Linux:
- Once the network share is accessible from your Linux machine, you can transfer files by dragging and dropping them to and from the shared folder.
- Changes made to the files in the shared folder will be reflected on both systems, ensuring data consistency.
Ensure you configure network share permissions to grant access to the shared folder. Additionally, consider security aspects such as using strong passwords and restricting access to authorized users only.
You can utilize network shares to conveniently move files between Windows and Linux without additional software or complex configurations. This method streamlines the file transfer process and facilitates seamless collaboration between the two operating systems.
Conclusion
In conclusion, transferring and sharing files between Windows and Linux systems can be achieved seamlessly through various methods.
Here are the key takeaways from the article:
- Securely copy files using SSH with the scp command.
- Utilize FTP for Windows to Linux file transfers by setting up an FTP server on the Linux machine and using an FTP client on Windows.
- Keep specific directories in sync between Windows and Linux using sync software like Resilio Sync.
- Share folders between your Windows host and Linux virtual machine to facilitate file sharing within the virtual environment.
Users can effortlessly exchange data between the two operating systems using SSH, FTP, sync software, or shared folders in a virtual machine. Each method offers its unique advantages, ensuring seamless and secure file transfer.