
Как форматировать диск или флешку в командной строке
Иногда пользователю может потребоваться отформатировать диск с помощью командной строки. Например, это может пригодиться, когда средствами Windows не удается завершить форматирование, при необходимости удаления разделов и в других ситуациях. Для этого в системе предусмотрено сразу несколько способов.
В этой инструкции подробно о способах форматировать жесткий диск, SSD или USB флешку в командной строке Windows 11, Windows 10 и предыдущих версиях операционной системы, а также пояснения о том, когда какие способы подойдут в большей степени.
Использование команды FORMAT
Format — команда для форматирования накопителей в командной строке, существующая ещё со времён DOS, но исправно работающая и в Windows 11/10. С помощью неё вы можете отформатировать флешку, жесткий диск или SSD, а точнее — раздел на них.
Для флешки это обычно не имеет значения, при условии, что она определяется в системе и видна её буква (так как они как правило содержат лишь один раздел), для жесткого диска или SSD может иметь: с помощью этой команды вы можете отформатировать только разделы по отдельности. К примеру, если диск разделен на разделы C, D и E, с помощью format вы можете отформатировать сначала D, затем — E, но не объединить их.
Порядок действий для форматирования раздела с помощью команды Format будет следующими:
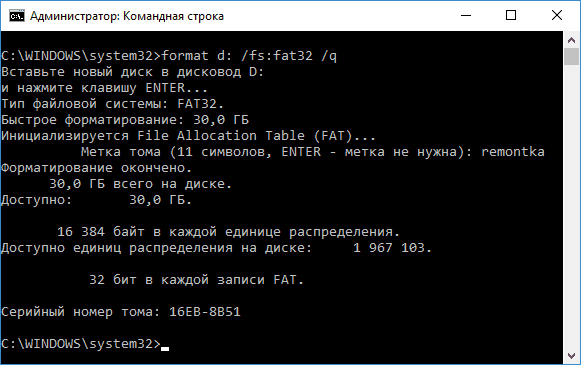
- Запустите командную строку от имени администратора (Как запустить командную строку от имени администратора) и введите команду (пример приведен для форматирования флешки или раздела жесткого диска с буквой D)
format d: /fs:fat32 /q
В указанной команде после fs: вы можете указать NTFS, чтобы форматировать не в FAT32, а в NTFS. Также, если не указать параметр /q то будет выполнено не быстрое, а полное форматирование, см. Быстрое или полное форматирование флешки и диска).

- Если вы увидите сообщение «Вставьте новый диск в дисковод D» (или с другой буквой), просто нажмите Enter.
- Также вам будет предложено ввести метку тома (имя, под которым будет отображаться диск в проводнике), введите на свое усмотрение.
- По завершении процесса вы получите сообщение о том, что форматирование окончено и командную строку можно будет закрыть.
Процедура простая, но несколько ограничена: иногда требуется не просто отформатировать диск, но и удалить все разделы на нем (т.е. объединить их в один). Здесь format не подойдет.
Форматирование флешки или диска с помощью DISKPART
Инструмент командной строки Diskpart, доступный во всех актуальных версиях Windows, позволяет не только отформатировать отдельные разделы флешки или диска, но и удалить их или создать новые.
Сначала рассмотрим использование Diskpart для простого форматирования раздела:
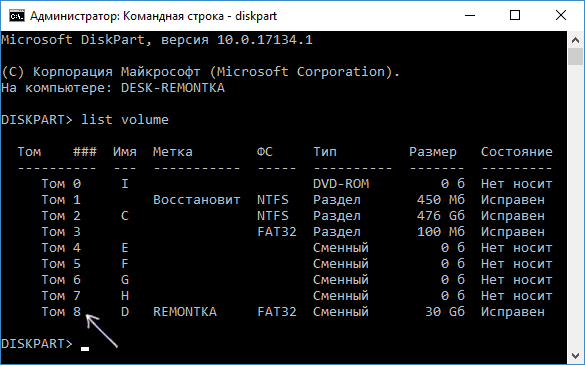
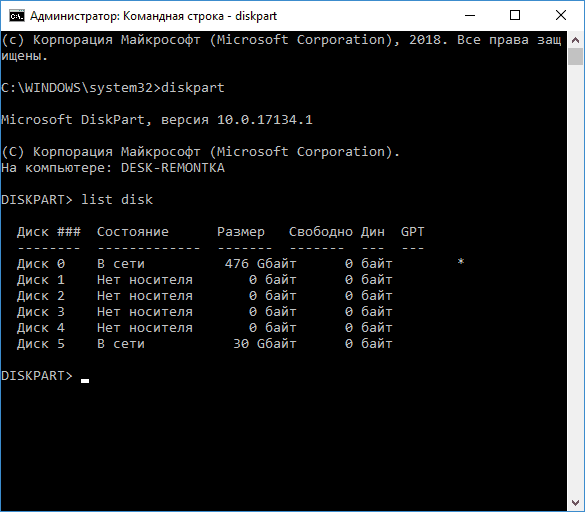
- Запустите командную строку от имени администратора, введите diskpart и нажмите Enter.
- По порядку используйте следующие команды, нажимая Enter после каждой.
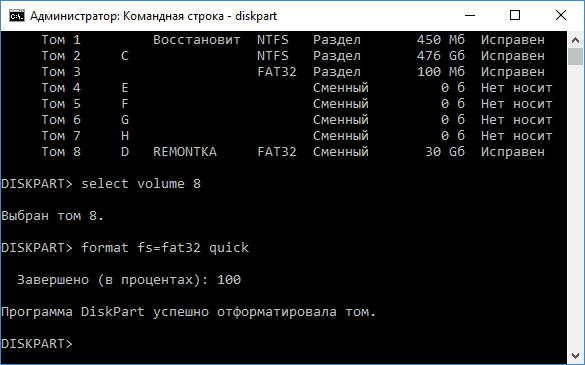
- list volume (здесь обратите внимание на номер тома, соответствующий букве диска, который нужно отформатировать, у меня это 8. В следующей команде используйте свой номер вместо N).

- select volume N
- format fs=fat32 quick (вместо fat32 можно указать ntfs, а если вам требуется не быстрое, а полное форматирование, не указывайте quick).
- exit
На этом форматирование будет завершено. Если же вам требуется удалить все без исключения разделы (например, D, E, F и остальные, в том числе скрытые) с физического диска и отформатировать его как единый раздел, информация об этом в разделе инструкции про удаление разделов с последующим форматированием накопителя ниже.
Форматирование в PowerShell
В Windows PowerShell также доступны команды для форматирования разделов диска. Пример использования:
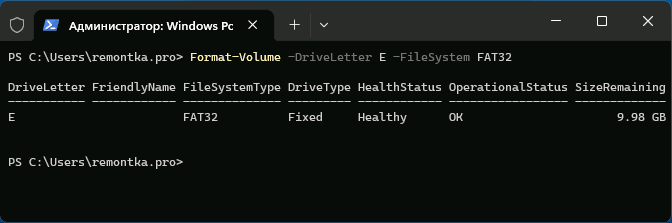
- Запустите Windows PowerShell или Терминал Windows, сделать это можно в меню по правому клику по кнопке «Пуск».
- Введите следующую команду, заменив букву диска D и файловую систему FAT32 на нужную при необходимости:
Format-Volume -DriveLetter D -FileSystem FAT32

- Добавив параметр -FileSystemLabel в команде вы можете указать метку диска, а параметр -Full выполнит полное форматирование вместо быстрого (используется по умолчанию).
Форматирование с удалением разделов
Возможен вариант, когда вам требуется не только выполнить форматирование накопителя, но и удалить имеющиеся разделы на диске или флешке, создав один единственный. Это можно сделать как в командной строке, так и в PowerShell.
При использовании командной строки и DISKPART шаги будут следующими:
- Запустите командную строку от имени администратора, введите команду diskpart и нажмите Enter, после чего используйте следующие команды.
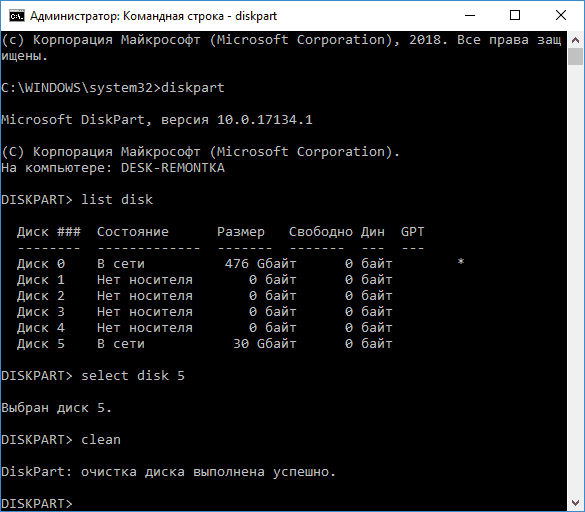
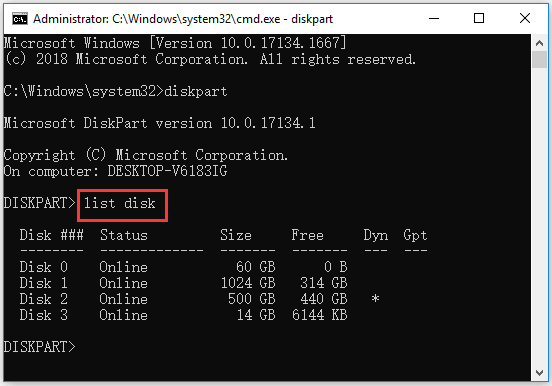
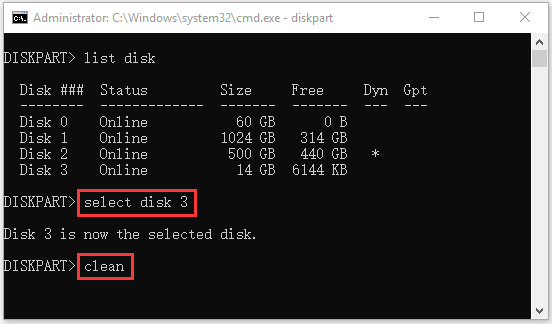
- list disk (вы увидите список подключенных физических дисков, вам нужен номер диска, который будет форматироваться, у меня это 5, у вас будет свой, далее — N).

- select disk N
- clean
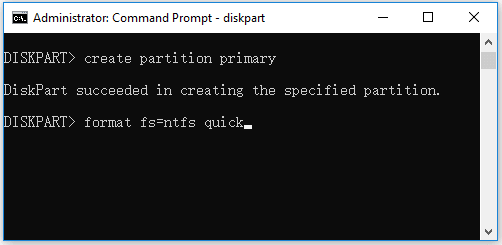
- create partition primary
- format fs=fat32 quick (вместо fat32 возможно указать ntfs или exFAT).
- exit
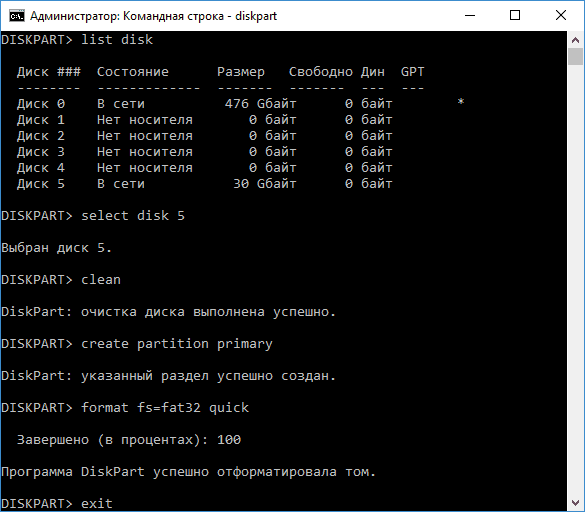
В результате на диске останется один отформатированный основной раздел с выбранной вами файловой системой. Это может быть полезно, например, когда флешка неправильно работает из-за того, что на ней несколько разделов (об этом здесь: Как удалить разделы на флешке).
В Windows PowerShell те же действия будут выглядеть следующим образом:
- Запустите Windows PowerShell или Терминал Windows от имени администратора.
- Используйте команду get-disk чтобы получить информацию о дисках и их номерах, в следующих командах вместо N укажите номер нужного диска, а вместо X — нужную букву диска после форматирования.
- Введите команды (файловую систему FAT32 можно поменять на нужную вам)
Clear-Disk -Number N -RemoveData
New-Partition -DiskNumber N -UseMaximumSize -IsActive -DriveLetter X
Format-Volume -DriveLetter X -FileSystem FAT32
Некоторые дополнительные нюансы, которые могут быть полезными в контексте форматирования накопителей с использованием командной строки:
- Если ваша задача — форматирование системного раздела диска, вы можете сделать это, загрузившись в WinPE, либо путем загрузки с установочной флешки Windows с последующим нажатием клавиш Shift+F10 (Shift+Fn+F10 на некоторых ноутбуках) в программе установки. Это откроет командную строку, где вы сможете выполнить все необходимые действия.
- Форматирование не всегда проходит без проблем: ошибки при форматировании могут быть вызваны как аппаратными проблемами с накопителем, так и другими факторами: например тем, что диск в момент форматирования используется системой (для последнего случая поможет форматирование с использованием WinPE или загрузочной флешки). Здесь могут пригодиться инструкции: Как форматировать флешку, защищенную от записи, Ошибка 0x8004242d при форматировании раздела, Windows не удается завершить форматирование — варианты решения.
Если у вас остаются вопросы, касающиеся рассмотренной темы, вы можете задать их в комментариях ниже, я постараюсь подсказать решение для вашей ситуации.
Все способы:
- Форматирование флешки через командную строку
- Способ 1: Команда «format»
- Способ 2: Утилита «diskpart»
- Вопросы и ответы: 43
Одним из способов отформатировать флешку является использование командной строки. Обычно к нему прибегают в случае, когда стандартными средствами это сделать невозможно, например, из-за возникающей ошибки. Как происходит форматирование посредством командной строки, мы рассмотрим далее.
Форматирование флешки через командную строку
Мы рассмотрим два подхода:
- через команду «format»;
- через утилиту «diskpart».
Их отличие в том, что ко второму варианту обращаются в более сложных случаях, когда флешка ни в какую не хочет форматироваться.
Читайте также: Что делать, если флешка не форматируется
Способ 1: Команда «format»
Формально Вы проделаете все то же, что и в случае стандартного форматирования, но только средствами командной строки.
Инструкция в данном случае выглядит следующим образом:
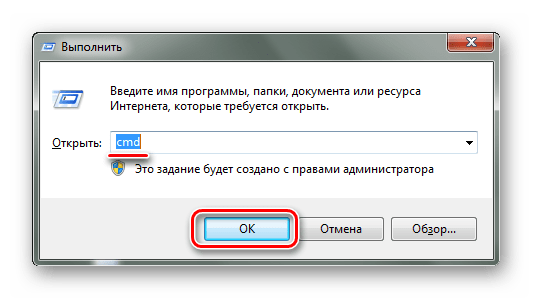
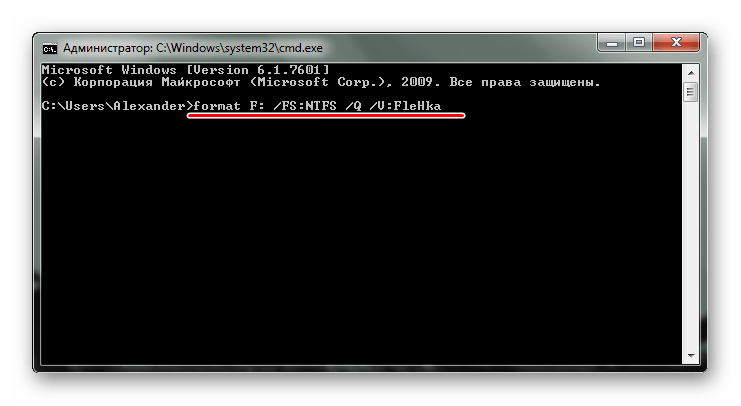
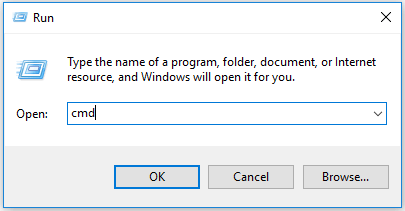
- Вызов командной строки можно осуществить через утилиту «Выполнить» («WIN»+«R»), введя команду «cmd».
- Наберите команду
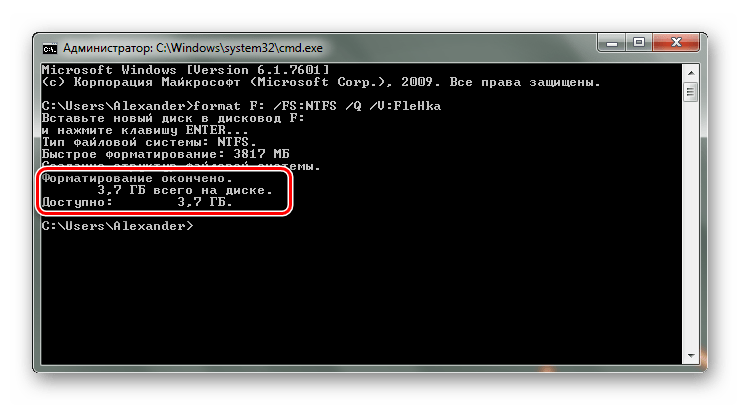
format F:, гдеF– присвоенная вашей флешке буква. Дополнительно можно указать настройки:/FS– файловая система,/Q– быстрое форматирование,/V– имя носителя. В итоге команда должна быть примерно в таком виде:format F: /FS:NTFS /Q /V:FleHka. Нажмите «Ввод». - Если Вы увидели сообщение с предложением вставить диск, значит, команда введена верно, и можно нажимать «Ввод».
- Следующее сообщение говорит об окончании процедуры.
- Можно закрывать командную строку.

При возникновении ошибки, можно попытаться проделать то же самое, но в «безопасном режиме» – так никакие лишние процессы не помешают форматированию.
Читайте также: Как вернуть удаленные файлы с флешки
Способ 2: Утилита «diskpart»
Diskpart – специальная утилита для управления дисковым пространством. Ее широкий функционал предусматривает форматирование носителя.
Чтобы воспользоваться данной утилитой, сделайте вот что:
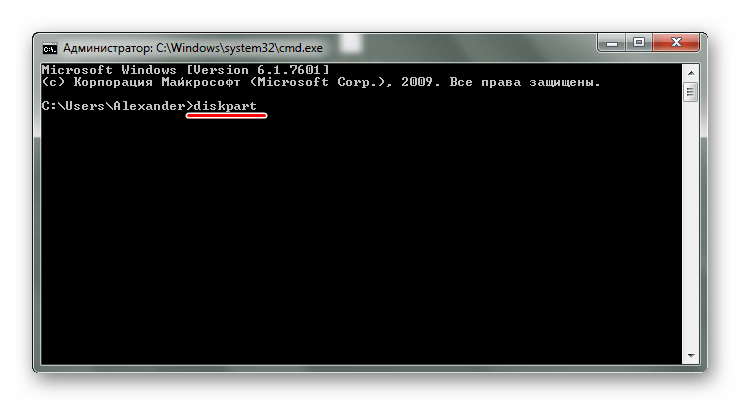
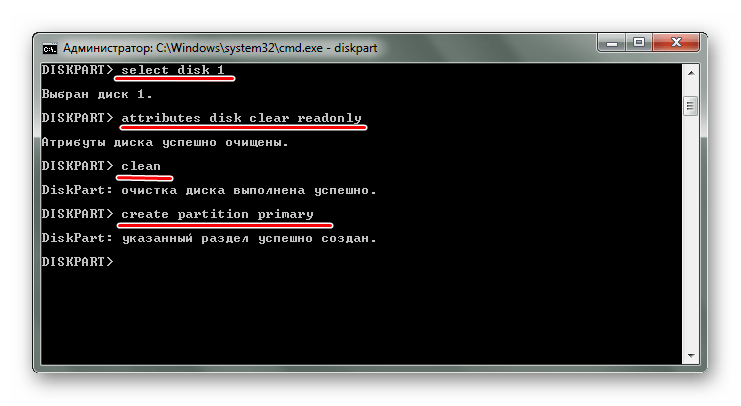
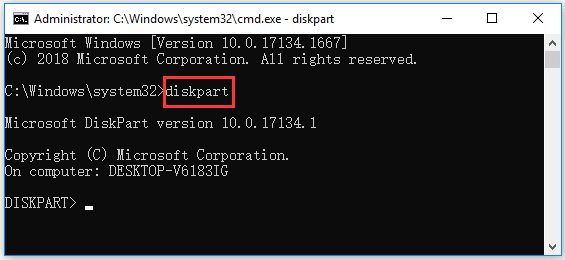
- После запуска «cmd», наберите команду
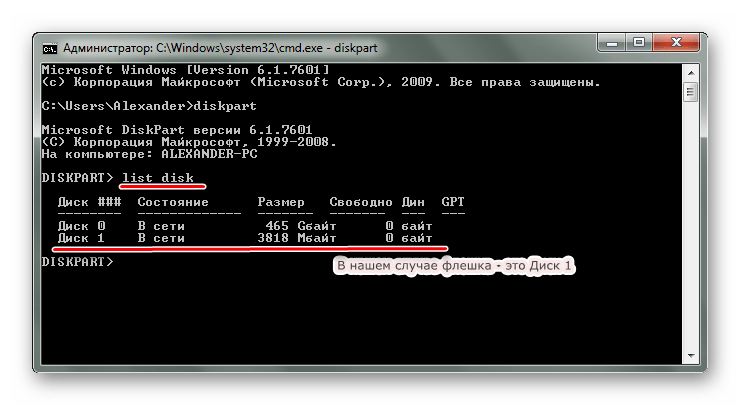
diskpart. Нажмите «Enter» на клавиатуре. - Теперь вбейте
list diskи в появившемся перечне найдите вашу флешку (ориентируйтесь на объем). Обратите внимание на то, под каким она номером. - Введите команду
select disk 1, где1– номер флешки. Затем следует очистить атрибуты командойattributes disk clear readonly, очистить флешку командойcleanи создать первичный раздел командойcreate partition primary. - Осталось прописать
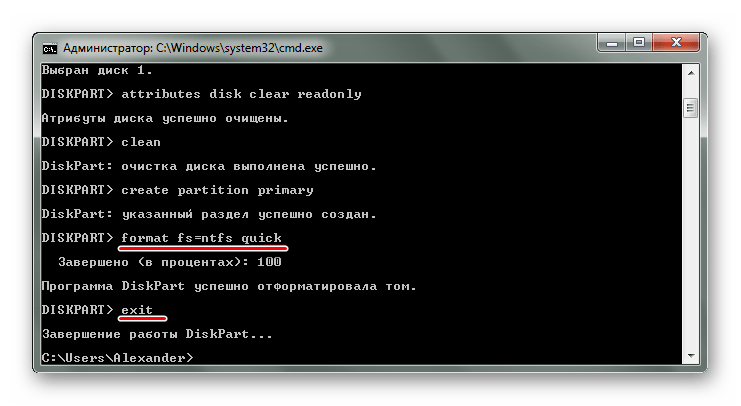
format fs=ntfs quick, гдеntfs– тип файловой системы (при необходимости указываетсяfat32или другой),quick– режим «быстрого форматирования» (без этого данные полностью удалятся и их невозможно будет восстановить). По завершении процедуры просто закройте окно.
Таким образом можно задать все необходимые настройки форматирования флешки. При этом важно не перепутать букву или номер диска, чтобы не стереть данные с другого носителя. В любом случае выполнить поставленную задачу несложно. Преимущество командной строки в том, что этот инструмент есть у всех пользователей Виндовс без исключения. Если у Вас есть возможность воспользоваться специальными программами для удаления, воспользуйтесь одной из тех, которые указаны в нашем уроке.
Урок: Как навсегда удалить информацию с флешки
Если у Вас возникли какие-либо проблемы, пишите о них в комментариях. Мы обязательно поможем!
Наша группа в TelegramПолезные советы и помощь
If a USB drive is corrupted/damaged, or needs to be formatted, you can easily format USB by using CMD on Windows 10/8/7. This tutorial includes a detailed guide. However, any disk formatting will erase all data on the disk, so you should back up all needed data beforehand. To recover data from formatted USB, you can try MiniTool Power Data Recovery, the best free data recovery software for Windows.
USB flash drive is widely used for storing and transferring files. But sometimes you may need to format the USB drive because of corrupted file system, data corruption issues, bad sectors, virus infection, etc. This post from MiniTool Software gives a step-by-step guide for how to format USB using CMD, namely the Windows built-in free DiskPart command tool, on Windows 10/8/7.
Also read: Unlock the secrets of hard drive data recovery and regain access to your precious files by delving into this enlightening article.
Note: Disk formatting will wipe all data on the disk. If the USB flash drive can still be recognized by computer, you can connect it to computer and copy needed files to another device. If the USB can’t be recognized by computer, you may try some tips to see if you can make it visible on PC before you use Command Prompt to format it.
How to Format USB Flash Drive/Pen Drive Using CMD on Win 10
Step 1. Open Command Prompt on Windows 10
You have several ways to open Command Prompt on Windows 10. One easy way is: press Windows + R, type cmd in Run dialog, press Ctrl + Shift + Enter and click Yes to run Command Prompt as administrator.
Step 2. Open DiskPart command tool
Next you can type the command diskpart in Command Prompt window. Press Enter to launch DiskPart utility.
Step 3. List all disks on PC
Then you can type the command list disk, press Enter and all detected disks will be displayed with detailed information. Check carefully which disk is your USB drive. You may identify the USB by checking the size. Here, my USB is Disk 3.
Step 4. Select and clean the target USB drive
Type the command select disk 3 and press Enter to select the target USB flash drive. Then type clean command and press Enter. DiskPart will wipe disk data.
Step 5. Format USB flash drive/pen drive with CMD (Command Prompt)
Tip: Before you format USB using CMD, you can confirm again that you’ve selected the right disk, to avoid formatting the wrong disk. You can type list disk command again, press Enter, and the selected disk should have a “*” mark before the disk number.
After that, you can type the command create partition primary, and press Enter.
Then type the command format fs=ntfs or format fs=fat32, and press Enter to format the USB flash drive to NTFS or FAT32 format. Optionally you can add a “quick” flag after the command for a faster format.
Step 6. Assign a drive letter for the USB
Continue to type the command assign letter=h, replace “h” with the preferred drive letter you want to assign to the USB drive. Press Enter to assign a letter for the USB drive and make it visible in Windows File Explorer.
Type exit to close DiskPart and type exit to close Command Prompt window.
After formatting the USB flash drive in CMD (Command Prompt), the USB drive should be shown in Windows File Explorer and is available for storing files.
Format USB Flash Drive for Free with Software
Actually, you can easily format a USB flash drive on Windows 10 by using File Explorer. You can connect your USB to your Windows computer, open File Explorer, and right-click the USB drive to select Format and select a file system to format the USB flash drive.
However, you might get an error message “Windows was unable to complete the format” when using this way to format USB. If you meet this error, you can use the Command Prompt to format the USB drive or use other USB formatter software to do this task for free.
MiniTool Partition Wizard is the best free disk partition manager for Windows 10. You can use this program to easily format USB to NTFS or FAT32 for free. The process is much simpler than formatting USB with CMD.
MiniTool Partition Wizard allows you to easily create/resize/format/delete/wipe partitions, convert FAT to NTFS or vice versa, check and fix disk errors, migrate OS, clone disk, benchmark disk, etc.
Download and install MiniTool Partition Wizard on your Windows 10 computer. Check how to use this tool to format USB in a few clicks below.
MiniTool Partition Wizard FreeClick to Download100%Clean & Safe
Step 1. Connect you USB to PC. Launch the USB format tool.
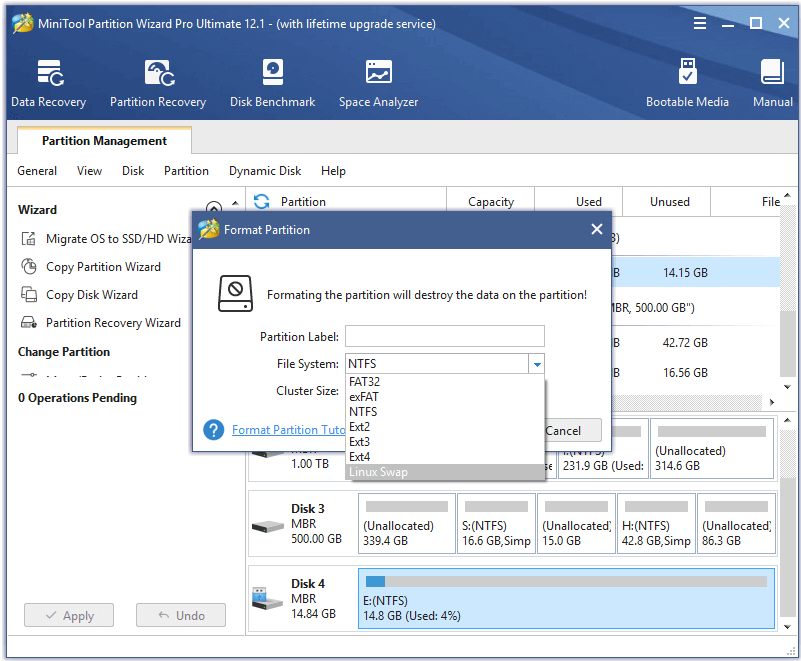
Step 2. Right-click the partition on the USB drive, and choose Format.
Step 3. In the pop-up Format Partition window, choose a file system like FAT32, NTFS. Type a preferred partition label if you like. Click OK.
Step 4. Click Apply button at the bottom-left to start the USB formatting process.
Click to Tweet
How to Recover Data from a Mistakenly/Intentionally Formatted USB
Formatting USB with CMD or other USB format tools will erase all data on it. No matter you mistakenly or intentionally formatted the USB flash drive/pen drive, you can recover data from USB drive if you want.
MiniTool Power Data Recovery is a free data recovery software for Windows. It lets you recover any deleted/lost files from USB flash drive/pen drive, SD card, HDD, SSD, and Windows local hard drive. You can use it to recover data from various data loss situations.
Download and install MiniTool Power Data Recovery on your Windows 10 computer, and check how to use it to recover data from formatted USB below.
MiniTool Power Data Recovery FreeClick to Download100%Clean & Safe
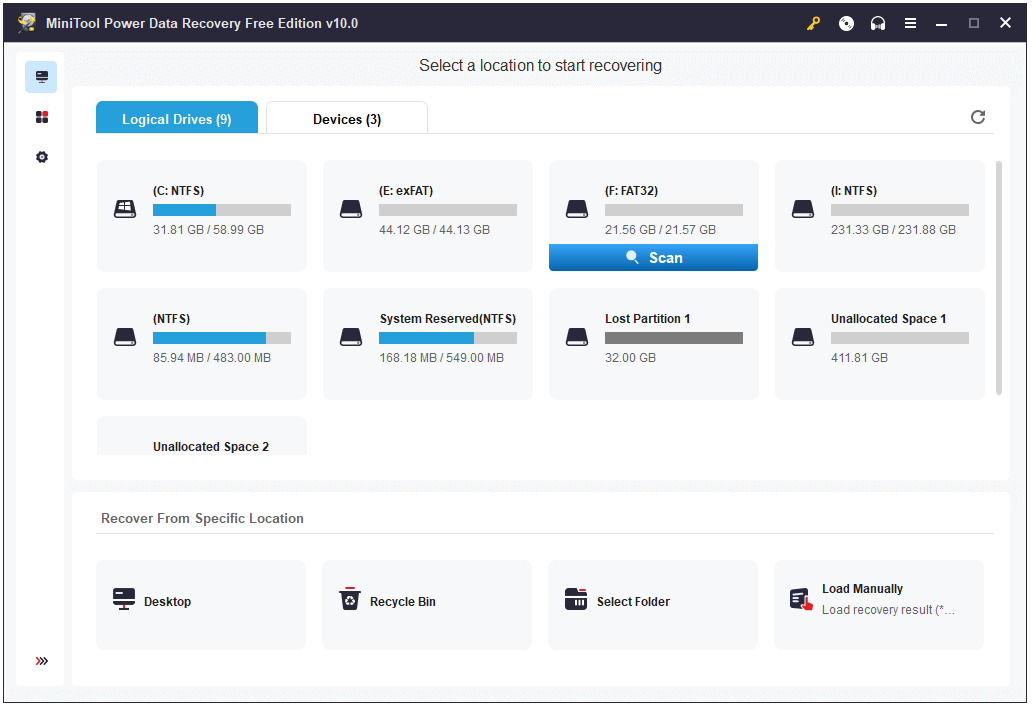
Step 1. Plug in the USB to your Windows 10 computer. Launch MiniTool Power Data Recovery.
Step 2. Next you can find and select the USB drive under Logical Drives. Click Scan to start scanning. Or you can click Devices tab and click the USB device to scan.
Step 3. After the software finishes the scanning, you can see it displays all files incl. deleted and lost files on the USB. It recovers all data on the formatted USB drive. You can check the folders to find needed files and click Save button to select a new destination to store the recovered files.
Conclusion
In this guide, you have learned how to format corrupt USB with CMD (Command Prompt) on Windows 10. An alternative free USB formatter software is also attached with an easy guide if Command Prompt is not working on your Windows 10 computer. Besides, you can find a tool to help you recover data from a formatted USB. However, the data recovery features of this software are not limited to this. You can also use it to recover files from SSDs, external hard drives, internal hard drives, and more.
MiniTool Power Data Recovery FreeClick to Download100%Clean & Safe
If you have any problems when using software from MiniTool, you can contact [email protected].
Format USB CMD FAQ
How can I format USB drive in CMD?
You can press Windows + R, type cmd, and press Ctrl + Shift + Enter to run Command Prompt as administrator. Then type the following commands and press Enter after each command.
- diskpart
- list disk
- select disk * (replace * with the exact disk number of USB)
- clean
- format fs=fat32 quick (replace fat32 with ntfs if you want to format USB to ntfs format)
- assign letter=* (replace * with preferred drive letter)
- exit
How do I completely format my USB?
You can either use CMD or MiniTool Partition Wizard to completely format USB flash drive or pen drive for free.
How to format write protected USB using CMD?
Click Start menu, type cmd, right-click Command Prompt to run it as administrator. Then type the following commands to format write-protected USB using CMD. Press Enter after each command.
- diskpart
- list disk
- select disk <disk number>
- attributes disk clear readonly
- select disk <disk number>
- clean
- format fs=fat32 quick (replace fat32 with ntfs if you want to format USB to ntfs format)
- assign letter=<preferred drive letter>
- exit
How can I format my USB to FAT32?
You can use Command Prompt or MiniTool Partition Wizard to easily format your USB to FAT32. The detailed guide is included in this post.
Download Article
A step-by-step guide to use the Command Prompt to reformat and clean a flash drive
Download Article
If you’re getting errors when trying to format your USB flash drive in Windows File Explorer (such as «Windows was unable to complete the format»), you can still format the drive using the Command Prompt. This wikiHow article will teach you how to erase and reformat your flash drive using the DiskPart tool in CMD using your Windows computer or laptop.
Things You Should Know
- Plug the USB into your computer, then run CMD as Administrator.
- After using the commands «diskpart», «list disk», and «select disk», type «clean» and press «Enter».
- Use the command «create partition primary» to further format your USB drive.
-

Plug your USB drive into your computer. Plug it into one of the various USB ports on your computer to continue.
- Normally, you’d format a USB drive by right-clicking it and selecting Format from the menu. You’ll only use Command Prompt if that other method does not work.
- You can also use this method if you can’t see the USB drive in File Explorer.
-
Open Command Prompt as an administrator. To do this, press the Win key on your keyboard and type «cmd» to search for the program.[1]
- Click Run as Administrator from the results list that appears.
Advertisement
-
You’ll see some feedback about your computer and initiates the DiskPart utility.[2]
-
In the list, you should be able to determine which listed disk is your USB.[3]
-
From the disk list, you’ll need to replace the
[Your disk]line with your disk number.[4]
- For example, if your USB is located in disk 2, you’d enter «
select disk 2.» - Once the command is accepted, you’ll see «[Your disk] is now the selected disk.»
- For example, if your USB is located in disk 2, you’d enter «
-
Wait a little bit while Command Prompt formats your USB drive.[5]
- You’ll see «DiskPart succeeded in cleaning the disk» when it’s finished.
-
You’ll need to do this before you can further format your USB drive.[6]
- Command Prompt will display «DiskPart succeeded in creating the specified partition» when it’s done.
-
This command will tell your USB drive to format with ntfs format. You can also use fat32 or exfat instead by replacing «ntfs» in the command.
- You’ll see «DiskPart successfully formatted the volume» when it’s finished.
-
9
Type «
assign letter=[letter]» and press ↵ Enter. This command will assign a specific letter to your drive.- In place of [letter], enter a single letter. For example, you’d enter «
assign letter=h«.
- In place of [letter], enter a single letter. For example, you’d enter «
-
This will exit the DiskPart program so you can continue using the USB drive to save files or disconnect it from your computer.


![Step 5 Type "select disk [Your disk]" and press ↵ Enter.](https://www.wikihow.com/images/thumb/c/ce/Format-a-USB-Using-Cmd-Step-5.jpg/v4-460px-Format-a-USB-Using-Cmd-Step-5.jpg)


Advertisement
Ask a Question
200 characters left
Include your email address to get a message when this question is answered.
Submit
Advertisement
Video
Thanks for submitting a tip for review!
References
About This Article
Article SummaryX
1. Plug your USB drive into your computer.
2. Open Command Prompt as an administrator.
3. Type «diskpart» and press Enter.
4. Type «list disk» and press Enter.
5. Type «select disk [Your disk]» and press Enter.
6. Type «clean» and press Enter.
7. Type «create partition primary» and press Enter.
8. Type «format fs=ntfs» and press Enter.
9. Type «exit» and press Enter.
Did this summary help you?
Thanks to all authors for creating a page that has been read 701,930 times.
Is this article up to date?
Updated on Apr 28, 2025
- 🔎Format SD Card Using CMD Alternative — Easier and Safer
- ⚒️How to Format SD Card Using CMD — Be Careful When Type Commands
Format SD Card Using CMD Alternative — EaseUS SD Card Formatter [Easiest]
Format Tool: EaseUS Partition Master — Perfect CMD AlternativeThird-party SD card formatter — EaseUS Partition Master can help you format a damaged or corrupted memory card in Windows 11/10/8/7. This SD card formatter helps users simply format SD cards to any wanted file system format in only a few simple clicks. Then, follow the easy steps to finish the task.
Compared to CMD, EaseUS Partition Master has the following advantages:
- 💡Easy to use: Without requiring any command lines
- 🚩Support file system: Support ext 2/3/4(CMD doesn’t support), and FAT32/exFAT/NTFS.
- 🔥Advance feature: Can format SD card larger than 32GB to FAT32 (CMD can’t)
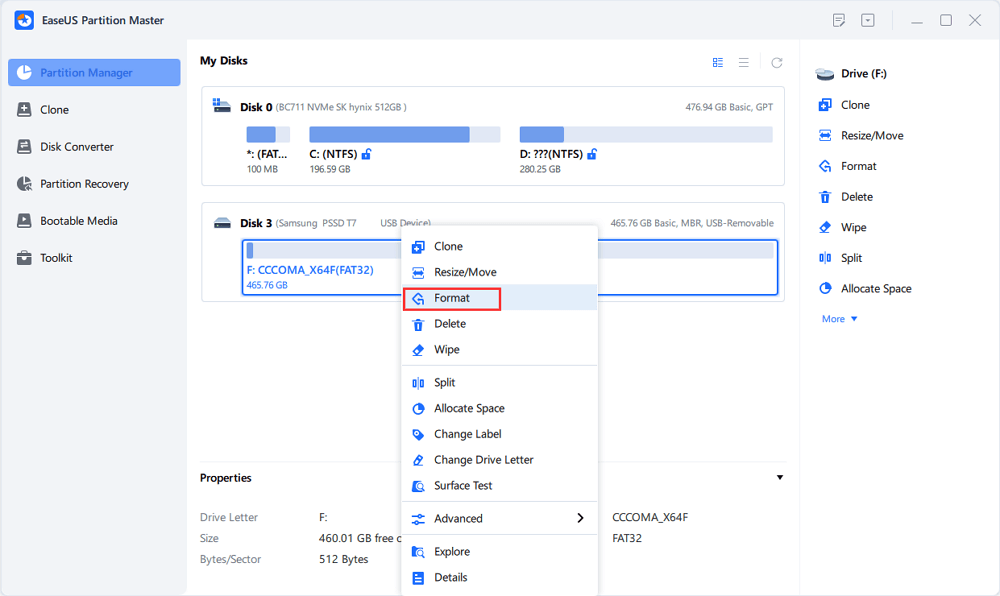
Step 1. Launch EaseUS Partition Master, right-click the partition on your external hard drive/USB/SD card which you want to format and choose the «Format» option.
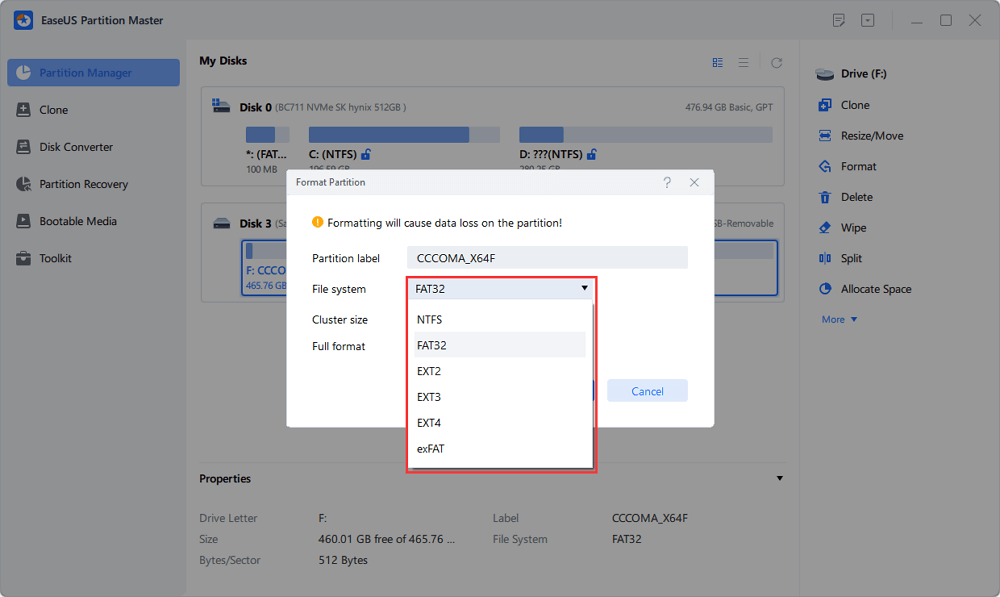
Step 2. Assign a new partition label, file system (NTFS/FAT32/EXT2/EXT3/EXT4/exFAT), and cluster size to the selected partition, then click «OK».
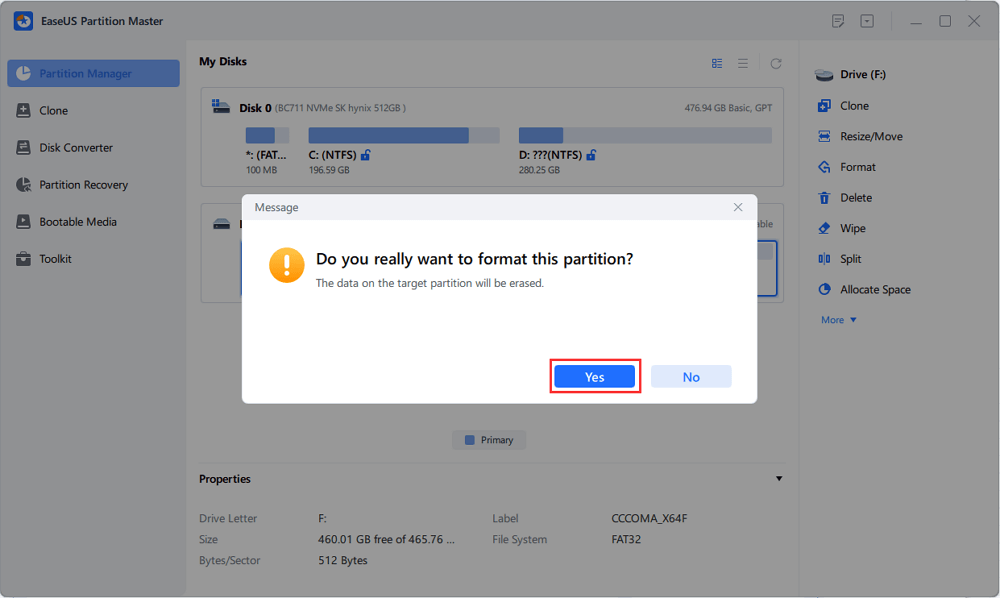
Step 3. In the Warning window, click «Yes» to continue.
Step 4. Click the «Execute 1 Task(s)» button in the top-left corner to review the changes, then click «Apply» to start formatting your external hard drive/USB/SD card.
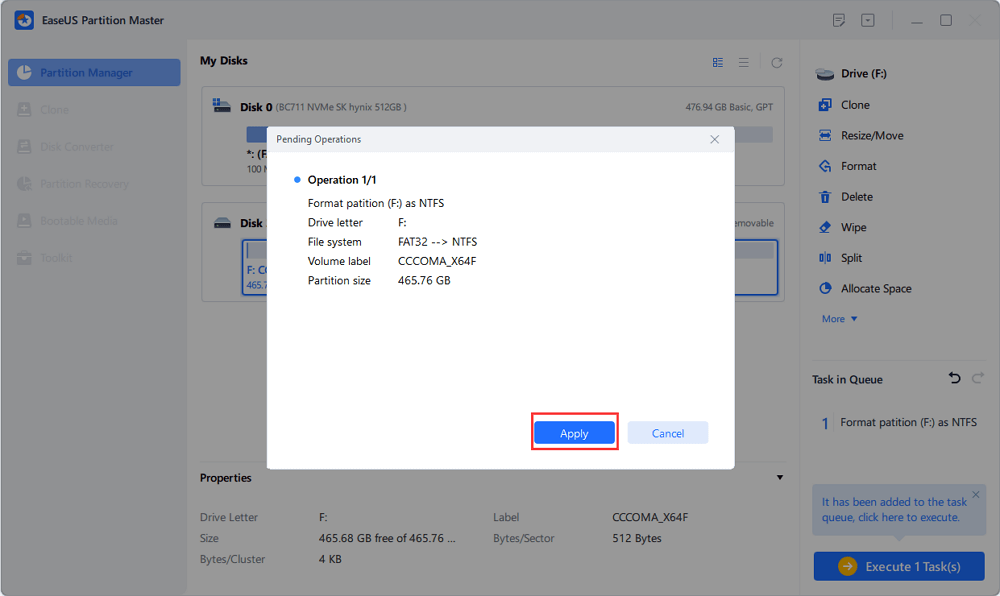
Hint: If the SD card is larger than 4GB, you can only choose FAT32, NTFS, or EXT2/EXT3; and if the partition is smaller than 4GB, you can choose FAT, FAT32, NTFS, or EXT2/EXT3.
EaseUS Partition Master is the easiest and safest way to format an SD card. If you are a beginner, download it to help.
Format Tool: DiskPart CMD
Diskpart is a built-in tool in Windows that manages your hard drives. You can use it to format the damaged or corrupted internal or external hard drive, USB drive, SD card, etc. This method is somewhat higher-level, and the Diskpart command is not recommended if you find it hard to go through the whole process.
Hint: Turn to Method 2 or Method 3 if you are a Windows beginner.
If you don’t know anything about CMD, we recommend a risk-free way to format your SD card, which is using professional memory card format software. But if you stick to this method, let’s see the step-by-step guide below on how to format SD cards using CMD in Windows 11/10.
Step 1. Type cmd in the search box to run Command Prompt as administrator.
Step 2. Type diskpart and press «Enter.»
Step 3. Type list disk to list all the available drives and press «Enter.»
Step 4. Type select disk K ( where K is the SD card name you want to format) and press «Enter.»
Step 5. Type clean and press «Enter» to erase the SD card.
Step 6. Type create partition primary and hit «Enter» to make a new partition.
Step 7. Type format fs=ntfs (or format fs=exfat) and press «Enter» to format the drive with NTFS or exFAT.
Step 8. Type assign drive letter M( where M is the new drive letter name) to assign a drive letter.
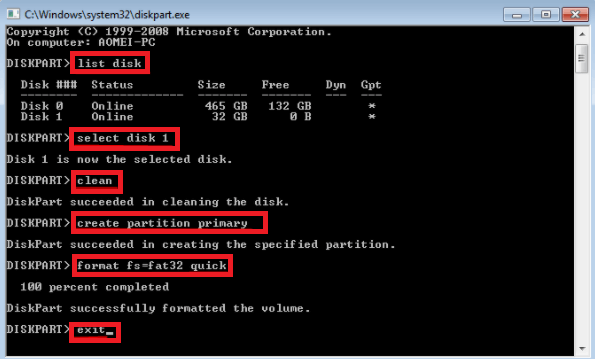
Then, you can continue typing exit to close the program when DiskPart says it has successfully formatted the volume. Don’t hesitate to let more users know how to use DiskPart to format a memory SD card.
If you have mistakenly formatted other hard drives, don’t despair; you can use a powerful data recovery application to recover data from a formatted hard drive with ease.
Video — How to Format Memory Card Using CMD
This video presents how to format any drive using CMD for advanced users.
- 00:04 Open Command Prompt
- 00:26 Format USB Drive
How to Format SD Card Using Two Windows Built-in Tools
Apart from the above two ways, you can also use Windows utilities to format the SD card. In this part, we’ll show you how to format a memory card using the Windows quick format feature and Disk Management.
Method 1. Perform SD Card Formatting Use File Explorer
When formatting your SD card in Windows Explorer, connect your SD card to your computer at the very beginning. Then follow the tutorial here to format the SD card:
Step 1. Press «Windows key + E» to bring up the Windows Explorer.
Or Click and open up the «Computer» in Windows 7 or «This PC» in Windows 11/10.
Step 2. Right-click on the connected SD card and select «Format».
Step 3. On the format window, you’ll be told to select the desired file system, which is set to NTFS, FAT32 for 32GB SD cards, or exFAT for 64GB SD cards.
Step 4. Click «Start».
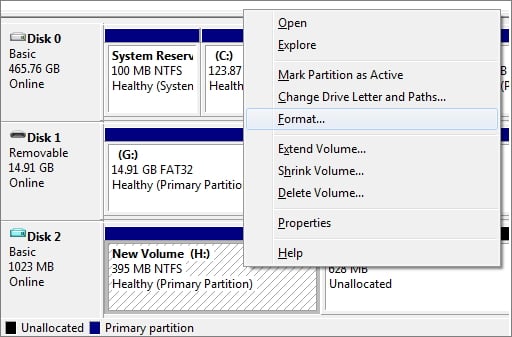
Method 2. Use Disk Management to Format SD Card
Step 1. Right-click on «Computer» or «This PC,» select Management, and then Disk Management under the Storage section.
Step 2. Right-click on the SD card partition and select «Format».
Step 3: On the format window, check the box of Perform a quick format, and in the same way, you need to choose a file system and allocation unit size.
Step 4: Click «OK.»
Back to use EaseUS Partition Master?
Why Do You Format SD Card/Memory Card
What does the formatting SD card do? Under many circumstances, people need to format SD Card to NTFS, FAT32, or exFAT file system in order to:
- Reset the SD card file system on a specific device, such as a digital camera, Android smartphone, game console, music player, etc.
- Fix or repair a problematic SD memory card from corruption, damage, inaccessibility, etc.
- Clean up the SD card, remove all files, and restore its full capacity.
- Review and prolong the SD card’s lifespan.
When it comes to fixing these issues by formatting the SD card, you may hear the solution that some advanced Windows users suggest — to format the SD card using CMD.
So, can you apply the CMD command to format the SD card? Sure! In the next section, we’ll be showing you the complete procedure of formatting SD cards using Diskpart CMD and two other alternative formatting tools in Windows 11, 10, 8.1, 8, 7, XP, and Vista.
- Important
- Formatting is a process of deleting all information and setting it up as a brand new one. So, make a full backup first if you care about data. See what to backup before formatting PC.
Bonus Tips — How to Protect SD Card Data
Formatting can be done on an SD card due to several reasons. You format an SD card or Memory card to remove data completely from the SD card and when its file system gets damaged or the SD card seems to be corrupted. However, you may lose data after the formatting process. To protect SD card data, you should keep these things in mind.
Tip 1. Back-Up Data Before Formatting
The best way to avoid further data loss is to back up files regularly on a storage device like the SD card. To do so, you can manually copy and paste these files from the SD card to another place or use free backup and recovery software. Free backup software like EaseUS Todo Backup makes it easy to schedule and run backup actively while data is increasing daily.

For a step-by-step guide, you can refer to this page for help: How to Backup SD Card Before Formatting. In 5 minutes, all your system, files, disk, or partitions are set up for automatic backups, no matter an individual photo or a whole C drive.
Tip 2. Safely Eject the Card from a PC
Just like other external hard drives, USB flash drives, and memory cards, you should always safely eject the SD card. That is to say, you should not remove the card from a device when it is still being accessed, such as transferring data or reading data, etc.
Tip 3. Don’t Use One Card on Many Devices
Another important thing is not using a single memory card on many different devices. Different devices may work on different file systems, which may be incompatible with what the memory card is formatted with. In this case, the card tends to die. Therefore, do not use one SD card, USB drive, or memory card on many devices.
Tip 4. Stop Using the SD Card When Getting Any Errors
As soon as your SD card gets errors like «The SD card is not detected», or «the disk is write protected», stop using the SD card immediately. Otherwise, further damage to the card would happen without letting you know.
Conclusion
You have learned how to format SD cards using CMD with Diskpart, EaseUS Partition Master, and Windows tools. If you are not familiar with CMD or the Windows doesn’t go smoothly, you can format your memory card with EaseUS Partition Master. As mentioned before, besides partition formatting, this competent disk management program supports many basic and advanced options, such as converting FAT to NTFS, converting MBR to GPT, migrating OS to SSD/HDD, and more. Try it, and you’ll find it great and helpful.
Extended Reading: What Else Can CMD Do Besides Formatting SD Card
On this page, we guide you on how to format an SD card with CMD or its alternative formatting solutions on Windows 11/10/8.1/8/7. Some of you may also want to know what else CMD can do for you. Here, we collected three major solutions and guide you to use them on an SD card successfully:
Feature 1. Check and Fix SD Card Corrupted Error with CHKDSK Command
- Connect the SD card to the computer.
- Run Diskpart, and type the command lines here: chkdsks E:/ f /r /x and hit Enter.
Replace E: with the drive letter of your SD card. Here are the syntax meanings:
- /F: Check for disk errors, not bad sectors.
- /R: Locate the bad sectors on the target hard disk and try to recover the readable information from the bad sectors (implies /F).
- /X: Forces the volume to dismount first, if necessary. It also includes the functionality of /f.
Feature 2. Delete All Partitions and Clean Up SD Card One-Time with Clean Command
- Connect SD card to computer.
- Type the command below in DiskPart one by one and hit Enter each time:
- list disk
- select disk 2 (Replace 2 with SD card drive number)
- clean
The clean command will delete all existing partitions and files on your SD card, restoring full capacity to your card.
Feature 3. Remove Write Protection from SD Card with Clear Readonly Command
- Connect SD card to computer and open DiskPart
- Type the commands below one by one and hit Enter each time:
- list disk
- select disk 2 (Replace 2 with the SD card drive number.)
- attributes disk clear readonly
If you want to learn more tutorials about how to use CMD to fix SD or other storage device issues, feel free to follow our articles or use the search button on our site for help.
Conclusion
FAQs About Format Memory Card Using CMD
If you have more questions about how to format an SD card using cmd, follow the questions here and find answers below:
1. How can you format an SD card to FAT32 using CMD?
Here is how to use DISKPART via Windows Command Prompt
Windows Command Prompt has DISKPART, which is also capable of reformatting SD cards and other drives.
- Run Windows command prompt as administrator.
- Type ‘list disk.’ All current dives will be displayed.
- Type ‘select disk X’ where X is the SD card drive number. (Make sure you enter the correct drive number)
- Type ‘clean’ to clean the drive. If an error occurs, simply retry typing ‘clean’.
- Type ‘create partition primary’.
- Type ‘format fs=FAT32’. The formatting may take a long while.
- After the progress is at 100%, type ‘assign’ to finalize the drive letter for Windows.
2. How do I force an SD card to Format?
- 1. Right-click the Start icon and select Disk Management.
- 2. Find and right-click the SD card and select Format.
- 3. Select the proper file system and Perform a quick format. Click OK.