
Все способы:
- Форматирование флешки через командную строку
- Способ 1: Команда «format»
- Способ 2: Утилита «diskpart»
- Вопросы и ответы: 43
Одним из способов отформатировать флешку является использование командной строки. Обычно к нему прибегают в случае, когда стандартными средствами это сделать невозможно, например, из-за возникающей ошибки. Как происходит форматирование посредством командной строки, мы рассмотрим далее.
Форматирование флешки через командную строку
Мы рассмотрим два подхода:
- через команду «format»;
- через утилиту «diskpart».
Их отличие в том, что ко второму варианту обращаются в более сложных случаях, когда флешка ни в какую не хочет форматироваться.
Читайте также: Что делать, если флешка не форматируется
Способ 1: Команда «format»
Формально Вы проделаете все то же, что и в случае стандартного форматирования, но только средствами командной строки.
Инструкция в данном случае выглядит следующим образом:
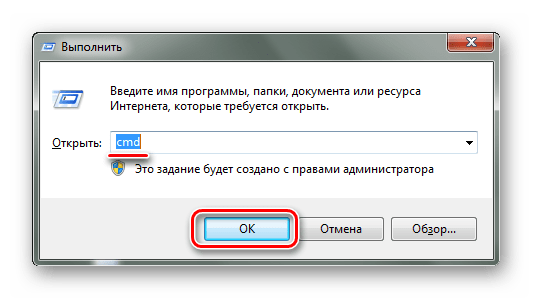
- Вызов командной строки можно осуществить через утилиту «Выполнить» («WIN»+«R»), введя команду «cmd».
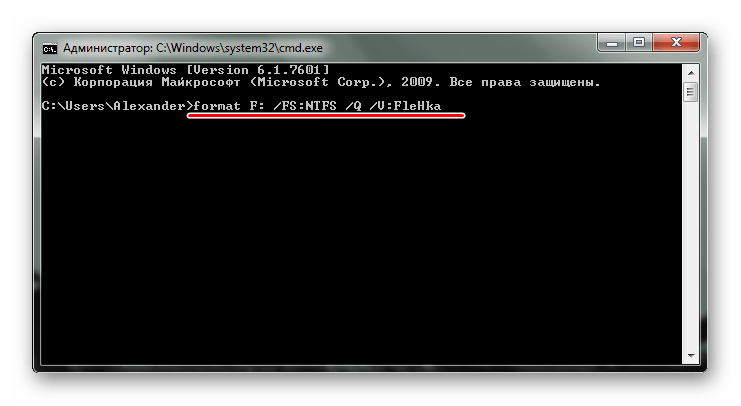
- Наберите команду
format F:, гдеF– присвоенная вашей флешке буква. Дополнительно можно указать настройки:/FS– файловая система,/Q– быстрое форматирование,/V– имя носителя. В итоге команда должна быть примерно в таком виде:format F: /FS:NTFS /Q /V:FleHka. Нажмите «Ввод». - Если Вы увидели сообщение с предложением вставить диск, значит, команда введена верно, и можно нажимать «Ввод».
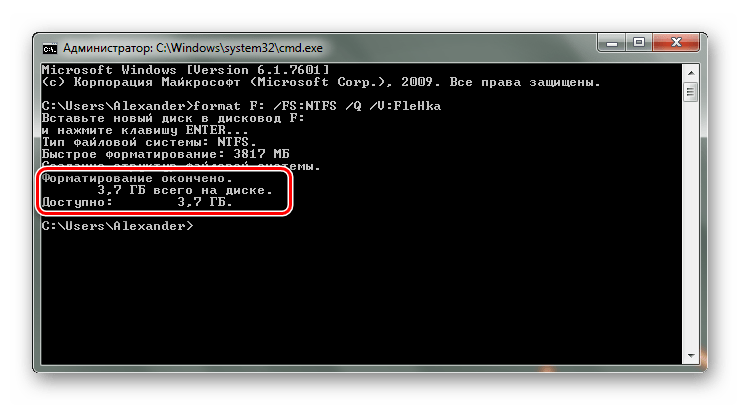
- Следующее сообщение говорит об окончании процедуры.
- Можно закрывать командную строку.

При возникновении ошибки, можно попытаться проделать то же самое, но в «безопасном режиме» – так никакие лишние процессы не помешают форматированию.
Читайте также: Как вернуть удаленные файлы с флешки
Способ 2: Утилита «diskpart»
Diskpart – специальная утилита для управления дисковым пространством. Ее широкий функционал предусматривает форматирование носителя.
Чтобы воспользоваться данной утилитой, сделайте вот что:
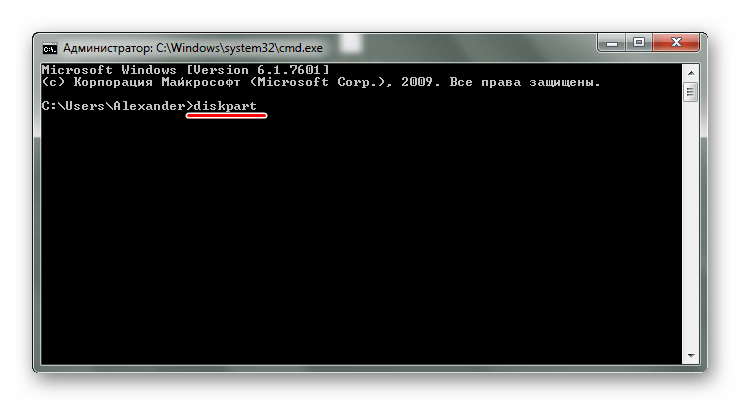
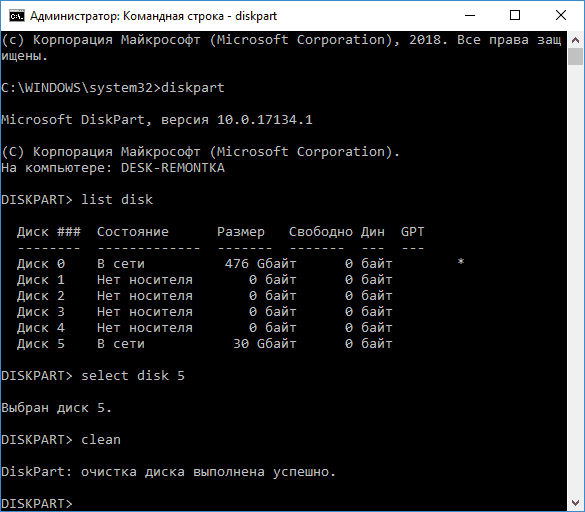
- После запуска «cmd», наберите команду
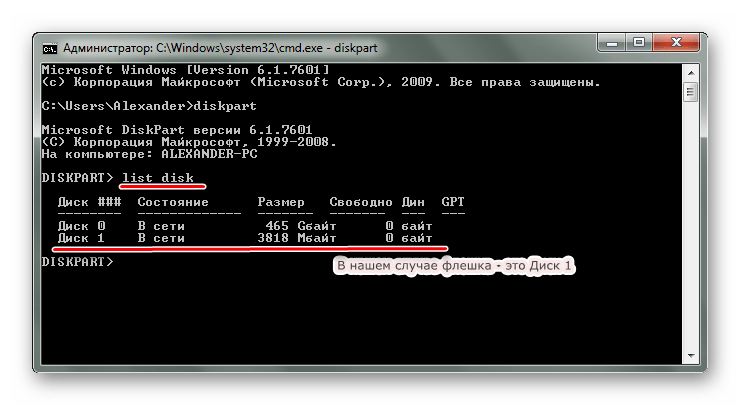
diskpart. Нажмите «Enter» на клавиатуре. - Теперь вбейте
list diskи в появившемся перечне найдите вашу флешку (ориентируйтесь на объем). Обратите внимание на то, под каким она номером. - Введите команду
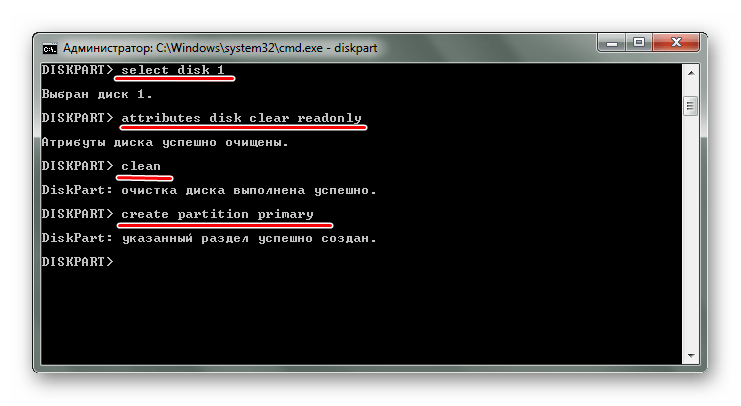
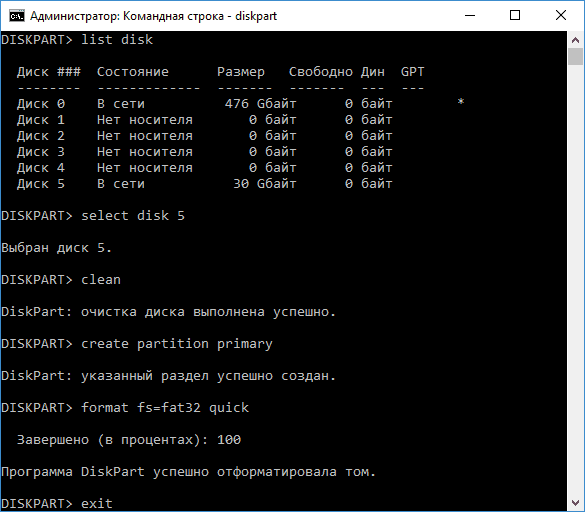
select disk 1, где1– номер флешки. Затем следует очистить атрибуты командойattributes disk clear readonly, очистить флешку командойcleanи создать первичный раздел командойcreate partition primary. - Осталось прописать
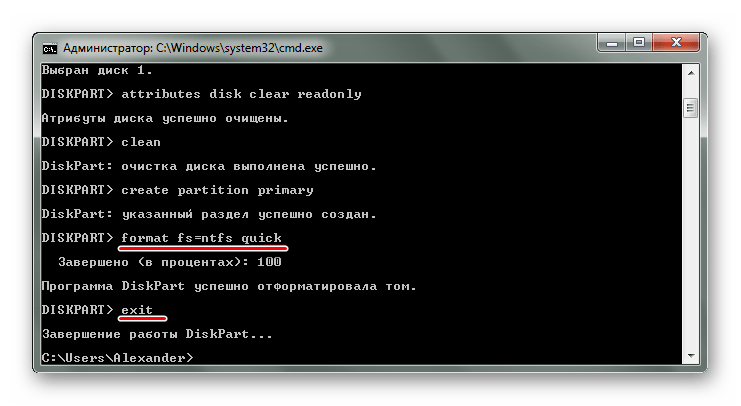
format fs=ntfs quick, гдеntfs– тип файловой системы (при необходимости указываетсяfat32или другой),quick– режим «быстрого форматирования» (без этого данные полностью удалятся и их невозможно будет восстановить). По завершении процедуры просто закройте окно.
Таким образом можно задать все необходимые настройки форматирования флешки. При этом важно не перепутать букву или номер диска, чтобы не стереть данные с другого носителя. В любом случае выполнить поставленную задачу несложно. Преимущество командной строки в том, что этот инструмент есть у всех пользователей Виндовс без исключения. Если у Вас есть возможность воспользоваться специальными программами для удаления, воспользуйтесь одной из тех, которые указаны в нашем уроке.
Урок: Как навсегда удалить информацию с флешки
Если у Вас возникли какие-либо проблемы, пишите о них в комментариях. Мы обязательно поможем!
Наша группа в TelegramПолезные советы и помощь
Как форматировать диск или флешку в командной строке
Иногда пользователю может потребоваться отформатировать диск с помощью командной строки. Например, это может пригодиться, когда средствами Windows не удается завершить форматирование, при необходимости удаления разделов и в других ситуациях. Для этого в системе предусмотрено сразу несколько способов.
В этой инструкции подробно о способах форматировать жесткий диск, SSD или USB флешку в командной строке Windows 11, Windows 10 и предыдущих версиях операционной системы, а также пояснения о том, когда какие способы подойдут в большей степени.
Использование команды FORMAT
Format — команда для форматирования накопителей в командной строке, существующая ещё со времён DOS, но исправно работающая и в Windows 11/10. С помощью неё вы можете отформатировать флешку, жесткий диск или SSD, а точнее — раздел на них.
Для флешки это обычно не имеет значения, при условии, что она определяется в системе и видна её буква (так как они как правило содержат лишь один раздел), для жесткого диска или SSD может иметь: с помощью этой команды вы можете отформатировать только разделы по отдельности. К примеру, если диск разделен на разделы C, D и E, с помощью format вы можете отформатировать сначала D, затем — E, но не объединить их.
Порядок действий для форматирования раздела с помощью команды Format будет следующими:
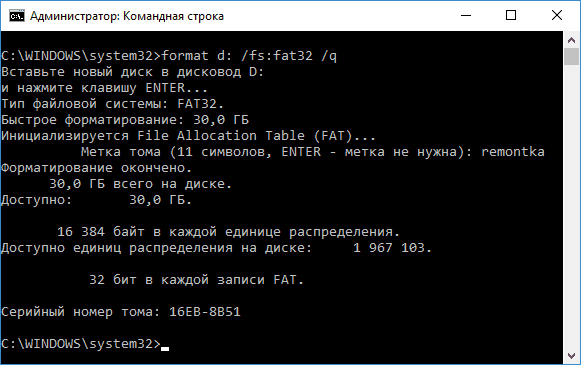
- Запустите командную строку от имени администратора (Как запустить командную строку от имени администратора) и введите команду (пример приведен для форматирования флешки или раздела жесткого диска с буквой D)
format d: /fs:fat32 /q
В указанной команде после fs: вы можете указать NTFS, чтобы форматировать не в FAT32, а в NTFS. Также, если не указать параметр /q то будет выполнено не быстрое, а полное форматирование, см. Быстрое или полное форматирование флешки и диска).

- Если вы увидите сообщение «Вставьте новый диск в дисковод D» (или с другой буквой), просто нажмите Enter.
- Также вам будет предложено ввести метку тома (имя, под которым будет отображаться диск в проводнике), введите на свое усмотрение.
- По завершении процесса вы получите сообщение о том, что форматирование окончено и командную строку можно будет закрыть.
Процедура простая, но несколько ограничена: иногда требуется не просто отформатировать диск, но и удалить все разделы на нем (т.е. объединить их в один). Здесь format не подойдет.
Форматирование флешки или диска с помощью DISKPART
Инструмент командной строки Diskpart, доступный во всех актуальных версиях Windows, позволяет не только отформатировать отдельные разделы флешки или диска, но и удалить их или создать новые.
Сначала рассмотрим использование Diskpart для простого форматирования раздела:
- Запустите командную строку от имени администратора, введите diskpart и нажмите Enter.
- По порядку используйте следующие команды, нажимая Enter после каждой.
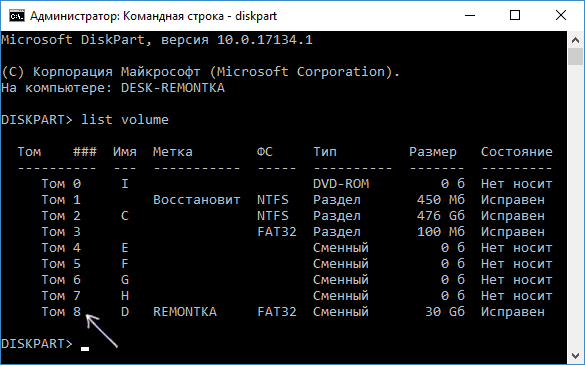
- list volume (здесь обратите внимание на номер тома, соответствующий букве диска, который нужно отформатировать, у меня это 8. В следующей команде используйте свой номер вместо N).

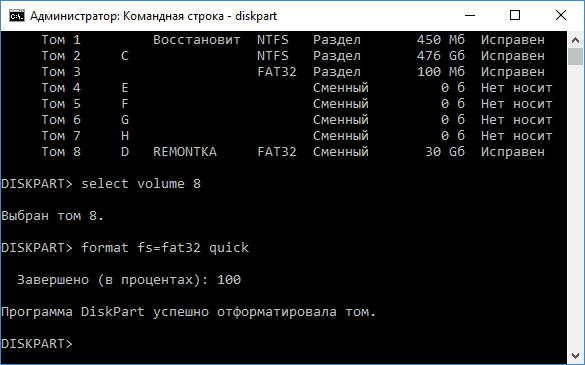
- select volume N
- format fs=fat32 quick (вместо fat32 можно указать ntfs, а если вам требуется не быстрое, а полное форматирование, не указывайте quick).
- exit
На этом форматирование будет завершено. Если же вам требуется удалить все без исключения разделы (например, D, E, F и остальные, в том числе скрытые) с физического диска и отформатировать его как единый раздел, информация об этом в разделе инструкции про удаление разделов с последующим форматированием накопителя ниже.
Форматирование в PowerShell
В Windows PowerShell также доступны команды для форматирования разделов диска. Пример использования:
- Запустите Windows PowerShell или Терминал Windows, сделать это можно в меню по правому клику по кнопке «Пуск».
- Введите следующую команду, заменив букву диска D и файловую систему FAT32 на нужную при необходимости:
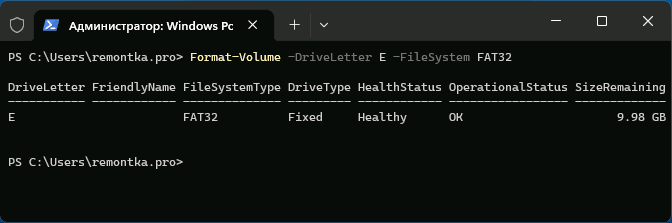
Format-Volume -DriveLetter D -FileSystem FAT32

- Добавив параметр -FileSystemLabel в команде вы можете указать метку диска, а параметр -Full выполнит полное форматирование вместо быстрого (используется по умолчанию).
Форматирование с удалением разделов
Возможен вариант, когда вам требуется не только выполнить форматирование накопителя, но и удалить имеющиеся разделы на диске или флешке, создав один единственный. Это можно сделать как в командной строке, так и в PowerShell.
При использовании командной строки и DISKPART шаги будут следующими:
- Запустите командную строку от имени администратора, введите команду diskpart и нажмите Enter, после чего используйте следующие команды.
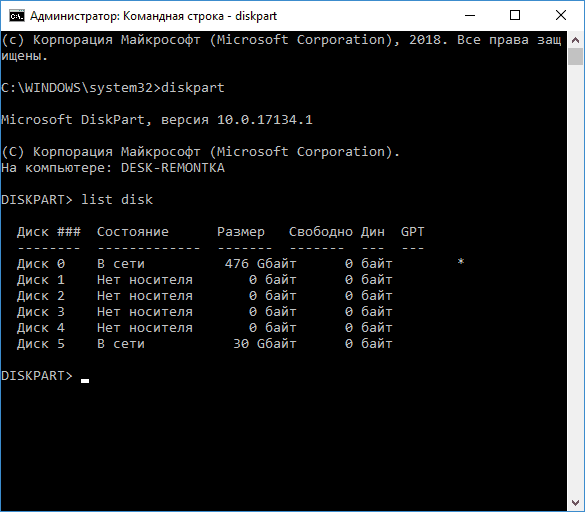
- list disk (вы увидите список подключенных физических дисков, вам нужен номер диска, который будет форматироваться, у меня это 5, у вас будет свой, далее — N).

- select disk N
- clean
- create partition primary
- format fs=fat32 quick (вместо fat32 возможно указать ntfs или exFAT).
- exit
В результате на диске останется один отформатированный основной раздел с выбранной вами файловой системой. Это может быть полезно, например, когда флешка неправильно работает из-за того, что на ней несколько разделов (об этом здесь: Как удалить разделы на флешке).
В Windows PowerShell те же действия будут выглядеть следующим образом:
- Запустите Windows PowerShell или Терминал Windows от имени администратора.
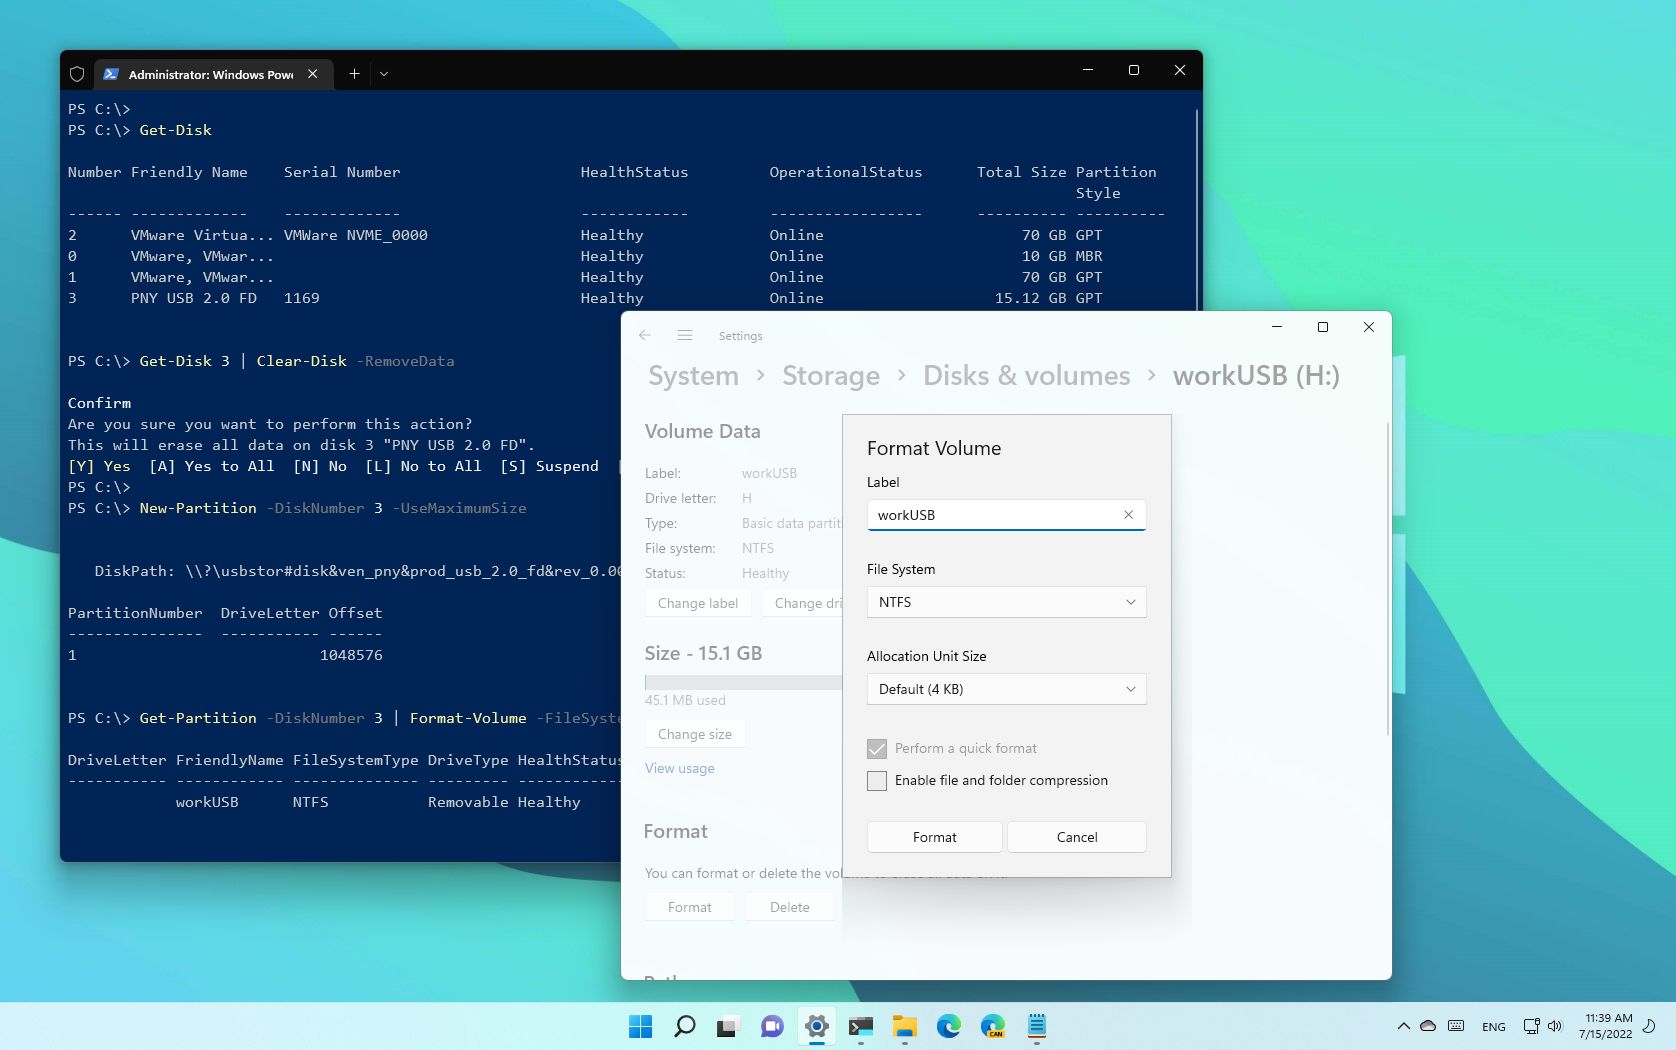
- Используйте команду get-disk чтобы получить информацию о дисках и их номерах, в следующих командах вместо N укажите номер нужного диска, а вместо X — нужную букву диска после форматирования.
- Введите команды (файловую систему FAT32 можно поменять на нужную вам)
Clear-Disk -Number N -RemoveData
New-Partition -DiskNumber N -UseMaximumSize -IsActive -DriveLetter X
Format-Volume -DriveLetter X -FileSystem FAT32
Некоторые дополнительные нюансы, которые могут быть полезными в контексте форматирования накопителей с использованием командной строки:
- Если ваша задача — форматирование системного раздела диска, вы можете сделать это, загрузившись в WinPE, либо путем загрузки с установочной флешки Windows с последующим нажатием клавиш Shift+F10 (Shift+Fn+F10 на некоторых ноутбуках) в программе установки. Это откроет командную строку, где вы сможете выполнить все необходимые действия.
- Форматирование не всегда проходит без проблем: ошибки при форматировании могут быть вызваны как аппаратными проблемами с накопителем, так и другими факторами: например тем, что диск в момент форматирования используется системой (для последнего случая поможет форматирование с использованием WinPE или загрузочной флешки). Здесь могут пригодиться инструкции: Как форматировать флешку, защищенную от записи, Ошибка 0x8004242d при форматировании раздела, Windows не удается завершить форматирование — варианты решения.
Если у вас остаются вопросы, касающиеся рассмотренной темы, вы можете задать их в комментариях ниже, я постараюсь подсказать решение для вашей ситуации.
On Windows 11, now and then, you may need to format a USB flash drive for many reasons. If it’s a new storage device, you may want to reformat it to clean it and ensure it does not contain any malicious code. If the removable drive has corruption problems or the system refuses to recognize it, deleting the current volume and starting from scratch may fix the most common issues. Or, if you plan to give it away, formatting the storage will make sure that you are not directly giving away any sensitive information.
Regardless of the reason, on Windows 11, you have different tools to clean and format any storage media type, including USB flash drives, using File Explorer, Settings, the legacy Disk Management, PowerShell, and Command Prompt.
This guide will walk you through the different ways to delete the contents and resolve common problems with a USB flash drive on Windows 11.
Important: Although it should be obvious, these instructions will delete everything on the storage. As a result, it’s crucial that you back up any data you want to keep before proceeding.
How to format USB drive on File Explorer
To quickly format a USB flash drive with File Explorer on Windows 11, use these steps:
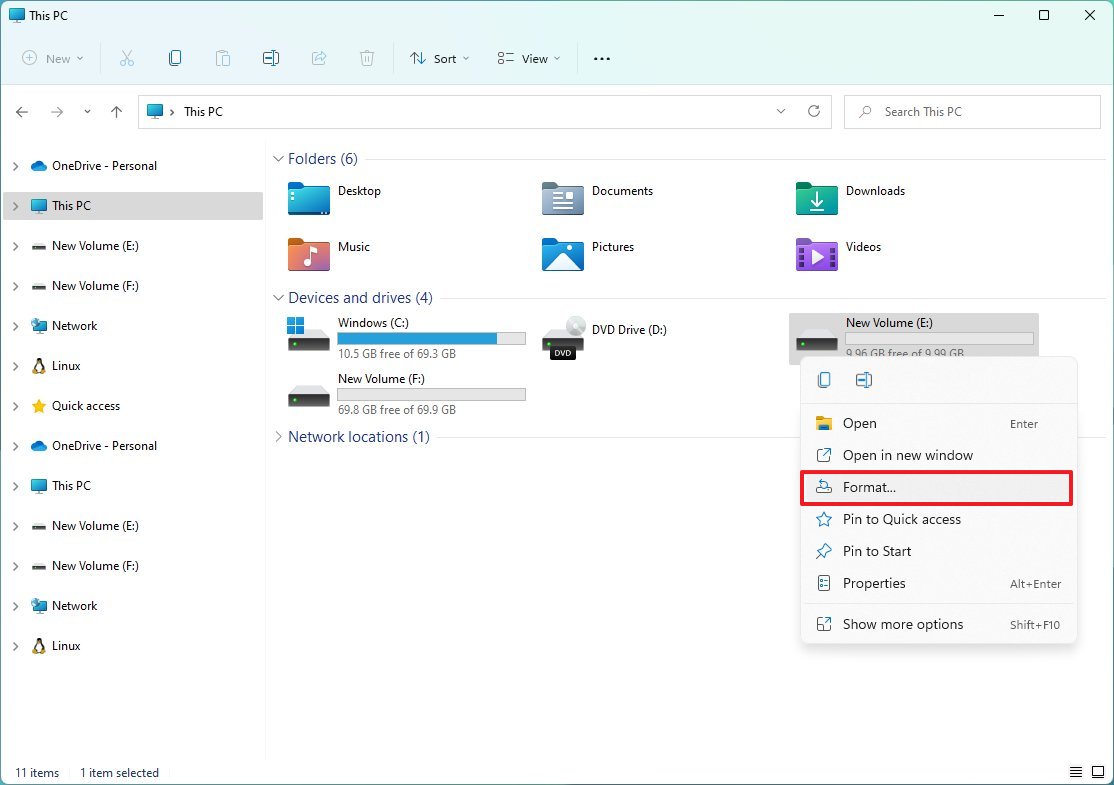
- Open File Explorer.
- Click on This PC on the left side.
- Under the «Devices and drives» section, right-click the USB drive and select the Format option.
- Use the «File system» drop-down menu and select the NTFS option.
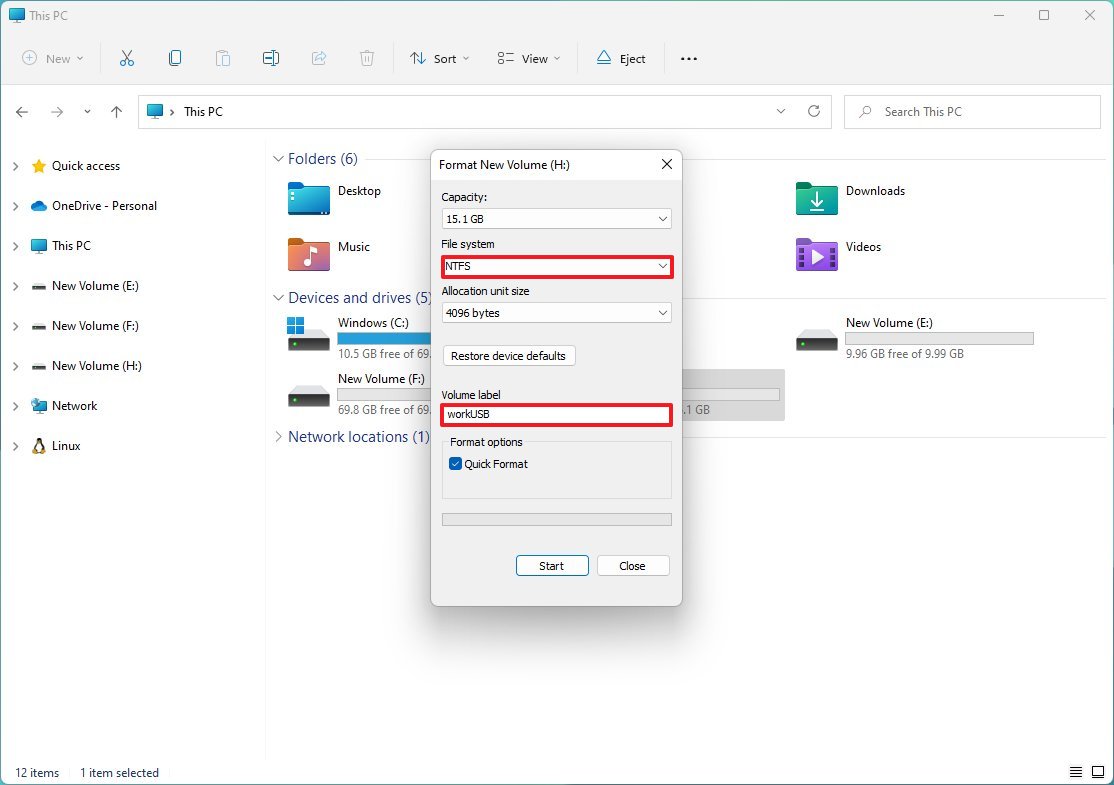
- Quick tip: The NTFS option has been designed for Windows. If you want to make the storage usable on other systems, such as macOS, use the «exFAT» option. If you use the flash drive on Linux, «FAT32» is your best option.
- Use the default selection in the «Allocation unit size» drop-down menu.
- In the «Volume label» field, confirm a drive name that will appear on File Explorer.
- Under the «Format options» section, select the Quick format option.
- Quick note: The «Quick format» option only deletes the file system table and the root folder, but the data may still be recoverable. If you clear the option, the tool will perform a full format, scanning for bad and writing zeros in all sectors to delete all the data. This process could take a long time, depending on the capacity.
- Click the Start button.
- Click the Yes button.
Once you complete the steps, the USB flash drive will erase and format to store files again.
How to format USB drive on Settings app
Windows 11 also comes with the «Disks & volumes» settings, a modern version of the Disk Management tool that allows you to manage drives, including the ability to format USB flash drives.
All the latest news, reviews, and guides for Windows and Xbox diehards.
Format removable storage
To reformat a USB drive through the Disks & volumes settings, use these steps:
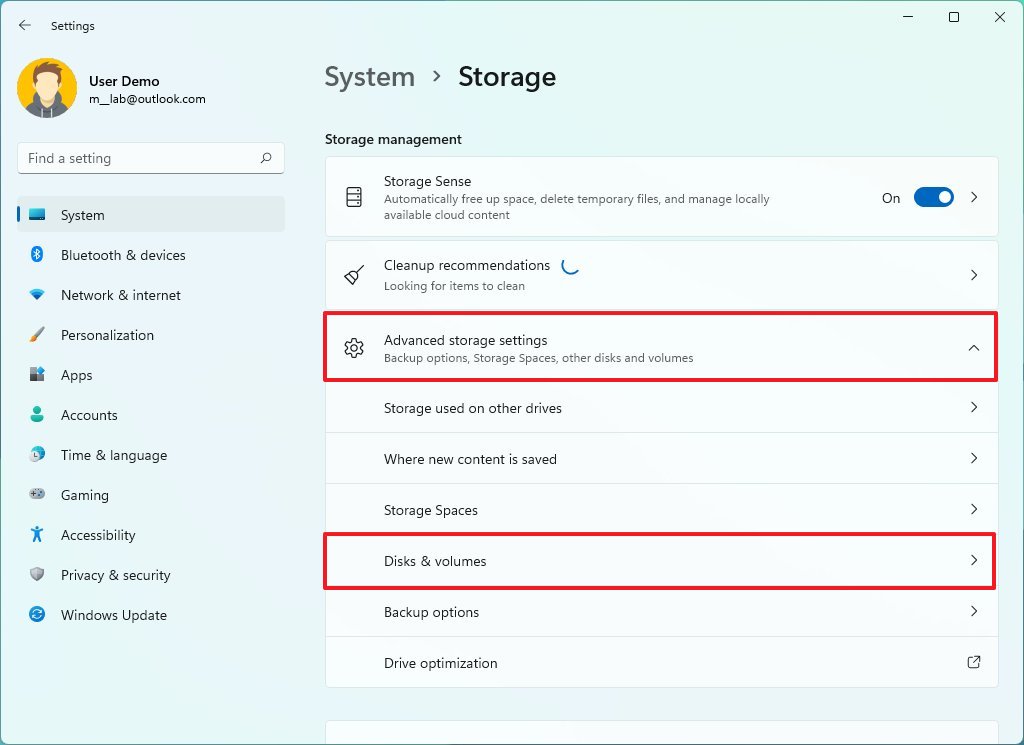
- Open Settings.
- Click on System.
- Click the Storage page on the right side.

- Under the «Storage management» section, click on Advanced storage settings.
- Click the «Disks & volumes» setting.
- Select the volume on the USB drive and click the Properties button.
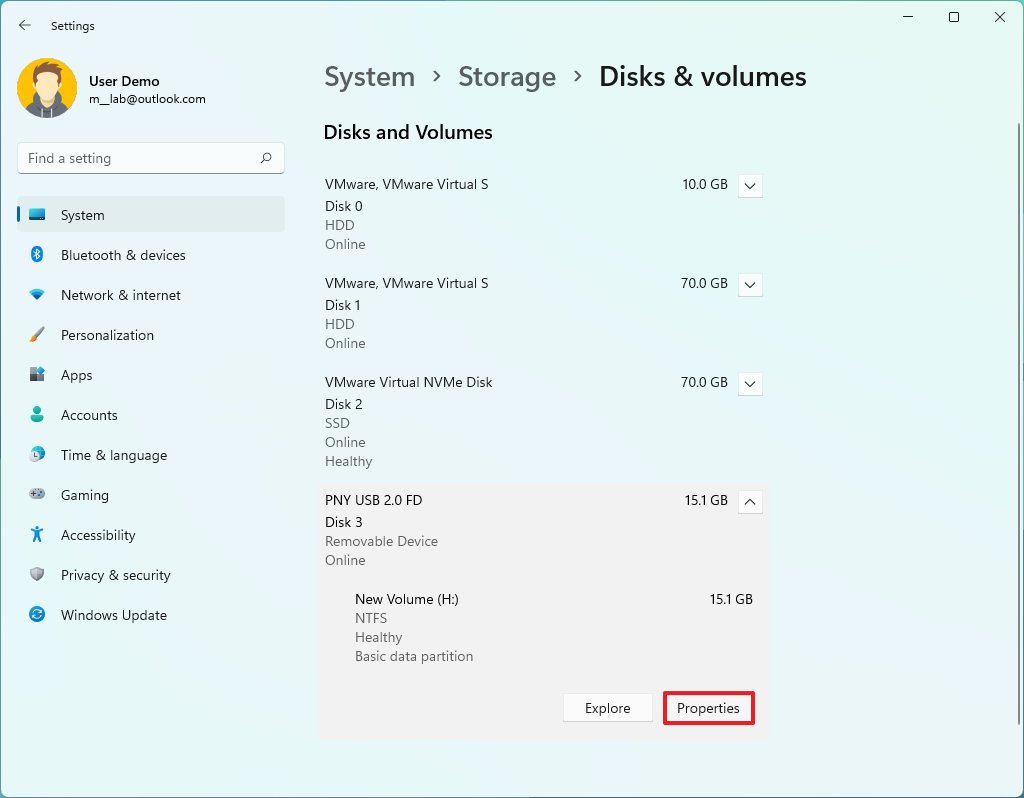
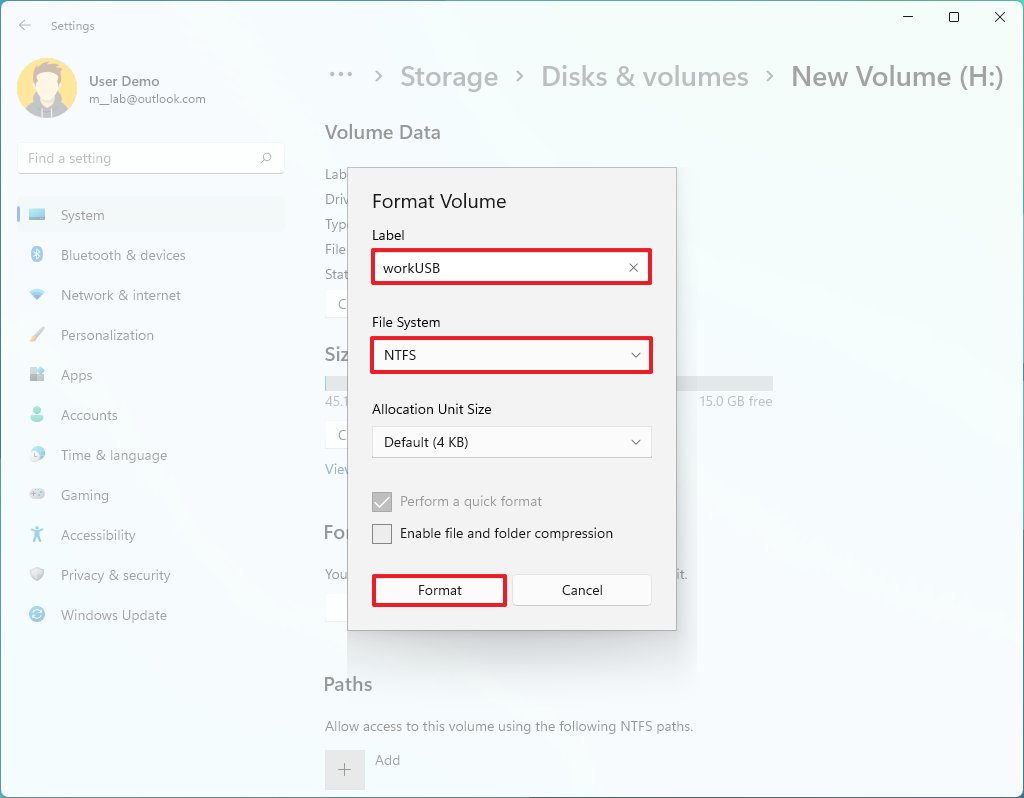
- Under the «Format» section, click the Format button.
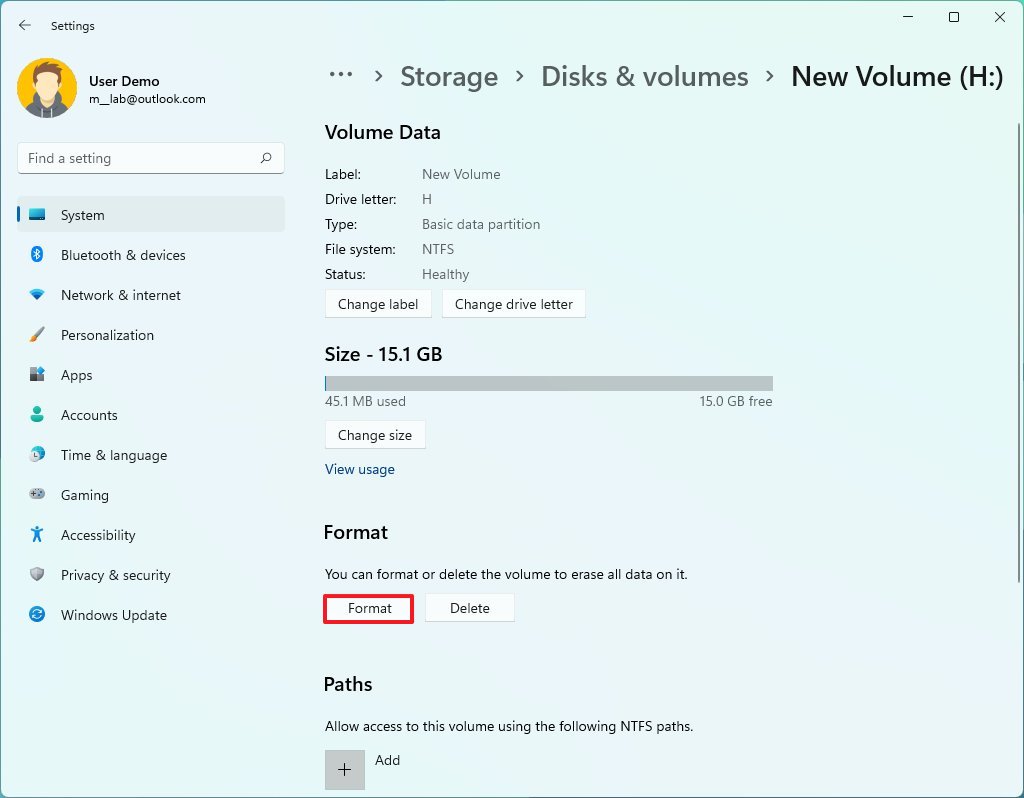
- In the «Label» setting, specify a descriptive name for the flash drive.
- Use the «File System» drop-down menu and select the NTFS option.
- Quick note: If you plan to use the removable storage on macOS, you may want to choose the «exFAT» option. If you plan to use the drive on Linux, you may want to select the «FAT32» option.
- (Optional) Check the «Enable file and folder compression» option.
- Click the Format button.
After you complete the steps, the flash drive will be ready from File Explorer.
Erase and format removable storage
To wipe out and format a USB flash drive through the Settings app, use these steps:
- Open Settings.
- Click on System.
- Click the Storage page on the right side.
- Under the «Storage management» section, click on Advanced storage settings.
- Click the «Disks & volumes» setting.
- Select the volume on the USB drive and click the Properties button.
- Under the «Format» section, click the Delete button.
- Click the Delete volume button.
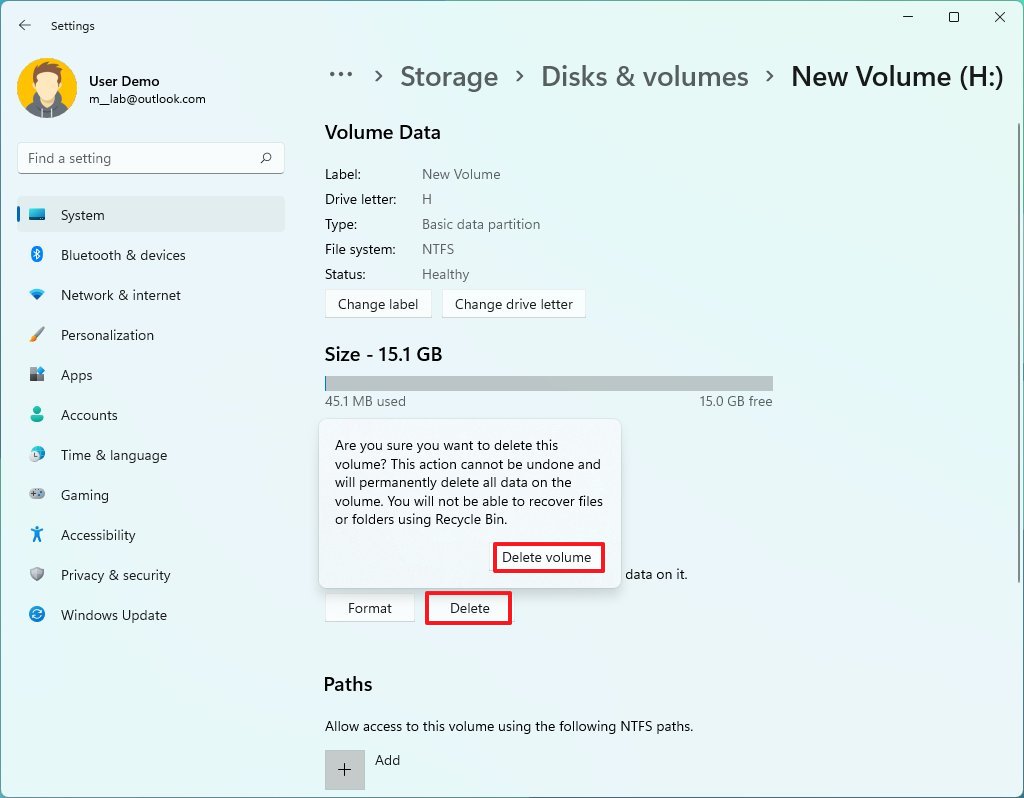
- Click the back button from the top-left corner.
- Quick note: The process will fail if you click the Format button from the device page since the volume is no longer available.
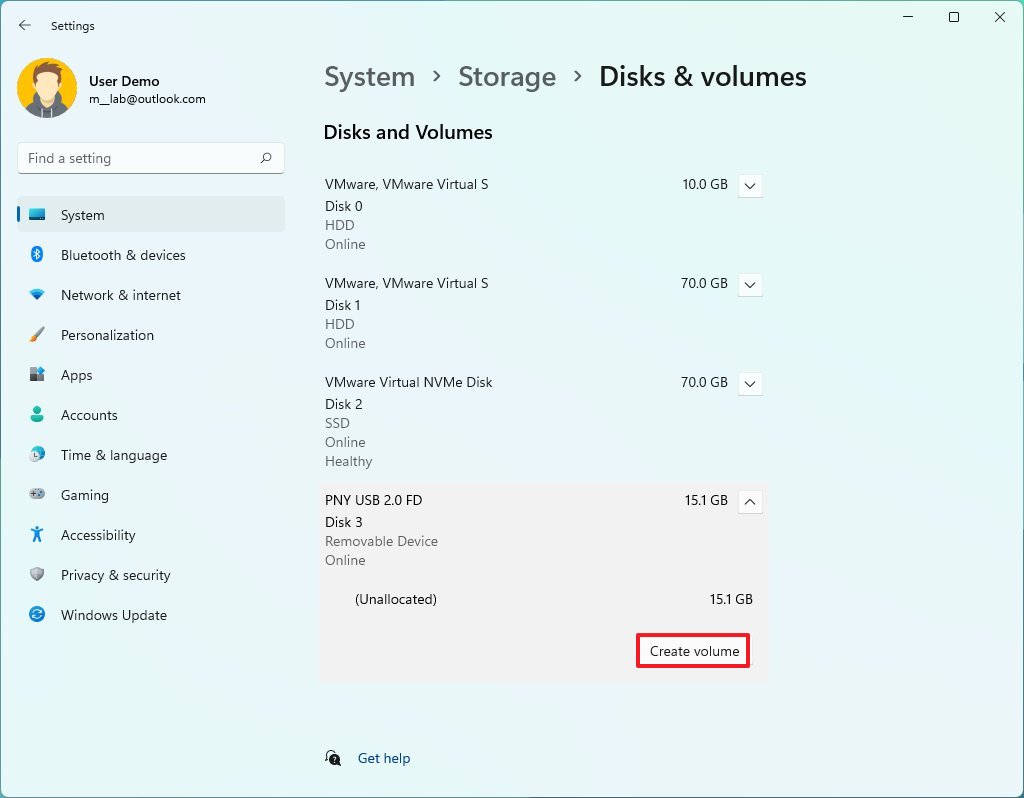
- Select the flash drive «Unallocated» space and click the Create volume button.
- In the «Label» setting, specify a descriptive name for the flash drive.
- Use the «File System» drop-down menu and select the NTFS option.
- Quick note: If you plan to use the removable storage on macOS, you may want to choose the «exFAT» option. If you plan to use the drive on Linux, you may want to select the «FAT32» option.
- (Optional) Check the «Enable file and folder compression» option.
- Click the Format button.
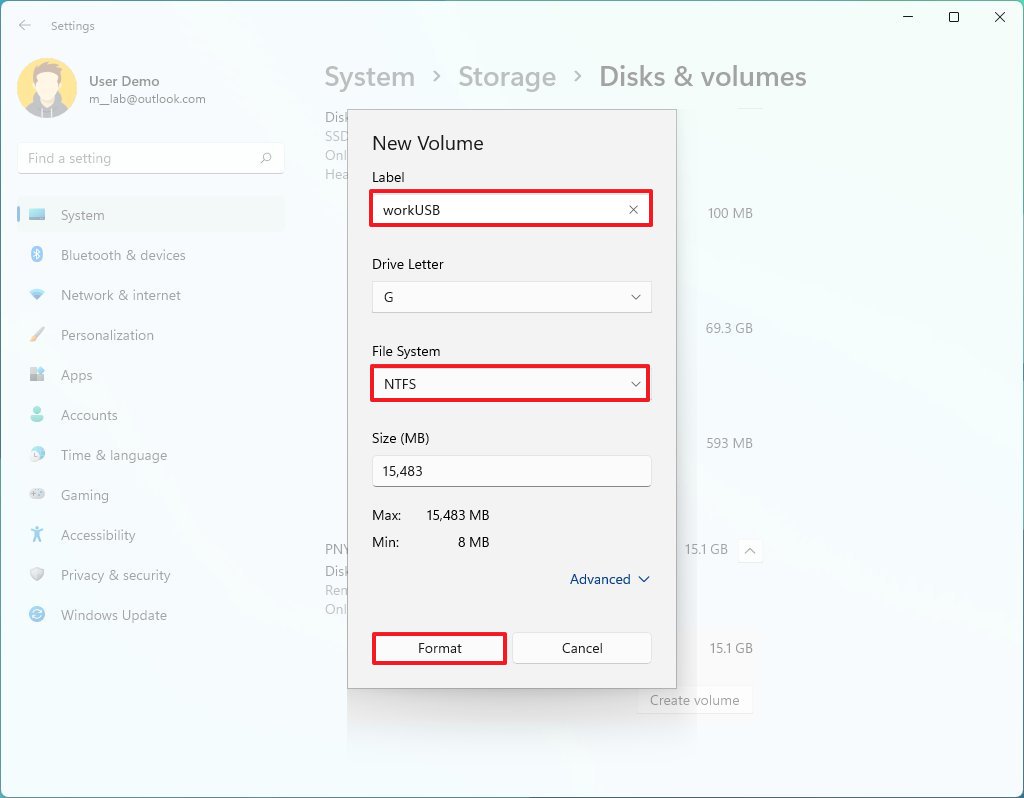
Once you complete the steps, you can use the removable storage to store files.
How to format USB drive on Disk Management
Also, you can still use the legacy Disk Management tool to format a USB flash drive in at least two different ways. You can format the external drive to rebuild the file system table and erase the content, and you can delete and recreate the volume to fix problems.
Format removable storage
To format a USB flash drive with Disk Management, use these steps:
- Open Start.
- Search for Create and format hard disk partitions and click the top result to open the Disk Management app.
- Right-click the removable drive and select the Format option.
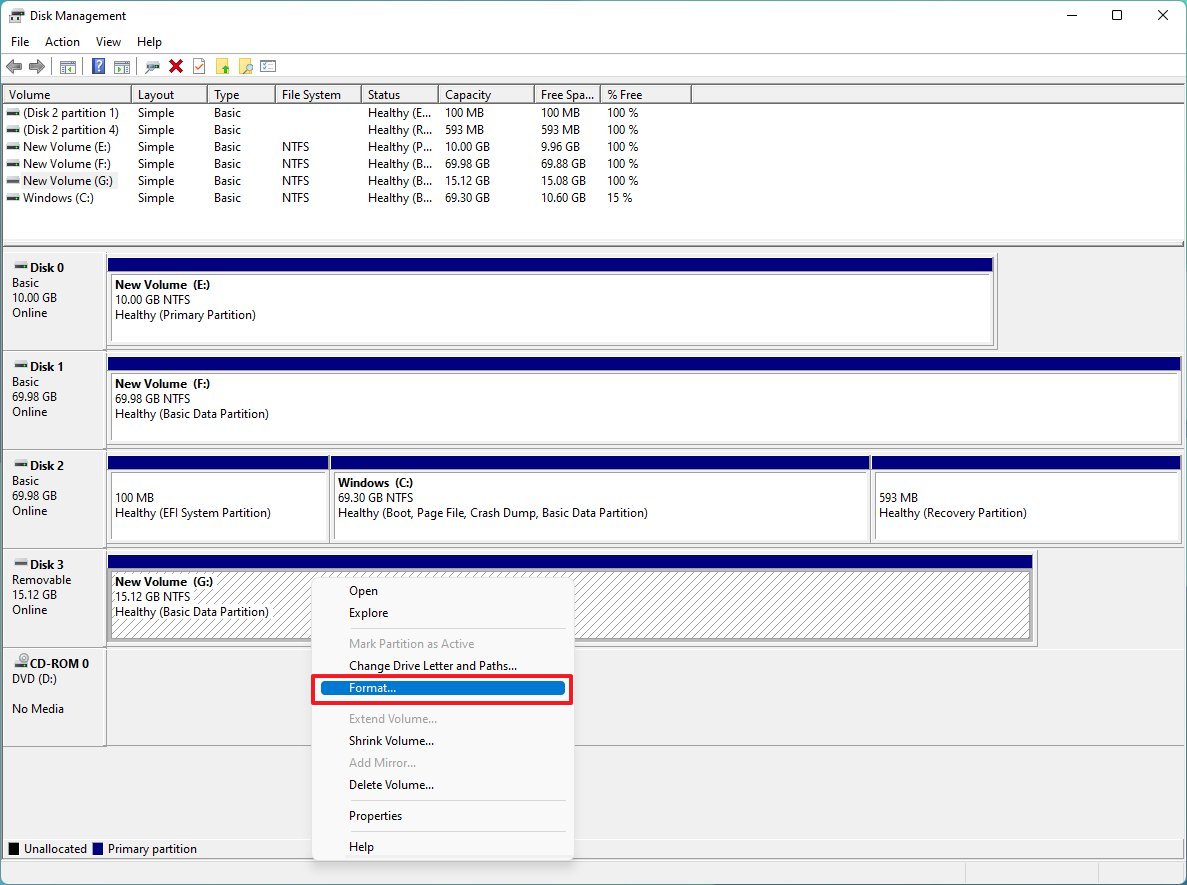
- Click the Yes button.
- In the «Volume label» setting, confirm the friendly name for the storage.
- Use the «File system» drop-down menu and select the NTFS option.
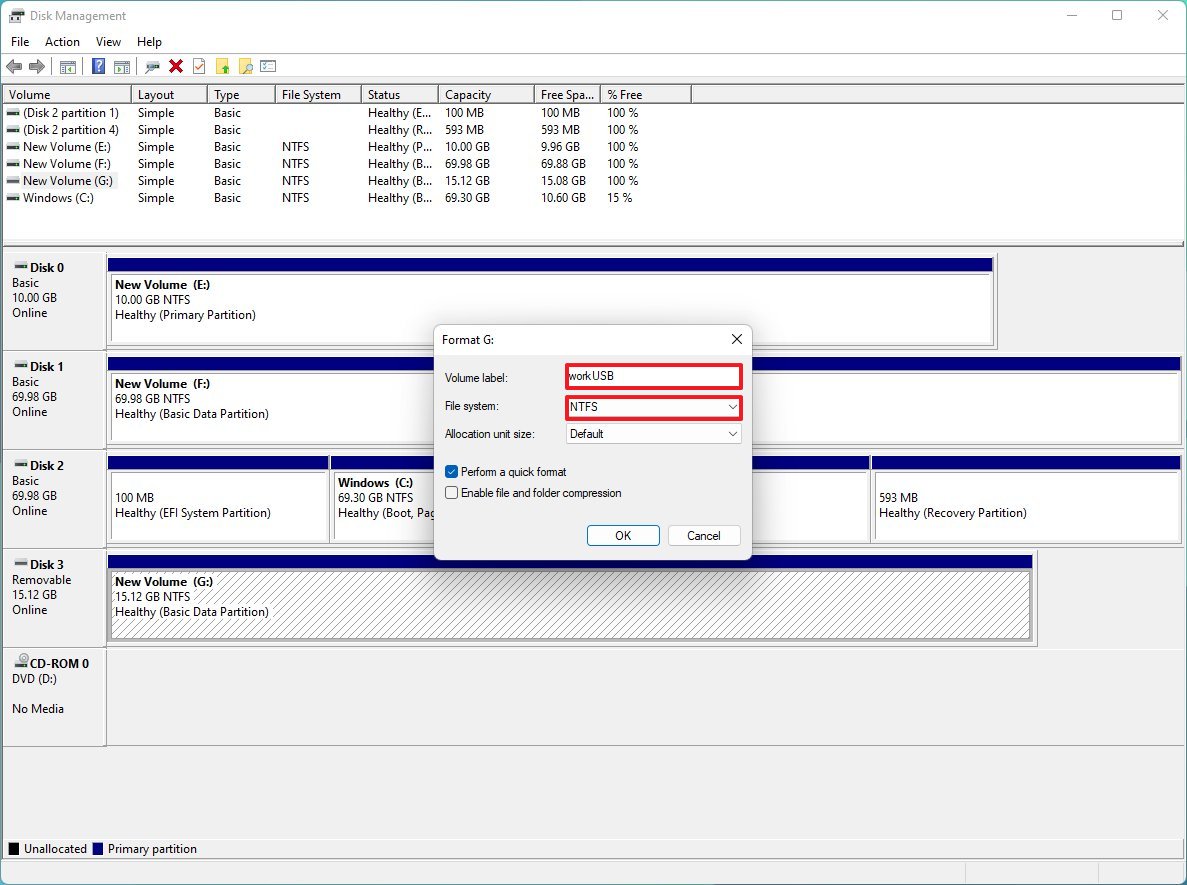
- Quick note: You can also choose the «FAT32» or «exFAT» option, depending on how you plan to use the storage.
- Use the Default option in the «Allocation unit size» drop-down menu.
- Check the Perform a quick format option.
- (Optional) Check the Enable file and folder compression option.
- Quick note: Although the compression option may allow storing more files in the same physical space, you may encounter performance issues.
- Click the OK button.
After you complete the steps, the flash drive will be ready to store documents, pictures, videos, and other files.
Erase and format removable storage
To erase and format a flash drive on Windows 11, use these steps:
- Open Start.
- Search for Create and format hard disk partitions and click the top result to open the Disk Management app.
- Right-click the removable storage and select the Delete Volume option.
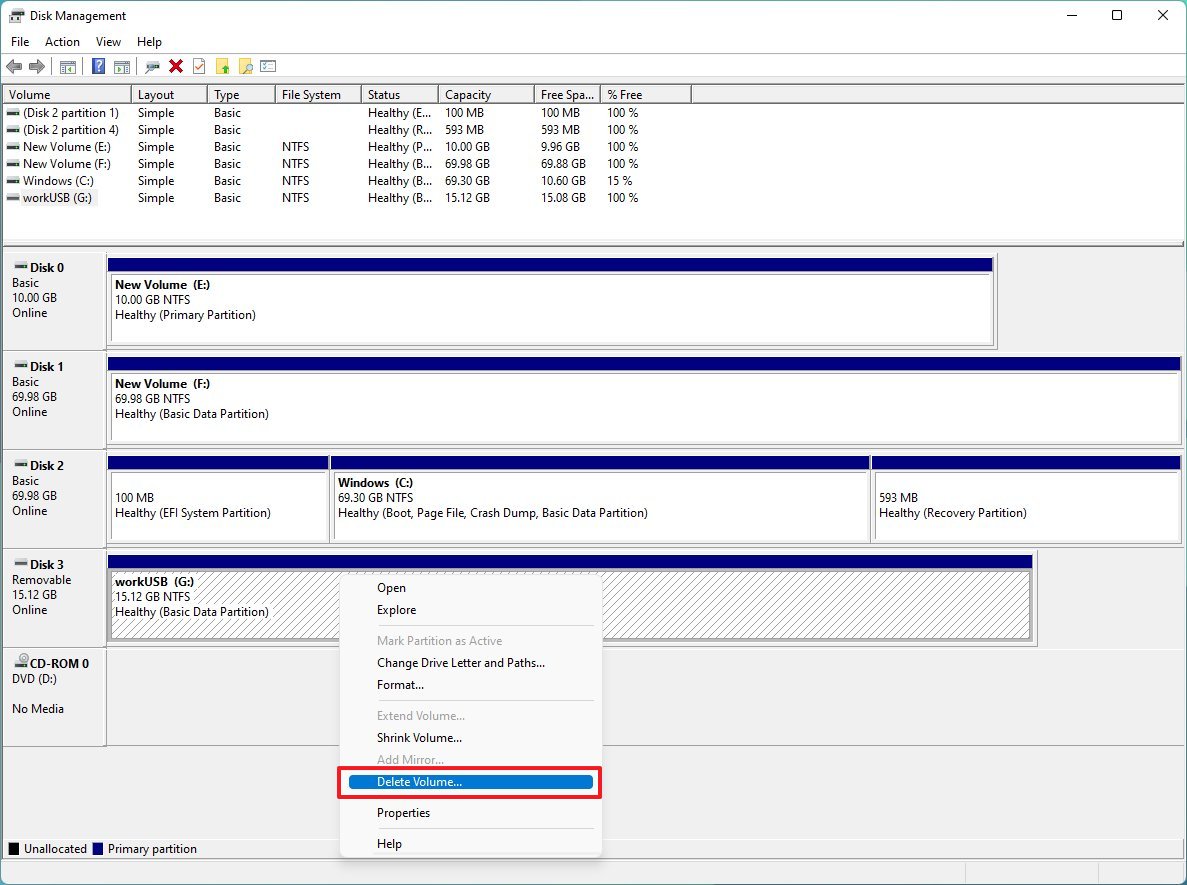
- Click the Yes button.
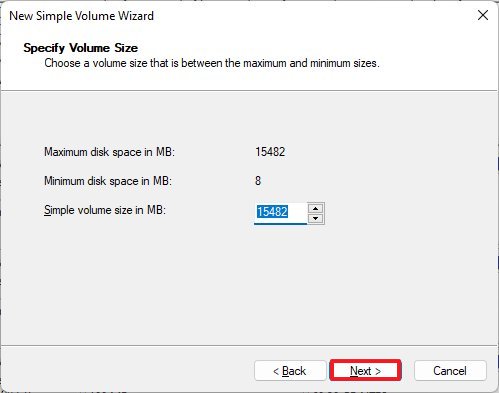
- Right-click the «Unallocated» space and choose the New Simple Volume option.

- Click the Next button.
- Click the Next button again.
- Select the Assign the following drive letter option.
- Use the drop-down menu to select one of the letters.
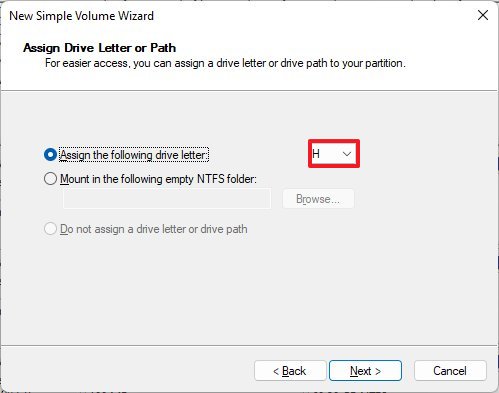
- Quick tip: If you assign a letter manually, it is best to choose a letter in reverse order (Z, Y, X, and so on).
- Click the Next button.
- Select the «Format this volume with the following settings» option.
- Use the File system drop-down menu and select the NTFS option.
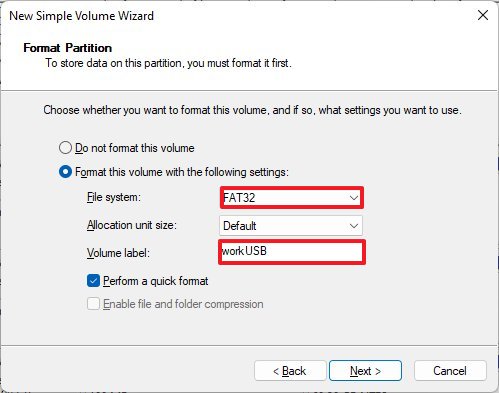
- Quick note: You can only use «NTFS» or «FAT32.» If you need to format the drive using «exFAT,» you will need to use Command Prompt or PowerShell.
- Use the Default option in the «Allocation unit size» drop-down menu.
- In the «Volume label» setting, confirm the friendly name of the flash drive.
- Check the Perform a quick format option.
- (Optional) Check the Enable file and folder compression option.
- Click the Next button.
- Click the Finish button.
Once you complete the steps, the wizard will set up the drive with your configuration. Usually, wiping out the flash drive and starting over with a new partition is the best option since it can also help to resolve logical issues, such as data corruption.
How to format USB drive on Command Prompt
On Windows 11, you can also use the DiskPart tool with Command Prompt to wipe out and format a USB flash drive.
Format removable storage
To use Command Prompt to format a USB flash drive, use these steps:
- Open Start.
- Search for Command Prompt, right-click the top result, and select the Run as administrator option.
- Type the following command to perform a quick format of the USB flash drive and press Enter: format VOLUME: /v:FLASHDRIVE-LABEL /fs:FILE-SYSTEM /q
In the command, replace the VOLUME with the correct drive letter of the storage, FLASHDRIVE-LABEL with the name you want the drive to appear in File Explorer, FILE-SYSTEM with one of the available file systems, including «FAT32,» «exFAT,» or «NTFS.»
This example performs a quick format of the «H» drive: format H: /v:workUSB /fs:NTFS /q
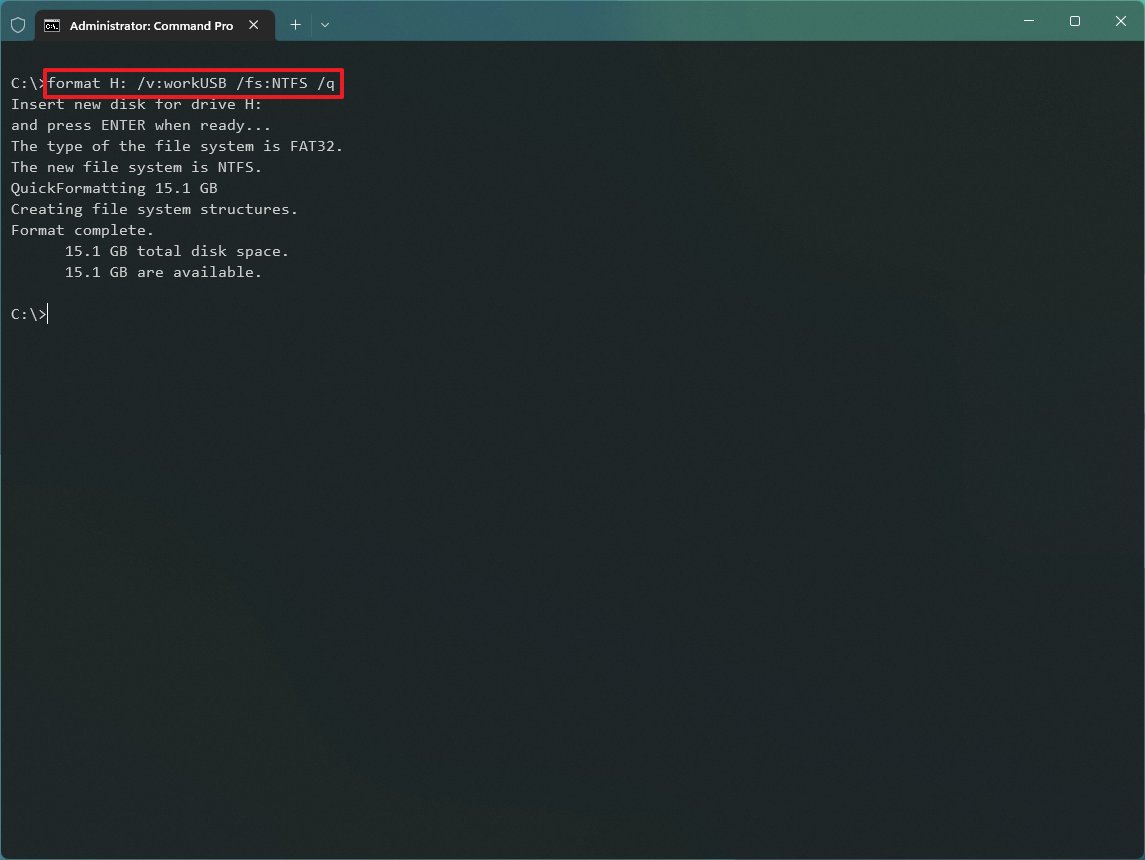
- Press Enter again to continue.
- (Optional) Type the following command to perform a full format the USB flash drive and press Enter: format VOLUME: /v:FLASHDRIVE-LABEL /fs:FILE-SYSTEM
This example performs a full format of the H drive: format H: /v:»workUSB» /fs:NTFS
- Press Enter again to continue.
After completing the steps, the thumb drive will format with the specified settings.
Erase and format removable storage
To clean and format a flash drive with commands on Windows 11, use these steps:
- Open Start.
- Search for Command Prompt, right-click the top result, and select the Run as administrator option.
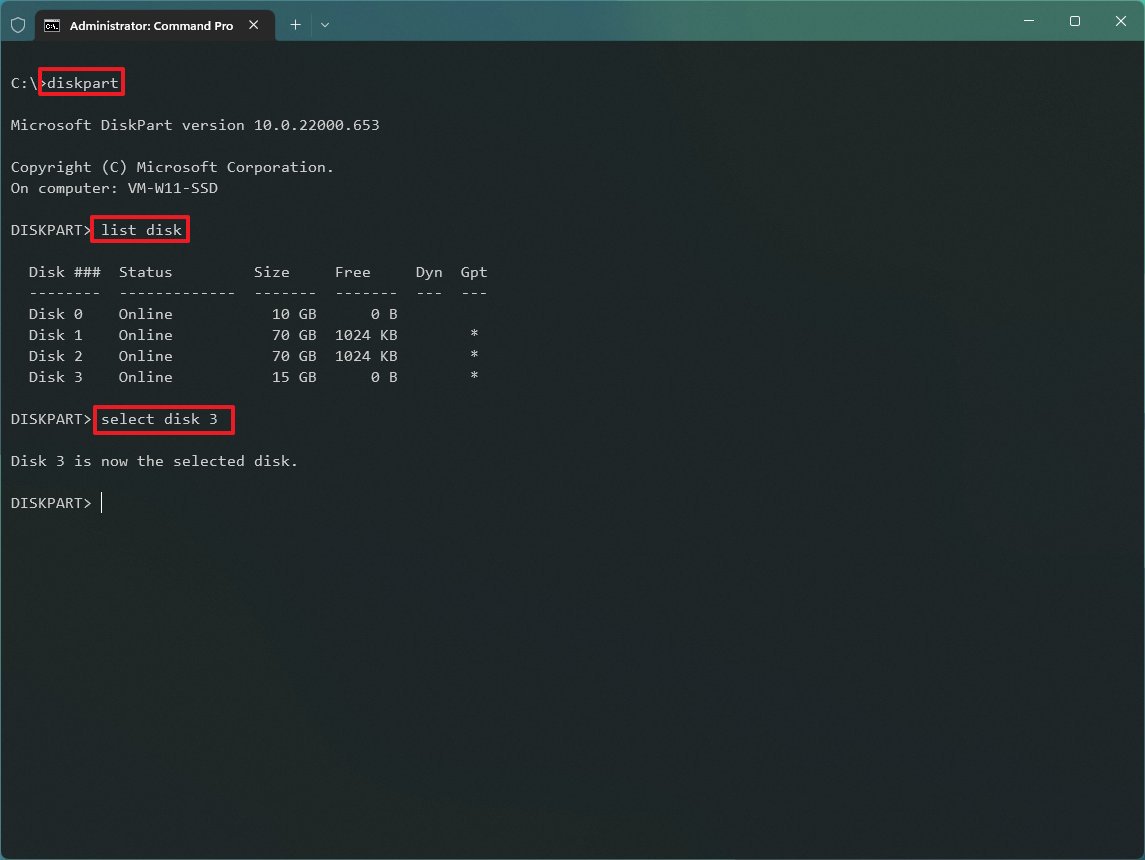
- Type the following command to launch the diskpart tool and press Enter: diskpart
- Type the following command to view a list of the available drives and press Enter: list disk
- Type the following command to select the flash drive you want to delete and press Enter: select disk DISK-NUMBER
In the command, replace DISK-NUMBER for the number representing the drive you are trying to format.
This example selects the flash drive listed as disk number 2: select disk 3
- Type the following command to delete all the partitions on the storage and press Enter: clean
- Type the following command to create a primary partition on the drive and press Enter: create partition primary
- Type the following command to perform a quick format and press Enter: format fs=FILE-SYSTEM label=DRIVE-NAME quick
In the command, replace FILE-SYSTEM for your preferred file system, including «FAT32,» «exFAT,» or «NTFS.» Also, replace DRIVE-NAME with the name you want to give the device. The «quick» option is optional, but the format can take a very long time if you don’t specify it.
This example formats the removable storage using the NTFS file system and applies the «workUSB» name: format fs=NTFS label=workUSB quick
- Type the following command to assign a drive letter and press Enter: assign
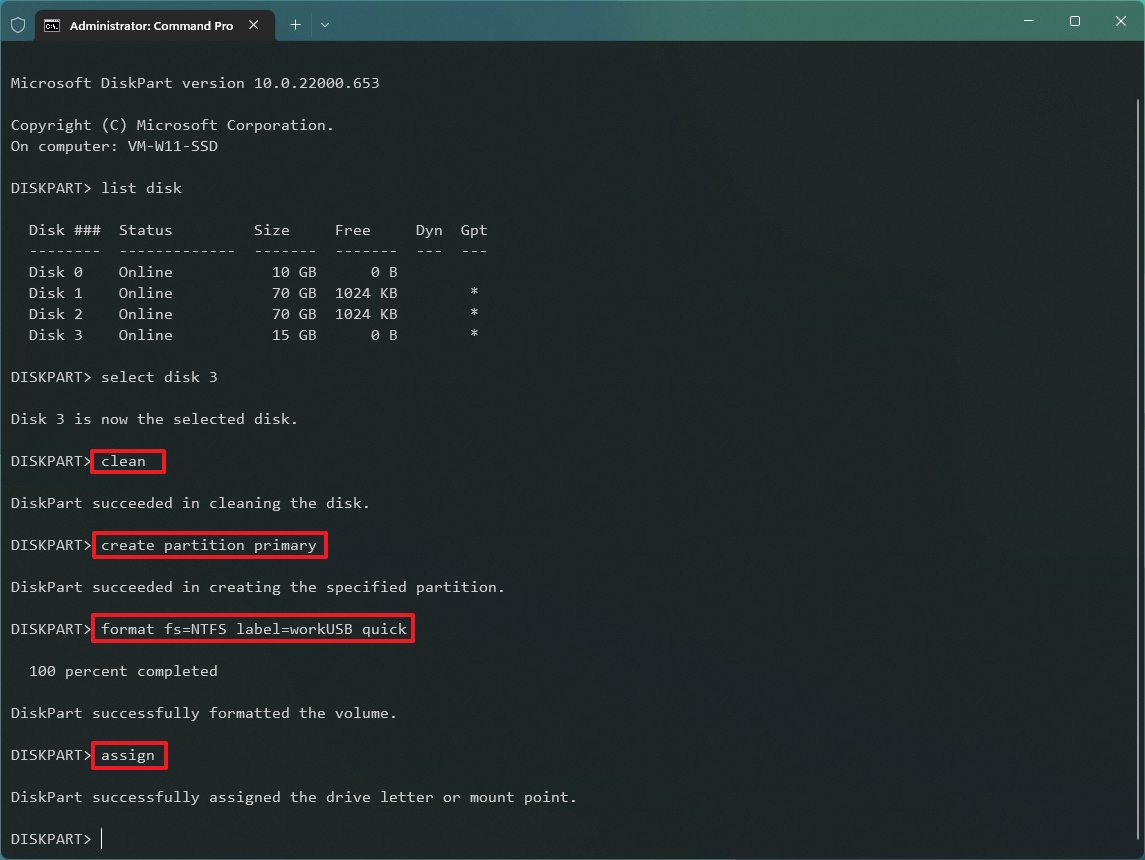
- Quick note: You can append «letter=E» in the command to assign «E» as the drive letter. Otherwise, the system will choose a letter automatically.
- Type the following command to close diskpart and press Enter: exit
Once you complete the steps, diskpart will clear the data from the thumb drive. It’ll create a new partition and configure a file system to store files.
How to format USB drive on PowerShell
Alternatively, you can also use PowerShell to format a USB flash drive on Windows 11.
Format removable storage
To format a USB flash drive with PowerShell, use these steps:
- Open Start.
- Search for PowerShell, right-click the top result, and select the Run as administrator option.
- Type the following command to perform a quick format on the flash drive and press Enter: Format-Volume -DriveLetter DRIVE-LETTER -FileSystem FILE-SYSTEM -NewFileSystemLabel DRIVE-NAME
In the command, replace DRIVE-LETTER with the correct letter reflecting the drive you want to format, FILE-SYSTEM for FAT32, exFAT, or NTFS, and DRIVE-NAME with the name you want it to appear on File Explorer.
This example performs a quick format of the «H» drive with the NTFS file system: Format-Volume -DriveLetter H -FileSystem NTFS -NewFileSystemLabel workUSB.

- (Optional) Type the following command to perform a full format of the USB flash drive and press Enter: Format-Volume -DriveLetter DRIVE-LETTER -FileSystem FILE-SYSTEM -Full -Force
In the command, replace DRIVE-LETTER with the correct letter of the drive to format, and FILE-SYSTEM for «FAT32,» «exFAT,» or «NTFS,» depending on the file system you want to use. If you do not know which one to pick, you should use NTFS for Windows 11. The Full option tells the command to perform a full format, and the -Force option specifies the override switch.
This example performs a full format of the «H» drive: Format-Volume -DriveLetter H -FileSystem NTFS -Full -Force
After completing the steps, PowerShell will format the removable storage with the specified settings.
Erase and format removable storage
To erase and format a USB flash drive with PowerShell commands, use these steps:
- Open Start.
- Search for PowerShell, right-click the top result, and select the Run as administrator option.
- Type the following command to view the flash drive you want to fix and press Enter: Get-Disk
- Type the following command to delete the volume and press Enter: Get-Disk DISK-NUMBER | Clear-Disk -RemoveData
In the command, change DISK-NUMBER for the correct number representing the flash drive you are formatting. This example selects and cleans the disk number 3: Get-Disk 3 | Clear-Disk -RemoveData
- Type Y to confirm the action and press Enter.
- Type the following command to create a new partition and press Enter: New-Partition -DiskNumber DISK-NUMBER -UseMaximumSize
In the command, change DISK-NUMBER to the correct number representing the storage you are formatting.
This example creates a new partition using the entire space available on drive number 3: New-Partition -DiskNumber 3 -UseMaximumSize
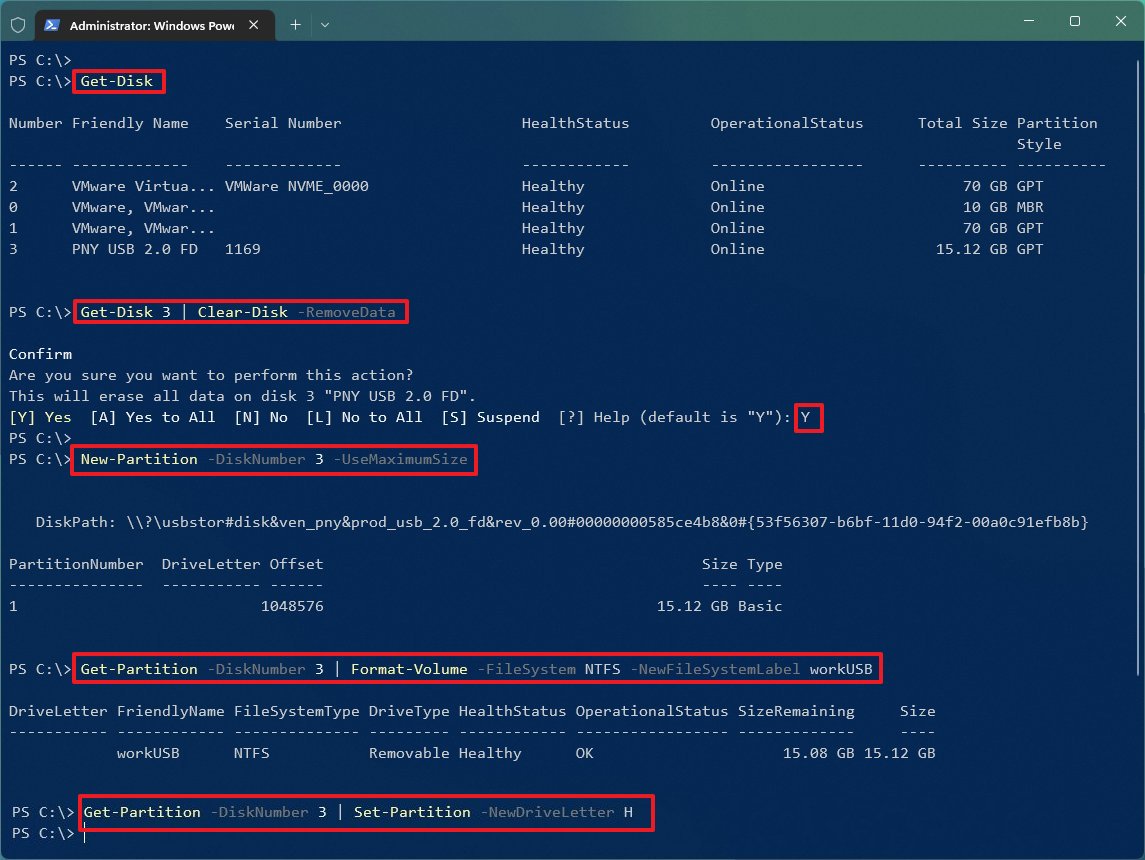
- Type the following command to perform a quick format and assign a drive label, and press Enter: Get-Partition -DiskNumber DISK-NUMBER | Format-Volume -FileSystem FILE-SYSTEM -NewFileSystemLabel DRIVE-NAME
In the command, change DISK-NUMBER for the number that identifies the storage in the system, FILE-SYSTEM for «NTFS,» «FAT32,» or «exFAT,» and DRIVE-NAME with the label you want to appear in File Explorer.
This example selects and formats drive number 3 using the NTFS file system: Get-Partition -DiskNumber 3 | Format-Volume -FileSystem NTFS -NewFileSystemLabel workUSB
- Type the following command to assign a new letter to the drive and press Enter: Get-Partition -DiskNumber DISK-NUMBER | Set-Partition -NewDriveLetter DRIVE-LETTER
In the command, replace DISK-NUMBER for the number that identifies the storage in the system, and DRIVE-LETTER with the letter you want the device to appear in File Explorer.
This example sets «E» as the drive letter for disk number 3: Get-Partition -DiskNumber 3 | Set-Partition -NewDriveLetter F
After you complete the steps, the process will clean the drive information and reformat the space to resolve common problems, such as corruption, write protection, and the removable storage not getting recognized by Windows 11.
More resources
For more helpful articles, coverage, and answers to common questions about Windows 10 and Windows 11, visit the following resources:
- Windows 11 on Windows Central — All you need to know
- Windows 10 on Windows Central — All you need to know
Mauro Huculak has been a Windows How-To Expert contributor for WindowsCentral.com for nearly a decade and has over 15 years of experience writing comprehensive guides. He also has an IT background and has achieved different professional certifications from Microsoft, Cisco, VMware, and CompTIA. He has been recognized as a Microsoft MVP for many years.
On this page, you’ll learn how to format USB using CMD or an easier CMD alternative in Windows 10/8/7 successfully. Pick up the suitable USB format tool for help now:
| USB Format Tool | Pros |
|---|---|
| 1. Format USB Via CMD Alternative |
|
| 2. Format USB Using CMD |
|
Applies to: Format corrupted USB, fix SD card won’t format, format BitLocker encrypted drives, and format USB to NTFS/FAT32,exFAT/EXT, etc. devices.
Supported OS: Windows 11/10/8.1/8/7 and Windows XP/Vista, and all Windows Server systems.
The 2 ways can both format a USB; CMD is too difficult for beginners. Hence, formatting a USB using CMD alternative is a better and easier choice. Click the button below to one-click format USB.
Back-Up Data before You Format USB Using CMD
Here are some tips that you can follow to get everything ready before formatting your USB using CMD:
#1. Backup USB Essentials
As formatting will remove all saved data on the USB drive, if your USB is accessible, make sure to back up valuable USB data to another secure location in advance. You can either manually copy files from USB to another device or turn to automated & free file backup software — EaseUS Todo Backup Free to create a full backup of everything on your USB at one time.
#2. Pick a Reliable USB Formatting Tool — CMD or Its Alternative
If you prefer an easy and quick way to format USB or you need to format to Ext 4/3/2, pick up CMD alternative — EaseUS Partition Master for help.
Experienced Windows users can directly run the CMD formatting command: format fs=ntfs quick or format fs=fat32 quick to format the USB drive.
Let’s start to format your USB using the CMD alternative tool or CMD command lines to make the RAW, inaccessible, unreadable, and even corrupted USB flash drive, pen drive, and memory stick work normally again.
Format Pen Drive Using CMD Alternative
Although you can format a USB from cmd, it’s not user-friendly for most Windows beginners. Also, any improper operation may cause data loss on other storage devices. Here, we would like to recommend you try third-party CMD alternative software, a free partition manager tool, EaseUS Partition Master Free Edition.
EaseUS Partition Master Free Edition is a perfect CMD alternative tool for USB formatting. With an easy-to-use interface and precise operation, you can use it to format USB easily in only a few clicks. All levels of users can apply this tool to format USB. Here are the detailed steps:
- Right-click the external drive or USB you intend to format and choose «Format».
- Set the Partition label, File system (NTFS/FAT32/EXT2/EXT3/EXT4/exFAT), and Cluster size if you intend to change. Then click «OK».
- Click «Yes» to continue.
- Click the «Execute 1 Task(s)» button and click «Apply» to format your selected external hard drive or USB stick.
You May Also Like:
Aside from replacing CMD to format the USB drive, EaseUS Partition Master is also a great hard drive format tool that you can apply to format and set up any type of storage device for different purposes, as shown below.
How to Format USB Using CMD (Command Prompt)
USB flash drive is worldwide used for storing data and transferring files. However, sometimes, USB may corrupt or become inaccessible due to RAW or invalid file system, bad sector, or other errors. A quick way to resolve these problems is to format USB using CMD or low-level format USB.
The following are two detailed guides, illustrating how to format a USB flash drive from Windows Command Prompt that you should strictly follow.
Steps to Format USB (to NTFS or FAT32) Using CMD
#1. Format USB using CMD in Windows 11/10:
Step 1. Connect USB to your PC and press Windows + R keys.
Step 2. Type cmd in the Search box and hit Enter to bring up Command Prompt.
Step 3. Type the following command lines one by one and hit Enter each time:
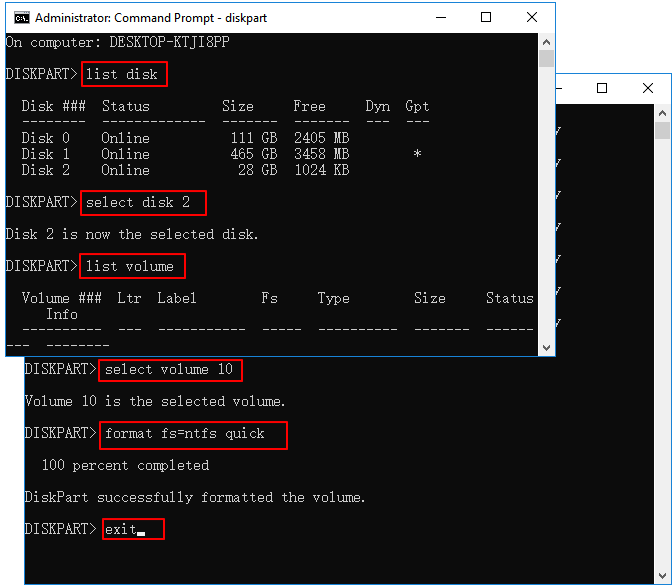
- diskpart
- list disk
- select disk + number (Replace 2 with the number of your USB drive.)
- list volume
- select volume + number (Replace 10 with the volume number of your USB flash drive.)
- format fs=ntfs quick (You can also replace NTFS with FAT32 or exFAT.)
- exit
CMD also works to fix Windows was unable to complete the format error in your computer hard drive, USB, or other storage devices.
Read Also: Format A USB Drive That Doesn’t Show Up
#2. Format USB flash drive using Command Prompt in Windows 8/7:
If you are using a Windows 8/7 system, here are the steps that you can follow to format USB using the command prompt:
Step 1. Connect your USB drive to the computer.
Step 2. Open File Explorer and remember the drive letter of your USB drive.
Step 2. Right-click the start menu and select «Search.»
Step 3. Type cmd right-click Command Prompt and select «Run as Administrator».
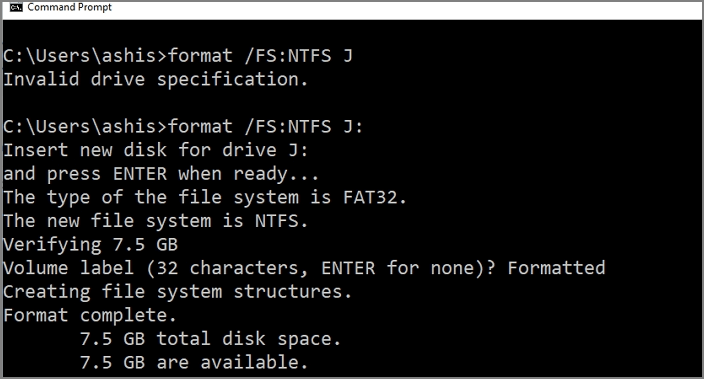
Step 4. Enter Command Prompt and type the following command lines one by one, and hit Enter each time:
- format /FS:NTFS J (You relace J with the drive letter of your USB.)
- exit
Bonus Tip: Clean and Format USB Using CMD
If you want to clear everything on your USB drive and re-use it for other purposes, you can try the listed steps here for help by using CMD:
Step 1. Right-click the Windows icon or Start menu, type cmd, right-click command prompt and select «Run as Administrator».
Step 2. Type the command lines below one by one and hit Enter each time:
- diskpart
- list disk
- select disk 2 (Replace 2 with the number of your USB drive.)
- clean
- create partition primary
- format fs=ntfs
- assign

After this, exit DiskPart, and you can save data to your USB flash drive again. However, as the Linux file system Ext2/3 is not compatible with Windows OS, you can refer to a UBS format tool in Part 1 for help.
Do you think the guide mentioned above is helpful? If you indeed solve your problems, you can share this article to help your friends who are facing the same situation
Video Tutorial on Formatting USB via CMD
Here, this video covers the above two methods, and you may follow them to reset your USB flash drive or USB external disk as fresh as new:
Fix Existing Errors While Formatting USB from Command Prompt
Some USB users reported that they encountered some errors while formatting the USB from CMD.
Here, we’ve collected two common errors in formatting USB using CMD; if you get the same errors, don’t worry. You can follow the provided solutions to resolve them:
Error 1: Diskpart format fs=ntfs stuck at 0, 10, 11, 12…
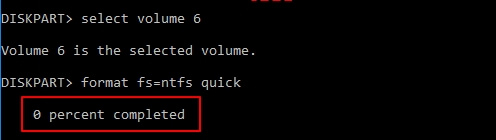
If the formatting process gets stuck in DiskPart, as shown in the message, don’t worry. You have two ways to go:
- #1. Just wait for the formatting process to complete.
- #2. Close CMD and turn to EaseUS Partition Master in Part 2 to format your drive.
Error 2: Diskpart has encountered an error: Access is denied. See the System Event Log for more information.

If you come across this issue, click the link below to get rid of the problem:
The End Line
Due to its portability, flexibility, large storage size, and reasonable price, the USB flash drive is still the No.1 external storage device around the world.
While using USB for data transfer or storage, USB flash drive problems also increase. Formatting a USB flash drive is one of the top issues.
We included two USB formatting tools on this page to help you format USB using CMD or CMD alternative — EaseUS Partition Master. You may pick up a suitable tool and follow the respective tutorial guide to make your USB flash drive work normally.
For an easy and free formatting resolution, take EaseUS Partition Master as your first choice. It’s a perfect CMD alternative tool that can help you anytime.
People Also Ask About Format USB Using CMD
Some of you may have more questions about formatting USB. Here, we collected some top questions of concern and listed the answers below. If you have the same doubts, check out the answers now.
1. Why do you need to format a USB flash drive?
Usually, HDDs and SSDs are widely used for OS installation and data storage, and removable storage devices like USB flash drives are used more for data transfer and storage. But the USB flash drive may become inaccessible, and you’ll need to format it so as to make it work again.
Here is a list of reasons why you and other USB users need to format the flash drive:
- 1. RAW, invalid, or unrecognized USB file system
- 2. USB flash drive corruption
- 3. Virus infection
- 3. USB is write-protected
- 3. Change the USB file system to NTFS, FAT32, or Ext 2/3/4 by formatting
2. How to format USB using cmd?
The process of formatting a bootable USB flash drive is almost the same as the process shown on this page. You can apply CMD to format it with the listed steps here:
- Type «diskpart» and press Enter. This command will open a diskpart window.
- Type «list disk» and press Enter. This command will list all your disks on the computer.
- Type «select disk [Your disk]» and press Enter. Replace Your disk with the correct disk label or number.
- Type «clean» and press Enter. Wait a little bit while Command Prompt formats your USB drive.
- Type «create partition primary» and press Enter. This command will create new partitions on your USB.
- Type «format fs=ntfs» and press Enter. This command will format your USB to ntfs format.
- Type «assign letter=[letter]» and press Enter. This will give an exact letter to your USB drive.
- Type «exit» and press Enter. This command exits diskpart.
3. How to format write-protected USB using cmd?
Here are the steps that you can follow to format a write-protected (read-only) USB using the command lines below:
- Step 1. Press «Win + R,» and type cmd to open «Command Prompt.»
- Step 2. Type diskpart and hit Enter.
- Step 3. Type list disk and hit Enter.
- Step 4. Type select disk 2 and hit Enter. (Replace 2 with the write-protected device number) and hit Enter.
- Step 5. Type attributes disk clear readonly and hit Enter.
- Step 6. Type exit to close the diskpart window.
Once the write protection removal process is complete, you can format the USB drive again. You can either apply EaseUS Partition Master, Windows File Explorer, or even the CMD command as shown in Part 2 to format the USB drive.
4. Windows was unable to complete the format, how to fix it?
When you use File Explorer to format the USB flash drive, it warns you that ‘Windows was unable to complete the format’, don’t worry. Here are 7 ways that you can try to fix this error:
- #1. Use EaseUS Partition Master
- #2. Use Diskpart Command
- #3. Use Disk Management
- #4. Clear Virus and Complete the Format
- #5. Remove Write Protection and Complete the Format
- #6. Fix Disk Errors and Complete the Format
- #7. Repair Bad Sectors and Complete the Format
Note that you can try the above two tutorials to format your USB flash drive and resolve this issue.
Можете ли вы форматировать SD-карту Через CMD? Форматирование SD-карты становится необходимым, если она показывает признаки повреждения или когда вы хотите стереть все данные, так как больше не нуждаетесь в них. Есть много способов форматирования SD-карты. Но CMD — это мощный инструмент, который может отформатировать карту памяти без проблем с помощью нескольких простых команд. В этой статье мы расскажем, как отформатировать SD-карту с помощью CMD и что делать, если вы не можете использовать CMD для форматирования. Если вы потеряли данные из-за форматирования, есть дополнительный совет по их восстановлению. Ну что ж, давайте читать дальше.
- Часть 1: Что вы должны знать перед форматированием SD-карты
- Часть 2: Шаги по форматированию SD-карты с помощью CMD
- Часть 3: Почему я не могу отформатировать SD-карту с помощью CMD и как это исправить?
- Бонусный совет: Что делать, если файлы на моей SD-карте потеряны после форматирования?HOT
Часть 1: Что вы должны знать перед форматированием SD-карты
Прежде чем рассказать, как отформатировать sd карту через cmd, мы расскажем вам об основах:
Что такое SD-карта и как она работает?
SD-карта — это внешнее устройство хранения данных, используемое в ноутбуках, мобильных телефонах, цифровых камерах и многом другом. Карта предлагает обширное пространство для хранения данных в небольшом корпусе. Она также портативна, что позволяет легко передавать данные между различными устройствами.
Когда следует форматировать SD-карту?
Есть две причины, по которым может потребоваться форматирование SD-карты. Во-первых, если она работает нестабильно и не определяется устройством. Во-вторых, если вы хотите удалить данные карты, так как больше не нуждаетесь в них.
Что такое CMD и как это работает?
CMD — это аббревиатура от Command и относится к встроенному инструменту «Командная строка» в Windows. Это мощный инструмент, который выполняет команды, введенные пользователем для различных функций. Вы можете запустить его, набрав «cmd» в строке поиска Windows.
Вот как отформатировать SD-карту с помощью CMD в Windows 10:
- Откройте «Панель поиска Windows». Затем введите «cmd».
- Появится окно «Командная строка». Запустите его с правами администратора.
- Введите «diskpart». Нажмите «Enter». Затем введите «list disk». Это поможет определить SD-карту из списка дисков.
- Проверьте номер диска вашей SD-карты. Введите «select disk», затем номер вашей SD-карты. И выберите вашу SD-карту из списка.
- Введите «clean». Это удалит все данные с SD-карты.
- Теперь вам нужно создать новый раздел на карте памяти. Введите «create partition primary». Нажмите «Enter».
- Затем введите «format fs=fat32». Нажмите «Enter». fs — это сокращение от file system (файловая система), а fat32 — это формат файлов, известный как Таблица распределения файлов (File Allocation Table). Если вы планируете сохранить на SD-карте файлы размером более 4 ГБ, форматируйте ее в файловой системе exFAT вместо fat32.
- Назначьте вашей SD-карте букву диска для удобного доступа из Проводника. Затем введите «assign letter f». Вместо f вы можете назначить любую другую букву на ваш выбор. В итоге, вот как отформатировать SD-карту с помощью CMD.
Часть 3: Почему я не могу отформатировать SD-карту с помощью CMD и как это исправить?
Если вы не можете отформатировать SD-карту через CMD, причин может быть много. Ниже приведены некоторые примеры, почему форматирование SD-карты может не удаться. Мы также указали решения для устранения этих ошибок.
Причина 1: SD-карта имеет статус «Только для чтения».
Форматирование карты памяти через CMD может быть невозможным, если карта имеет статус «только для чтения». Это значит, что содержимое вашей карты памяти может быть прочитано, но вы не можете удалять или редактировать существующие данные или добавлять новые файлы.
Решение 1:
Вы можете снять статус «Только для чтения» следующими способами:
Переместите переключатель: Некоторые карты памяти имеют переключатель «только для чтения». Вы можете переместить его, чтобы отключить этот статус карты.
Удалить защиту от записи: Другой способ снять защиту от записи или статус «только для чтения» — это через программную команду. Если вы сталкиваетесь с ошибкой при использовании CMD для форматирования SD-карты, следуйте шагам, указанным ранее в «Части 2», и добавьте дополнительный шаг.
После ввода «select disk», за которым следует номер SD-карты, введите команду «attributes disk clear read-only». Эта команда уберет статус «только для чтения» у SD-карты, который не позволяет вам добавлять или редактировать ее содержимое.
Причина 2: Файловая система повреждена.
Если вы не можете отформатировать SD-карту, возможно, ее файловая система повреждена или на ней есть плохие сектора. В этом случае утилита CHKDSK может пригодиться. Вы можете использовать ее, если на SD-карте есть логические ошибки, такие как поврежденные записи в Главной таблице файлов (MFT), неправильные временные метки или информация о конкретном файле. Или вы можете использовать CHKDSK для исправления мягких и жестких плохих секторов.
Решение 2:
Вот как использовать CHKDSK:
- Подключите SD-карту к вашему компьютеру. Найдите ее букву диска в Проводнике Windows.
- Откройте «Панель поиска Windows». Введите «cmd».
- Откроется окно «Командная строка». Запустите его с правами администратора.
- Введите «chkdsk h: /f». Здесь H — это буква диска SD-карты, а f — параметр, который будет исправлять проблемы на вашей SD-карте.
Вы также можете присвоить различные параметры, такие как f, для разных функций, например, /p для глубокого поиска. Или введите /r для поиска плохих секторов и извлечения читаемых файлов с SD-карты.
Причина 3: Буква диска SD-карты не отображается.
Форматирование SD-карты через CMD невозможно, если ваш компьютер не распознает ее букву диска. Вы можете исправить эту проблему, используя инструмент Управление дисками, чтобы изменить букву диска вашей SD-карты.
Решение 3:
Вот как исправить проблему с невидимой буквой диска SD-карты с помощью Управления дисками:
- Откройте «Панель поиска Windows».
- Введите «Управление дисками». Запустите его с правами администратора.
- Щелкните правой кнопкой мыши по SD-карте и выберите «Изменить букву диска и пути».
- Назначьте новую букву диска для вашей SD-карты. Нажмите «ОК».
Причина 4: SD-карта заражена вирусом.
Вирусная инфекция или вредоносное ПО сделают SD-карту непригодной для использования. Ваш компьютер также может быть заражен. Поэтому перед тем, как подключить вашу SD-карту к компьютеру для форматирования, установите надежную антивирусную программу, например, AVG.
Решение 4:
Сначала выполните сканирование на компьютере, чтобы удалить вирус, затем подключите к нему вашу SD-карту и выполните сканирование карты памяти на наличие вирусов. Как только вы убедитесь, что все вирусы удалены как с компьютера, так и с SD-карты, попробуйте снова отформатировать карту памяти.
Бонусный совет: Что делать, если файлы на моей SD-карте потеряны после форматирования?
Вы должны знать, что форматирование SD-карты может стереть данные. Однако файлы никогда не удаляются окончательно и остаются скрытыми на карте до тех пор, пока вы не перезапишете их. Таким образом, если у вас нет резервной копии и данные были потеряны из-за форматирования, есть отличный способ восстановить их в первоначальное состояние. 4DDiG Data Recovery — профессиональный инструмент для извлечения файлов, может восстановить удаленные, скрытые, потерянные, отформатированные и поврежденные файлы в трех простых шагах с вашей SD-карты.
Вот что еще может 4DDiG:
- Простой графический пользовательский интерфейс.
- Он восстанавливает аудио, видео, документы и изображения с SD-карт, USB-накопителей, корзины для мусора, жестких дисков и цифровых камер.
- Он извлекает более 1000 популярных форматов файлов без проблем.
- Использует быстрое сканирование для поиска на поверхности или глубокое сканирование для более глубокого поиска данных.
- Извлекает файлы, потерянные из-за форматирования, случайного удаления, плохих секторов, проблем с разделами, поврежденных систем или вирусных атак.
- Использует передовой алгоритм для экономии времени восстановления данных.
Следуйте приведенным ниже шагам, чтобы восстановить данные с SD-карты, потерянные из-за форматирования, с помощью 4DDiG:
- Подключите отформатированную SD-карту к вашему ПК. Скачайте и установите инструмент восстановления данных Tenorshare 4DDiG на ваш компьютер. Откройте программу и выберите SD-карту, на которой вы потеряли данные.
- Нажмите кнопку «Старт» для поиска данных, потерянных из-за форматирования. Вы можете использовать фильтр, чтобы сузить поиск до отформатированных или удаленных данных. Кроме того, вы можете приостановить сканирование для предварительного просмотра целевых файлов.
- Как только инструмент восстановит все ваши целевые файлы, нажмите «Восстановить», чтобы сохранить их на диске вашего ПК. Не восстанавливайте файлы на SD-карте, где вы их потеряли. Сохраняйте их на вашем ПК, чтобы избежать окончательной потери данных.
Заключение
Итак, это все, что нужно было знать о том, как как отформатировать sd карту через cmd. Это мощный инструмент, который использует интерпретатор команд diskpart для форматирования карты памяти без каких-либо проблем. Если при форматировании SD-карты с помощью CMD возникают проблемы, следуйте решениям, которые мы упомянули выше, чтобы исправить их. Просто помните, что форматирование также может привести к потере данных. Однако вы можете восстановить их с помощью the лучшего инструмента для восстановления данных с SD-карты. Это простой в использовании многофункциональный инструмент, который будет реконструировать отформатированные данные, делая их восстанавливаемыми. Вы также можете использовать его для извлечения скрытых, потерянных, удаленных и поврежденных файлов. Он может восстанавливать более 1000 типов файлов с любых устройств хранения данных.
Tenorshare 4DDiG Data Recovery
4DDiG — это ваш непревзойденный выбор для восстановления всех потерянных данных на компьютере Windows / Mac после различных сценариев потери, таких как удаление, форматирование, RAW и т.д. с более высокой вероятностью успеха.
Скачать Бесплатно
Скачать Бесплатно
Купить Сейчас
Купить Сейчас