
If you need to format a USB flash drive, HDD, SDD, or some other form of storage to FAT32, you’ve come to the right place.
In this article we’ll go over what a file system is, the FAT32 standard, and several ways to format a storage device to FAT32 on Windows 10.
What’s a file system?
A file system is a standardized way of organizing data on a computer storage device like a flash drive or HDD.
A file system divides a storage device into virtual compartments, almost like a wall of post office boxes, and keeps track of all the information that gets stored in each box.
Some of the most common file system formats for portable storage devices are FAT32, NTFS, and ExFAT.
FAT32 compared to other formats
Of those three common formats, FAT32 is the oldest and most widely supported. Every major operating system will allow you to read and write from a USB flash drive that’s formatted to FAT32.
Meanwhile, macOS can only read NTFS drives, and you would need to install third-party software to write back to the drive.
However, though FAT32 is well supported, its maximum drive and file size is severely limited when compared to newer formats like NTFS and ExFAT:
| Max drive size | Max file size | Windows | macOS | Linux | |
| FAT32 | 32 GB (Windows), up to 16TB (Other OSs) | 4 GB | Read/Write | Read/Write | Read/Write |
| NTFS | 8 PB* | 16 EB** | Read/Write | Read | Read/Write |
| ExFAT | 128 PB* | 16 EB** | Read/Write | Read/Write | Read/Write |
* 1 petabyte is about 1 thousand terabytes
** 1 exabyte is about 1 million terabytes
Note that the maximum drive and file size of NTFS and ExFAT is so large that there’s basically no limit. (But it would be nice to have a 128 PB USB drive, wouldn’t it?)
On the other hand, FAT32’s max file size of 4 GB is almost nothing now that phones can record 4K videos. Also, it’s a little more difficult to format a drive larger than 32 GB to FAT32 on Windows 10.
These days, the only reason why you’d choose to format a drive to FAT32 is for compatibility. For example, if you need to boot up an old computer, maybe with a different operating system, and backup some of its files. But you’d need to be sure that none of those files are greater than 4 GB.
If you’re sure you want to go with FAT32, here’s how to format a storage drive on Windows 10.
Important note: Before you format a drive, make sure that you backup all of your important files. In fact, make two backups, and keep one on a remote service like Google Drive or Dropbox.
Formatting a drive will delete all of the data that’s currently on it.
How to use Windows File Explorer to format a USB drive to FAT32
A quick note about this method: it only works on USB flash drives that are less that 32 GB. If your USB drive is larger than 32 GB, check out one of the later methods.
With that out of the way, plug your USB drive into your computer and open Windows File Explorer.
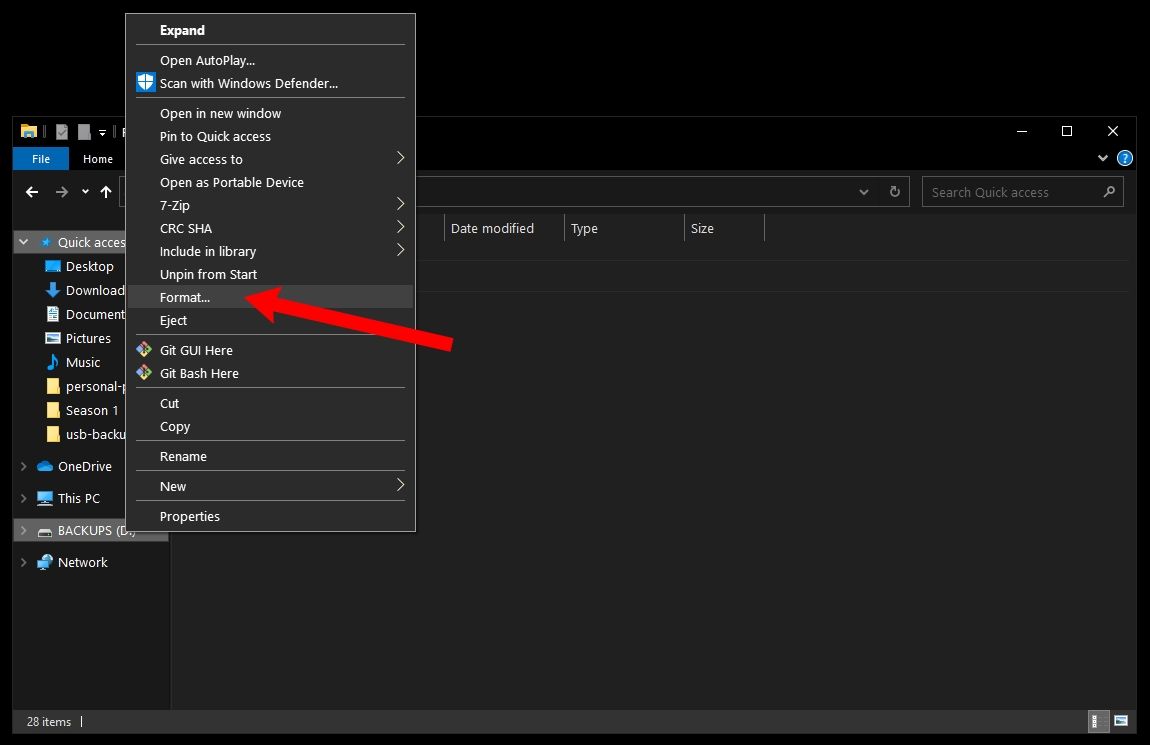
Next, right-click on the drive on the left hand side of the File Explorer window and click «Format»:
In the window that pops up, ensure that «FAT32» is selected. Also, feel free to rename the USB drive whatever you’d like:
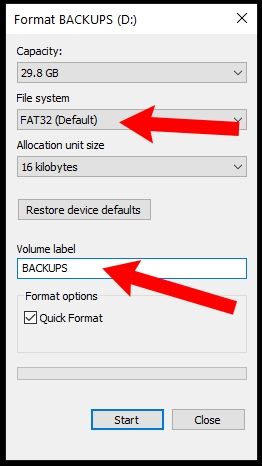
You can leave the rest of the options alone. Just click start to format your drive.
Once it’s done, your USB drive should be formatted to use the FAT32 file system.
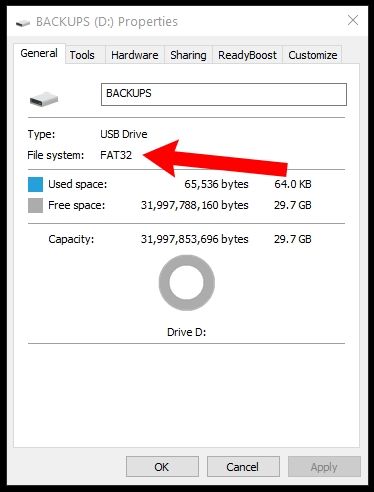
To double check this, open File Explorer, right click on your USB drive, and click «Properties».
A window will pop up and you should see that the file system is now FAT32:
If your USB drive is larger than 32 GB, you’ll need to use a third-party program like Rufus to format it.
There are lots of other programs that can format USB drives, but Rufus is really small and portable. This means you can stick Rufus right on a USB drive, plug it into any Windows computer, and format other drives on the go.
After you download Rufus, double click on the .exe file to start the application.
Make sure your USB drive is selected. Then, click the «Boot selection» dropdown and select «Non bootable»:

Next, click the «File system» dropdown and select «FAT32».
Also, feel free to change the name of your USB drive under «Volume label»:

Then, click the «Start» button to format your drive. After a few seconds it’ll be formatted to FAT32.
How to use PowerShell to format a USB drive to FAT32
While this method works with drives larger than 32 GB, it’s really slow – even formatting a 32 GB drive can take up to an hour depending on your computer.
But, if you aren’t able to use the previous two methods for some reason, this will work in a pinch.
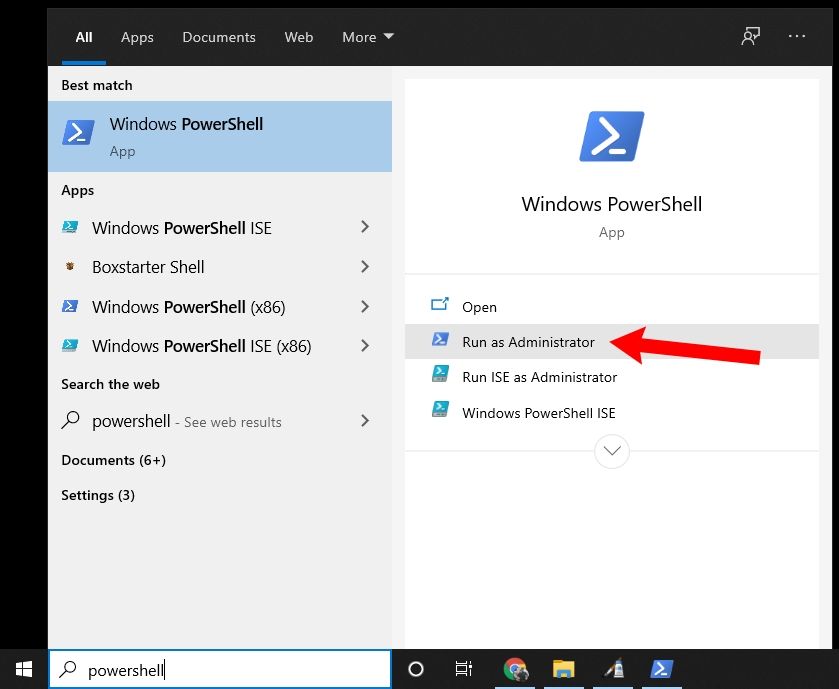
First, click on the Windows Search Bar and type in «powershell». Then, click «Run as administrator» to launch PowerShell with elevated privileges:
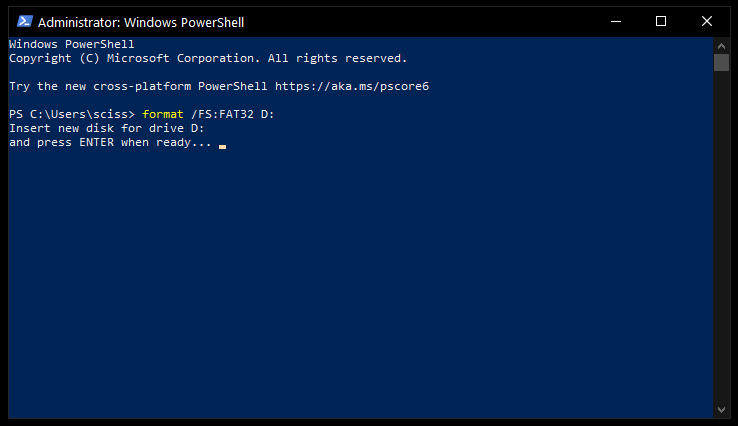
In the PowerShell terminal, enter the following command:
format /FS:FAT32 DRIVE_LETTER:
Use the File Explorer to double check your drive letter. My drive letter was D, so I entered format /FS:FAT32 D:.
Press Enter, make sure your USB drive is plugged in, and press the Enter key again to start the process:
Then go run some errands or something – it will take awhile.
Once the format command is finished, your drive should be formatted to FAT32.
In closing
Now you should be able to format a USB drive of any size to FAT32 on Windows 10. And with just a little modification, any of these methods can be used to format your drive to another file system like NTFS or ExFAT.
Now get out there and format all your USB drives. (But only after you backup everything important!)
Was this helpful? Is there a better method that you know of? Tweet at me and let me know how you format things on Windows 10.
Learn to code for free. freeCodeCamp’s open source curriculum has helped more than 40,000 people get jobs as developers. Get started
Недавно на сайте была опубликована статья о том, какую файловую систему выбрать для флешки внешнего жесткого диска — FAT32 или NTFS. Теперь же — инструкция о том, как отформатировать флешку в FAT32. Задача не сложная, но в некоторых случаях возможны проблемы: отсутствие выбора нужной файловой системы или сообщения о том, что том слишком велик для конечной файловой системы.
В данной инструкции по порядку рассмотрим, как это сделать в Windows 11 и 10 (и предыдущих версиях), Mac OS X и Ubuntu Linux. Также может оказаться полезным: Что делать, если Windows не удается завершить форматирование флешки или карты памяти.
Форматирование флешки в FAT32 в свойствах диска
Первый вариант — самый быстрый и простой, но сработает не для любых накопителей. Необходимые шаги:
-
- Подключите флешку к компьютеру и откройте «Мой компьютер». Кстати, вы можете сделать это быстрее, если нажмете клавиши Win + E (латинская E).

- Кликните правой кнопкой мыши по нужному USB накопителю и выберите пункт контекстного меню «Форматировать».
- Подключите флешку к компьютеру и откройте «Мой компьютер». Кстати, вы можете сделать это быстрее, если нажмете клавиши Win + E (латинская E).

- Выберите нужную файловую систему в списке и, при необходимости, укажите остальные параметры (можно оставить по умолчанию). Всё, что останется сделать — нажать кнопку «Начать», ответить «ОК» на предупреждение о том, что все данные на диске будут уничтожены.
В результате накопитель будет отформатирован и вы увидите сообщение о том, что форматирование завершено.
В командной строке
Если файловая система FAT32 не отображается в диалоговом окне форматирования, можно использовать командную строку для форматирования с помощью команды FORMAT или утилиты DISKPART.
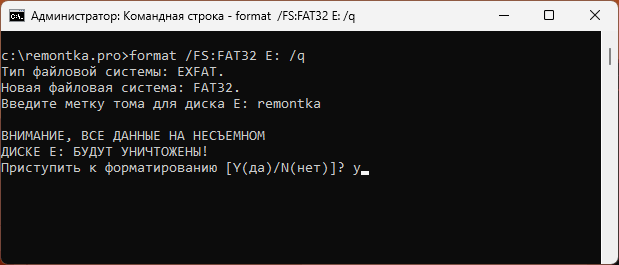
В первом случае достаточно запустить командную строку (лучше — от имени администратора) и ввести команду (заменив букву диска E на нужную):
format /FS:FAT32 E: /q
После этого можно ввести метку диска (или просто нажать Enter), и подтвердить форматирование накопителя нажатием клавиши Y с последующим вводом:
Вторая возможность — использование команд DISKPART:
- Запустите командную строку от имени администратора.
- По порядку выполните команды (заменив N на номер диска в 3-й команде):
diskpart
list disk
select disk N
clean
create partition primary
format fs=fat32 quick
exit

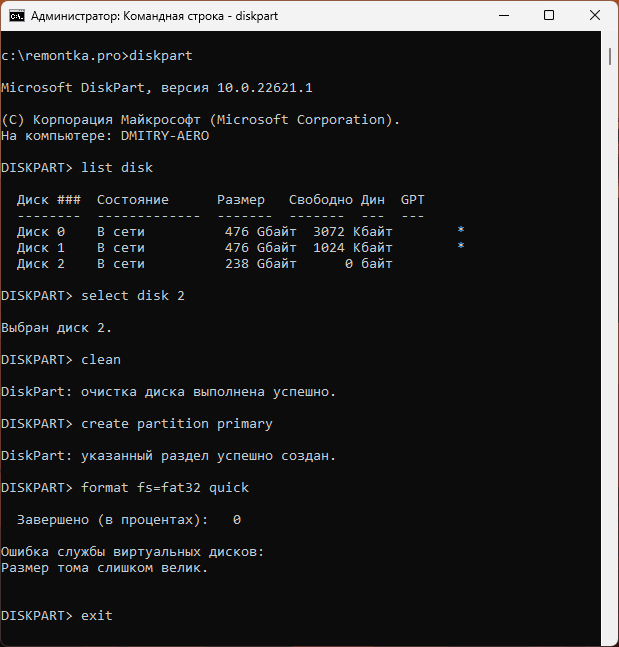
Если всё прошло успешно, флешка будет отформатирована, иначе придётся прибегнуть к следующему способу.
Утилита FAT32 Format (форматирование флешки большого размера)
При попытке форматирования USB-накопителя большого размера в FAT32 в Windows вы можете столкнуться с проблемами:
- Отсутствие возможности выбрать файловую систему FAT32 в диалоговом окне форматирования
- Сообщение о том, что том слишком велик для FAT32 в командной строке или DISKPART


При этом в действительности размер раздела FAT32 может быть равным 2 Тб, ограничения накладывает лишь Windows. Их можно обойти с помощью сторонних программ для форматирования, в частности — FAT32 Format:
- Скачайте GUI-версию приложения FAT32 Format с официального сайта (загрузка производится при нажатии на скриншот окна программы) и запустите её.
- Выберите вашу флешку в списке доступных (чтобы она отображалась в списке, ей должна быть назначена буква) и нажмите кнопку Start (параметры можно оставить заданными по умолчанию).

- Подтвердите форматирование накопителя и то, что вы осознаете, что данные с него будут удалены.
- Дождитесь завершения форматирования.


Готово, флешка, независимо от её размера (если он не превышает 2 Тб) будет успешно отформатирована в файловую систему FAT32.
Как отформатировать флешку в FAT32 в MacOS
Если вы владелец компьютера или ноутбука с MacOS, для форматирования можно использовать дисковую утилиту:
- Откройте дисковую утилиту (Запустите Finder — Приложения — Дисковая утилита)
- Выберите флешку, которую следует отформатировать и нажмите кнопку «Стереть»
- В списке файловых систем выберите FAT32 и нажмите стереть, дождитесь, когда процедура будет завершена. Не отключайте USB накопитель во время форматирования.
В Ubuntu Linux
Для форматирования флешки в FAT32 в Ubuntu, найдите в поиске приложений «Диски» или «Disk Utility», если вы используете английский язык интерфейса. Откроется окно программы. В левой части выберете подключенную флешку, после чего с помощью кнопки с иконкой «настроек», вы можете отформатировать флешку в нужный вам формат, в том числе, в FAT32.

Кажется, рассказал обо всех наиболее вероятных вариантах при процедуре форматирования. Учитывайте, что в современных реалиях более осмысленным может быть форматирование в ExFAT — как наиболее совместимый вариант файловой системы без ограничений, присущих FAT32.
Step-by-step guide to format USB drives to FAT32.
Published
6 min read
How to Format a USB Drive to FAT32 on Windows 11 or Windows 10
Formatting a USB drive to FAT32 is a common procedure that allows users to ensure compatibility across different operating systems and devices. While NTFS and exFAT file systems have their advantages, FAT32 remains a popular choice—especially for smaller drives and older hardware. This detailed guide will walk you through the steps to format a USB drive to FAT32 on Windows 11 and Windows 10, exploring various methods including using File Explorer, Disk Management, and the command prompt.
Understanding FAT32
FAT32 (File Allocation Table 32) is a file system developed by Microsoft in 1977. It has become one of the most widely supported file systems in the world. Here are some key characteristics of FAT32:
- Compatibility: Works on various platforms including Windows, macOS, Linux, game consoles, and other devices.
- File Size Limit: The maximum size of any single file that can be stored in FAT32 is 4 GB.
- Volume Size Limit: The maximum size of the volume (USB drive) that FAT32 can support is 8 TB, but due to certain limitations, it is often formatted to smaller sizes for practical use.
Given these characteristics, FAT32 is ideal for USB drives used for file transfers, especially for devices that limit file size and type.
Reasons to Format a USB Drive
Before diving into the formatting steps, it’s important to note why you might want to format a USB drive to FAT32:
- Improved Compatibility: If you plan to use the USB drive with various devices like cameras, gaming consoles, or older computers, FAT32 will likely provide the best compatibility.
- Elimination of Corruption: Formatting can help resolve file system corruption issues on the drive.
- Organization: A fresh format can help in organizing the data better, making it easier to store and retrieve files.
- Securing Personal Data: If you’re selling or giving away your USB drive, formatting will help remove personal files.
Preparing to Format
Before formatting your USB drive, here are some preliminary steps you should take:
-
Backup Data: When you format a drive, all the existing data will be erased. Make sure to back up important files to another location.
-
Check Drive Size: The size of the USB drive being formatted matters. While FAT32 can support larger drives, any single file larger than 4 GB will not be transferable to a FAT32 drive.
-
Connect the USB Drive: Insert the USB drive into a USB port on your computer. Make sure it is properly recognized.
Method 1: Formatting Using File Explorer
One of the simplest ways to format a USB drive to FAT32 on Windows 10 or Windows 11 is through File Explorer. Here’s how:
-
Open File Explorer: Press
Windows + Eor click on the File Explorer icon in your taskbar. -
Locate the USB Drive: In the left pane, find your USB drive under “This PC.” It will often be labeled with the drive letter (e.g., E:, F:).
-
Right-Click and Select Format: Right-click on the USB drive and select “Format” from the context menu.
-
Adjust Format Settings:
- File System: Click on the dropdown menu next to “File system” and select “FAT32.”
- Allocation Unit Size: Generally, you can leave this setting as default.
- Volume Label: Here, you may input a name for your drive (optional).
-
Select Quick Format: Make sure to check the “Quick Format” option. If unchecked, it will perform a full format which takes longer but can help detect bad sectors.
-
Start Formatting: Click the “Start” button to begin the formatting process. A warning will pop up informing you that all data will be lost. Click “OK” to proceed.
-
Completion: Once the formatting is complete, a message will appear. Click “OK” and close the format window.
Your USB drive is now formatted to FAT32 and ready for use.
Method 2: Formatting Using Disk Management
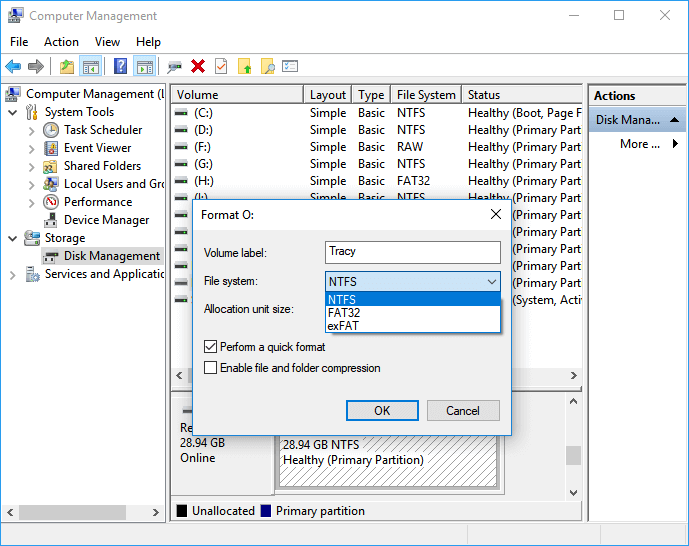
Disk Management is another tool provided by Windows that allows advanced disk management, including formatting drives. Here’s how to use it:
-
Open Disk Management: Right-click on the Start button and select “Disk Management” from the menu.
-
Locate Your USB Drive: In the Disk Management window, find your USB drive. It can usually be identified by its size.
-
Right-Click on the USB Drive: Right-click on your USB drive’s partition (e.g., Volume E:) and select “Format.”
-
Configure Format Options:
- Volume Label: Enter a name for your USB drive.
- File System: Choose “FAT32” from the list.
- Allocation Unit Size: Leave it as default.
-
Uncheck Perform a Quick Format (if necessary): While you can still perform a Quick Format, it’s sometimes advisable to perform a full format to ensure the drive is clean.
-
Start Formatting: Click “OK” and confirm any warnings presented regarding data loss and click “OK” again.
The process will take a few moments. Once complete, your USB drive will be formatted to FAT32.
Method 3: Formatting Using Command Prompt
For users who prefer more control or need to format larger drives that exceed 32 GB where File Explorer may not allow FAT32 formatting, using the Command Prompt is a robust option. Follow these steps:
-
Open Command Prompt:
- Click on the Start button, type “cmd”, and select “Command Prompt.”
- Alternatively, you can right-click the Start button and select “Windows Terminal (Admin)” or “Command Prompt (Admin).”
-
Open Diskpart Utility:
- Once Command Prompt is open, type
diskpartand hit Enter. This will launch the Diskpart utility.
- Once Command Prompt is open, type
-
List Connected Drives:
- Type
list diskand press Enter. This command will display all the drives connected to your computer.
- Type
-
Select Your USB Drive:
- Identify your USB drive in the list (e.g., Disk 1, Disk 2) based on its size.
- Type
select disk X(replace X with your USB drive’s number) and press Enter.
-
Clean the Drive:
- Type
cleanand hit Enter. This command will delete all partitions and data on the selected USB drive.
- Type
-
Create a New Partition:
- Type
create partition primaryand press Enter to create a new primary partition.
- Type
-
Format to FAT32:
- Type
format fs=fat32 quickand hit Enter. This command will format the USB drive to FAT32 using a quick format.
- Type
-
Assign a Drive Letter:
- Type
assignand press Enter. This command assigns the next available drive letter to the USB drive.
- Type
-
Exit Diskpart:
- Enter
exitand press Enter to leave the Diskpart utility.
- Enter
-
Close Command Prompt:
- Type
exitagain and hit Enter.
- Type
Your USB drive is now successfully formatted to FAT32 via the Command Prompt!
Troubleshooting Common Issues
While formatting a USB drive can usually be straightforward, you may encounter a few issues. Below are some common problems and their fixes:
-
Drive Not Detected: If the USB drive does not appear in
File ExplorerorDisk Management, try reconnecting it or using another USB port. -
Drive Write Protection: If you cannot format the drive, it might be write-protected. Check for any physical switches on the drive or use the Diskpart command to remove write protection.
-
Cannot Format Larger Drives: Sometimes, Windows will not allow you to format drives larger than 32 GB to FAT32 using File Explorer or Disk Management. In this case, use the Command Prompt method as detailed above.
-
Drive Is In Use: Ensure no files on the USB drive are open or in use. Close any programs that may be accessing the drive.
-
Corrupted Drive: If you continue to experience errors, the drive may be corrupted. In such cases, you might need to attempt recovery tools or format using specialized software.
Conclusion
Formatting a USB drive to FAT32 on Windows 11 or Windows 10 is a simple yet vital process for maximizing compatibility across hardware and software platforms. By following the methods outlined in this guide, including using File Explorer, Disk Management, or the Command Prompt, users can efficiently prepare their USB drives for various purposes.
Always remember to back up any important data before formatting and make sure your choice of file system aligns with your needs. Whether for file transfer, backup solutions, or sharing files with friends and devices, knowing how to format a USB drive is a valuable skill in today’s digital age. Enjoy your newly formatted FAT32 USB drive and the seamless experience it provides!
Updated on Apr 28, 2025
On Windows 10/8.1/8/7, there are typically four ways to format USB to FAT32, which has the greatest compatibility compared to other file systems. For small capacity flash drives, pen drives, or SD cards that range from 2GB-32GB, any of the four methods are workable. However, for USB flash drives, HDDs, or external hard drives that exceed 32GB, the applicable tools will be restricted to the third-party best USB format tools and the Windows Command Prompt.
For both average and advanced users, the four ways can help you. The first one can save your time as much as possible.
1. (lifewire-recommend) Third-party USB Format tool
2. Windows 10 Explorer Quick Format
3. Windows 10 Disk Management Format
4. Windows Command Prompt
Video Guide: How to Format to FAT32 in Windows 10 in 4 Ways
Can’t format to FAT32 in Windows 10 with all given disk formatting tools? Directly jump to the final part to get additional fixes for «Cannot Format to FAT32» in Windows 10.
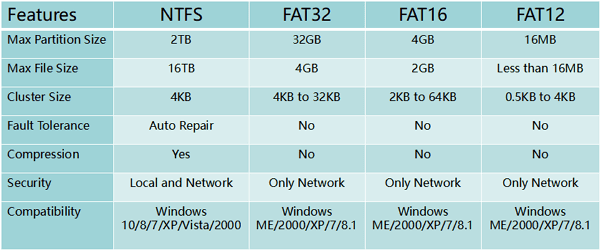
About File Systems (FAT32 Format, FAT16, FAT12, NTFS)
In computing, a file system controls how data is stored and retrieved. The common Windows file systems include FAT16, FAT32, and NTFS, etc. Users can convert their USB flash drives or external hard drives between different file systems. In the chart below, we have listed features of four common file systems, giving detailed information from max partition size to the compatibility of these file systems.
- Notice:
- Formatting a USB drive or external hard drive will remove all existing files on the device. Please make sure you have backed up files before formatting to avoid further data loss.
Solution 1. Format to FAT32 Using FAT32 Formatter Windows 10
USB requirements: none
A professional third-party Windows 10 FAT32 formatting tool can make the formatting process simple and secure. We recommend you try EaseUS Partition Master with its Format feature. Besides FAT32, it also supports format USB to NTFS, EXT2, EXT3, and ReFS.
Download this partition magic now, and follow the simple steps to freely format USB to FAT32 in Window 10.
lifewire.com: EaseUS Partition Master Free Edition is incredibly simple to use.
- Right-click the external drive or USB you intend to format and choose «Format».
- Set the Partition label, File system (NTFS/FAT32/EXT2/EXT3/EXT4/exFAT), and Cluster size if you intend to change. Then click «OK».
- Click «Yes» to continue.
- Click the «Execute 1 Task(s)» button and click «Apply» to format your selected external hard drive or USB stick.
You May Also Like:
How to Partition Hard Drive in Windows 10
With this FAT32 formatted, you can also repartition the volumes on your HDD/SSD, external storage devices. Follow to learn how to partition a hard drive on your own.
Solution 2. Format FAT32 Windows 10 via File Explorer
USB requirements: no more than 32GB. Otherwise, you can only choose to format USB to NTFS.
To format USB under 32GB to FAT32 in Windows 10 Explorer, follow the three steps:
Step 1. Connect USB or external hard drive to Windows 10 PC.
Step 2. Open File Explorer, locate and right-click on the USB drive, select «Format».
Step 3. Set the FAT32 as the target file system, tick «Quick Format» and click «Start» to start the formatting.
When the process completes, click «OK» to confirm. And now your USB is FAT32.
Read Also: Format A USB Drive That Doesn’t Show Up
Solution 3. Format USB/External Drive to FAT32 with Disk Management
USB requirements: Similar to the Explorer, your USB drive has to be under 32GB in order to format to FAT32 within the program
Follow the 3-step guide here to format to FAT32:
Step 1. In Windows 10, go to This PC > Manage > Disk Management.
Step 2. Locate and right-click on your USB flash drive or external hard drive, select «Format».
Step 3. Set the USB file system to FAT32, tick «Perform a quick format» and click «OK» to confirm.
Solution 4. Format to FAT32 Format Windows 10 Using Command Prompt
USB requirements: none
Some experienced users or administrators prefer to use command lines to execute some operations on Windows PC. It’s also an applicable way to format your flash drive or external hard drive to FAT32 in Windows 10.
Note: Be careful while using command lines on your PC to format USB drive. Any improper operations would cause serious issues.
There are two options for you to use Command Prompt, and if they do work on your issue, share this article to help more users.
Here are the details of how to use CMD, DiskPart, or PowerShell command lines formatting device:
Option 1. Use CMD — Command Prompt/Diskpart Format FAT32
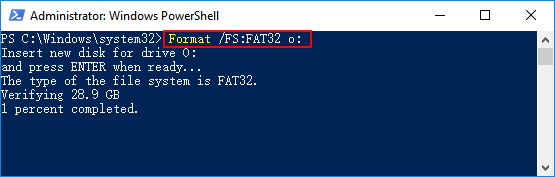
Step 1. Type command prompt in Windows 10 search bar or right-click on «Windows icon» > select «Search», and type cmd.
Step 2. Right-click on «Command Prompt» and select «Run as Administrator».
Step 3. Check the USB label and type format /fs:FAT32 o: at the prompt and hit «Enter». (Replace O: with the drive letter of your USB drive.)
Windows 10 will begin formatting the USB flash drive or external hard drive into FAT32.
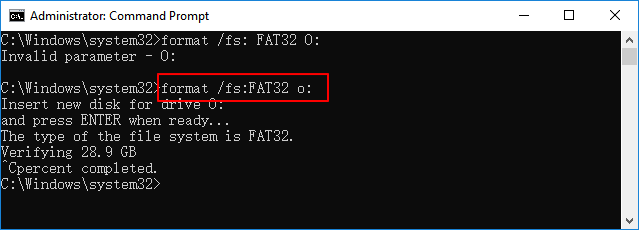
Step 4. Type exit when the process has completed.
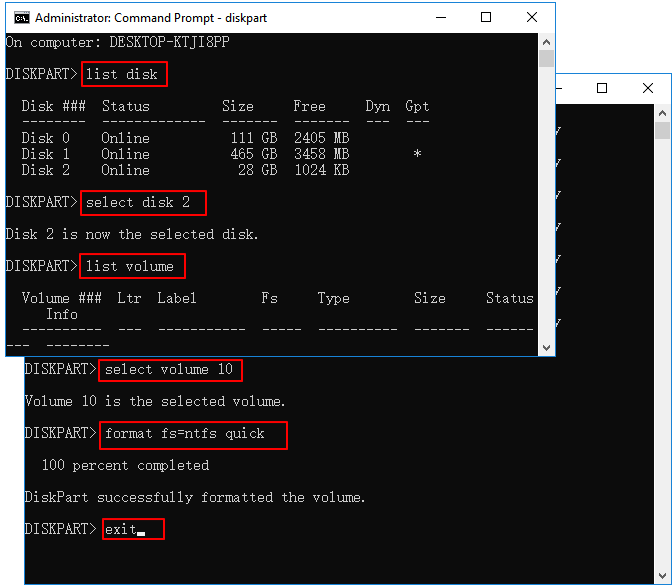
Option 2. Use DiskPart
Step 1. Type diskpart in Windows search bar and hit Enter.
Step 2. Hit Enter each time when you type the below command lines to quick format hard drive:
- list disk
- select disk 2 (Replace 2 with your USB disk number)
- list volume
- select volume 10 (Replace 10 with the volume number of the USB drive that you want to format)
- format fs=fat32 quick
Step 3. Type exit and hit Enter to close the program when DiskPart reports it has successfully formatted the USB.
Video Tutorial You May Also Like:
Option 3. Use PowerShell
Step 1. Right-click on the Windows icon and select «Windows PowerShell Admin», click «Yes» to open it.
Step 2. Check the USB drive label, type Format /FS:FAT32 o: in PowerShell, and hit Enter.
Step 3.Type exit when the formatting process completes.
Video Guide: 4 Ways to Format to FAT32 in Windows 10
01:30 Method 1. Format the drive in File Explorer
02:13 Method 2. Format the drive in Disk Management
02:46 Method 3. Format the drive using DiskPart
03:49 Method 4. Apply EaseUS Partition Master to Format Drive
Additional Fixes for «Cannot Format to FAT32» in Windows 10
If you met a problem while formatting USB or Windows warns that Windows was unable to complete the format, don’t worry. In this part, you’ll learn why you can’t format to FAT32 in Windows 10 and how to resolve this issue effectively.
Reasons for Why You Can’t Format to FAT32
To find the right solution for your case, it’s important to find out the reason that is causing the FAT32 format option not available. Here are the main reasons:
- 1. File system error, bad sectors exist on USB/external hard drive
- 2. The USB drive contains 2 partitions or the partition need for formatting to FAT32 is not the first primary partition
- 3. The partition in USB or external hard drive is larger than 32GB
- 4. The USB drive or external hard drive is write-protected
So how to resolve these issues, switching your USB drive to FAT32? Follow the quick fixes to troubleshoot the problem of FAT32 format in Windows 10.
Fix 1. Check disk error, fix file system errors or bad sectors
To do so, both the third-party partition manager software — EaseUS Partition Master and Windows Disk Check will work.
Method 1. Use EaseUS Partition Master to check and fix disk error
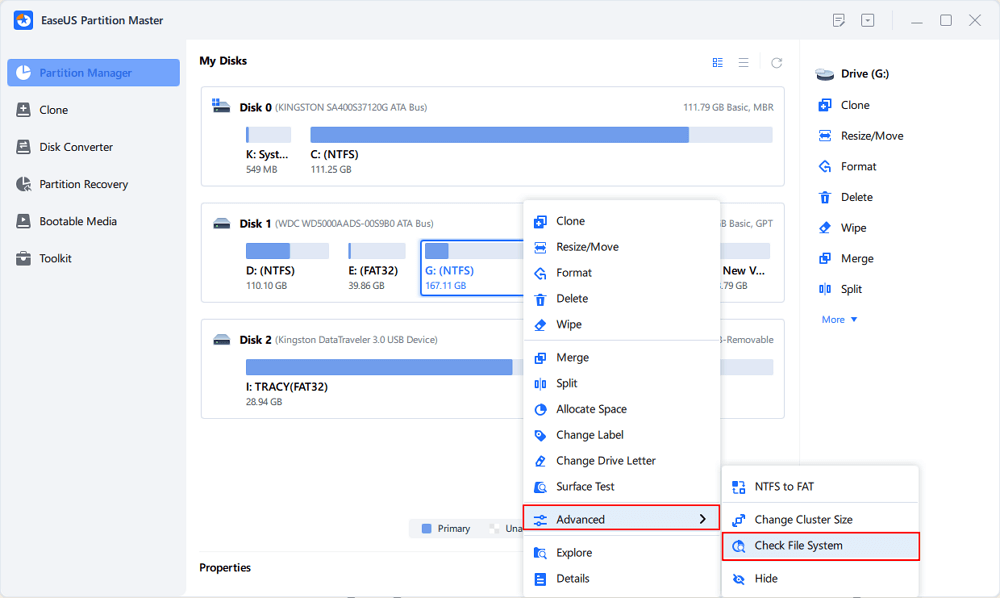
Step 1. Open EaseUS Partition Master on your computer. Then, locate the disk, right-click the partition you want to check, and choose «Advanced» > «Check File System».
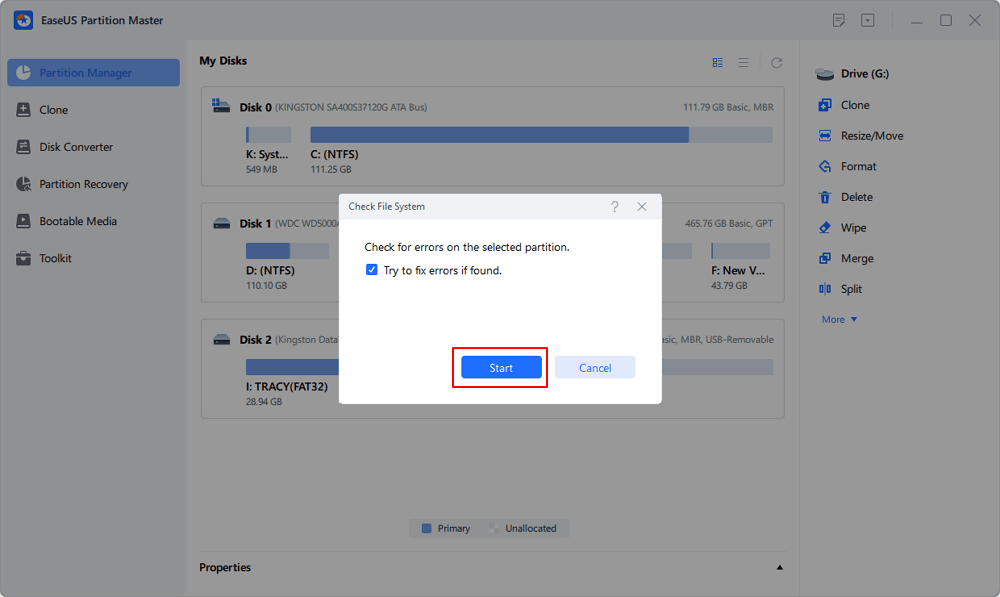
Step 2. In the Check File System window, keep the «Try to fix errors if found» option selected and click «Start».
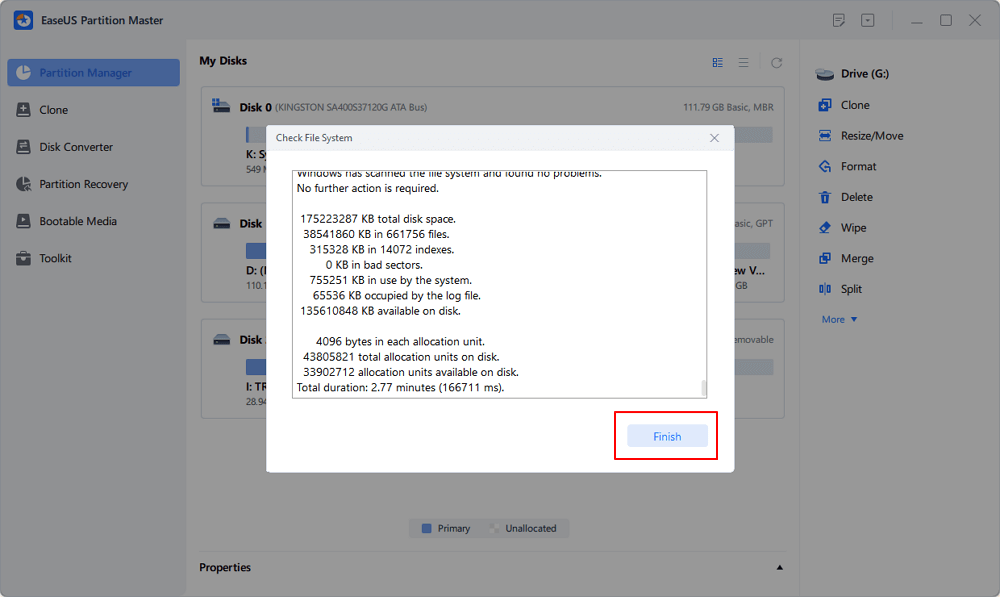
Step 3. The software will begin checking your partition file system on your disk. When it completes, click «Finish».
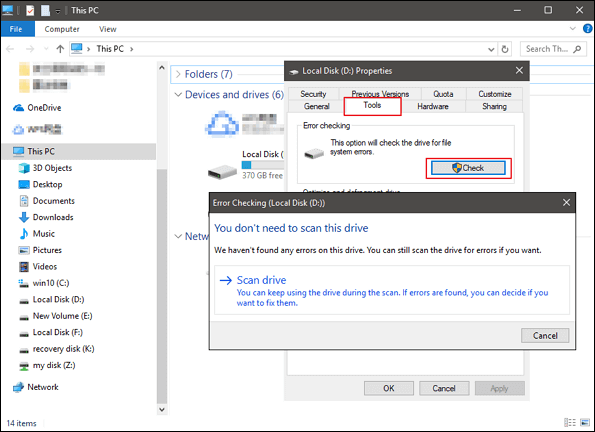
Method 2. Run Disk Check in Windows File Explorer
Step 1. Open File Explorer, locate and right-click the USB or external hard drive, and click «Properties».
Step 2. Go to «Tools» and click «Check» under Error-checking.
Step 3. Select «Scan and repair drive».
Or select and check both «Automatically fix file system errors» and «Scan for and attempt recovery of back sectors», then click «Start».
Fix 2. Delete all partitions and create a new FAT32 partition on USB drive
If your Windows system (version before Windows 8.1) or your USB drive doesn’t support creating two primary partitions, the computer won’t be able to recognize nor format the non-primary partition on the USB drive to FAT32.
The solution to this problem is to delete all existing partitions on USB and create a new FAT32 partition:
Step 1. Connect USB to PC and open Disk Management.
Step 2. Locate and right-click the primary partition on USB and select «Delete Volume», click «Yes» to confirm.
Step 3. Right-click on the logical partition on the USB drive, select «Delete Volume».
Step 4. Click «Yes» to confirm.
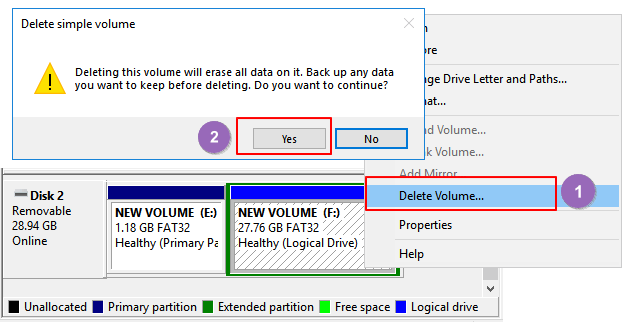
Step 5. The logical partition will become free space, right-click on it and select «Delete Partition», click «Yes» to confirm.
Step 6. When the USB becomes unallocated, right-click on the unallocated space and select «New Simple Volume» > «Next».
Step 7. Follow the on-screen instructions to specify volume size, drive letter, and set file system to FAT32, click «Next» > «Finish» to complete.
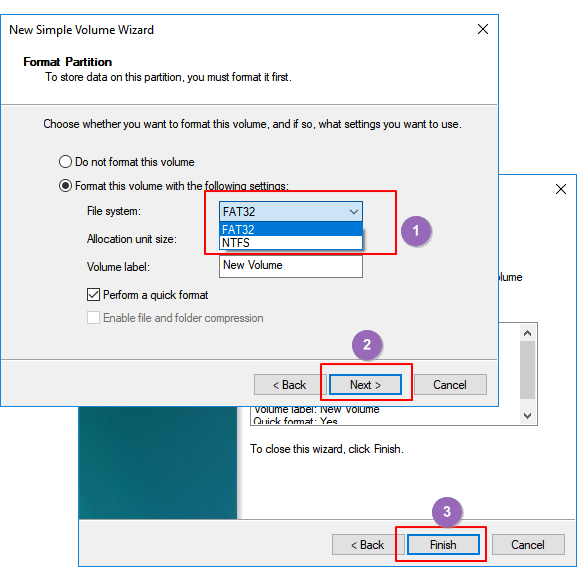
After this, you’ve successfully converted your USB or external hard drive to FAT32 and you don’t need to format this drive again.
Fix 3. Select NTFS as the file system or split USB larget partition to smaller FAT32 partitions
As shown in the chart at the beginning, the max size of the FAT32 partition is 32GB, which means you can only format devices smaller than 32GB into this file system.
In other words, when your USB drive partition is larger than 32GB, you can’t format it into FAT32. There are three solutions to this issue:
- Method 1. Apply EaseUS Partition Master to format USB to FAT32
Unlike Windows built-in tools, EaseUS Partition Master can simply format your USB drive even bigger than 32GB to FAT32 with ease. All you need is to go back to the partition manager to directly format your USB to FAT32 without any limitation.
- Method 2. Set NTFS as the file system of your USB drive
NTFS supports saving a single file that is larger than 4GB and supports creating a partition larger than 32GB.
If you only want to keep one partition on the USB drive, make full use of the drive space, the best choice is to set the NTFS as your USB drive.
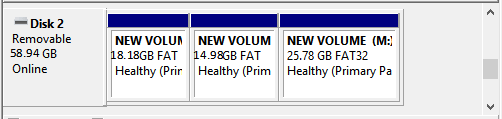
Method 3. Divide USB partition into small ones (less than 32GB) with FAT32
The other way is to split the USB partition into small ones and format them into FAT32:
Pre-conditions: Windows system (versions after 8.1) and USB drive both support two or more partitions.
Step 1. Use Disk Management to delete the USB partition.
Step 2. Create two or more partitions smaller than 32GB with the FAT32 file system.
Fix 4. Remove USB write protection and format USB to FAT32
When the USB drive is write-protected or locked with a password, you can’t directly format it into FAT32. Here are the detailed steps to resolve this problem:
Step 1. Remove USB write protection and unlock USB
You can refer to this link to remove USB write protection on Windows 10/8/7. Or you can try to use EaseUS M Tool to simply remove the USB lock in 3 steps:
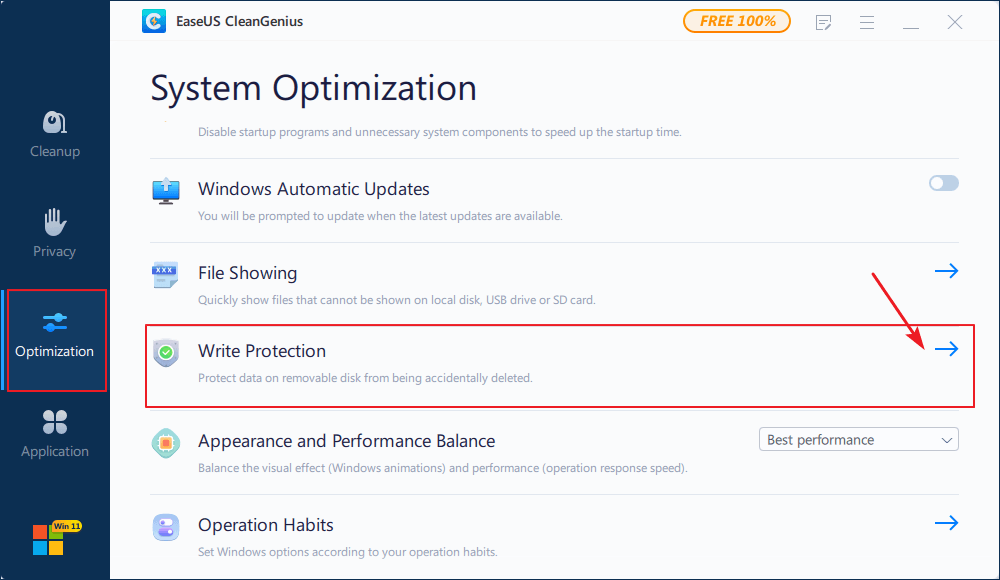
If you don’t consider yourself a pro-computer user and you’re not familiar with command-lines, don’t worry. There are graphical-based solutions to help you remove write-protection from your hard drives, USB drives, and even SD cards.
EaseUS CleanGenius is one of these tools that helps you fix aforementioned issues on your drives without knowing a thing about command-line.
Here’s an easy-to-follow guide on how to use this tool to get your issues sorted:
Step 1: DOWNLOAD and install EaseUS CleanGenius (free) on your computer.
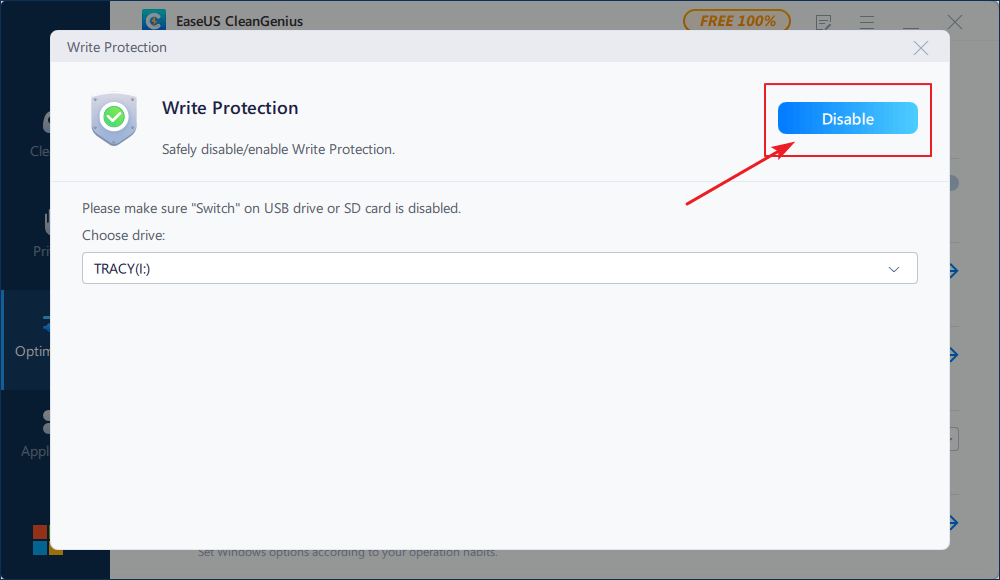
Step 2: Run EaseUS CleanGenius on your PC, select Optimization and choose the Write Protection mode.
Step 3: Select the device that is write-protected and click Disable to remove the protection.
Step 2. Format USB to FAT32
After removing the USB write protection, you can apply any one of the above-provided solutions in Part 1 to format your USB drive to FAT32.
Final Word — Windows 10 Format FAT32
This page tells how to format a USB or external hard drive into FAT32 and resolve the issue of being unable to format USB to FAT32. It also includes helpful solutions in formatting devices bigger than 32GB into FAT32 without data loss.
If you want to convert devices into NTFS without formatting, refer to How to Convert FAT to NTFS for help.
1. How do I format a microSD card to FAT32? — Quora.com
The built-in tools, Windows Disk Management and File Explorer, are easy to use to format microSD card.
Use Disk Management: Right-click SD card and choose Format from the list. Change volume, file system, and unit size. Check Quick Format and click OK.
File Explorer: Right-click device and select Format…Choose file system label, and unit size. Confirm WARNING message and click OK.
2. How do I format a hard disk? — Quora.com
To save time and edit fast, we recommend a professional hard disk formatter — EaseUS Partition Master. If you are planning to format hard drive, run this software. Right-click the drive that needs to be formatted. Select format. It’s done!
3. Why can’t I format my USB drive to fat32?
Error happens due to USB error, USB size(larger than 32GB), and write-protected state.
Use File Explorer (drives smaller than 32GB) or Powershell (for drives greater than 32GB)
Updated on March 11, 2023
What to Know
- File Explorer: Go to File Explorer > This PC > right-click the USB Drive > Format > Start > OK.
- Or launch Powershell > enter format /fs:fat32 : and wait for the process to finish.
- You can format drives smaller than 32GB in File Explorer; for larger drives, you must use Powershell.
This article explains how to format a USB drive in FAT32 on Windows. Instructions apply to both Windows 11 and 10.
How to Format a USB Drive as FAT32 Using File Explorer
Using File Explorer to format USB to FAT32 is the easiest method.
It’s only possible to format a drive smaller than 32GB in FAT32 format using this method. Any data previously contained on the USB drive is removed during the formatting process.
-
Select File Explorer (the folder icon) in the Windows 11 taskbar.
-
Select This PC on the left side of File Explorer.
-
Right-click the USB Drive and select Format.
-
If the File system isn’t listed as FAT32, click on the drop-down menu and choose it.
-
Select Start.
-
Wait for the drive to format then select OK to finish the process.
Format a USB Drive in FAT32 Using Powershell Command Line Tools
If you want to format a drive larger than 32GB, then your only option is to use Windows 10’s Powershell Command Line Tools to do so. It’s a much slower process than through File Explorer, but it works. Here’s how to format a USB drive using the command line function.
As before, any data previously stored on the USB drive is removed during the formatting process.
-
Select the Search Bar.
If you don’t see the search bar, select Start (the Windows icon) in the taskbar.
-
Type in Powershell.
-
Select Powershell.
-
Type format /fs:fat32 :
-
Wait for the process to complete.
Formatting this way can take a long time.
Pros and Cons of Using FAT32
FAT32 is an old file system that’s been around for many years. That means it’s not an ideal fit for Windows 10. However, there are reasons why you might want to use it. We delve into a brief overview of the pros and cons behind FAT32.
- FAT32 is near-universal. If you frequently move your USB drive between PC, Mac, Linux system, and even your phone, FAT32 is a good choice. That’s because it has near-universal compatibility, so you can easily share files using this file system.
- FAT32 can’t be used on drives larger than 16TB or files larger than 4GB. FAT32 isn’t able to work with hard drives larger than 16TB. That won’t affect many users yet, but it cannot deal with files over 4GB in size. That can be a big issue nowadays, especially if you regularly edit videos.
- FAT32 is slightly slower. FAT32 is somewhat slower than its alternatives—NTFS and exFAT. It might not make a huge difference at first, but it all adds up, and if you don’t require universal support, you may as well use NTFS or Microsoft’s exFAT file system instead.
FAQ
-
To format an SD card to FAT32, select This PC in File Manager and right-click your SD card in the Devices section. Select Format and choose FAT32 from the File System drop-down menu. Select Start > OK.
-
FAT32 is the latest version of the File Allocation Table (FAT) file system. It supports drive sizes up to 2TB and can go as high as 16TB with 64KB clusters. A FAT32 volume can hold up to 268,173,300 files using 32KB clusters.
-
To format a USB flash drive to FAT32 on a Mac, connect the drive to your Mac, open Disk Utility, and select the flash drive. Rename the USB drive and select MS-DOS(FAT) as your format option. Select Erase.
Thanks for letting us know!
Get the Latest Tech News Delivered Every Day
Subscribe