
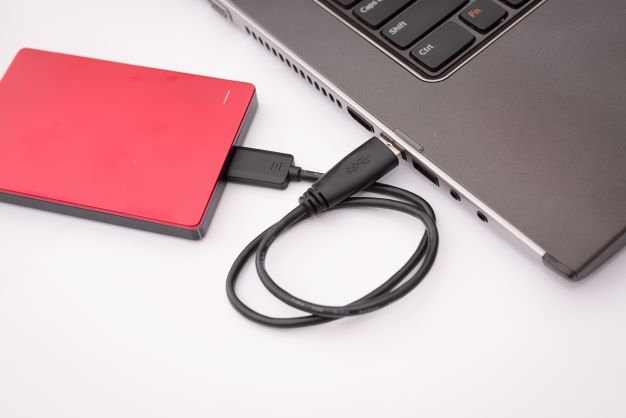
Производители электроники всячески пытаются убедить, что мы живем в мире беспроводных технологий. Однако, лучше старой проверенной флешки пока ничего не придумали.
Для быстрой передачи данных с одного устройства на другое, для связи на разных операционных системах, для надежного хранения данных все так же удобно использовать внешние накопители информации.
Проблема лишь в том, чтобы правильно отформатировать флешку или диск. Сейчас расскажем, как сделать, чтобы и macOS и Windows в дальнейшем без проблем смогли работать с такой флешкой.
Какую файловую систему выбрать

Среди множества существующих файловых систем на данный момент самыми популярными принято считать: FAT32, NTFS, exFAT, APFS (Apple File System), HFS+ (Mac OS Extended).
Из коробки Windows полноценно поддерживает FAT32, NTFS и exFAT, а macOS – FAT32, exFAT, HFS+ и APFS (с macOS High Sierra и выше).
При помощи сторонних драйверов и утилит можно научить Windows работать с HFS+ и APFS либо добавить в macOS поддержку NTFS.
Внимание! При форматировании флешки или другого накопителя все данные на нем будут удалены, заранее сохраните все необходимое.
Имеющиеся сегодня решения сильно отличаются по стабильности работы и скорости передачи данных. Чтобы не грузить систему лишним ПО и не терять время при копировании или переносе файлов, лучше использовать файловую систему, которая поддерживается и Windows, и macOS.
Выбор стоит между FAT32 и exFAT.
Главным недостатком FAT32 является ограничение на размер файла. На такой диск не получится записать файл размером более 4ГБ. Учитывая наличие больших баз данных, бекапов, проектов или видео файлов лучше не привязываться к устаревшей файловой системе FAT32 и выбрать exFAT.
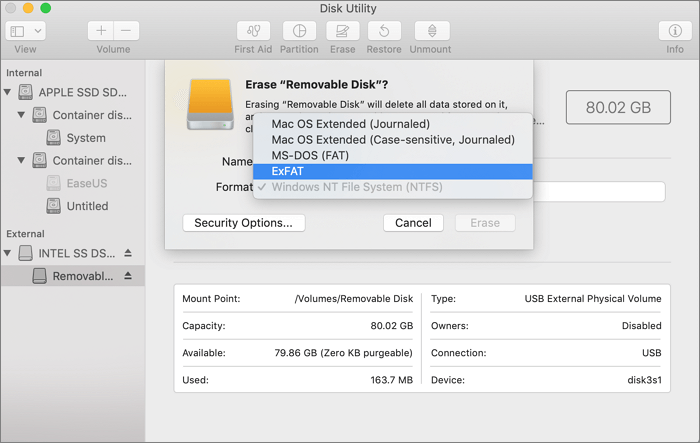
Как отформатировать флешку в macOS
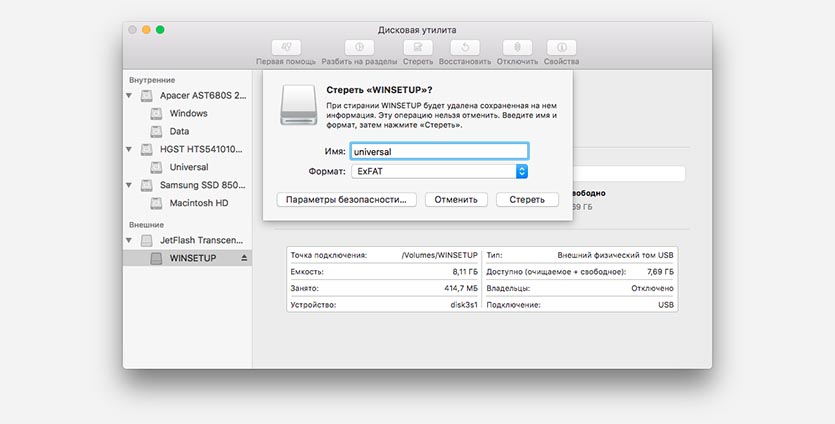
1. Запустите приложение Дисковая утилита через Spotlight или Launchpad.
2. В левой панели выберите необходимый для форматирования накопитель.
3. Нажмите кнопку Стереть.
4. Укажите файловую систему exFAT и подтверждаем действие.
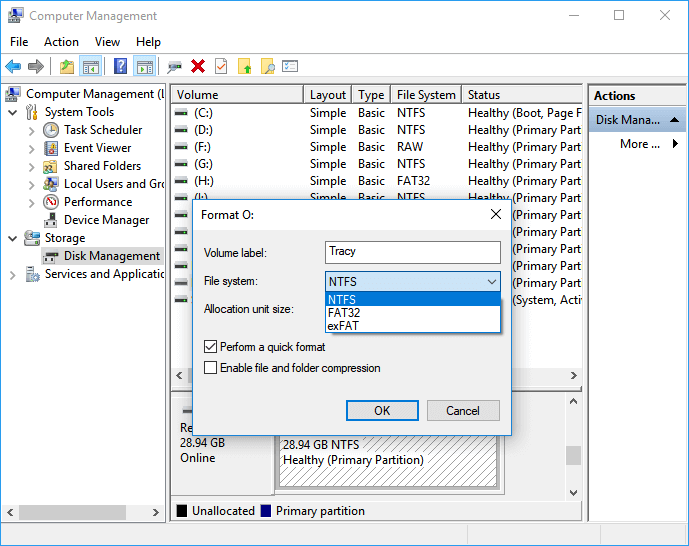
Как отформатировать флешку в Windows
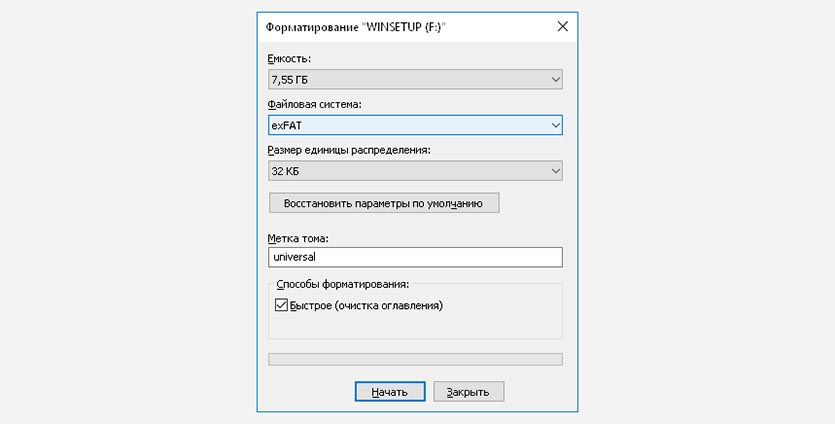
1. Откройте проводник.
2. Выберите необходимый для форматирования накопитель.
3. В контекстном меню выберите пункт Форматировать…
4. Укажите файловую систему exFAT, при необходимости установите другие параметры форматирования.
5. Подтвердите процедуру.
Готовая флешка в формате exFAT будет распознаваться как Windows-компьютером, так и любым Mac. При этом будет возможность как читать данные с накопителя, так и записывать на него без ограничения на размер файла в 4 ГБ.
⭐ Спасибо re:Store за полезную информацию.
(64 голосов, общий рейтинг: 4.75 из 5)
iPhones.ru
Быстро и просто.
Артём Суровцев
@artyomsurovtsev
Люблю технологии и все, что с ними связано. Верю, что величайшие открытия человечества еще впереди!
Last updated on April 19, 2024
Both operating systems rely on files and folders, so it’s important to know how to work with the file system on both types of devices, especially since Windows and Mac are such widely used operating systems. Unfortunately, Windows and Mac use different file systems, which can make it difficult to swap a flash drive or USB between Mac and Windows computers after formatting it.
Ideally, you would need to format the USB flash drive for Mac and PC compatibility. It’s a daunting task, but not impossible!
What format of flash drive is compatible with both Mac and PC?
Before we delve into learning how to format a USB drive for both PC and Mac, we need to understand which file systems work on both major operating systems. Once we have a full grasp of the file formats supported by each OS, we can easily find a compatible file system for both platforms.
| File System | Windows | Mac |
|---|---|---|
| FAT | Supported | Supported |
| FAT32 | Supported | Supported |
| NTFS | Supported | Not Supported |
| ReFS | Supported | Not Supported |
| exFAT | Supported | Supported |
| APFS | Not Supported | Supported |
| Mac OS Extended | Not Supported | Supported |
From the table above, it’s clear that FAT and exFAT are the two best file systems to ensure full compatibility between Mac and Windows. You can read on below for a comparison of some differences between FAT32 and exFAT.
Also Read: How to Fix ‘Item Is Too Large for the Volume’s Format’ Error on Mac and Windows 10
How to Format a USB Flash Drive for Mac and PC on Windows 11/10
If you’re looking at options for formatting a USB drive on your PC or Mac, Windows actually gives you a few choices. You can pick from built-in options or use third-party tools, depending on your preference.
Use a partition management tool – such as Partition Master – to do this.
Tool Partition Master is a unique and excellent option for achieving high compatibility with how to format a USB drive for use on both PC and Mac. It supports various file systems that you can utilize.
You can format your USB to file systems like NTFS, exFAT, EXT3, EXT2, FAT32, FAT16, FAT12, and ReFS.
Here’s how to format a USB drive using the Partition Master tool.
Step 1: Select the USB drive to format.
Connect your USB drive or flash drive to your computer. Download and launch a partitioning tool. Right-click the USB drive you want to format, then select “Format.”
Step 2. Assign the USB drive letter and file system.
Assign a new partition label, file system (NTFS/FAT32/EXT2/EXT3/EXT4/exFAT) and cluster size to the selected partition, and click “OK”.
Step 3: Check the box next to “Yes” to confirm that you want to format the USB drive.
If a warning window appears, click Yes. Back up your data in advance if it contains important information.
Step 4: Apply the changes.
Click “Execute 1 Task(s)” first, then click “Apply” to format the USB drive.
Windows 10 Disk Management indeed provides you with free and professional features. It offers you complete partition management tools without any data loss. Whether you’re a beginner or an expert, the partition management tool is your best choice.
Use the File Explorer options
1. Open File Explorer. You’ll find this app in the Start menu. If your USB drive isn’t inserted, plug it into your computer now.
Step 2: Right-click on the flash drive and select “Properties.”
Step 3: Click on the «Format» option.
Step 4: Under File system, select either exFAT or FAT32 from the drop-down menu.
Step 5: Click «Start» when you’re done.
Wait for the USB drive to format. This may take a while, depending on the size of your flash drive.
Read more: Format a USB Drive that Does Not Show Up
Utilize disk management tools
Using the Disk Management utility to format a flash drive might be a more complicated option, but it will ensure that the drive is formatted.
Step 1: Open the Windows search and look for «Create and format hard disk partitions.»
Step 2: Right-click the flash drive and select «Format.»

Step 3: From the “File System” drop-down, select “FAT32” or “exFAT”. You can also provide a label for the drive.

Step 4. Click “OK,” and wait for the formatting to complete.
How to Format a USB Flash Drive for Mac and PC on a Mac
If you’re using a Mac, you can use the built-in Disk Utility to format the USB flash drive on your Mac. The process involves:
Step 1. Insert the USB drive you want to format. Your Mac should detect the drive and display it on your desktop.
Step 2: Open Disk Utility. You can search for Disk Utility and open it.
Step 3: Select your drive from the list on the left.
Step 4. Click the “Erase” option from the top menu.

Step 5: Give the disk a name and choose the file system to use.
Step 6. Choose the “Erase” option, and your USB drive will be formatted.

[FAT32 vs ExFAT: What’s the Difference Between the File Systems?](#4)
FAT32 is one of the oldest file systems used in the Windows ecosystem. It was introduced with Windows 95, replacing the older FAT16 system used in MS-DOS and Windows 3.x. FAT32 has, in fact, become a de facto standard for most computer systems. Nowadays, most flash drives come formatted with the FAT32 file system, which allows for high compatibility between Mac and Windows systems quite efficiently.
The main problem with the FAT32 file system is its size limitation of 4 GB. The file system cannot handle files larger than that. This makes it theoretically good for flash drives and USB drives, but absolutely not for internal drives.
exFAT, or the Extended File Allocation Table file system, was introduced in 2006 alongside Windows XP to overcome limitations of the FAT32 system. It is optimized for flash drives and is suitable for both internal hard disks and flash drives. The main differences between exFAT and FAT32 can be summarized as follows:
| Comparison | FAT32 | exFAT |
|---|---|---|
| Introduction Date | Launched with Windows 95 | Introduced in 2006 with Windows XP |
| Compatibility with Flash Drives | Easier to use, faster | Better suited for flash drives |
| Compatibility with Windows | Works with all versions of Windows | Works with all versions of Mac |
| Special Configuration | None required | Additional software needed for Mac devices |
| Size Limitations | Maximum file size limit of 4GB | No size limitations |
It’s clear that exFAT has an advantage over FAT32 for all the reasons mentioned above.
Last Words
Fortunately, formatting the USB drive to be compatible with both Mac and Windows is straightforward, provided you know which file system to choose. While there are several ways to format a USB drive for use with both PCs and Macs, using third-party software – like Partition Master – is a good option.
The simple interface, ease of use, and powerful features give you total disk management capabilities.
Frequently Asked Questions About Formatting Flash Drives for Mac and PC
For more help formatting a USB flash drive for use with both Macs and PCs, look here.
How do I make my flash drive compatible with both Mac and PC?
To make your flash drive compatible with both Macs and PCs, you’ll need to format the file system as FAT32 instead of NTFS or APFS. FAT32 formatting works with both Windows and Mac computers.
2. Is exFAT compatible with both Mac and Windows?
Yes, exFAT is compatible with both Mac and Windows computers. You can format your external hard drive with this file system to transfer data between Mac and Windows without encountering read/write issues.
3. Which is Better for Mac, FAT32 or exFAT?
On a Mac, the data transfer speeds for FAT32 and exFAT are almost identical. The only difference is the partition size limit with FAT32. If your device has 64 GB or more of storage, you can format it as exFAT only on a Windows computer.
Fortunately, Macs have no such limitation. So, on a Mac, you can use either the FAT32 or exFAT format.
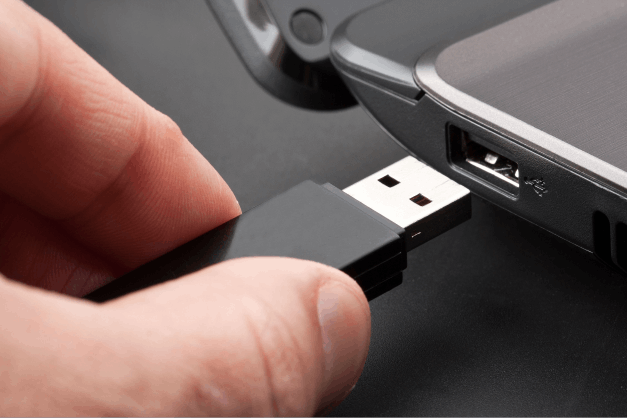
A USB (Universal Serial Bus) is a perfect storage device to keep data safe in external storage. It allows for the transfer and storage of data in a much safer way. Sometimes, the need to erase data quickly or use the USB in another Operating System calls for a USB format. The following questions are worthy of note:
1. Does a flash drive need to be formatted for Mac?
Yes, if it previously worked for Windows, you must format it for Mac.
2. Can a flash drive be used on both Mac and PC?
Yes, you can use FAT32 and exFAT USB format for both Mac and Windows. This is a perfect solution if you want to use your USB drive on Mac and Windows operating systems simultaneously without formatting it every time.
Let’s dive into the best USB format for both Mac and Windows.
FAT32 or exFAT — Which Is the USB Format for Mac and Windows?
So, for using a USB device for MAC and Windows simultaneously, there are two formatting options, i.e., FAT32 and exFAT. Both options are helpful and can format the flash drive for both Mac and Windows.
FAT32 is a traditional format option for many computer users. It is usually the default format for Mac and Windows 10 Operating Systems. However, the problem is that it is an outdated way of formatting. Also, this format option only stores up to 4GB of data.
Instead of using FAT32, exFAT is the latest formatting option for both Windows and Mac Operating Systems. It is an excellent alternative to FAT32 and can handle more than 32GB. Moreover, it is also well-matched with the latest versions of Windows and Mac Operating Systems.
Follow the guidelines below to format USB for both Mac and Windows Operating Systems.
There are various ways to format a USB for both Mac and Windows. However, knowing the right tool and how to go about it matters. Here is the complete guideline of tools that can be used to format USB to FAT32 and exFAT. Some of the best ways to go about it are:
- #1. Use USB Formatter — EaseUS Partition Master
- #2. Use File Explorer
- #3. Use Disk Management
- #4. Use Disk Utility
- #5. Use Terminal
Also, remember to back up your USB files before starting the formatting process on the USB drive. Let’s dive into greater detail.
1. Use USB Formatter — EaseUS Partition Master
The EaseUS Partition Master is a software with many formatting options, such as NTFS, FAT32, and exFAT. It comes with free and paid versions, but the free version is good enough to use. The good thing is that it can also convert previously formatted devices into another format option without erasing any data.
EaseUS Partition Master Free allows for the format of a USB with FAT32 and exFAT and allows interconversion among these two options. It is a highly recommended tool because it provides an easy-to-understand interface and is free.
Follow the steps below to use this tool to format your USB:
Step 1. Select the USB drive to format.
Connect the USB drive or pen drive to your computer. Launch EaseUS partition software, right-click the USB drive you intend to format and choose «Format».
Step 2. Set the drive letter and file system on USB.
Assign a new partition label if you want to change the drive letter of your USB, set the desired file system -NTFS/FAT32/EXT2/EXT3/EXT4/exFAT to your USB, then click «OK».
Step 3. Check «Yes» to confirm formatting USB.
Click «Yes» if you see the Warning window. If you have important data on it, back up the data in advance.
Step 4. Apply the changes.
Click the «Execute 1 Task(s)» button first, and then click «Apply» to format the USB drive.
2. Use File Explorer
This is an in-built option on your system to format the USB derive for FAT32, exFAT, and NTFS. It can be used for USB flash of any brand, and its storage capacity is up to 128GB. Also, it is free-to-use software and can easily remove data from the device with the required format option. To use File Explorer to set your USB format, follow the steps below:
Step 1. Open the File Explorer and choose «This PC.»
Step 2. Connect the USB.
Step 3. Now right-click on the USB device you want to format.
Step 4. On the dialogue box that comes up, select the required formatting style from the drop-down menu.
Step 5. Click on the Quick Format option, then formatting begins.
3. Use Disk Management
If you want to format the USB with FAT32 and exFAT but don’t want to use File Explorer, you can use Disk Management to format the USB. This software is available on most Operating Systems. Follow the steps below to use the Disk Management option to set your USB format:
Step 1. Right-click on ‘This PC’ and select the Manage option.
Step 2. Select the Disk Management option.
Step 3. Select the USB drive that you want to format. Then, right-click on it and select Format.
Step 4. Select the formatting option FAT32 or exFAT.
Step 5. Click the quick format option and click OK to start formatting.
If you are familiar with the Windows command line, you can click on the video below to see more information about formatting USBs using commands:
4. Use Disk Utility
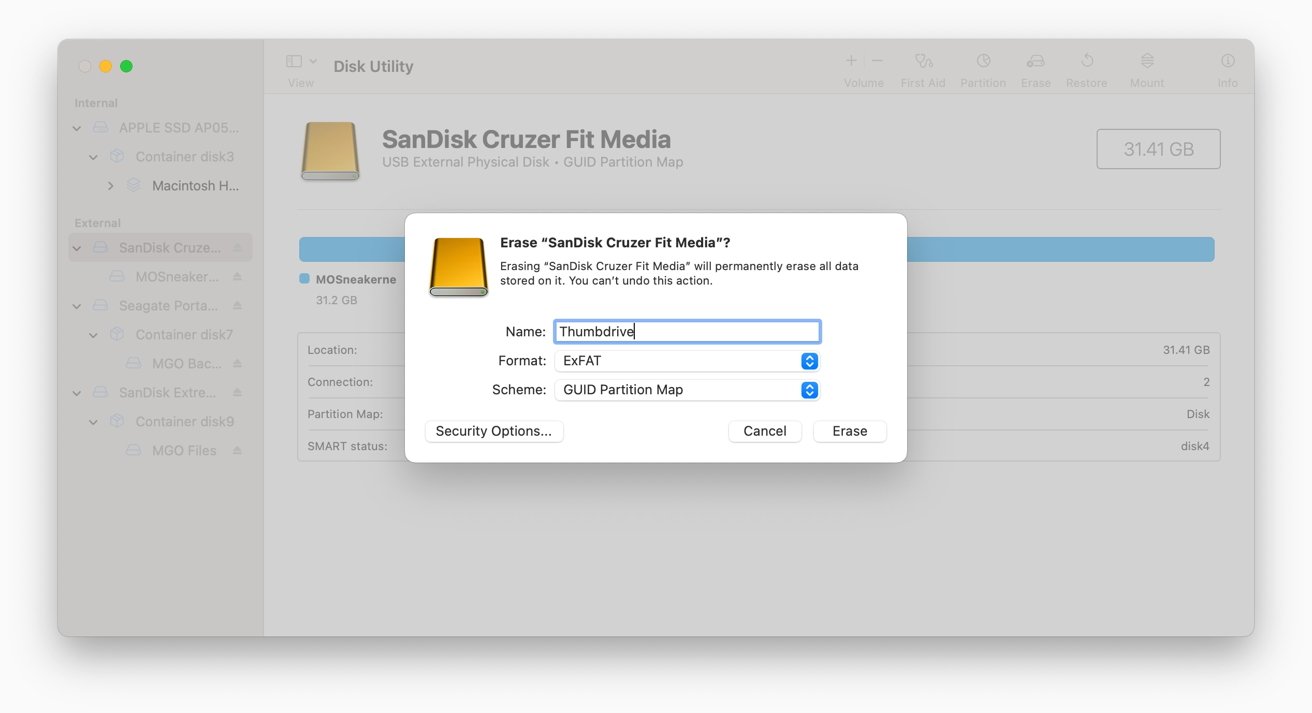
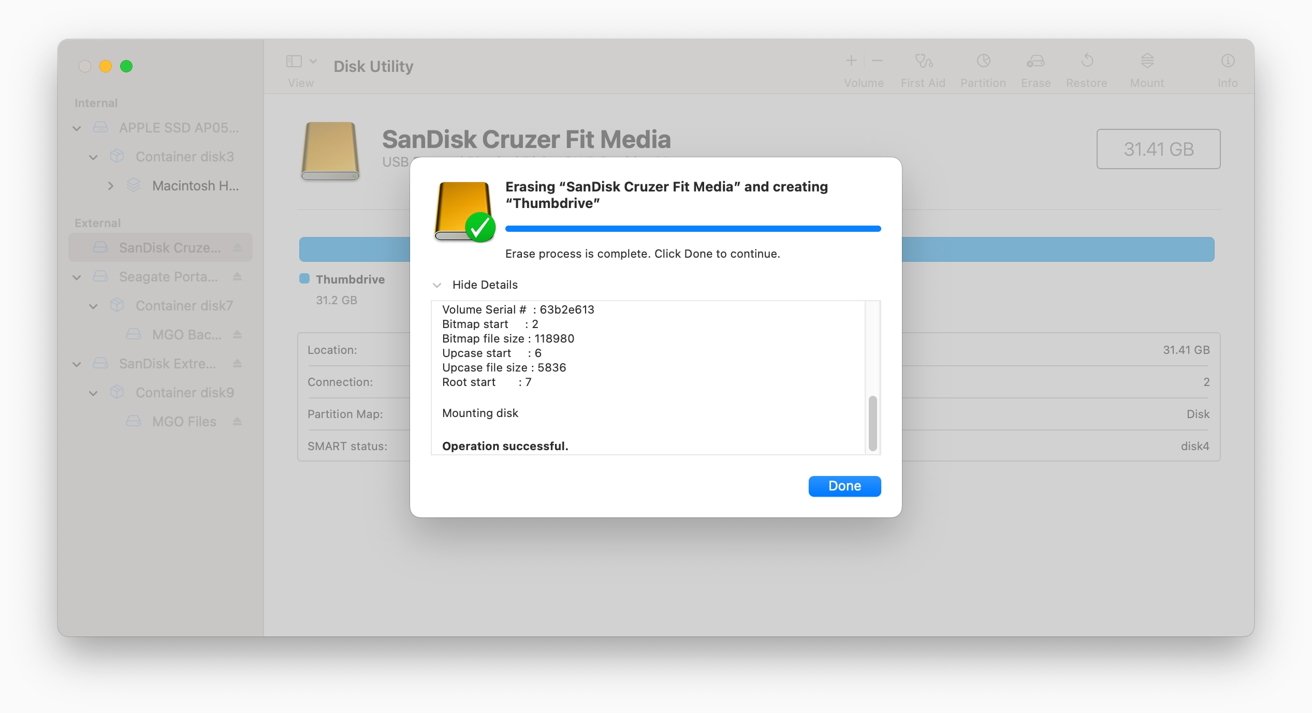
Disk utility can also be used to format the USB. It can format drives, repair damaged discs, and validate disc integrity. Also, it is a free, in-built, and advanced tool in the macOS that helps format a USB. The steps below will help you set your USB format using the Disk Utility.
Step 1. Click the Finder and search for the Disk Utility.
Step 2. Open the Disk Utility on your Mac.
Step 3. Choose the USB drive that you want to format and erase all the data from the USB device.
Step 4. Now label it with a new name.
Step 5. Choose the formatting option.
Step 6. Now click «Erase» to start formatting.
5. Use Terminal
You can also use the Terminal to format your USB. It is the command line interface of macOS. You have to give different commands to format your USB device. The steps below can help you.
Step 1. Connect your Mac to your USB disc.
Step 2. Launch Terminal by pressing command + space keys.
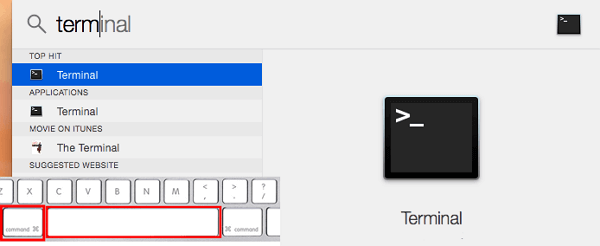
Step 3. Enter the following command ‘diskutil eraseDisk Your DRIVE NAME MS-DOS FAT32′ as shown in the screenshot below.
Step 4. Then, press Enter.
Step 5. Enter ‘sudo mkfs.MS-DOS -F32 /dev/disk2′ on the command line.
You should now have a formatted USB disc!
- Point to Note
- Select the method that suits you according to your system and ease of usage, and remember to back up your data before commencing the process.
Conclusion
FAT32 and exFAT remain the best USB formats for both Mac and Windows. Also, the EaseUS Partition Master, Windows File Explorer, and Disk Utility are the three best options that can help you format your USB for both Mac and Windows without worry.
FAQs of the USB Format for Mac and Windows
If you still need clarification about the best format for Mac and Windows, our FAQ section can help.
1. exFAT vs. FAT32, which is better for USB?
exFAT is better for USB because it can handle more than 32GB of data and is also compatible with the latest versions of Windows and Mac Operating Systems.
2. What USB format works on Mac and Windows?
FAT32 and exFAT are excellent options for formatting a USB for both Mac and Windows.
3. Is exFAT compatible with Mac and Windows?
Yes, exFAT is compatible with both Mac and Windows.
Although the current trends favor using the cloud and decentralized applications for storage and file transfer, the USB drive still plays a relevant role in business applications. A USB drive requires no internet connection, can transfer files to and from a local device quickly, can be physically disconnected and secured away and are physical objects that can carry your branding and company identity.
If you’re interested in formatting USB drives for business use, it is crucial to understand that the process depends on whether your company primarily uses Windows PCs, Macs or a mix of both. Here are the step-by-step procedures for all three use cases.
The File System: Why the Formatting Method Matters
One of the primary differences between Windows PCs and computers running macOS is the file system. The file system is a collection of processes dictating your operating system’s data reading and writing methods. For example, a file system determines how files are named, stored, organized and retrieved.
The file system on Windows is New Technology File System (NTFS) which has been in use since the release of Windows NT 3.1 in 1993. On macOS, the file system is simply known as Apple File System (APFS), introduced in 2017 with macOS 10.13 and iOS 10.13.
How to Choose the Right File System
Brand-new USB drives, from single thumbsticks to USB wristbands sold wholesale, cannot be immediately used and recognized by a computer because they have not yet been formatted to use a file system that the computer can recognize. Depending on the OS your business computers use the most, you have three formatting options: NTFS, APFS or exFAT.
Shop USB Wristbands Wholesale Here
- If you are confident that your USB drives will only be used on Windows systems, you can format a USB drive to use NTFS. The primary advantage is making your drives compatible with virtually all Windows systems with USB ports (the USB standard was released in 1996).
- If your drives are meant exclusively for use on Apple devices, you can format your drive to use APFS. APFS is supported on all macOS, iOS, tvOS and watchOS devices featuring USB ports.
- If you want your USB drives to be compatible on both Windows and Mac computers, the most versatile option is to format your USB drives to exFAT (extensible File Allocation Table). Although exFAT was developed by Microsoft and is a descendant of earlier FAT16 and FAT32 file systems, it is recognized by both Windows and Mac systems.
How to Format Your USB Drive to exFAT
Whether your USB drives are standard thumbsticks or USB business cards, the formatting process remains the same. Here are the steps to follow on each operating system.
Formatting to exFAT on Windows:
- Insert your USB drive into your Windows PC. Brand-new drives should cause Windows to display a text box asking you if you want to format it. Click the «Format Disk» button.
- A new window titled «Format Windows» should appear, displaying your drive’s actual capacity in gigabytes, typically slightly under the drive’s advertised capacity (e.g., a nominally 32 GB drive might actually have 29.5 GB or 29.8 GB of free space). Under it is a file system drop-down menu. Click it and select «exFAT.»
- If «Quick Format» is checked, uncheck it.
- Volume label refers to the drive’s name. Entering a name is optional.
- Once ready, click Start. Windows may display another window asking you to confirm. Click «OK.»
Windows will then automatically format your drive to the exFAT file system. Simply let it finish the process and it’ll be ready for use and compatible with any Windows or Mac computer.
Custom Branded USB Sticks
Formatting to exFAT on Mac:
- Insert your USB drive into your Macintosh computer.
- Open the Disk Utility app by typing «Disk Utility» in Launchpad or using the keyboard shortcut Command + Space.
- Select your USB drive on the left-hand menu when the Disk Utility window opens. It should be under the «External» list.
- Ensure that you have selected the correct drive and then click the «Erase» button.
- You will be prompted to give the drive a new name and choose a file system in the new window. Select «ExFAT» from the drop-down list.
- When ready, click Erase.
Your Mac will automatically format your drive to the desired format. Unplug the drive when finished. It is now ready for use on any Mac or Windows system.
Shop the Best Selection of Custom USB Drives at USB Memory Direct
USB Memory Direct specializes in high-quality custom USB drives. We carry a large selection of uniquely-shaped models, serving as ideal bases to create your perfect branded flash drives, from standard thumbsticks to woodblock drives, USB business cards and even flexible wristband drives.
If you have to use a flash drive on both Macs and Windows PCs, make sure both systems can read it. Here’s how to format the drive correctly.
While there is a lot of interoperability between Apple’s Mac ecosystem and Windows computers, not everything is completely rosy. One of these areas is data sharing.
Sure, you could rely on a network connection and devices like a NAS or a fileserver to handle data storage between the two sides, but it’s not necessarily an option for everyone.
In some cases, you’ll have to rely on flash drives or external hard drives, and physically moving and connecting the storage to each device. This can be true in situations where there’s a lot of data in use, such as video editing, where it can be a lot quicker to go down this route than to work over a network.
Though it seems simple, there’s still some things you need to know before going down this route.
File Systems
While hardware concerns are going to be fairly easy to work out, such as what physical connections are available and a budget for drives, there’s another element that can trip people up.
The file systems natively used by Windows and macOS are wildly different, with security and other elements getting in the way of being able to use them both on the same computer.
For example, if you format a drive to NTFS, the file system favored by Windows, your Mac will be able to read the drive but won’t write to it directly. Likewise, an APFS drive will be readable by a Mac, but on Windows, you need some further software assistance to work with it.
The answer to the problem is to use exFAT, a file system designed to replace the old FAT32 file system. As well as going far beyond FAT32’s 4TB maximum file size and 8TB partition size limits, exFAT is also optimized for flash drives, which includes thumb drives and external storage devices.
Formatting a drive in macOS is easy, and is all done via Disk Utility.
Handily, both Windows and macOS play nice with exFAT, with each reading from and writing to partitions using the file system.
As a general rule, if the flash drive you are using is 32GB in capacity or lower, you should set it to be MS-DOS(FAT), and save exFAT for drives above 32GB in capacity. However, as we’re seeing fewer sub-32GB thumb drives in regular use, it’s not a bad thing to stick to using exFAT in such cases.
Formatting
You can use either macOS or Windows to format the drive into exFAT, as it’s equally usable by both platforms, regardless of which formatted it in the first place. What follows are instructions for formatting the drive on both platforms.
How to format a flash drive in macOS to use on Windows
- Plug the drive into an appropriate port on the Mac, or a connected dock’s ports. It will usually appear as a drive on the desktop.
- Open Disk Utility, which can be found via the Launchpad or by using Spotlight with Command-Space followed by searching for the term «Disk Utility.»
- In the left-hand sidebar, select the disk you’ve just attached to the Mac.
- Click Erase in the toolbar.
- In the Erase dialog box, enter a meaningful name for the drive, then select ExFAT under the Format dropdown.
- If the dialog box has a Scheme option, set it to Master Boot Record.
- Click Erase. Once complete, click Done.
For the Scheme option, Apple recommends using Master Boot Record to ensure the drive is compatible with all Windows PCs. You could also use GUID Partition Map, but Apple warns that it is usable by «some newer» PCs, and therefore may not work for older PC setups.
You should typically use Master Boot Record as the most compatible option for Windows desktops. You can get away with GUID Partition Map, but there’s that small chance of incompatibility.
What you’ll see once you finish a disk format in macOS
At this point, you should unmount the drive as usual, then plug it into your Windows PC to check it functions as intended.
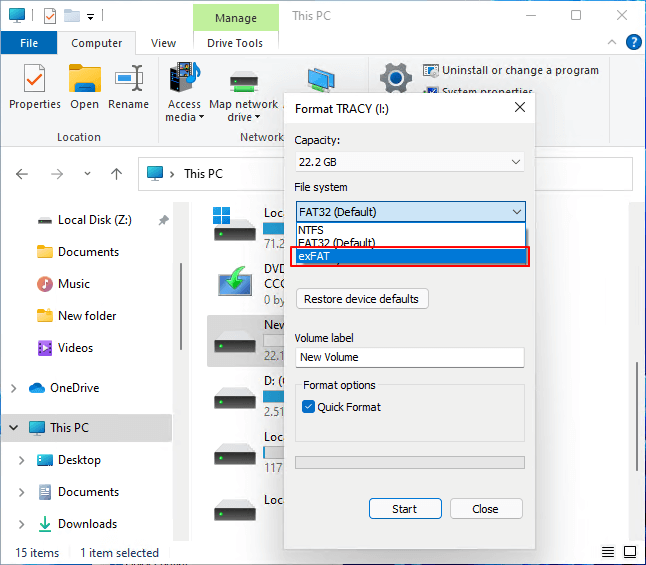
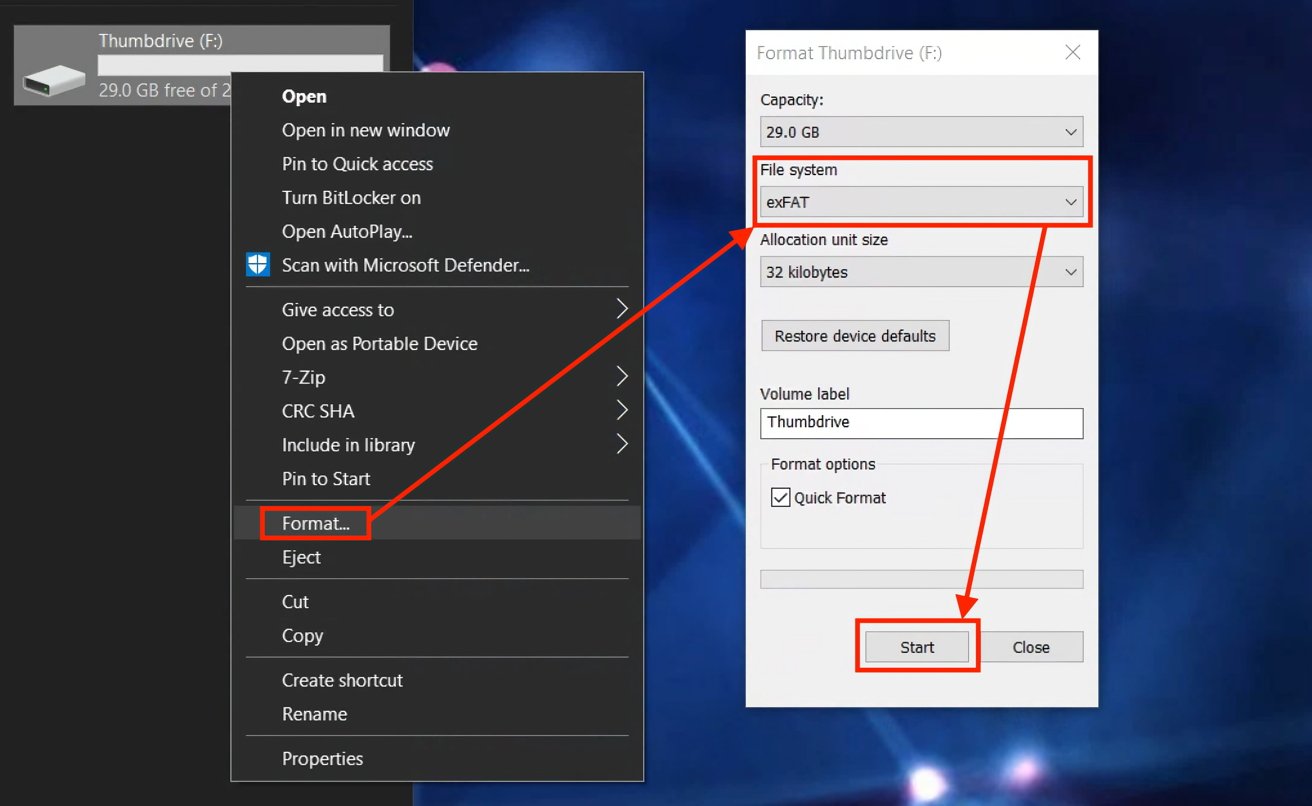
How to format a flash drive in Windows for macOS
- Plug the drive into the PC.
- Open File Explorer, and select This PC in the sidebar.
- Select then right-click on the drive, and click Format.
- In the Format window, select exFAT for the file system.
- The Allocation unit size refers to the chunks of capacity a file can use, with smaller sizes more appropriate for large numbers of tiny files. If in doubt, this can be safely left at default settings.
- Enter a name for the drive under Volume Label.
- If the drive contained sensitive information, uncheck Quick Format, otherwise keep it enabled.
- Click Start, then on the Warning dialog box, click OK.
- Once the format has completed, click OK.
Formatting a drive in Windows.
Again, you can unmount the drive and put it onto a Mac to confirm it works as expected.
You really should use cloud storage or a NAS if you can
While you could perform file transfers or have a shared data pool using flash drives or other external drives, it’s not really the best approach for most users.
Strongly consider acquiring a NAS for your network, especially if there is more than one person that needs to access the same data at the same time. Using a NAS, multiple users can access that data, without needing to ask one another for physical possession of the drive itself.
Then there’s the ability to have multiple large drives at your disposal, providing higher capacities and redundancy depending on the configuration.
And, for more modest needs, cloud storage works too.
A flash drive is useful for data transfers when you’re in a pinch or there’s a sense of urgency when there’s no other option available. A network-based approach is a far better plan to adopt.