
Все способы:
- Способ 1: Закрытие связанного процесса
- Способ 2: «Командная строка»
- Способ 3: Изменение владельца файла
- Способ 4: Загрузка в «Безопасном режиме»
- Способ 5: Переименование файла
- Способ 6: Функции архивирования
- Способ 7: Сторонние программы
- Вопросы и ответы: 0
Способ 1: Закрытие связанного процесса
Бывает, что при удалении файла появляется предупреждение о том, что удалить его нет возможности, поскольку он используется определенной программой, которая в этот момент запущена в системе.
Если связанный с файлом софт отображается на нижней панели, то его нужно просто закрыть обычным способом. Когда его интерфейс не разворачивается, щелкните по задаче правой кнопкой мыши и выберите пункт «Закрыть окно».
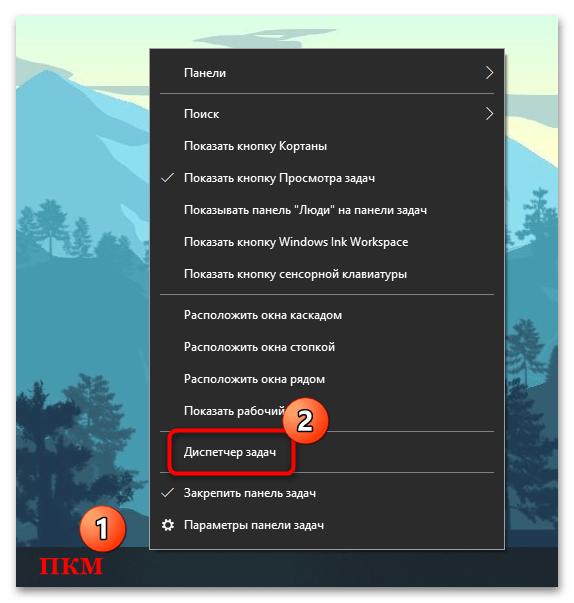
Если же программа нигде не отображается, то выключить ее можно через «Диспетчер задач»:
- Откройте «Диспетчер задач». Проще всего кликнуть правой кнопкой мыши по нижней рабочей панели и запустить приложение через контекстное меню.
- На вкладке «Процессы» отыщите проблемную программу. Если необходимо, можно упорядочить названия по имени, кликнув по названию столбца вверху. Выделите приложение, затем выберите кнопку «Снять задачу». Для детального поиска процесса можно переключиться на вкладку «Подробности» и поискать там.
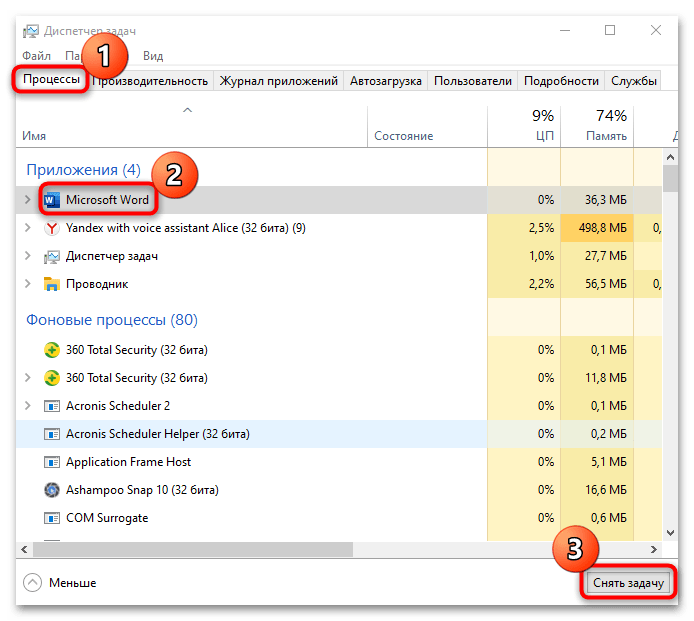
После того как программа будет закрыта, должно получиться удалить файл.
Читайте также: Методы принудительного удаления программ в Windows 10
Способ 2: «Командная строка»
Принудительно удалить файл в Windows 10 можно через встроенную консоль, использовав специальную команду и указав путь к нему. Метод может сработать, даже если файл открыт, но из-за сбоев в системе не получается его закрыть.
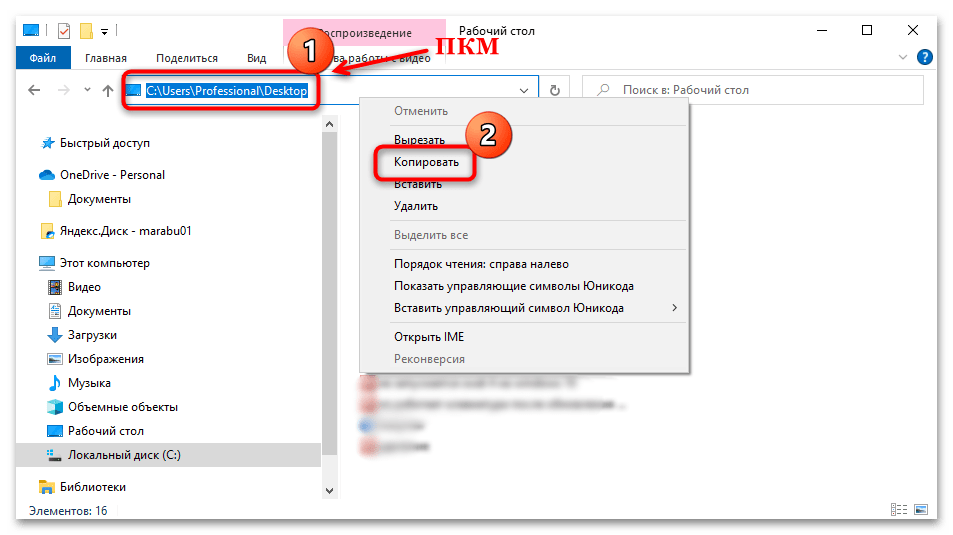
- Через «Проводник» перейдите к расположению файла. Если он находится на рабочем столе или в папке «Загрузки», то указывать нужно путь на диске C через персональную папку (то есть, например,
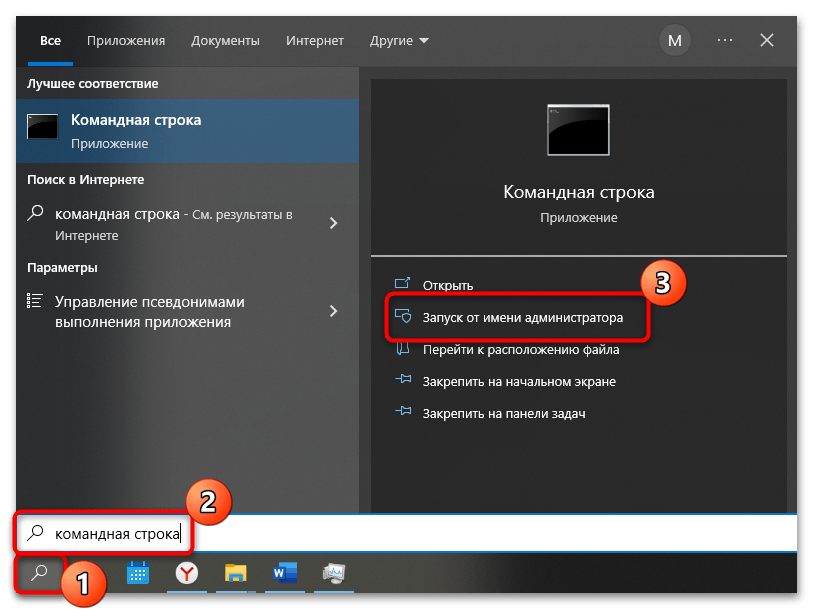
C:\Users\ИМЯ_ПОЛЬЗОВАТЕЛЯ\Downloads). Скопируйте адрес из верхней строки, кликнув по ней правой кнопкой мыши и выбрав пункт «Копировать». - Запустите «Командную строку» с расширенными правами, нажав на «Пуск» и введя в нем название приложения. Среди результатов выберите открытие от имени администратора.
- В консоли введите
del /f /s /q /a, затем поставьте пробел, откройте кавычки и вставьте путь к файлу, поставьте обратный слэш (\) и впишите точное название удаляемого файла с его расширением, после чего закройте кавычки. К примеру, если файл находится на рабочем столе, в нашем примере команда будет выглядеть так:del /f /s /q /a «C:\Users\Professional\Desktop\документ.docx», где «Professional» — имя нашей учетной записи. Нажмите на клавишу «Enter», чтобы подтвердить удаление.
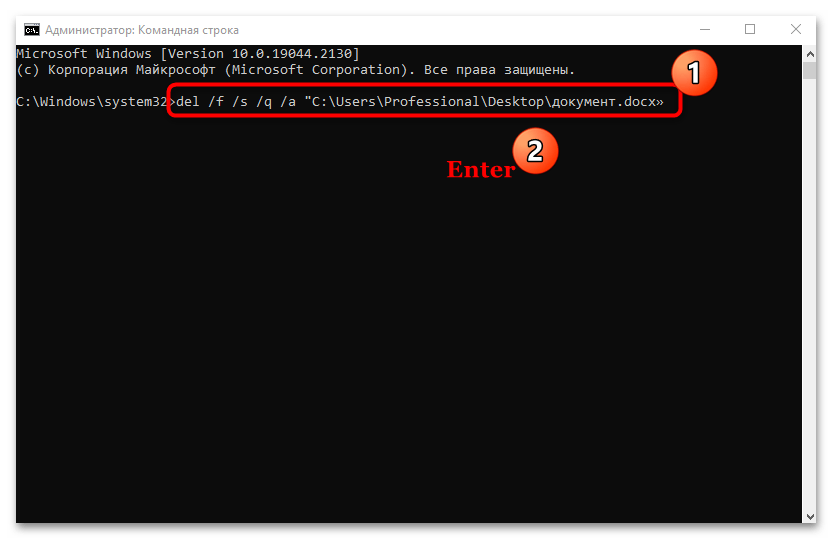
В результате отобразится сообщение, что файл удален, причем при таком подходе он будет стерт без временного помещения в «Корзину».
Способ 3: Изменение владельца файла
В том случае, если во время удаления Windows сообщает, что у пользователя нет прав осуществить процедуру, то здесь проблема заключается во владельце. Обычно это происходит, когда на компьютере используется несколько учетных записей или планируется удалить специфический файл. Чтобы удалить файл, который принадлежит другой учетной записи, потребуется получить право собственности на него. Следует отметить, что это доступно только для администратора Windows 10.
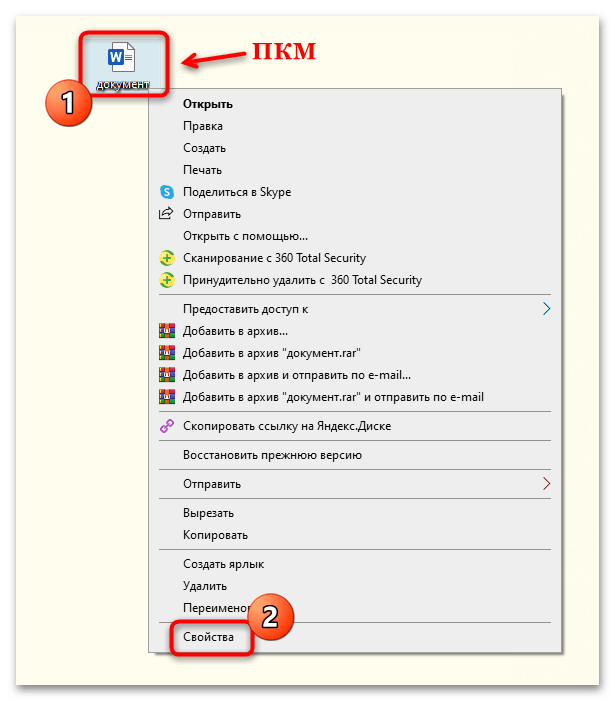
- Щелкните правой кнопкой мыши по названию файла, чтобы вызвать контекстное меню. Перейдите в раздел «Свойства».
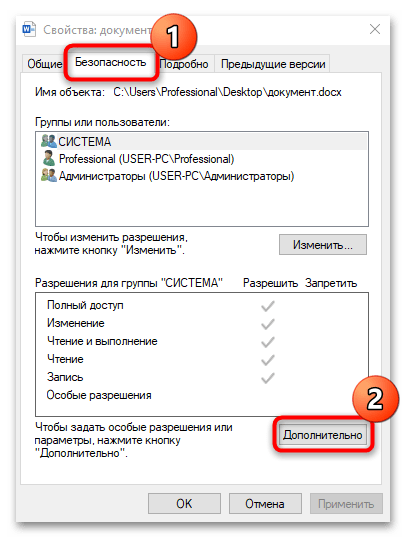
- В новом окне нажмите на вкладку «Безопасность», затем на кнопку «Дополнительно».
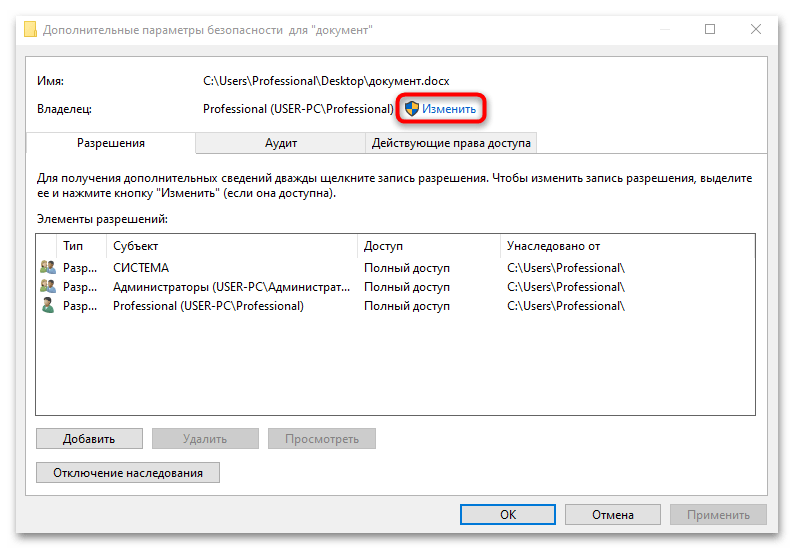
- На строке «Владелец» кликните по ссылке «Изменить».
- Введите имя своей учетной записи в специальное поле и щелкните по кнопке подтверждения.
Закройте все окна раздела со свойствами и попробуйте снова удалить файл.
Способ 4: Загрузка в «Безопасном режиме»
Когда сторонние программы мешают удалению файла или это не получается сделать из-за вирусов, которые проникли в систему, может помочь загрузка Windows 10 в «Безопасном режиме»:
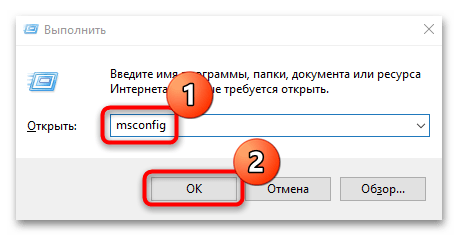
- Откройте средство «Конфигурация системы» с помощью диалогового окна «Выполнить». Одновременно нажмите клавиши «Win + R», затем напишите команду
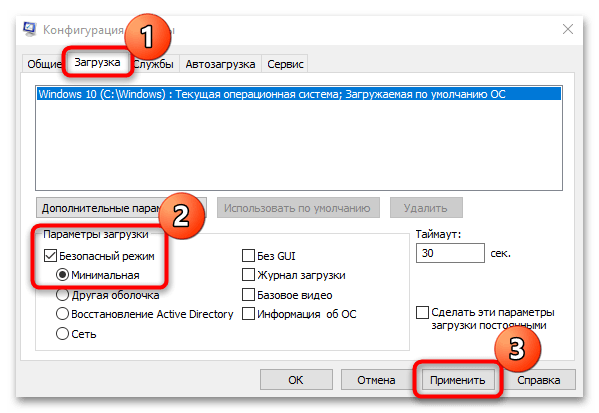
msconfigи кликните по «ОК». - Перейдите на вкладку «Загрузка». В блоке «Параметры загрузки» отметьте пункт «Безопасный режим» и выберите параметр «Минимальная», при которой система будет запущена лишь только с критически необходимым количеством драйверов, служб и программ. Нажмите на «Применить».
После процедуры останется перезагрузить компьютер, чтобы запустить систему в «Безопасном режиме». Найдите проблемный и файл и повторите попытку его удаления.
Читайте также: Выход из «Безопасного режима» на Windows 10
Способ 5: Переименование файла
Многим помогает старый и проверенный метод, подразумевающий переименование файла. Возможно, проблема появилась из-за того, что в системе произошел сбой или часть проблемного файла записалась на битый сектор жесткого диска, поэтому такой метод может исправить ситуацию.
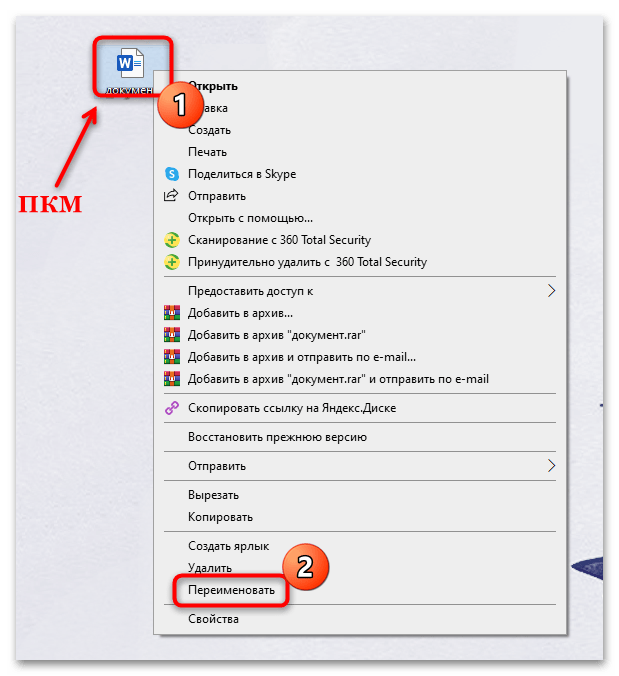
Переименуйте файл, используя функцию контекстного меню. Также можно попробовать изменить его расширение: после точки, отделяющей название от формата, впишите другое расширение, например измените .docx .zip.
Способ 6: Функции архивирования
Некоторые архиваторы позволяют тонко настраивать процедуру архивирования файлов, в том числе удалять оригинал после завершения процедуры. Другими словами, вам понадобится заархивировать проблемные данные, выбрать соответствующую функцию в программе, а потом избавиться от самого архива. В этом может помочь бесплатный софт, например 7-Zip.
Скачать 7-Zip
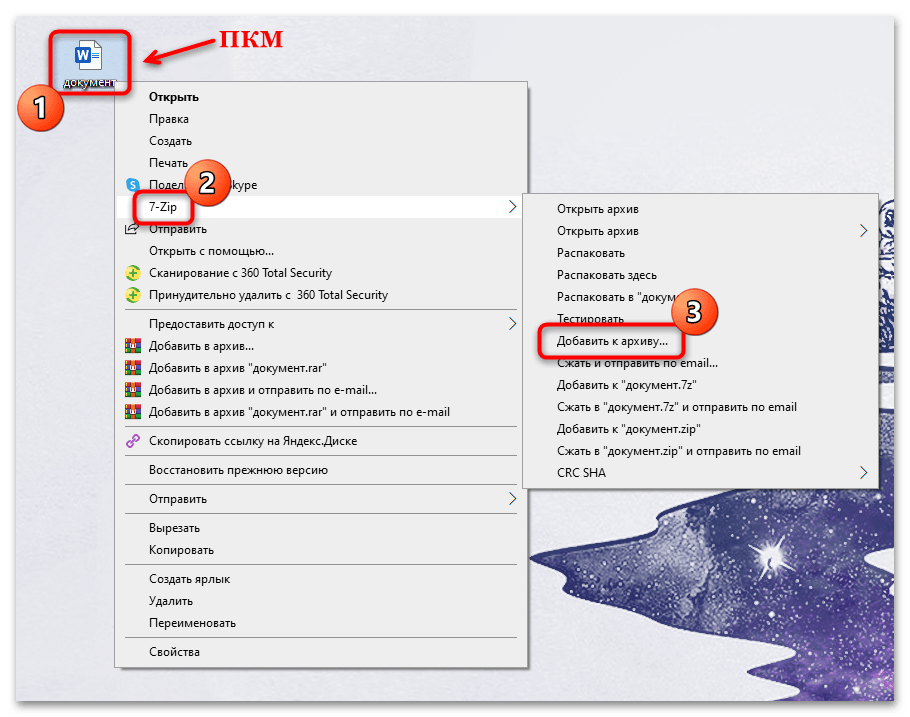
- Установите архиватор. Его функции автоматически интегрируются в контекстное меню. Щелкните по файлу правой кнопкой мыши, наведите курсор на пункт «7-Zip» и из дополнительного списка выберите «Добавить к архиву…».
- В окне с настройками архива найдите блок «Опции» и отметьте пункт «Удалять файлы после сжатия». Нажмите на «ОК».
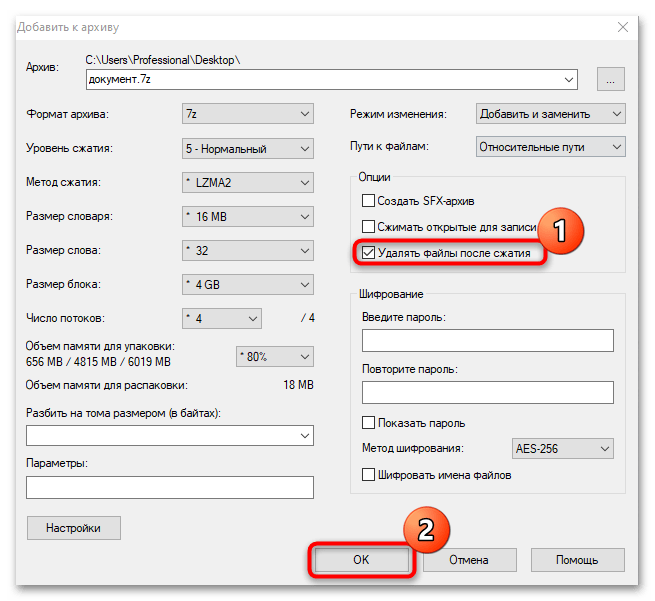
Дождитесь, пока архив будет создан. Изначальный файл должен быть удален автоматически, а вам останется вручную удалить саму сжатую папку.
Способ 7: Сторонние программы
Если ни один рассмотренный выше способ не помог, попробуйте прибегнуть к помощи специализированного софта, который предназначен для удаления неудаляемых обычными методами файлов. Помимо основной функции, многие программы располагают дополнительными возможностями по работе с данными: копирование, смена имени, отображение заблокированных и скрытых файлов. В отдельной статье на нашем сайте разобраны наиболее эффективные и проверенные приложения, а также представлены ссылки на их скачивание.
Подробнее: Программы для удаления файлов, которые не удаляются

Наша группа в TelegramПолезные советы и помощь
Forcing a stubborn file to delete on Windows 10 can seem like wrestling with a ghost. If you’ve tried the usual delete method and the file refuses to budge, don’t worry—there’s a way to make it disappear. The process involves using a mix of Task Manager and Command Prompt to bypass whatever is keeping the file open. Follow these steps, and you’ll be able to delete that pesky file in no time.
Here’s a simple guide to help you get that stubborn file out of your system. We’ll tackle this by closing any processes that might be using the file and then using the Command Prompt to delete it unconditionally.
Step 1: Identify the Stubborn File
Locate the file you want to delete in File Explorer and note down its path.
Ensure you have the correct file path since you’ll need it for the Command Prompt. You can find this by right-clicking the file, selecting properties, and copying the location.
Step 2: Open Task Manager
Press Ctrl + Shift + Esc to open the Task Manager.
In the Task Manager, look for any processes that might be using the file. This could include applications or background processes that are running the file. Close these processes to free up the file.
Step 3: Open Command Prompt as Administrator
Type ‘cmd’ in the Start Menu search bar, right-click Command Prompt, and choose ‘Run as administrator.’
Running the Command Prompt as an administrator gives you the necessary permissions to delete protected files or files used by the system.
Step 4: Use Command Prompt to Delete the File
Type the command del /f /s /q /a "" and press Enter.
This command forces the deletion of the file, regardless of any locks or permissions that might be in place. Make sure to replace “” with the actual path of your file.
Step 5: Close the Command Prompt
Once the file is deleted, type ‘exit’ and press Enter to close the Command Prompt.
It’s important to close the Command Prompt properly to ensure that no processes are left hanging.
After completing these steps, the file that was once immovable should be gone for good. If it isn’t, double-check you’ve got the right file path and that any related programs are closed.
Tips for Forcing a File Delete in Windows 10
- Always double-check the file path to avoid deleting the wrong file.
- Use Task Manager to ensure no processes are using the file.
- If you’re unsure of what a process does, look it up before ending it.
- Regularly empty your Recycle Bin to free up space and reduce clutter.
- Consider using third-party tools designed to force file deletions for more persistent issues.
Frequently Asked Questions
Why can’t I delete a file even with Command Prompt?
If Command Prompt fails, the file might be protected by the system or in use by an undetected process. Rebooting in Safe Mode can help.
Is it safe to force delete a file?
Yes, but proceed with caution. Ensure you’re deleting the correct file to avoid system issues.
Can I recover a force-deleted file?
Force-deleted files bypass the Recycle Bin and require specialized recovery software to retrieve, which may not always be successful.
What can I do if the file reappears after deletion?
This can occur if the file is associated with a software that regenerates it. Check the software settings to prevent this.
Can malware prevent file deletion?
Yes, malware can prevent deletion. Run a comprehensive antivirus scan to resolve underlying issues.
Summary
- Identify the stubborn file.
- Open Task Manager.
- Open Command Prompt as Administrator.
- Use Command Prompt to delete the file.
- Close the Command Prompt.
Conclusion
Forcing a file to delete on Windows 10 might feel like trying to catch a greased pig, but with the right tools, it’s completely doable. By using Task Manager and Command Prompt, you can break through those stubborn file barriers and clean your system. Remember to proceed with caution, especially when operating in the Command Prompt as an administrator. Deleting critical system files could lead to bigger problems, so always verify the file path before hitting Enter.
If you find yourself frequently battling with files that refuse to delete, it might be time to evaluate your system setup or consider third-party tools designed to handle such tasks more efficiently. These tools often provide a user-friendly interface that simplifies the entire process, sparing you from the command line’s daunting appearance.
For those interested in diving deeper, there are plenty of resources online that explore advanced file management techniques on Windows 10. Whether you’re a tech guru or just someone trying to tidy up their digital space, understanding how to effectively manage your files is an invaluable skill. So, roll up your sleeves, fire up that Command Prompt, and reclaim your computer’s cleanliness and efficiency!
Matt Jacobs has been working as an IT consultant for small businesses since receiving his Master’s degree in 2003. While he still does some consulting work, his primary focus now is on creating technology support content for SupportYourTech.com.
His work can be found on many websites and focuses on topics such as Microsoft Office, Apple devices, Android devices, Photoshop, and more.
Deleting files or folders in Windows 10 is something we do all the time. Regular file deleting simply requires you to right-click on the item and select the Delete option from the context menu, or after selecting the file, press the Delete key on your keyboard directly.
You can also permanently delete a file or folder using the Shift + Delete keys combination. But some files or folders are so stubborn that you can’t delete them no matter what you do, only get the error message «Cannot delete [filename]: Access is denied».
There are many reasons why a file or folder cannot be deleted. For example, the file or folder is in use by a program and you cannot delete it until the program using the file is closed. Or the folder is read-only, the disk on which the files are stored is write-protected, the Recycle Bin is full, and so on. Whatever the reason, if you are sure that the file or folder is useless, you can try the following four methods to force delete folders or files on Windows 11/10/8/7.
| Workable Solutions | Step-by-step Troubleshooting |
|---|---|
| Fix 1. Force delete folder in CMD | If you can’t regularly delete some folders or files, you can apply the DEL command in CMD…Full steps |
| Fix 2. Force delete folder with software | Using force delete folder software to learn files that can’t be deleted is a useful and simple way…Full steps |
| Fix 3. Delete files with ownership | To delete files or folders on Windows, you need to have user ownership. Gain or change the ownership…Full steps |
| Fix 4. Force delete a folder or file in Safe Mode | In Safe Mode, problematic applications or features won’t start, you can delete folders…Full steps |
1. Force Delete Folder Windows 10 Using Del Command in CMD
Windows’ Command Prompt can be used to perform advanced operations, including forcing delete folders or files, whether or not a program is using them. If you’re a computer expert, Command Prompt is a great disk and file management tool for you.
Here’s how to force delete a folder on Windows 10.
Step 1. Press Win + E to open File Explorer. Find the file or folder that is to be deleted. Copy the location of the file or folder.

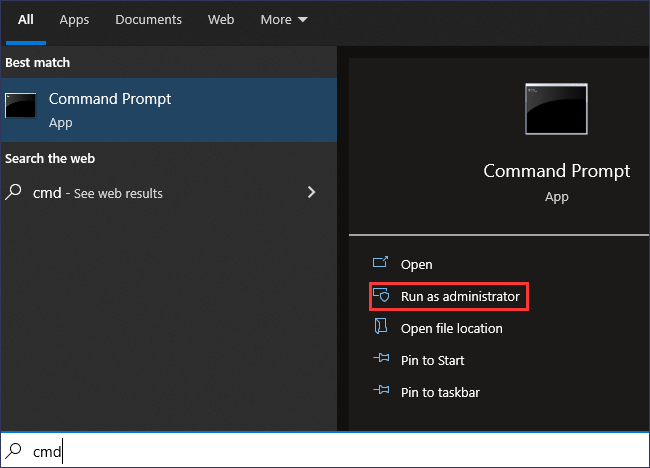
Step 2. Click the Search button and type in cmd. Click on «Run as administrator» on the right panel to open it with admin rights.
Step 3. Type the following command and press Enter.
del (FilePath)
e.g. del D:\Pictures. Replace the FilePath with the file or folder address copied in Step 1.
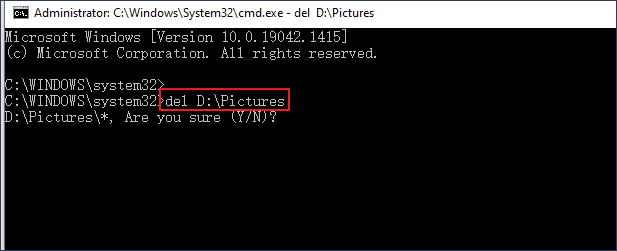
Step 4. Type Y for «Are you sure (Y/N)?» and press Enter. Then, the folder will be deleted fast.
- Warning
- The DEL command will permanently delete a folder or file bypass the Recycle Bin on your Windows PC, and you can’t restore it unless using a professional file recovery tool.
How to Recover Permanently Deleted Folders or Files on Windows 10/11
You may permanently lose files by accidental deletion/formatting, hard drive corruption, virus attack, or OS crash. In any case, you can use EaseUS data recovery software to retrieve lost or deleted files safely and efficiently.
EaseUS Data Recovery Wizard is one of the top-notch data recovery software that you can use to recover lost and deleted files stored on HDD, SSD, SD card, USB flash drive, pen drive, and many more devices without hassle.
What’s more, it’s also good at repairing corrupted files after data recovery. You can repair corrupted videos (MOV/MP4/GIF), photos(JPEG/JPG/BMP/PNG), and documents (DOC/DOCX/XLS/XLSX) effortlessly.
Now, free download this reliable file recovery program to restore more than 1000 kinds of files like video, audio, documents, graphics, emails, and other files.
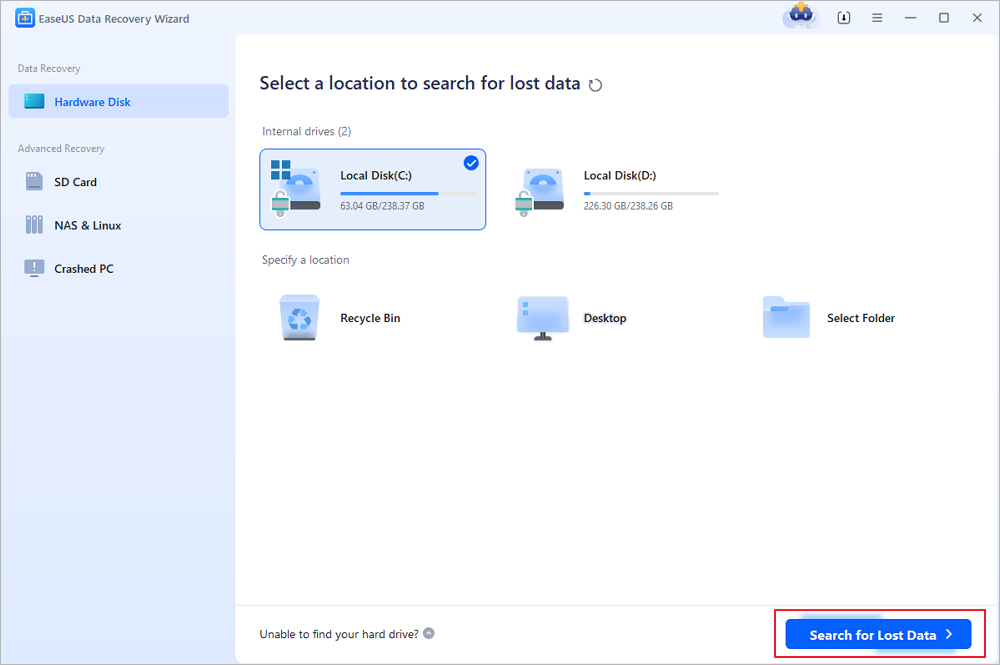
Step 1. Select the location to scan
Choose the specific device and drive where you have permanently deleted files using Shift delete or emptying recycle bin. Then, click the «Search for Lost Data» button to find lost files.
Step 2. Check the results
The software will automatically start scanning all over the selected drive. When the scan completes, select the deleted or lost folders in the left panel using the «Path» feature. Then, apply the «Filter» feature or use the search box to quickly find the deleted files.

Step 3. Recover deleted files
Select the deleted files and click «Preview». Next, click «Recover» to save them to another secure location or device. You can choose a cloud storage, such as OneDrive, Google Drive, etc., and click «Save» to save your recovered files.

2. Use a File Shredder Tool to Force Delete a Folder or File
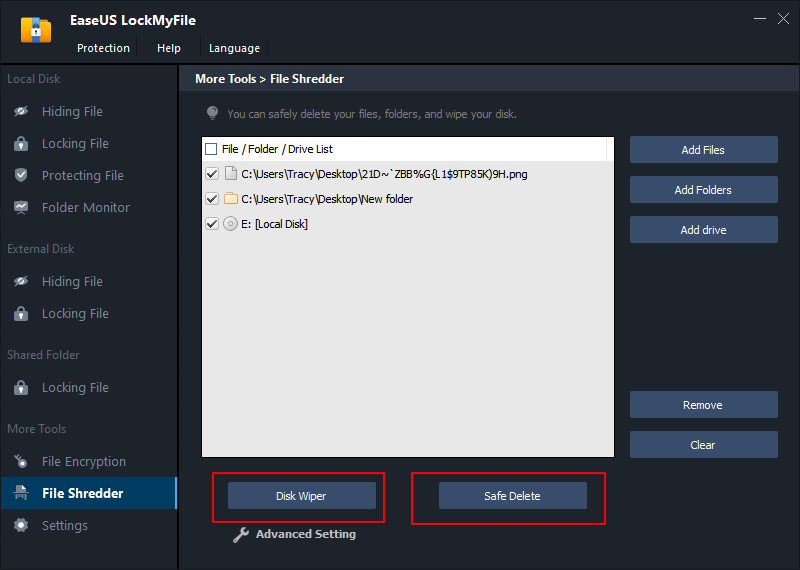
Another useful way to remove folders or files that cannot be deleted is using a simple file shredder. EaseUS LockMyFile is an easy-to-use file management tool that can help you delete and shred files or folders from your computer completely with its File Shredder feature.
Step 1. Download and launch EaseUS LockMyFile.
Step 2. Click «File Shredder» under More Tools, click «Add Files, Add Folders, or Add drive» to select files, folders, or a disk that you need to shred.
Step 3. Confirm the files, folder, or drive that you need to shred, click «Safe Delete» or «Disk Wiper» to shred the selected items.
These are for removing unwanted folders or files. The software is best known for file/folder protection, including file encryption, file locking, file hiding, and so on. If you need maximum protection for your important data, try this tool.
3. Force Delete Folders Windows 10 by Changing File Ownership
To delete a file or folder, you need to have ownership of that folder/file. If you are trying to remove folders created by another user, learn how to get ownership on Windows 11/10/8 with the steps below.
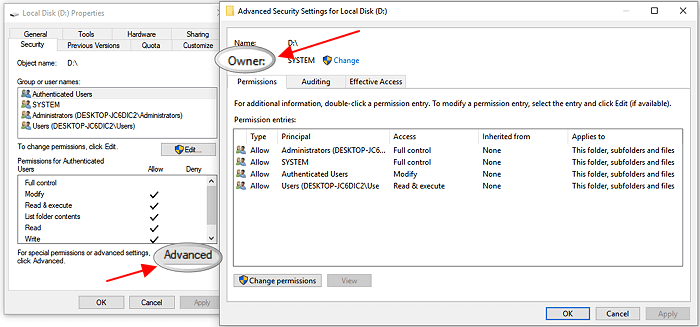
Step 1. Go to Windows File Explorer and find the file/folder you need to delete. Right-click it and select «Properties».
Step 2. Click «Security» > «Advanced» as shown in the screenshot below.
Step 3. To change a user or a group that already existed: click «Change», choose the target user account, and click «OK» to save changes.
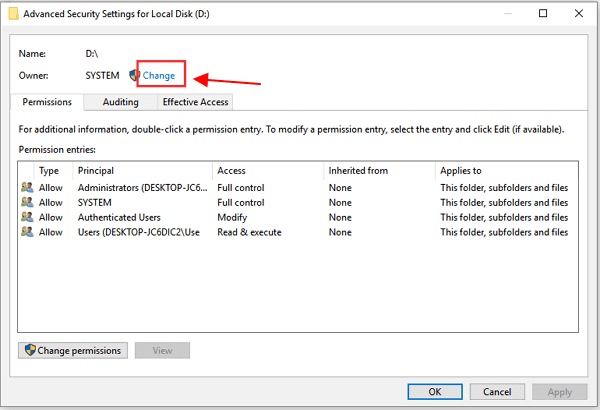
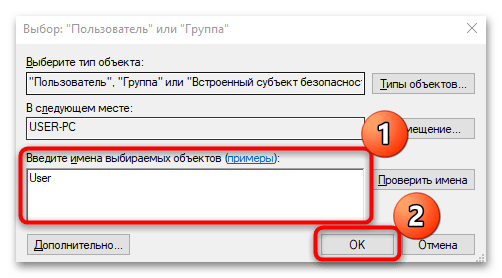
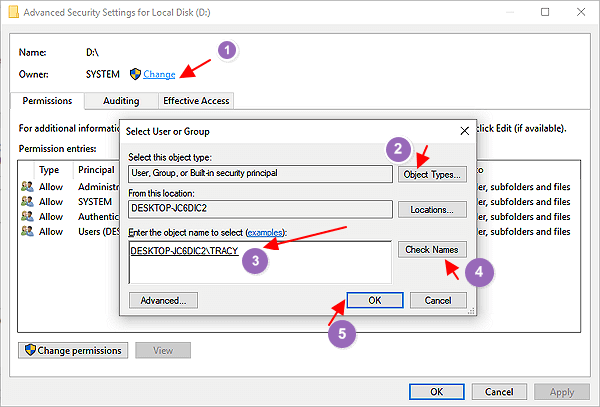
If you want to change the ownership to a user or group that does not exist: Click «Change» > «Object Types…», and type the name of the user or group under «Enter the object name to select», then click «Check Names» > «OK».
Step 4. If you want to change the owner of all sub-containers and objects, tick the «Replace owner on sub-containers and objects» box.
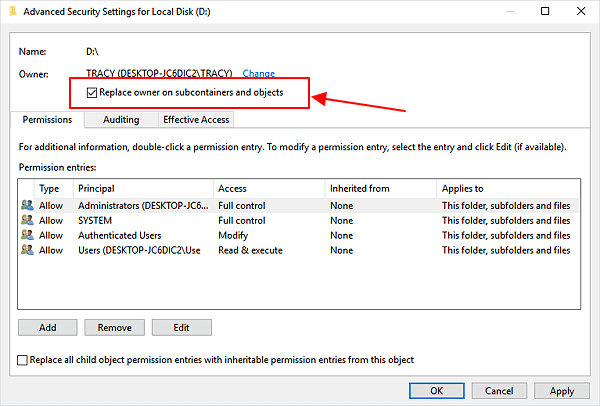
Then, try again to see if you can delete folders or files that cannot be deleted.
Gain ownership to force delete folder on Windows 7:
Step 1. Right-click the target folder or file and choose «Properties».
Step 2. Click the «Security» >»Advanced».
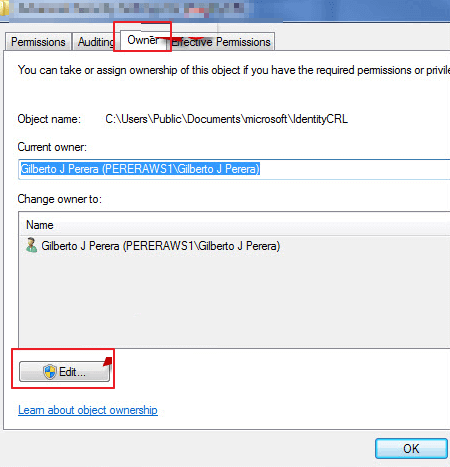
Step 3. Click the «Owner» > «Edit» to change the owner.
Step 4. Click «Other users or groups» to choose the user manually.
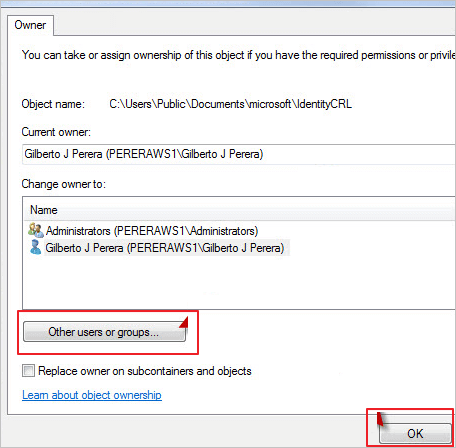
Step 5. Follow the on-screen instructions to change the ownership like the above Step 3 on Windows 10.
4. Force Delete a Folder or File Using Safe Mode
If the above methods failed, you still have the last chance to force delete folders on Windows 10 or Windows 11 in Safe Mode. In safe mode, most applications will not start, so there is a very simple environment to delete a file/folder.
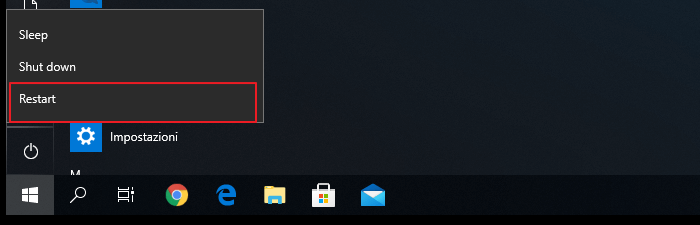
Step 1. Click the Windows button and choose «Power». Hold the «shift» key and click «Restart».
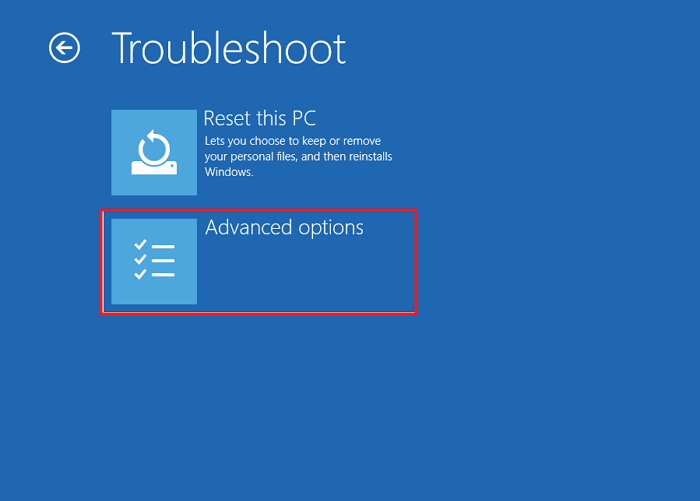
Step 2. Click the «Troubleshoot» > «Advanced options».
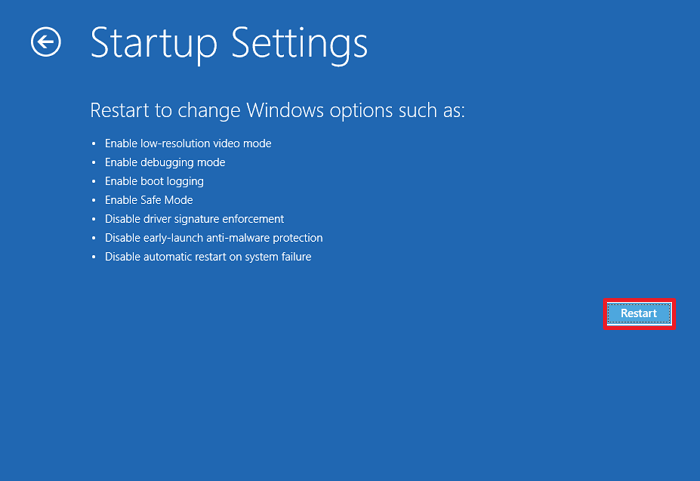
Step 3. Click «Startup Settings» on the following screen. Then, click «Restart».
Step 4. From the startup settings, choose one way to enable Safe Mode as listed in numbers 4, 5, and 6.
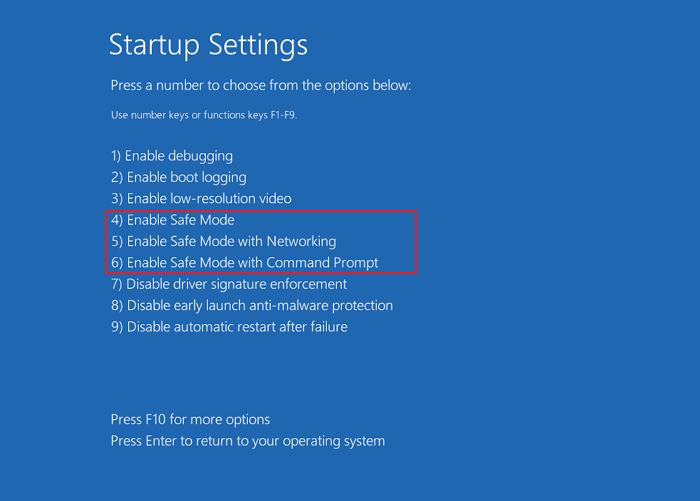
Then, your Windows computer will start in Safe Mode. You can try to delete folders or files again.
Concluding Words and FAQs
We covered these four working solutions to help you force delete a folder or file in Windows 10 or Windows 11. Other quick tips you can try to remove an undeletable folder or folder are checking your antivirus, which protects your files from being deleted, rebooting your system, uninstalling some third-party applications, and more.
Before performing force delete, make sure that the data you are going to clear is the target folder or file. If an error occurs, stop using your computer or external device and use EaseUS data recovery software to retrieve your data immediately.
More Force Delete Folder FAQs
1. How to force delete folder Windows 10 open in another program?
To overcome the File in Use error when deleting folders, you can:
- Close the program via the Task Manager
- Restart your computer
- Force delete folder using CMD
- Force delete folder with software
2. Force delete folder software
Try the following two force delete folder software on Windows 10/8/7
- EaseUS LockMyFile: its File Shredder feature allows you to completely delete folders, files, or even wipe the whole disk
- EaseUS Partition Master Free: its Wipe Data feature enables you to clean partition data permanently
3. How to force delete folder Windows 10 PowerShell
Step 1. Search for PowerShell and run it as administrator.
Step 2. In the Command Prompt window, type remove-item D:\Pictures and hit Enter key.
Tip: Replace D:\Pictures with the location of the file or folder you need to delete.
Want to force delete file or force delete folder Windows 10 using Command Prompt? Learn how to force delete a file or force delete a folder in Windows 10 PC.
We do have lots of files and folders on our laptops, computers where we store our data. Over the time, these files and folders multiply as we download new stuff from the Internet.
Sometimes, it is possible that you are not able to delete a file or folder from your computer running on Windows 10 or any previous operating systems.
If we look at the common practice, we can simply delete any file or folder just by pressing the Delete key. However, if you are having viruses on your system it might restrict you to delete any file or folder which you are trying to.
It is important that you delete all the files and folders which are getting multiplied by the virus as it might infect your entire system. The normal process won’t work here and one has to force delete file or folder in this case.

(Disclosure: This post contains affiliate links and images. I earn advertising/referral fees if you make a purchase by clicking them. There is no extra cost to you. See our full disclosure here. )
The processes to force delete a file or force delete folder Windows 10 is a bit different as compared to the normal deletion process. With the force delete method, you will be able to easily delete any undeletable files and folders which you wish to.
These below explained solutions to force delete folder in Windows 10 will not only work if your system is infected with virus or malware and is leading to the creation of multiple files and folders but will also help you out in normal scenarios where you are not able to delete any file or folder with your system being secure.
To force delete a file or folder in Windows 10 PC, you can use either a third party force delete folder software and file deleter software like Unlocker or you can go with the Windows Command Prompt which comes pre-installed in all Microsoft Windows operating systems.
So without any delay, let’s learn how to force delete file or how to force delete folder in Windows 10 operating system using Command Prompt and delete undeletable stuff.
Deleting undeletable files using Command Prompt is a pretty simple thing if you know the right command line and how to apply them. Follow the below explained instructions and learn how to force delete files using CMD on Windows 10 computer:
Step (1): At first, right-click on the Start button and select Command Prompt (Admin) option from the power user menu to open Command Prompt with administrative privileges on your system.
Step (3): Once the Command Prompt window is opened, enter the following force delete file command line and press Enter key:
DEL /F /Q /A <File Path>
If you are confused by the attributes which you see above, don’t worry. In the above command line, /F parameter stands for force deletion of the files. /Q parameter ensures the forces deletion of read-only files. /A parameter is here to select only the files with the ready for archiving attribute.
And finally, you have to replace <File path> with the path of the file which you want to force delete from your computer.
We have shared an example below of how the command would look like if we want to force delete a file named Report.txt which is present on our desktop.
DEL /F /Q /A C:\Users\Dell\Desktop\Report.txt

Once you have executed this command, you should be able to delete the file which you wanted to. We hope now you know very well how to delete undeletable files using command prompt in Windows 10 computer.
How to Force Delete Folder in Windows 10
The above-explained method is going to help you in force deleting a file, but if you want to learn how to force delete a folder using CMD on Windows 10 computer then follow the below explained instructions:
Step (1): First of all, open Command Prompt with admin rights just by right-clicking on the Start button and then selecting Command Prompt (Admin) option from the power user menu.
Step (2): Once you have opened the Command Prompt window, enter the following force delete folder command line and press Enter key:
RD /S /Q <Path of the Folder>
Here RD stands for Remove Directory, /S parameter is responsible for deleting all the subfolder and files. /Q parameter deletes all the directories without any confirmation.
And finally, you have to replace <Path of the Folder> with the path of the folder which you want to force delete from your computer.
Here is an example, how the complete command will look like if you want to delete a particular folder.
RD /S /Q C:\Users\Dell\Desktop\Report

Once you have executed this command, you should be able to delete the folder which you wanted to.
Thus, you can see how simple is to force delete undeletable files using CMD and force delete folder in Windows 10 PC.
Conclusion
These are the two simplest methods which will help you in force deleting files and force deleting folders from your Windows 10 computer using command prompt.
If you have any better solutions of how to force delete a file without using any software or how to force delete folder Windows 10 then feel free to let us know using the comment section below.
You may also be interested in checking out:
- How to Fix Windows 10 File Explorer Not Responding
- How to Reset Windows 10 File Associations or Change File Type
- How to Change the Owner of a Shared Folder in Dropbox
- Where is Startup Folder in Windows 10?
- How to Fix “Outlook data file cannot be accessed” in Windows 10
- What is Pagefile and How to Disable Page File in Windows 10?
- How to Deny Security Permission to Make Folder Undeletable
Trying to delete a stubborn file or folder from your Windows PC can be frustrating. For example, you could be pressing delete and thinking the file or folder is gone, only to find it in the exact location you removed it from.
There are several reasons why you can’t delete a file or folder, including:
- The file may be in use by another program, background process, or application.
- The file’s unlock process may not have been completed.
- Disk failure or corruption.
- The folder or file is read-only or corrupted.
- You may be trying to delete a system file.
- The Recycle Bin is either full or corrupted.
- The file or folder is infected with malware or a virus.
- The disk is write-protected or full.
- You get the Access Denied warning when you try deleting files or folders from a mounted external drive.

This guide explains how to force delete a file or folder in Windows 10 and get rid of it for good.
You can force delete a file or folder in Windows via Command Prompt, Safe Mode, using a keyboard shortcut, or using a third-party app. Before trying any of these methods, here are a few basic steps to help you get around the issue:
- Close any running applications or programs on your computer, and then delete the file or folder again.
- Use Task Manager to close the file or folder and then try deleting it again.
- Restart Windows and see if you can delete the file or folder successfully once your computer reboots.
- Run a virus or malware scan to check for threats that may lurk within your PC.
- Check whether the file or drive is marked as read-only, otherwise you may not be able to delete the file or folder. You can do this by right-clicking on the file or folder and selecting Properties.
- Update Windows and then try to delete the problematic file or folder.
If the above basic steps didn’t help resolve the issue, use the methods below to force delete a file or folder in Windows.
Force Delete a File or Folder in Windows Using Command Prompt
Command Prompt in Windows PCs can perform advanced administrative functions, automate tasks via batch files and scripts, and troubleshoot issues in Windows.
How to Force Delete a File Through Command Prompt
- Type CMD in the search box and select Run as administrator.

- Type cd x:\ and press Enter. In this case, x represents the name of the drive letter, where the folder containing the file you want to force delete resides.

- Type del filename and press Enter. Make sure you replace the filename with the name of the file you want to delete in Windows.

Alternatively, type the command as del /F c:\users\thispc\desktop\filename to force delete the file if it is read-only. In this case, you’ll enter del plus your the /F parameter, the file’s location, and the filename, which would look something like this: del /F c:\admin\thispc\desktop\deletethis.
Note: If you use del to delete a file in Windows, you can’t retrieve the file later.
How to Force Delete a Folder Through Command Prompt
If the folder has a file in it, you can use the steps above to force delete the file and then use Command Prompt to delete the folder. This process can be tedious and time-consuming if you have many nested files and folders, but here’s how to do it quickly.
- Open Command Prompt > Run as administrator.
- Use the /s flag with rmdir to force delete the folder along with subfolders and files in it. For example, if you want to remove a folder called “Test Folder”, enter rmdir /s test folder.

- If you get a prompt to confirm the deletion, select Y and press Enter.

Note: Any folder you delete using the rmdir command cannot be retrieved.
Delete a File or Folder in Windows Using Safe Mode
Safe Mode is a diagnostics mode that starts Windows in a basic state with a limited set of drivers and files. You can delete files or folders in Safe Mode, which you’d otherwise not be able to delete before.
Enter Safe Mode, find the file or folder you want to delete, and then reboot your PC to exit Safe Mode.
Use a Third-Party Program to Force Delete a File or Folder in Windows
If you still cannot force delete a file or folder after trying the steps above, you can use a third-party program to simplify the deletion of the files and folders.
Unlocker is one of the best file or folder deletion programs that allows you to regain control over your data by unlocking files and killing unresponsive processes.

The app can kill processes, unload DLLs, unlock, delete, rename or move locked files without restarting your computer and deleting index.dat files. However, Unlocker can kill important processes and delete critical files from Windows, so you need to be cautious when using the app.
Other similar tools that you can use include File Assassin and Long Path Tool.
Remove Stubborn Files and Folders from Your PC
Trying to remove undeletable files and folders from your computer can be stressful. However, with the solutions here, you should get around this problem and delete the files or folders for good.
Let us know what worked for you by leaving a comment in the section below.
Related Posts
- How to Fix a “This file does not have an app associated with it” Error on Windows
- How to Fix an Update Error 0x800705b4 on Windows
- How to Resolve “A JavaScript error occured in the main process” Error on Windows
- How to Fix the Network Discovery Is Turned Off Error on Windows
- How to Change Folder Icons in Windows