,
The following issue may appear on a Windows 10 based computer. The «SrTasks.exe» causes the disk to work at 100%. The «SrTasks.exe» (Microsoft System Protection Background Tasks) process, is a legitimate Windows process, and it used to start up the Volume Shadow Copy Service and the Microsoft Software Shadow Copy Provider service.
The «SrTasks.exe» process starts the related services needed to create restore points and normally should not affect the system performance continuously, and especially in systems where the «System Protection» is disabled.

This tutorial contains instructions to resolve the SrTasks.exe 100% Disk Usage issue on Windows 10.
How to Fix SrTasks.exe High Disk Usage in Windows 10.
Method 1. Scan your computer for Malware & Viruses.
The first step to troubleshoot the «SrTasks.exe high disk usage» problem, is to ensure that your system is virus/malware free. For that task follow the instructions in this guide: How To Scan Your Computer for Viruses and other Malicious Programs.
Method 2. Disable System Protection.
The second method to resolve the high disk usage issue which caused from the «SrTasks.exe» process, is to disable the System Restore Protection on your PC. To do that:
1. Open Windows explorer, right click at ‘This PC» and choose Properties.

2. Choose System Protection at the left.

3. Highlight the Local Disk C: (System) and click Configure.
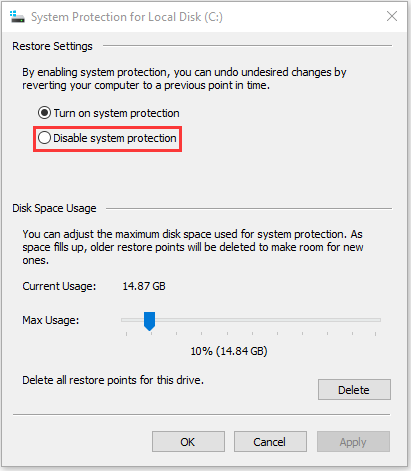
4. At System Protection options, select Disable system protection and click OK. *
* Note: If the «System Protection» is already disabled, then continue to next method.
5. Restart your PC and then check if the high disk usage issue has resolved. If the problem persists, re-enable the system protection and continue to next method.
Method 3. Disable Superfetch Service.
In many cases, the 100% disk usage issue, is resolved after disabling the Superfetch service. To disable the «Superfetch» service:
1. Press Windows + R keys to open the run command box.
2. In the Search box, type: services.msc & click OK.

3. At the services list, double click at Superfetch service to open its properties.
4. Set the ‘Startup type’ to Disabled and then OK.

5. Restart your computer. If after restart the problem persists, re-enable the «SuperFetch» service and continue to the next method.
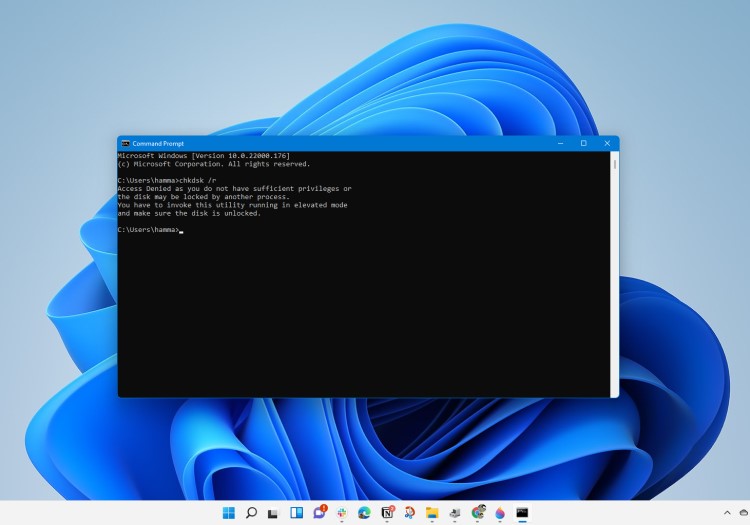
Method-4. Run Check Disk to Find and Fix Hard Disk Errors.
1. Open Command Prompt as Administrator. To do that:
1. Press the Windows + R keys to open the ‘Run’ command box
2. Type CMD and then press CTRL + SHIFT + ENTER.
2. At command prompt give the following command to repair your disk and press Enter.
- chkdsk C: /R
3. Press the Y key to schedule the checking at the next restart.
4. Restart your computer.

5. Now wait for the disk check process to finish. (it will take several hours).
6. When the check disk process is completed, check if the «SrTasks.exe High Disk Usage» has resolved.
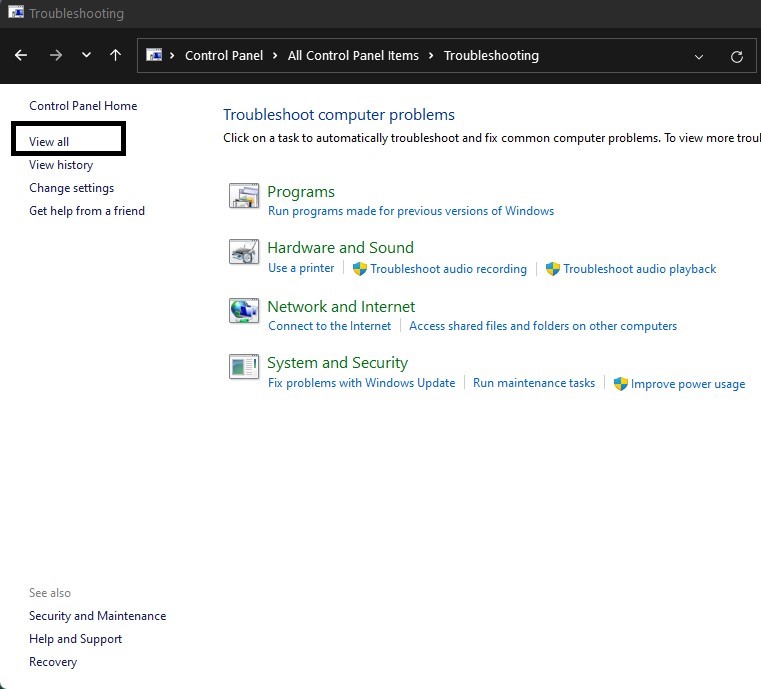
Method 5. Troubleshoot Windows problems by Running the Maintenance Tasks.
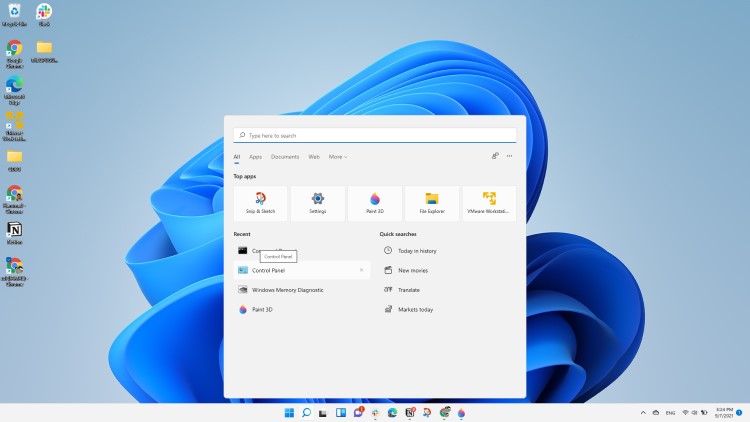
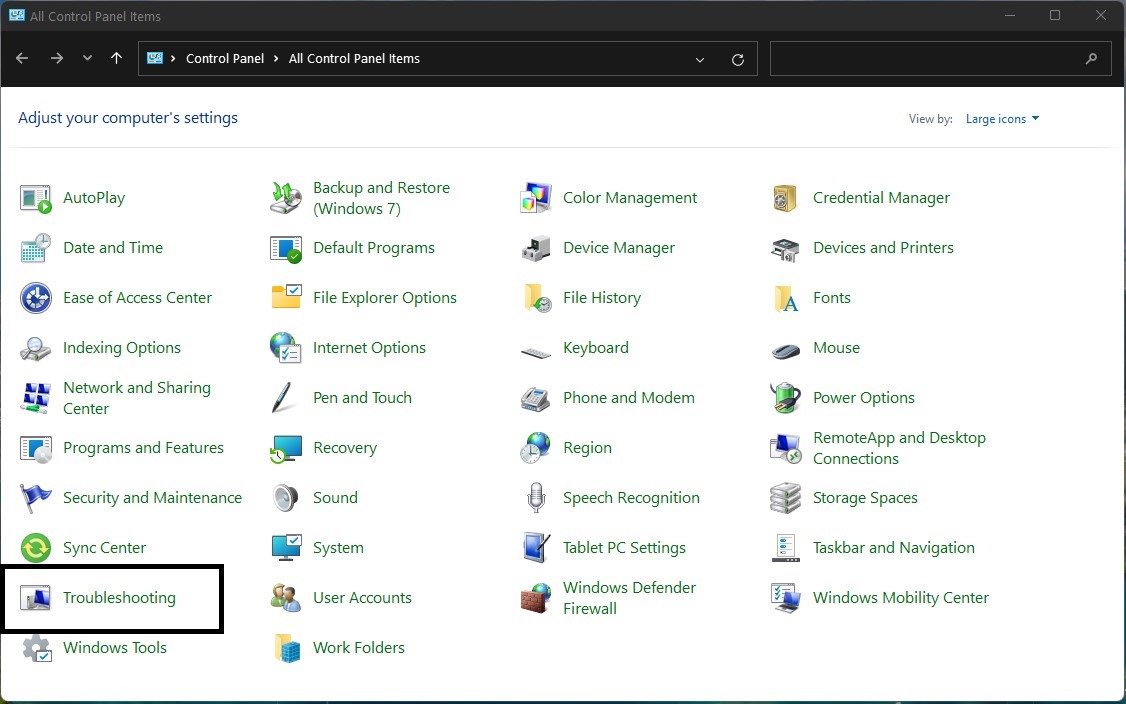
1. Navigate to Control Panel and open Troubleshooting. *
* Note: If you don’t see the Troubleshooting option, set the ‘View by’ to Small icons.

2. Under ‘System and Security’, select Run Maintenance Tasks.

3. Press Next and then wait until the System Maintenance utility detecting problems.
4. Follow the on screen instructions to fix the problems found.
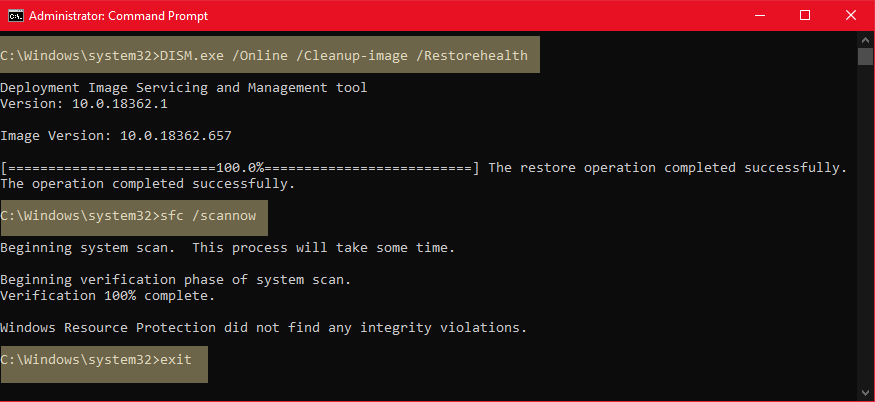
Method 6. Repair Windows System Files.
Another method to resolve the SrTasks.exe high disk usage issue in Windows 10, is to repair Windows by using the DISM and SFC commands.
1. Open Command Prompt as Administrator.
2. In command prompt give the following command and press Enter:
- DISM.exe /Online /Cleanup-image /Restorehealth

3. When the DISM operation is completed, type the following command and hit Enter:
- sfc /scannow

4. Now wait until the System File Checker repairs the Windows System Files.
5. When this done, restart your computer.
That’s all folks! Did it work for you?
Please leave a comment in the comment section below or even better: like and share this blog post in the social networks to help spread the word about this solution.
If this article was useful for you, please consider supporting us by making a donation. Even $1 can a make a huge difference for us.
- Author
- Recent Posts
Konstantinos is the founder and administrator of Repairwin.com. Since 1995 he works and provides IT support as a computer and network expert to individuals and large companies. He is specialized in solving problems related to Windows or other Microsoft products (Windows Server, Office, Microsoft 365, etc.).
Microsoft Windows System Protection Background Tasks, also called SrTasks.exe, is used for creating system restore points by the Windows Task Scheduler. However, this important Windows service can also hog up your system resources.
System Protection Background Task having insanely high CPU and Disk usage is a common issue in Windows 8 and 10. Furthermore, you cannot even end the task through normal means, and SrTasks.exe gets stuck with high CPU and Disk usage.
In this article, we have listed the cause and fixes for System Protection Background Task having high CPU and Disk usage.
Why Does Srtasks.exe Hog All System Resources?
Here are some probable causes for why Microsoft Windows System Protection Background Tasks use high CPU and disk space.
- Bugs and errors in the Windows system
- Software conflict
- Malware and Viruses
- Corrupted system files
How to Fix Microsoft Windows System Protection Background Tasks Having High CPU and Disk Usage?
Fixing System Protection Background Tasks using high CPU and disk space can be very easy and relatively hard, depending on what is causing the issue.
Before jumping into any other troubleshooting methods, make sure to restart your PC first. Follow along and try the different fixes to see which one works for you.
Run Performance Troubleshooter
Windows has a built-in Performance troubleshooter to check and fix any issues that might lower your PC’s speed. We know the cause; System Protection Background Tasks use high CPU and disk space. So, you just have to run the Performance troubleshooter to fix this issue automatically.
Here’s how to run the Windows Performance troubleshooter.
- Search the Control Panel in the search bar and open it.
- In the Control Panel, next to view by, select Large icons.
 High CPU & Disk Usage 16")
- Scroll down and click on Troubleshooting.
 High CPU & Disk Usage 17")
- Under System and Security, click on Run maintenance tasks.
- In the new window, click on Advanced and Run as Administrator.
 High CPU & Disk Usage 18")
- Hit Next.
 High CPU & Disk Usage 17")
 High CPU & Disk Usage 18")
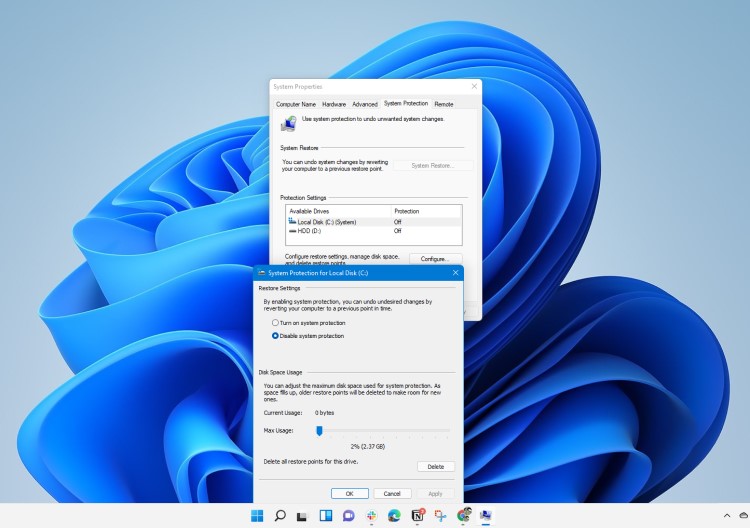
Disable System Restore
Task schedulers use System Protection Background Tasks to make a system restore point. While the SrTasks.exe isn’t supposed to hog so many system resources, bugs and errors can cause it to malfunction.
Nonetheless, disabling system restores altogether stops the function of SrTasks. While doing this will solve your issue, you won’t be able to perform a system restore in the future. System restore is essential to troubleshooting other Windows errors, and you should consider it before trying out this fix.
To disable system restore, follow the steps below.
- Open the Run box and enter systempropertiesprotection
- In the System Properties window, click on Configure.
 High CPU & Disk Usage 19")
- Select Disable system protection, click Apply and OK.
 High CPU & Disk Usage 20")
- Follow the on-screen instructions.
 High CPU & Disk Usage 19")
 High CPU & Disk Usage 20")
Update or Roll back Windows OS
Most users experienced this issue after a Windows update. While the newer updates have the bug fixed, some users still experience this issue after updating their windows. In this case, you can either update to the latest version or uninstall recent updates.
Here’s how you can update your Windows OS.
- Open Settings from the start menu.
- Click on Update & Security.
- In Windows update, click on Check for updates.
 High CPU & Disk Usage 21")
- Install the new update if there are any.
 High CPU & Disk Usage 21")
Here’s how to uninstall recent Windows updates.
- Open Settings from the start menu.
- Click on Update & Security.
- In Windows update, click on View update history.
 High CPU & Disk Usage 22")
- Click on Uninstall updates.
 High CPU & Disk Usage 23")
- In the new window, uninstall recent updates.
- Restart your computer.
 High CPU & Disk Usage 22")
 High CPU & Disk Usage 23")
Furthermore, if the issue started after upgrading your Windows version, you can downgrade to your previous version.
Disable Superfetch
Disabling Superfetch can also help solve this error. Superfetch pre-loads all the apps you use frequently, which could cause System Protection Background Tasks to use high CPU and Disk space. It can be because Superfetch is malfunctioning, or it thinks you use SrTasks frequently.
To disable superfetch, follow the steps below.
- Press
Windows + Rkeys to open the Run box. - Type
service.mscand press Enter. - Locate SysMain, right-click it, and click on Stop.
 High CPU & Disk Usage 24")
- After SysMain stops, right-click on SysMain again and press on Properties.
- Next to Startup type, choose Disabled and click Apply.
- Press OK.
 High CPU & Disk Usage 24")
Check for Viruses & Malware
Malware and viruses can also disguise themselves as Windows system processes and cause harm to your computer. If SrTasks uses too much CPU and Disk space, check if the process has any typos. A virus or malware usually has typos to disguise as a system process while still being named differently.
Here’s how to check if SrTasks.exe is a virus or not.
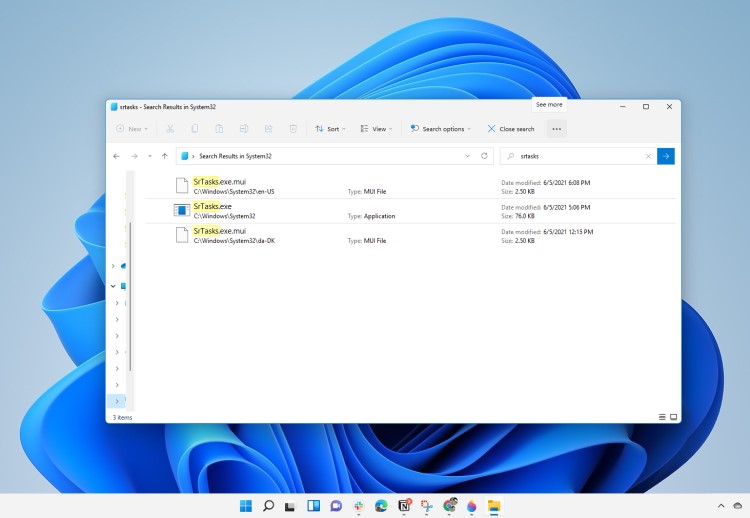
- Open Taskmanager from the taskbar.
- Locate
SrTasks.exein the Task manager and right-click it. - Click on Open file location.
If the SrTasks process is in the C:/Windows/System 32 directory, it is a legit system process. If the SrTasks process is not in System 32, it is probably a virus or malware.
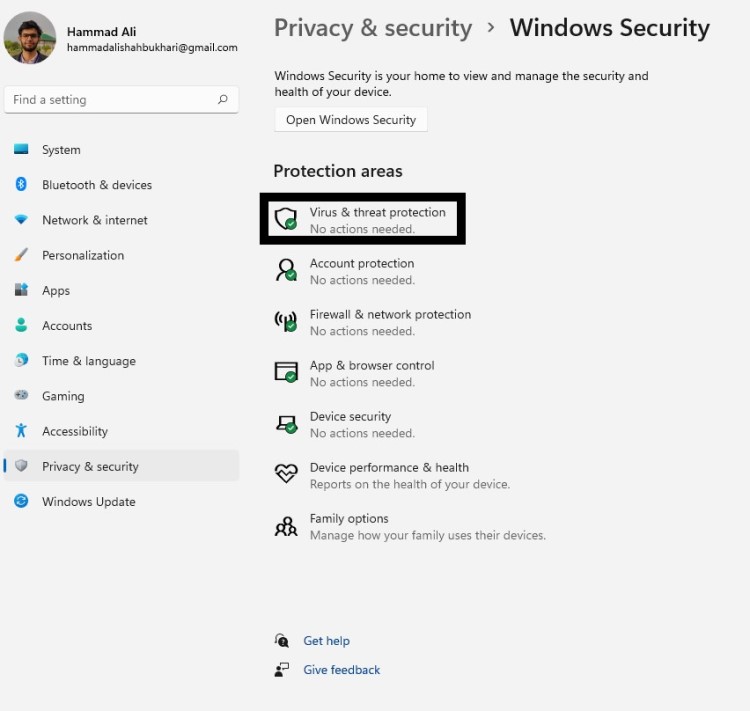
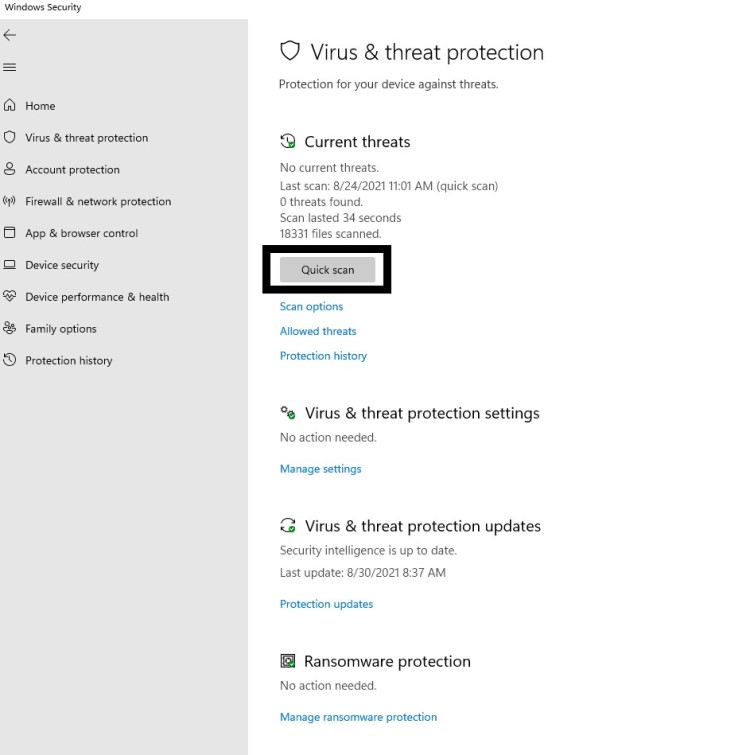
However, please don’t rush to delete the virus. You should run your antivirus and let the antivirus handle it. Here’s how you can run the built-in Windows antivirus, Virus & threat protection.
- Open settings and press Update & Security.
- Select Windows Security and click on Virus & threat protection.
- In the Window security window, click on Scan options.
 High CPU & Disk Usage 26")
- Select Full scan and tap Scan now.
 High CPU & Disk Usage 27")
 High CPU & Disk Usage 26")
 High CPU & Disk Usage 27")
Run the CHKDSK Command
System Protection Background Tasks use a specified amount of disk space to create system restore points. However, if the disk space assigned to SrTasks becomes defective (damaged disk sector where the system cannot read or write), the SrTasks can get stuck trying to create a new system restore point there. It causes SrTasks to use high disk space and lag your PC.
The CHKDSK command checks and fixes any issues like the bad disk sector and stops SrTasks from trying to keep writing in the corrupt sector.
Follow the steps below to run the CHKDSK command.
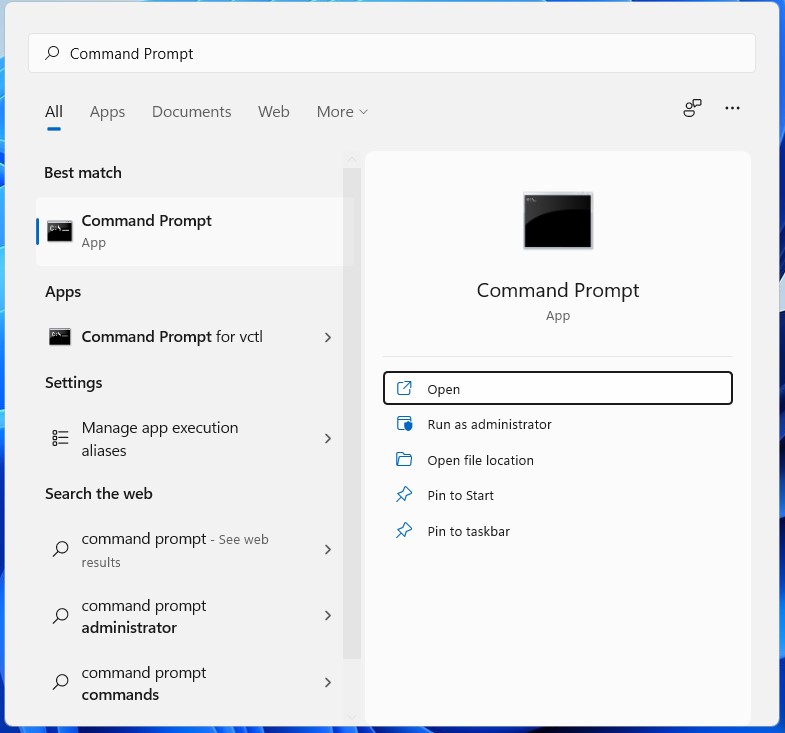
- Search Command Prompt in the search bar and right-click Command Prompt.
- Select Run as Administrator and select Yes in the dialog box.
- Type
Chkdsk C: /x/f /rin the panel and press Enter. (Windows systems are usually installed in C drive. If your Windows system is on a different drive, enter that drive in the command.) High CPU & Disk Usage 28")
- Follow the on-screen instructions.
 High CPU & Disk Usage 28")
Run in Safe Mode and Clean Boot
Safe mode starts the PC with a minimal number of drivers and files to troubleshoot if any program is interfering and causing the errors. If any programs are conflicting with SrTasks and causing this issue, you can check with safe mode and identify the program with Clean boot.
Here’s how to run in Safe mode:
- Restart your PC and hold down the shift key as it is restarting.
- An options menu will pop up. Select Troubleshoot.
- Click on the Advanced Options and tap on Startup Settings.
- Click on Restart.
- After your PC restarts, you will be given a few options. Choose either Enable Safe Mode or Enable Safe Mode with networking.
 High CPU & Disk Usage 29")
 High CPU & Disk Usage 29")
If your System Protection Background Tasks stay normal in Safe mode, a different program is likely interfering with it to cause the error. You can locate the misbehaving program with a Clean boot.
Then perform a clean boot following the steps below.
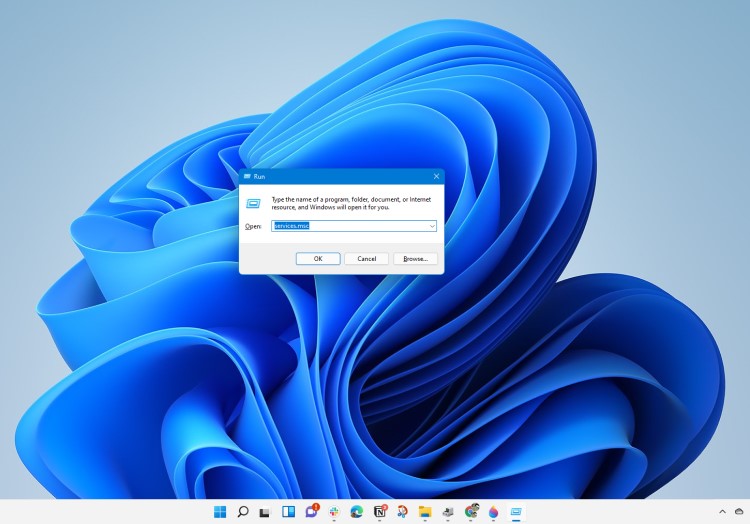
- Open the Run and enter
msconfig. - Go to the Services tab and click on Hide all Microsoft services.
 High CPU & Disk Usage 30")
- Click on Disable all and hit Apply.
- Go to the Startup tab and click on Open Task Manager.
- Disable all the startup programs.
- Restart your PC for the changes to take effect.
 High CPU & Disk Usage 30")
Enable the services and program one by one to pinpoint which software is causing the error and disable that software. You can enable the services and programs in groups to efficiently sort it out.
Windows 10 is an operating system that was introduced by Microsoft. A file that is associated with Microsoft Windows System Protection Background Task is srtaska.exe. SRTasks stands for System Runtime Tasks. And also, it does not cause any harm to the Computer. Usually, all this procedure inhabits 50-60% of your CPU, but it consumes 70% or more than 70% of the CPU usage. It is a widespread error that can be faced by anyone. So it is part of Windows, so the location for this in Windows 10 is- C:\Windows\System32. But you can’t find this in the older versions of Windows, like in Windows 7.
What is Microsoft System Protection Background Tasks?
Microsoft Windows System Protection Background Tasks run a legitimate file, which is the srtasks.exe files. This executable file, generally used by Windows 10 task scheduler, is used to create system restore points. All these methods use some of the space of the CPU.
If you wish learn entire concept, you can attempt CCNA Practice Test Dumps.
Potential Security Threat
According to some users, the antivirus application has marked this process as a potential malware application. In the process of making it more creative, virus, malware, and trojan creators invented the same name after the appearance of its effect. This is the method that most people refer to as camouflage, which is the time to call for it. At this time, you can check if you are getting the malware threat by seeing the location of srtasks.exe’s location. In this case, you will have to open the Task Manager, and you need to find the location of the srtasks.exe process, which will be found in the process tab. After this, you will have to the right click on srtasks.exe process and click on “Open File Locator.”
Now, if you find that the process gets back to Windows>System 32, then Congratulations! There is no virus. But if you find it in a different location, then there is a virus. In this situation, try doing a full malware scan in your system.
Is deleting SRTasks.exe good thought?
SRTasks.exe is a real Windows Process that is signed by Microsoft Corporation. You should not delete this executable file. If you find that the CPU has high usage or high Disk usage in any case, you can get that also due to an error that appears while creating a system restore point. In this case, you can only do is to reboot your system and see if the CPU usage or high Disk usage has come down or if this error still occurs.
There are many methods of fixing Microsoft System Protection Background Tasks in Windows 10 and I have listed all those methods here by dividing the entire method into easy actionable steps.
Disable the System Restore (Method 1)
It is mostly related to CPU usage. This issue is prevalent. The users have reported CPU usage by 70% to 90% by this process separately. The best solution for fixing this issue is to disable the System Restore from the ‘systempropertiesprotection.’
STEP 1: Press the Windows Key+ R to open the RUN WINDOW. Then write systempropertiesprotection in the field and then press ENTER.
STEP 2: The tab on the screen named System Properties will appear on the screen and navigate to System Protection if you are already there then move on to the next step.
STEP 3: Then, the select the c: drive or your Windows 10 installed drive and click on Configure button.

STEP 4: Under System Protection Tab in the Restore Settings and select “Disable system protection.”

STEP 5: A warning message will appear (check image below), click on Yes, Click Apply and OK.

STEP 6: Click on the Apply option and hit on OK.

Run a Check Disk to Find out Hard Disk Errors and fix it (Method 2)
If disabling System Restore didn’t worked or only the CPU usage is decreased but Hard Drive usage are still high then you must run disk check on your PC or Laptop, follow the steps given below to complete this process.
- Type “Command Prompt” in the start menu search bar in Windows 10 taskbar and run Command Prompt as Administrator (it’s important).

- Give the following commands “chkdsk C: /F /R” to repair your disk and then press Enter.

- Press Y to schedule the checking.
- It will schedule a Disc Check on the next start or restart of the Computer.
- Wait until the disk check process to finish.


When the check disk procedure gets completed, check if the “SrTasks.exe High Disk Usage” has resolved or not.
Scan for Malware & Viruses on your Computer (Method 3)
If everything did not worked then there is a high chance that your Computer is infected with some virus, follow the steps below to perform a virus scan on Windows 10 using Windows Defender, if your using any other Anti-Virus program then scan your Computer with that.
- Open Windows Defender by typing Windows Defender on the Start menu search bar or click on the left side arrow near the date & time display on the right bottom corner of Windows 10 Taskbar as shown in the picture below and click on the Windows Defender icon.
- Click on Virus & threat protection tab.

- Click on Scan options.

- Select Full scan and click on Scan now.

- Wait for some time; it can take up to a few hours depending on your system disc drive used memory.
- Once a virus is detected, it will ask your permission to remove it, or it will automatically remove it from your Computer.
- Once the Scan is completed, I hope your system will start to work nicely without consuming extra CPU or HDD usage.
- If you follow all the methods, then the problem of High CPU/Disc usage due to Microsoft Windows System Protection Background Tasks will be fixed, and if still it’s not fixed, then I recommend you to backup all the files and data into a separate drive and Download Windows 10 on USB Flash Drive and make it Bootable and Install a Fresh Windows 10 on your Laptop or PC.


Hopefully, now you know the importance and of the Microsoft Windows System Protection Task. If you still have some issues or queries, leave a comment, and I would love to help you for sure.
Thank you for reading this. I hope you like it. 🙂
Is your Srtasks.exe using High Disk Usage?
And
You don’t know what even Microsoft Windows System Protection Background Tasks is?
Recently, users have reported that their PC started is getting a bit laggy and the performance is getting low and when they opened the Task Manager they saw that Srtasks.exe is using almost 90% of the disk/CPU.
First of all, you don’t need to worry much because you are not alone in this and many users were trying some wrong fixes for Srtasks exe on Windows 11.
But,
We have compiled a list of the best solutions for you to fix the SRtasks High disk Usage.
Before going to the fix there will be some important questions regarding the Windows System Protection Background Tasks error that might be in your mind.
What is Srtasks.exe?
Srtasks.exe is an executable file and stands for Microsoft Windows System Protection Background Tasks and was introduced in Windows 8, and can also be found in the latest versions of Windows 10 and 11.
Microsoft Windows System Protection Background Tasks is responsible for providing the service needed to create a restore point on your system as it’s really important for your PC to have one restore point where all things are working perfectly on your PC.
Srtasks exe is allocated in C:/Windows/System32/ folder.
Can I disable Microsoft Windows System Protection Background Tasks?
I won’t recommend you to disable Microsoft Windows System Protection Background Tasks as this process plays an important role in Windows OS so there are chances many services would stop and your PC performance might be affected.
Is SRTasks exe a virus?
It’s totally safe as SRTasks is a legitimate program digitally signed by Microsoft Corporation and most users have not found it safe.
As it is legitimate so hackers might attack the program to make changes and carry out their illegal activities through Srtasks.exe
Moreover, if you are a Windows XP or Windows Vista user and if you see this console window host process running on your PC then it’s an unwanted program as this file no longer works there.
Also, we can clear our doubt that SRTasks exe is a virus or not by checking the file location as it should be located in its default file location when it was originally developed.
But still, to be on the safe side you can check if there’s a virus or not through Task Manager:
- Press together Ctrl + Shift + Esc keys to open Task Manager.
- Go to Details and look for Srtasks.exe
- Also on your right side under the description column make sure its name is correct.
- Right-click on it and select Open file location.
- If it is located at C:\Windows\System32

And if it’s not in the given address then it might be a virus or spyware so my advice is for you to run a full system scan with the help of your anti-virus program installed on your PC.
Also Read: FIXED: Windows Performance Monitor?
Solution 1: Scan For Virus and Threats
When you download something from a malicious website you may download a virus with it which replicates itself with the Srtasks.exe name.
This can result in a Srtasks high disk usage process.
Although you have an antivirus installed on your PC still it can’t protect your system 100%.
Also, it replaces the damaged files.
So, to overcome Microsoft System Protection Background Tasks high disk usage in Windows 11 it’s best to scan for viruses using the Windows 11 built-in virus protection software.
Here’s is how you can do it:
- Click on the Search icon
- Select Settings.
- Now click on Privacy & security > Windows Security
Also Read: LockApp.exe? What’s It? Is It Safe?
Solution 2: Disable System protection to Fix Srtasks.exe High Disk Usage
To fix Srtasks.exe you need to disable the system protection service but keep in mind that after disabling this service you won’t be able to go back to your previous point in time.
Here’s what you need to do:
- Type in the search bar “Create a restore point”.
- Click on System Restore on the System Properties window that appeared.
- Then select Local Disk C: (System) and click on Configure.
- In the pop-up windows click on the radio button saying Disable system protection
- Now click on Apply and Ok.

- After that restart your PC and see if Srtasks.exe high disk usage is solved or not.
If System Protection is already disabled then move on to the next solution.
Solution 3: Perform a System File Check to Fix System Protection Background Tasks
Sometimes the damaged file can lead to System Protection Background Tasks high CPU usage on Windows 11 and your program will be unable to run.
So, the Sfc(System file checker) helps you scan the errors and replaces them if Srtasks.exe replicated itself.
Here’s what you need to do to fix the Srtasks exe high CPU usage:
- Open Command Prompt as an Administrator, press Windows Key + X
- Or, search “Command Prompt” in the Startup menu, then choose Run as administrator

- Type “sfc /scannow”

- Be careful with the spaces between commands.
- This action may take up to 20 minutes so don’t interrupt it.
- After that restart your PC and check if Microsoft Windows System Protection Background Tasks high CPU usage is solved or not.

Also Read: FIXED: WaasMedic Agent.exe High Disk Usage?
Solution 4: Disable Superfetch to Fix Microsoft Windows System Protection Background Tasks high CPU usage
Disabling Superfetch will help you get over Srtasks.exe high CPU usage but you should know that Superfetch is an important service for Windows when you need data for your apps.
But you can disable it when you don’t need it in near future.
So, here’s what you need to disable Superfetch process:
- Press Windows key + R to open the Run window.

- Then type services.msc and click OK to enter the service app.
- Scroll down and find Superfetch and double-click the Services to open its Properties.
- In the Startup Type section choose Disabled from the drop-down list.
- Click on Apply and then select OK.
- Restart your PC and see if Srtasks.exe is fixed or not.
Also Read: MMC.exe Error Blocked
Solution 5: Run System Maintenance Troubleshooter to Fix Srtasks exe High Disk Usage
This System maintenance troubleshooter will look for errors all-around your PC and will fix them.
Moreover, the corrupted files that will get fixed with it will also solve Microsoft Windows System Protection Background Tasks high disk Usage.
So, here’s what you need to do:
- Click on the Search icon
- Select Control Panel.

- Now look for Troubleshooting

- In the left pane click on View all.

- Now double-click on Windows Store Apps
After the troubleshooting is done you need to run your Windows in Safe Mode.
And you do this by following the steps below:
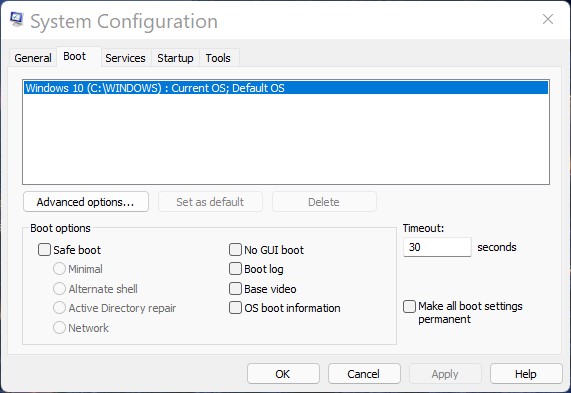
- Press Windows Button + R Key
- The Run Dialogue Box will appear
- Type “msconfig“ and press Enter.
- The System Configuration window will open and then click on the Boot tab.
- Now checkbox the Safe boot option.

- Then click on Apply and OK for the system to reboot in safe mode.
- After rebooting check if System Protection Background Tasks high disk usage is fixed or not.
Having a High CPU Error CHECK OUT: What is Acrord32.exe?
Solution 6: Run a CHKDSK Scan to Fix Srtasks.exe
The chkdsk(Check Disk) scan function replaces all the missing and corrupted files that were leading to Srtasks.exe high disk usage.
Sometimes your disk captures errors related to the system such as internal corrupted files and leads to high disk usage.
So, here’s what you need to do to fix the Microsoft Windows System Protection Background Tasks:
- Open Command Prompt as an Administrator, press Windows Key + X
- Or, search “Command Prompt” in the Startup menu, then choose Run as administrator
- Click the Yes button for confirmation when the dialog box appears
- Type chkdsk /r and press Enter
- You will receive a message saying if you want the disk scan to be performed when you reboot your PC next time
- Type Y and press Enter.
- After the disk drive scan is complete then check if Srtasks.exe high CPU usage is fixed.

Solution 7: Scan System File
Most errors are caused by corrupted files, so start by checking the system files to fix the Srtasks.exe error
You can do this using the DSIM tool which will replace missing files.
While typing commands be careful at the spaces between ‘/’ and word.
So here’s what you need to do to fix the Windows System Protection Background Tasks:
- Search by pressing the Window key and type “Command Prompt“
- Right-click “Command Prompt” and select “Run as Administrator“. The option is available in the right pane of the window too.
- Type “DISM.exe /Online /Cleanup-image /Res and press Enter.
- It Might take up to 30 minutes to complete the process
- Once the operation is completed successfully, type “sfc /scannow” in the command line and then press the Enter key.
- If there were any corrupted files you would see the following message on the command line: “Windows Resource Protection detected corrupted files and successfully restored them.”
- If so, type exit and hit enter.
- Srtasks.exe error corrupted files would have been fixed by now.
- You can restart your windows and check if the Srtasks.exe high disk usage error in Windows 7 exists.

Conclusion
So, these are the best fixes we could get for you in fixing Srtasks.exe High disk Usage in Windows 11 and
Disabling Windows System Protection Background Tasks from your system is not that much of an easy job and also we don’t recommend it to so that’s why we have provided you with the best possible solutions.
It’s best you try all the solutions and if you have any other fix related to Srtasks.exe high disk usage or any type of question then just let us know in the comment section below.
FAQs
-
How do you stop Srtasks?
You can’t stop Srtasks directly but you can disable it for some time by disabling System Restore.
-
Why is my disk usage so high?
Your disk usage is high as the executable file might be finding some replaced file or there’s a malicious activity taking place in your system.
-
Is SRTasks exe safe?
SRTasks exe is not a virus unless it replicates itself or harms your computer so it’s totally safe.
-
Where is Srtasks.exe located?
Srtasks.exe is allocated in C:\Windows\System32 where it was store default when developed
Zul is an avid gamer with a passion for RPG and racing games. He enjoys playing games like Need for Speed and Grand Theft Auto 5 and is also skilled at fixing errors and crashes to enhance the gaming experience. Zul stays up-to-date with the latest gaming news and enjoys sharing his knowledge through writing gaming guides and articles.
Follow him on Twitter