
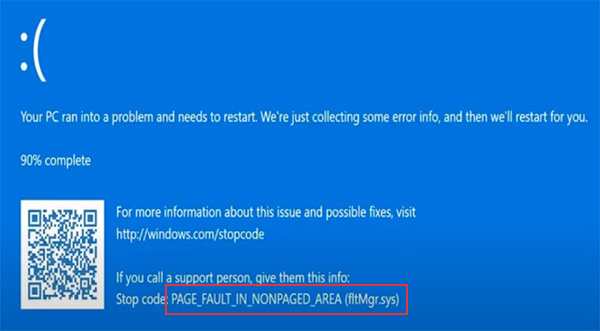
fltmgr.sys is a system file that ensures all files existing on the hard drive to be in the respective directories. Full form of the file is Microsoft Filesystem Filter Manager that also makes sure that the data written to the HDD is correct and not corrupted. Error fltmgr.sys BSOD occurs when this process can’t perform its duty properly and system keeps crashing with random restarts. This blue screen of death mostly appears with Kmode exception not handled, Page fault in nonpaged area, Memory_management, and Irql_not_less_or_equal.
File System Filter Manager becomes damaged or unreadable if the communication between CPU and hardware is lost or malfunctioned. Other potential reasons that cause fltmgr.sys blue screen error is missing system components, malware infection, outdated device drivers, and cracked software programs. Sometimes, a simple restart works as a tweak to fix fltmgr.sys BSOD. On the other hand, the same blue screen of death occasionally doesn’t let you login into your system thus resolving the issue becomes difficult.
fltmgr.sys BSOD Error in Windows 10
Here is how to fix fltmgr.sys BSOD Error in Windows 10 –
1] Boot into Safe mode with Networking
To solve this Blue screen issue you need to boot in safe mode with networking in the condition you cannot access the desktop. Suppose you are able to log in after encountering fltmgr.sys BSOD error, you can directly move to method 2.
- Click the search icon on the taskbar.
- Type – advanced startup.
- Press – Restart now.
- On the coming screen, go to Troubleshoot => Advanced options => Startup Settings successively.
- Next, click – Restart.
- Once the system powers up, press 5 or f5 to enable Safe Mode with Networking.
2] Perform Virus scan
fltmgr.sys with page fault in nonpaged area, kmode exception not handled, memory_management
, or irql_not_less_or_equal might occur when malware enters the system. During this process, some fundamental elements that are necessary to make sure the smooth functioning of Windows 10 PC either go missing or become corrupted.
Threat or attack is nearly impossible for Windows 10 because the version has built-in utility Windows security that ensures online and offline safety. Despite, an outdated operating system, broken device drivers, disabled security suite oftentimes make it easy for malware to get access. So, before you try out any other solutions, it’s important to eliminate existing malware so that it can’t overspread.
- Press – Windows + S.
- Type in – Virus & threat protection.
- Hit – Enter.
- Click the link reading – Scan options.
- Hit the radio button set for – Full scan.
- Click – Scan now.
- If the utility traces out any malware, hit – Clean Threat.
- Thereafter, click Remove and then Start actions.
- Once the removal process ends, reboot Windows.
3] Restore missing system elements
Some system files might be disappeared or misplaced due to malware infection or software conflict or other reasons. If any of these items are related to File System Filter Manager, you need to restore the missing components. System File Checker comes to the rescue in such conditions. Sfc /Scannow mainly is a command-line utility that scans the integrity to resolve the defective system files and restore lost system elements. To run the same –
- Click the search icon from taskbar.
- Type – cmd.
- Press – Ctrl + Shift + Enter.
- When User Account Control asks for approval, click – Yes.
- In the elevated Command Prompt, insert – sfc /scannow.
- Hit – Enter.
- After completion of the scanning process, restart the Windows PC.
4] Update Windows 10
fltmgr.sys BSOD still persists even after following the above ways then there is a chance that your system lacks some critical updates. To get –
- Press – Windows + I.
- Click – Update & Security.
- From the right-hand side, click – Check for updates.
- If there is an available patch, click – Download.
- After downloading when the installation process finishes, hit – Restart now.
5] Make sure all device drivers are up-to-date
Automatic update also installs OEM drivers but sometimes they are broken or incompatible. That’s why some users keep device drivers excluded from updates. There might be some other situations too when you need to search for device drivers update manually.
- Press – Windows key.
- Type – devmgmt.msc.
- Hit – Enter.
- When “Device Manager” appears, look for the device that may cause fltmgr.sys BSOD.
- Double-click the same.
- Find out which driver is causing issue or outdated.
- Right-click on that ‘driver’ and choose – Update driver.
- Opt for – Browse my computer for drivers.
- Click – Let me pick from a list of available drivers on my computer.
- Select the correct model.
- Hit – Next.
- After installing the update, reboot the device.
6] Check external hardware to fix fltmgr.sys BSOD
fltmgr.sys BSOD is often caused by connected peripherals like printers, external hard drives, second monitors, and Bluetooth devices. So, disconnecting them may solve the problem. However, you can keep the mouse and keyboard attached.
To check whether any of your connected hardware is damaged, disjoint their USB cables from the individual ports. After that, restart Windows 10 and see if the blue screen error still exists. If no, connect the peripherals one after another. In the meantime, check if any particular hardware is triggering the blue screen error.
7] Resolve disk error
Malfunctioned or corrupted hard drive can also cause fltmgr.sys BSOD. If the problem is non-physical, CHKDSK command-line can be a lifesaver, or else you will have to replace the hard disk with a new one. Disk checking utility analyzes the hard drive to find out existing error moreover fix found issue automatically. To execute the same –
- Open Command Prompt as administrator.
- Type in – chkdsk c: /f /r.
- Hit – Enter.
8] Replace corrupted fltmgr.sys
To replace the original fltmgr.sys that is probably corrupted, you need to download the file first and then insert it into the correct directory. This procedure is super easy if follow the below steps precisely. Steps are as followed –
- Download – fltMgr file.
- Unzip the file and copy fltmgr.sys.
- Visit the fltmgr.sys location folder – C:\Windows\System32\drivers.
- Delete the existing file paste the downloaded one.
9] Reinstall Microsoft Office access to fix fltmgr.sys BSOD
Many Windows 10 users reported that they started finding fltmgr.sys BSOD after installing Microsoft office access program. If the same happens to you, uninstall the app first. Here’s how –
- Press – Windows + R.
- In the void text bar, put – appwiz.cpl.
- Click – OK.
- Find – Microsoft Office Access.
- Right-click the same and choose – Uninstall.
- Keep following on-screen directions to complete the removal process.
- Once done, restart the Windows system.
- Check if fltmgr.sys BSOD is fixed.
- Now, visit the Download Center of Microsoft.
- Reach to Microsoft Access 2010 Runtime segment.
- Choose the preferred language and click – Download.
- After downloading, install the program in the usual way.
10] Reset the OS
Installing new software programs or making any changes in the settings or services modify Windows components along with registry keys. If these modifications don’t go with your system, fltmgr.sys BSOD may be generated. To eliminate the blue screen error, you can reinstall Windows 10 afresh. Steps are as followed –
- Click – Start icon.
- Type – reset this PC.
- Hit – Enter.
- From the right-pane, click – Get started.
- Select – Keep my files.
- Choose – Local reinstall.
- Click – Next.
- Hit – Reset.
11] Use Blue Screen Troubleshooter
To fix BSOD occurring on Windows 10, Microsoft offers a walkthrough troubleshooter escorting you till the end of the error. You can try the series of steps there to figure out the issue on your PC.
Go to this – BSOD troubleshoot page, select the correct reason, and follow the stepwise instructions provided there.
12] Repair Windows 10 to fix fltmgr.sys BSOD Windows 10
If you are still struggling with fltmgr.sys BSOD after trying out the above workarounds, there must be some serious corruption. This generally happens due to sudden power failure, virus attack, improper shutdown, and hardware as well as software errors.
In such a case, the last resort you can try out is repairing the Windows. This way, all defective and broken files will be replaced with fresh ones moreover the operational speed of the system will be smoother. To repair the system, you will have to use the Windows CD that comes with the device.
Methods list
1] Boot into Safe mode with Networking
2] Perform virus scan
3] Restore missing system elements
4] Update Windows 10
5] Make sure all device drivers are up-to-date
6] Check external hardware
7] Resolve disk error
8] Replace corrupted fltmgr.sys
9] Reinstall Microsoft Office access
10] Reset the OS
11] Repair Windows 10
That’s all!!
BSoD or Blue screen of death errors are the most dreaded errors in Windows. They indicate a major issue and unexpectedly crash computers. One such BSoD is the fltMgr.sys blue screen of death, which occurs due to multiple reasons like virus infection, corrupted data, and more.
The fltMgr.sys or Microsoft File system Filter Manager file is an important part of the OS, which handles data storage drives like hard drives. Windows uses this file to interact with the system storage and file manager. This file also ensures that the hard drives are accessible and their data readable.
If the fltMgr.sys fails, users encounter an unexpected crash along with the fltMgr.sys blue screen right away. This error screen displays an error code that varies depending upon the trigger behind the error. Some of these error codes are –
- SYSTEM_SERVICE_EXCEPTION
- PAGE_FAULT_IN_NONPAGED_AREA
- KMODE_EXCEPTION_NOT_HANDLED
In most cases, the error is caused by corrupted data present on the drive or due to a hardware failure. However, there could be more reasons behind this pesky issue. If you are encountering this error, the reasons could be –
- Bad Windows update
- Power outage
- Corrupt system files
- Corrupted data
- Corrupted hard drive
- Hardware damage
- Malware infection due to illegitimately obtained software
As the fltMgr.sys BSoD is displayed without any bug check value; it becomes a bit tricky to resolve it using the simple code mentioned along with it. However, there are ways you can try to get rid of this error. Let’s dive in to the methods to fix the fltMgr.sys error.
Methods to Fix the fltMgr.sys BSoD Error
Here, we will discuss some methods you can use to easily get rid of the fltMgr.sys blue screen error.
Pre activity –
Before moving on to the methods, let’s perform a few steps to see if there’s a problematic application or hardware causing the fltMgr.sys BSoD error screen to occur frequently.
- Load your PC into safe mode to check for any problematic application.
- Check hardware for any physical damage using the hardware troubleshooter. Also, use Memtest86 to check the RAM.
These preliminary checks will allow you to gauge the extent of the damage. If you encounter the fltMgr.sys BSoD while trying to enter the safe mode, it means there is severe damage.
To fix the fltMgr.sys BSoD error, we will first use System Restore to restore the PC to a previous healthy state. While this has helped a lot of users, it might not work every time. In such a scenario, we will reinstall Windows, which is the last resort to fix any Windows error.
Performing System Restore doesn’t affect the data present on your hard drive. It simply restores the system to a previously known healthy state. On the other hand, clean installing Windows will remove everything, including the data and files present on the storage media. Hence, always back up your critical data on an external storage drive before proceeding with these methods.
If the fltMgr.sys has failed and your computer is stuck in an endless loop of the fltMgr.sys BSoD error, your data present on the HDD/SSD will become inaccessible.
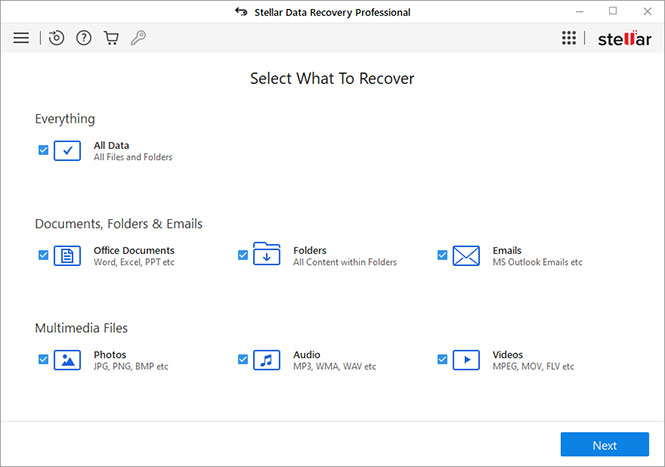
Get hold of a professional data recovery software like Stellar Data Recovery Professional to recover your data stuck in an inaccessible system. Simply create a bootable recovery media (USB) using another PC and boot into the problematic PC. Refer to our guide to perform data recovery from an unbootable PC.
Once you have retrieved your data, it is time to start troubleshooting the fltMgr.sys blue screen error.
Method 1: Perform System Restore
Here, we will take the help of Windows Installation media to enter WinRE and then perform the system restore. You can use an old system restore point to revert to a previous error-free state. Doing so will bring back all the system settings of the selected state and will remove any changes made after that save point. Here’s how you can do this –
- Connect your Windows installation media to your computer and boot your computer with it.
- On the installation screen, click on Repair your computer.
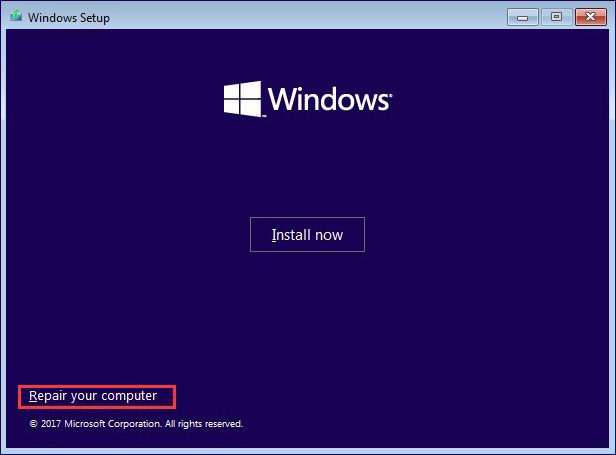
- Go into WinRE and then click on Troubleshoot > Troubleshoot > Advanced options.
- Click on the System Restore option.
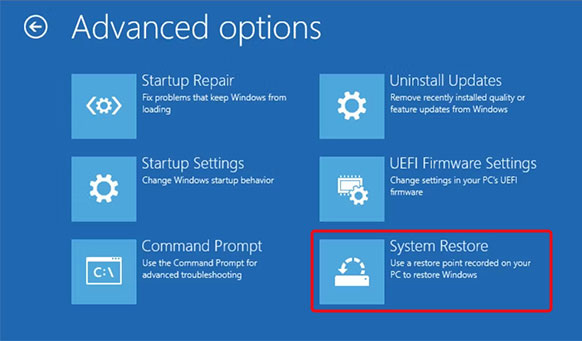
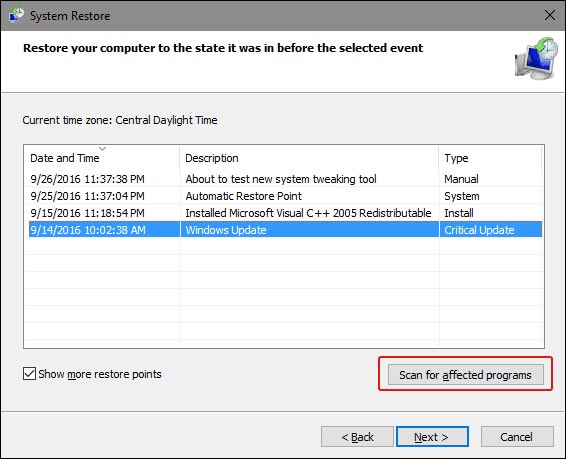
- In the System Restore window, click on the version you wish to restore and click on Scan for affected programs.
- Then, click on Next to proceed with your selection.
- On the final screen, click on Finish.
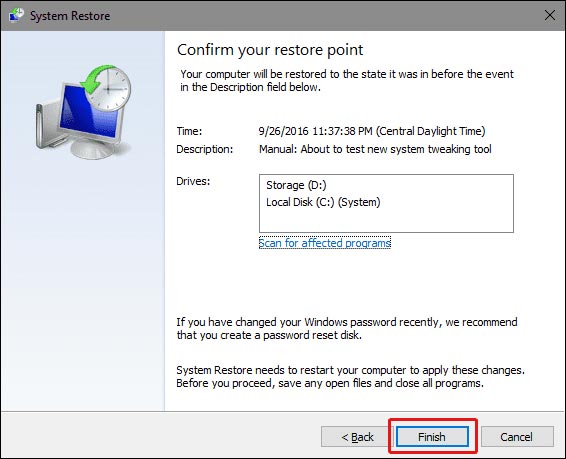
Wait for the process to end. This will restore your Windows 10 computer to the selected state. Check if this fixes the fltMgr.sys blue screen error on your PC.
Once you have restored the system to a healthy state, install any available driver and software updates. Keeping your system updated will help you avoid such errors.
Method 2: Reinstall Windows
Using the system restore point to load a previous healthy state is a great way to resolve errors, such as the fltMgr.sys BSoD. However, if that doesn’t work, you will have to clean install the Windows as a last resort. For this, you will have to use your Windows version-specific installation media and use it to boot your computer.
For booting your computer via installation media, you will have to change the boot sequence by going into the BIOS. Once it is done, your computer will restart automatically and display the installation screen. Follow the instructions on screen to proceed with the OS installation procedure. You can also refer to this guide for detailed steps.
Reinstalling Windows from scratch should eliminate the fltMgr.sys blue screen error from your system. You can now reinstall applications and restore all your data backed up on an external drive.
Conclusion
Like any other BSoD error, the fltmgr.sys blue screen error can unexpectedly crash the computer and make it unstable. We hope one of the methods explained above helped you quickly resolve the blue screen error.
P.S. – Always keep your drivers & OS updated, avoid downloading software from unreliable sources, and regularly maintain a data backup.
Related Topics –
PAGE_FAULT_IN_NONPAGED_AREA
kmode_exception_not_handled
FAQs
Can a faulty RAM module cause thefltMgr.sys BSoD?
Yes, a faulty RAM module can make the PC unstable by generating frequent BSoD errors including the fltMgr.sys error.
Why am I getting the kmode_ exception_not_handled BSoD error?
This could be due to reasons, such as outdated network drivers, missing device drivers, installing a problematic update, memory or hardware issue, etc.
How do I fix the fltMgr.sys blue screen error?
Clean junk files in Windows Registry using the built-in Disc Cleanup utility to remove irrelevant files clogging up the system and causing the fltMgr.sys error.
Was this article helpful?
YES2
NO
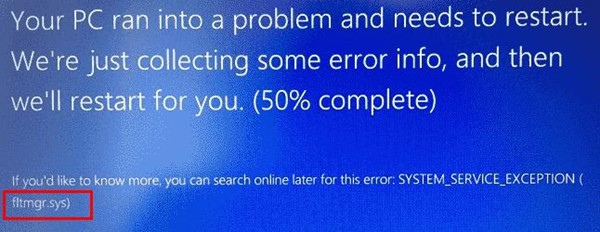
The fltmgr.sys file or the Filter Manager is the one that’s responsible in making sure that all the file stored in a computer’s hard drive stays on their respective locations and is located in C:/Windows/System32/drivers. Now when you encounter a Blue Screen of Death or BSOD error saying, “Your PC ran into a problem that it couldn’t handle, and now it needs to restart. SYSTEM_SERVICE_EXCEPTION”. This kind of Stop error is due to an error with the driver that’s responsible for enabling the communication between the hardware and the computer. It indicates that this driver allows direct access to the internal hardware from the CPU itself.
What’s worse about the SYSTEM_SERVICE_EXCEPTION BSOD error is that there are times when you won’t be able to log in to your computer even after it reboots. However, you need not worry as this post will guide you into fixing this BSOD error. All you have to do is follow the given options below carefully and that before you proceed make sure that you create a System Restore point just in case something goes wrong.
Option 1 – Run the Windows Update
Obviously, since the fltmgr.sys file is a system file from Microsoft, you can try running the Windows Update and see if it fixes the problem or not.
Option 2 – Run the System File Checker
The System File Checker, also known as the SFC scan, is a built-in utility in Windows that can be found in the C:/Windows/System32 folder. This tool allows you to scan and restore any corrupted system files in Windows that might be causing the SYSTEM_SERVICE_EXCEPTION BSOD error. To use this tool, follow the steps below.
- Tap Win + R to launch Run.
- Type in cmd in the field and tap Enter.
- After opening Command Prompt, type in sfc /scannow
The command will start a system scan which will take a few whiles before it finishes. Once it’s done, you could get the following results:
- Windows Resource Protection did not find any integrity violations.
- Windows Resource Protection found corrupt files and successfully repaired them.
- Windows Resource Protection found corrupt files but was unable to fix some of them.
- Restart your computer and then check if it has fixed the error or not.
Option 3 – Run the Blue Screen Troubleshooter
The Blue Screen troubleshooter is a built-in tool in Windows 10 that can be found on the Settings Troubleshooters page. To use it, refer to these steps:
- Tap the Win + I keys to open the Settings panel.
- Then go to Update & Security > Troubleshoot.
- From there, look for the option called “Blue Screen” on your right-hand side and then click the “Run the troubleshooter” button to run the Blue Screen Troubleshooter and then follow the next on-screen options. Note that you might have to boot your PC into Safe Mode.
Option 4 – Check your hardware for any physical issues
There are times when faulty hardware can result in serious problems in the system such as the SYSTEM_SERVICE_EXCEPTION Blue Screen error. Thus, it is highly recommended that you check the internal components of your CPU to find out if there are any problems. And if there is any physical damage, you need to bring that to a technician to get it fixed or have it replaced.
Option 5 – Run the CHKDSK utility
You can also run the Chkdsk utility to resolve the BSOD error. The Chkdsk utility is the one that repairs hard drive errors that might be causing the problem.
- Open Command Prompt with admin privileges.
- After opening Command Prompt, execute the commands listed below, and don’t forget to hit Enter right after you type in each one of them and if you have installed Windows to some different directory, you must replace “C” with the name of the drive you’ve installed Windows with.
- chkdsk C: /r /x
- chkdsk C: /f
Do You Need Help with Your Device?
Our Team of Experts May Help
Troubleshoot.Tech Experts are There for You!
GET HELP
Troubleshoot.Tech experts work with all versions of Microsoft Windows including Windows 11, with Android, Mac, and more.
Share this article:
You might also like
Error code 10, device manager code occurs when Bluetooth or Wi-Fi cannot be enabled. Inside device manager beside device would be yellow exclamation sign and if you go into device properties status would be: This device cannot start.
Following are proven solutions that will resolve the issue and provide you with a working device.
Reboot PC, check for switch
This simple solution can usually work in most cases, first thing is to check if by any chance hardware switch for Wi-Fi or Bluetooth is OFF (laptops have a small switch that can turn the device On or OFF), then if you do not have a switch or you made sure it is ON, reboot your system.
Run Network Adapter Troubleshooter
If previous simple step solutions have not proven to be effective run Network Adapter Troubleshooter
- Press WINDOWS + I to open settings
- Go to System > Troubleshoot > Other troubleshooters
- Inside Find Network Adapter
- Click on Run to start the troubleshooters
Disable and then re-enable Adapter
If the previous solution has not fixed the issue try disabling the adapter and then re-enabling it back.
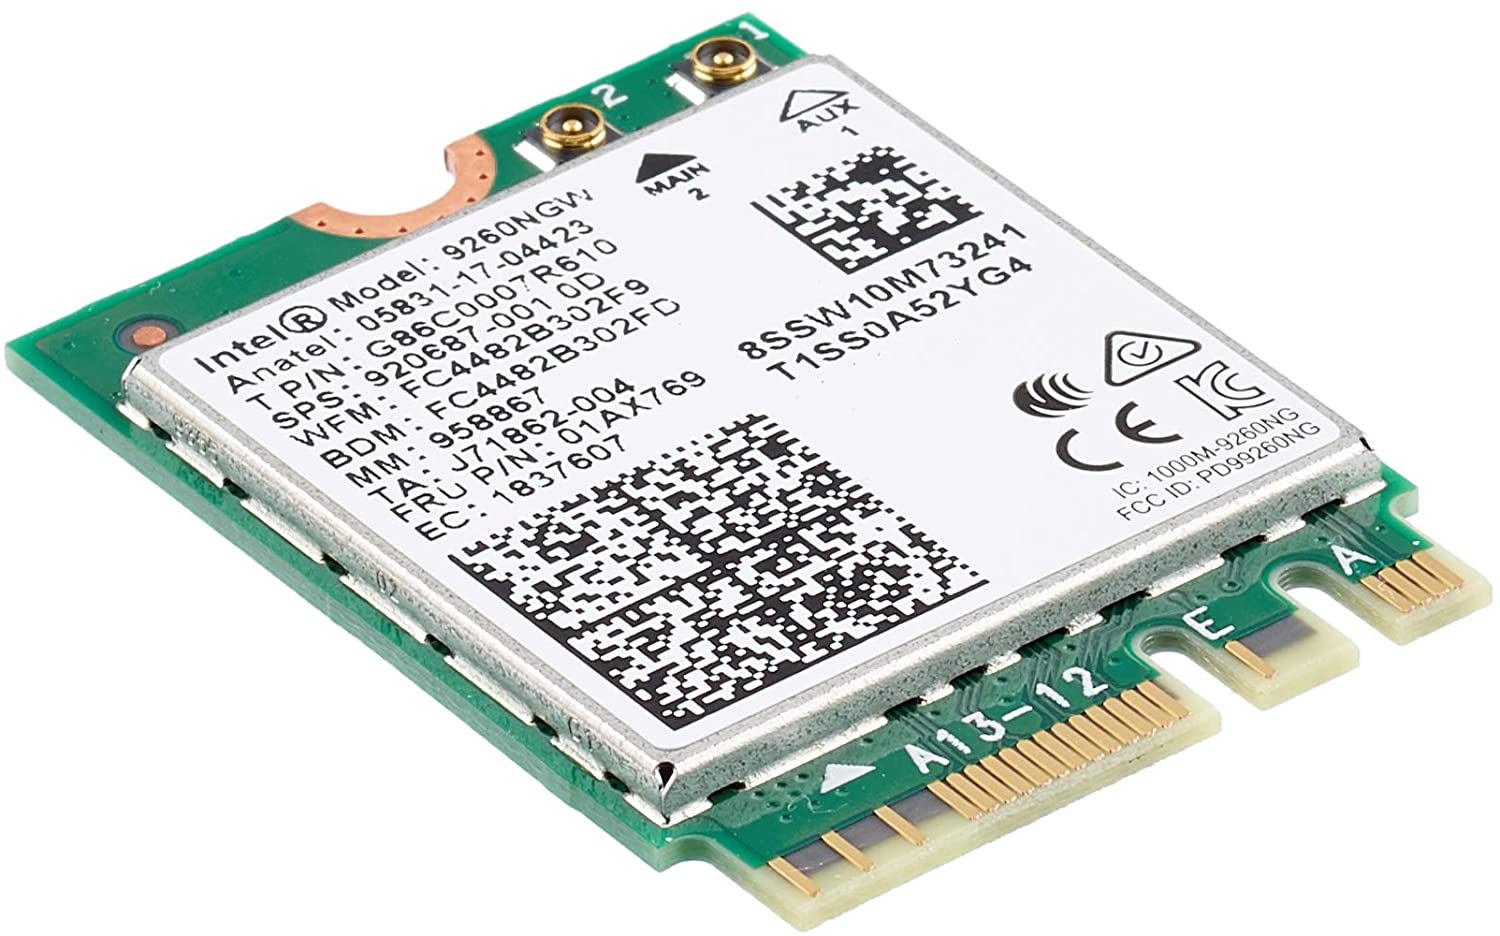
Update network adapter
Go to the intel website and download the latest driver package. After the download is finished install the latest driver.
Turn ON the WLAN AutoConfig service
- Press Windows key + R to invoke the Run dialog.
- In the Run dialog box, type services.MSC and hit Enter to open Services.
- In the Services window, scroll and locate the WLAN AutoConfig service.
- Double-click on the entry to edit its properties.
- In the properties window, click the drop-down on the Startup type and select Automatic.
- Next, make sure the Service status is started and running.
- Click Apply > OK to save changes.
- Exit Services console.
- Restart PC.
Read More
Getting a few errors here and there when updating your Windows 10 computer is not uncommon. Some of these errors won’t allow the Windows Update service to initiate while the other ones will halt the process while it’s running. So in this post, we’ll show you what you can do to fix the Windows Update error 0x80070020.
The Windows Update error 0x80070020 is most likely caused by some programs installed in the system which interferes with the Windows Update process. It might be an antivirus program, an incompatible program, a potentially unwanted program, or worse, malware. In addition, corrupted or missing files might also be the culprit. Whichever the cause may be, here are some suggestions you need to check out to resolve the problem.
Option 1 – Try to reset the Windows Update components manually
- To manually reset the Windows Update components, first, you need to stop the Background Intelligent Transfer Service, Windows Update, and the Cryptographic Services. To do so, run the following command in Command Prompt and make sure to press Enter after you enter each one of them:
- net stop bits
- net stop wuauserv
- net stop cryptsvc
- Next, delete the “qmgr*.dat” file in order to reset the Windows Update components. To do delete this file, run the following command in Command Prompt:
- Del “%ALLUSERSPROFILE%Application DataMicrosoftNetworkDownloaderqmgr*.dat
- Now you have to rename both the SoftwareDistribution and Catroot2 folders by entering the following command in Command Prompt:
- Ren %systemroot%SoftwareDistributionSoftwareDistribution.bak
- Ren %systemroot%system32catroot2catroot2.bak
- Reset BITS and Windows Update service by entering the following commands in Command Prompt:
-
- sc.exe sdset bits D:(A;;CCLCSWRPWPDTLOCRRC;;;SY)(A;;CCDCLCSWRPWPDTLOCRSDRCWDWO;;;BA)(A;;CCLCSWLOCRRC;;;AU)(A;;CCLCSWRPWPDTLOCRRC;;;PU)
- sc.exe sdset wuauserv D:(A;;CCLCSWRPWPDTLOCRRC;;;SY)(A;;CCDCLCSWRPWPDTLOCRSDRCWDWO;;;BA)(A;;CCLCSWLOCRRC;;;AU)(A;;CCLCSWRPWPDTLOCRRC;;;PU)
- Now enter the following command:
- cd /d %windir%system32
- RE-register BITS and other Windows Update related files by typing each one of the following commands:
-
- regsvr32.exe atl.dll
- regsvr32.exe urlmon.dll
- regsvr32.exe mshtml.dll
- regsvr32.exe shdocvw.dll
- regsvr32.exe browseui.dll
- regsvr32.exe jscript.dll
- regsvr32.exe vbscript.dll
- regsvr32.exe scrrun.dll
- regsvr32.exe msxml.dll
- regsvr32.exe msxml3.dll
- regsvr32.exe msxml6.dll
- regsvr32.exe actxprxy.dll
- regsvr32.exe softpub.dll
- regsvr32.exe wintrust.dll
- regsvr32.exe dssenh.dll
- regsvr32.exe rsaenh.dll
- regsvr32.exe gpkcsp.dll
- regsvr32.exe sccbase.dll
- regsvr32.exe slbcsp.dll
- regsvr32.exe cryptdlg.dll
- regsvr32.exe oleaut32.dll
- regsvr32.exe ole32.dll
- regsvr32.exe shell32.dll
- regsvr32.exe initpki.dll
- regsvr32.exe wuapi.dll
- regsvr32.exe wuaueng.dll
- regsvr32.exe wuaueng1.dll
- regsvr32.exe wucltui.dll
- regsvr32.exe wups.dll
- regsvr32.exe wups2.dll
- regsvr32.exe wuweb.dll
- regsvr32.exe qmgr.dll
- regsvr32.exe qmgrprxy.dll
- regsvr32.exe wucltux.dll
- regsvr32.exe muweb.dll
- regsvr32.exe wuwebv.dll
- Now type each one of those commands below.
- net start bits
- net start wuauserv
- net start cryptsvc
Option 2 – Install the updates in a Clean Boot State
You might want to try putting your computer in a Clean Boot state and then install Windows Updates again without any trouble. During this state, you can start the system with a minimum number of drivers and startup programs that will surely help you in isolating the root cause of the issue.
- Log onto your PC as an administrator.
- Type in msconfig in the Start Search to open the System Configuration utility.
- From there, go to the General tab and click “Selective startup”.
- Clear the “Load Startup items” check box and make sure that the “Load System Services” and “Use Original boot configuration” options are checked.
- Next, click the Services tab and select the “Hide All Microsoft Services” check box.
- Click Disable all.
- Click on Apply/OK and restart your PC. (This will put your PC into a Clean Boot State. And configure Windows to use the usual startup, just simply undo the changes.)
- After that, try to install the Windows Updates or upgrade again.
Option 3 – Clear the contents of both the SoftwareDistribution and Catroot2 folders
- Open the WinX Menu.
- From there, open Command Prompt as admin.
- Then type in the following command – don’t forget to hit Enter right after typing each one of them.
net stop wuauserv
net stop bits
- After entering these commands, it will stop the Windows Update Service and the Background Intelligent Transfer Service.
- Next, go to the C:/Windows/SoftwareDistribution folder and get rid of all the folders and files thereby tapping the Ctrl + A keys to select them all and then click on Delete. Note that if the files are in use, you won’t be able to delete them.
- Once all the contents in the Software Distribution folder are deleted, restart your PC and then go back to Command Prompt and input the following commands again.
net start wuauserv
net start bits
Since the folder has already been flushed, it will be populated afresh the instant your restart your computer and open Windows Update.
Option 4 – Try to run the Windows Update Troubleshooter
Running the built-in Windows Update troubleshooter could also help you resolve the Windows Update error 0x80070020. To run it, go to Settings and then select Troubleshoot from the options. From there, click on Windows Update and then click the “Run the troubleshooter” button. After that, follow the next on-screen instructions and you should be good to go.
Option 5 – Try restarting the Windows Update Services
- Open the Services Manager.
From there, make sure that you set the following services and Startup types:
- Background Intelligent Transfer Service: Manual
- Cryptographic Service: Automatic
- Windows Update Service: Manual (Triggered)
Read More
The file is too large for the destination file system is the error when you try to copy a file larger than 4GB on a drive formatted in the FAT32 file system. FAT32 is the old file system used in previous Windows versions and it was replaced by superior NTFS, altho FAT32 is still used because of its compatibility fact that it could be accessed in various operating systems its disadvantage among others is that it can not hold files larger than 4GB in size. This refers to the size of a single file, so if you have a file that is this large and when you try to copy or move it on a drive formatted in FAT32 you will get this message, and the operation will not be able to complete.
Format drive
In order to actually transfer the file in its glorious size, I am afraid that you will need to format destination drive in NTFS or if you have data on drive which you do not want to lose with formatting, use third-party software to convert file system from FAT32 to NTFS without losing data. I would recommend AOMEI partition assistant, it is a free and proven application letting you both manage your partitions and convert any one of them into another file system without data loss. You can get AOMEI here.
Split file
Another option if you are not keen on installing third-party tools or formating is to divide large files into smaller ones that are less than 4GB in size. You can use any archiving application since built-in Windows ZIP support will not let you split file into various different sizes. The best tool in my humble opinion is WinRAR, but you can choose any proven one. When file is split into parts less than 4GB in size, you will have no issues copying or move the file to the destination drive.
Read More
Error Code 45 – What is it?
Error Code 45 is a common device manager problem that users encounter on any Windows 2000 and later operating system versions.
The error occurs when your Windows system fails to acknowledge the connected device by either stating that the device is not present or that it was previously attached to a computer.
The error pops up and appears on your computer screen with the following message:
“Currently, this hardware device is not connected to the computer” (Code 45)
Solution
Error Causes
The error is prompted either due to a temporary system file malfunction or a problem in the Windows registry system files. In the latter case, it could be due to a damaged or corrupted Windows registry.
Further Information and Manual Repair
While it may appear that Error Code 45 is a serious threat to your computer, it cannot be farther from the truth. Error Code 45, unlike other error codes, is the easiest one to fix. Here is how you can do it.
Method 1 – Reconnect the device to your computer
Unplugging and plugging the USB cable of the device into the computer is the easiest way to solve the error.
Doing this will help refresh the system and increase the likelihood of the device driver files loading and function properly.
It is often only a case of reconnecting the device back to your computer which helps eliminate the error and does not require any particular resolution other than this.
Method 2 – Install DriverFIX
Although reconnecting the disconnected device is all you need to fix the error code, it is always safer to fix your Windows registry system files by using a program like DriverFIX.
DriverFIX, with its user-friendly approach to help you fix your PC issues, comes with an integrated database that detects which drivers you need to reconfigure within just a few seconds and downloads it automatically.
It further ensures that your drivers are installed in their entirety leaving no room for any corrupted or damaged registry.
It also has the added advantage of being able to backup and restores your files should there be the slightest possibility of system file damage.
Thus, registry damage can be averted by letting the software roll back the system files to an earlier healthy checkpoint. DriverFIX is the answer to fixing your PC error codes accurately and quickly.
Click here to download DriverFIX now!
Read More
If you were trying to print some documents but encounter the HIDCLASS.SYS Blue Screen error instead, then you’ve come to the right place as this post will guide you in fixing any Blue Screen errors related to the HIDCLASS.SYS file. HIDCLASS.SYS is a Windows operating system driver file. HID or Human Interface Device includes Keyboards, mice, and other input devices.
HIDCLASS.SYS is a critical system driver file that is responsible for connecting different kinds of devices all over the system, including the functionality where a Word Processor can access the printer to print documents. This file comes under the category of kernel-mode device drivers and if the driver fails, it can result in a Stop Error. There are a lot of Stop errors related to the HIDCLASS.SYS file, such as:
- KMODE EXCEPTION NOT HANDLED
- SYSTEM SERVICE EXCEPTION
- DRIVER POWER STATE FAILURE
- PAGE FAULT IN A NONPAGED AREA
- SYSTEM THREAD EXCEPTION NOT HANDLED
- DRIVER VERIFIER IOMANAGER VIOLATION
- IRQL NOT LESS EQUAL
The fixes for the Blue Screen errors related to the HIDCLASS.SYS files are pretty simple but before you troubleshoot the problem using these fixes, make sure that you boot your computer into Safe Mode with Networking first. After that, get started on these tips:
Option 1 – Update or rollback or disable concerned device drivers
To fix the HIDCLASS.SYS error, you can also try to roll back, or update, or disable the concerned device drivers.
- Open the Devices Manager from the Win X Menu.
- Then locate the device drivers particularly the ones that are under the sections of Keyboard, Mouse, USB, and HID Drivers.
- Next, right-click on them to open the Properties.
- After that, switch to the Driver tab and click on the Uninstall Device button.
- Follow the screen option to completely uninstall it.
- Finally, restart your computer. It will just reinstall the device drivers automatically.
Note: You can install a dedicated driver on your computer in case you have it or you could also look for it directly from the website of the manufacturer. On the other hand, if you have just updated your device drivers then you need to roll back the drivers to their previous versions or disable them.
Option 2 – Check for any incompatible devices
The next thing you can do to troubleshoot the HIDCLASS.SYS Stop error is to plug in and out each one of the different hardware that is connected to your computer. Doing so will help you determine which one of the hardware is the one that’s triggering the error to pop up. You will also know what hardware drivers or anything else that could be causing this error which includes external devices like mouse, keyboard, printer, as well as internally attached components like the Graphics card and so on.
Option 3 – Try running the ChkDsk utility
Running the ChkDsk utility can also help you resolve any Blue Screen errors related to the HIDCLASS.SYS file. To run this tool, refer to these steps:
- First, open This PC and right-click on your operating system partition for Windows.
- Next, click on Properties and navigate to the Tools tab.
- Then click on Check under the Error Checking section.
- After that, a new mini window will be opened and from there click on Scan drive and let it scan your disk drive partition for any errors and then restart your computer.
Option 4 – Try checking the Memory for any errors
- Tap the Win + R keys to open Run and type exe and hit Enter to open the Windows Memory Diagnostic Tool.
- After that, it will give two options such as:
- Restart now and check for problems (Recommended)
- Check for problems the next time I start my computer
- Once your computer has restarted, perform a basic scan or you could also go for the “Advanced” options such as “Test mix” or “Pass count”. Simply tap the F10 key to start the test.
Note: After you select the option, your PC will restart and check for memory-based issues. If it finds any issues, it will automatically fix them.
Option 5 – Run the System File Checker
System File Checker or SFC is a built-in command utility that helps in restoring corrupted files as well as missing files. It replaces bad and corrupted system files with good system files. To run the SFC command, follow the steps given below.
- Type “cmd” in the Start search and then right-click on the appropriate search result.
- Next, select “Run as administrator” to open Command Prompt with admin privileges.
- After opening Command Prompt, type in sfc /scannow
The command will start a system scan which will take a few whiles before it finishes. Once it’s done, you could get the following results:
- Windows Resource Protection did not find any integrity violations.
- Windows Resource Protection found corrupt files and successfully repaired them.
- Windows Resource Protection found corrupt files but was unable to fix some of them.
- Now restart your computer and see if the Blue Screen error is fixed or not.
Read More
The store is not downloading Apps: As you know, the Windows Store is one of the places where you can download Windows apps. However, there are times when you might not be able to do so for some reason. For instance, if you search for an app and click on the get it now button, instead of downloading the app, nothing happens and there are also cases when the download will start but the page will refresh after half a second. When this issue happens, you won’t be seeing any error message or warning at all. So you’ll just have to look at the download get started where the page will refresh and you’ll be back at the Get button.
This issue in the Windows 10 Store only happens for a few apps so even though you are able to download some apps, you might be able to do on other ones. Note that the apps affected are random and there is no specific set of apps that cause this issue while downloading and that this problem will repeat again each time you click on the Get it now button. This issue is definitely caused by Windows itself and has something to do with a bug in the Windows store which was brought by the latest Windows Update. It’s already a known issue among other Windows 10 users who are also suffering the same dilemma. So until Microsoft releases another update to fix this bug, you will have no choice but to deal with it in the meantime. On the other hand, you can also try a couple of suggestions laid out in this post. Follow the steps in every option given below to fix the issue with the Windows 10 Store.
Option 1 – Try signing out from the Microsoft Store
A lot of Windows 10 users were able to resolve the problem by simply signing out and signing back into the Microsoft Store. How? Follow these steps:
- Go to the Microsoft Store.
- Next, go to the Get page of the app you were trying to download.
- And then click on your account picture located in the top right corner of the window and select your account.
- Sign out from your account and after that, click the Get button to download the app.
- After that, a new window will appear where you’ll have to select your account and click on Continue.
- Now enter your credentials. Once you do, the app should be downloaded automatically after you’re signed in. And that’s about it.
Note: Keep in mind that this option is merely a temporary solution to the problem and once you close the Microsoft Store and open it back again, you will be back to square one.
Option 2 – Wait for the Windows Update
As mentioned, this is already a known issue and a lot of Windows 10 users have already complained about it to Microsoft so a bug fix will be soon released in the latest Windows Updates.
Read More

If we are to believe news from Intel, new series of processors based on Alder Lake architecture are about to be released somewhere in October. Alder Lake is the 12th Generation Core of Intel processors and it is meant to have all advantages of the current CPU structure.
I9 is aimed to pack a punch against its competitors with technology including eight high-performance Golden Cove cores (P-cores) with Hyper-Threading and eight energy-efficient Goldmont (E-cores) equipped with a 30MB L3 cache and operating at high clock speeds.
During the benchmark test, the new CPU outperformed all of Intel’s previous Rocket Lake structure processors which is logically expected but the big surprise came from results that indicate better performance than Apple’s new M1 processor even in single-threaded performance which is supposed to be best in that field.
Another surprise was really beating AMD Ryzen 9 in each field. If we take into account that i9 has 16 cores in total and can process 24 threads against Ryzen 9 with 16 Cores and 32 threads this is an impressive feature.
Now truth to be told Alder lake has massive L3 cache and microarchitectural advantages and consumes much more power but the results of performance are high. Also, note that this early CPU is not really a mass production one and maybe some things will still change but early results are very satisfactory.
We will see what will price tag be since in this age of shortage and competition that will also play a big role in its overall success. Speaking of competition I eagerly await AMD’s response to this, in any way it seems that the CPU market is for some turbulence which is always a good thing for the final customer and I welcome it.
Read More
Referenced Memory at — What is it?
0x Referenced Memory at 0x is an error code that occurs when the random memory addresses conflict.
This error causes running programs or browsers to crash. Referenced memory at error code is considered as a service violation error. It is displayed as the following:
“The instruction at 0xf77041d24 referenced memory at 0×00000000. The memory could not be read.”
Solution
Error Causes
The ‘referenced memory at’ errors is either triggered by:
- Hardware failure
- Problems with the RAM and the registry
Hardware failure may result if the driver is not installed properly. The problems in the RAM indicate registry issues that occur due to data overload in the hard disk and poor PC maintenance.
The registry saves all the information and activities you perform on your system on the hard disk.
This includes the junk files, temporary files, invalid registry entries, and files of both installed and uninstalled programs. These files accumulate and take over a lot of RAM space.
Also, the referenced memory at error can be considered to be a form of memory leak where unknown third-party software can take up the memory space that has been reserved for a particular program.
For example, if you have toolbars and add-ons installed in your browser, it can also lead to invalid registry storage in the registry.
If you don’t clean the registry, these unnecessary files can overload your data and lead to hard disk/RAM damage and corruption triggering obscure error messages like referenced memory at error.
Further Information and Manual Repair
Referenced memory is a critical error; if not resolved it can lead to serious PC damages like a system failure. To avoid this, it is advisable to fix it right away.
Here are a couple of ways to repair this issue on your system:
Cause: Hardware Failure
Solution: If the referenced memory at error is generated due to hardware failure then to resolve this error you must reinstall the driver that has caused the error to appear.
Let’s say if the error pops up because of the printer driver, reinstall it. For re-installation of the driver, simply go to the control panel and click on the Device Manager option.
Once you click it you will see a detailed page with a list of devices.
Now click on the printer (the problematic driver in this situation) to reinstall the driver software. Double click on it to open the properties dialog box and then click the driver tab and update the driver. Once you have updated the driver, try using the printer. Check if it works.
If it works and the referenced memory at the error code does not appear on the screen, this means the problem was with the hardware. However, if the error still pops up then this means the problem is deeper. It’s related to the registry.
Cause: Problems with the RAM and the registry
Solution: If the problem is with the RAM and the registry, then it is advisable to download Restoro.
Restoro is a new, next-generation, and highly functional registry cleaner.
It detects and removes all the registry issues, unnecessary and obsolete files saved in the hard disk taking up a lot of RAM space. It clears the RAM and cleans up the disk.
Furthermore, it repairs the damaged files, fragmented disk, and the corrupt registry in seconds enabling you to resume the program that you were running before the error occurred.
Restoro has a user-friendly interface and easy navigation.
To run and operate this system you don’t need any kind of technical expertise. In just a few clicks you can resolve the critical referenced memory at error on your PC.
It is compatible with all Windows versions
Click here to download and install Restoro on your PC and fix the referenced memory error code now.
Read More
If you encounter an error saying, “Invalid file handle” when you try to rename, copy, delete a file or other operations in your Windows 10 computer, then read on as this post will guide you in what you can do to fix it. This kind of error pops up when the operating system tries to carry out an operation on a folder or file using the following words:
CON, PRN, AUX, NUL, COM1, COM2, COM3, COM4, COM5, COM6, COM7, COM8, COM9, LPT1, LPT2, LPT3, LPT4, LPT5, LPT6, LPT7, LPT8, and LPT9
When you rename or create a folder or file using the reserved words given above, you could encounter an error that says, “The specified device name is invalid”. This occurs since these words are Windows system reserved words that you can’t use, unlike any other words. Thus, if you have a folder or file which contains any of the reserved words on another computer that runs a non-Windows operating system and you try to copy or rename it Windows, then it’s no wonder why you’re getting this error message.
In such cases, you can always click on the Skip button to stop the operation. However, if there are various folders or files, you can just use the Command Prompt to carry out the task. All it takes is a simple command that will get rid of the folder as well as the files in it. How? Refer to the instructions given below.
Step 1: Tap the Win + R keys to open the Run utility.
Step 2: Next, type “cmd” in the field and then tap Enter to open Command Prompt.
Step 3: After opening Command Prompt, execute the following command:
rd \.file-folder-path /S /Q
Note: The “rd” command will remove the directory or the folder while the “\.” command will select the current computer. The “/S” command, on the other hand, helps you in removing all the sub-directories and the files that are in the CON folder. The “/Q” command is not really mandatory since it helps you remove everything silently without any confirmation message. For example, if you have a folder named “CON” located on your Desktop, the path will be like this “C:/Users/<username>/Desktop/CON”. In this case, the command should be like this:
rd \.C:Users<username>DesktopCON /S /Q
However, if the error pops up for a whole different reason, you could use the following command instead to remove the reparse point extended functionality. Once you’ve entered the given command below, you should now be able to delete the file.
FSUTIL reparsepoint delete C:Users<username>DesktopFileName
DEL C:Users<username>DesktopFileName
Read More
When performing a Windows Backup to the NAS device (backup to a network share) that is running Samba, fails with an error message The backup failed, The version does not support this version of the file format (0xC03A0005). The problem occurs because of a conflict with the VHD file that is created by Windows Backup and is mounted during the process. There are three types of VHD files:
- Fixed,
- Expandable
- Differencing
If the VHD file is a sparse file that is not supported by the native VHD driver, the mounting will fail, and you will get this error. An example VHD file is one that keeps expanding depending on the backup size. The problem occurs only in the case of File Level backup (file/folders in a volume) but not on the block level backup as the vhd file is never mounted. However, in the case of File Level Backup, the vhd is mounted, created by Windows Backup, which does not support the mounting of sparse files.
The solution is to use Strict Allocate: option in the smb.conf file
Login to SMB using SSH. Open the configuration file using the VI editor located at /etc/samba/smb.conf. If the option is not there, you can manually add strict allocate = yes which will make sure there are no sparse file that is created.
Read More
Copyright © 2023, ErrorTools. All Rights Reserved
Trademark: Microsoft Windows logos are registered trademarks of Microsoft. Disclaimer: ErrorTools.com is not affiliated with Microsoft, nor claims direct affiliation.
The information on this page is provided for information purposes only.
Fltmgr.sys BSOD (blue screen of death) is common. For instance, Fltmgr.sys BSOD appears after you create an email in outlook. Like many other BSOD errors such as internal power BSOD, blue screen due to the fltmgr.sys file is a system problem that may disable users from running the computer smoothly.
More often than not, you may hit upon various variants of Fltmgr.sys BSOD errors like System_Service_Exception, Irql_not_less_or_equal, or kmode_exception_not_handled, or page_fault_in_nonpaged_area fltmgr.sys. This post will show you common but useful solutions to get out of the blue screen.
What is FltMgr.sys? Is it Virus, Trojan, Spyware, and Malware?
Fltmgr.sys, short for Microsoft File System Filter Manager, is a system file that ensures files on the hard drive to be located in the right directories and data on the hard drive is correct. Users can normally locate this find in C drive > Windows > System 32.
As a system file on the Windows system, fltmgr.sys is not a virus, Trojan, spyware, or malware. However, once Microsoft File System Filter Manager (fltmgr.sys) is infected or even damaged by viruses, it will stop working and fail to realize the communication between the computer CPU and hardware. In this case, a blue screen error may pop up due to the malfunctioned fltmgr.sys file.
How do I Fix FltMgr.sys Blue Screen of Death on Windows 11, 10, 8, 7?
As it has been suggested, when the system file fltmgr.sys is corrupted, it may result in various system errors, mostly, endless BSODs and tasks randomly being killed due to the fltmgr.sys blue screen error. Common culprits of the File System Filter Manager BSOD are corrupted files, drivers, malware, and computer hardware like disk errors.
Or sometimes, system conflicts or crashes are the root cause of your blue screen System_Service_Exception (fltmgr.sys) or any other BSOD errors caused by this system file. You can remove the filed fltmgr by following the solutions below.
Solutions:
- 1: Restart the Computer
- 2: Enter the Safe Mode
- 3: Check the Hardware
- 4: Run SFC
- 5: Update Device Drivers
- 6: Check Disk Drives
- 7: Check for Updates
Solution 1: Restart the Computer
Sometimes, a simple computer restart may help you deal with various computer problems, with no exception for system crashes like BSODs.
Once you noticed that blue screen with the error message of fltmgr sys, you may as well reboot your device to see if the blue screen will disappear and whether you can use the device as smoothly as before.
Solution 2: Enter the Safe Mode
If restarting the computer does not help, your device is trapped into fltmgr.sys blue screen of death loop. Whether you can boot up the Windows system or not, try to enter the safe mode using different ways.
In the safe mode, users can run the computer with minimal programs and features so that file and program corruptions will be removed to allow you to troubleshoot the tricky fltmgr.sys blue screen problem.
You can choose to get into the safe mode with networking or command prompt and then fix the file manager error more easily.
Solution 3: Check the Hardware
Windows 10 BSOD system_thread_exception_not_handled FLTMGR.sys when accessing programs over the network also requires users to make sure there are not any hardware issues.
Understandably, any hardware problems like Windows setup could not configure Windows to run on this computer’s hardware may result in BSOD. Therefore, you need to disconnect all the external devices and then check the fltmgr.sys error persists and then connect them if needed.
Solution 4: Run SFC
Corrupted system files will also
cause FLTMGR.sys Windows 10 blue screen. In this way, it is necessary for you
to run the System File Checker, a Windows-based file checker, to automatically
troubleshoot and correct file corruption. As a system file, fltmgr.sys will be
checked by the system checker easily.
1. Search Command Prompt in the search box and then right click the result to Run as administrator.
2. In Command Prompt, enter sfc/scannow and then press Enter to run System File Checker.
Wait until SFC finishes checking all the system files on Windows 10, 8, 7. You then will be prompted what system files are corrupted and whether SFC can correct them itself.
After that, fltmgr.sys BSOD errors will disappear and you are advised to run SFC regularly to prevent fltmgr.sys blue screen.
Solution 5: Update Device Drivers
Fltmgr.sys kmode_exception_not_handled or System_Service_Exception or any other BSOD errors demand users to ensure all the device drivers like the network and graphics card drivers updated to achieve the communication between the hardware and the system.
That is to say, you might as well check all the driver versions and update all the device drivers to make them compatible with the system without any system crashes.
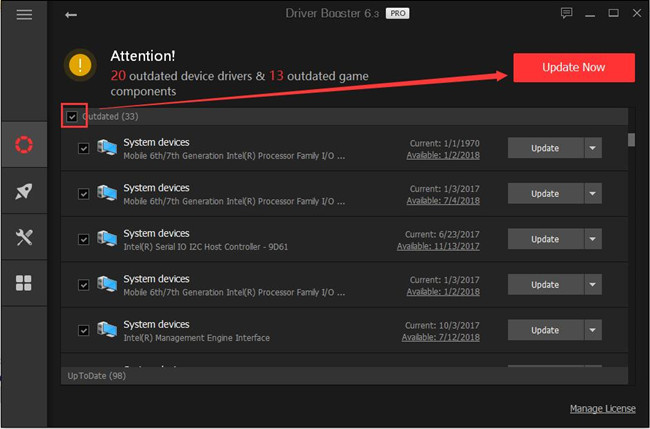
Here, Driver Booster
is a recommendable driver tool for you to search for, download, and install all the device drivers automatically and quickly. This driver tool will then help you fix the blue screen due to the File System Filter Manager more easily.
1. Download, install and run Driver Booster on Windows 11 or 10.
2. Hit Scan.

3. Find out Update all to get all the device drivers updated at the same time.
With all the drivers installed,
you will see no more memory management blue screen of death on Windows 10, 8,
7. You can access any program as you wish.
Solution 6: Check Disk Drives
Since fltmgr.sys is a system
file, corrupted files or disk drives may give rise to blue screen Fltmgr.sys on
Windows 10. It is also a necessity to troubleshoot the hard drive problem
regularly to keep your computer safe and away from viruses and malware.
1. Type File Explorer in the search box and then press Enter to navigate to File Explorer.
2. Right-click the hard drive that you are to troubleshoot, such as hard drive E to open its Properties.
3. Under Tools, locate Error checking and then hit Check.
After that, you can observe that
the disk error checking tool is troubleshooting your hard drive. If possible,
you can also check the disk errors in other hard drives to ensure there is no
hard drive corruptions that may lead to fltmgr.sys blue screen error.
Solution 7: Check for Updates
The window system may also be one of the culprits of the BSOD error caused by the File Memory Manager. Sometimes, you may run into the blue screen labeled by fltmgr.sys due to system corruption.
Microsoft may have sometimes provided you with fixes for various system problems. Therefore, you can try to install the system updates to prevent BSOD issues.
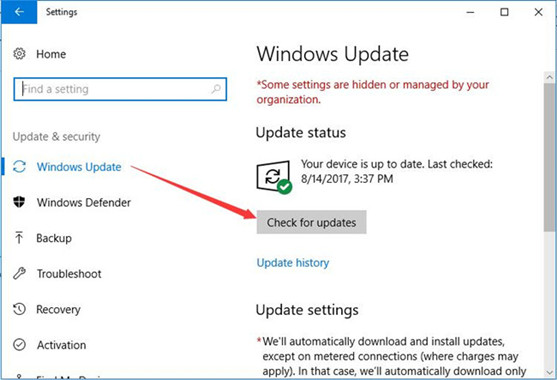
1. Find out Start > Settings > Update & Security.
2. Under Windows Update, hit “Check for updates”.
In a word, this article shows you how to fix fltmgr.sys BSOD on Windows 7, 8, 10 using different solutions. You can get out of the blue screen loop caused by the fltmgr.sys with one or more methods.
More Articles:
Fixed: Faulty Hardware Corrupted Page Blue Screen on Windows 10/11
8 Ways to Fix Kernel Security Check Failure on Windows 10/11
Solved: NTFS File System Error on Windows 10/11