
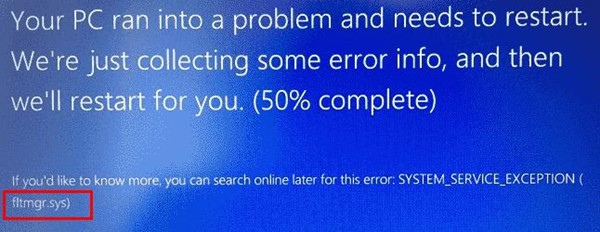
fltmgr.sys is a system file that ensures all files existing on the hard drive to be in the respective directories. Full form of the file is Microsoft Filesystem Filter Manager that also makes sure that the data written to the HDD is correct and not corrupted. Error fltmgr.sys BSOD occurs when this process can’t perform its duty properly and system keeps crashing with random restarts. This blue screen of death mostly appears with Kmode exception not handled, Page fault in nonpaged area, Memory_management, and Irql_not_less_or_equal.
File System Filter Manager becomes damaged or unreadable if the communication between CPU and hardware is lost or malfunctioned. Other potential reasons that cause fltmgr.sys blue screen error is missing system components, malware infection, outdated device drivers, and cracked software programs. Sometimes, a simple restart works as a tweak to fix fltmgr.sys BSOD. On the other hand, the same blue screen of death occasionally doesn’t let you login into your system thus resolving the issue becomes difficult.
fltmgr.sys BSOD Error in Windows 10
Here is how to fix fltmgr.sys BSOD Error in Windows 10 –
1] Boot into Safe mode with Networking
To solve this Blue screen issue you need to boot in safe mode with networking in the condition you cannot access the desktop. Suppose you are able to log in after encountering fltmgr.sys BSOD error, you can directly move to method 2.
- Click the search icon on the taskbar.
- Type – advanced startup.
- Press – Restart now.
- On the coming screen, go to Troubleshoot => Advanced options => Startup Settings successively.
- Next, click – Restart.
- Once the system powers up, press 5 or f5 to enable Safe Mode with Networking.
2] Perform Virus scan
fltmgr.sys with page fault in nonpaged area, kmode exception not handled, memory_management
, or irql_not_less_or_equal might occur when malware enters the system. During this process, some fundamental elements that are necessary to make sure the smooth functioning of Windows 10 PC either go missing or become corrupted.
Threat or attack is nearly impossible for Windows 10 because the version has built-in utility Windows security that ensures online and offline safety. Despite, an outdated operating system, broken device drivers, disabled security suite oftentimes make it easy for malware to get access. So, before you try out any other solutions, it’s important to eliminate existing malware so that it can’t overspread.
- Press – Windows + S.
- Type in – Virus & threat protection.
- Hit – Enter.
- Click the link reading – Scan options.
- Hit the radio button set for – Full scan.
- Click – Scan now.
- If the utility traces out any malware, hit – Clean Threat.
- Thereafter, click Remove and then Start actions.
- Once the removal process ends, reboot Windows.
3] Restore missing system elements
Some system files might be disappeared or misplaced due to malware infection or software conflict or other reasons. If any of these items are related to File System Filter Manager, you need to restore the missing components. System File Checker comes to the rescue in such conditions. Sfc /Scannow mainly is a command-line utility that scans the integrity to resolve the defective system files and restore lost system elements. To run the same –
- Click the search icon from taskbar.
- Type – cmd.
- Press – Ctrl + Shift + Enter.
- When User Account Control asks for approval, click – Yes.
- In the elevated Command Prompt, insert – sfc /scannow.
- Hit – Enter.
- After completion of the scanning process, restart the Windows PC.
4] Update Windows 10
fltmgr.sys BSOD still persists even after following the above ways then there is a chance that your system lacks some critical updates. To get –
- Press – Windows + I.
- Click – Update & Security.
- From the right-hand side, click – Check for updates.
- If there is an available patch, click – Download.
- After downloading when the installation process finishes, hit – Restart now.
5] Make sure all device drivers are up-to-date
Automatic update also installs OEM drivers but sometimes they are broken or incompatible. That’s why some users keep device drivers excluded from updates. There might be some other situations too when you need to search for device drivers update manually.
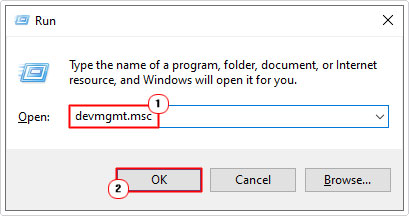
- Press – Windows key.
- Type – devmgmt.msc.
- Hit – Enter.
- When “Device Manager” appears, look for the device that may cause fltmgr.sys BSOD.
- Double-click the same.
- Find out which driver is causing issue or outdated.
- Right-click on that ‘driver’ and choose – Update driver.
- Opt for – Browse my computer for drivers.
- Click – Let me pick from a list of available drivers on my computer.
- Select the correct model.
- Hit – Next.
- After installing the update, reboot the device.
6] Check external hardware to fix fltmgr.sys BSOD
fltmgr.sys BSOD is often caused by connected peripherals like printers, external hard drives, second monitors, and Bluetooth devices. So, disconnecting them may solve the problem. However, you can keep the mouse and keyboard attached.
To check whether any of your connected hardware is damaged, disjoint their USB cables from the individual ports. After that, restart Windows 10 and see if the blue screen error still exists. If no, connect the peripherals one after another. In the meantime, check if any particular hardware is triggering the blue screen error.
7] Resolve disk error
Malfunctioned or corrupted hard drive can also cause fltmgr.sys BSOD. If the problem is non-physical, CHKDSK command-line can be a lifesaver, or else you will have to replace the hard disk with a new one. Disk checking utility analyzes the hard drive to find out existing error moreover fix found issue automatically. To execute the same –
- Open Command Prompt as administrator.
- Type in – chkdsk c: /f /r.
- Hit – Enter.
8] Replace corrupted fltmgr.sys
To replace the original fltmgr.sys that is probably corrupted, you need to download the file first and then insert it into the correct directory. This procedure is super easy if follow the below steps precisely. Steps are as followed –
- Download – fltMgr file.
- Unzip the file and copy fltmgr.sys.
- Visit the fltmgr.sys location folder – C:\Windows\System32\drivers.
- Delete the existing file paste the downloaded one.
9] Reinstall Microsoft Office access to fix fltmgr.sys BSOD
Many Windows 10 users reported that they started finding fltmgr.sys BSOD after installing Microsoft office access program. If the same happens to you, uninstall the app first. Here’s how –
- Press – Windows + R.
- In the void text bar, put – appwiz.cpl.
- Click – OK.
- Find – Microsoft Office Access.
- Right-click the same and choose – Uninstall.
- Keep following on-screen directions to complete the removal process.
- Once done, restart the Windows system.
- Check if fltmgr.sys BSOD is fixed.
- Now, visit the Download Center of Microsoft.
- Reach to Microsoft Access 2010 Runtime segment.
- Choose the preferred language and click – Download.
- After downloading, install the program in the usual way.
10] Reset the OS
Installing new software programs or making any changes in the settings or services modify Windows components along with registry keys. If these modifications don’t go with your system, fltmgr.sys BSOD may be generated. To eliminate the blue screen error, you can reinstall Windows 10 afresh. Steps are as followed –
- Click – Start icon.
- Type – reset this PC.
- Hit – Enter.
- From the right-pane, click – Get started.
- Select – Keep my files.
- Choose – Local reinstall.
- Click – Next.
- Hit – Reset.
11] Use Blue Screen Troubleshooter
To fix BSOD occurring on Windows 10, Microsoft offers a walkthrough troubleshooter escorting you till the end of the error. You can try the series of steps there to figure out the issue on your PC.
Go to this – BSOD troubleshoot page, select the correct reason, and follow the stepwise instructions provided there.
12] Repair Windows 10 to fix fltmgr.sys BSOD Windows 10
If you are still struggling with fltmgr.sys BSOD after trying out the above workarounds, there must be some serious corruption. This generally happens due to sudden power failure, virus attack, improper shutdown, and hardware as well as software errors.
In such a case, the last resort you can try out is repairing the Windows. This way, all defective and broken files will be replaced with fresh ones moreover the operational speed of the system will be smoother. To repair the system, you will have to use the Windows CD that comes with the device.
Methods list
1] Boot into Safe mode with Networking
2] Perform virus scan
3] Restore missing system elements
4] Update Windows 10
5] Make sure all device drivers are up-to-date
6] Check external hardware
7] Resolve disk error
8] Replace corrupted fltmgr.sys
9] Reinstall Microsoft Office access
10] Reset the OS
11] Repair Windows 10
That’s all!!
Fltmgr.sys BSOD (blue screen of death) is common. For instance, Fltmgr.sys BSOD appears after you create an email in outlook. Like many other BSOD errors such as internal power BSOD, blue screen due to the fltmgr.sys file is a system problem that may disable users from running the computer smoothly.
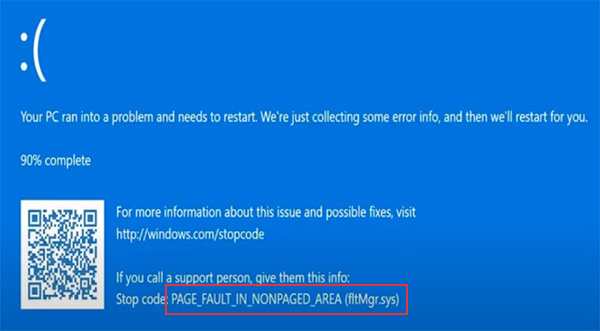
More often than not, you may hit upon various variants of Fltmgr.sys BSOD errors like System_Service_Exception, Irql_not_less_or_equal, or kmode_exception_not_handled, or page_fault_in_nonpaged_area fltmgr.sys. This post will show you common but useful solutions to get out of the blue screen.
What is FltMgr.sys? Is it Virus, Trojan, Spyware, and Malware?
Fltmgr.sys, short for Microsoft File System Filter Manager, is a system file that ensures files on the hard drive to be located in the right directories and data on the hard drive is correct. Users can normally locate this find in C drive > Windows > System 32.
As a system file on the Windows system, fltmgr.sys is not a virus, Trojan, spyware, or malware. However, once Microsoft File System Filter Manager (fltmgr.sys) is infected or even damaged by viruses, it will stop working and fail to realize the communication between the computer CPU and hardware. In this case, a blue screen error may pop up due to the malfunctioned fltmgr.sys file.
How do I Fix FltMgr.sys Blue Screen of Death on Windows 11, 10, 8, 7?
As it has been suggested, when the system file fltmgr.sys is corrupted, it may result in various system errors, mostly, endless BSODs and tasks randomly being killed due to the fltmgr.sys blue screen error. Common culprits of the File System Filter Manager BSOD are corrupted files, drivers, malware, and computer hardware like disk errors.
Or sometimes, system conflicts or crashes are the root cause of your blue screen System_Service_Exception (fltmgr.sys) or any other BSOD errors caused by this system file. You can remove the filed fltmgr by following the solutions below.
Solutions:
- 1: Restart the Computer
- 2: Enter the Safe Mode
- 3: Check the Hardware
- 4: Run SFC
- 5: Update Device Drivers
- 6: Check Disk Drives
- 7: Check for Updates
Solution 1: Restart the Computer
Sometimes, a simple computer restart may help you deal with various computer problems, with no exception for system crashes like BSODs.
Once you noticed that blue screen with the error message of fltmgr sys, you may as well reboot your device to see if the blue screen will disappear and whether you can use the device as smoothly as before.
Solution 2: Enter the Safe Mode
If restarting the computer does not help, your device is trapped into fltmgr.sys blue screen of death loop. Whether you can boot up the Windows system or not, try to enter the safe mode using different ways.
In the safe mode, users can run the computer with minimal programs and features so that file and program corruptions will be removed to allow you to troubleshoot the tricky fltmgr.sys blue screen problem.
You can choose to get into the safe mode with networking or command prompt and then fix the file manager error more easily.
Solution 3: Check the Hardware
Windows 10 BSOD system_thread_exception_not_handled FLTMGR.sys when accessing programs over the network also requires users to make sure there are not any hardware issues.
Understandably, any hardware problems like Windows setup could not configure Windows to run on this computer’s hardware may result in BSOD. Therefore, you need to disconnect all the external devices and then check the fltmgr.sys error persists and then connect them if needed.
Solution 4: Run SFC
Corrupted system files will also
cause FLTMGR.sys Windows 10 blue screen. In this way, it is necessary for you
to run the System File Checker, a Windows-based file checker, to automatically
troubleshoot and correct file corruption. As a system file, fltmgr.sys will be
checked by the system checker easily.
1. Search Command Prompt in the search box and then right click the result to Run as administrator.
2. In Command Prompt, enter sfc/scannow and then press Enter to run System File Checker.
Wait until SFC finishes checking all the system files on Windows 10, 8, 7. You then will be prompted what system files are corrupted and whether SFC can correct them itself.
After that, fltmgr.sys BSOD errors will disappear and you are advised to run SFC regularly to prevent fltmgr.sys blue screen.
Solution 5: Update Device Drivers
Fltmgr.sys kmode_exception_not_handled or System_Service_Exception or any other BSOD errors demand users to ensure all the device drivers like the network and graphics card drivers updated to achieve the communication between the hardware and the system.
That is to say, you might as well check all the driver versions and update all the device drivers to make them compatible with the system without any system crashes.
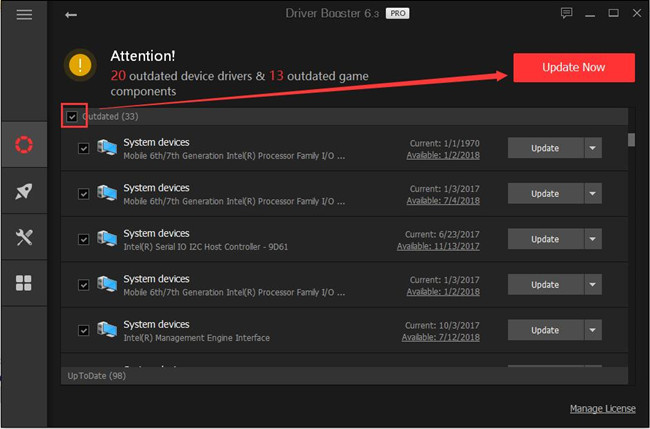
Here, Driver Booster
is a recommendable driver tool for you to search for, download, and install all the device drivers automatically and quickly. This driver tool will then help you fix the blue screen due to the File System Filter Manager more easily.
1. Download, install and run Driver Booster on Windows 11 or 10.
2. Hit Scan.

3. Find out Update all to get all the device drivers updated at the same time.
With all the drivers installed,
you will see no more memory management blue screen of death on Windows 10, 8,
7. You can access any program as you wish.
Solution 6: Check Disk Drives
Since fltmgr.sys is a system
file, corrupted files or disk drives may give rise to blue screen Fltmgr.sys on
Windows 10. It is also a necessity to troubleshoot the hard drive problem
regularly to keep your computer safe and away from viruses and malware.
1. Type File Explorer in the search box and then press Enter to navigate to File Explorer.
2. Right-click the hard drive that you are to troubleshoot, such as hard drive E to open its Properties.
3. Under Tools, locate Error checking and then hit Check.
After that, you can observe that
the disk error checking tool is troubleshooting your hard drive. If possible,
you can also check the disk errors in other hard drives to ensure there is no
hard drive corruptions that may lead to fltmgr.sys blue screen error.
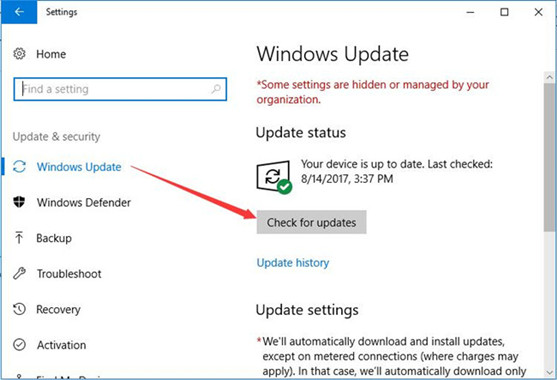
Solution 7: Check for Updates
The window system may also be one of the culprits of the BSOD error caused by the File Memory Manager. Sometimes, you may run into the blue screen labeled by fltmgr.sys due to system corruption.
Microsoft may have sometimes provided you with fixes for various system problems. Therefore, you can try to install the system updates to prevent BSOD issues.
1. Find out Start > Settings > Update & Security.
2. Under Windows Update, hit “Check for updates”.
In a word, this article shows you how to fix fltmgr.sys BSOD on Windows 7, 8, 10 using different solutions. You can get out of the blue screen loop caused by the fltmgr.sys with one or more methods.
More Articles:
Fixed: Faulty Hardware Corrupted Page Blue Screen on Windows 10/11
8 Ways to Fix Kernel Security Check Failure on Windows 10/11
Solved: NTFS File System Error on Windows 10/11
BSoD or Blue screen of death errors are the most dreaded errors in Windows. They indicate a major issue and unexpectedly crash computers. One such BSoD is the fltMgr.sys blue screen of death, which occurs due to multiple reasons like virus infection, corrupted data, and more.
The fltMgr.sys or Microsoft File system Filter Manager file is an important part of the OS, which handles data storage drives like hard drives. Windows uses this file to interact with the system storage and file manager. This file also ensures that the hard drives are accessible and their data readable.
If the fltMgr.sys fails, users encounter an unexpected crash along with the fltMgr.sys blue screen right away. This error screen displays an error code that varies depending upon the trigger behind the error. Some of these error codes are –
- SYSTEM_SERVICE_EXCEPTION
- PAGE_FAULT_IN_NONPAGED_AREA
- KMODE_EXCEPTION_NOT_HANDLED
In most cases, the error is caused by corrupted data present on the drive or due to a hardware failure. However, there could be more reasons behind this pesky issue. If you are encountering this error, the reasons could be –
- Bad Windows update
- Power outage
- Corrupt system files
- Corrupted data
- Corrupted hard drive
- Hardware damage
- Malware infection due to illegitimately obtained software
As the fltMgr.sys BSoD is displayed without any bug check value; it becomes a bit tricky to resolve it using the simple code mentioned along with it. However, there are ways you can try to get rid of this error. Let’s dive in to the methods to fix the fltMgr.sys error.
Methods to Fix the fltMgr.sys BSoD Error
Here, we will discuss some methods you can use to easily get rid of the fltMgr.sys blue screen error.
Pre activity –
Before moving on to the methods, let’s perform a few steps to see if there’s a problematic application or hardware causing the fltMgr.sys BSoD error screen to occur frequently.
- Load your PC into safe mode to check for any problematic application.
- Check hardware for any physical damage using the hardware troubleshooter. Also, use Memtest86 to check the RAM.
These preliminary checks will allow you to gauge the extent of the damage. If you encounter the fltMgr.sys BSoD while trying to enter the safe mode, it means there is severe damage.
To fix the fltMgr.sys BSoD error, we will first use System Restore to restore the PC to a previous healthy state. While this has helped a lot of users, it might not work every time. In such a scenario, we will reinstall Windows, which is the last resort to fix any Windows error.
Performing System Restore doesn’t affect the data present on your hard drive. It simply restores the system to a previously known healthy state. On the other hand, clean installing Windows will remove everything, including the data and files present on the storage media. Hence, always back up your critical data on an external storage drive before proceeding with these methods.
If the fltMgr.sys has failed and your computer is stuck in an endless loop of the fltMgr.sys BSoD error, your data present on the HDD/SSD will become inaccessible.
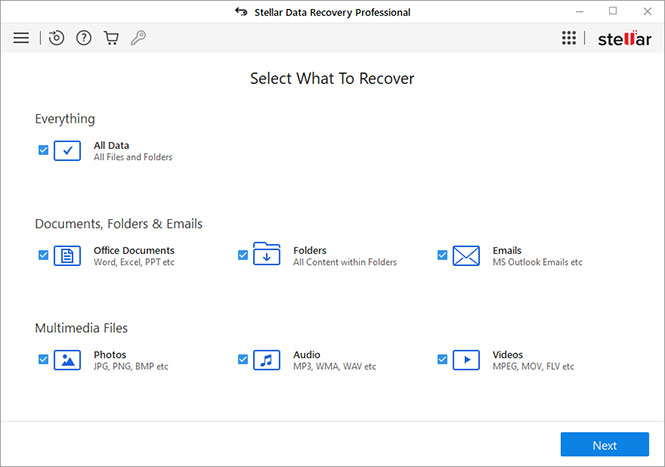
Get hold of a professional data recovery software like Stellar Data Recovery Professional to recover your data stuck in an inaccessible system. Simply create a bootable recovery media (USB) using another PC and boot into the problematic PC. Refer to our guide to perform data recovery from an unbootable PC.
Once you have retrieved your data, it is time to start troubleshooting the fltMgr.sys blue screen error.
Method 1: Perform System Restore
Here, we will take the help of Windows Installation media to enter WinRE and then perform the system restore. You can use an old system restore point to revert to a previous error-free state. Doing so will bring back all the system settings of the selected state and will remove any changes made after that save point. Here’s how you can do this –
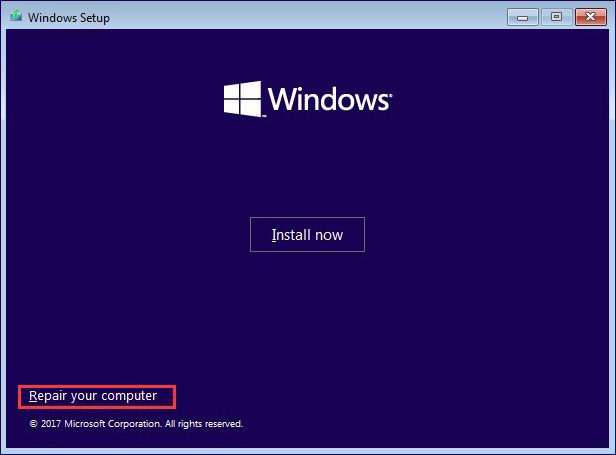
- Connect your Windows installation media to your computer and boot your computer with it.
- On the installation screen, click on Repair your computer.
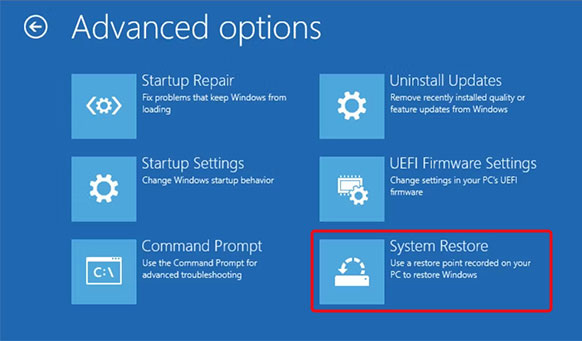
- Go into WinRE and then click on Troubleshoot > Troubleshoot > Advanced options.
- Click on the System Restore option.
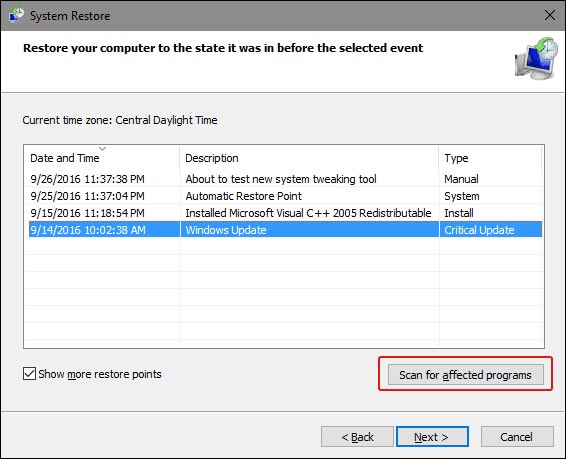
- In the System Restore window, click on the version you wish to restore and click on Scan for affected programs.
- Then, click on Next to proceed with your selection.
- On the final screen, click on Finish.
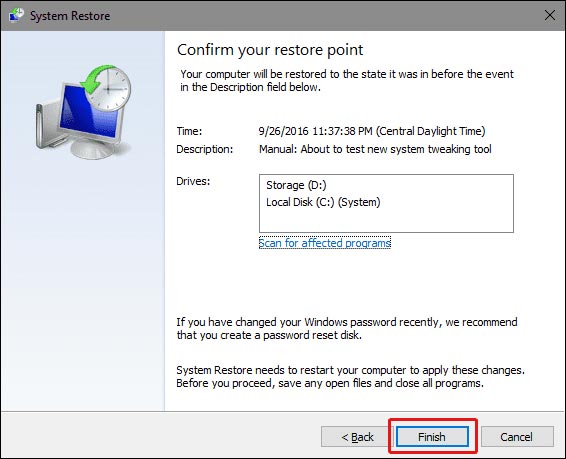
Wait for the process to end. This will restore your Windows 10 computer to the selected state. Check if this fixes the fltMgr.sys blue screen error on your PC.
Once you have restored the system to a healthy state, install any available driver and software updates. Keeping your system updated will help you avoid such errors.
Method 2: Reinstall Windows
Using the system restore point to load a previous healthy state is a great way to resolve errors, such as the fltMgr.sys BSoD. However, if that doesn’t work, you will have to clean install the Windows as a last resort. For this, you will have to use your Windows version-specific installation media and use it to boot your computer.
For booting your computer via installation media, you will have to change the boot sequence by going into the BIOS. Once it is done, your computer will restart automatically and display the installation screen. Follow the instructions on screen to proceed with the OS installation procedure. You can also refer to this guide for detailed steps.
Reinstalling Windows from scratch should eliminate the fltMgr.sys blue screen error from your system. You can now reinstall applications and restore all your data backed up on an external drive.
Conclusion
Like any other BSoD error, the fltmgr.sys blue screen error can unexpectedly crash the computer and make it unstable. We hope one of the methods explained above helped you quickly resolve the blue screen error.
P.S. – Always keep your drivers & OS updated, avoid downloading software from unreliable sources, and regularly maintain a data backup.
Related Topics –
PAGE_FAULT_IN_NONPAGED_AREA
kmode_exception_not_handled
FAQs
Can a faulty RAM module cause thefltMgr.sys BSoD?
Yes, a faulty RAM module can make the PC unstable by generating frequent BSoD errors including the fltMgr.sys error.
Why am I getting the kmode_ exception_not_handled BSoD error?
This could be due to reasons, such as outdated network drivers, missing device drivers, installing a problematic update, memory or hardware issue, etc.
How do I fix the fltMgr.sys blue screen error?
Clean junk files in Windows Registry using the built-in Disc Cleanup utility to remove irrelevant files clogging up the system and causing the fltMgr.sys error.
Was this article helpful?
YES2
NO
The fltmgr.sys file or the Filter Manager is the one that’s responsible in making sure that all the file stored in a computer’s hard drive stays on their respective locations and is located in C:/Windows/System32/drivers. Now when you encounter a Blue Screen of Death or BSOD error saying, “Your PC ran into a problem that it couldn’t handle, and now it needs to restart. SYSTEM_SERVICE_EXCEPTION”. This kind of Stop error is due to an error with the driver that’s responsible for enabling the communication between the hardware and the computer. It indicates that this driver allows direct access to the internal hardware from the CPU itself.
What’s worse about the SYSTEM_SERVICE_EXCEPTION BSOD error is that there are times when you won’t be able to log in to your computer even after it reboots. However, you need not worry as this post will guide you into fixing this BSOD error. All you have to do is follow the given options below carefully and that before you proceed make sure that you create a System Restore point just in case something goes wrong.
Option 1 – Run the Windows Update
Obviously, since the fltmgr.sys file is a system file from Microsoft, you can try running the Windows Update and see if it fixes the problem or not.
Option 2 – Run the System File Checker
The System File Checker, also known as the SFC scan, is a built-in utility in Windows that can be found in the C:/Windows/System32 folder. This tool allows you to scan and restore any corrupted system files in Windows that might be causing the SYSTEM_SERVICE_EXCEPTION BSOD error. To use this tool, follow the steps below.
- Tap Win + R to launch Run.
- Type in cmd in the field and tap Enter.
- After opening Command Prompt, type in sfc /scannow
The command will start a system scan which will take a few whiles before it finishes. Once it’s done, you could get the following results:
- Windows Resource Protection did not find any integrity violations.
- Windows Resource Protection found corrupt files and successfully repaired them.
- Windows Resource Protection found corrupt files but was unable to fix some of them.
- Restart your computer and then check if it has fixed the error or not.
Option 3 – Run the Blue Screen Troubleshooter
The Blue Screen troubleshooter is a built-in tool in Windows 10 that can be found on the Settings Troubleshooters page. To use it, refer to these steps:
- Tap the Win + I keys to open the Settings panel.
- Then go to Update & Security > Troubleshoot.
- From there, look for the option called “Blue Screen” on your right-hand side and then click the “Run the troubleshooter” button to run the Blue Screen Troubleshooter and then follow the next on-screen options. Note that you might have to boot your PC into Safe Mode.
Option 4 – Check your hardware for any physical issues
There are times when faulty hardware can result in serious problems in the system such as the SYSTEM_SERVICE_EXCEPTION Blue Screen error. Thus, it is highly recommended that you check the internal components of your CPU to find out if there are any problems. And if there is any physical damage, you need to bring that to a technician to get it fixed or have it replaced.
Option 5 – Run the CHKDSK utility
You can also run the Chkdsk utility to resolve the BSOD error. The Chkdsk utility is the one that repairs hard drive errors that might be causing the problem.
- Open Command Prompt with admin privileges.
- After opening Command Prompt, execute the commands listed below, and don’t forget to hit Enter right after you type in each one of them and if you have installed Windows to some different directory, you must replace “C” with the name of the drive you’ve installed Windows with.
- chkdsk C: /r /x
- chkdsk C: /f
Do You Need Help with Your Device?
Our Team of Experts May Help
Troubleshoot.Tech Experts are There for You!
GET HELP
Troubleshoot.Tech experts work with all versions of Microsoft Windows including Windows 11, with Android, Mac, and more.
Share this article:
You might also like
Gaming on the computer has become one of the most used past-time activities among people of all ages. And since we are still in pandemic it has only risen as activity. People can acquire a lot of games at various discounts on various platforms and enjoy them at the leisure of their home.
Among many game platforms and stores, Electronic art’s Origin is one of the bigger ones, and having some titles that could not be found anywhere else coupled with the ability to have access to almost the whole game catalog with one monthly subscription make it one of the most used clients.
Sadly as with every piece of software Origin’s client is not perfect by any means and it can behave strangely from time to time.
Hello everyone and welcome to errortools.com, today we will fix Origin error code 10 which oddly enough can appear out of nowhere and can even appear on the very end of installation for the chosen game. If you have managed to come by this error you are in luck to be here because we have a couple of fixes for it.
I know that you might be excited to play the game so let’s go and do some fixing
Check Server status
Before diving into technicality and before we start deleting files and fixing things you should check the Server status. This seems maybe like something you should not do but if the server has experienced some kind of downtime or it is in maintenance Origin will throw this error in the client. Unexpected situations can cause various server issues all of a sudden and the first thing is to check are servers online and working. There are various ways to check server status from official origin website to Electronic arts twitter channel to Reddit and many more online server status websites. If it turns out that the server is to be blamed for this error then sit back and wait for EA to resolve the issue, there is not much you can do anyway.
Delete OriginThinSetupInternal.exe
- After some research, it has come to light that originthinsetupinternal.exe can cause this specific error. The best solution is to delete the file and then run Origin as administrator so the file is remade new.
- First, make sure that Origin is fully closed, check the taskbar and if it lurks there right-click on it and click on quit
- Run file explorer and go into the folder where Origin is installed, by default it is C:\Program Files (x86)\Origin
- Locate OriginThinSetupInternal.exe and delete it
- Then locate origin.exe and right-click on it and then click on Run as administrator
Reinstall Origin client
If the previous solution has not solved the issue then Origin might have some corrupted files inside it. It is known that the Origin client can produce some bad files if the installation has been forcefully canceled. The best thing is to reinstall the completely whole client.
- Press ⊞ WINDOWS + R to open the run dialog
- Inside run dialog type in Control panel and press ENTER
- In the control panel locate programs and features group and double click on it
- Locate Origin, click to select it, and on top click on uninstall
- After uninstall process is completed start file explorer and go to the folder where Origin was installed, by default it is C:\Program Files (x86). Locate the Origin folder and delete it.
- Go to the official origin website and download the new client installation.
- After the download is finished double click on it and follow onscreen instructions.
Disable antivirus
If every solution so far has not been able to remove error then obviously something else is interfering with the origin client and installation functioning. Altho not advisable, turn OFF your security suite including both firewall and antivirus and try installing the game again. There is the possibility that the origin client or some game file has been marked as false positive by security software thus preventing it from executing properly.
Read More
As you know, one of the most useful web browsers all over the globe is Google Chrome. However, it is not without flaws as you could encounter errors while using it. One of these errors is the ERR_UNSAFE_PORT error. This kind of error is caused by the data being accessed using a port that isn’t recommended. When you encounter this kind of error in Chrome, you will see the following error message on your screen:
“The webpage is not available, The webpage at <Address> might be temporarily down or it may have moved permanently to a new address. Error code: ERR_UNSAFE_PORT”
In this post, you will be guided on how you can fix the ERR_UNSAFE_PORT error in Google Chrome on your Windows 10 computer. You can try to set allowed ports or reset or reinstall Google Chrome. For more details, refer to the given options below.
Option 1 – Try to set allowed ports
- To get started, open Google Chrome.
- After that, go to the Shortcut tab and type the following after the whole address in the field named Target: —explicitly-allowed-ports=xxx
- It should look like this “C:/Documents and Settings/User/Local Settings/Application Data/Google/Chrome/Applicationchrome.exe —explicitly-allowed-ports=6666”.
- Now click on Apply and click OK to save the changes made.
Option 2 – Reset Chrome
Resetting Chrome can also help you fix the error. This means that you will be restoring its default settings, disabling all the extensions, add-ons, and themes. Aside from that, the content settings will be reset as well and the cookies, cache, and site data will also be deleted. To reset Chrome, here’s what you have to do:
- Open Google Chrome, then tap the Alt + F keys.
- After that, click on Settings.
- Next, scroll down until you see the Advanced option, once you see it, click on it.
- After clicking the Advanced option, go to the “Restore and clean up option and click on the “Restore settings to their original defaults” option to reset Google Chrome.
- Now restart Google Chrome
Option 3 – Try to clean reinstall Chrome
There are instances when programs leave files behind after you’ve uninstalled them and the same thing can happen to Chrome so before you reinstall Chrome, you have to make sure that you have deleted the User Data folder. To do so, refer to the following steps:
- Hit the Win + R keys to open the Run dialog box.
- Next, type “%USERPROFILE%AppDataLocalGoogleChromeUser Data” in the field and hit Enter to open the User Data folder.
- From there, rename the default folder and name it something else, e.g. “Default.old”.
- After that, install Google Chrome again and check if the issue is now fixed.
Read More
If you notice that your tabs in your Firefox browser keep on crashing recently, then there might be something wrong with your browser. Every time any of your tabs crashes, you might encounter an error message saying, “Gah, Your tab just crashed”. If you encounter this kind of error message then it is most likely that your Firefox Profile is having some issues with the existing installation of Firefox.
The “Gah, Your tab just crashed” error rarely happens but when it does, it can get quite annoying as you won’t get to browse the internet peacefully. So to fix it, here are some suggestions you could check out.
Option 1 – Try disabling multi-process tabs in Firefox
Since Mozilla has one process for Firefox itself, while one process handles all the tabs, you have the option to disable these multi-process tabs in Firefox. To do that, follow these steps:
- In the address bar of Firefox, type “about: config” and hit Enter.
- Next, look for the following configurations and set them to false.
- tabs.remote.autostart = false
- tabs.remote.autostart.2 = false
- After that, double-click on the toggle switch between true and false.
Option 2 – Try checking your Add-ons
In this option, you need to start Firefox in Safe Mode and then check if the problem is fixed. If it is, you may have to check your Firefox add-ons as well as extensions as one of them might be the one that’s causing the “Gah, Your tab just crashed” error.
Option 3 – Downgrade the Firefox version you’re using
It could be that the current version of Firefox you’re using has some issues so you might have to downgrade it, especially if you are already using the latest version. To downgrade your Firefox browser, go to the directory of the other versions and languages and select an older version that worked for you. After that, you have to disable automatic Firefox updates.
- First, click the menu button and select Preferences.
- Next, go to the Firefox Updates section under the General panel.
- Then select the radio button labeled “Check for updates but let you choose to install them”. This will ensure that you will not have the same issue with the new update.
Note that this is only a temporary fix since updating your programs, including browsers.
Option 4 – Try sending Crash Reports
You might want to send crash reports to Mozilla. This way, Mozilla might come up with some fix to resolve the problem. All you have to do is type “about: crashes” in the address bar. This will list all the crash reports. Now send it to Mozilla using the built-in interface. Although this won’t instantly fix the problem, a lot of user finds it useful. And besides, the issue will get fixed in future releases or with minor updates.
Read More
In case you don’t know, Windows 10 now allows users to check the Bluetooth battery level of devices. More often than not, the accessories or peripherals users use for their Windows 10 devices are connected to it using Bluetooth technology. This high-speed low-powered wireless technology is designed to link mobile devices, computers, and other network devices over a short distance wirelessly.
Monitoring the battery level of a device where Bluetooth is enabled isn’t an easy task as most of these devices do not support the Bluetooth battery monitor or the battery level display. And even when on devices that do, you still have to install additional software to find it. However, Windows 10 eliminates this requirement and all you have to do is add a Bluetooth device and connect that Bluetooth device. How? Follow the instructions provided below.
Step 1: Adding a Bluetooth Device
The easiest way to get your Bluetooth device battery to be displayed on your Windows 10 screen is to simply add a Bluetooth device. To do so, follow these sub-steps:
- First, turn on the Bluetooth mode on your device.
- Next, go to Windows Settings > Devices > Bluetooth & other devices.
- From there, click on the “+” button next to the ‘Add Bluetooth or other devices” option and select the type of device you want to add.
Step 2: Connecting the Bluetooth Device
Once you’ve added the device, it will be visible under the “Add a device” screen.
- Now select the newly added Bluetooth device and click the “Done” button.
- After that, it will now be connected. Go back to the “Bluetooth & other devices” window and scroll down to the section of “Mouse, Keyboard, and Pen”.
- From there, move the cursor alongside the connected device to display its battery level.
Keep in mind that there are several ways in which you can display the battery information of the Bluetooth device. However, Windows 10 understands only one of them per se. So if your device is not a Bluetooth Low Energy device, Windows 10 won’t be able to show its battery information and won’t display its battery level.
Read More
Among other things and innovations, Windows 11 brings to the table is the game mode. The game mode is a system designed to release some resources and optimize your system when Windows 11 detects that you are playing games. It also turns off automatic updates while the game is active.
The game mode is active at all times and usually, everything works great but in some instances, it can sadly cause some performance issues. If you are one of these unlucky people where game mode is not working as supposed to do, don’t panic, we have a quick guide for you on how to turn it off.
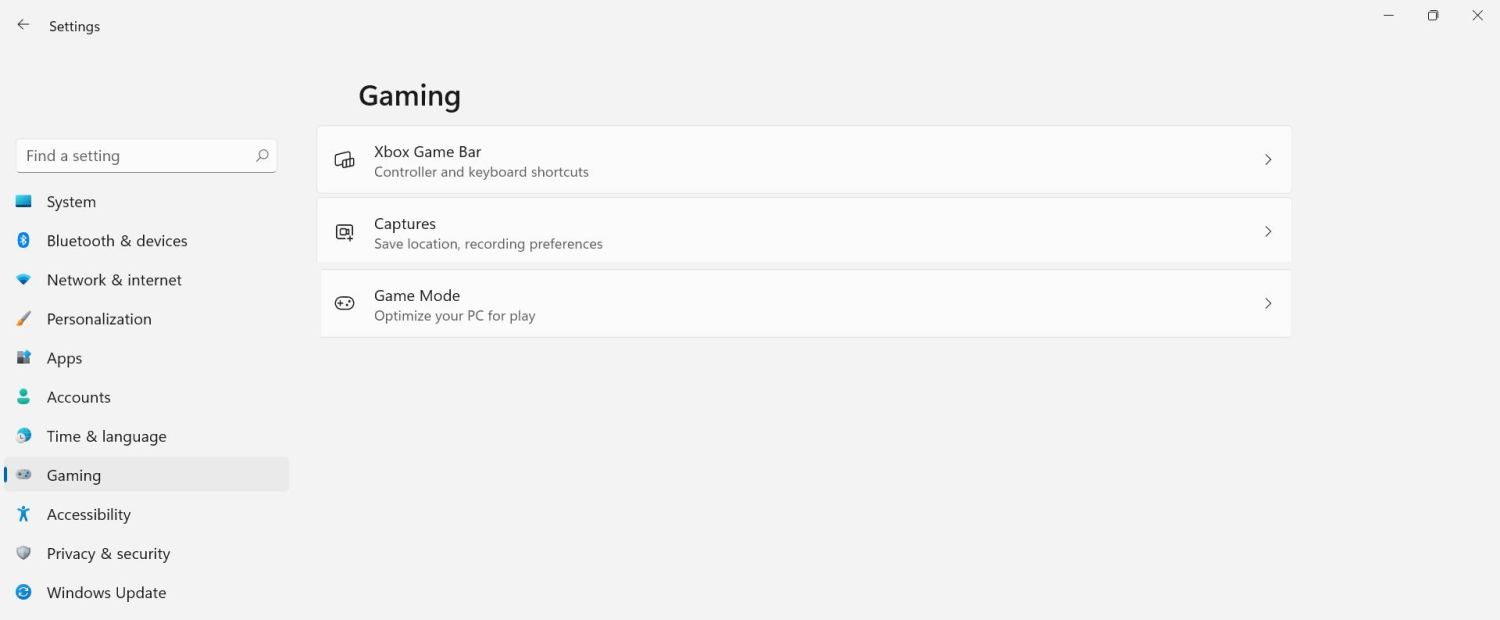
- Press ⊞ WINDOWS + I to open settings
- Inside click on Gaming
- Select Game mode
- Click switch beside Game mode to turn it off
- Close settings
Everything will be automatically saved and applied and you should not have any issues from now on. If for any reason you wish to turn game mode back ON, just follow the same steps and turn the switch to ON.
Read More
One of the popular tools that allow a user to offer or obtain remote assistance on a computer is the TeamViewer. It is available on all the major computer and mobile platforms which makes it a lot useful to every kind of user, even on the go. If you are one of the users who frequently use TeamViewer, then you must be familiar with this one sentence that states, “Initializing display parameters”. In common cases, this sentence will appear for a second and load the other user’s screen. However, some users reported that TeamViewer gets stuck on that stage and did not move ahead even a bit. If you experience the same problem, read on as this post will guide you in fixing this issue with TeamViewer on your Windows 10 computer.
At the time of writing, the cause of this issue is still unclear. It could be due to the quality of internet connection, conflicts in process, misconfiguration of Remote Access, and many more. To fix this issue, you can try to update TeamViewer for both the users or have it reinstalled with Unattended Remote Access, or reconfigure the Remote Access. You can also try to kill any conflicting processes or optimize your internet connection. For more details, refer to the given options below.
Option 1 – Reboot your router
The first thing you can try to do to fix the error is to simply restart your router. All you need to do is reboot the router from its Admin panel or you can also turn it off manually and turn it back on after a couple of seconds so that it can completely reboot. Once you’re done, try accessing your server again and see if the error is now fixed.
Option 2 – Try to update TeamViewer on both users’ end
You might have to update the TeamViewer on both ends and to do that, you need to start the TeamViewer installer again. Once it is installed, run the program and click on the Help option in the Menu ribbon and then select the “Check for updates…” option. If an update is found, you will be notified within a couple of seconds through a pop-up mini window. From there, click on Update and then follow the next onscreen instructions that appear and choose your TeamViewer version to update.
Option 3 – Try reinstalling TeamViewer via the Unattended Remote Access
If the first two given options didn’t work, you might have to reinstall TeamViewer from the Windows 10 Settings app or Control Panel.
- Tap the Win + R keys to launch the Run utility and type “regedit” in the field and hit Enter to open the Registry Editor.
- Here, navigate to this registry key: Computer HKEY_LOCAL_MACHINE SOFTWARE Wow6432Node TeamViewer
- Next, look for the TeamViewer key and right-click on it, and select Delete.
- After that, restart your PC to apply the changes made and then start TeamViewer again, and then click on Connection > Open Management Console.
- Then sign in or sign up to get registered and select the Add new device radio button under Add > Add computer located on the top-right corner and then select the Download now option.
- Now follow the next onscreen instructions that appear to complete the installation and then check if it fixes the problem or not.
Option 4 – Try reconfiguring the Remote Access
You can also try to reconfigure Remote Access in case there is some misconfiguration that might have caused the problem with TeamViewer.
- On your Desktop, right-click on This PC and click on Properties.
- Next, go to the left side of the navigation panel and click on Remote Settings.
- From there, make sure that the “Allow Remote Assistance Connections to this computer” checkbox is checked under the Remote Assistance section.
- Once done, click on the Advanced button. This will open a new mini window where you’ll have to check the “Allow this computer to be controlled remotely” option under the Remote Control section.
- Then click on OK and see if it fixed the problem.
Option 5 – Try to kill any conflicting processes
- Tap the Ctrl + Shift + Esc key combination to open the Task Manager.
- Then navigate to the Processes tab and right-click on the BGInfo process.
- Now select the End Task option to kill its process and then start TeamViewer again and check if the problem is resolved.
Option 6 – Try to optimize the quality of connection
You need to take care of two things under this option – first, you have to disable the loading of the Wallpaper of the computer which is the one that you’re trying to access remotely. To do that, you have to select the Extras menu from the menu ribbon and then select Options. And under the Remote Control section, check the “Remove remote wallpaper” option. The next thing you have to do is to optimize the quality for the speed by selecting the “Optimize Speed” for the menu of Quality still under the Remote Control section.
Read More
0x800ccc92 — What is it?
Do you come across this error message “Receiving’ reported error (0x800ccc92): “Your e-mail server rejected your login”? Verify your user name and password in your account properties. The server responded: — ERR invalid user names and password” when you try to send or open emails using your Outlook account?
If yes, then this article is a must-read for you as we explain why this error occurs and how you can resolve it.
To begin with, 0x800ccc92 is a common Microsoft Outlook error.
This error restricts your ability to send and receive emails on your Outlook email address. In other words, it locks you out and hampers your ability to use your account successfully causing a great deal of inconvenience especially if you use your Outlook account for communication in and across your office.
Solution
Error Causes
The 0x800ccc92 error message may occur due to numerous reasons so narrowing it down to one particular reason for occurrence is not easy. However, here we have listed down some of the most common causes of this error code:
- Incorrect Outlook configuration settings
- Invalid password or username
- PST file crosses its fixed file size limit
- Failure of POP3 and Protocol STMP in database server connection
- Improper synchronization between Outlook and the server
- Virus Infection
- Invalid registry entries
Further Information and Manual Repair?
To fix the error code 0x800ccc92 on your system, here are some quick, effective, and easy DIY solutions that you can try:
Solution 1:
Sometimes the error code may occur due to an invalid password and usernames entry. Therefore, first, cross-check user ID and password. If you’ve entered the wrong password, try inserting the correct password to access your account.
Solution 2:
If the error still persists, then try installing the latest available Server Service Pack for Exchange. This solution works best if compatibility is the issue and the underlying reason for the error is improper synchronization between Outlook and the server.
Solution 3:
The presence of malware and viruses can also lead to such errors. Therefore, it is advisable to scan your entire PC for malware and viruses using a powerful antivirus.
Solution 4:
If the issue occurs due to bad and invalid registry entries, then it is important that you remove them right away. Due to such entries, you may experience the 0x800ccc92 error on your PC. To remove them, you need to download a registry cleaner.
Downloading two programs an antivirus and a registry cleaner separately may slow down the speed of your PC. Therefore, to ensure this does not happen it is recommended you install Restoro
Restoro is an advanced and multi-functional PC Fixer. This software is deployed with an intuitive algorithm and multiple powerful PC repair utilities including a registry cleaner, anti-virus, and a system optimizer. It is a one-stop solution for all PC-related issues.
Using this tool, you can scan your entire PC and remove all types of malicious software including malware, viruses, spyware, and Trojans corrupting your PC in seconds. Simultaneously, it also removes all bad registry keys and entries and files the damaged system file, thereby restoring the registry back to normal.
The system optimizer utility ensures your PC speed is not compromised due to the repair process.
This software is safe, bug-free, efficient, and user-friendly. It is compatible with all Windows versions.
Click here to download Restoro on your PC to instantly remove viruses and invalid registry entries to resolve the 0x800ccc92 error message on your system now!
Read More
PC Optimizer Pro is a PC optimizer utility developed by Xportsoft Technologies. It is classified as a potentially unwanted program, due to its aggressive scan and registration reminders, and that it is often distributed bundled with other programs in a manner that leads many users to not know how it got on their computer. While not inherently malicious, PC Optimizer Pro adds numerous registry keys, startup entries and while running consumes a relatively high amount of system resources, especially during its scans. The software installs from a .exe file that is around 5.20 MB or 5.453.240 Bytes (depending on the version). As of the publication of these videos, the current version of PC Optimizer Pro was detected as malicious or potentially unwanted by at least 21 AntiViruses.
About Potentially Unwanted Applications
If you have ever installed freeware or shareware, chances are high that your computer can get installed with a bunch of unwanted applications. A Potentially Unwanted Program, also called PUP, in short, is actually software that contains adware, installs toolbars, or has other hidden goals. These kinds of programs are almost always bundled up with free software which you download from the net or are also bundled within the custom installers on many download sites.
PUPs did not really constitute pure “malware” in the strict sense of the term. Just like malicious software, PUPs cause problems when downloaded and installed on your PC, but what makes a PUP different is that you give consent to download it – although the truth is vastly different – the software installation package actually tricks you into accepting the installation. Irrespective of whether it is regarded as malware or not, PUPs are nearly always harmful to the user as they might bring on adware, spyware, keystroke logging, and also other bad crapware features on your computer.
What do PUPs do on your computer, exactly?
Potentially Unwanted Programs come in many forms and varieties, but in most instances, these are adware programs that show annoying pop-up adverts and advertisements on websites you check out. The PUPs also get installed into your computer in the form of web browser add-ons and toolbars. Not only they needlessly take up space on your computer screen, but toolbars may also manipulate search engine results, watch your web browsing activities, decrease your web browser’s efficiency, and decelerate your internet connection to a crawl.
Potentially Unwanted Programs at times act quite similarly to viruses or spyware. Some PUPs include keyloggers, dialers, along with other software to gather your private details that may result in identity theft. These are programs that don’t do anything good for you; in addition to taking over space on your hard drive, they also slow down your computer, often modify settings without your approval, the list of bothersome features goes on.
Ways to avoid PUPs
• Always study the EULA and privacy statement. Don’t agree until you know precisely what you are acknowledging.
• Choose the “custom” install whenever installing a software program. In particular, look closely at those small boxes that have been checked as default, where you may ‘agree’ to receive promotions or install software bundlers.
• Use good antivirus software, like Safebytes Anti-Malware that offers real-time protection against PUPs.
• Avoid adding a freeware program you do not use. Turn off or remove toolbars and web browser extensions you don’t really need.
• Always download software from reliable sources like official sites as opposed to untrustworthy sharing space. Avoid file-hosting sites where/when possible.
What you can do if Malware Prevents You From Downloading Or Installing Antivirus?
Practically all malware is bad, but certain types of malware do much more damage to your computer than others. Certain malware goes to great lengths to stop you from downloading or installing anything on your personal computer, particularly antivirus applications. If you are reading this right now, you have probably recognized that a malware infection is the real cause of your blocked web connectivity. So what to do if you need to install an antivirus program like Safebytes? There are a few steps you can take to circumvent this problem.
Install in Safe Mode
The Windows OS has a special mode known as “Safe Mode” in which just the bare minimum required programs and services are loaded. In the event the malware is blocking the internet connection and affecting the computer, running it in Safe Mode will let you download antivirus and run a diagnostic scan while limiting possible damage. To start the computer into Safe Mode, press the “F8” key on your keyboard right before the Windows boot screen comes up; Or right after normal Windows boot up, run MSConfig, look over “Safe Boot” under Boot tab, and click Apply. After you reboot into Safe Mode with Networking, you can download, install, and update anti-malware software from there. Right after installation, run the malware scanner to remove standard infections.
Switch to an alternate browser
Some malware may target vulnerabilities of a specific browser that block the downloading process. If you seem to have malware attached to Internet Explorer, then switch over to an alternate web browser with built-in safety features, such as Firefox or Chrome, to download your favorite antivirus program – Safebytes.
Install and run anti-virus from the USB drive
Another solution is to create a portable anti-malware program on your USB stick. Adopt these measures to employ a thumb drive to clean your infected computer system.
1) Download Safebytes Anti-Malware or MS Windows Defender Offline onto a clean PC.
2) Plug the Thumb drive into the clean computer.
3) Run the setup program by double-clicking the executable file of the downloaded software, with a .exe file format.
4) Choose the flash drive as the location for saving the file. Do as instructed on the screen to complete the installation process.
5) Now, plug the pen drive into the corrupted computer.
6) Double-click the anti-malware software EXE file on the USB flash drive.
7) Press the “Scan” button to run a full system scan and remove viruses automatically.
SafeBytes Anti-Malware: Lightweight Malware Protection for Windows PC
These days, an anti-malware tool can protect your computer from different types of online threats. But how to choose the best one amongst numerous malware protection application that’s available out there? You may be aware, there are numerous anti-malware companies and tools for you to consider. A few are well worth your money, but many aren’t. You have to be very careful not to choose the wrong application, especially if you buy a paid application. In terms of commercial anti-malware application options, many people select well-known brands, such as SafeBytes, and are quite happy with it.
SafeBytes anti-malware is a powerful, highly effective protection tool created to help end-users of all levels of IT literacy in detecting and eliminating malicious threats from their computer. Using its cutting-edge technology, this software can assist you to eliminate several types of malware such as computer viruses, trojans, PUPs, worms, ransomware, adware, and browser hijackers.
SafeBytes has excellent features when compared to other anti-malware programs. Let’s have a look at a few of them below:
Robust, Anti-malware Protection: Safebytes is made on the best virus engine within the industry. These engines will find and get rid of threats even during the initial phases of a malware outbreak.
Active Protection: Malware programs aiming to enter the system are discovered and stopped as and when detected by the SafeBytes active protection shields. It’ll check your PC for suspicious activity at all times and safeguards your personal computer from unauthorized access.
High-Speed Malware Scanning Engine: SafeBytes’s high-speed malware scanning engine minimizes scan times and extends the life of the battery. Simultaneously, it will effectively detect and eliminate infected computer files or any online threat.
Website Filtering: SafeBytes checks the hyperlinks present on a webpage for possible threats and informs you whether the site is safe to explore or not, through its unique safety rating system.
Lowest CPU/Memory Usage: SafeBytes is a lightweight and user-friendly antivirus and antimalware solution. Since it utilizes negligible computer resources, this tool leaves the computer’s power exactly where it belongs to: with you.
Premium Support: You may get high levels of support round the clock if you’re using their paid software.
Technical Details and Manual Removal (Advanced Users)
If you wish to manually remove PCOptimizerPro without the use of an automated tool, it may be possible to do so by removing the program from the Windows Add/Remove Programs menu, or in cases of browser extensions, going to the browsers AddOn/Extension manager and removing it. You will likely also want to reset your browser.
To ensure the complete removal, manually check your hard drive and registry for all of the following and remove or reset the values accordingly. Please note that this is for advanced users only and may be difficult, with incorrect file removal causing additional PC errors. In addition, some malware is capable of replicating or preventing deletion. Doing this in Safe Mode is advised.
The following files, folders, and registry entries are created or modified by PCOptimizerPro
Files:
DesktopPC Optimizer Pro.lnk.
%Programs%PC Optimizer ProLive Support.url.
%Programs%PC Optimizer ProPC Optimizer Pro.lnk.
%Programs%PC Optimizer ProUninstallation Guide.url.
%Programs%PC Optimizer ProVisit Website.url.
%ProgramFiles%PC Optimizer ProPCOptimizerPro.exe.
%ProgramFiles%PC Optimizer ProPCOptProCtxMenu.dll.
%ProgramFiles%PC Optimizer ProPCOptProTrays.exe.
%ProgramFiles%PC Optimizer ProStartApps.exe.
%ProgramFiles%PC Optimizer Prouninst.exe.
%QuickLaunch%PC Optimizer Pro.lnk.
WindowsTasksPC Optimizer Pro Idle.job.
WindowsTasksPC Optimizer Pro Scan.job.
WindowsTasksPC Optimizer Pro startups.job.
WindowsTasksPC Optimizer Pro Updates.job.
C:DOCUME1USER1LOCALS1Tempoptprosetup.exe
C:WINDOWSsystem32netmsg.dll
C:DOCUME1USER1LOCALS1Tempoptprosetup.exe
C:DOCUME1USER1LOCALS1Tempis-SJGJ9.tmpoptprosetup.tmp
C:DOCUME1USER1LOCALS1Tempis-NTRVH.tmp_isetup_shfoldr.dll
C:WINDOWSsystem32shfolder.dll
C:DOCUME1USER1LOCALS1Tempis-NTRVH.tmpOptProHelper.dll
C:DOCUME1USER1LOCALS1Tempis-NTRVH.tmpitdownload.dll
C:1e4e2d65e12311cac2c0eeb8c5c1d7bd1ddc865b367b98b56bc2330bf18436
C:WINDOWSRegistrationR000000000007.clb
C:DOCUME1USER1LOCALS1Tempoptprosetup.exe
C:WINDOWSsystem32shfolder.dll
C:1e4e2d65e12311cac2c0eeb8c5c1d7bd1ddc865b367b98b56bc2330bf18436
C:WINDOWSRegistrationR000000000007.clb
C:WINDOWSsystem32shell32.dll
C:DOCUME1USER1LOCALS1Tempis-SJGJ9.tmpoptprosetup.tmp
C:Program FilesOptimizer Pro 3.99OptimizerPro.exe
C:Program FilesOptimizer Pro 3.99unins000.exe
C:Program FilesOptimizer Pro 3.99OptProStart.exe
c:autoexec.bat
C:DOCUME1USER1LOCALS1Tempoptprosetup.exe
C:DOCUME1USER1LOCALS1Tempis-SJGJ9.tmpoptprosetup.tmp
C:DOCUME1USER1LOCALS1Tempis-NTRVH.tmp_isetup_shfoldr.dll
C:DOCUME1USER1LOCALS1Tempis-NTRVH.tmpOptProHelper.dll
C:DOCUME1USER1LOCALS1Tempis-NTRVH.tmpitdownload.dll
C:Program FilesOptimizer Pro 3.99is-BDCDJ.tmp
C:Program FilesOptimizer Pro 3.99is-DB4S5.tmp
C:Program FilesOptimizer Pro 3.99is-C16E7.tmp
C:Program FilesOptimizer Pro 3.99is-QE691.tmp
C:Program FilesOptimizer Pro 3.99is-GQ78C.tmp
Registry:
Key 003B9C22-6FE0-4BCA-A73F-9AA99B9BBDAA at HKEY_CLASSES_ROOTTypeLib.
Key 12AB121E-44C6-488B-8773-B0AE25E662E1 at HKEY_CLASSES_ROOTInterface.
Key 203ABD21-41F1-4F1B-BAE3-D6A89A90D239 at HKEY_CLASSES_ROOTCLSID.
Key PC Optimizer Pro at HKEY_CURRENT_USERSoftware.
Key PC Optimizer Pro at HKEY_LOCAL_MACHINESOFTWARE.
Key PC Optimizer Pro at HKEY_LOCAL_MACHINESoftwareMicrosoftWindowsCurrentVersionUninstall.
Key PCOptimizerPro.exe at HKEY_LOCAL_MACHINESOFTWAREMicrosoftWindowsCurrentVersionApp Paths.
Key PCProCtxMenu at HKEY_CLASSES_ROOT*shellexContextMenuHandlers.
Key PCProCtxMenu at HKEY_CLASSES_ROOTlnkfileshellexContextMenuHandlers.
Read More
What is Windows ImageAcquisition High CPU & Disk usage? The Windows Image Acquisition is the driver model in charge of the communication between the graphics hardware and the operating system. There are times when it causes high disk and CPU usage in Windows 10 systems which results in slow performance of the computer. To fix this issue, read on as this post will help you in addressing the problem.
The cause of this problem might have something to do with the hardware or the drivers. And so if your computer becomes slow because of the Windows Image Acquisition process, here are some suggestions that might be of help. You can try to restart the Windows Image Acquisition service, run a System File Checker Scan, disconnect & reconnect imaging hardware as well as update and reinstall the drivers and updating the graphics drivers.
For a complete set of instructions, follow the given options below.
Option 1 – Try restarting the Windows Image Acquisition Service
- Tap the Win + R keys to open the Run dialog box.
- Then type “services.msc” in the field and hit Enter to open the Windows Services Manager.
- From there, look for the Windows Image Acquisition Service and check on its service Status.
- If the Service Status is blank, right-click on it and select Start. And if the service Status is Running right-click on it and select Restart. After that, check if your computer’s performance is now back to normal.
Option 2 – Try running a System File Checker scan
As you know, running a System File Checker scan can help in replacing missing files as well as repair the corrupted ones which might be the reason behind the problem.
- Tap Win + R to launch Run.
- Type in cmd in the field and tap Enter.
- After opening Command Prompt, type in sfc /scannow
The command will start a system scan which will take a few whiles before it finishes. Once it’s done, you could get the following results:
- Windows Resource Protection did not find any integrity violations.
- Windows Resource Protection found corrupt files and successfully repaired them.
- Windows Resource Protection found corrupt files but was unable to fix some of them.
- Restart your computer after the scan is completed.
Option 3 – Try disconnecting and reconnecting the imaging hardware and then update and reinstall its drivers
It could be that the hardware that calls for the Windows Image Acquisition service has some issues which are why disconnecting and reconnecting the imaging hardware like scanners, printers, cameras can help in fixing the problem. In addition, you can also boot your computer in a Clean Boot State so that you can find the problematic hardware by hit and trial method. Refer to the steps below to do so:
- Log onto your PC as an administrator.
- Type in MSConfig in the Start Search to open the System Configuration utility.
- From there, go to the General tab and click “Selective startup”.
- Clear the “Load Startup items” check box and make sure that the “Load System Services” and “Use Original boot configuration” options are checked.
- Next, click the Services tab and select the “Hide All Microsoft Services” check box.
- Click Disable all.
- Click on Apply/OK and restart your PC. (This will put your PC into a Clean Boot State. And configure Windows to use the usual startup, just simply undo the changes.)
Option 4 – Try updating the Graphics drivers
- First, boot your computer into Safe Mode.
- After that, tap the Win + R keys to launch Run.
- Type in devmgmt.msc into the box and tap Enter or click OK to open the Device Manager.
- After that, a list of device drivers will be displayed. From there, look for the Display Adapters and click on them.
- After that, right-click on each entry under the Display Adapters and select the “Uninstall Device” option from the menu.
- Now restart your computer.
- After restarting your computer, go to the Settings app and Check for Updates in the Windows Update section.
Note: You also have the option to go directly to the website of your graphics card manufacturers like NVIDIA, Intel, or AMD and go to the section called Drivers then check if there’s a new available update – if there is, download and install it.
Read More
Sqlite3.dll Error — What is it?
Sqlite3.dll error is a typical example of DLL errors. This error message occurs when the system fails to access Sqlite3.dLL (Dynamic Link Library) files shared by certain programs to run on the PC. The error is displayed in the following format:
«Cannot find the file sqlite3.dll (or one of its components)»
Followed by:
«Error starting program.. A required .DLL file sqlite3.dll was not found.»
Solution
Error Causes
The sqlite3.dll error message may pop up on your computer screen due to the following reasons:
- Missing sqlite3.dll files
- DLL files affected due to viruses and malware on your system
- Registry overloaded with invalid entries
- Disk fragmentation
Whether the cause for the sqlite3.dll error code on your PC is malware invasion or registry issues, it is recommended to resolve it immediately before the damage sets in.
Such errors can expose your PC to serious threats like privacy errors, data breaches, identity thefts, cybercrime, system failure, crashes, and valuable data loss.
Further Information and Manual Repair
When it comes to fixing sqlite3.dll error code, you don’t always need to hire a professional and spend hundreds of dollars on the repair. Here are some simple and do it yourself solutions that you can try and resolve the error on your system for free.
1. Check inside recycle bin and restore the deleted file
If this error popped on your computer screen after installing a certain program, then you need to check your recycle bin.
This is because DLL files are shared by multiple programs, it might be possible that the program you just deleted also used the sqlite3.dll file to run on your system. And so when you uninstalled the program, the sqlite3.dll file also got removed.
To resolve this, check your recycle bin for the file. If you find it, restore it. Once the files is restored, try running the application that was generating the sqlite3.dll error message. If the error still persists, then this means the cause of the sqlite3.dll error is deeper. It could be due to malware or the registry.
2. Remove Malware
To remove malware, run an antivirus. This will help scan for such malicious software on your system affecting DLL files and remove them. However, the drawback is that it may slow down the speed of your PC significantly. And when running it, you may have to stop all other activities on your system.
3. Repair and Restore the Registry
If the cause of the sqlite3.dll error is the registry corrupted with invalid entries and disk fragmentation, then you need to repair and restore the registry. The best way to do this is to download Restoro.
Restoro is a powerful and highly functional registry cleaner.
It scans your entire PC and detects all registry issues in seconds. It wipes out all the unnecessary and obsolete files including the junk files, invalid registry entries, bad registry keys, temporary internet files, cookies, and browser history.
It clears up hard disk space and frees it of clutter. Furthermore, this registry cleaner also repairs the damaged DLL files and restores the registry.
Restoro is not only a registry cleaner but is also a system optimizer. This means you can also run it to scan and remove malware on your PC and system instability issues. It boosts your PC’s speed and performance.
It runs smoothly on all Windows versions. It is safe, efficient and user-friendly. The layout is neat and the interface is easy to use and intuitive. In just a few clicks you can resolve the sqlite3.dll error and resume using your desired programs.
Click here to download Total System Care on your PC to resolve sqlite3.dll error pop-ups.
Read More
Copyright © 2023, ErrorTools. All Rights Reserved
Trademark: Microsoft Windows logos are registered trademarks of Microsoft. Disclaimer: ErrorTools.com is not affiliated with Microsoft, nor claims direct affiliation.
The information on this page is provided for information purposes only.
Attention Before you read this post, I highly recommend you check out my resources page for access to the tools and services I use to not only maintain my system but also fix all my computer errors, by clicking here!
FltMgr.sys is an integral system file used by Microsoft Windows for the management of files on your hard drive, fltmgr.sys is an abbreviation of Microsoft File System Filter Manager, and its main responsibility is to ensure that data written to your hard drive(s) is not corrupted. FltMgr.sys errors occur when the operating system is unable to read or write to file(s) on your hard drive, usually the result of a corrupted or missing File System Manager. In the event that this has occurred on your system, it can result in blue screen errors (BSOD) and hard drive failure.
When fltmgr.sys errors occur, they are typically accompanied by the following error message:
SYSTEM_SERVICE_EXCEPTION
fltmgr.sys – Address XXXXXXXXXXXXXXXX base at XXXXXXXXXXXXXXXX
In most cases, the fltmgr.sys BSOD error will occur within a Windows session, due to the reasons outlined above. But in some rare cases, it has been known to prevent the end user from booting into Windows altogether.
Can You Remove FltMgr.sys?
FltMgr.sys is an important Windows system file, and for that reason, should not be prohibited from running. In the event that an end user was to remove this file, it’s not uncommon for it to break Windows entirely. Preventing the system from booting into Windows.
FltMgr.sys poses no threat to your system. Though, the commonly associated fltmgr.sys errors can lead to a number of additional issues for your system (such as random system crashing and hard drive failure).
There are a variety of reasons why fltmgr.sys errors occur. Below I discuss in greater detail the most likely cause of the error on your system.
What Causes FltMgr.sys Errors?
FltMgr.sys is an integral system file, but sadly, not a stranger to problems. Below are some of the reasons why its associated error has occurred on your system:
- Device drivers are corrupted or outdated.
- The Windows file system has been corrupted.
- A malicious file has infiltrated and corrupted integral system files.
How to Fix it
When it comes to fixing fltmgr.sys errors, there are several viable options available to you. However, before we go into any of those solutions. The first thing for you to consider, is whether or not the File System Manager was properly loaded during Windows start-up. An improper start-up can and typically is caused by a new Windows update or a random system crash/error.
In any case, the first thing you’ll want to do, is restart your system. By restarting the computer, you’ll clear the system RAM, and give the computer an opportunity to load everything up again.
If after a fresh restart of your computer, the error continues to occur, then I recommend you attempt the various solutions below. Depending on your circumstances, you may have to carry them out within Safe Mode – but only if you’re unable to boot into Windows.
If you don’t know how to boot into Safe Mode, I suggest you check out my post on fixing error 0x800700b7.
The Windows registry is an essential part of Microsoft Windows, used for storing all the most important system data. Such as file locations, hardware and software configuration data, and more. It’s this central database system that Windows uses, to properly manage all the various programs and hardware components within a session. However, despite its importance, the Windows registry is highly susceptible to errors and faults.
Because of the repeated and continuous use of the registry, by Windows, the database can and often does become corrupted. This results in slower boot up times and a less responsible Windows experience. If you’ve tried restarting your system, but to no avail. Then it’s recommended that you consider a Windows registry scan.
To scan and repair your registry, you will need to use a specialised Windows repair tool, like Advanced System Repair Pro. This tool, when run, will scan various key areas of your operating system, and render assistance where it deems necessary.
It’s a very easy tool to get up and running, and with that said, you can learn more about it, from the link below:
CLICK HERE TO CHECK OUT ADVANCED SYSTEM REPAIR PRO
Reinstall Device Drivers
The operating system is unable to keep the drivers for all your various devices up-to-date. As a result, manufacturers are forced to constantly release new drivers, as and when Microsoft releases a new update for its operating system.
However, it’s not uncommon for circumstance to occur where a Windows update has rendered a hardware component inoperable. Or has caused a Windows error due to conflicting drivers. In circumstances like this. It’s advised the end user updates his/her drivers.
This is where the driver updater tool DriverFinder comes into the equation. As an automated driver updater tool, capable of scanning, detecting and updating the drivers for all the devices attached to your system. It makes sense to use this tool, as opposed to attempting to update everything by yourself.
That said, you can learn more about DriverFinder and how it can help you, from the link below:
CLICK HERE TO CHECK OUT DRIVERFINDER
Manual Driver Update
Alternatively, you could attempt to update your device drivers manually, by doing the following:
1. First, make sure you have booted into your computer as an administrator.
2. Then press + R, type devmgmt.msc and click on OK.
3. When Device Manager loads up, click on the > icon next to a specified Device Type, then right-click on a Device and select Update driver.
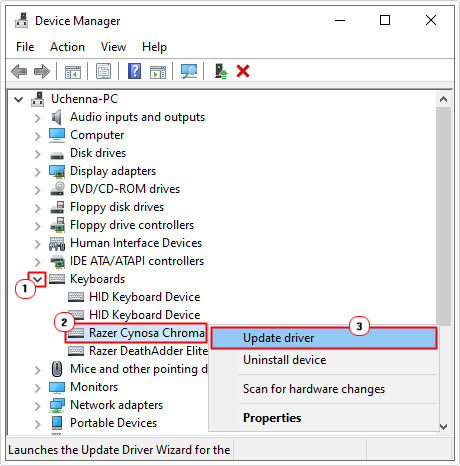
4. This will bring up an Update driver applet, from here, click on either Browse my computer for driver software or Search automatically for updated driver software to update the devices drivers.
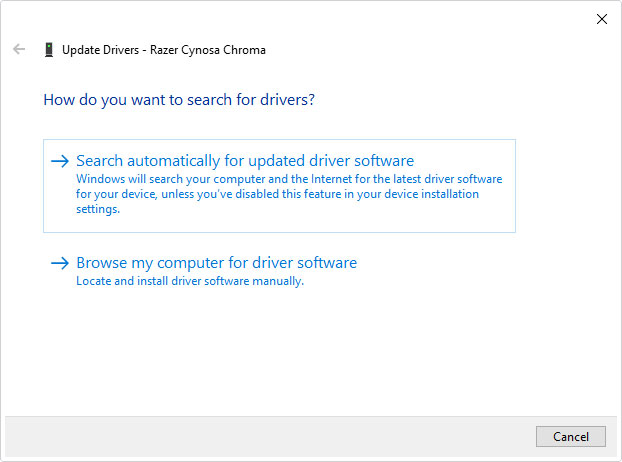
Note: The search automatically for updated driver software option, will see Windows search Microsoft’s servers for updated drivers for the select device. Microsoft’s servers has a limited assortment of driver files.
Ideally, you’d want to either, manually download the drivers, from the manufacturer’s website, and run the InstallShield. Or download the drivers and use the browse my computer for driver software option, to locate and install the drivers for the device.
Run Chkdsk
FltMgr.sys is an integral system process that works in tandem with your hard drive. FltMgr.sys errors are sometimes caused by corruption, in which case, the corruption could be caused by bad sectors on your hard drive. To rectify this problem, you can run the built-in windows tool Chkdsk, which will locate and reallocate data found on bad sectors of your hard drive.
For step-by-step instructions on how to run this tool, I suggest you check out my post on repairing error 0x0000007b.
Reinstall Windows
If after attempting all the solutions below, you’re still encountering fltmgr.sys errors, it could very well be that the level of Windows corruption is unsalvageable. This occurs in cases of power failure or when a malicious file has had substantial time to infiltrate and corrupt a large number of Windows files.
In this particular situation, the best option will be to reinstall Windows.
Note: A Windows reinstallation will result in total loss of data. Thus, it’s important you backup your files beforehand.
You will need your Windows Installation Media to reinstall Windows. If you don’t have one, then I suggest you check out my post on fixing error 0xc0000225.
Check Your Hard Drive
If your hard drive is faulty or not properly connected to the motherboard, it can cause a plethora of problems for your computer. Thus, you’ll want to ensure that everything inside the case, is where it should be.
Do you hear any weird sounds coming from your computer? Are the fans, within your computer case, working as they should? Do you hear any clicking sounds when attempting to access your hard drive?
These are the kinds of things that can cause fltmgr.sys errors. In the event that your hard drive is making weird sounds, I recommend you purchase a new one.
Are you looking for a way to repair all the errors on your computer?
If the answer is Yes, then I highly recommend you check out Advanced System Repair Pro.
Which is the leading registry cleaner program online that is able to cure your system from a number of different ailments such as Windows Installer Errors, Runtime Errors, Malicious Software, Spyware, System Freezing, Active Malware, Blue Screen of Death Errors, Rundll Errors, Slow Erratic Computer Performance, ActiveX Errors and much more. Click here to check it out NOW!