
10 November 2023 Technology Manager of Test Dept.
Summary
Discover the simple steps to create and use a password reset USB disk for Windows XP. Say goodbye to password worries and regain access to your account with ease. Never be locked out of your account again, learn how to create your own password reset USB disk now.
Windows XP is a popular operating system that has been around for decades. However, as technology evolves, it becomes more vulnerable to hacking and security breaches. One of the most common issues faced by Windows XP users is forgetting their password. Without the password, access to important files and documents becomes impossible. Luckily, there is a solution to this problem – a windows XP password reset USB. In this article, we will guide you through the process of creating a password reset USB using Renee PassNow, a reliable and user-friendly software. So, let’s dive into the first method – creating a general Windows XP password reset USB disk with Renee PassNow.
Method 1: Creating a General Windows XP Password Reset USB Disk with Renee PassNow
Create a Windows XP Password Reset USB Disk
Renee PassNow is a reliable and efficient tool for creating a general password reset USB disk for Windows XP. This method is ideal for users who want to reset their password without losing any data or reinstalling the operating system. Follow the steps below to create a Windows XP password reset USB disk using Renee PassNow.
To reset your Windows XP password using Renee PassNow, follow these steps:
Step 1: Download and Install Renee PassNow
Start by downloading Renee PassNow from the official website and install it on a different computer that you can access. You can choose the appropriate version based on your computer’s operating system.
Renee PassNow – Professional Windows System Rescue Tool
Remove Windows Login Password 3 steps for whole password remove process.
Recover the files Recover the deleted files without Windows system.
Transfer the data Transfer the important files of the computer with system.
Fix Windows startup error Fix various Windows startup failures or crashes.
Erase disk Completely erase disk files which will not be restored.
Remove Windows Login Password 3 steps for whole password remove process.
Recover the files Recover the deleted files without Windows system.
Transfer the data Transfer the important files of the computer with system.
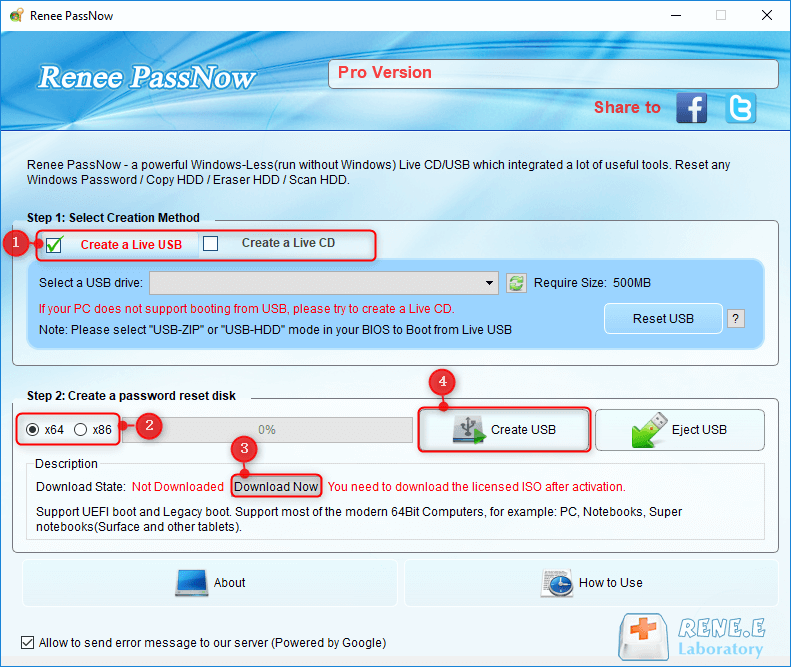
Step 2: Create a Bootable USB or CD/DVD
Launch Renee PassNow and insert a USB flash drive or blank CD/DVD into the computer. Select the option to create a bootable media. Follow the on-screen instructions to complete the process.
Step 3: Boot the Locked Server from the Bootable Media
Insert the bootable USB or CD/DVD into the locked Windows computer. Restart the computer and enter the BIOS settings by pressing the appropriate key (usually F2 or Delete). Configure the boot order to prioritize the bootable media.
| Server Type | Enter boot menu method |
|---|---|
| DELL | Press the F12 key repeatedly before the Dell logo appears on the screen. |
| HP | Press the F9 key multiple times when the HP logo is displayed. |
| BIOS Name | Enter boot menu method |
|---|---|
| ASRock | DEL or F2 |
| ASUS | DEL or F2 for PCs/ DEL or F2 for Motherboards |
| Acer | DEL or F2 |
| Dell | F12 or F2 |
| ECS | DEL |
| Gigabyte / Aorus | DEL or F2 |
| Lenovo (Consumer Laptops) | F2 or Fn + F2 |
| Lenovo (Desktops) | F1 |
| Lenovo (ThinkPads) | Enter then F1 |
| MSI | DEL |
| Microsoft Surface Tablets | Press and hold Power and Volume Up buttons |
| Origin PC | F2 |
| Samsung | F2 |
| Toshiba | F2 |
| Zotac | DEL |
| HP | Esc/ F9 for `Boot Menu`/ Esc/ F10/ Storage tab/ Boot Order/ Legacy Boot Sources |
| INTEL | F10 |

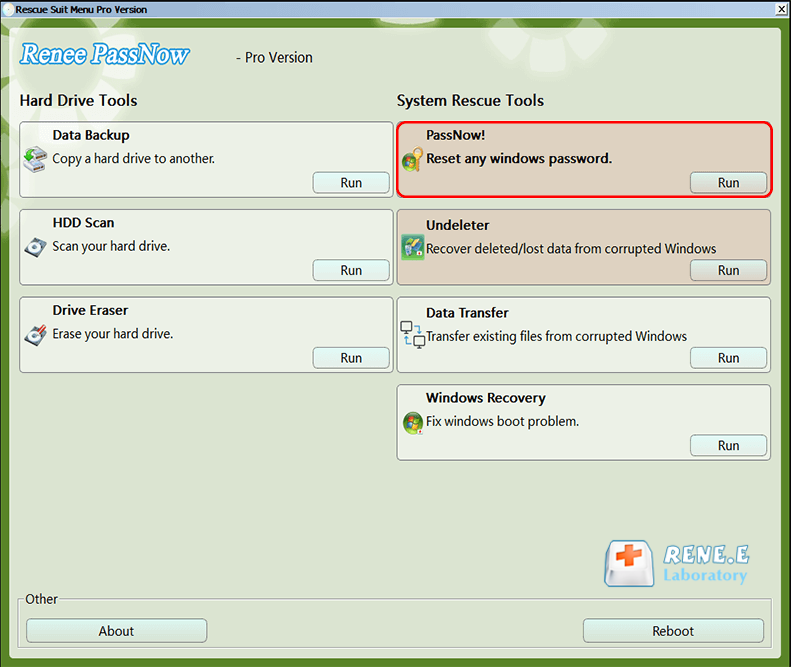
Step 4: Select password reset function
After successfully booting from the bootable media, Renee PassNow will load. Select “PassNow!” function after booting from the new created Windows password reset disk.
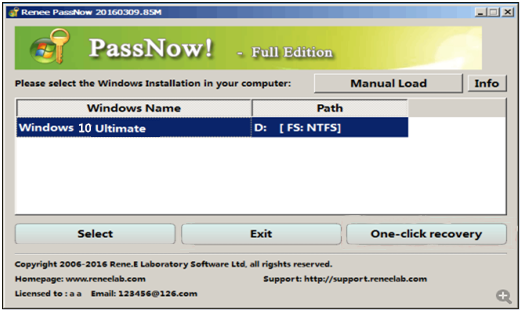
Step 5: Resetting the Password
Choose the user account for which you want to reset the password. Then, click on the “Clear Password” button. Renee PassNow will remove or reset the password for the selected user account.
Step 6: Reboot the PC
Once the password is reset, remove the bootable media from the PC and restart the computer. You will now be able to log in to Windows Account without a password.
In this chapter, we have discussed how to create a general Windows XP password reset USB disk using Renee PassNow. This method is suitable for users who want to reset their password without losing any data or reinstalling the operating system. However, it requires an accessible computer to create the USB disk and cannot reset domain passwords. In the next chapter, we will discuss another method for resetting Windows XP passwords using the Windows password reset disk and Command Prompt.
Pros:
- Easy to use and does not require technical knowledge.
- Can reset password without losing any data or reinstalling the operating system.
- Compatible with all versions of Windows XP.
Cons:
- Requires an accessible computer to create the password reset USB disk.
- Cannot reset passwords for domain accounts.
Method 2: Using the Windows XP Password Reset Disk with Command Prompt
The Windows XP operating system allows users to create a password reset disk in case they forget their password in the future. This method involves using the Command Prompt in Safe Mode to reset the forgotten admin password. While this method may seem complicated, it is actually a reliable and effective way to regain access to your computer. Let’s take a look at the step-by-step process.
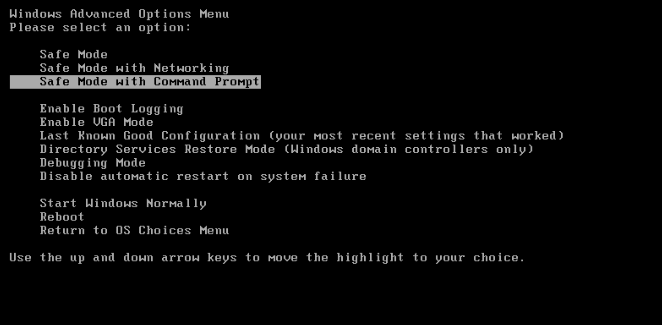
Step 1: Restart your computer and access Safe Mode with Command Prompt
The first step is to restart your computer and press F8 while it is booting. This will bring up the Advanced Boot Options menu. Use the arrow keys to navigate and select “Safe Mode with Command Prompt“. This will boot your computer into Safe Mode, which allows you to access the Command Prompt.
Step 2: Change the password using the Control Panel
Once you are in Safe Mode, navigate to Control Panel > User Accounts > Change Account and select the account that you have forgotten the password for. Then, simply change the password for that account. If this works, you can skip to step 6. If not, move on to step 3.
Step 3: Open the Command Prompt
If changing the password through the Control Panel did not work, you can use the Command Prompt to reset the password. Press the Win + R keys to open the Run dialog box, type
Step 4: Run the net user command
In the Command Prompt window, type the following command and press Enter:
net user [account name] [new password]
For example, if the account name is Ariel and you want to change the password to 123456, the command would be:
If you want to clear the password and set a new one later, you can run the command
net user [account name] «»
Step 5: Restart your computer and log in with the new password
After running the net user command, you can restart your computer and log back in with the new password.
Step 6: Test the password reset disk
To ensure that the password reset disk is working correctly, log out of your account and try logging back in with an incorrect password. After a few failed attempts, you should see an option to use the password reset disk. Select this option and follow the instructions to reset your password.
Step 7: Store the password reset disk in a safe place
It is important to store the password reset disk in a safe place, as anyone with access to it can reset the password for your account. It is recommended to use a USB drive for the password reset disk and keep it in a secure location.
Note: If you do not have a password reset disk, you can use a third-party universal password reset disk, such as Renee PassNow or Ophcrack, which will be discussed in subsequent chapters.
The Windows XP password reset disk is a useful tool for resetting a forgotten password. It is easy to create and can be a lifesaver in case you cannot access your computer. However, it is important to keep the password reset disk in a safe place and be cautious when using third-party tools to reset your password.
Next, we will explore another method for creating a password reset disk – Ophcrack. Stay tuned for the next chapter.
Method 3: Exploring Ophcrack – An Alternative Free Solution
Ophcrack is a free and open-source password cracking software that is specifically designed to recover forgotten Windows passwords. It uses a combination of advanced algorithms and rainbow tables to crack passwords, making it an effective tool for resetting forgotten passwords on Windows XP.
Step 1: Download and Install Ophcrack
To use Ophcrack, you will first need to download and install it on another computer with internet access. Once installed, create a bootable USB or CD/DVD using Ophcrack to run it on your locked Windows 10 desktop.
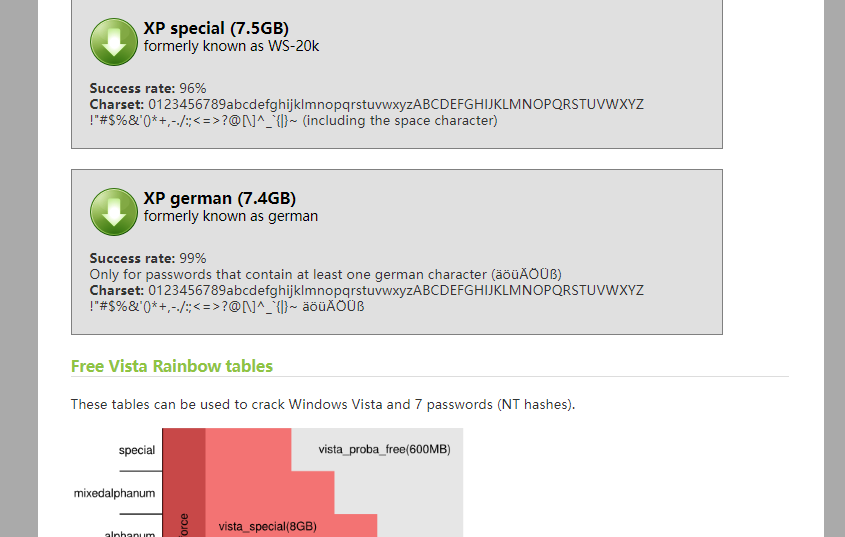
Step 2: Choose and download the Correct Tables
Ophcrack requires rainbow tables to crack passwords. These tables contain precomputed hashes for a wide range of possible passwords. Select the appropriate tables according to the Windows version you are using. In this case, select the tables for Windows XP.
Once you have prepared the bootable device, insert it into the ASUS laptop and restart the computer. As the laptop boots up, you will need to access the boot menu, which can typically be done by pressing a designated key (e.g., F2, F8, or F12) during the startup process. Select the bootable device from the menu, and the Ophcrack software will begin to load.

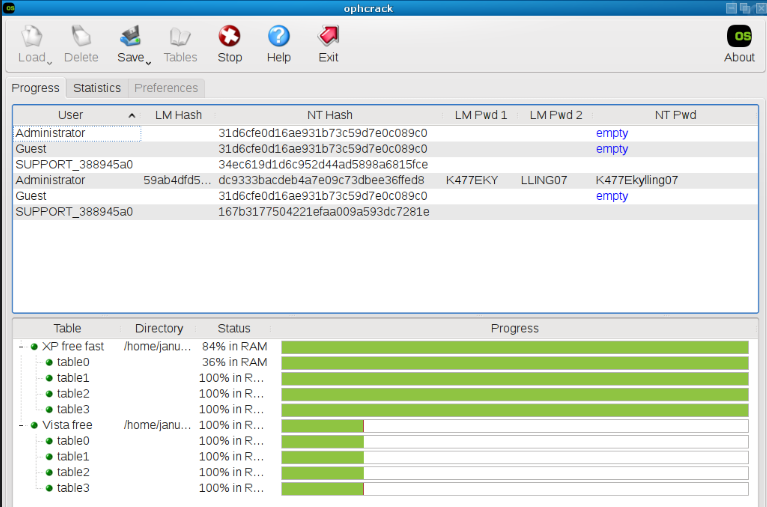
Step 4: Begin the Password Recovery Process
Once you have selected the correct tables, click on the “Load” button to load them into Ophcrack. Then, click on the “Crack” button to start the password recovery process. Ophcrack will begin analyzing the hashes and attempting to crack the password
In conclusion, Ophcrack is a powerful tool for resetting forgotten passwords on Windows XP. However, it does have its limitations and may not work for everyone. If Ophcrack does not work for you, do not worry as there are other methods for creating a password reset disk, which will be discussed in the following chapters.
Next Chapter: Troubleshooting Common Issues When Creating or Using a Password Reset Disk in Windows XP.
Pros:
- Ophcrack is a free and open-source software, making it accessible to everyone.
- It has a high success rate in cracking passwords, making it a reliable tool for resetting forgotten passwords.
- Ophcrack is easy to use, even for those without technical expertise.
Cons:
- Using Ophcrack requires access to an accessible computer and a blank CD or DVD.
- It may take a considerable amount of time to crack the password, depending on the complexity of the password.
Troubleshooting Common Issues When Creating or Using a Password Reset Disk in Windows XP
If you have forgotten your Windows XP password, you may be looking for ways to reset it. One method that is commonly suggested is using a password reset disk. This disk is created beforehand and can be used when you need to reset your password. However, there are some common issues that users may encounter when creating or using a password reset disk in Windows XP. In this chapter, we will explore these issues and provide solutions to help you troubleshoot them.
Incorrect Password or Disk Does Not Work
A common issue that may occur when using a password reset disk is that the disk does not work. This can happen if you have entered an incorrect password or if you have chosen the wrong disk. When you enter an incorrect password, you will receive an error message stating that the password is incorrect. If you have chosen the wrong disk, the disk will not work and you will not be able to reset your password.
Creating a Password Reset Disk
One of the main issues that users encounter when creating a password reset disk is that they forget to create one beforehand. This means that when they forget their password, they do not have a disk to use for resetting it. Another issue is that the disk may not work if the computer is not properly configured. To ensure that the disk will work, it is important to follow the correct steps when creating it and to regularly update it.
Using a Password Reset Disk for the Wrong Account
When creating a password reset disk, it is specific to the account that is currently logged in. This means that you cannot use the disk to reset the password for a different account. If you have multiple user accounts on your Windows XP computer, you will need to create a separate password reset disk for each account. Trying to use a disk for the wrong account will result in an error message and the disk will not work.
In summary, a password reset disk can be a helpful tool when you need to reset your Windows XP password. However, there are some common issues that users may encounter. These include entering an incorrect password, not creating the disk beforehand, using the disk for the wrong account, and the disk not working. It is important to follow the correct steps when creating a password reset disk and to regularly update it to ensure it will work when needed. If you forget your password, you can also use alternative methods such as Ophcrack to reset it.
Conclusion
In conclusion, a password reset disk for Windows XP is an essential tool for users who may find themselves locked out of their account due to a forgotten password. In this article, we have discussed three methods for creating and using a password reset disk: using Renee PassNow, utilizing Command Prompt, and exploring Ophcrack. While each method has its own advantages, it is important to be aware of potential troubleshooting issues and how to address them. With the creation of a password reset disk, users can easily regain access to their account and avoid the hassle and frustration of being locked out. Whether you choose to create a USB disk or use alternative methods, having a password reset disk on hand can provide peace of mind and save you from potential login headaches. So don’t wait until it’s too late, create a password reset disk for your Windows XP now to ensure a smooth and stress-free user experience.
Сегодня хочу рассказать о очень хорошей программе для сброса паролей с Windows 2000/XP/Vista/7/8.1/10, Windows Server 2003(R2)/2008(R2)/2012(R2)/2015/2019 и macOS. Она позволяет сделать это проще чем с помощью ручных методов описанных в этой статье. Кроме того есть бесплатная версия позволяющая сделать это для типовых задач пользователя. Расширенные версии имеют очень широкий функционал и подходят для использования профессионалами занимающимися восстановлением доступа к операционным системам Windows и macOS. И называется эта программа PassFab 4WinKey
- Очень проста в использовании, так как имеет интуитивно понятный GUI.
- Позволяет создать DVD диск сброса пароля в пробной версии
- Позволяет сбрасывать пароль в версиях Windows 2000/XP/Vista/7/8/10 для ПК бесплатно
- Позволяет сбрасывать пароль в серверных версиях Windows c Актив Директори
- Позволяет сбрасывать пароль администратора в AD
- Позволяет создать загрузочную флешку
Создание загрузочного CD/DVD диска.
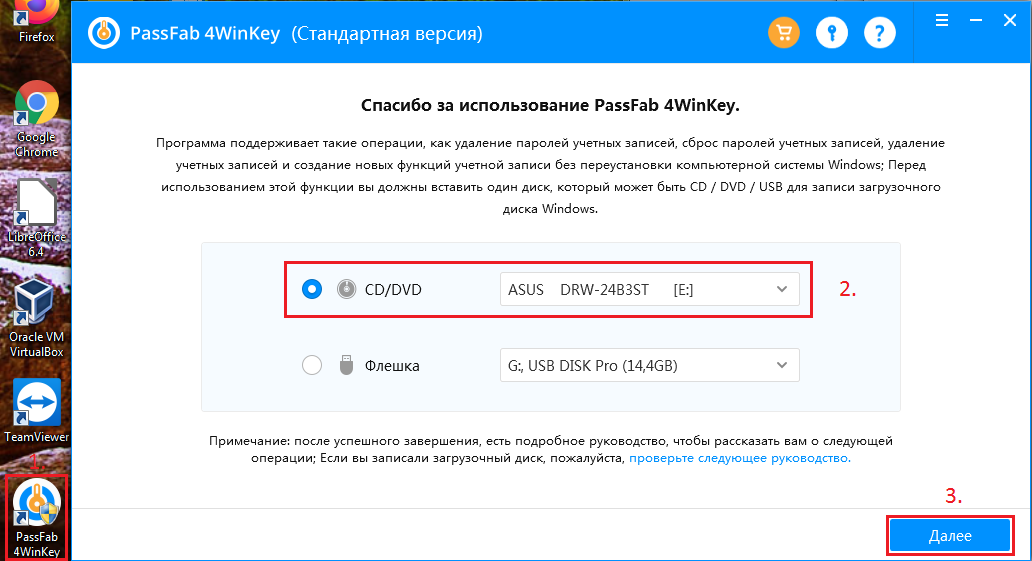
Запускаем установленную программу PassFab 4WinKey с ярлыка на рабочем столе:
Программа предложит очистить ваш CD/DVD-RW если на нём есть информация:
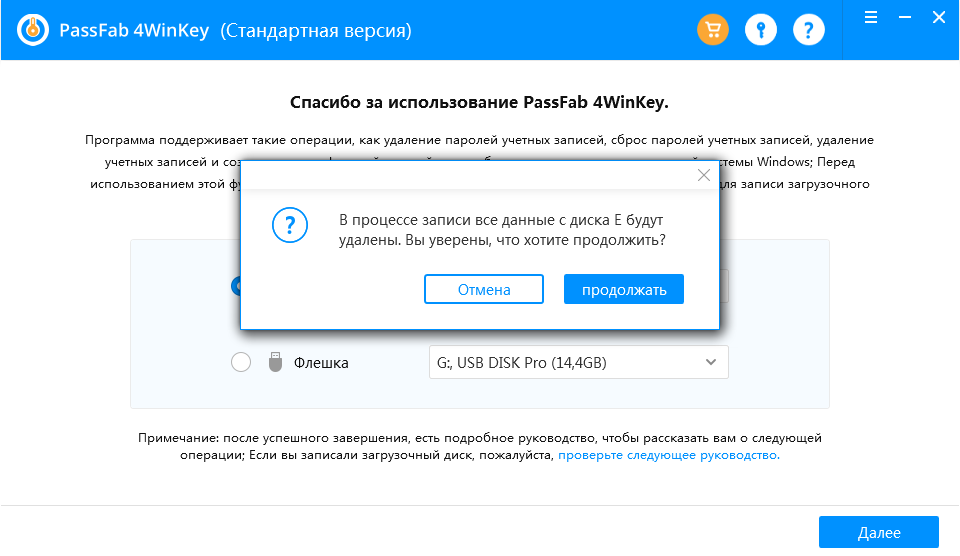
Сразу же после очистки носителя CD/DVD начнётся записть загрузочных файлов.

После окончания записи носителя отобразятся инструкции по загрузке компьютера с дисковода/флешки. Для опытного пользователя это не составляет труда, но если вы только начинаете своё знакомство с ПК рекомендуем ознакомиться с ними.

Загрузка с CD/DVD носителя на материнских платах Gigabyte.
Для примера загрузимся с диска вызвав загрузочное меню с помощью F12. Меню вызывается перед загрузкой Windows.

Выбираем загрузочное устройство. В нашем случае это ASUS DRW-24B3ST.
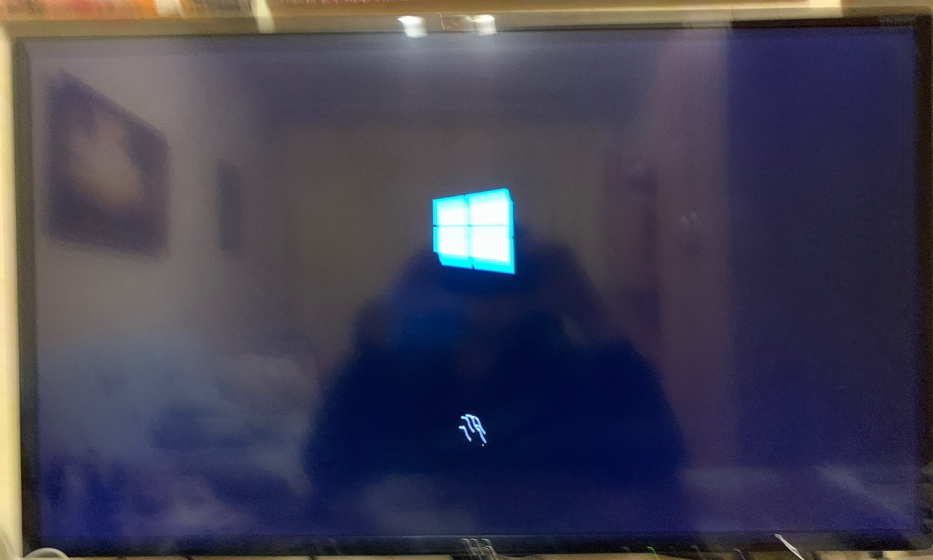
Начинается загрузка:
Выбираем версию Windows с которой надо снять пароль:

Выбираем учётную запись с которой надо снять пароль:
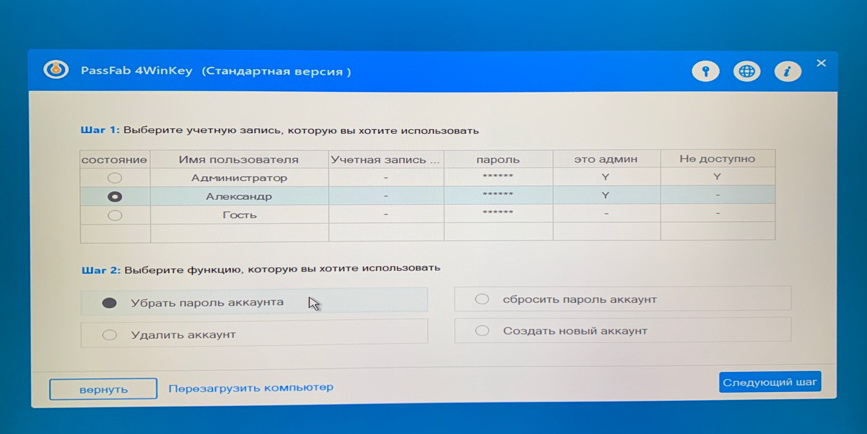
Ждём пока закончится снятие пароля:

После перезагрузки системы нас позравляют со снятием пароля на английском языке:
Как видете всё гораздо проще чем в случае ручного съёма пароля стандартными инструментами Windows:
- Каким способом сбросить пароль на Windows 10?
- Как сбросить пароль Windows 7 используя загрузочный DVD
Так что утилиту PassFab 4WinKey я рекомендую заменой стандартных инструментов как более удобную и к тому же бесплатную для простых задач пользователя.
Что может сделать
Windows Password Key — Безопасно и профессионально
Отключение или сброс забытых паролей администратора или пользователя в Windows 11/10/8.1/8/7/Vista/XP/2000 и Windows Server без потери данных.
Сброс паролей с помощью загрузочного USB-накопителя.
Прост в использовании, всего 3 шага.
100% процентное восстановление.
100% безопасно, без потери данных
Обход, сброс и удаление всех паролей администратора или пользователя.
Мгновенный сброс пароля в течение 5 минут.
Поддержка всех марок настольных и ноутбуков, таких как HP, Acer, Samsung, Dell, Lenovo и др.
Поддержка Windows11, 10, 8.1, Windows 8, 7, Vista, XP и Windows Server.
Получите мгновенный доступ к заблокированному компьютеру за 3 простых шага
2. Вставьте диск в заблокированный компьютер.
Gradient>
3. Отключите, сбросьте или удалите пароль успешно.
5+ Ситуаций, когда вам понадобится сбросить пароль Windows
- У вас нет диска для сброса пароля и вы забыли пароль для входа.
- Потеряли пароль учетной записи администратора и нет другой учетной записи администратора.
- Изменили пароль и долгое время не использовали компьютер.
- Установили учетную запись Microsoft, но забыли пароль к ней.
- Кто-то другой использовал ваш компьютер и изменил пароль администратора.
Нам доверяют ведущие СМИ
Часто задаваемые вопросы о PassFab 4WinKey
A1: PassFab 4Winkey — это легальное программное обеспечение для восстановления паролей, которое вы можете использовать с уверенностью. Этот продукт поддерживает бесплатное пробное использование, бесплатную техническую поддержку и гарантию возврата денег в течение 30 дней.
A2: PassFab 4WinKey — платное программное обеспечение, но вы можете использовать этот инструмент для создания диска сброса пароля Windows бесплатно.
A3: PassFab 4WinKey на 100% безопасен, он не нарушает вашу конфиденциальность и не заставляет вас загружать что-либо, не связанное с продуктом.
A4: Нет. Он сбрасывает/удаляет пароли Windows или создает учетные записи Windows абсолютно безопасно и гарантирует, что вы не потеряете никаких данных с вашего компьютера.
A5: USB-флеш-накопитель или CD/DVD и доступный компьютер, Windows или Mac.
A6: В этом случае вам нужно использовать другой доступный компьютер, чтобы скачать, установить программное обеспечение и создать диск сброса пароля Windows с использованием USB/CD/DVD, а затем использовать диск для разблокировки вашего заблокированного ПК.
A7: Если у вас есть USB/CD/DVD-привод и вы хотите сбросить пароль Windows, выберите профессиональную версию.
Если вы хотите
удалить пароль администратора домена, выберите версию Enterprise. Если вы хотите использовать все
функции, лучшая версия — Ultimate.
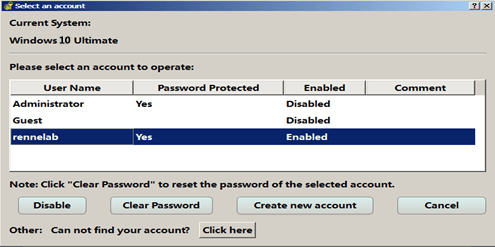
A8: Если вы не можете найти систему, как показано на рисунке:
Пожалуйста, проверьте, зашифрован ли компьютер с помощью BitLocker; если он зашифрован, вы не можете удалить, сбросить пароль, сбросить учетную запись и удалить учетную запись; Или вы можете нажать кнопку «Создать журнал» в верхнем правом углу интерфейса и найти папку с именем PassFab 4winkey Logs на вашем USB. Пожалуйста, скопируйте файлы журнала и отправьте их в наш службу поддержки для получения помощи.
PassFab 4WinKey
Best Windows password recovery and password reset tool, 100%
working and
easy!
Calificado 4.9/5
Basado en la opinión de 4210 clientes
Все способы:
- Сброс администраторского пароля Windows XP
- Подготовка загрузочного носителя
- Сброс пароля
- Вопросы и ответы: 3
Проблема забытых паролей существует с тех времен, когда люди стали защищать свою информацию от посторонних глаз. Потеря пароля от учетной записи Windows грозит утратой всех данных, которыми Вы пользовались. Может показаться, что ничего поделать нельзя, и ценные файлы утрачены навсегда, но есть способ, который с высокой вероятностью поможет войти в систему.
Сброс администраторского пароля Windows XP
В системах Windows имеется встроенная учетная запись «Администратор», используя которую можно выполнять любые действия на компьютере, так как данный пользователь имеет неограниченные права. Войдя в систему под этой «учеткой», Вы можете сменить пароль для того пользователя, доступ к которому утерян.
Подробнее: Как сделать сброс пароля в Windows XP
Распространенная проблема заключается в том, что часто, в целях безопасности, во время установки системы мы назначаем пароль для Администратора и успешно его забываем. Это и приводит к тому, что в Windows проникнуть никак не удается. Далее мы поговорим о том, как войти в защищенную учетную запись Админа.
Стандартными средствами Windows XP сбросить пароль Админа нельзя, поэтому нам понадобится сторонняя программа. Разработчик назвал ее весьма незатейливо: Offline NT Password & Registry Editor.
Подготовка загрузочного носителя
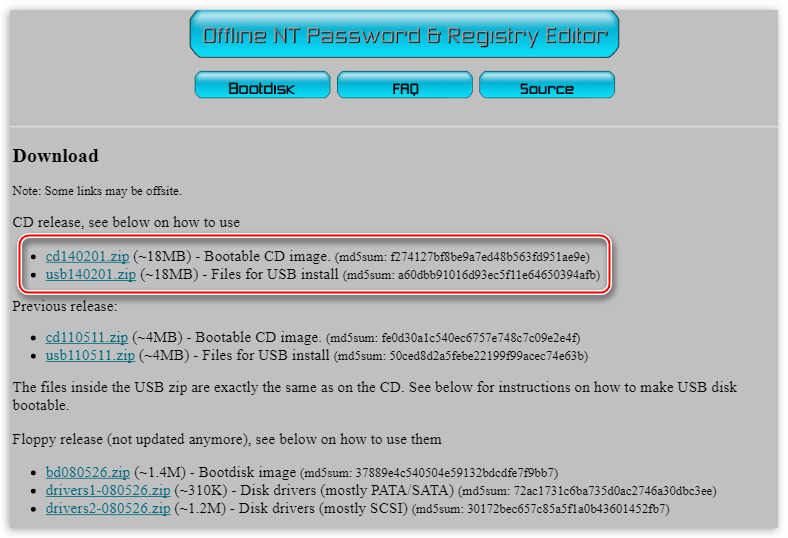
- На официальном сайте присутствует две версии программы – для записи на компакт-диск и флешку.
Скачать утилиту с официального сайта

Версия для CD представляет собой образ диска в формате ISO, который просто записывается на болванку.
Подробнее: Как записать образ на диск в программе UltraISO
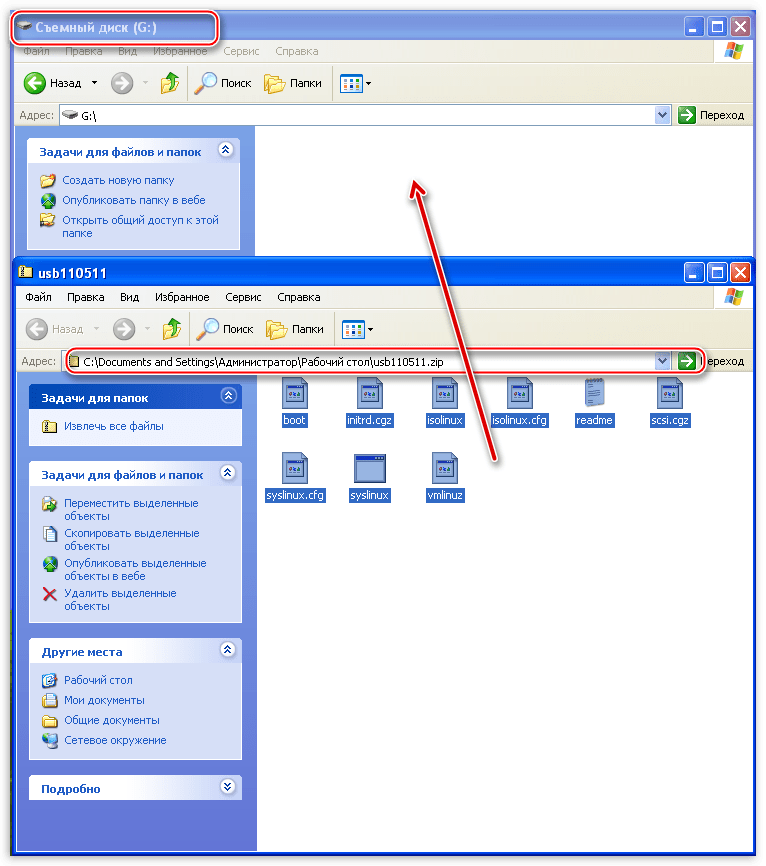
В архиве с версией для флешки лежат отдельные файлы, которые необходимо скопировать на носитель.

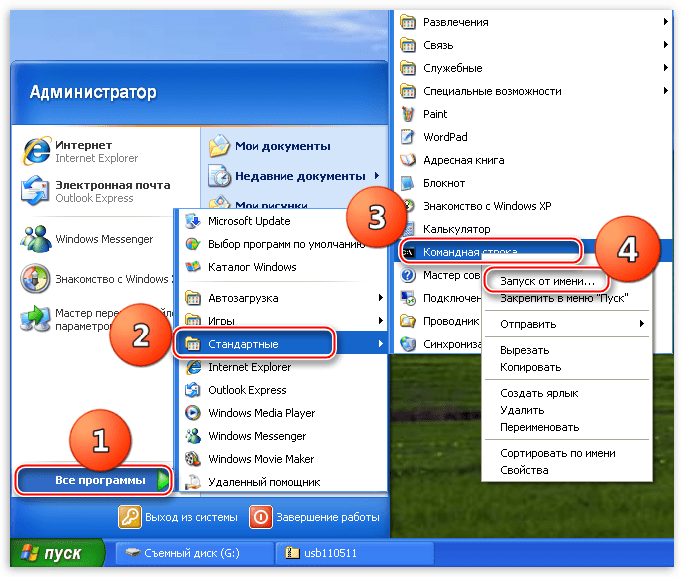
- Далее необходимо включить загрузчик на флешке. Делается это через командную строку. Вызываем меню «Пуск», раскрываем список «Все программы», далее идем в папку «Стандартные» и находим там пункт «Командная строка». Кликаем по нему ПКМ и выбираем «Запуск от имени…».

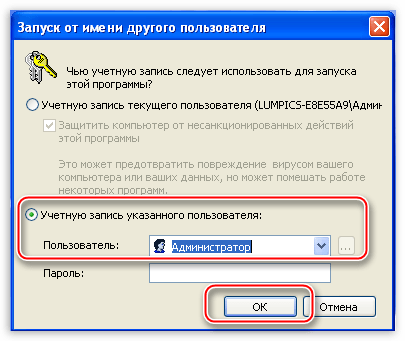
В окне параметров запуска переключаемся на «Учетную запись указанного пользователя». Администратор будет прописан по умолчанию. Нажимаем ОК.

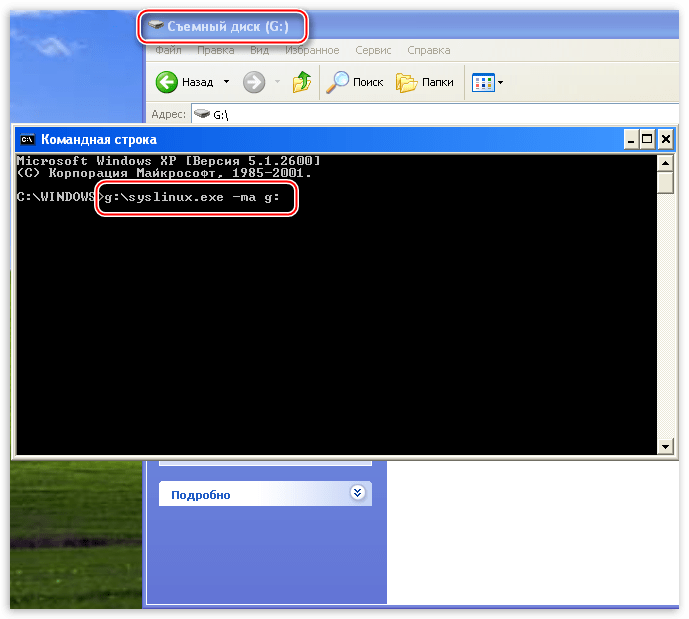
- В командной строке вводим следующее:
g:\syslinux.exe -ma g:G – буква диска, присвоенная системой нашему флеш накопителю. У Вас буква может быть другая. После ввода нажимаем ENTER и закрываем «Командную строку».

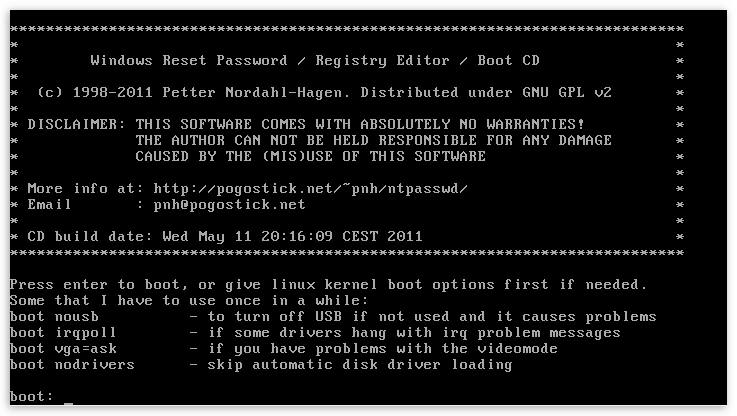
- Перезагружаем компьютер, выставляем загрузку с флешки или CD, в зависимости от того, какой версией утилиты мы воспользовались. Снова делаем ребут, после чего запустится программа Offline NT Password & Registry Editor. Утилита является консольной, то есть, не имеющей графического интерфейса, поэтому все команды придется вводить вручную.
Подробнее: Настраиваем BIOS для загрузки с флешки

Сброс пароля
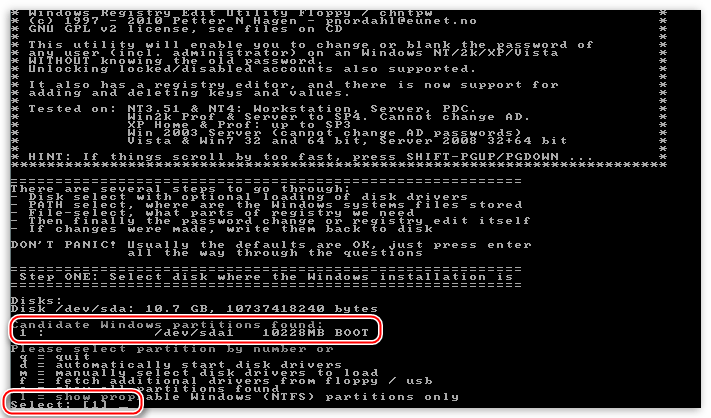
- Первым делом, после запуска утилиты нажимаем ENTER.
- Далее мы видим список разделов на жестких дисках, которые в данный момент подключены к системе. Обычно программа сама определяет, какой раздел требуется открыть, так как он содержит загрузочный сектор. Как видим, он у нас расположен под цифрой 1. Вводим соответствующее значение и снова жмем ENTER.

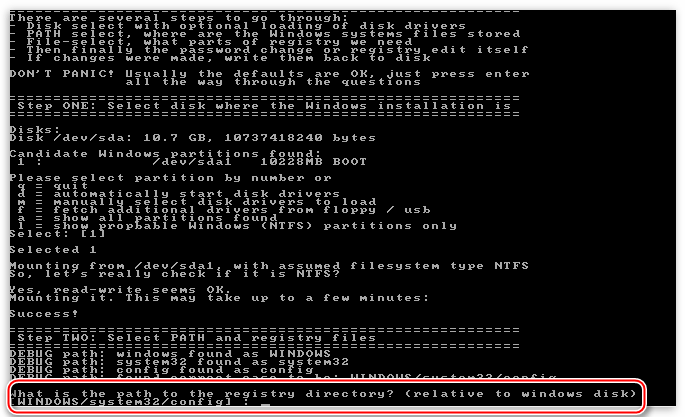
- Утилита разыщет на системном диске папку с файлами реестра и попросит подтверждения. Значение правильное, нажимаем ENTER.

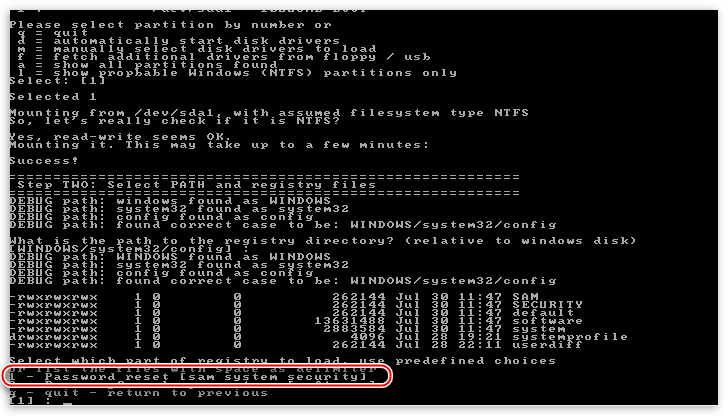
- Затем ищем строчку со значением «Password reset [sam system security]» и смотрим, какая цифра ей соответствует. Как видим, программа снова сделала выбор за нас. ENTER.

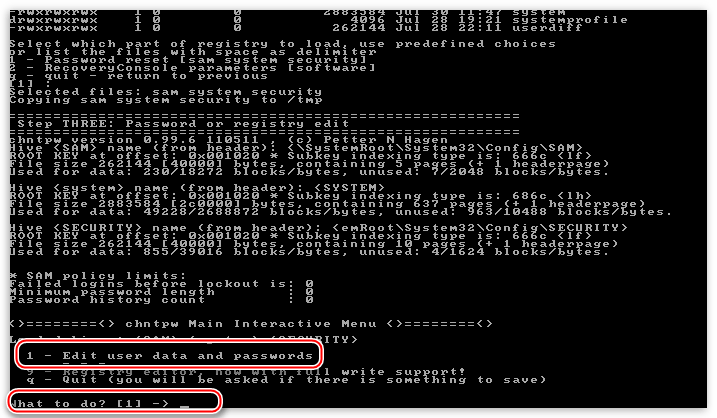
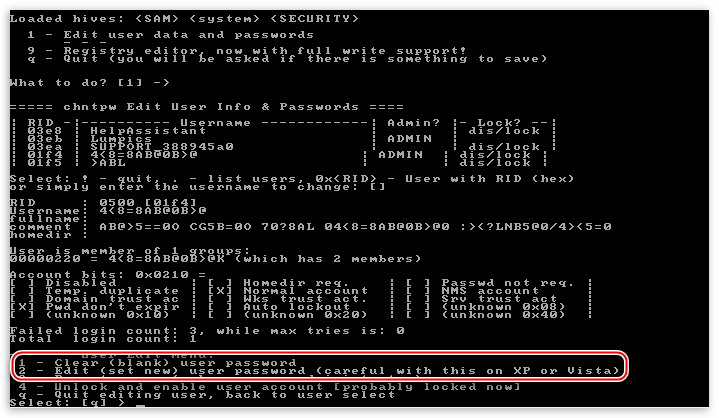
- На следующем экране нам предлагают на выбор несколько действий. Нас интересует «Edit user data and passwords», это опять единица.

- Следующие данные могут вызвать недоумение, поскольку «учетки» с именем «Администратор» мы не видим. На самом деле, здесь проблема с кодировкой и нужный нам пользователь называется «4@». Здесь ничего не вводим, просто нажимаем ENTER.

- Далее можно сбросить пароль, то есть, сделать его пустым (1) либо ввести новый (2).

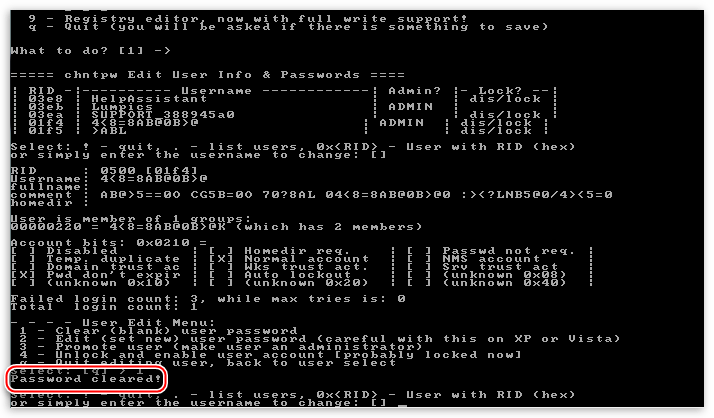
- Вводим «1», жмем ENTER и видим, что пароль сброшен.

- Дальше пишем по очереди: «!», «q», «n», «n». После каждой команды не забываем нажать Ввод.

- Извлекаем флешку и перезагружаем машину сочетанием клавиш CTRL+ALT+DELETE. Затем необходимо выставить загрузку с жесткого диска и можно входить в систему под учетной записью Администратора.


Данная утилита не всегда работает корректно, но это единственный способ получить доступ к компьютеру в случае потери «учетки» Админа.
При работе с компьютером важно соблюдать одно правило: хранить пароли в надежном месте, отличном от папки пользователя на жестком диске. Это же касается и тех данных, утрата которых может дорого Вам стоить. Для этого можно использовать флешку, а лучше облачное хранилище, например, Яндекс Диск.
Наша группа в TelegramПолезные советы и помощь
Updated on Apr 28, 2025
We must create a bootable USB password reset tool because of forgetting or losing passwords on our Windows PCs/Laptops. In that case, a bootable USB password reset tool helps us reset the password to reaccess our computer normally. What’s the way to reset the password of Windows local accounts?
The way is simple, and you have to create a bootable USB password reset tool beforehand that can help you recover your PC if you occasionally forget the password. EaseUS will show you how to create a bootable USB password reset tool in this guide. So, follow this guide and take the necessary measures in advance to avoid any hassle.
Windows built-in tools such as Forgotten Password Wizard and Diskpart enable us to create a bootable USB password reset tool. You need a more than 2 GB USB drive for the Forgotten Password Wizard option. And for the Diskpart option, you need at least 5 GB of USB space. However, these methods have some limitations. But don’t worry. We’ll guide you on creating a USB flash drive for a password reset using EaseUS WinRescuer without extra effort, restraints, and challenges.
Please check the following table for more information:
| Workable Solutions | Efficiency | Difficulty |
|---|---|---|
| 🏅EaseUS EaseUS WinRescuer | High — It offers a reliable solution for making a bootable USB to remove the Windows password. | ⭐ |
| 🥈Diskpart | Medium — It requires a fundamental understanding of command parameters. Any incorrect commands will result in data issues. | ⭐⭐⭐ |
| 🥉Forgotten Password Wizard | Medium — It can only make a bootable USB before you forget the password since it requires the current password. | ⭐⭐ |
- Note:
- Password reset USBs work only for local accounts and cannot reset Microsoft account passwords. For Microsoft accounts, visit the official website to change your password.
Way 1. Use EaseUS WinRescuer — Bootable Media
EaseUS WinRescuer provides a «Password Reset» tool that allows users to create bootable media on a healthy computer and then use this device to remove the Windows password on a locked computer. It is versatile beyond just creating bootable USB password reset tools. With this tool, you can manage your disk partitions efficiently, making it a valuable addition to your toolkit. This utility has a user-friendly interface, comprehensive drive management features, and a reliable and efficient bootable media creation tool.
Follow the steps for creating a bootable USB password reset tool using EaseUS WinRescuer.
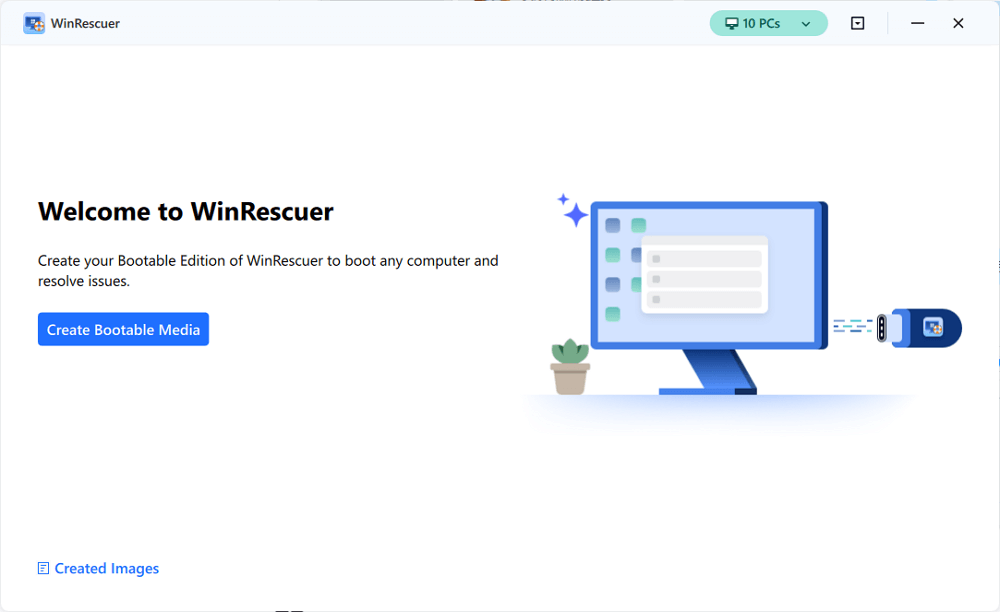
Step 1. Connect the USB drive/external drive to a working computer, open EaseUS WinRescuer, and click «Create Bootable Media.»
Step 2. Select EaseUS Boot Toolkits and other components you need. Then, click «Next.»

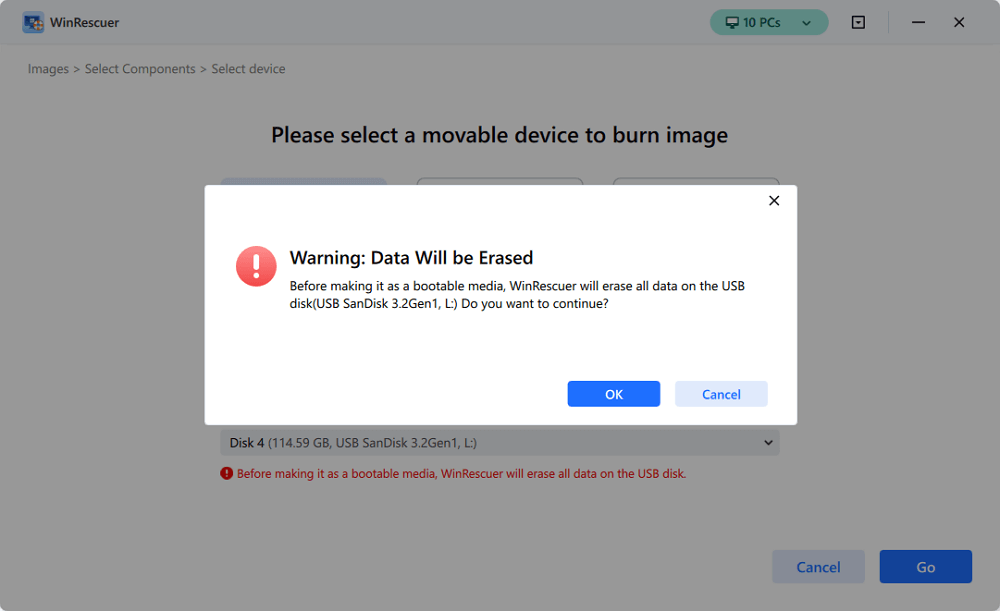
Step 3. Select your movable device and click «Go» to create an image on your USB drive/external drive.
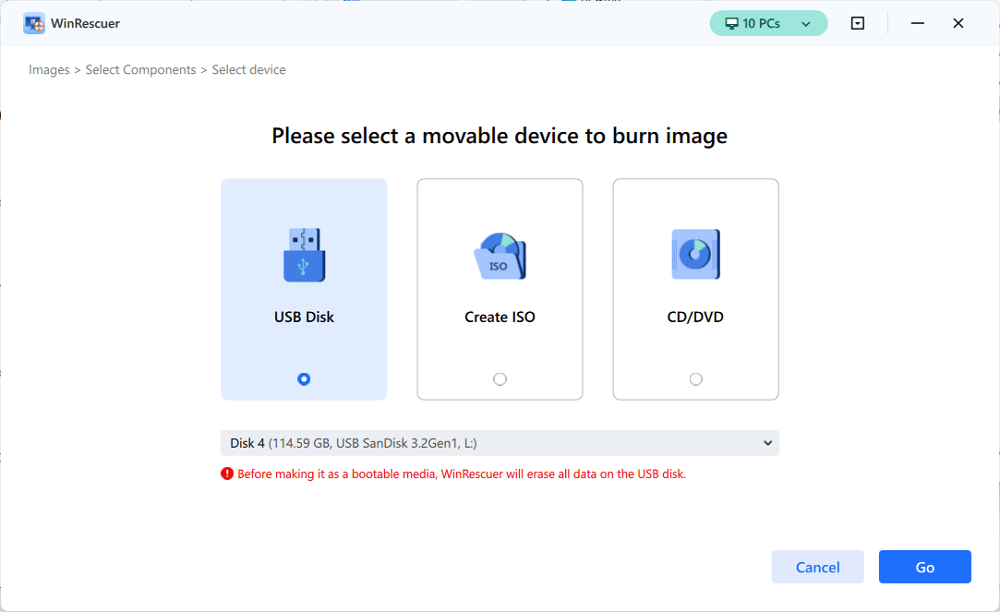
Step 4. Before making the bootable media, you will receive the warning message: data will be erased. Click «OK» to confirm.
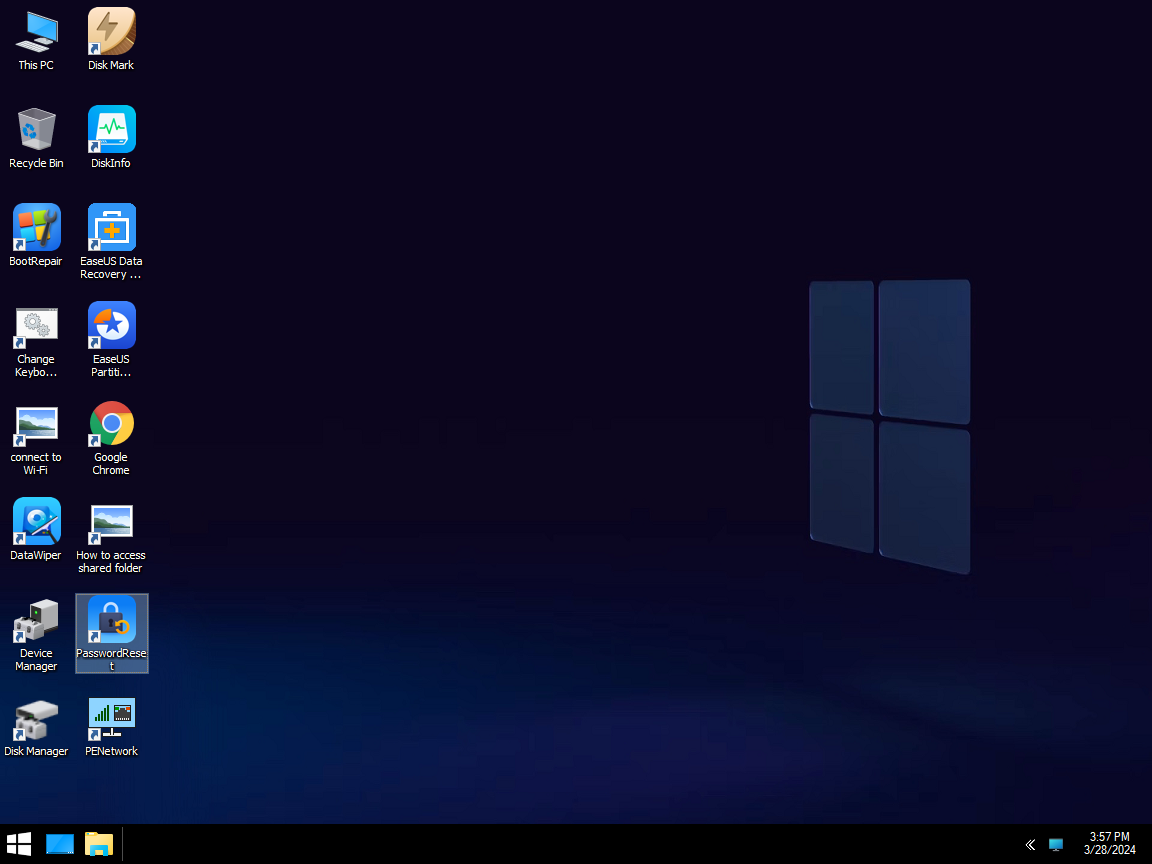
Step 5. Connect the created bootable drive to the faulty computer and reboot it by pressing and holding «F2″/»Del» to enter the BIOS. Then, set the WinPE bootable drive as the boot disk and press «F10» to exit.

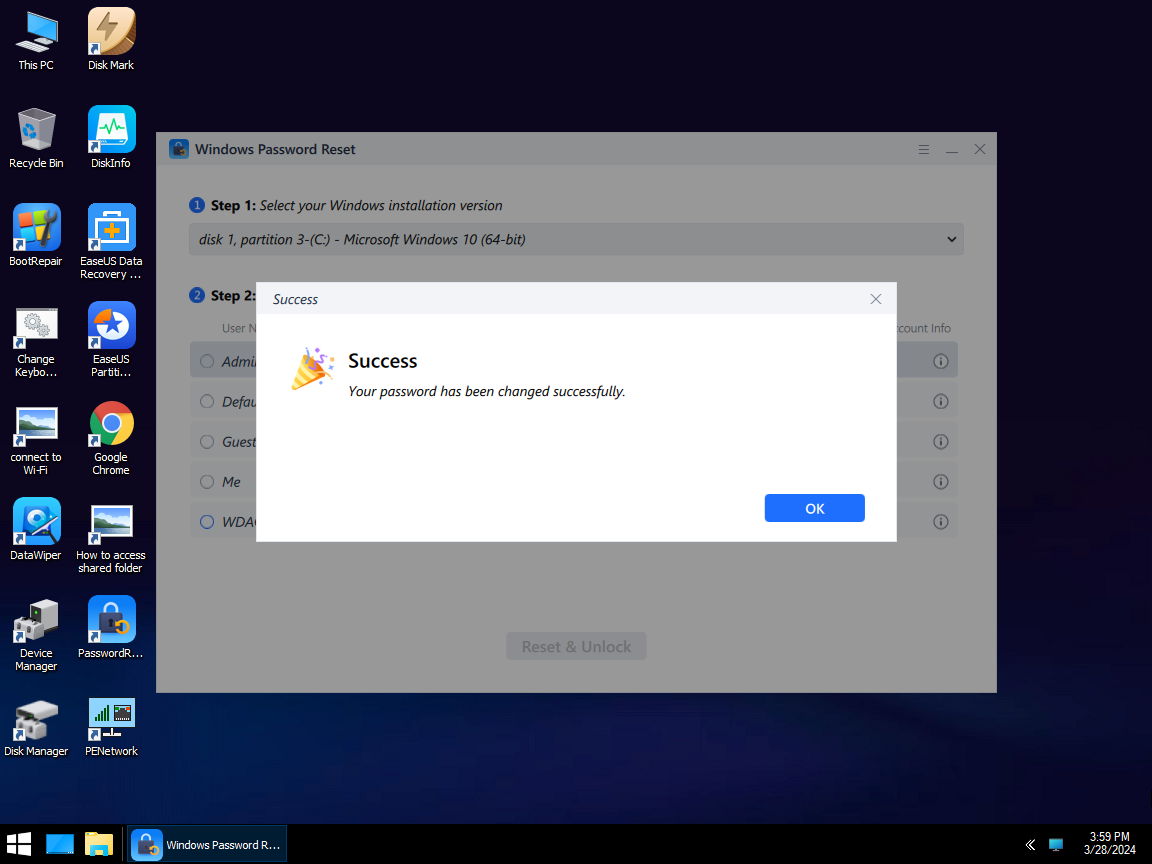
Step 6. Then, the computer will enter WinPE desktop. Find and launch Password Reset.
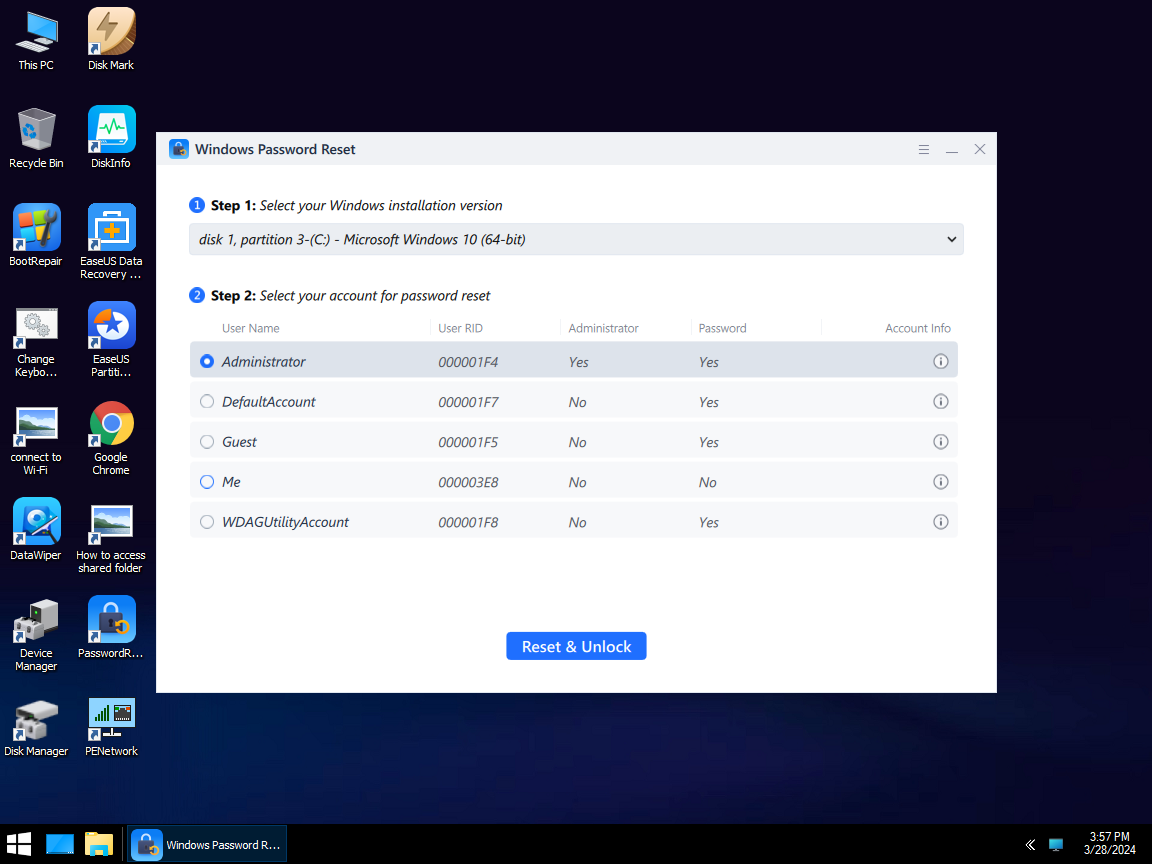
Step 7. Select your Windows version and choose the Windows account you want to reset.
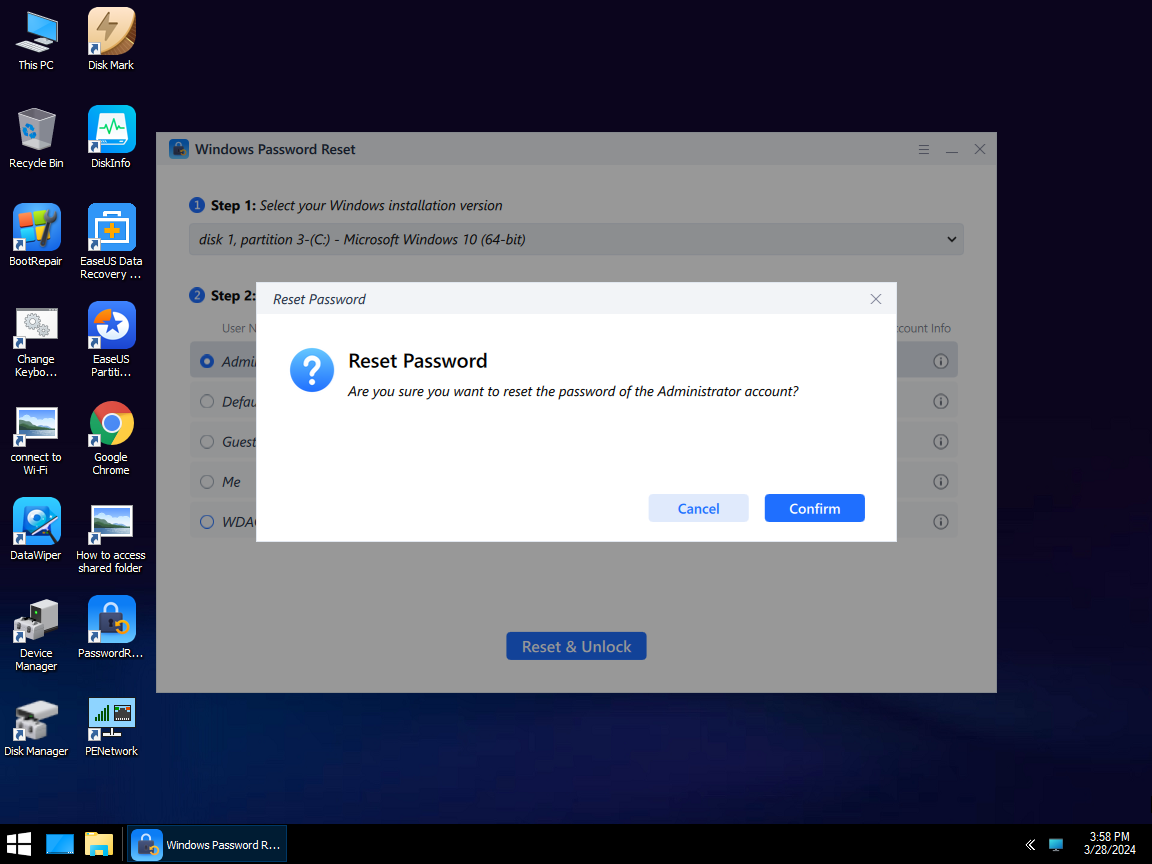
Step 8. When this prompts, click «Confirm» to continue resetting your Windows password.
Step 9. Wait patiently, and you will receive an message that the password has been changed successfully. Click «OK» to complete the password reset process.
Other Features of EaseUS WinRescuer:
- Create Bootable USB to Wipe Hard Drive
- Boot Windows from an SD card.
- Reset Windows Vista Password Without A Disk
- Make a password reset disk for another computer.
So, let’s download the EaseUS WinRescuer and make bootable media beforehand to avoid frustration and hassle in the future in the event of losing the PC’s password.
Read Also:
Way 2. Run Diskpart to Create a Bootable USB Drive
For this method, you should arrange at least 5 GB of free space USB in advance to create a bootable USB drive. Windows installation media will help you to use the Command Prompt (CMD) without logging in to your PC/Laptop if you forget your password. So, creating a bootable USB drive in advance enables you to remove Windows 10 password on your PC through CMD.
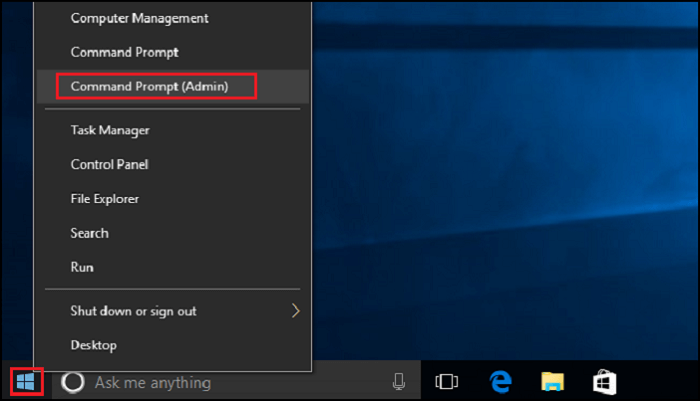
Step 1. Type «CMD» in the search dialog in the taskbar. Once the «Command Prompt» pops, press «Enter» to open it.
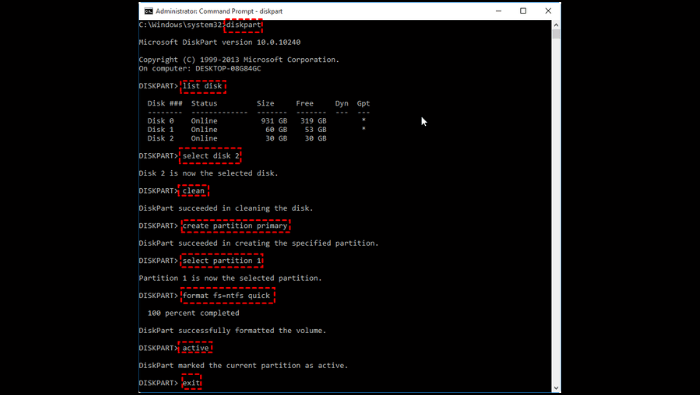
Step 2. Type the following commands by pressing the «Enter» button after each command.
- diskpart
- list disk
- select disk # (Where # is should be the target USB)
- clean
- create partition primary
- select partition 1
- format fs=ntfs quick (To create UEFI bootable USB, format it as FAT32 with the command «format fs=fat32 quick» instead)
- active
- exit
Once you format your USB flash drive and set the primary partition as active, type «Exit» to exist from the diskpart, go to «File Explorer,» copy and paste all files/content of the Windows ISO to the USB flash drive. When you lose or forget your PC’s password, you must connect your USB to your PC and reset the password.
Here is a related post that you may be interested in:
Way 3. Create a Bootable USB with Forgotten Password Wizard
The Forgotten Password Wizard is a built-in Windows tool for resetting passwords. You should have a USB drive with over 2 GB of space to create a Windows password reset USB. If there’s valuable data, back it up, even though it won’t be formatted.
Here is a how-to-do guide on creating a bootable USB with Windows Forgotten Password Wizard:
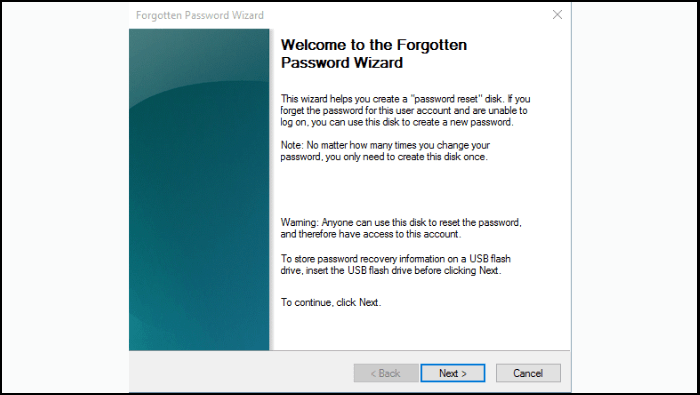
Step 1. Connect the USB to your PC. Write «create password reset disk» in the search bar. Click it.
Step 2. Click «Next» in the «Forgot Password wizard» window. Select the USB and click «Next».
Step 3. Type your current password and click «Next». Once the password reset USB is created, click «Next.»
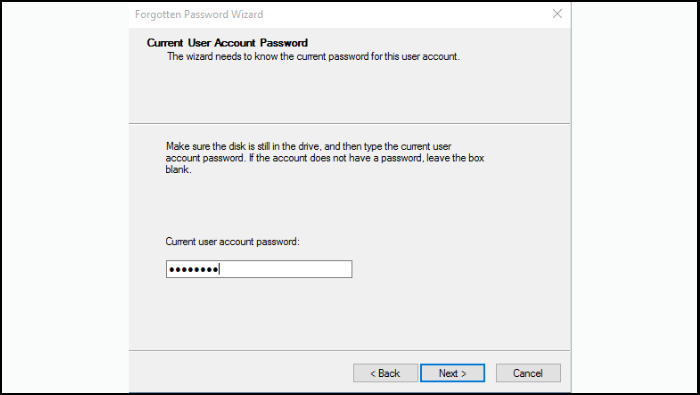
If you occasionally forget your password, you must connect this bootable USB to your PC. You’ll see a password screen after connecting your USB to your PC. Click the «Reset Password» under the password box to join the Password Reset Wizard and reset the password.
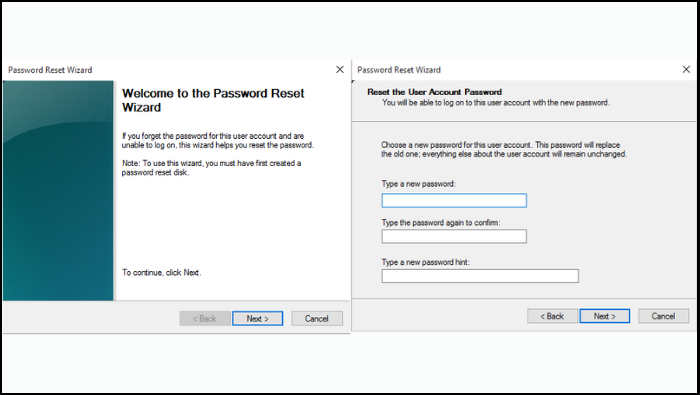
Note: Users must have created a password reset USB in advance for this tool, and this USB can only be used on the specific Windows PC it was built on. If you haven’t made a password reset disk before forgetting your password, you won’t be able to employ this method for resetting it.
🚩Further Reading: Reset Windows 10 Password with USB, Reset Windows 11 Password with USB
Share this useful page with people who need to reset their Windows passwords on social media:
Bonus Tip: How to Reset Windows Password?
Now that you have learned how to create a bootable USB password reset tool, you must also know how to reset your Windows password. There are two cases to reset the Windows password. The challenging situation is that you don’t know your password and cannot log in to your PC. This part will teach you two workable ways of password resetting.
- Note: We have learned how to create a bootable USB drive using Diskpart in Way 2. Keep that USB in your hands. We’ll use that USB to reset the password. That’s why we prepared that in advance. If you haven’t prepared your USB, please follow Way 2 to prepare it instantly.
Follow the steps to reset the Windows password in CMD:
Step 1. First, connect the bootable USB to your PC to boot your computer.
Step 2. Once the PC boots up, the Windows Setup screen will appear. Press «Shift + F10» to open «Command Prompt.»
Step 3. Type the following commands in the «Command Prompt» to replace the Utility Manager on the Windows 10 sign-in screen. Change the c letter with your operating system drive letter and hit the «Enter» tab after typing each command.
- move c:\windows\system32\utilman.exe c:\
- copy c:\windows\system32\cmd.exe c:\windows\system32\utilman.exe
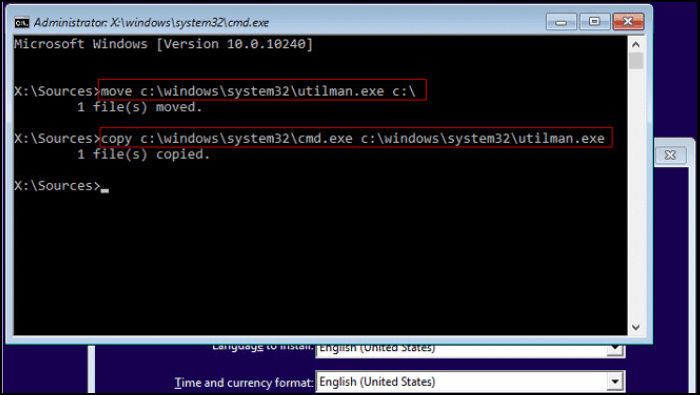
Step 4. After the successful execution of both commands, disconnect the bootable USB and restart your PC.
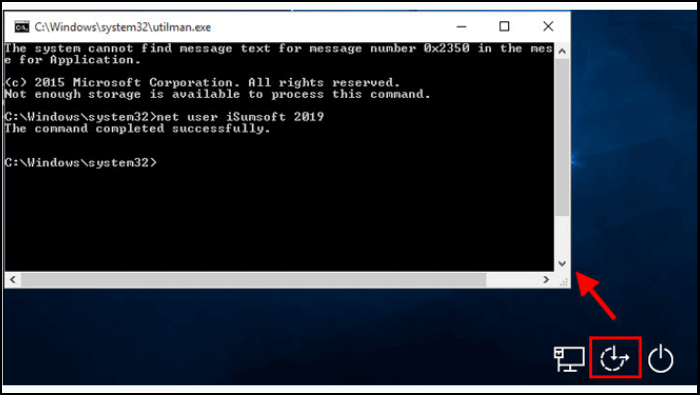
Step 5. When your PC restarts and displays the Windows 10 sign-in screen, click the Ease of Access icon in the bottom-right corner.
Step 6. The «Command Prompt» will be opened. Type the password reset command: net user and press Enter to reset the password of your Windows 10 admin account. After successfully resetting the password, close the Command Prompt, and now you can access your computer with a new password.
📖Read Also: Windows 10 Password Reset USB Free Download🔥
You can also click the video to learn a simple solution to reset Windows password:
If you want to know more information about password reset on Windows 10, click the link below:
Conclusion
To successfully bypass this challenge, we presented three different solutions. You should take some necessary measures in advance to perform effectively during that situation. EaseUS WinRescuer software provides an uncomplicated and efficient solution to regain access to your system, making it a valuable resource for addressing password-related issues. Its user-friendly interface and robust capabilities simplify the password recovery process and assist in re-establishing control over your Windows account. Find more available solutions and information in the following articles:
FAQs About Bootable USB Password Reset Tool
If you have more queries or want to learn more about creating a Bootable USB Password Reset Tool, please follow the below FAQs.
1. Can I reset my Windows 10 password without logging in?
Yes, you can. There are many ways to reset your Windows 10 password without logging in. We’ll suggest a straightforward way. Follow these steps:
Step 1. Create a bootable USB password reset tool using software like EaseUS WinRescuer.
Step 2. Boot your computer from the USB drive.
Step 3. Follow the on-screen guide when you reset your password.
2. How do I reset my Windows password on my HP computer?
You can reset the Windows password on an HP computer using a bootable USB password reset tool. Follow the steps:
Step 1. Create a bootable USB using software like EaseUS WinRescuer.
Step 2. Boot your HP computer from the USB drive.
Step 3. Follow the on-screen tutorial to reset the password.
3. How do I reset my local admin password in BIOS?
Resetting the local admin password in BIOS applies different ways/steps. For a quick overview:
Step 1. Access your computer’s BIOS by pressing a specific key during startup (often F2, Del, or Esc). It depends on your particular model.
Step 2. Navigate to the security settings or similar sections.
Step 3. Find the option to reset the BIOS password and follow the on-screen instructions.