
Значки, файлы и папки отмечаются флажками при выборе — как отключить?
Некоторые пользователи могут столкнуться с тем, что при выборе значка, файла, папки или ярлыка на рабочем столе или в проводнике Windows он отмечается «галочкой» или флажком в левом верхнем углу, что не совсем привычно, но может включаться как опция по умолчанию для устройств с сенсорными экранами.
Если такое поведение вам не по душе, вы можете отключить появление отметок при выборе файлов: о том, как это сделать и пойдёт речь далее в инструкции.
Параметры Проводника
При установке Windows 11/10 на ноутбуке или планшете с сенсорным экраном, для «Проводника» по умолчанию включается опция, показывающая «галочки» или «флажки» при выборе элементов.

С точки зрения разработчиков, это будет удобнее для пользователя, что не всегда так и в этом случае опцию можно отключить.
Первый способ убрать появление отметок при выборе файлов и папок — использовать параметры Проводника:
- Нажмите правой кнопкой мыши по кнопке «Пуск», выберите пункт «Выполнить», введите control folders и нажмите Enter. Либо откройте «Проводник» и используйте главное меню, чтобы открыть его параметры.
- Перейдите на вкладку «Вид».
- Снимите отметку «Использовать флажки для выбора элементов».
- Нажмите кнопку «Ок» — настройки будут применены.
Редактор реестра
Обычно метода, приведённого выше, бывает достаточно. Однако при желании или необходимости то же самое можно сделать в редакторе реестра:
- Нажмите клавиши Win+R на клавиатуре, введите regedit и нажмите Enter
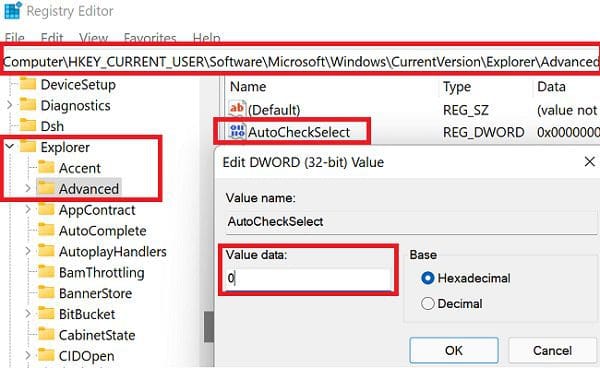
- Перейдите в раздел реестра
HKEY_CURRENT_USER\Software\Microsoft\Windows\CurrentVersion\Explorer\Advanced
- Дважды нажмите по параметру с именем AutoCheckSelect и измените его значение на 0

- Нажмите «Ок» для сохранения настроек.

При использовании редактора реестра для изменения настройки может потребоваться перезапуск Проводника (или перезагрузка компьютера): откройте диспетчер задач, выберите «Проводник» в списке процессов и нажмите кнопку «Перезапустить».
В Windows 11 последних версий было замечено, что даже при отключении флажков значков описанными способами, при переводе устройства в планшетный режим, флажки продолжают отображаться, решения, к сожалению, предложить не могу.
If you see checkboxes (tick box, check mark) on each of your files and folders icons on the desktop or in File Explorer, this guide will show you how to remove the checkboxes from the icons in Windows 11.
Why is there a check mark on my desktop icons?
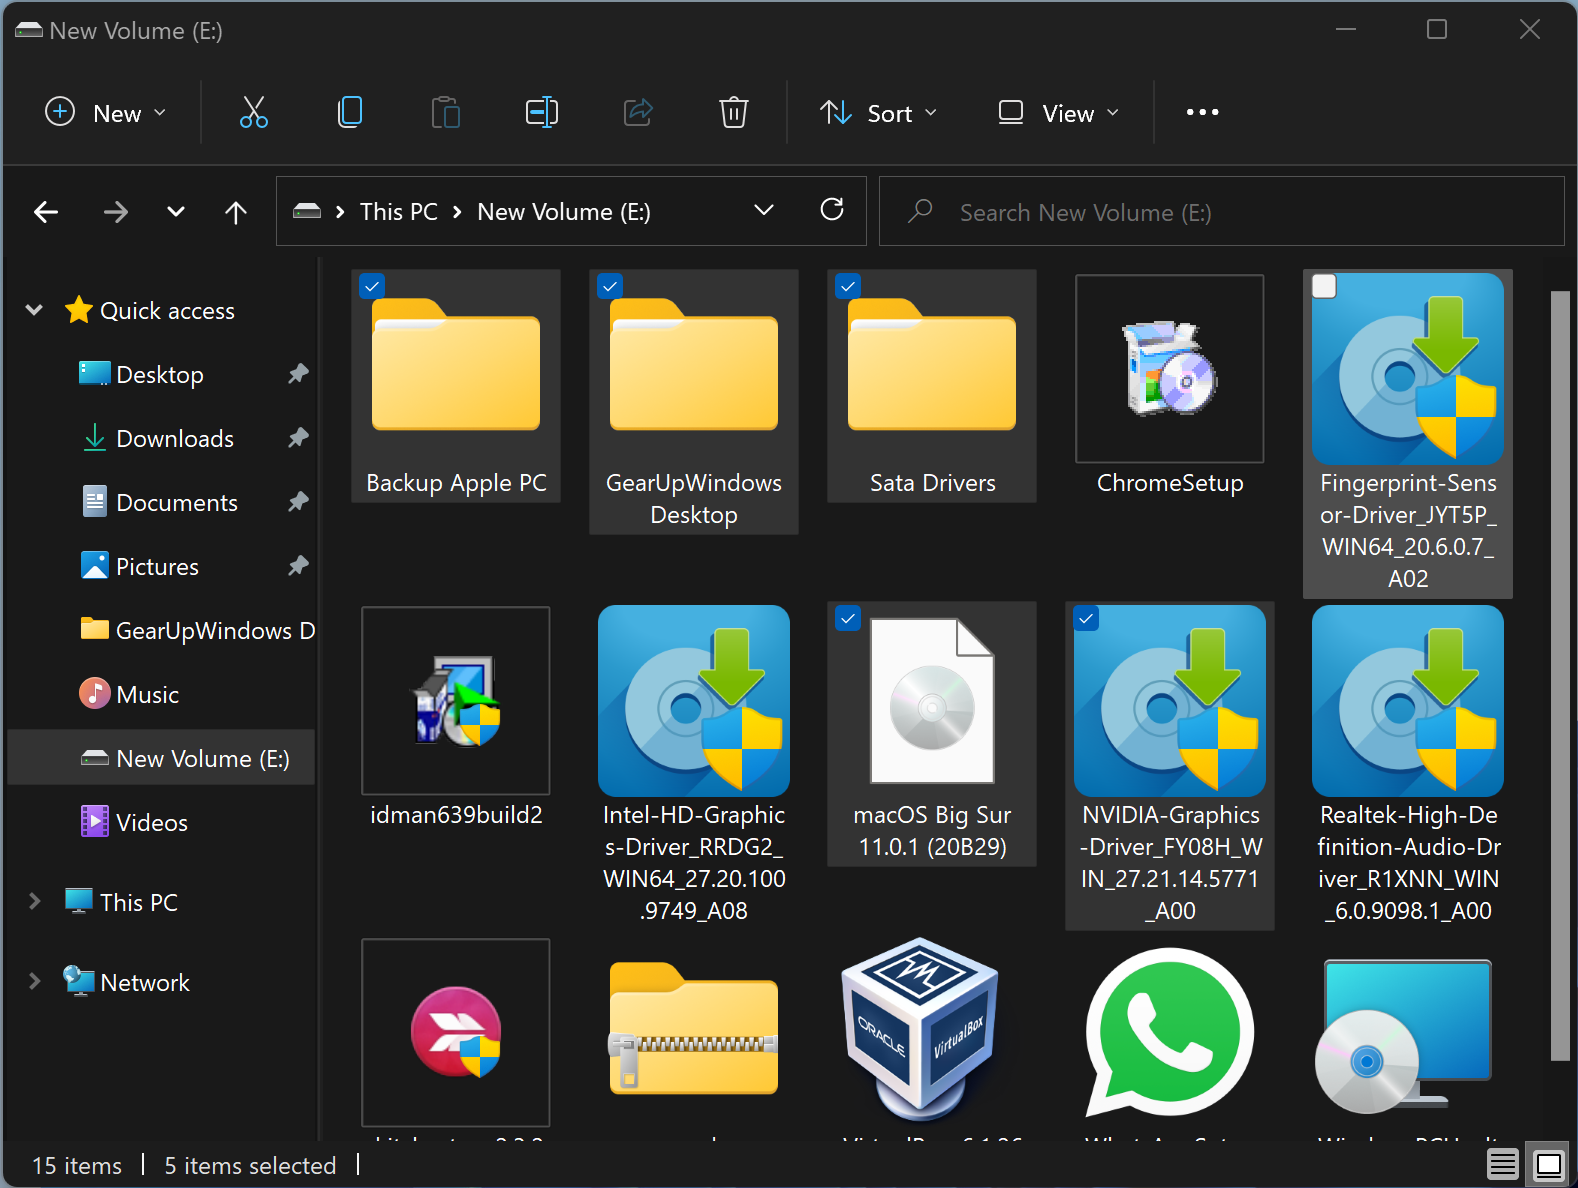
The check mark, or often known as check box or tick box, on icons is a feature in Windows that allows users to quickly select or highlight multiple files and folders by clicking on the check boxes of the items. This feature is called “Item check boxes”. If this feature is enabled, all icons on your desktop and files and folders in File Explorer will have check boxes on them.
You can disable the feature to get rid of the check boxes from your files and folders icons in Windows 11. Follow one of the two methods below to do so.
The Item checkbox feature is disabled by default in Windows 11. If you know you didn’t enable the feature but the checkboxes suddenly started appearing on files and folders icons in File Explorer and on the desktop, one of your programs may have altered the settings and enabled the item checkbox feature.
How to get rid of the checkbox in Windows 11
The item check boxes feature is an optional feature that some users may find useful when selecting or highlighting multiple files. If you don’t need the feature and want to get rid of the check boxes from desktop icons and items in File Explorer, here’s how to disable the item check boxes feature in Windows 11.
- Open File Explorer or This PC in Windows 11.
- On the menu bar, click on View.
- Hover your mouse over Show.
- Then, uncheck the option called “Item check boxes“.

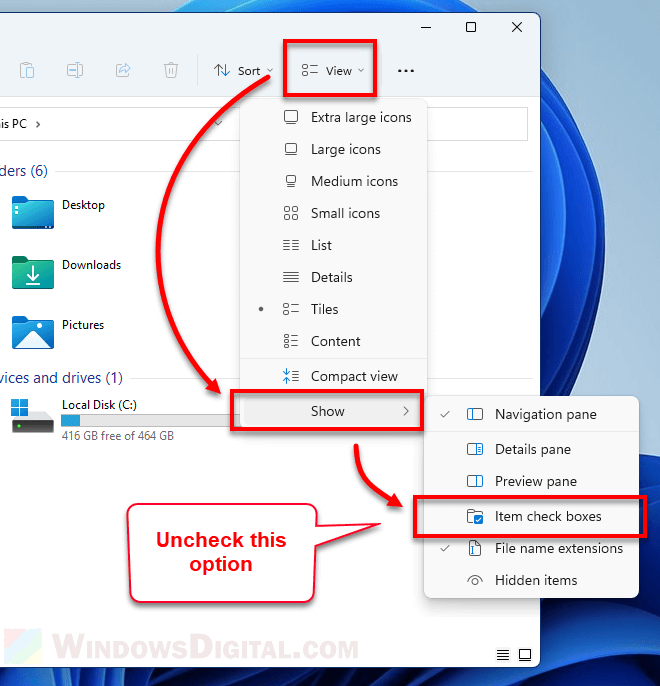
Once the feature is disabled, the check boxes on all icons will disappear.
To turn on the check boxes in Windows 11, simply repeat the steps above and enable the “Item check boxes” feature.
Disable item check box feature via Folder Options
If that doesn’t work to remove the check boxes from icons on your Windows 11, here’s another method to disable the item check boxes feature via the Folder Options in File Explorer.
- Open File Explorer.
- Click on the triple dotted icon at the top right corner of the window.
- Then, select Options.

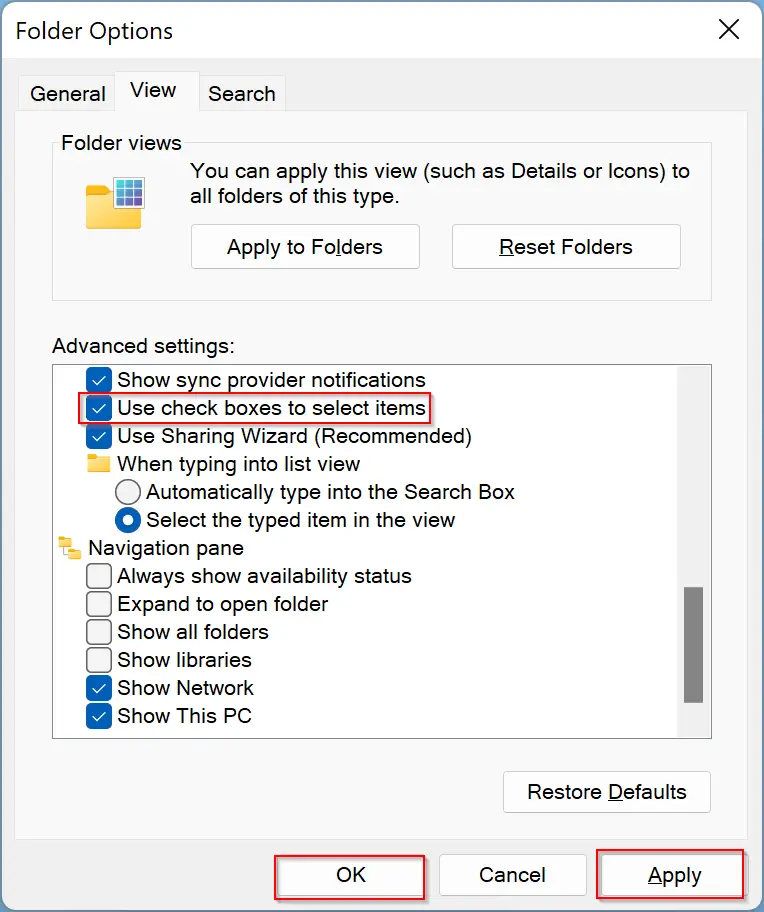
- In the Folder Options window, click on View tab.
- In the Advanced settings column, scroll down and look for an option called “Use check boxes to select items“.
- Uncheck to disable the option.

- Click Apply, then OK to save the changes.

Both the “item check boxes” options mentioned in the two methods above are the same and correlated with each other. When you disable one, the other will be disabled too. So, you only need to follow one of the two methods above to enable or disable the “item check boxes” feature in Windows 11.
The checkmark or checkbox on icons is a feature in Windows that allows users to select multiple files and folders quickly. On Windows 11, this feature is known as “Item check boxes.” When this feature is enabled on your computer, all icons on your desktop and files/folders in File Explorer will have checkboxes on them.
This feature is handy for touchscreen devices. Non-touchscreen device users can also use this feature to select multiple items without pressing and holding a CTRL key. When you move the mouse cursor to an icon, a checkbox appears. Clicking on them, you can quickly select.
By default, “Item check boxes” are enabled on touchscreen devices and disabled on non-touchscreen PCs. If you prefer this checkbox, you can allow it on a non-touchscreen computer, and if you don’t want to use it on a touchscreen laptop, you can disable this feature.
This gearupwindows article will guide you on turning on/off the “Item check boxes” feature on Windows 11.
How to Add or Remove Checkboxes from Icons in Windows 11 via Command Bar?
Follow these steps to add or remove Checkboxes from Icons in Windows 11 via Command Bar:-
Step 1. Press Windows + E keys to open up File Explorer.
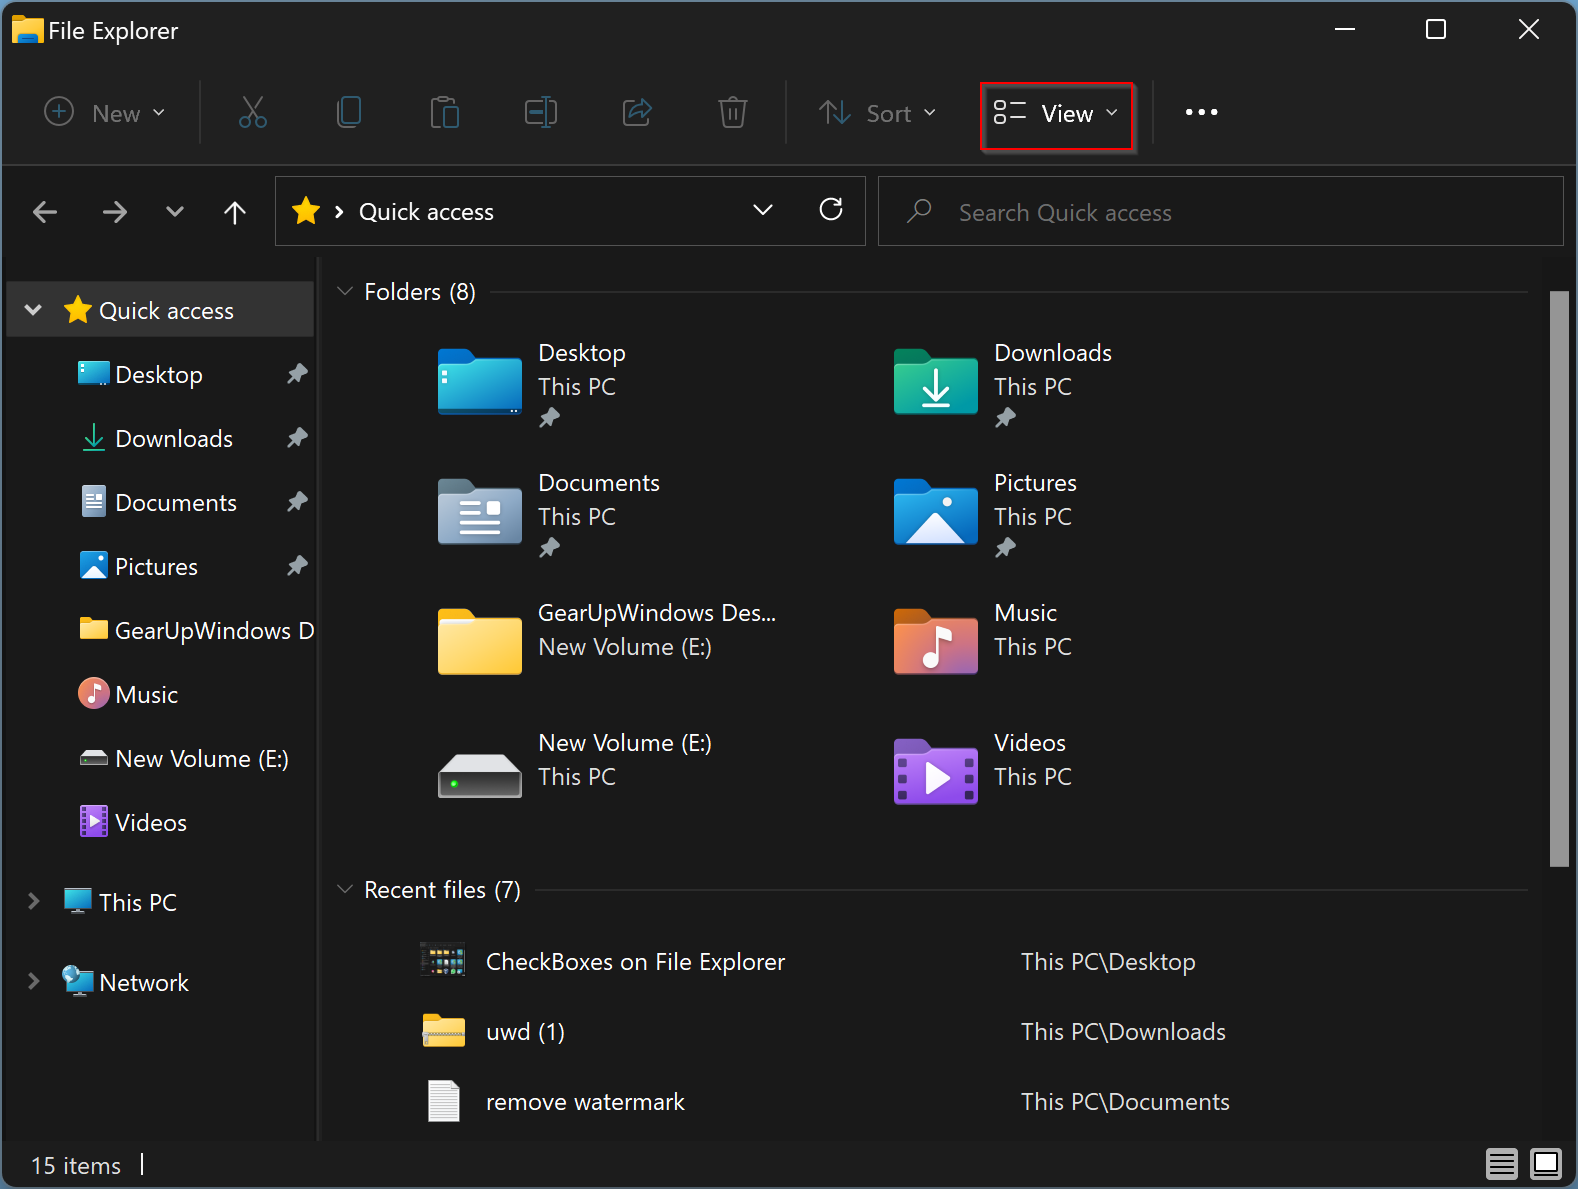
Step 2. Inside the File Explorer window, click View on the ribbon bar at the top.
Step 3. From the context menu that appears, select “Show” > “Item check boxes” to enable the selection.

In the future, if you wish to disable the “Item check boxes” feature on your Windows 11 computer, repeat the above steps and uncheck this option in step 3 above.
How to Turn On/Off Checkboxes from Icons in Windows 11 through Folder Options?
Follow these steps to enable or disable Checkboxes from Icons in Windows 11 through Folder Options:-
Step 1. Open Folder Options.
To do that, press the Windows + R keys from the keyboard to launch the Run dialog box. Type control.exe folders and hit Enter from the keyboard to access Folder Options.
Step 2. Navigate to the View tab in the Folder Options dialog and then scroll down to the bottom.
Step 3. Check or uncheck the option Use check boxes to select items to enable or disable the select checkboxes.
Step 4. Click Apply.
Step 5. Click OK.
That’s it!
Conclusion
In conclusion, the “Item check boxes” feature in Windows 11 is a convenient way to select multiple files and folders without having to press and hold the CTRL key. This feature is particularly useful for touchscreen devices, but it can also be enabled on non-touchscreen computers. By following the steps outlined in this guide, users can easily turn on or off the “Item check boxes” feature using either the Command Bar or Folder Options. Whether you need to select multiple files for copying, moving, or deleting, this feature can save you time and effort in managing your files and folders.
Many Windows 11 users have complained they can’t turn checkbox usage off in File Explorer. When the app is open, each item has a strange checkbox next to it. If restarting File Explorer and rebooting your computer failed to solve the problem, follow the troubleshooting steps below.
Contents
- 1 How to Disable File Explorer Checkboxes in Windows 11
- 1.1 Disable Checkboxes in Folder Settings
- 1.2 Edit Your Registry
- 1.3 Disable Tablet Mode
- 1.4 Create a New User Account
- 1.5 Roll Back to Windows 10 and Upgrade Again
- 1.6 Conclusion
How to Disable File Explorer Checkboxes in Windows 11
Disable Checkboxes in Folder Settings
- Press the Windows and R keys to open a new Run window.
- Enter control.exe folders, and hit Enter.
- In the new Folder Options window, locate Use checkboxes to select items.
- Untick the checkbox to disable the option.
Restart File Explorer, and check if the checkboxes are still there.
Edit Your Registry
If the issue persists, tweak your Registry Editor settings, and disable AutoCheckSelect.
- Launch the Registry Editor.
- Navigate to HKEY_CURRENT_USER\SOFTWARE\Microsoft\Windows\CurrentVersion\Explorer\Advanced\AutoCheckSelect
- Double-click on the AutoCheckSelect key.
- Edit its value to 0 (zero)
.

- Save the settings, and check the results.
Disable Tablet Mode
This issue seems to occur more frequently when users flip the keyboard in Tablet mode. Basically, the OS ignores your settings and displays check boxes next to all items listed under File Explorer.
As a workaround, you can disable Tablet Mode. While this may not be the ideal solution, especially if you really need to use Table mode, do give it a try, and check if you notice any changes.
Create a New User Account
Check if this problem affects new user accounts as well.
- Navigate to Settings.
- Select Family and other users.
- Then, add a new user account.
- Log out of your current account.
- Log in to the newly created account, and check if the checkboxes are still there.
Roll Back to Windows 10 and Upgrade Again
If this checkbox issue is really that annoying to you, roll back to Windows 10. After upgrading to Windows 11, there is a 10-day window during which you can downgrade to Windows 10.
Navigate to Settings, select System, and click on Recovery. Then, select the Go back button. Wait for a few minutes, restart your computer, and install Windows 11 again. If this checkbox problem was caused by some unexpected glitches during the upgrade process, reinstalling the OS should fix it.
Conclusion
If you can’t disable checkboxes in File Explorer, try disabling the checkbox option in Folder Settings. Then, edit your Registry settings and disable AutoCheckSelect. Additionally, create a new user account. If the issue persists, downgrade to Windows 10, restart your computer, and reinstall Windows 11.
Did you manage to solve the problem? Let us know in the comments below.