
Вкратце рассказываем о том, как можно прошить BIOS, зачем это делать и стоит ли вообще тратить на это время.
- Что такое BIOS
- Зачем прошивать BIOS
- Подготовительный этап перепрошивки
- Перепрошиваем BIOS
Basic Input/Output System — это низкоуровневое программное обеспечение, которое «вшивается» в материнскую плату и позволяет ей работать совместно со всем установленным оборудованием. А также помогает корректному взаимодействию операционной системы и «железа». Если говорить еще проще, то BIOS — это первая программа, которая запускается на компьютере после нажатия на кнопку питания. И она отвечает за его дальнейшую работу вплоть до старта Windows, Linux или macOS.
Зачем прошивать BIOS?
Вообще, столь важное программное обеспечение лучше не трогать. По крайней мере, из праздного интереса. Прошивать BIOS стоит только при реальной необходимости. Например:
- Если устройство начало сбоить при запуске. Допустим на ноутбуке перестал загораться экран. Или BIOS не может обнаружить оперативную память. Вещи такого рода часто решаются перепрошивкой BIOS.
- Когда необходимо добавить в компьютер новые возможности. Некоторые функции, такие как виртуализация, к примеру, можно запустить только на уровне BIOS и только в том случае, если версия BIOS поддерживают такую функцию.
- Ну или вы хотите научиться перепрошивать BIOS, чтобы помогать это делать другим людям. Полезно попрактиковаться перед тем, как начинать свой бизнес по ремонту компьютеров.
А больше особо и незачем. От переустановки BIOS компьютер быстрее не станет. Какие-то важные пользовательские функции не появятся. Обычный пользователь вообще не заметит преимуществ. Поэтому не спешите.
Подготовительный этап перепрошивки
На этом этапе нужно сделать две вещи:
- Выяснить текущую версию BIOS.
- И найти подходящую ей замену.
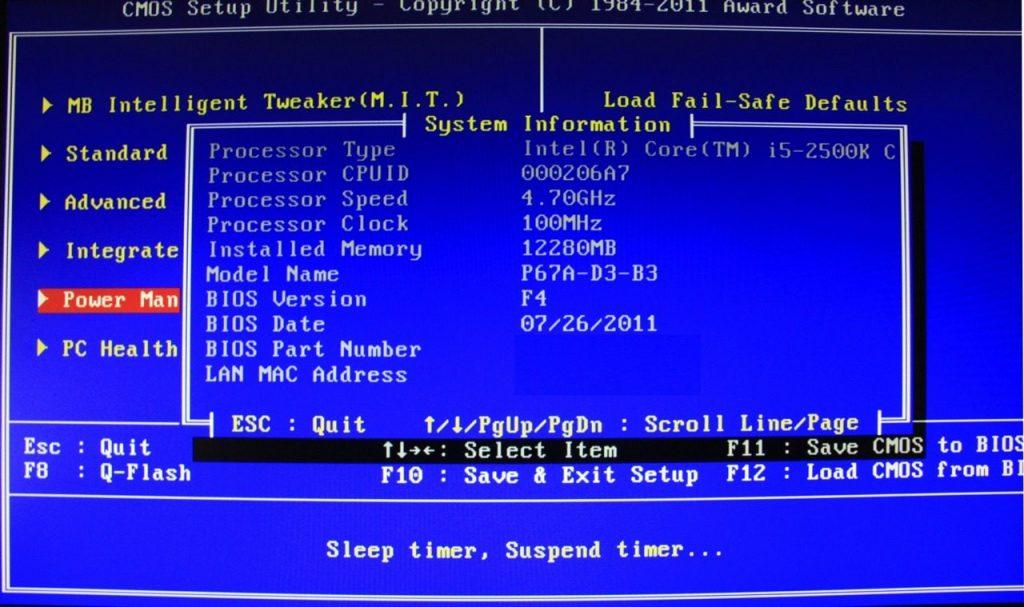
С первым пунктом все довольно просто. Чтобы узнать версию BIOS:
- Запускаем компьютер.
- На этапе загрузки жмем на специальную клавишу для перехода в меню BIOS.
- На главном экране ищем строчку BIOS Vendor и BIOS Version. Напротив них и указана версия используемой прошивки и поставщик этой самой прошивки.
Со вторым пунктом чуть сложнее. Выяснив текущую версию BIOS, мы:
- Заходим на официальный сайт производителя материнской платы.
- Переходим на страницу техподдержки.
- Вводим там модель своей материнской платы.
- Загружаем для нее свежую версию программного обеспечения.
Точная реализация каждого шага зависит от модели платы.
Перепрошиваем BIOS
Теперь приступаем непосредственно к поставленной задаче. Здесь обсудим основные методы обновления BIOS.
Прошиваем BIOS прямо из Windows
Это самый простой и наиболее щадящий способ для пользователей, которые не очень дружат с BIOS и английским языком, а еще не совсем понимают, что означают разные пункты меню. Тут лучше не рисковать, конечно.
Если вы не чувствуете себя достаточно уверенно, работая с низкоуровнем программным обеспечением, то этот вариант подойдет вам.
Чтобы обновить BIOS, не покидая привычную среду:
- Сначала выясняем производителя своей материнской платы (мы это уже сделали в предыдущем блоке статьи).
- Заходим на официальный сайт производителя.
- Скачиваем специальную утилиту для обновления и переустановки BIOS.
- Запускаем ее и ждем, пока процесс завершится автоматически.
Есть несколько таких программ. Поговорим о каждой подробнее.
Gygabyte BIOS Update
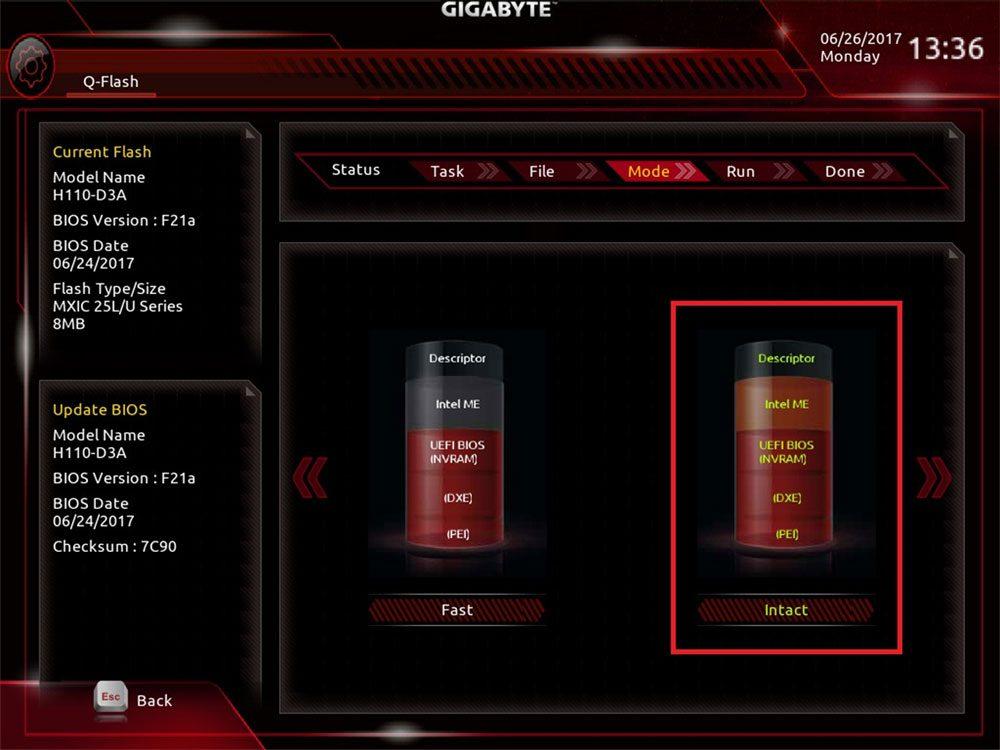
Конкретно эта утилита была разработана компанией Gygabyte для собственных материнских плат. У нее довольно простой интерфейс и два режима работы. В одном программа сама загружает прошивку для BIOS с серверов разработчика. В другом — позволяет выбрать файл прошивки, который уже лежит на компьютере. Приложение автоматически сохраняет все необходимые данные, чтобы избежать возможных потерь информации и сбрасывает настройки.
Скачать Gygabyte BIOS Update
ASUS BIOS Update
Практически идентичная программа. Даже интерфейс местами похож. И суть у нее та же. Утилита прошивает BIOS одним из двух способов. Позволяет «накатить» собственный файл прошивки и «зачищает» все выставленные ранее параметры.
Прошиваем BIOS с помощью флешки, используя DOS-оболочку
Расскажу о двух вариантах действий.
AsRock BIOS Instant Flash
Эта утилита уже встроена в BIOS, поэтому ее даже не нужно скачивать. Чтобы ее запустить, нужно войти в меню BIOS и перейти на вкладку Advanced. Также она не умеет скачивать прошивку самостоятельно, так что придется заранее ее загрузить и скинуть на флешку. А эту флешку, соответственно, подключить к компьютеру еще до того, как он запустится. Так мы окажемся в меню BIOS.
По сути, этот метод относится именно к следующей категории. То есть к прошивке с внешнего носителя. Так что рассмотрим его чуть подробнее.
Перед обновлением убедитесь, что у вас есть бесперебойное электричество. Во время прошивки BIOS не должна пропасть сеть. Иначе есть риск вовсе потерять материнскую плату без возможности восстановления низкоуровневого ПО.
Предположим, что вы уже скинули прошивку на какой-то внешний диск. Теперь ваша задача состоит в том, чтобы запустить процедуру обновления.
Если делать это через BIOS, то:
- Ищем в BIOS вкладку Advanced.
- А в ней меню Instant Flash.
- Открыв Instant Flash, ищем подключенный внешний диск с нужной прошивкой, выделяем его и жмем на клавишу «Ввод».
Процесс обновления должен запуститься автоматически.
BOOT_USB_utility
Второй вариант сложнее, но универсальнее.
- Скачиваем в сети пакет приложений BOOT_USB_utility.
- Достаем из него программу HP USB Drive Format Utility (можно использовать любой аналог для форматирования флешек) и устанавливаем.
- Вставляем в компьютер флешку для записи прошивки BIOS.
- Запускаем HP USB Drive Format Utility.
- Выбираем в пункте Device нашу флешку, а в пункте Using — DOS system, а также указываем папку USB DOS из пакета BOOT_USB_utility.
- Нажимаем на кнопку Start.
Если не удастся настроить приложение HP USB drive Format Utility или найти USB DOS систему, то можно воспользоваться программой Rufus, и во время форматирования поставить галочку напротив пункта Create a DOS Bootable disk.
- Потом кликаем по пустому пространству на флешке правой кнопкой мыши.
- Наводим курсор на пункт «Создать».
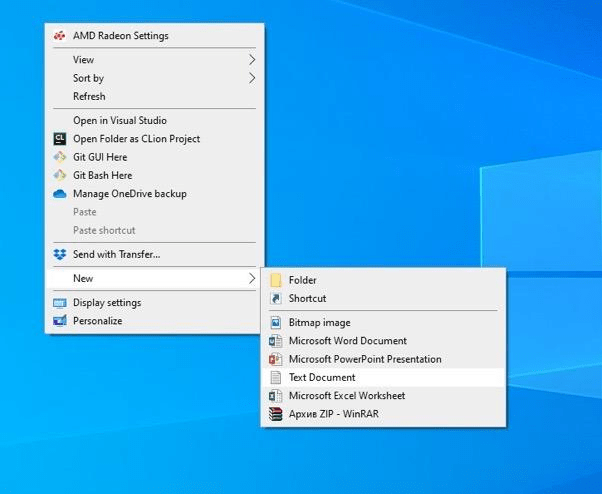
Вот нужный пункт
- В выпавшем списке выбираем «Текстовый документ».
- Вписываем в него строки awdflash flash.bin /cc/cd/cp/py/sn/e/f
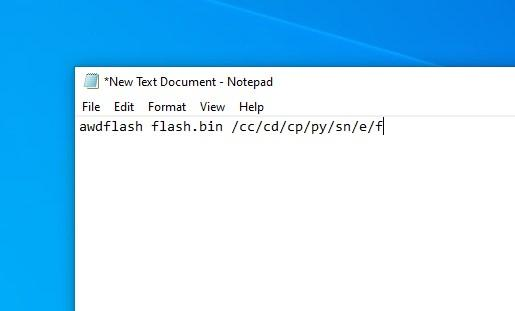
Так должно выглядеть содержимое файла
- Затем одновременно нажимаем на клавиши Ctrl + S.
- Вводим в качестве названия документа слово awdflash.bat.

Нужно указать расширение прямо тут, чтобы система поняла, что это Bat-файл, а не текст
- Затем перезагружаем компьютер.
- В Boot Menu выбираем нашу флешку.
- Когда откроется DOS-система, установленная на накопитель, ищем там файл awdflash.bat и запускаем, нажав на «Ввод».
На этом наша инструкция подошла к концу. Удачной прошивки!
Post Views: 737
Загрузить PDF
Загрузить PDF
Из этой статьи вы узнаете, как обновить BIOS на компьютере под управлением Windows. Имейте в виду, что BIOS нужно обновлять в редких случаях, а неправильное обновление может привести к полной поломке материнской платы. На компьютерах Mac BIOS нет.
-

Нажмите на логотип Windows в нижнем левом углу экрана.
-
Введите сведения в меню «Пуск», а затем нажмите «Сведения о системе» в верхней части меню «Пуск».
-
В строке «Модель» вы найдете ряд цифр и букв — это модель компьютера. Эта информация понадобится, чтобы найти файл обновления BIOS.
- Пропустите этот шаг, если ваш компьютер собран на заказ.
-
В строке «Версия BIOS» вы увидите название компании-производителя BIOS, модель компьютера и версию BIOS (модель компьютера и версия BIOS разделены точкой).
- Например, если модель компьютера «Q553UB», а версия BIOS «202», в строке «Версия BIOS» отобразится «Q553UB.202».
- Если ваш компьютер собран на заказ, определите модель своей материнской платы, а не модель компьютера.
-
Для этого в поисковой системе («Яндекс» или Google) введите имя производителя компьютера, модель компьютера, а затем слово «драйверы» или «BIOS» (без кавычек). В зависимости от производителя компьютера вам, возможно, придется перейти по нескольким ссылкам, прежде чем вы найдете нужную страницу.
- Если ваш компьютер собран на заказ, в поисковике введите имя производителя материнской платы, а затем слова «обновить BIOS» (без кавычек). Потом откройте сайт производителя BIOS.
-
В зависимости от веб-сайта откройте раздел «Updates» (Обновления), «Support» (Поддержка), «Downloads» (Загрузка) или щелкните по заголовку «BIOS».
- Процесс поиска файла обновления может включать метод проб и ошибок.
СОВЕТ СПЕЦИАЛИСТА
Mobile Kangaroo — ремонтная мастерская с центральным офисом в Маунтин-Вью, Калифорния, которая оказывает полный спектр услуг и является авторизованным сервисным центром Apple. Ремонтирует электронные устройства, такие как компьютеры, телефоны и планшеты, более 16 лет. Имеет представительства более чем в 20 городах.
Mobile Kangaroo
Специалисты по ремонту компьютеров и телефоновБезопасно ли обновлять BIOS непосредственно в Windows? Джозеф Александер, специалист по ремонту компьютеров, объясняет: «Как правило, делать это безопасно. Главное — скачать файл обновления с сайта производителя и внимательно следовать всем инструкциям».
-
В имени файла отобразится версия BIOS. Если эта версия новее версии вашего BIOS, скачайте файл обновления.
- Если версия файла обновления такая же, как версия вашего BIOS, BIOS обновлять не нужно.
- Если версия вашего BIOS представлена целым числом (например, 301), а версия файла обновления десятичной дробью (например, 301.1), версия файла обновления новее версии вашего BIOS.
-
Нажмите «Download» (Скачать). Когда файл обновления BIOS скачается на компьютер, можно приступить к обновлению BIOS.
- В некоторых случаях щелкните по имени файла, чтобы скачать его.
- Большинство файлов обновления BIOS скачаются в виде архива (ZIP-файла).
Реклама


-
Если компьютер выключится во время обновления BIOS, материнская плата выйдет из строя.
- Если вы пользуетесь ноутбуком, зарядите его аккумулятор и подключите к электророзетке.
-
Для этого:
- дважды щелкните по ZIP-файлу, чтобы открыть его;
- перейдите на вкладку «Извлечь» в верхней части окна;
- нажмите «Извлечь все»;
- когда появится запрос, нажмите «Извлечь»;
- подождите, пока откроется извлеченная папка.
-
Дважды щелкните по этому файлу, чтобы открыть его, а затем внимательно прочитайте его содержимое.
- Если инструкции в файле «README» противоречат инструкциям, данным в этой статье, следуете инструкциям файла «README».
-

В процессе обновления BIOS не сможет получить доступ к файлам компьютера, поэтому файл обновления нужно записать на пустой USB-накопитель.
-
Щелкните по файлу обновления BIOS, нажмите Ctrl+C, чтобы скопировать его, откройте окно USB-накопителя, а затем нажмите Ctrl+V, чтобы вставить скопированный файл.
- Не отключайте накопитель во время обновления BIOS.
-
Войдите в BIOS. Нажмите «Пуск»

> «Питание»
> «Перезагрузить», а затем несколько раз нажмите клавишу для входа в BIOS. Если вы не смогли войти в BIOS, перезагрузите компьютер и попробуйте нажать другую клавишу.
- На большинстве компьютеров нажмите одну из F-клавиш (например, F12), хотя на некоторых компьютерах нужно нажать клавишу Del или Esc.
- Если вы не знаете, какую клавишу нажать, в поисковике введите имя производителя компьютера или материнской платы, номер модели и слова «клавиша для входа в BIOS».
-
Если на главной странице BIOS есть опция «Backup» (Резервное копирование) или «Save» (Сохранить) или если в верхней части экрана вы видите вкладку «Backup» (Резервное копирование), нажмите на эту опцию или вкладку и следуйте инструкциям на экране. Так вы сможете восстановить BIOS, если после обновления компьютер будет работать не так, как нужно.
- Возможно, вам будет предложено создать резервную копию BIOS, когда вы запустите процесс обновления.
- Не все версии BIOS позволяют создавать свои резервные копии.
-
Процесс обновления зависит от версии BIOS, поэтому откройте сайт производителя BIOS и найдите на нем информацию о том, как обновить BIOS.
- Во многих случаях нужно перейти на вкладку «Boot» (Загрузка), найдите подключенный USB-накопитель, сделайте резервную копию BIOS (если возможно), перейдите на вкладку «Advanced» (Дополнительные) и нажмите «Start Flash» (Начать обновление).[1]
- Иногда, если подключить к компьютеру USB-накопитель и нажать на клавишу для входа в BIOS, открывается меню, в котором нужно нажать «Update» (Обновить) и следовать инструкциям на экране. Это часто встречается на компьютерах Dell.[2]
- Во многих случаях нужно перейти на вкладку «Boot» (Загрузка), найдите подключенный USB-накопитель, сделайте резервную копию BIOS (если возможно), перейдите на вкладку «Advanced» (Дополнительные) и нажмите «Start Flash» (Начать обновление).[1]
-
Этот процесс может занять от нескольких минут до часа в зависимости от компьютера и сложности обновления BIOS. Когда процесс обновления завершится, компьютер перезагрузится (возможно, вам придется подтвердить это).
- Не выключайте компьютер во время обновления BIOS. Это может привести к повреждению BIOS — в этом случае компьютер не сможет запуститься или завершить установку BIOS, или вообще перестанет работать.
Реклама


Советы
- На современных компьютерах BIOS называется UEFI.
- Обновления BIOS выпускаются для того, чтобы исправить существующие ошибки, добавить поддержку нового оборудования и стандартов или добавить функциональность. Если обновления доступны, прочитайте примечания или другую документацию к обновлениям, чтобы выяснить, нужно ли обновлять свой BIOS.
- В случае неполадок с BIOS восстановите BIOS.
Реклама
Предупреждения
- Не обновляйте BIOS, если не знаете, что делаете. Несоблюдение указаний производителя и мер предосторожности может привести к повреждению BIOS.
- Никогда не скачивайте обновления BIOS со сторонних сайтов (делайте это только на сайте производителя BIOS), потому что файл обновления BIOS может содержать вредоносной код.
Реклама
Об этой статье
Эту страницу просматривали 103 657 раз.
Была ли эта статья полезной?
Sometimes, you may need to install BIOS from USB. The specific process may vary depending on different PC or motherboard brands. This post from Partition Magic shows you how to update BIOS with USB for the top 8 PC or motherboard brands.
BIOS, short for Basic Input/Output System, is a firmware program stored in the ROM chip on the motherboard. When you power on a PC, it is the first program to be loaded. When it is loaded, it will check the computer hardware status, initialize the hardware, find the bootable disk, and then load the operating system on the drive.
BIOS is very important. If it is corrupt or out of date, your PC may encounter some issues. For example, the PC won’t boot up, a device can’t be recognized because it hasn’t been recorded in BIOS, etc. Therefore, you may need to update BIOS sometimes.
Nowadays, updating BIOS is very easy. Many manufacturers will offer an executable version of the BIOS update so that you run this file in Windows to update the BIOS directly. Or, they offer software to update all drivers of the PC, including BIOS. However, you may need to update BIOS with USB sometimes, especially if your PC becomes unbootable.
How to update BIOS with USB? This post will show you that in detail. Keep reading to get the guide.
Stage 1. Prepare a FAT32 USB Drive
To install BIOS from USB, you need to prepare a proper USB drive. Most PCs support the FAT32 file system when updating BIOS with USB. Therefore, you should format the USB drive to FAT32 first. Here are 2 ways for you.
Tips:
Before you reformat the USB drive, back important files to another place first because the formatting process will delete all files on the USB drive.
Way 1. Use CMD (DiskPart)
If your USB drive is smaller than 32GB, you can try this method.
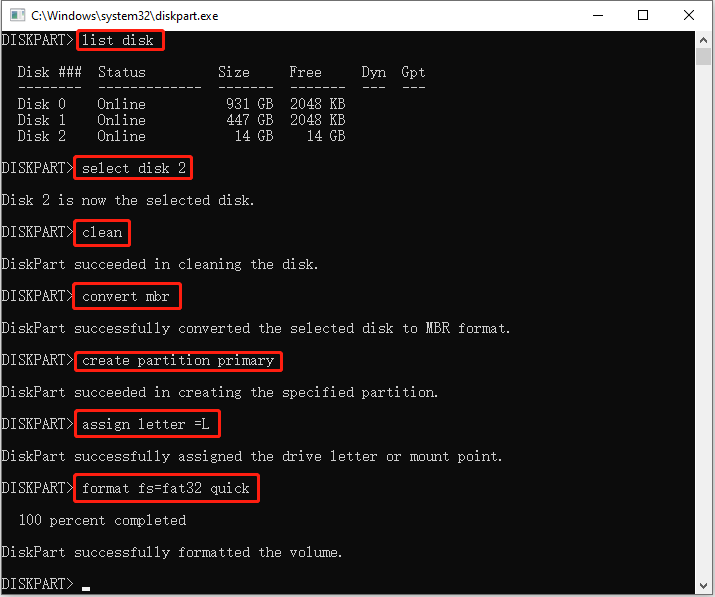
Step 1: Press the Windows logo key + R to call out the Run dialog. In the text bar, type “diskpart” and press Enter to open it.
Step 2: Execute the following commands one by one.
- List disk (This will list all disks connected to your computer)
- Select disk # (# is the number of the USB drive. You can identify it according to the size)
- Clean (This will clean the USB drive)
- Convert MBR (This will convert the USB drive to MBR)
- Create partition primary (This will use all the space on the USB drive to create a primary partition)
- Assign letter = * (* should be a letter not used by other partitions)
- Format fs-fat32 quick (format the partition to FAT32 in the quick format way)
Way 2. Use MiniTool Partition Wizard
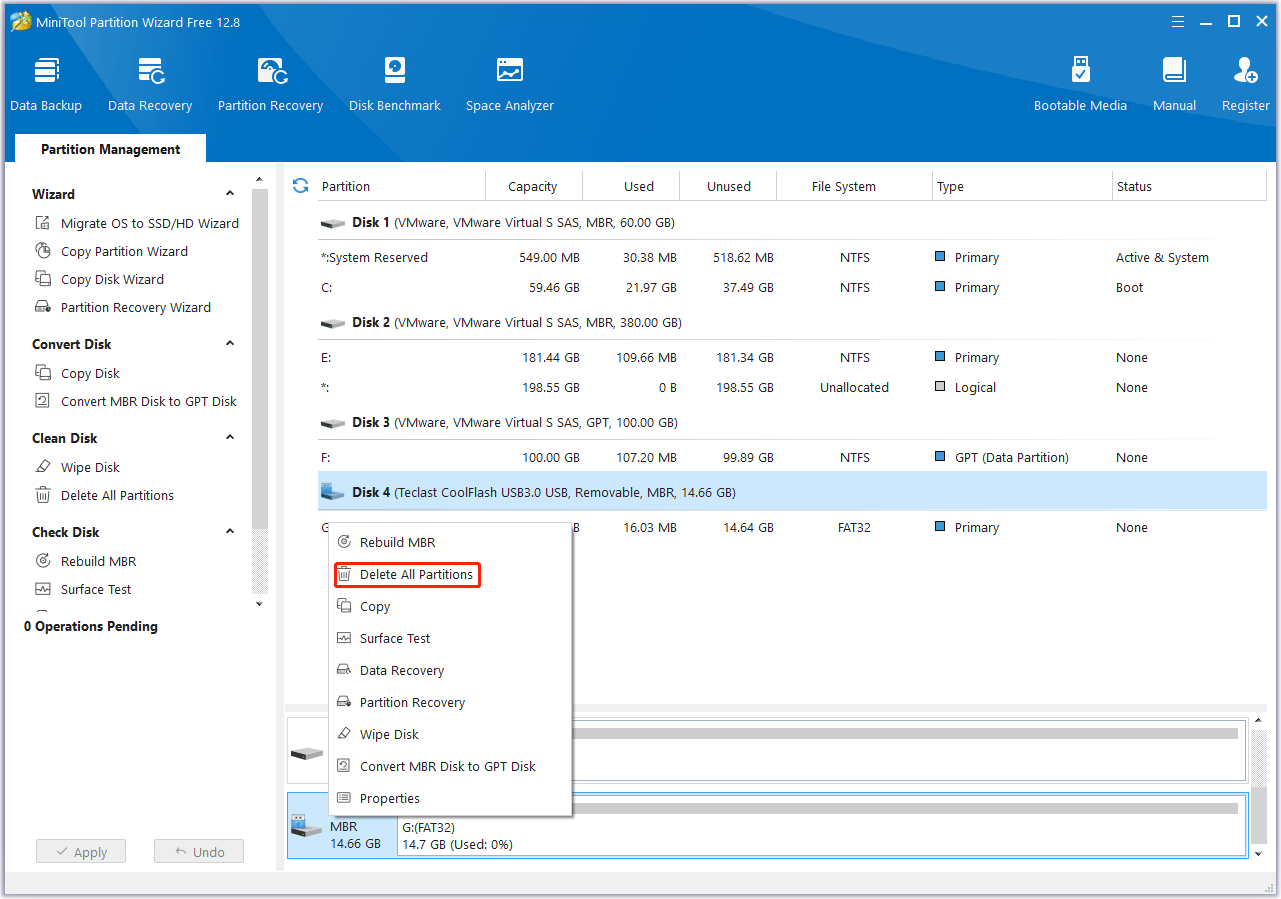
If the USB drive is larger than 32GB, the first way may fail. Then, you can try MiniTool Partition Wizard. This method is also free. Here is the guide:
MiniTool Partition Wizard FreeClick to Download100%Clean & Safe
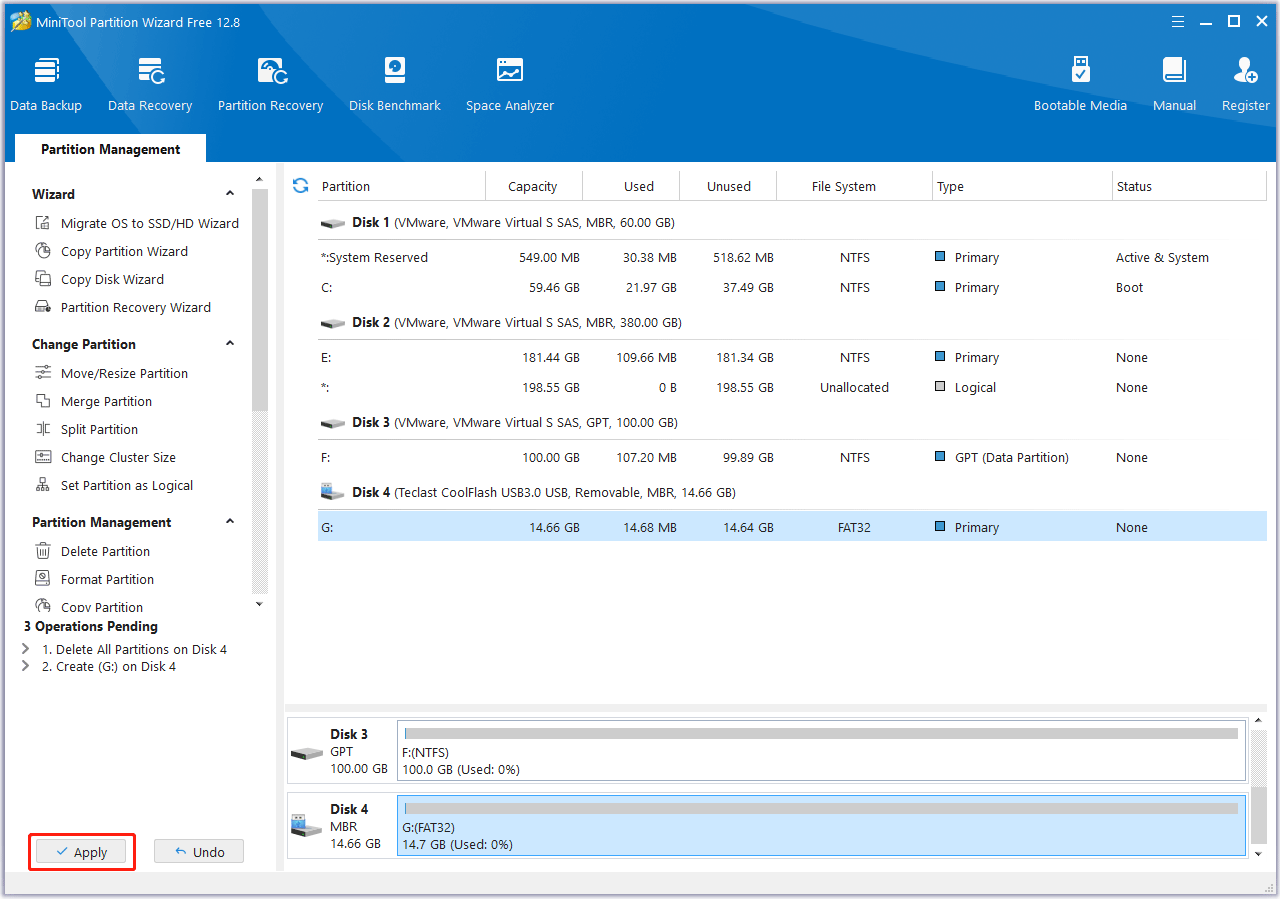
Step 1: Download and install MiniTool Partition Wizard. Launch this software and right-click on the USB drive. Then, choose Delete All Partitions. Click Yes to confirm this operation.
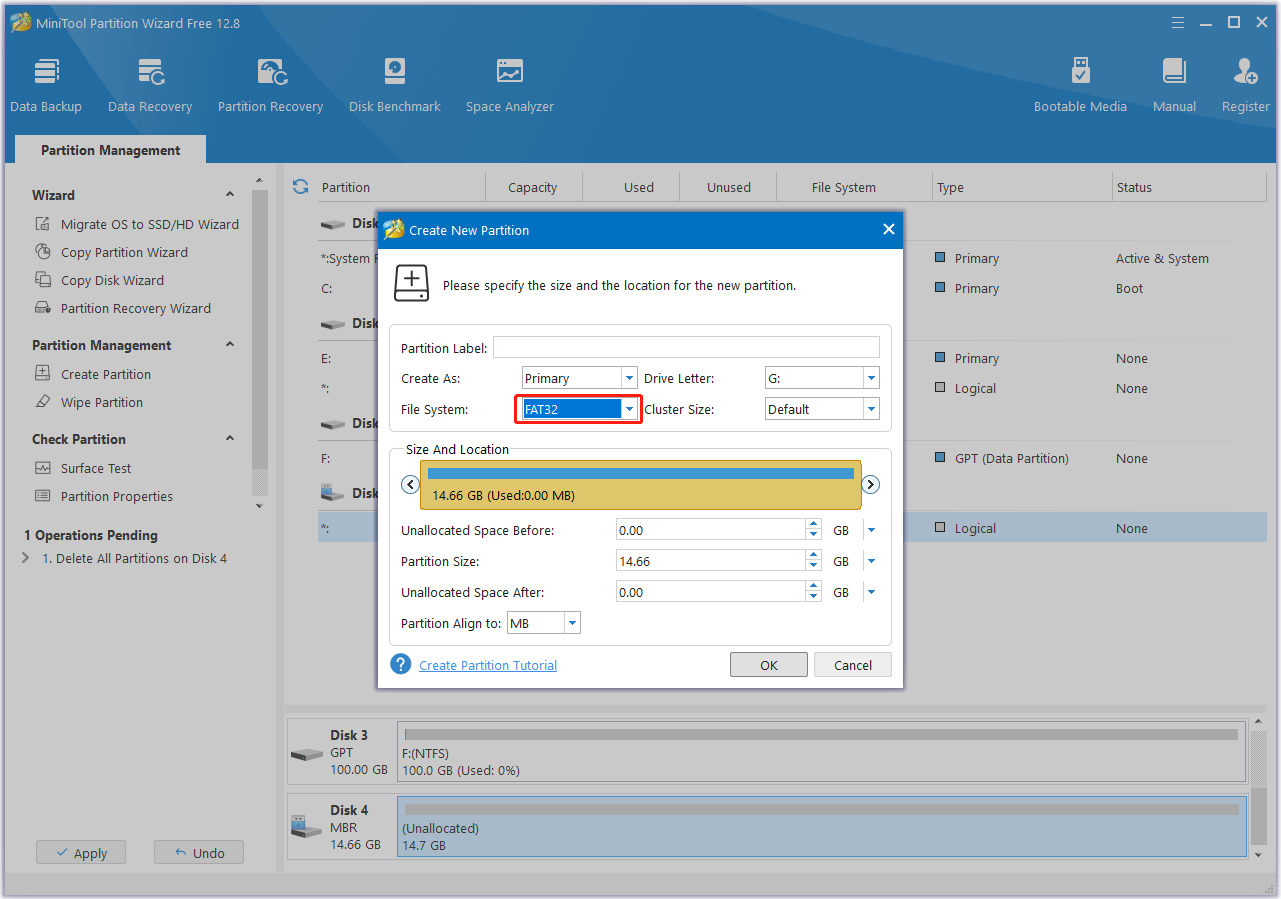
Step 2: Right-click on the unallocated space on the USB drive and choose Create.
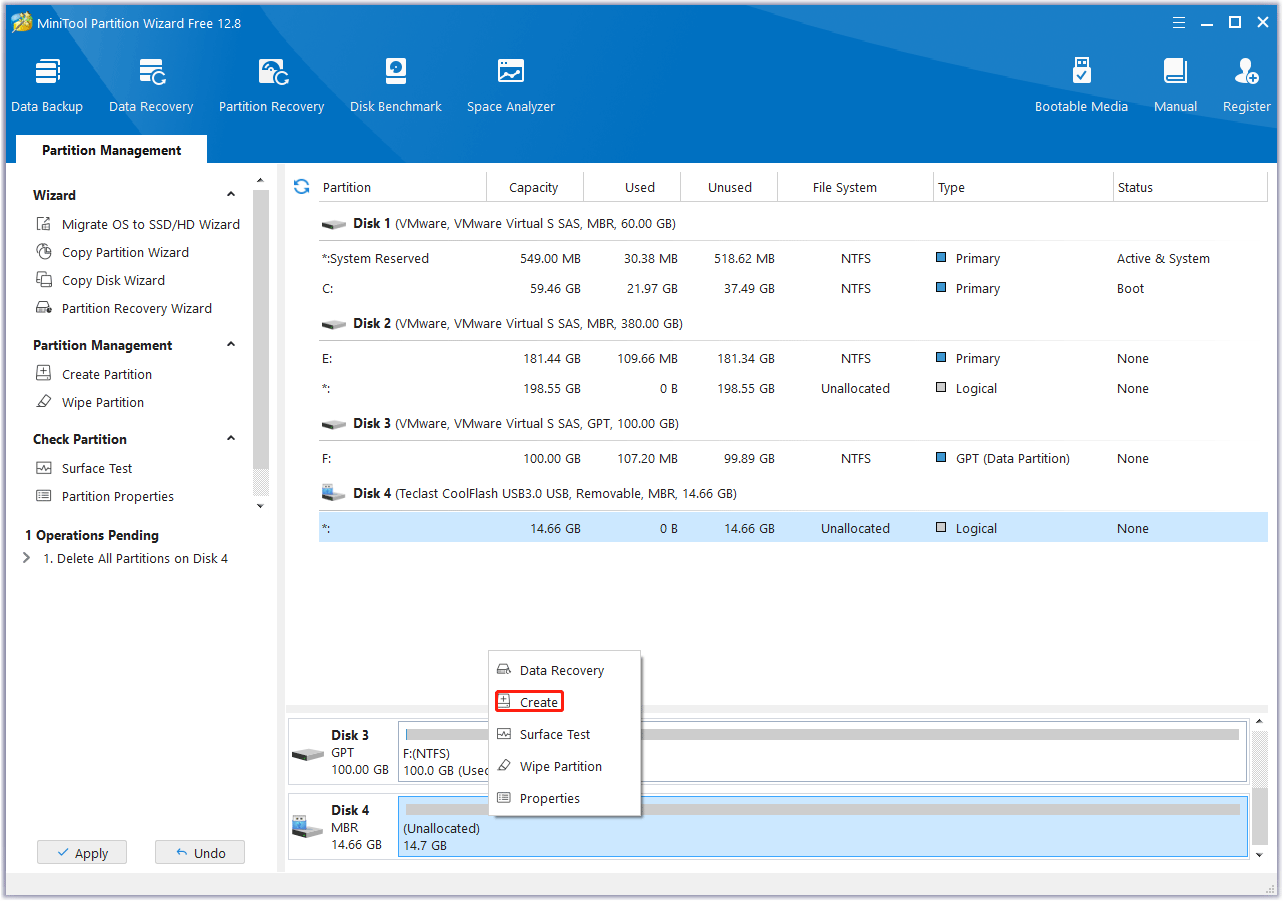
Step 3: On the pop-up window, change the File System to FAT32 and keep other parameters to default. Then, click OK.
Step 4: Click Apply to execute all pending operations.
Stage 2. Download the BIOS File and Update the BIOS
The specific process of updating BIOS may vary depending on the different PC brands (Lenovo, HP, Dell, ASUS, and Acer) or motherboard brands (Gigabyte, MSI, ASUS, and ASRock). You need to find the guide according to your condition.
Tips:
If your computer is bought from PC vendors, you need to know the PC model. You can check that in System Information or BIOS. If your computer is built by yourself, you need to know the motherboard model. You can check that using CPU-Z or in manual.
#1. Lenovo PCs
How to update Lenovo BIOS with USB? You can refer to this guide:
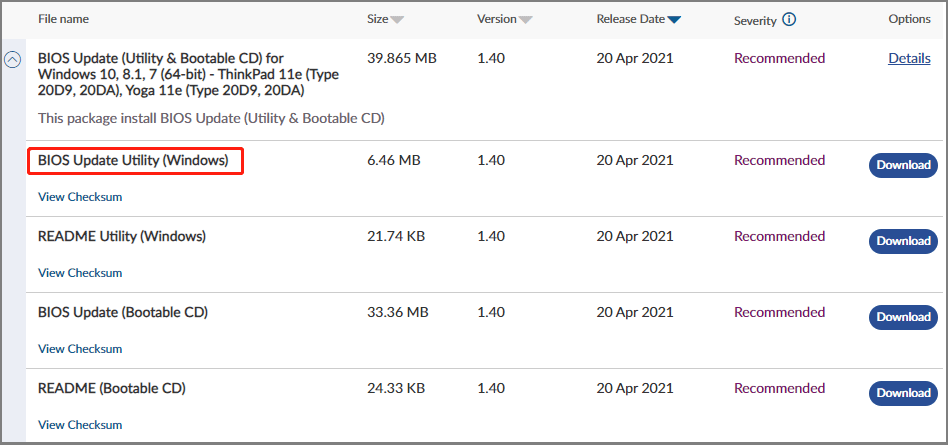
Step 1: Open the Lenovo support website. Follow the wizard to find your PC model. On the product page, click Drivers & Software and then click Select Drivers under Manual Update. Click BIOS/UEFI to filter files. Select BIOS Update Utility (Windows) to download.
Tips:
You can also download the Bootable CD version here to get an ISO file. Then, burn the ISO file into your USB driver using Rufus.
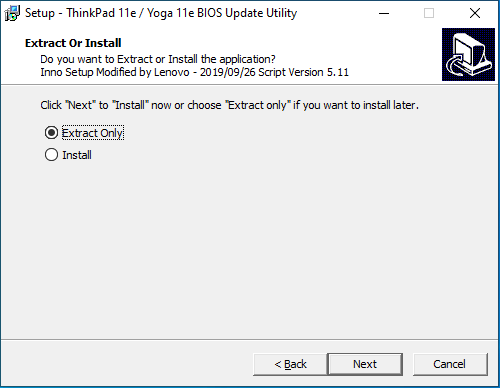
Step 2: Run this tool. When it asks you whether to extract or install, select Extract Only.
Step 3: On the next page, copy the path where files will be saved. Then, click Extract.

Step 4: After the extraction is completed. Open File Explorer and paste the path in the quick access bar. Then, press Enter to open it. Select all files here (Ctrl + A) and copy them (Ctrl + C). Then, go to the C drive to create a folder named lenovo and then paste all files into this folder (Ctrl + V).
Step 5: Insert a USB to your computer. Then, search “cmd” in the Windows Search. From the result list, right-click Command Prompt and select Run as administrator to open Command Prompt.
Step 6: Open the lenovo folder to find the mkusbkey.bat file. Only if you see this file, you can continue to make a USB for updating BIOS. Now, in the Command Prompt, execute the following commands.
- Cd\
- Cd lenovo
- Mkusbkey.bat [drive letter]: (the drive letter is that of your USB drive. You can check that in File Explorer)
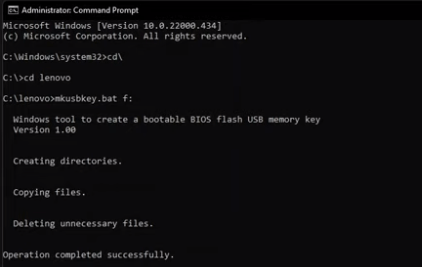
Step 7: Insert the USB drive into the Lenovo PC that needs to update the BIOS. Make the PC boot from the USB drive. Then, select the option to update system program. Then, follow the wizard to flash BIOS.
Tips:
To boot a computer from a USB drive, the process should be as follows: Power on the computer and then press the BIOS key (F2, Del, Esc, etc.) to enter firmware. Then, select the USB drive as the boot device. Save changes and the PC should boot from the USB drive.
#2. HP PCs
How to update HP BIOS with USB? The process should be as follows:
Step 1: Go to the HP Software and Driver Downloads page. Navigate to the product page for your computer. Select BIOS from the list that displays, and then review any available BIOS updates. Download the BIOS file and you will get an executable file.
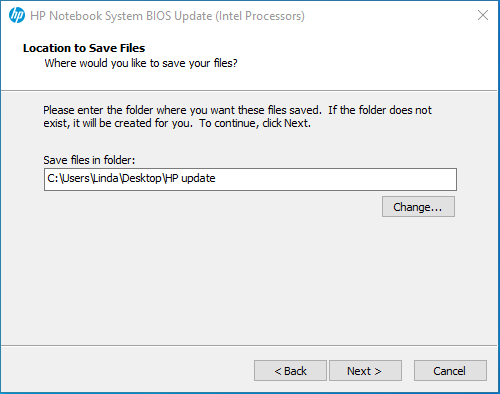
Step 2: Create a folder named HP update on Desktop. Run the BIOS file. When it asks you where to save files, you can click Change and then navigate to the HP update folder. Then, continue to complete the process.
Step 3: HP BIOS Update and Recovery will open automatically. Insert a USB drive into the computer. Follow the wizard to Create Recovery USB flash drive. It will detect the USB drive. Select it and click Next to go on.

Step 4: After the recovery USB drive is created, insert it into the HP PC that needs to update BIOS. Then, boot the HP computer from the USB drive. HP PC Hardware Diagnostics UEFI should open.
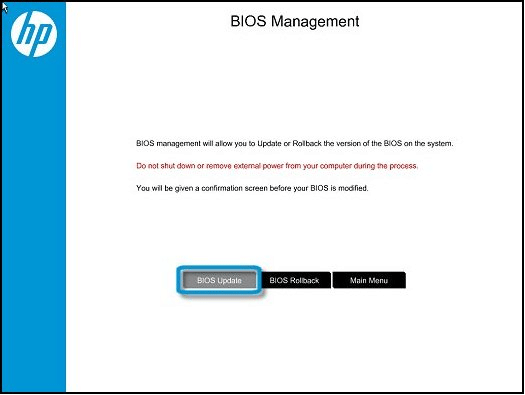
Step 5: Select Firmware Management or BIOS Management > BIOS Update > Select BIOS Image to Apply > HP_TOOLS-USB Drive > Hewlett-Packard > BIOS > Current. Then, select the BIOS update file that matches the System Board ID (example: 02291.bin). Click Apply Update Now.
#3. Dell PCs
How to update Dell BIOS with USB? The process should be as follows:
Step 1: Download the Dell Diagnostic Distribution Package (DDDP) and run it directly. Go to the C:\Dell\Drivers\R174621 folder created by DDDP. Open DIAGS and remove everything, EXCEPT for the following:
- AUTOEXEC.bat
- COMMAND.com
- CONFIG.sys
- DELLBIO.bin
- DELLRMK.bin
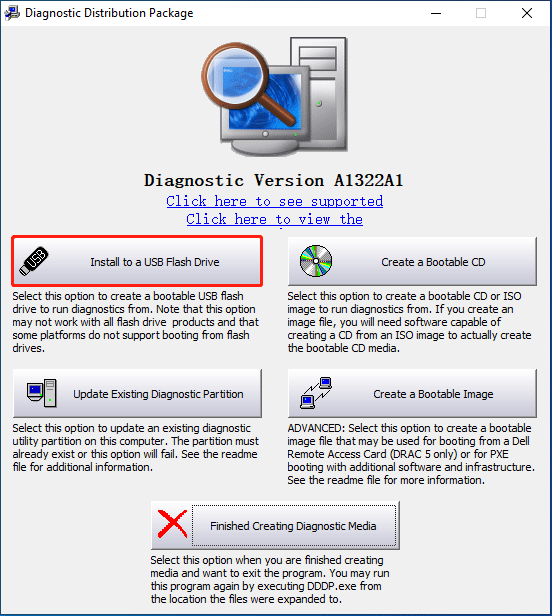
Step 2: Insert a USB drive into your PC. Go to C:\Dell\Drivers\R174621\ and double-click the application DDDP to run it again. On the tool, choose Install to a USB Flash Drive. Click OK to confirm the operation. This will make the USB drive bootable.
Step 3: Go to the Dell Support website. In the Search box, enter the Service Tag, product ID, or system model of your computer, and then click Search. Under the Drivers & Downloads tab, filter the BIOS file in Download Type or Category. Download the BIOS file and you will get an executable file.
Step 4: Move the BIOS file into the USB drive. Now, insert the USB drive into the Dell PC that needs to update the BIOS and boot the PC from the USB drive. After that, you need to select BIOS Flash Update, make sure the Current Path is the BIOS file, and then hit Flash Upgrade. Then, follow the wizard to complete the update.
#4. ASUS PCs or Motherboards
How to update ASUS BIOS with USB? The process is very simple. Just follow the guide below:
Step 1: Go to the ASUS Support website to find your product. Select Driver & Utility > BIOS & Firmware. Under BIOS, select a proper BIOS file to download. You will get a ZIP file. Unzip it.
Step 2: Insert a USB drive into your PC and move the unzipped BIOS file into the USB drive. For ASUS PCs, the unzipped BIOS file’s extension name should be a number (example: .305). For ASUS motherboards, the unzipped BISO file’s extension name should be CAP.
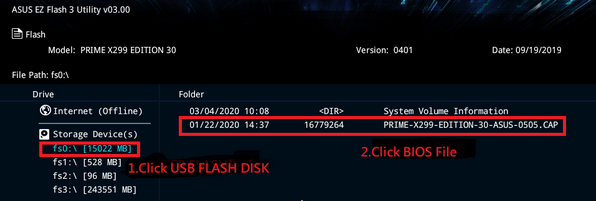
Step 3: Insert the USB drive into the ASUS PC that needs to update BIOS and boot into the firmware. Go to Advanced Mode and select ASUS EZ Flash 3 Utility. Now, select the USB drive and then the BIOS file. Then, follow the wizard to complete the update.
If you want to learn more methods to update ASUS BIOS, you can read this post: Perform ASUS BIOS Update with Four Methods.
#5. Acer PCs
How to Acer BIOS with USB? Here is the guide:
Step 1: Go to the Acer Support website and select Drivers and Manuals. Type your device serial number, SNID, or model number, and then press Enter to find your product. Under the Drivers and Downloads tab, expand BIOS/Firmware. Select a BIOS file to download. You will get a ZIP file.
Step 2: Insert a USB drive into your computer. Unzip the BIOS file and move all files in the extracted folder into the USB drive.
Step 3: Insert the USB drive into the Acer computer that needs to update BIOS. While pressing the Fn key and Esc key, press the Power button. When the power light comes on, release the Fn and Esc keys. The power light will begin to flash. Let the system run. After approximately 1 to 7 minutes, the system will reboot and the BIOS will be updated.
#6. Gigabyte Motherboards
How to update Gigabyte BIOS with USB? The guide is as follows:
Step 1: Download the BIOS file for your motherboard from the GIGABYTE’s website. You will get a ZIP file. Unzip it and save the new BIOS file (e.g. Z68XPUD4.F1) to your USB flash drive.
Step 2: Insert the USB drive into the PC that needs to update BIOS. Power on the PC and press the End key to enter Q-Flash.
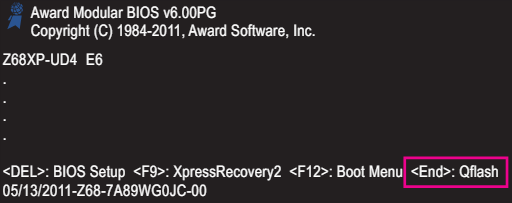
Step 3: In the main menu of Q-Flash, select Update BIOS from Drive and press Enter. Select HDD 1-0 and press Enter. Select the BIOS update file and press Enter. Then, follow the wizard to complete the BIOS update.
#7. MSI Motherboards
Here is how to update MSI BIOS with USB:
Step 1: Go to the MSI official website. Search your motherboard and download the latest BIOS. You will get a ZIP file. Extract it.
Step 2: Insert a USB drive into your computer and copy all files in the extracted folder to the root folder of the USB flash drive.
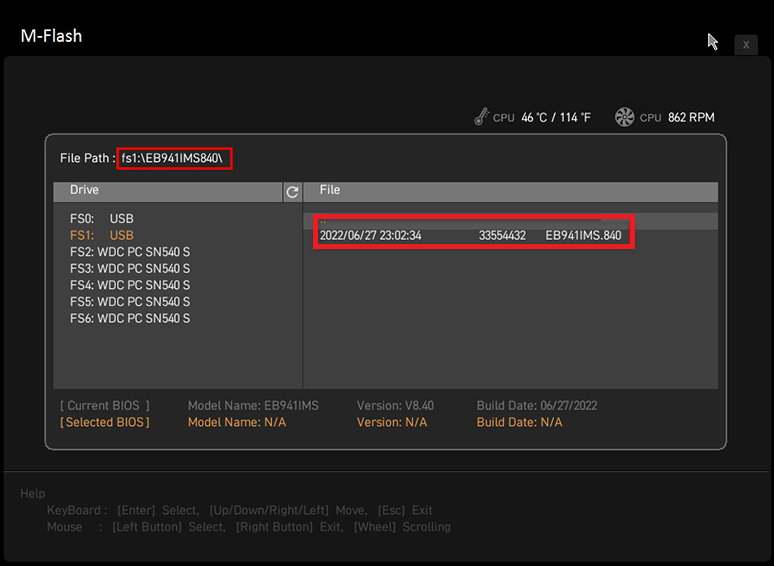
Step 3: Insert the USB drive into the computer that needs to update BIOS. Power the computer and then press the Del key immediately to enter the firmware. Enter M-FLASH. Select the USB flash drive and choose the BIOS file. Then, follow the wizard to complete the update.
#8. ASRock Motherboards
How to update ASRock BIOS with USB? The guide is as follows:
Step 1: Download the BIOS file of your motherboard from the ASRock website and then unzip it.
Step 2: Insert a USB drive into your computer and move the unzipped BIOS file into the USB drive.
Step 3: Insert the USB drive into the PC that needs to update BIOS. Power on the PC and press F2 immediately to enter the firmware. Go to the Tool tab and select the Instant Flash utility. Then, follow the wizard to complete the update.

This post shows you how to update BIOS with USB based on different PC brands or motherboard brands. It’s worth reading and favorites. I will recommend it to you.Click to Tweet
Bottom Line
If you want to update BIOS with USB without CPU, you need to use BIOS FlashBack. Then, this post may help you: How to Use BIOS FlashBack [ASUS, MSI, Gigabyte, ASRock Boards]. In addition, if you encounter problems when using MiniTool Partition Wizard, feel free to contact us via [email protected]. We will get back to you as soon as possible.
Your computer’s BIOS is an integral part of making sure your PC starts and runs correctly. If you’ve been experiencing issues with starting up your computer, you may have read that you should flash the BIOS. What does it mean to do this? Is it safe?
Here is what you need to know about this task and whether you even need to do it at all. It might be that you simply need to replace your CMOS battery (read how to do that here) or you may need to replace a corrupted driver. If you do need to flash the BIOS, we can help. Read on for tips to get you up and running again.
Contents
- What does it mean to flash a BIOS?
- Is it safe to flash BIOS?
- Flashing BIOS through an automatic update
- How to check BIOS version for manual updates
- How to flash computer BIOS
- Do I need to flash my BIOS?
What does it mean to flash a BIOS?
For your computer to start up (also known as «booting up»), it needs instructions. These instructions are stored in the Basic Input/Output System, or BIOS. If your BIOS isn’t updated, it’s possible that your computer could have difficulty performing basic tasks, such as interacting with your hardware and making sure the operating system runs quickly and without bugs — especially upon startup.
If you run into issues getting your computer to boot up properly, it may be a BIOS problem. “Flashing the BIOS” is a term used by computer-savvy people to describe the process of updating the BIOS.
Is it safe to flash BIOS?
If you know what you’re doing or are relying on automatic updates from your PC manufacturer, this can be an easy and effective way to get a buggy PC working smoothly again. If you’re not confident with manually adjusting the BIOS settings or are unsure if your problem is related to the BIOS, you may want to leave the manual update to an expert. There’s also a danger to your computer if you experience a shut-down or frozen PC during the BIOS update. A BIOS update that isn’t complete can cause more harm than good.
Getting familiar with your BIOS menu and settings is a practical first step to learning how to flash BIOS. Note that Mac computers do not have a BIOS.
Flashing BIOS through an automatic update
Fortunately, most HP computers will update the BIOS as part of their regular updates. To see if your computer needs an update, do the following:
- Search for the HP Support Assistant and open it
- Click on the My devices tab
- Find your computer and choose Updates
- Choose Check for updates and messages
- If you need a BIOS update, a checkbox will appear next to the BIOS update field. Check it, along with any other updates you want to be done, and choose Download and install
How to check BIOS version for manual updates
What about computers not made by HP®? Flashing a BIOS merely means updating it, so you don’t want to do this if you already have the most updated version of your BIOS. But how can you tell what you have? You can check the BIOS version you are running in one of the following ways:
- Click Windows+R to open the run box, type “msinfo32,” and hit Enter. The system information window will open for you to see the BIOS version/date number in the System Summary
- Open a Command Prompt window by typing “cmd” in the Windows search box. When opened, type the following: wmic bios get smbiosbiosversion (The current version will appear)
How to flash computer BIOS
If your BIOS version isn’t the newest one and you’ve decided that manually flashing the BIOS will resolve your issues, there are basic steps you can take to get the job done. These directions may be slightly different for different computers, and they depend on the Windows operating system and the computer manufacturer:
- Go to the website of your motherboard or computer manufacturer and look for the page that offers support. They should have your BIOS version (found via the steps above) listed for you to find supporting information. Download the most recent fix or version
- Go to the file. If it is a ZIP or compressed file, extract the contents using your Windows ZIP software. Look through the contents of the unzipped file for the BIOS file. It is usually the only file that is not a .txt file. Make note of the location of this individual BIOS file
- The other file or files in the compressed folder are likely directions. Look carefully through any files named “Read Me” or similar. They will give you additional directions for updating the BIOS, specific to your manufacturer
- The Read Me file should give tips for which outside storage device to save the BIOS file to. A thumb drive is a common choice. Save the BIOS file to the outside device now, before entering the BIOS flash process
- Ensure that your computer is plugged in or that your laptop is fully charged and plugged in. Restart your computer
- Immediately upon restarting, enter the BIOS screen by pressing the key indicated by the manufacturer’s instructions for a BIOS update. This may be F2, Delete, F8, Esc, or another key
- Once in the BIOS screen, start the update process depending on your computer brand. For many, you will access the Boot tab and ensure your USB thumb drive shows up as an option. Enable any “Flash” options in the menu before selecting Start. Some computers will detect the flash drive upon entering the BIOS Boot Menu and will prompt you to update automatically. Follow the steps to complete the process
- The BIOS flash can take a few minutes or up to a few hours. Once the BIOS update is complete, your computer will restart. It is very important not to disrupt power to the computer. Any interruption can corrupt the BIOS and make your computer inoperable
Do I need to flash my BIOS?
If you flash your BIOS and it doesn’t solve your problems, it was most likely never the BIOS in the first place. Thankfully, most computers are designed to perform important tasks automatically, including BIOS updates. By opting into automatic software updates from Windows and your PC manufacturer, you’re more likely to be covered and won’t have to manually flash the BIOS anytime soon.
BIOS is a crucial component of every PC that allows you to change your hardware settings without starting Windows.
Your BIOS has many features available, but some advanced users tend to update theirs in order to get access to new features.
Updating BIOS can be a somewhat complicated procedure, so today we’re going to show you how to flash your BIOS on Windows 10.
How do I update my BIOS in Windows 10? The easiest way to update your BIOS is directly from its settings. Before you start the process, check your BIOS version and the model of your motherboard.
Another way to update it is to create a DOS USB drive or use a Windows-based program. If you want to know how to do that, check the steps below.
How can I flash the BIOS on Windows 10?
1. Do I need to update my BIOS for Windows 10?

Flashing your BIOS is an advanced procedure, and if you don’t perform it properly you can cause major damage to your PC.
The main problem with BIOS is that it’s located on a chip on your motherboard, and if the update process goes wrong, you won’t be able to start Windows at all.
In most cases, you don’t even have to update your BIOS unless there’s a major problem with your hardware.
How do I know if my BIOS needs updating? If you have a hardware problem and the only way to fix it is to update BIOS, then you might have to update it.
To perform a BIOS update successfully, you need to be sure that the update process isn’t interrupted by a power loss or unexpected shutdown.
If that happens, the BIOS update process will fail, and you’ll most likely cause damage to your motherboard.
To prevent any problems, be sure to connect your laptop directly to the power outlet or use a UPS for your desktop PC.
Although updating the BIOS can be potentially dangerous, there are certain benefits after updating it. Sometimes, the BIOS update brings support for new hardware, such as support for new CPUs.
Another benefit of BIOS updates is improved stability and potentially new features such as overclocking.
2. How do I check my BIOS version?
Before you update your BIOS, you need to find out which version are you currently using. The easiest way to do that is to use Command Prompt or System Information tool.
Here are more ways to check the BIOS version on Windows 10
- Use Command Prompt
- Use System Information tool
- Try the Registry Editor
- Use DXDiag
- Use PowerShell
We already covered each method extensively, so make sure you take a look at our full guide on how to check your BIOS version on Windows 10.
In addition to the BIOS version, you also need to know the model of your motherboard. If you don’t have the data readily available you can use our guide to check your motherboard model.
You can see the model of your motherboard by using any hardware information tool such as Speccy or CPU-Z. Here’s a full list of tools to check your system configuration.
- After finding the version of BIOS that you’re using, you need to download the new version from your motherboard manufacturer’s website.
- Go to the Support or Download section and select your motherboard model. Be sure to download the BIOS update for the exact model of the motherboard that you’re using.
- When you download a new version of BIOS, it will be stored in an archive so you’ll need to extract it first.
- After that, check the available readme file for instructions and any additional information.
NOTE
Installing the wrong version of BIOS on your motherboard can cause damage, so be extra cautious.
Almost all versions of BIOS have update notes available on the download page so you can easily see what issues the update fix.
3. Update BIOS through Windows
-
1. Download the newest BIOS version from your motherboard manufacturer’s website and copy it onto an USB flash drive.
-
2. Open the Start Menu and click the Power button.
-
3. Hold the Shift key and choose the Restart option.
-
4. You should see several options available. Choose Troubleshoot.

-
5. Now select Advanced options and select UEFI Firmware Settings.

-
6. Click the Restart button and your computer should now boot to BIOS.
-
7. Once you enter BIOS, look for BIOS update option and select it.
-
8. Now you need to choose the BIOS update file from your USB flash drive and wait while your BIOS updates.


Some motherboard manufacturers allow you to flash your Windows 10 BIOS simply by accessing it and choosing the update option.
This is relatively simple and in order to do that you need to move the downloaded BIOS update to a USB flash drive. Manufacturers offer tools that will create a USB flash drive with all the necessary files, so you won’t have to transfer them manually.
Before moving the update to the USB drive, be sure that there aren’t any other files available on the drive.
You can access BIOS during the boot sequence by pressing the appropriate key. In most cases that’s Del or some other F key, so keep an eye for a message that tells you to press a certain key to enter SETUP.
In addition, you can always check your motherboard manual to see which key you need to press in order to access BIOS.
Keep in mind that the update process is a bit different for each motherboard model, so be sure to check the instruction manual for details on how to update your BIOS.
4. Create a DOS USB drive
This DOS solution is an older method of flashing BIOS and is probably the most complicated. This process requires you to create a bootable USB flash drive and to copy the new version of BIOS to the drive as well.
In addition, you’ll need a script that will flash the BIOS. This file will usually be available in the archive with your BIOS update, and it will have .exe or .bat extension.
In some cases, this script will have to be downloaded separately. To create a bootable USB drive with a DOS system, you need to use third-party tools such as Rufus.
Simply format the drive using this tool and be sure to check the Create a bootable disk using the FreeDOS option.
After doing that, transfer the BIOS update file and an installation script to the USB drive and restart your PC. Boot your PC from the USB drive and run the setup script using DOS.
This is an advanced procedure, so we highly recommend that you check your motherboard manual for detailed instructions on how to do that.
- 8 best USB drives for fast data transfer [2022 Guide]
- 5+ best overclocking software for Windows 10/11 [2022 Guide]
- 16 best privacy protector software for Windows 10/11
5. Use Windows-based programs
If using DOS seems too complicated for you, you might want to consider using a Windows-based application in order to update Windows 10’s BIOS.
Many motherboard manufacturers have BIOS update applications available that allow you to update BIOS by using a simple graphic interface.
Although this is the simplest way to do it, there are certain issues with it. Installed software can sometimes interfere with this process and cause BIOS updates to fail.
Security programs can often interfere with BIOS update process and cause all sorts of problems to appear, so it might be best that you disable them completely while flashing your BIOS.
Any system crash or freeze could also affect the update process, so it might be better that you use some different method to update BIOS.
Motherboard manufacturers will often recommend the best method to update your BIOS, so be sure to use that method.
Updating BIOS isn’t a hard process, but it might be potentially dangerous, so be cautious if you decide to update your BIOS.
In addition, be sure to double-check everything before starting. Many BIOS update tools will give you the option to save or back up your current BIOS, so be sure to use this feature.
It’s not necessary that you update your BIOS, especially because you can cause irreversible damage to your motherboard if you don’t do it properly.
However, if you’re having a hardware issue and the only solution is to update your BIOS, be sure to carefully read your motherboard’s instruction manual to see how to update your BIOS properly.
Some computer manufacturers like Asus, Dell, or Lenovo offer a built-in tool to update your BIOS. You can always check your PC’s manual to see if it offers such a tool to make things a little bit easier.
6. Can I perform a BIOS update on Windows 10 without a battery?
Sometimes, you might find yourself in a situation where your laptop battery is not charging. Performing a BIOS update can help you recover a stubborn battery that refuses to charge. But there is a catch.
As you probably know, updating your BIOS requires an AC adapter plugged in or at least 10% of battery autonomy. So how to break this loop and force the Windows 10 BIOS to update?
Here’s how to bypass the BIOS battery requirements:
Download the latest BIOS update file from your manufacturer’s home page and store it at hand.
- Next, open the CMD with administrative privileges. (Don’t worry if it does not work from the first attempt, we will show you what to do if you can’t run Command Prompt as admin).

- Enable UAC if prompted.
- Once you reached the root directory in the C:\Windows\system32> area, type the following:
biosfilename.exe/forceit - Note that you must replace the biosfilename value with the exact name of the file you previously downloaded from the manufacturer’s site.
- Press Enter and proceed with the reboot in order to complete the BIOS flashing.

Not sure how to access BIOS in Windows 10? Don’t worry, we will guide you from the very beginning. And if you are wondering: What are the best BIOS settings?, rest assured that we have the right answer for you.
In case you’re having additional problems, we have a great guide on what to do if the PC keeps booting to BIOS, so make sure you check it out.
If you have any more questions or concerns with the Windows 10 BIOS update process, please leave them in the comments section below.