
- Главная
- Fl Studio Панель процессора и памяти
Данная статья является частью цикла статей «Fl Studio»
Панель процессора и памяти отображает для проекта загруженность процессора, полифонию и использование памяти.
- CPU Meter (измеритель центрального процессора) — когда этот измеритель приближается к 100%, звук воспроизводимый в режиме реального времени начинает трещать (это известно как опустошение). Измеритель показывает в реальном времени примерный процент необходимой мощности процессора, для создания звука чтобы заполнить каждый звуковой буфер, по сравнению с длиной буфера. Например, 20% означает, что FL Studio может заполнить буфер на 20% от имеющегося времени. 90% означает, что FL Studio имеет только на 10% больше свободного времени, чем нужно, чтобы заполнить буфер, и это близко к исчерпанию времени. После того, как FL Studio потребуется больше времени, чтобы заполнить буфер, чем длина буфера, у нас в звуке будут слышны пробелы (глюки, заикания и похожие шума). Советы по снижению загрузки процессора см. в разделе «оптимизации«. Щелкните правой кнопкой мыши — для повышения частоты обновления измерителя. Чтобы узнать, почему измеритель уровня нагрузки FL Studio не совпадает с показателем процессора операционной системы, см. раздел ниже о многоядерной обработке процессора.
- Memory Meter (измеритель памяти) — опции этого измерителя зависят от версии FL Studio которую вы используете. Примечание: См раздел «Оперативная память в сравнении с адресным пространством» ниже, это важные вещи! Адресное пространство памяти это не оперативная память.
- FL Studio 64 Bit — измеритель показывает используемую память адресного пространства. Вы можете использовать до 8 ТБ для 64 битных программ в зависимости от версии Windows 64 Bit.
- FL Studio 32 Bit — измеритель показывает сколько (от 2 Гб до 4 Гб) адресного пространства памяти доступно для FL Studio или сколько не используется. (Щёлкните правой кнопкой мыши по панели для изменения режима между Show available (показать доступное) и Show used (показать используемое)). 32-битные программы могут получать доступ максимум к 4 ГБ «адресного пространства памяти». Если вы превысите максимально доступный объём памяти вы можете получить ошибки, такие как нарушения прав доступа или переполнение буфера. Если это так, см «Управление памятью FL Studio 32 Bit» ниже.
- CPU Graph (график центрального процессора) — показывает загрузку процессора, работает в виде графика, так что вы можете отслеживать изменения и наблюдать шипы. Щелкните правой кнопкой мыши, чтобы изменить скорость обновления. Примечание: Смотрите раздел «Измеритель CPU и обработка много-ядерными процессорами» ниже.
- Polyphony (полифония) — показывает количество голосов (независимые звуки) смешиваемые одновременно. Настройки во вкладке различных настроек инструментов имеют некоторые параметры для каждого инструмента, чтобы установить максимальную полифонию.
Оперативная память в сравнении с адресным пространством
Значения отображаемые в панели это не оперативная память, это адресное пространство. Объем оперативной памяти вашего ПК не ограничивает то какое количество памяти могут использовать программы. Добавление большего количества оперативной памяти в ПК не даёт FL Studio больше памяти. Каждая программа работает с выделенным адресным пространством памяти операционной системы, в которую она может сохранять и извлекать рабочие данные. 32 битные программы имеют максимально 4 Гб (хотя существуют обходные пути, см. «Управление памятью FL Studio 32 Bit«, ниже). 64 битные программы могут получить доступ до 8 ГБ на программу. Если есть 4 работающие программы, здесь может быть от 16 Гб (32 бит) до 32 ТБ (64 бит) памяти в использовании между ними. Как уже отмечалось, объем оперативной памяти вашего компьютера не имеет ничего общего с этим. Но есть загвоздка:
Почему нам необходима оперативная память — если в рабочей памяти для хранения данных не хватает оперативной памяти, операционная система разделяет доступную оперативную память среди активных программ и создаёт для любого дефицита файл подкачки, на жестком диске, который действует в качестве расширения памяти. Если происходит такая ситуация то возможно 3 варианта. Рабочая память FL Studio может быть расположена в физической оперативной памяти (победа!), на жёстком диске в файле подкачки (проигрыш) или комбинация из двух (победа с небольшими потерями). Должно быть понятно, что чем больше физической оперативной памяти вы имеете, тем больше вероятность того, что FL Studio всегда будет побеждать в «лотерее» распределения оперативной памяти и иметь все рабочие данные, хранящимися в оперативной памяти. Потому как физическая оперативная память намного быстрее, чем жёсткий диск, FL Studio будет работать быстрее и будет менее вероятно опустошение буфера как в случае медленного считывания звуковых данных с SSD/жёсткого диска.
Зачем для FL Studio 32 Bit показывать «доступную» память, а для FL Studio 64 Bit нет — потому как для 32-битных программ имеется доступ максимум к 4 ГБ памяти, вполне возможно, что вы будете превышать это количество. В этом случае, доступная память упадёт до 0. В таком случае FL Studio вероятно упадёт или будет вести себя непредсказуемо, поэтому это важно. FL Studio 64 Bit имеет доступ к 8 ТБ памяти (8000 Гб). Вы никогда не будете использовать так много памяти. Не полезно знать, что у вас есть 7,936 ТБ в наличии (используется 64 ГБ). Мы показываем сколько памяти использовано чтобы вы могли сравнивать, сколько оперативной памяти у вас есть, по причинам, рассмотренным выше.
Измеритель CPU и обработка много-ядерными процессорами
Если вы откроете диспетчер задач Windows или монитор активности macOS, и проверите количество используемых ядер и их относительную загрузку, вы можете задаться вопросом, почему вы иногда испытываете сбои в работе аудиосистемы, когда процессор нигде не приближается к 100% нагрузке. Давайте посмотрим более подробно на CPU метр FL Studio в сравнении с CPU метром операционной системы, рассмотрев метрики, время и логику:
- Различные метрики — CPU метр FL Studio измеряет, как быстро заполняется каждый звуковой буфер (время, необходимое для заполнения буфера/длины буфера). 50%-ное толкование означает, что звук для буфера был рассчитан в 1/2 доступного времени. С другой стороны, CPU метр операционной системы измеряет общий коэффициент использования CPU и «утилизацию» ядра. Утилизация — это часть слотов-обработки используемого CPU (заполнены слоты-обработки/доступные слоты-обработки). 50%-ное толкование означает, что использовалась половина используемых процессоров. Таким образом, утилизация больше о том, насколько близко к максимальной емкости процессор, а не как быстро он обрабатывает задание, например, звуковую обработку FL Studio. Проще говоря, измеритель FL Studio измеряет время (скорость обработки), а операционная система пространство (заполненные слоты обработки). Таким образом, эти две меры не совпадают, даже если они оба указаны в процентах! Но подождите, есть еще: время и логика.
- Масштабирование времени — CPU метр FL Studio относителен размера звукового буфера ~ 10 мс. CPU метр операционной системы работает с фиксированным интервалом ~ 1000 мс. Разница во времени составляет около 100x. CPU метр операционных систем может показать нагрузку 30%, за последние 1000 мс, но в течение этого периода времени могли происходить множественные сбои звуковой обработки. Почему так? В режиме реального времени звуковым «смешиваемым потокам» придётся ждать, пока закончатся другие потоки, потому как они не могут быть многопоточными (обрабатываться одновременно), FL Studio может испытывать звуковые опустошения или, по крайней мере, очень высокие показания CPU метра FL Studio. В то же время операционная система может сообщать о низком общем и/или индивидуальном использовании CPU. У CPU было много свободных слотов, они были не в состоянии идти в ногу с выходом в реальном времени. Обычно для обработки звука процессор должен дождаться завершения программных и системных задач до того, как он сможет продолжить, и поэтому может не справиться с воспроизведением звука в реальном времени. Генерирование ~ 44100 сэмплов в секунду на постоянной основе без прерывания ни на один сэмпл, 0,02 мс. Просто, почему CPU должен «ждать», все связано с логикой:
- Логика обработки звука — существует длинный список задач, которые необходимо обрабатывать последовательно, а это значит, что логически невозможно обработать их параллельно (многопоточно). Например: плагины должны дождаться инструкций от пианоролла и плейлиста до того, как они сделают звук. Эффекты должны дождаться аудиосигнала от вышестоящих эффектов, прежде чем они смогут его обработать. Кроме того, невозможны параллельные (многопоточные) инструменты и эффекты, которые находятся на одном и том же канале микшера (где их звук смешивается) или даже в одной и той же линии маршрутизации микшера (когда одна дорожка микшера связана с другой и другой). Даже обработка эффектами имеет порядок сверху вниз в стеке эффектов. Затем мастер канал микшера должен дождаться обработки каждого инструмента > каналов микшера > эффектов до того, как он обработает звук через мастер-эффекты. Это естественный и неизбежный факт обработки звука. Подумайте об этом как о производственной линии. Это означает, что CPU может быть не полностью занят, используя все его ядра и слоты для обработки, но у него не хватает времени, чтобы заполнить этот крошечный аудио-буфер 5 мс, потому было много задач, которые нужно было обрабатывать последовательно. Должно быть ясно, что быстрая обработка очень важна, и это не то же самое, что многоядерная обработка. Лучший процессор — тот, у которого достаточно ядер, чтобы разделять работу и может сделать большинство работы на одном ядре в течении каждого временного фрагмента буфера. Что приводит к нашему СОВЕТУ: сравнивая процессоры, ищите самые быстрые показатели производительности одного ядра в пакете с минимум четырьмя физическими ядрами. В большинстве тестов производительности процессоров отображается одноядерная производительность. Например, на веб-сайте CPU Benchmark перечислены основные показатели ядра.
Так что вы можете сделать, чтобы минимизировать «ожидание процессора» и улучшить многоядерную производительность? — убедитесь, что ваши плагины нагружающие процессор в наибольшей степени направляются на независимые каналы микшера без общих каналов «посыла». Каждый канал микшера представляет собой «возможность» для создания этих независимых параллельных путей обработки. Итак, вот как работает многопоточность:
- Генераторы будут обрабатываться в нескольких потоках (если включена опция Allow threaded processing).
- Любые каналы микшера, аудиовходы которых не зависят друг от друга, могут обрабатываться одновременно, т.е. в нескольких потоках (если включена опция Allow threaded processing).
- Каналы микшера, которые зависят от выхода других каналов микшера, будут обрабатываться после этих других каналов микшера и, вероятно, на одном и том же ядре.
Тестирование — если вы будете тестировать и сравнивать загрузку процессора, это количество плагинов и/или эффектов, которые могут быть обработаны без переполнения буфера. Не зацикливайтесь на том, как используются ядра, особенно на низких уровнях нагрузки, поскольку планировщик будет пытаться снизить энергопотребление за счёт отключения ядер, постепенно включая их и выровнять это распределение по мере приближения нагрузки процессора к 100%. См. больше информации здесь.
Управление памятью FL Studio 64 Bit
Чтобы использовать 64-битную версию FL Studio, запустите исполняемый файл ..\FL Studio\FL64.exe. Мы рекомендуем использовать 64-битную версию FL Studio, если вы сделали переход на 64-битную библиотеку VST и у вас есть проекты с использованием более 4 ГБ.
- Память — вы можете использовать до 512 ГБ в зависимости от вашей версии 64-битной Windows без каких-либо мостов или других обходов, используемых в 32-битной версии FL Studio (см. в разделе ниже).
- Размер аудиофайла — этот релиз не позволит вам записывать или загружать один аудиофайл (равно как и Edison), который превышает 2 ГБ.
- 32-битный мост — FL Studio 64 Bit автоматически «подключает через мост» 32-битные плагины. Подключение через мост загружает 32-битный плагин в специальную «оболочку», которая преобразует между 32-битным и 64-битным стандартами памяти плагинов и хоста (FL Studio).
В идеале вы должны ограничить использование 32-битных плагинов в пределах FL Studio 32 Bit и 64-битных плагинов в FL Studio 64 Bit . На практике мы знаем, что это не всегда возможно, но имейте в виду, что подключение через мост добавляют небольшую нагрузку на процессор, и мост может быть ещё одной точкой отказа, где может произойти сбой плагина. Если у вас возникли проблемы с 32-битным плагином подключенным через мост, сообщите об этом в службу технической поддержки и попробуйте работать с 64-битным версией, если она доступна.
Вы должны использовать Windows 64 Bit для запуска FL64.exe. 64-разрядный исполняемый файл установлен в ..\Program Files (x86)\Image-Line\FL Studio\FL64.exe, а не ..\Program Files\Image-Line\FL Studio\FL64.exe, как это обычно бывает для 64-битных программ.
Управление памятью FL Studio 32 Bit
Если вы используете 32-битную версию FL Studio, приведенные ниже опции позволят использовать более 4 ГБ памяти, в зависимости от версии Windows:
1. Удаление сэмплов и инструментов из распределённой памяти FL Studio 32 Bit
Keep on disk (сохранить на диск) и режим Bridged (подключение через мост) позволят значительно снизить объём памяти необходимый FL Studio. Вместе они позволяют запускать проекты на предельных возможностях компьютера и операционной системы (32 или 64 бит).
- Keep on disk (сохранить на диск) — откройте большие аудио клипы и или инструмент Sampler и включите опцию Keep on disk, расположенную во вкладке SMP. Для автоматического включения опции Keep on disk активируйте опцию Auto keep long audio on disk (автоматически держать длинные звуковые сэмплы на диске) в общих настройках (F10), затем сохраните и повторно загрузите ваш проект. Примечание: Для того чтобы опция Keep on disk была доступна, сэмплы должны быть в формате 16 или 32 бит. При использовании максимальной памяти, для каждого аудио клипа/сэмплера будет доступно 2 ГБ.
- Bridged режим для VST (соединительный) — откройте в оболочке вкладку PROCESSING и включите опцию Bridged. Bridging перемещает плагин вместе с его требованиями к памяти, в отдельный процесс от FL Studio. Максимальный объём памяти, доступный для плагина будет по крайней мере 2 ГБ для Windows 32 бит, и до 192 ГБ в зависимости от версии 64 битной Windows. Этот режим является наиболее выгодным для плагинов сэмплеров и ромплеров, которые потребляют большое количество памяти, загрузкой своих сэмпловых банков.
-
В идеале вы должны ограничится использованием 32 битных плагинов в FL Studio 32 Bit и 64 битными в FL Studio 64 Bit. На практике мы знаем, что это не всегда возможно, но имейте в виду, что подключение через мост добавляет небольшую нагрузку на процессора и мост может быть другой точкой неудачи, когда плагин может привести к сбою. Если у вас есть проблемы с подключением через мост 64-битных плагинов, пожалуйста, сообщите об этом в службу поддержки, и используйте 32-битную версию, если таковая имеется.
-
2. Увеличение распределения рабочей памяти FL Studio 32 Bit
Увеличение распределения рабочей памяти FL Studio — в папке установки FL Studio существует файл FL.exe. Использование его для запуска FL Studio после внесения следующих изменений в операционную систему Windows, даст доступ FL Studio до 3 или 4 ГБ (по сравнению с 2 ГБ), в зависимости от вашей операционной системы:
- Windows 8, 7 и Vista — 64 бит: FL Studio автоматически получат доступ к 4 ГБ оперативной памяти, когда для запуска используется ..\Program Files (x86)\Image-Line\FL Studio\FL.exe.
- Создайте ярлык на рабочем столе Windows для расширенной памяти FL Studio исполнимый ..\Program Files (x86)\Image-Line\FL Studio\FL.exe и используйте его для запуска FL Studio в будущем.
- Windows 8, 7 и Vista — 32 бит: Используйте переключатель 3 ГБ для доступа к 3 ГБ оперативной памяти.
- Включение переключателя 3 ГБ:
- Из Пуска Windows перейдите Все программы > Стандартные и щёлкните правой кнопкой мыши по файлу Командная строка. Нажмите «Запуск от имени администратора».
- В окне командной строки введите, тип bcdedit /set IncreaseUserVa 3072 и нажмите клавишу Enter на клавиатуре. Когда появится окно безопасности, разрешите сделанные изменения.
- Перезагрузите компьютер.
- Создайте ярлык на рабочем столе Windows для расширенной памяти FL Studio исполнимый ..\Program Files\Image-Line\FL Studio\FL.exe и используйте его для запуска FL Studio в будущем.
- Отключение переключателя 3 ГБ:
- Из Пуска Windows перейдите Все программы > Стандартные и щёлкните правой кнопкой мыши по файлу Командная строка. Нажмите «Запуск от имени администратора».
- В окне командной строки, введите bcdedit /deletevalue IncreaseUserVa и нажмите клавишу Enter на клавиатуре. Когда появится окно безопасности, разрешите сделанные изменения.
- Перезагрузите компьютер.
- Не забудьте в будущем использовать оригинальный FL Studio исполняемый ..\Program Files\Image-Line\FL Studio\FL.exe.
- Включение переключателя 3 ГБ:
- Windows XP 32 бит: Для доступа к 3 ГБ оперативной памяти используйте в XP переключатель 3 ГБ.
-
Не выполняйте следующее, если вы не уверено работаете с файловой системой Windows. Редактирование файла Boot.ini. Boot.ini является важным файлом системы, поэтому перед заморочками с ним мы настоятельно рекомендуем сохранить его копию, и назвать её Original-Boot.ini. Добавьте команду переключения «/3GB» до конца загрузки сценария в файле Boot.ini и сохраните.
- Перезагрузите компьютер.
- Создайте ярлык на рабочем столе Windows для расширенной памяти FL Studio исполнимый ..\Program Files\Image-Line\FL Studio\FL.exe и используйте его для запуска FL Studio в будущем.
- Устранение неисправностей 32 бит:
- Конфликты драйверов — не может быть загружен драйвер с переключателем /3GB.
- Настройка пользовательского пространства памяти — как использовать переключатель /userva с переключателем /3GB для настройки пользовательского режима пространства для значения между 2 и 3 ГБ.
-
Начиная с FL Studio 11 файл FL (extended memory).exe был переименован в FL.exe и после установки является исполняемым файлом по умолчанию.
3. Используйте версию FL Studio 64 Bit
Откройте исполняемый файл ..\FL Studio\FL64.exe и загрузите ваш проект. 64 битная версия FL Studio не имеет никаких ограничений в использовании памяти, кроме тех, которые относятся к 64 Bit Windows. 32 битные плагины будут автоматически подключены через мост 64 бит, хотя мы рекомендуем использовать 64-битные версии плагинов в 64 битной версии FL Studio, где это возможно. Примечание: Если вы используете Windows 32 Bit, то FL Studio 64 Bit не будет работать на вашем компьютере.
Sometimes it is common to see FL Studio run out of memory when working with large projects on computers with limited processing resources. That’s why I’m going to show you how to allocate more RAM memory to FL Studio.
The easiest way to allocate more RAM and avoid running out of memory in FL Studio is to take some of the storage space on the hard disk and convert it into virtual memory, which will serve to increase the smoothness and performance of the DAW.
Increasing the capacity will prevent you from running out of memory and will help FL Studio run smoother and faster and therefore have a more enjoyable user experience for creating higher quality beats.
See also: 10 Famous Songs Were Made On FL Studio

Table of Contents
- Why Increase the Ram and Reduce the Memory Usage In FL Studio?
- How Do I Allocate More RAM Memory To FL Studio?
- Steps to Increase Ram and Avoid Running Out Of Memory
- Is FL Studio Out Of Memory? Tips To Reduce RAM Memory Usage
- Recommendations Before Buying RAM Sticks
- F.A.Q.
Why Increase the Ram and Reduce the Memory Usage In FL Studio?
RAM is a vital component of any modern device and is used to store data temporarily so that it can be used by the CPU quickly and effectively, that’s why is necessary to have enough capacity to avoid getting out of memory.
So, when memory usage is high by the DAW or simply insufficient we can experience lag or slow performance of the PC.
This kind of RAM related issues makes that the final result of our project does not come out according to what we want and that it is of low quality. For example, you may run out of memory when exporting a project.
Today I will show you an easy and simple way to upgrade the memory of your PC without having to buy a new one. You won’t have to pay a technician or take it to a hardware store, you can do it yourself, find out how!
In my experience in the music industry, it is very common to see many producers trying to create their beats on low to mid-range computers with very limited processing resources.
A large number of them have it installed on somewhat obsolete laptops, whose performance leaves much to be desired to ensure optimal and fast production.
Therefore, in order to be able to use the program efficiently, our computer has to meet, at least, the basic requirements.
FL Studio 20 only needs 4 gigabytes of RAM, 4 gigabytes of free hard disk storage, and an Intel Core i3 CPU or higher.
Then, due to the age of these computers, it becomes very difficult to upgrade their hardware with new parts.
For these reasons I am going to show you some tips and tricks to give more RAM to FL Studio and make it run faster on your PC.
The following procedure will help you to extend memory and can be applied on any computer running Windows, from XP to Windows 11.
See also: How To Install And Add Izotope Vinyl In FL Studio 20 (Step By Step)
Steps to Increase Ram and Avoid Running Out Of Memory
Extending your computer’s memory is no problem and it doesn’t matter what type of Windows you are using. I have personally used this method for many years to always get the best performance possible and the results are incredible.
This process only involves manipulating your computer’s hard drive so that some space on it can be converted into virtual memory.
This way, it will be able to perform all the functions that the hardware does and this will allow the computer to have more capacity to load FL Studio faster.
Once the steps are finished you will be able to run any program more smoothly.
Note: I strongly recommend that you make a backup copy of the system to ensure the integrity of the data in case of any problem.
Anyway, I remind you that this procedure is totally safe. Just try to follow the step-by-step guide. Let’s get started!
How To Increase The Virtual Memory:
- The first thing you are going to do is go to your Computer, right click on a blank space and select the “Properties” option.
- Once there, look at the left menu at the top and click on “Advanced System Settings“.
- This option will open another window, there click on “Advanced Options”. Locate the “Performance” tab and click the “Settings” button.
- Another box will open in which you must select “Advanced Options“, there you will see the option “Virtual Memory“, so press “Change“.
- This will open another window, in which you must remove the check arrow from the “Automatically Manage Paging File Size for all Drives” option and it will allow you to modify the capacity of your drives.
- On your document drive set an initial size of 3000 MB and a maximum size of 3000 MB or higher, then click “OK” and then “Set“.
- Then you must restart your computer to save the changes.
You can check that you managed to expand the storage correctly in the “Performance Options” window and in the virtual memory description you will notice that the capacity has increased.
Now you will be able to use FL Studio without any problem and start making amazing productions with more dedicated RAM.
See also: Top 13 Chromebook Alternatives To FL Studio 20
Is FL Studio Out Of Memory? Tips To Reduce RAM Memory Usage
With these simple advices, you will be able to better manage how the programs running on your computer consume resources.
In other words, your computer’s overall performance will improve even more and FL Studio’s interface will run smoother and faster.
How do I lower my memory usage in FL Studio? Just follow these easy tricks.
A) Disable unnecessary services
This is one of the most effective methods to increase the speed of your computer and at the same time free up more RAM space used by other applications.
This procedure consists of disabling unnecessary Windows services executed when the operating system starts up.
The first thing to do is to press the Windows key + R shortcut and a small command prompt window will appear. Now type the command ”msconfig” and press accept.
See also: FL Studio: Make Unique Like A Pro (Step-by-Step Guide)
Then a System Configuration dialog box will open, where you should go to the Services tab. There you only have to disable the services you do not use.
Finally, apply and accept the changes. Then restart the system for everything to take effect.
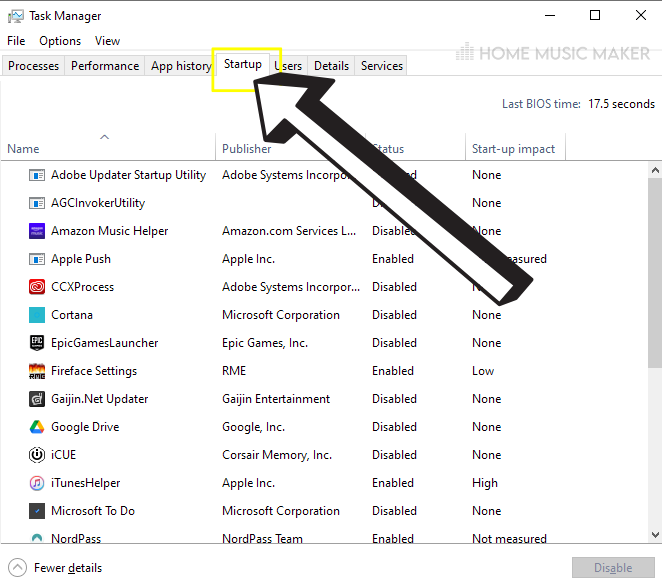
B) Disable applications at startup
This trick is similar to the one explained above and is performed in the System Configuration window through the command ”msconfig”.
Then go to the Windows Startup tab where you will see each of the programs that start when you turn on the PC. Go carefully disabling each one of them, apply the changes and restart the computer.
Note: In recent versions of Windows you can deactivate all the programs from the Task Manager.
C) Use only the necessary plugins
While you are using FL Studio, ideally only load the plugins you need for your project at that moment.
That is to say, the more plugins you run in the DAW, the more RAM it will consume. Do not open too many of them at the same time to avoid the interface from lagging or running slow if memory is not enough.
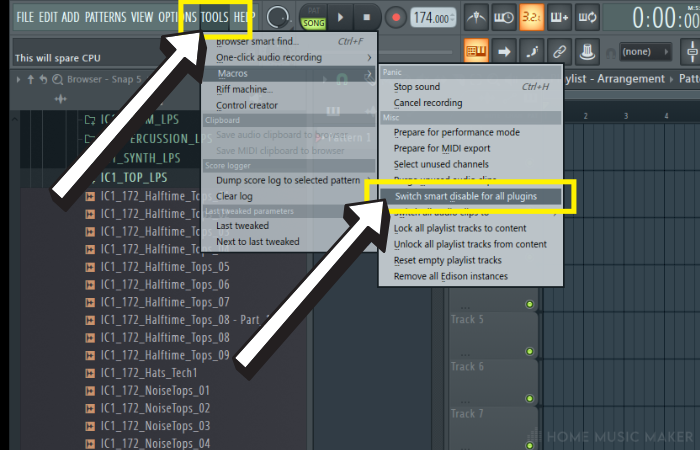
For this reason, I suggest you activate the Smart Disable For All Plugins option. I love this feature because when turned on it will close all plugins that are in the background, which increases the speed of Fruity Loops.
See also: Discover What Plugins Come With FL Studio Producer Edition
D) Close programs in the background
This is a very basic tip, which is based only on common sense and the correct use of the equipment.
When you are working with your music production software you have to close all the applications you don’t use, such as social networks, browsers, games, media players, among others.
Just try to use FL Studio at that time and you will see that your computer will no longer run out of RAM, which is great.
Recommendations Before Buying RAM Sticks
Now I want to give you some suggestions based on my experience so that you can choose the most suitable RAM modules that are compatible with your PC.
One of the most important steps is to check if the motherboard supports the modules you want to buy. This is a typical mistake that many people make when buying without consulting.
-Capacity: Normally with 4GB of memory you will be fine. However, what I recommend is to buy 8GB, since every day DAWs, plugins, and operating systems consume more resources. So be prepared for the future.
Avoid wasting your money and make smart purchases!
-Frequencies: Always try to choose RAM modules with the highest frequency possible, as long as it is supported by the motherboard.
-Latencies: Choosing RAM with the lowest latency is the best thing you can do. It is the most important and determining factor in the speed of your device.
-Enable Dual Channel: This is a technology that helps increase the data transfer rate to the processor, which speeds up the productivity of the PC.
This is achieved by using two memory sticks of the same model, frequency, and latencies.
-Consult the manufacturer: Ideally, check the QVL (Qualify Vendor List) of the motherboard manufacturer to make sure the modules are compatible.
Also use specialized tools such as CPU Z, Aida64, or HWiNFO to further investigate what your device supports.
See also: FL Studio vs Reaper - Comprehensive Guide
F.A.Q.
Do plugins use RAM?
Yes, of course. Each of the plugins used in your DAW for music production uses your computer’s memory, that is why you should avoid using too many plugins.
How much RAM does FL Studio use?
Usually, the RAM used by FL Studio is determined by how big the project you are working on and the plugins used. It is best to have at least 4GB available.
Is 4GB RAM enough for FL Studio?
The short answer is yes. If you are working on tracks that are not very complex then 4GB is usually more than enough and you will be able to do any music creation without hardware limitations.
Does more RAM help FL Studio?
Yes, it does. If you use memory modules with a higher capacity than 4GB, low latencies, and higher frequencies you will get more speed and fluidity when using FL Studio.
Does RAM speed matter for music production?
It definitely does. The higher the RAM frequency, the faster the processing speed. However, the most determining factor in speed is latency. In other words, if the modules have low latencies you will be more productive in music creation.
Is RAM or CPU more important for music production?
Both elements are very important in the music industry. However, most music production software are dependent on the processing power of the CPU. This means that the processor is the most important component of the device you use.
See also: How To Install reFX Nexus On FL Studio 20
The quickest method to free up RAM (Random Access Memory) for use in FL Studio is to close any background PC applications or to use the “Smart Disable For All Plugins” option under Tools > Macros > Smart Disable. This shuts off any plugins that aren’t currently being used.
Quality Over Quantity, Or Is It Both?
While the quality of your music production may be paramount, it could be unattainable if the quantity of your computer’s performance is lacking.
The quantity of short-term memory (RAM) processes much of the data within your FL Studio projects. Naturally, the bigger your project, the more memory will be required to run it smoothly.
I have been caught out with this in the past. I’ve had audio sample-heavy projects running loads of plugins, and FL Studio has almost locked up entirely.
Perhaps you’ve had the same?
Read on, and I’ll explain how this frustrating issue can be prevented and circumvented for you.
How To Allocate More RAM To FL Studio On PC (Avoid Running Out Of Memory)
Increase your PC’s Virtual Memory
Step 1 – System Settings
Navigate to your explorer window and right-click a blank space to select properties, followed by Advanced System Settings.
Alternatively, this can be searched directly by hitting your Windows Key and typing Advanced Settings.
Step 2 – Change Virtual Memory
In the new window under “performance,” go to Settings > Advanced > Change as indicated above.

Step 3 – Edit Allocation
Uncheck the box at the top that auto allocates. Then head to custom size and input your new sizings.

Microsoft recommends an initial size of no more than 1.5 times your computer’s RAM size and a maximum size of no more than three times your computer’s RAM size.
Hit set to finish.
Tips On Improving RAM Usage In FL Studio
A less drastic approach, but often a few tweaks to how the memory behaves, can solve many problems in FL Studio.
Here are some of my tricks:
Smart Disable For All Plugins
My go-to, as this setting stays on for the duration of the project and will remain so each time you open your FL Studio project.
Tools > Macros > Smart Disable.
Closing Open Programs
Too many windows or applications running on your computer could be using memory and processing power.
Disable Programs At Startup
Often many programs by default will try and load in the background when your PC boots up.
Head to task manager quickly by pressing CTRL+SHIFT+ESC (CMD+ALT+ESC for MAC) > Startup tab > Disable unwanted programs.
Remove Unused Audio
This is a 2-in-1 win.
FL Studio will scan your project, and any audio clips put on your playlist that are now not present will be deleted, saving heaps of processing time for your CPU and your memory too!
Tools > Macros > Purge unused audio clips.
Why Should You Increase The RAM And Reduce The Memory Usage In FL Studio?
Ultimately you want your computer and FL Studio to work seamlessly and without effort.
Memory is considered a short-term process. There are lots of them going on all the time – more memory and less usage mean a more manageable workload!
How To Tell If FL Studio Is Out Of Memory?
Depending on the process you attempt, such as loading a heavy-duty plugin or recording into Edison, you may get an error message notifying you about the lack of memory available.
Alternatively, FL Studio may start to stutter when playing back your audio.
There is also an indicator in your top toolbar that shows both your CPU core percentage and the amount of memory in Megabits being used.
Watch out for high readings.
How Much RAM Does FL Studio Use?
While there is no specific amount, as it can vary from project to project, it is recommended to have at least 4GB of memory available on your computer for FL Studio to run without issues.
Does Having More RAM Help With Music Production In FL Studio, And Does It Matter?
Absolutely. You want to allocate/assign/upgrade the highest amount of memory possible to get the best out of your DAW (Digital Audio Workstation) and your computer.
Nobody wants their creativity to get bogged down, so don’t let your computer do it either!
How Do I Allocate Or Boost My CPU Usage In FL Studio?
Method 1 – Buffer Settings
Firstly, you want to use either the specified audio driver from your interface or the FL Studio ASIO Driver or ASIO4ALL.
These will run the smoothest for your project as opposed to the Primary sound driver.
Take note of the highlighted areas below, which show the drop-down to select drivers, the CPU settings (which should be checked and highlighted as shown), and, more importantly, the buffer size.
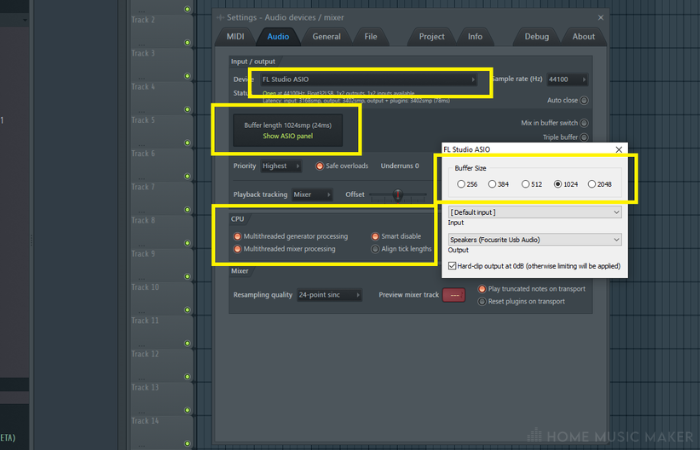
A higher buffer size will take the load off your CPU and make it run faster/smoother.
Method 2 – Smart Disable
As mentioned, smart disable not only helps with memory, but high-usage plugins also are heavy on your CPU load, so turning these off when not in use will assist you.
Method 3 – Remove Unused Channels
Go to Tools > Macros > Select Unused Channels. This will select and highlight any channels you aren’t using.
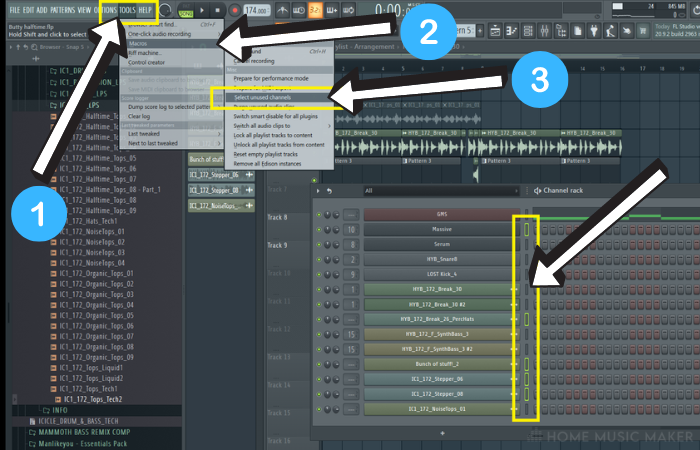
These could be samples or plugins, perfect if you’ve made multiple instances of a CPU-heavy plugin that can be dropped to help you manage the load.
Method 4 – Plugin CPU Meter
This is best used on busy, down-the-line projects where you may have loads of patterns, automations, and plugins running.
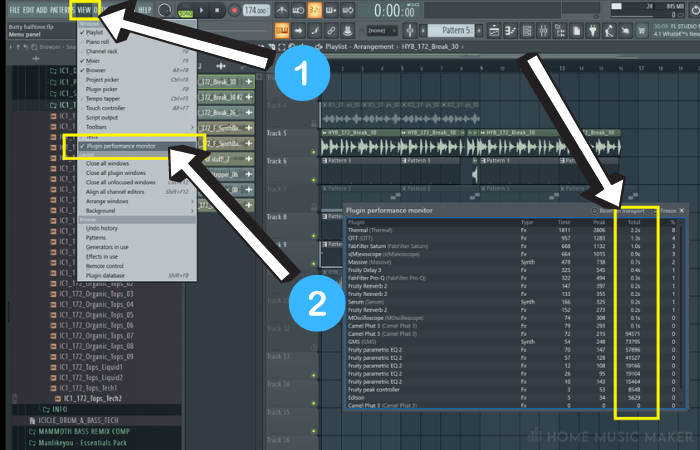
The program scans everything running in your project and gives a reading of its run-time, thereby showing you what is the most hungry for your processor.
Is There Anything I Can Do Outside Of FL Studio That Can Help?
Go to Power Setting > Advanced Settings > High Performance Mode for Windows only. This will prevent your PC from conserving battery power and optimizes your performance output.
What Is Triple Buffer In FL Studio?
Enabling this can reduce audible underruns when your CPU is running high. It can be helpful but bear in mind this doubles your ASIO latency, potentially resulting in delays in the sound, which can be a problem when recording vocals or an instrument.
What Is A Good Buffer Length For FL Studio?
As a rule of thumb, I leave my buffer set at 1024, as it is optimal for me to get good sound quality without sacrificing CPU or latency. Remember that using your interface driver may prevent you from playing audio from other applications, such as SoundCloud or YouTube.
What Specs Should Your Device Have For Music Production?
At least a quad-core 2.5ghz or higher CPU and at least 4GB of RAM.
Check out this next article on fixing FL Studio from lagging.
If you’re a music producer, then you probably know that FL Studio 20 is one of the most popular digital audio workstations (DAW) out there. However, sometimes you may find that you’re running out of RAM while working on a project. This can lead to your computer slowing down or even crashing, which can be frustrating and time-consuming.
Fortunately, there are ways to allocate more RAM to FL Studio 20 and avoid these issues. By doing so, you can ensure that your computer has enough memory to handle even the most complex projects. In this article, we’ll go over some tips and tricks for allocating more RAM to FL Studio 20 and optimizing its performance. Whether you’re a seasoned pro or just starting out, these tips will help you get the most out of your DAW.
Understanding RAM and FL Studio 20
If you’re experiencing slow performance or crashes when using FL Studio 20, it could be due to insufficient RAM. RAM, or Random Access Memory, is a type of computer memory that is used to temporarily store data that your computer needs to access quickly. When you’re running FL Studio 20, it uses RAM to store audio samples, plugin data, and other information.
FL Studio 20 is a powerful digital audio workstation that can require a lot of RAM to run smoothly. By default, FL Studio 20 is set to use up to 2GB of RAM. However, if you have more RAM available on your computer, you may be able to allocate more of it to FL Studio 20 to improve performance.
To check how much RAM FL Studio 20 is currently using, you can go to Options > General Settings > Performance Monitor. This will show you how much RAM FL Studio 20 is using, as well as other performance metrics.
If you find that FL Studio 20 is using all of your available RAM, you may need to allocate more RAM to the program. Keep in mind that allocating too much RAM to FL Studio 20 can cause other programs on your computer to run more slowly, so it’s important to find the right balance.
To allocate more RAM to FL Studio 20, you can go to Options > General Settings > Memory Management. Here, you can adjust the “Use maximum memory” setting to allocate more RAM to FL Studio 20. However, it’s important to keep in mind that allocating too much RAM can cause other programs on your computer to run more slowly, so it’s important to find the right balance.
How to Check Current RAM Allocation
Before allocating more RAM to FL Studio 20, it’s important to check how much RAM is currently allocated to the software. This will help you determine how much additional RAM you need to allocate to improve its performance.
To check the current RAM allocation, follow these steps:
- Open FL Studio 20.
- Click on “Options” in the top menu bar.
- Select “General Settings” from the dropdown menu.
- Click on the “Memory” tab.
On the Memory tab, you will see the current RAM allocation for FL Studio 20. The default allocation is 512 MB, but you can increase it up to 4 GB (Windows 32-bit) or 2 TB (Windows 64-bit).
It’s important to note that allocating too much RAM can actually slow down your system, so it’s best to allocate only what is necessary for FL Studio 20 to run smoothly. As a general rule, allocate at least 1 GB of RAM for every 10 plugins or samples you are using in your project.
In addition to allocating more RAM, you can also optimize FL Studio 20’s performance by closing any unnecessary programs or processes running in the background, reducing the number of plugins and samples in your project, and using the 64-bit version of FL Studio 20 if your system supports it.
By following these tips, you can ensure that FL Studio 20 is running at its best and producing high-quality music without any lag or performance issues.
To ensure that FL Studio 20 runs smoothly, it is important to allocate enough RAM to the software. Here are the steps to allocate more RAM to FL Studio 20:
Accessing System Settings
- Click on the Start menu and select “Settings.”
- Click on “System.”
- Click on “About.”
- Scroll down to “Device specifications” and click on “Advanced system settings.”
- Click on the “Advanced” tab.
- Under “Performance,” click on “Settings.”
- Click on the “Advanced” tab.
- Under “Virtual memory,” click on “Change.”
Adjusting FL Studio 20 Preferences
- Open FL Studio 20.
- Click on “Options” in the top menu bar.
- Click on “General Settings.”
- Click on “Memory management.”
- Adjust the “Memory model” slider to the right to allocate more RAM to FL Studio 20.
- Click on “Reload current project” to apply the changes.
By following these steps, you can allocate more RAM to FL Studio 20 and prevent any performance issues. Remember to always save your work before making any changes to your system settings.
Potential Issues and How to Avoid Them
Over-Allocation
Allocating too much RAM to FL Studio can cause other programs running on your system to slow down or crash. It can also cause FL Studio to become unstable and crash. To avoid over-allocation, only allocate the amount of RAM that you need for your specific project.
Compatibility Issues
Allocating more RAM to FL Studio can sometimes cause compatibility issues with certain plugins or hardware. Before allocating more RAM, make sure to check if your plugins and hardware are compatible with the amount of RAM you are allocating. You can check the plugin and hardware manufacturer’s website for compatibility information.
To avoid compatibility issues, it’s also a good idea to update all of your plugins and hardware drivers to the latest versions. This can help ensure that they are compatible with the amount of RAM you are allocating.
allocating more RAM to FL Studio can greatly improve its performance, but it’s important to do it carefully to avoid potential issues. By only allocating the amount of RAM you need and checking for compatibility issues, you can ensure that FL Studio runs smoothly and efficiently.
Conclusion
allocating more RAM to FL Studio 20 can significantly improve its performance and prevent crashes. However, it is important to note that simply increasing the RAM allocation may not always solve the problem. It is important to optimize the software settings and reduce the CPU load as well.
Before increasing the RAM allocation, make sure that your computer has enough RAM available. Check your computer’s specifications and ensure that the RAM is compatible with your motherboard.
Once you have confirmed that your computer has enough RAM, you can allocate more RAM to FL Studio 20 by following the steps mentioned earlier. Remember that allocating too much RAM can also lead to performance issues, so it is important to find the right balance.
In addition to allocating more RAM, you can optimize FL Studio’s performance by adjusting the buffer size, disabling unnecessary plugins, and using the 64-bit version of the software. These steps can help reduce the CPU load and prevent buffer underruns.
allocating more RAM to FL Studio 20 can be a great way to improve its performance and prevent crashes. However, it is important to optimize other settings as well and find the right balance. With the right settings and enough RAM, you can enjoy a smooth and seamless music production experience with FL Studio 20.