
Fixing Disk Error in Windows 10 can seem like a daunting task, but it’s simpler than it appears. The process involves checking for disk errors and using built-in Windows tools to repair any issues. Start by using the Error Checking tool to scan the disk, followed by using the Command Prompt to execute a more in-depth check with the Check Disk utility. These steps will help you identify and fix errors, ensuring your system runs smoothly.
Fixing Disk Error in Windows 10
Fixing disk errors in Windows 10 is essential for maintaining your computer’s health and performance. By following these steps, you’ll be well on your way to resolving any pesky disk issues.
Step 1: Open File Explorer
First, open File Explorer by clicking on the folder icon in your taskbar or pressing the Windows key + E.
Once in File Explorer, you’ll have access to all drives on your computer. This is where you’ll begin the process of checking for disk errors.
Step 2: Right-click on the Drive
Right-click on the drive you want to check, usually the C: drive, and select “Properties.”
The Properties menu provides several tabs with options for managing your disk. Here, you’ll find tools specifically designed to check for errors.
Step 3: Navigate to the Tools Tab
In the Properties window, click on the “Tools” tab, where you’ll see the option to perform an error check.
The Tools tab is a treasure trove of utilities. The error-checking section is where you’ll start your initial scan for issues.
Step 4: Click on “Check” under Error Checking
Click on the “Check” button in the Error Checking section to start the disk check.
This will initiate a basic scan to identify any surface-level issues. It may prompt you to scan the drive immediately or schedule a scan for the next restart.
Step 5: Run Check Disk from Command Prompt
If issues persist, open Command Prompt as an administrator and type “chkdsk C: /f /r” to perform a thorough check and repair.
This command digs deeper, scanning for bad sectors and attempting repairs. It may take some time, so be patient.
After completing these steps, your computer will either fix the detected errors or provide you with a report. If errors were fixed, your system should run more smoothly. If issues persist, you might need to look into advanced repairs or seek professional help.
Tips for Fixing Disk Error in Windows 10
- Regularly back up important data to protect against potential data loss during disk repairs.
- Run disk checks as part of your routine system maintenance to catch issues early.
- Use tools like Disk Cleanup to remove unnecessary files that may contribute to disk errors.
- Keep your Windows 10 updated, as updates often include fixes for known issues.
- Consider investing in a reliable third-party disk management tool for additional features and options.
Frequently Asked Questions
What causes disk errors in Windows 10?
Disk errors can be caused by hardware failures, corrupted files, or improper shutdowns, among other reasons.
Can disk errors lead to data loss?
Yes, disk errors can lead to data corruption, which may result in the loss of important files.
Is it safe to use third-party disk repair tools?
While third-party tools can offer additional features, it’s important to use reputable software to avoid further issues.
How long does a Check Disk scan take?
The duration of a Check Disk scan depends on the size of the drive and the number of errors found. It can range from a few minutes to several hours.
What should I do if disk errors persist after following these steps?
If disk errors persist, consider seeking professional assistance or replacing the hard drive if it’s a hardware issue.
Summary
- Open File Explorer.
- Right-click on the Drive.
- Navigate to the Tools Tab.
- Click on “Check” under Error Checking.
- Run Check Disk from Command Prompt.
Conclusion
In conclusion, fixing disk errors in Windows 10 is a crucial part of maintaining your computer’s performance and longevity. While it might seem technical at first, the built-in tools in Windows 10 simplify the process. Routine checks and maintenance can prevent these issues from escalating into more significant problems.
Remember, your computer’s health is much like your own. Just as regular check-ups with a doctor can catch potential health issues early, regular disk checks can prevent data loss and system failures. Be proactive. Implementing these steps into your regular computer maintenance routine can save you time, frustration, and even money in the long run.
For those interested in diving deeper, numerous resources are available online that offer more advanced solutions and insights into disk management. Whether you’re a tech enthusiast or a casual user, understanding how to fix disk errors in Windows 10 empowers you to keep your system running smoothly. So, go ahead and give it a try. Your computer will thank you!
Matt Jacobs has been working as an IT consultant for small businesses since receiving his Master’s degree in 2003. While he still does some consulting work, his primary focus now is on creating technology support content for SupportYourTech.com.
His work can be found on many websites and focuses on topics such as Microsoft Office, Apple devices, Android devices, Photoshop, and more.
Learn how to fix C Stage 1 stuck in Windows 10 with a simple reboot and registry fix. Follow our step-by-step guide to resolve it.

This guide will walk you through steps for fixing C Stage 1 stuck and getting your PC back to running smoothly. We will cover how to reboot and skip disk checking and provide an advanced solution using the Registry Editor.

Step 1: Reboot and Skip Disk Checking
The easiest way to resolve the C Stage 1 stuck problem is to reboot your PC and skip disk checking. Here’s how:
- Reboot your PC: During the startup process, when the disk check initiates, you’ll be need to press any key to skip the check.
- Press any key: To bypass the disk check and continue booting Windows.
If you’re unable to skip the disk check or it loops endlessly, let the disk check complete once. Once finished, log into your system. This often solves the problem.
Step 2: Modify Registry Settings to Prevent Future Disk Checks
If your Windows 10 system continues to get stuck at C Stage 1 or C Stage 2, it’s time to adjust some registry settings to prevent this from happening again. But before you start, make sure to create a System Restore point in case anything goes wrong.
Steps to Fix C Stage 1 Stuck Using Registry Editor
- Create a System Restore Point: Always back up your system before editing the registry.
- Open the Registry Editor:
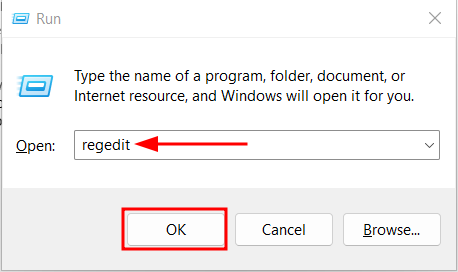
- Press Windows + R to open the Run dialog.
- Type
regeditand hit Enter. - Accept any User Account Control (UAC) prompts to proceed.
- Navigate to the Session Manager Key:
- In the Registry Editor, go to:
HKEY_LOCAL_MACHINE\SYSTEM\ControlSet001\Control\Session Manager
- In the Registry Editor, go to:
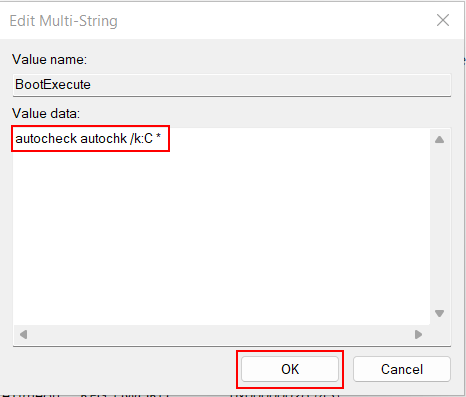
- Locate and Modify the BootExecute Value:
- In the right pane, find the BootExecute entry. This controls the disk checking process.
- Double-click BootExecute to edit the value. If the current Value data is set to
autocheck autochk *, change it to:autocheck autochk /k:C * - This change will prevent future disk checks for the C drive, fixing the issue for C Stage 1 and C Stage 2 stuck problems.
- Close the Registry Editor and Reboot:
- After editing, click OK and close the Registry Editor.
- Reboot your system and check if the issue is resolved.
What If Your System Gets Stuck on Other Stages?
If your system gets stuck on other stages, such as Stage 2 or Stage 4, similar steps can help you resolve the issue. Modify the BootExecute value in the registry for other drives (e.g., D, F, or G), depending on where the issue occurs.
For example:
- To fix D Stage 1 stuck, modify the BootExecute to:
autocheck autochk /k:D * - Similarly, if you’re stuck on F Stage 1, use:
autocheck autochk /k:F *
Why Is My System Getting Stuck on Disk Checking?
You might be wondering, “Is fixing C Stage 2 bad?” The answer is no—disk checks are designed to repair file system errors, but when they take too long or get stuck, it can be a sign of more serious underlying issues such as disk corruption or hardware failure.
In cases where your PC is stuck on fixing C Stage 2 Windows 10, or even worse, fixing C Stage 2 100% stuck, it may indicate larger problems with your disk that might require advanced tools or professional assistance to resolve
What is Fixing C Stage 1 in Windows 10?
Before diving into the solution, let’s explain what C Stage 1 means. During startup, Windows sometimes runs a disk check to verify the integrity of your hard drive. This process is divided into stages, with C Stage 1 being the first phase. However, the system can sometimes get stuck here, particularly after improper shutdowns or disk errors. This issue can also appear as C Stage 2 stuck or even C Stage 5 stuck for other users.
Conclusion
Fixing C Stage 1 stuck in Windows 10 doesn’t have to be a daunting task. In most cases, simply rebooting and skipping the disk check will resolve the issue.
However, if the problem persists, modifying the registry to prevent unnecessary disk checks will ensure your system starts smoothly in the future.
Remember, always create a System Restore point before making changes to your system, and if problems with disk errors continue, it might be time to check the health of your hard drive.
By following the steps above, you should be able to fix issues like Windows 10 stuck fixing C Stage 2 and even prevent future problems with disk checks.
FAQs
Q1. What is fixing C Stage 1 in Windows 10?
Fixing C Stage 1 refers to the initial phase of disk checking during Windows startup. The system checks for errors on the C drive, but it can sometimes get stuck, causing a delay in booting.
Q2. How do I skip the disk check?
When the disk check starts, you’ll see a prompt to press any key to skip it. Simply press a key to bypass the check.
Q3. Why does my PC keep getting stuck on C Stage 1?
It could be due to disk errors, improper shutdowns, or system corruption. Following the steps in this guide should help resolve it.
Q4. Is it safe to stop disk checking on Windows 10?
Yes, as long as your disk health is good. You can use the registry tweak to prevent unnecessary disk checks.
Now you’re equipped to fix C Stage 1 Windows 10 stuck and enjoy a smoother startup experience!
Also read,
- How to Perform Clean Boot in Windows 11, 10, 8, 7: A Step-by-Step Guide
- How to Solve “There was a problem resetting your PC” Error in Windows 11
- How to Resolve Task Scheduler error 2147943712 in Windows 10
- How to Fix Windows 10 Startup Problems: A Step-by-Step Guide
Visit Our Post Page: Blog Page
Discover more from Izoate
Subscribe to get the latest posts sent to your email.
On a bright fine morning, you open your Windows PC or laptop only to get interrupted by a black screen with the Windows logo. Instead of seeing the welcome screen, you see a message saying something like “Fixing C: stage 2(or 1)” with some percentage and time estimation.
Surprised?
A lot of us panicked when we first saw this error in our Windows machine. So what is this error? Why does it occur? And most importantly, how to get rid of it?
That’s all we cover in this comprehensive guide. Stay till the end so that you don’t miss anything.
Let’s get your PC fixed!
What is the ‘Fixing C: Stage 2’ Issue in Windows?
This situation is more of a troubleshooting process itself than an error. It’s when the system checks your disks for any bad sectors using a tool called CHKDSK prior to Windows boot. But the real problem occurs when this checking gets stuck for hours and days in the worst cases.
Usually, the full message that’s displayed on your screen goes something like this:
Fixing (C:) Stage 2: n% (a of b); Total x%, ETA hh:mm:ss
This is just a basic form with placeholders used. You will see numbers instead of a,b x, or n. So let’s break down this message first.
C: refers to the C drive. Stage 2 means it’s currently in the second stage. There are 3 main stages of the scan, with 2 more optional stages. The percentages indicate how much of the scanning process has been done. ETA refers to a rough estimation of how much time is needed for the scanning to be complete.
Reasons Why You May Face This Problem
There are a couple of reasons, the most common being defects in your hard drives. Other reasons include the following:
- Improper shutdown of your computer
- Junk files on the hard drive
- Corrupted or old hard drive
- Power failure
Now that you have some clear ideas about this problem and why it might happen, let’s learn how to fix it quickly.
Fix #1: Let it Continue
Since this process is normal and it’s fixing problems in your hard disk, the easiest thing to do is wait for it to finish. It can take roughly 20 minutes to about an hour in most cases. After the scan is finished, your PC will start normally.
But if it’s taking a ridiculous amount of time, for example, 24+ hours, or it’s stuck at the same percentage for several hours, then this is not normal. In such cases, proceed to the next methods.
Before the scanning started, you were given 8 seconds to press any button to skip the scanning and start your PC. However, you will see that same screen again the next time you reboot your device. So in that 8 seconds, press a button to skip the scanning, and then when your PC starts in normal mode, try any of the below fixes.
Fix #2: Turn off Disk Fixing From Registry
From the search menu, type ‘run’ and open it. Alternatively, press the Windows button + R. Now type in ‘regedit’ and press OK.
You may get a prompt first; Press ‘Yes’. Then the registry editor window will pop up.
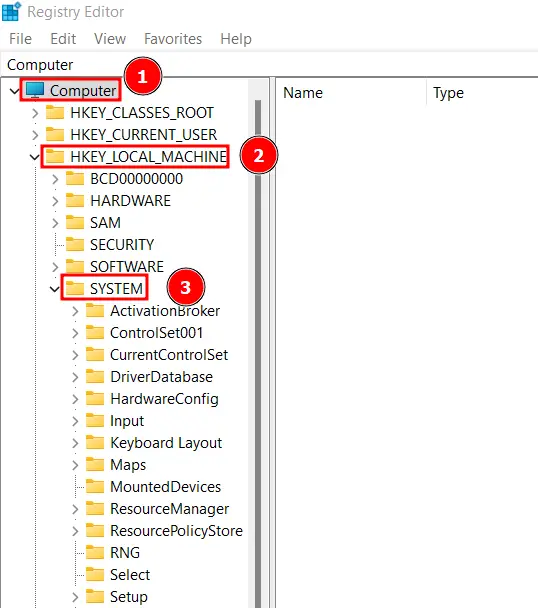
Go to Computer → HKEY_LOCAL_MACHINE → SYSTEM. To expand each folder, left-click on each one.
Inside SYSTEM, open ‘CurrentControlSet’. Then expand ‘Control’. It’s the first option.
After that, start scrolling until you find ‘Session Manager.’ Double-click on it.
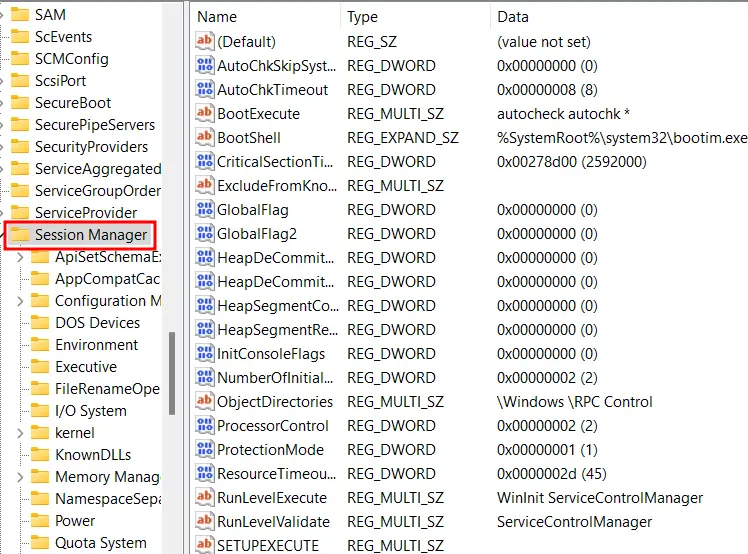
Notice all the options appearing in the right window. From there, right-click on ‘BootExecute’. Then press ‘Modify’.
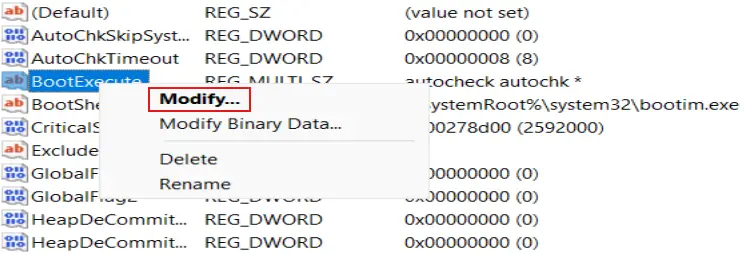
You can see a value data ‘autocheck autochk *’. We need to edit this. Change the value to this exact value below:
autocheck autochk /k:C *
When done, press ‘OK.’
Now restart your PC and see if the problem persists.
Fix #3: Run CHKDSK from the Command Prompt
So instead of letting the system run this utility, you can run it yourself from the command prompt.
Search for the command prompt in the search bar by typing ‘command prompt’. Right-click on it and press ‘Run as Administrator’.
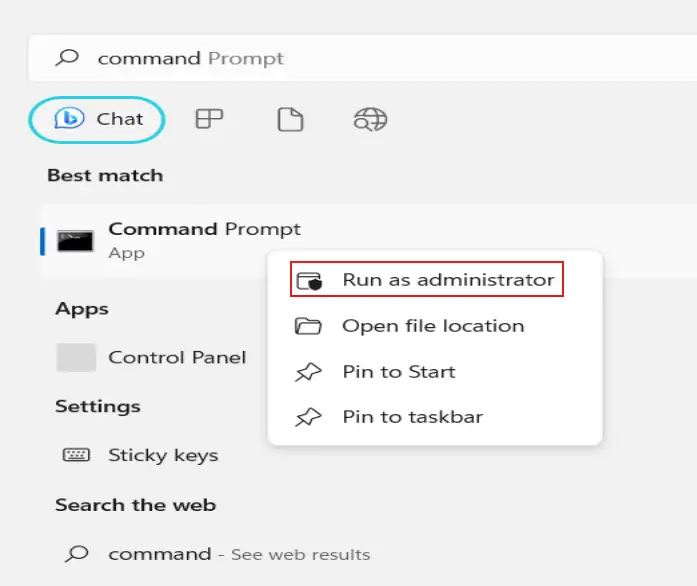
If you get a prompt about making changes to the device, just tap ‘Yes’.
Enter this command into the prompt:
chkdsk c: /rAdding /r with the command means that it will only find bad sectors in the disk and try to recover readable information.
Now hit Enter. You should see the following output:

Since we are currently using this volume, we can’t scan it now. But it will scan it later.
You can enter ‘Y’ to schedule your PC scanning. So now, if you restart your PC, your disk will get scanned like before. But since we are manually checking the disk, there’s a chance that it won’t get stuck anymore.
Fix #4: Run an SFC Scan
SFC scan can help remove many disk errors by doing a scan.
- First, get the Windows Installation Media from Microsoft. Boot your PC from it. Choose ‘Repair your computer.’ Optionally, you can do this in Safe Mode as well.
- You will appear on a blue screen. Pick ‘Troubleshoot’.
- Then choose ‘Advanced options’.
- Tap on ‘Command Prompt’.
- Run the command sfc /scannow
- After the scanning completes, reboot your device.
You can learn more about SFC scan in our scanning and repairing article.
Fix #5: Run Startup Repair
This method uses the Startup Repair tools of the Windows OS. This tool can be used to troubleshoot many booting errors.
- Hard shut down your PC. To do that, hold down the power button for a few seconds.
- Reboot your PC.
- Wait for the manufacturer(Asus, Lenovo, Dell) logo to appear. When you see it, quickly hold down the power button for 10 seconds. You should see a blue screen with many options.
- Press ‘Troubleshoot’.
- Go to ‘Advanced options’.
- Choose ‘Startup Repair’.
After this process finishes, see if you still see the fixing C: stage error.
Fix #6: Replace Your Hard Drive
This would be a last resort if none of the above methods fixed the issue for you. Perhaps your hard drive is too faulty and went beyond any repair. In such cases, it’s a good idea to replace the hard drive completely instead of continuing to tweak your hardware.
Although a bit more costly, we recommend getting a good Solid State Drive(SSD). It will boost your PC performance and speed drastically. They also last long without facing so many issues as hard drives face.
Final Thoughts
This guide shows you different methods of how to fix the ‘Fixing (C:) stage 2 issue in Windows 10 and Windows 11. You can choose any of the methods you feel comfortable with. And if none of them works, consider taking your PC to a local repair shop. You may also need to change your hard drive.
When dealing with booting problems, it’s generally not recommended to force shut down your PC with the power button. Worst case, you may find a Blue Screen of Death(BSOD). So unless it’s urgent, don’t do it.
If you have any questions about this article, feel free to let us know in the comments below.
Are you troubled by Fixing (C:) Stage 1 in Windows 10/11? Do you know how to stop Fixing (C:) Stage 1 and start the system quickly? Here, in this post, MiniTool Partition Wizard introduces some solutions for you.
If you see a black screen with a Windows logo and a message saying “Fixing (C:) Stage 1” when you boot the Windows PC, it means your system is checking for disk error. It will detect hard drive issues and fix them during the process, which usually takes a long time to finish. And sometimes the process even gets stuck at a certain percentage. That will really bother you a lot.
The following are some possible factors that can lead to the Fixing (C:) Stage 1 screen:
- Improper shutdown
- Power failure
- Corrupted or old hard drive
- Heavy-loaded junk files on the hard drive
- …
Once the message comes out, you have to stop the checking process, or it will show up whenever you start your computer. So, how to stop Fixing (C:) Stage 1? You can have a look at the guide below.
Tips:
This guide may also help when you are stuck on the Fixing (C:) Stage 2 Windows 10/11 screen.
Method 1: Press the Power Button
When you are in the process of Windows Fixing (C:) Stage 1, trying to press the Power button for 2 to 3 seconds may help to some degree. Please note you can only speed up the progress instead of stopping it. And remember not to press the button for more than 3 seconds, or you will shut down your computer.
If the Windows 10/11 Fixing (C:) Stage 1 message remains on the screen, you are supposed to go on with the next solution.
Method 2: Change the Value in Registry Editor
You can also attempt to stop Windows 10/11 Fixing (C:) Stage 1 or Fixing (C:) Stage 2 by running the Registry Editor in Safe Mode. To get into Safe Mode through Windows RE (Recovery Environment), you can use the Windows installation disc to boot your computer. If you don’t have Windows installation media, the steps below can work as well.
Step 1: Press and hold the Power button on your PC for several seconds to force shut down your computer, and then press the Power button to turn it on. As soon as the screen lights up, hold the Power button again to turn off the computer.
Note: With this step, your PC might be damaged or certain data loss may occur. Therefore, you ought to back up data before acting.
Step 2: Repeat the action of turning on and turning off your computer 3 times until a blue screen with Recovery shows up.
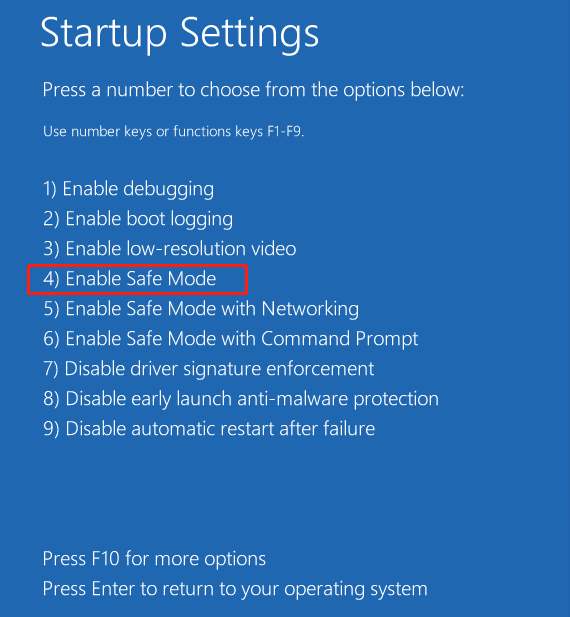
Step 3: Press F8 to go to Startup Settings.
Step 4: In the next window, select Enable Safe Mode by pressing 4 or F4 on your keyboard.
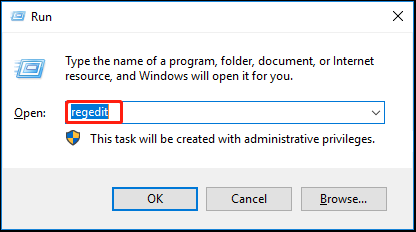
Step 5: After booting into the Safe Mode, press Windows + R to open the Run dialog.
Step 6: Type regedit in the box and then press Enter to open Registry Editor.
Note: Some unexpected issues may happen if you make any mistake while editing the registry key. To avoid it, you’d better backup your registry first.
Step 7: In the Registry Editor, navigate to the following path: HKEY_LOCAL_MACHINE\SYSTEM\CurrentControlSet\Control\Session Manager
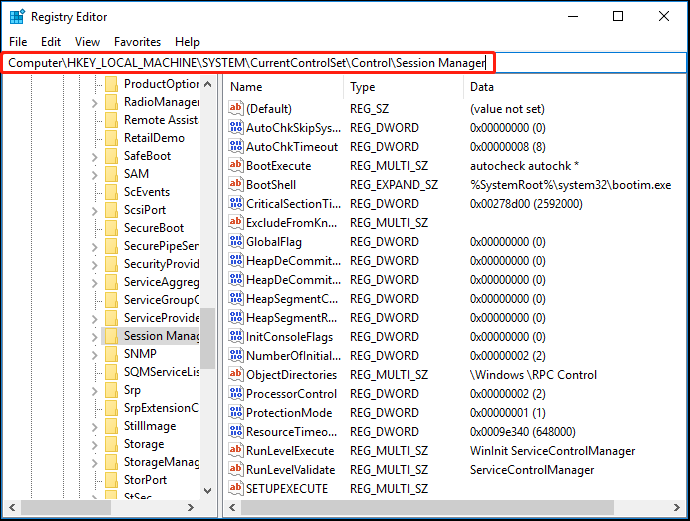
Step 8: In the right pane, double-click the file named BootExecute and change its value data to autocheck autochk *.
Note: If the value data of this file is already autocheck autochk *, then you should set it as autocheck autochk /k:C * instead.
Once you complete the operation, restart your computer to see if the message Fixing (C:) Stage 1 has been removed.
When the Windows Fixing (C:) Stage 1 message comes out and prevents you from starting your computer normally, it may indicate that there are some errors in the hard disk. In this case, you can check the hard disk and fix errors using MiniTool Partition Wizard. It is a comprehensive partition manager that offers different features to help you manage your hard disks.
With this tool, you can try to check both logical and physical errors existing on the hard drive.
Before that, you are supposed to build a bootable USB flash drive with MiniTool Bootable Media Builder on another computer so that you can boot your computer with the bootable disk.
Note: This operation will format your USB flash drive. Therefore, you’d better use an empty USB flash drive or backup the data on the USB drive before you start building the bootable USB disk.
To create the bootable media, follow the steps below.
Note: The Bootable Media Builder is provided in Pro and higher editions. So, you need to upgrade MiniTool Partition Wizard to a proper edition first.
Step 1: Connect your USB flash drive to acomputer that can run normally.
Step 2: Download and install MiniTool Partition Wizard first. And then launch it to enter the main interface.
MiniTool Partition Wizard DemoClick to Download100%Clean & Safe
Step 3: To build a bootable USB flash drive, select the Bootable Media feature in the top-right corner.
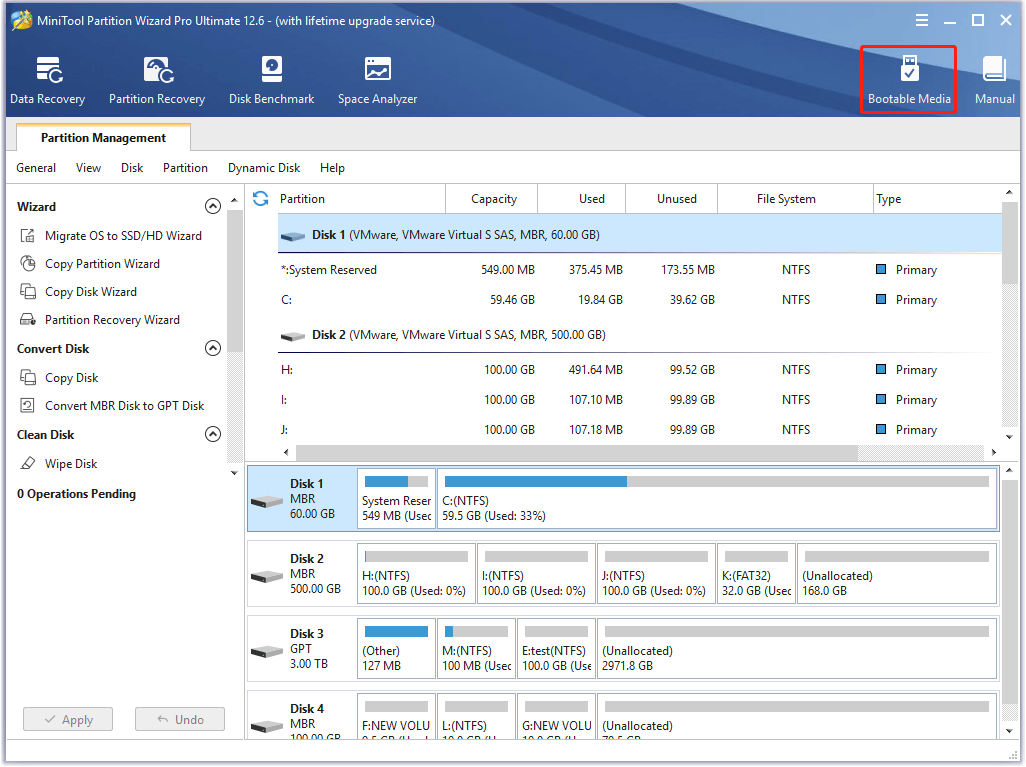
Step 4: Click WinPE-based media with MiniTool plug-in to continue.
Step 5: In the next window, check the USB Flash Disk and then click Yes to continue when there is a warning saying that the data on the USB flash drive will be destroyed.
Step 6: Wait until the MiniTool Bootable Media Builder finishes to build the bootable USB disk. Finally, click Finish.
Once the bootable USB flash drive is built, you can continue to check your hard disk.
Way 1: Check and Fix Corrupted File System
This method can help you check and fix issues related to the file system.
Step 1: Boot your computer from the bootable USB drive. Then you will enter the main interface of MiniTool Partition Wizard automatically.
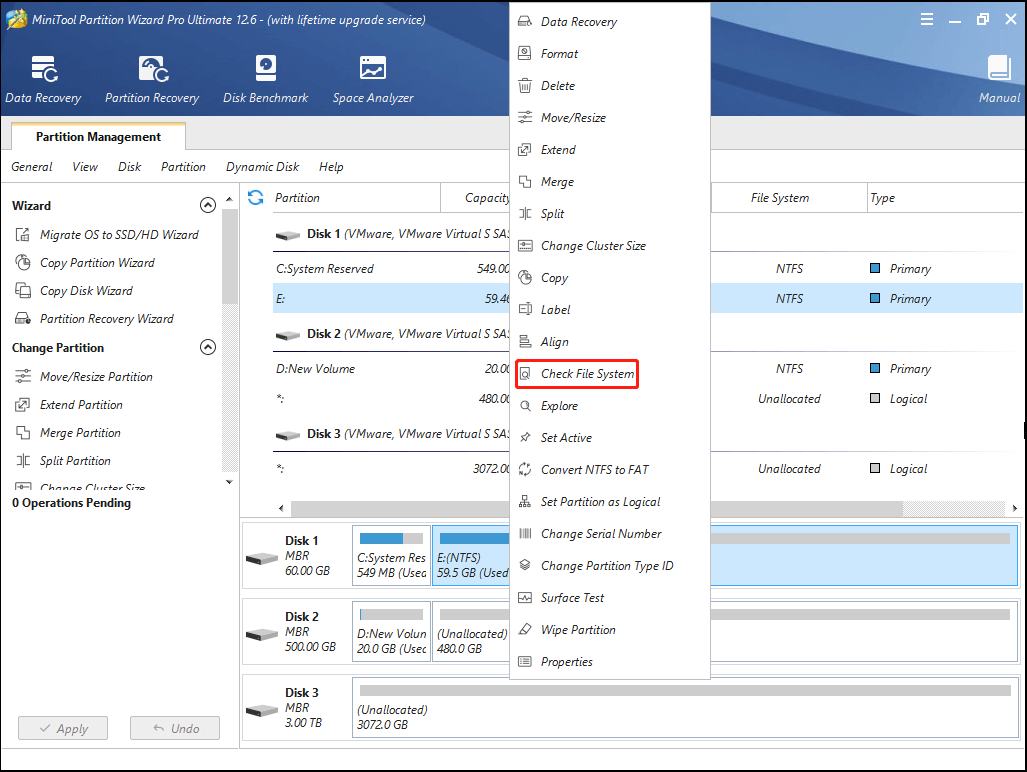
Step 2: Right-click the problematic partition and select Check File System.
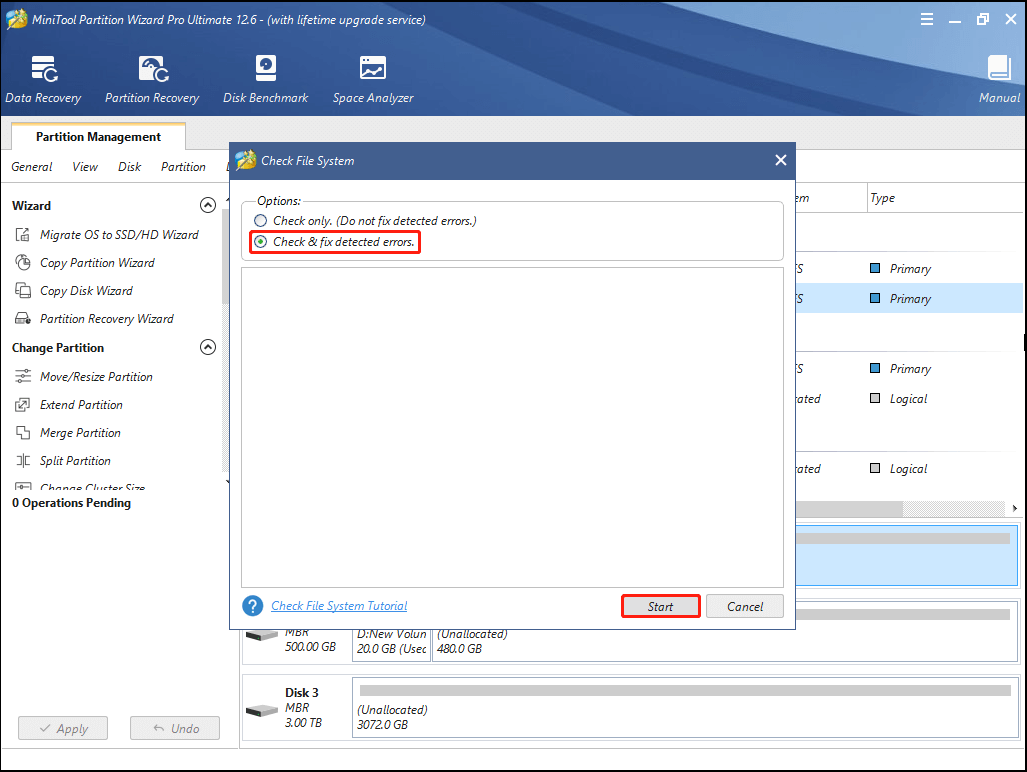
Step 3: Choose the Check & fix detected errors option and then click Start.
Step 4: After the operation, close MiniTool Partition Wizard and restart your computer.
Way 2: Check for Bad Sectors
MiniTool Partition Wizard can also help you to check for bad sectors on the disk.
Note: You can only scan for bad sectors without repairing them in this way.
Step 1: Boot your computer from the bootable media and then enter MiniTool Partition Wizard.
Step 2: Find the target partition and then select Surface Test from the left action pane.
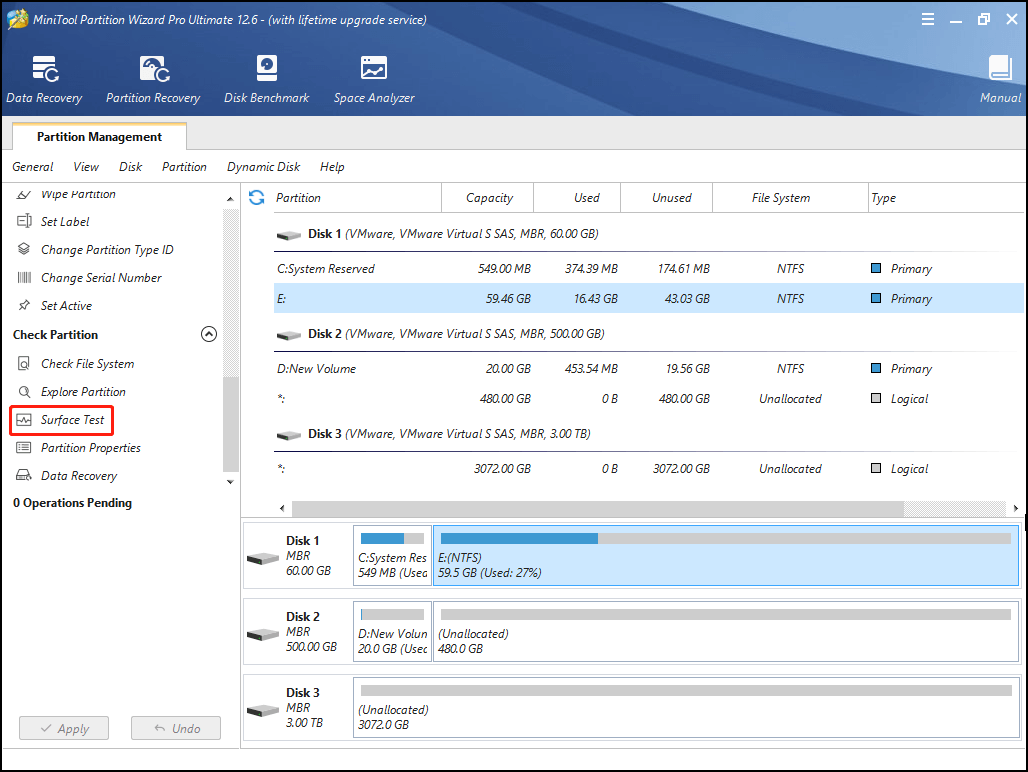
Step 3: Click Start Now to begin scanning the bad sectors.
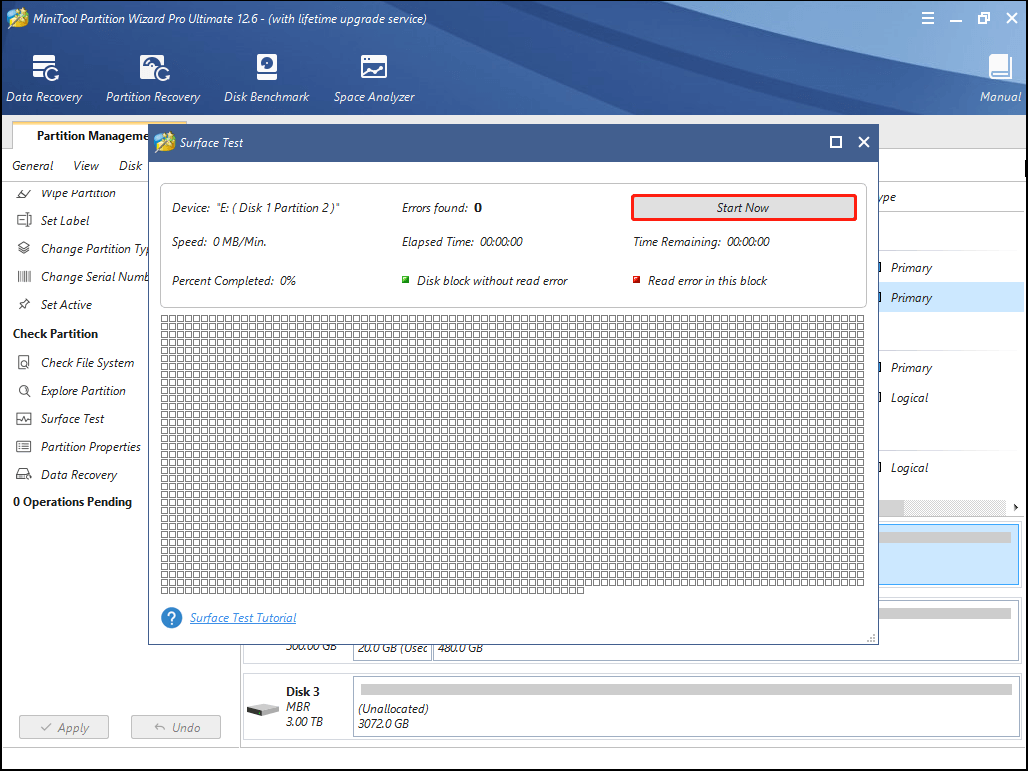
If any bad sectors are found during the process, they will be marked as red. You need to back up the files to avoid data loss.
In addition, you can also try to mark the bad sectors as unavailable through the CHKDSK tool, which is explained in detail in the Way 1 of the next method. And after the operation is completed, the system will skip the bad sectors and you may start your computer successfully.
If there are too many bad sectors in the hard disk, it is better for you to replace the disk with a new one.
Method 4: Run the CHKDSK Utility
As a matter of fact, the Fixing (C:) Stage 1 or Fixing (C:) Stage 2 screen indicates that your system is running the CHKDSK utility to repair disk errors. It won’t disappear until the process is completed. So, to end the Fixing (C:) Stage 1, you can try to open Command Prompt and run CHKDSK in Win-RE.
How to stop Fixing (C:) Stage 1 or 2 with it? There are two ways available to you.
Way 1: Run the chkdsk c: /r Command
With this command, you are able to fix logical errors and mark physical errors as unreadable on your disk.
Step 1: Boot your computer into the Windows RE.
Step 2: Go to See advanced repair options > Troubleshoot > Advanced Options > Command Prompt.
Step 3: In the Command Prompt panel, type chkdsk c: /r and then press Enter to execute the command.
Step 4: After the process finishes, restart your computer, and the Fixing (C:) Stage 1 may disappear.
Way 2: Run the chkntfs /x c: Command
This command can exclude a specified partition from checking when your computer starts up. If you want to skip the process of checking partitions while starting your PC, you can run the command.
Step 1: Enter Command Prompt in the Windows RE.
Step 2: In the Command Prompt panel, type chkntfs /x c: and then press Enter to run the command.
Tip: To make sure that you won’t run into checking other partitions and start your computer successfully, you can also add their drive letters after c:, such as chkntfs /x c: d: e:.
Step 3: Reboot your computer to check if the message Fixing (C:) Stage 1 still exists.
Method 5: Replace the Old Hard Disk with a New One
The Windows Fixing (C:) Stage 1 appears mainly because the hard disk you are using is corrupted or damaged. To avoid the issue, you’d better replace the old hard disk with a new SSD/HDD to improve the performance of your computer and hard disk.
Note: Please find out which disk interface your computer supports while selecting the new hard disk.
Before replacing your disk, you’d better migrate data including the operating system and personal files to your new hard drive. In this way, you are able to use the new disk without reinstalling Windows or applications.
To execute the operation, you are recommended to use the professional software – MiniTool Partition Wizard. The following are detailed steps.
Step 1: Connect the new SSD/HDD you prepared to the computer with a SATA to USB cable, and then boot your computer from the bootable USB flash drive created with MiniTool Partition Wizard.
Tip: The target SSD/HDD should be large enough to save all the data on the original disk.
Step 2: Choose Migrate OS to SSD/HD Wizard from the left action pane. Then there will be two options provided to you, and you can choose one according to your needs.
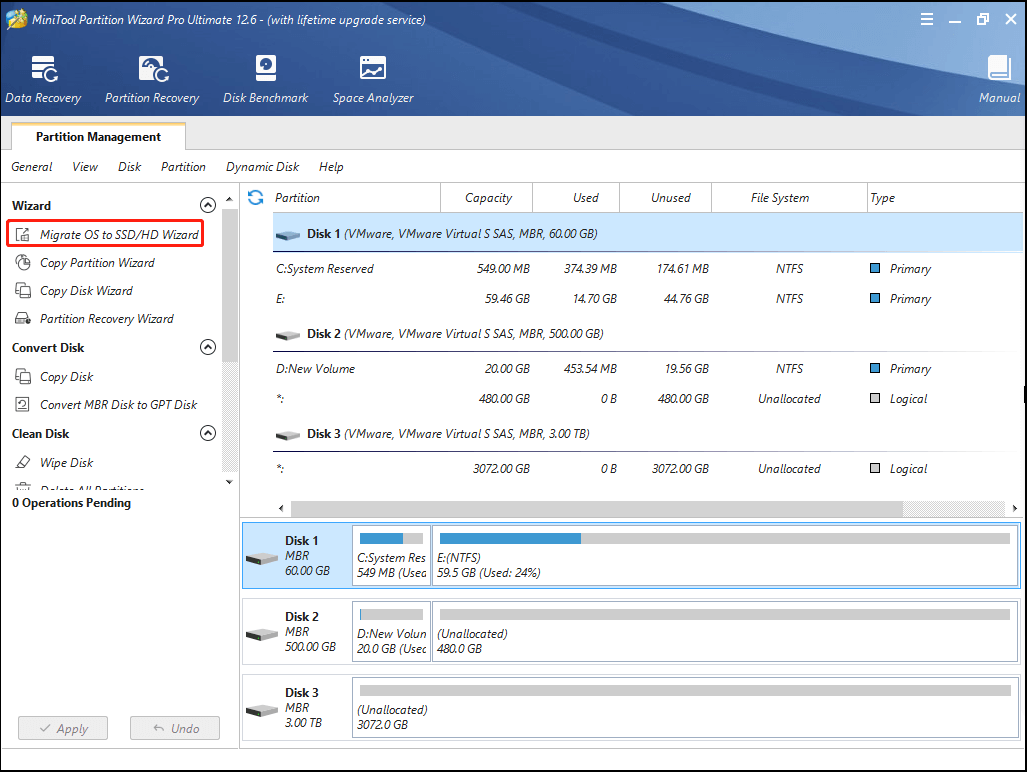
Step 3: Select the SSD you prepared as the destination disk and click Next. Click Yes to go on when you see a pop-up warning window.
Step 4: On the Review the changes page, you can make and review certain changes to meet your needs.
Step 5: In the next window, click Finish to accomplish the settings of the migration. And finally, don’t forget to click Apply to carry out these changes.
Step 6: You may wait for a long time until the migration is finished. After that, boot your PC from the new disk to make sure that you migrate the OS and data successfully. Then shut down your PC and disconnect all external devices including the power source and monitor.
Step 7: Open your computer case and remove the original hard disk with the instructions in the user’s manual. Then install the new hard disk. Please be careful to avoid any possible issues. But if there is an additional slot that is suitable for the new disk, you don’t need to remove the old one.
Note: You can follow this tutorial to deal with the old hard disk safely.
Once you accomplish all the steps, you can boot your computer successfully without meeting the Fixing (C:) Stage 1.
Recently, I succeeded in resolving the Fixing (C:) Stage 1 with this tutorial. It’s wonderful. And I’d like to share it with you guys who meet the same issue. Click to tweet
Bottom Line
Are you bothered by the Fixing (C:) Stage 1? Do you know how to stop it? These methods mentioned in the post are available. Try them to solve your problem if you get stuck on the Fixing (C:) Stage 1 screen.
You can also leave a message in our comment part below if any other problems with this issue trouble you. In addition, if you have anything confused when using MiniTool Partition Wizard, please contact us via [email protected].