
Audio issues on your PC can be incredibly frustrating, especially when you’re trying to watch a video, attend a meeting, or listen to music. Fortunately, most sound problems can be fixed by following a series of troubleshooting steps. This article provides a comprehensive guide to resolving audio issues in Windows. The tips are listed in order, so start with the first one, see if that helps, and then continue to the next one if it doesn’t.
Run the Windows audio troubleshooter
If you are using a Windows 11 device, start by running the automated audio troubleshooter in the Get Help app. It will automatically run diagnostics and attempt to fix most audio problems. If you are using an older version of Windows or a mobile device, please skip to General troubleshooting steps.
Run the troubleshooter in Get Help
If the Get Help app is unable to resolve your sound or audio issue, try the possible solutions listed.
General troubleshooting
Please try the following general troubleshooting steps to help solve the audio problem.
If multiple audio output devices are available, check that you have the appropriate one selected. Here’s how:
-
Select the Speakers icon on the taskbar.
-
Next, select the arrow to the right of the speaker volume slider to open a list of audio devices connected to your computer. The tool tip should display as Select a sound output when hovering over the arrow.
-
Check that your audio is playing to the audio device you prefer, such as a speaker or headphones.
If this doesn’t help, continue to the next tip.
Try these steps:
-
Check your speaker and headphone connections for loose cords or cables. Make sure all cords and cables are plugged in.
-
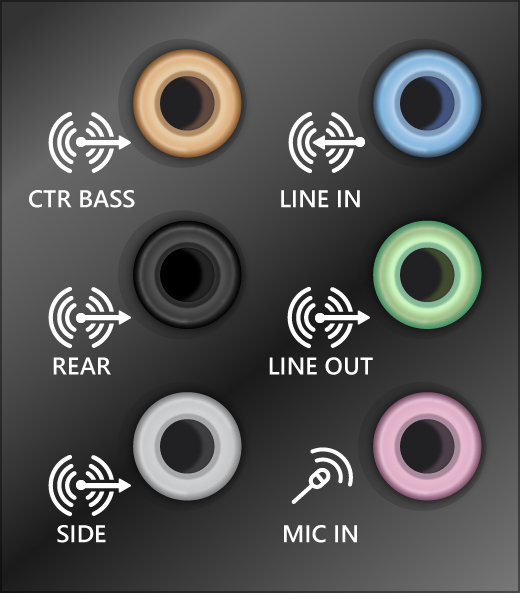
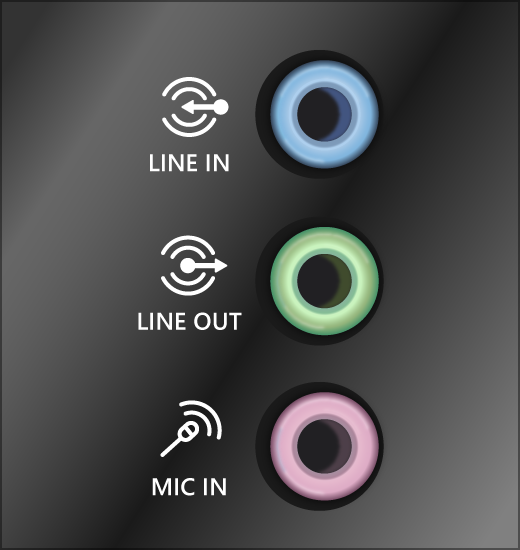
If you have multiple 5mm jacks to plug into, especially on a surround sound system, make sure all cords and cables are plugged into the correct jack.
-
If it’s not clear which jack goes with which cord, consult your hardware manufacturer, or try the most obvious outputs one at a time and see if they work.

Note: Some systems use a green jack for output and a pink jack for mic input and others will be labeled «headphone» or «microphone.»
-
-
Make sure the power is turned on.
-
Make sure the mute setting is not turned on and try turning up all the volume controls.
Note: Some speakers and apps have their own volume controls. Be sure to check them all.
-
Try connecting your speaker and headphones to a different USB port.
-
It’s possible that your speakers won’t work when your headphones are plugged in. Unplug your headphones and see if that helps.
If you’re still having audio problems, see the next sections for additional troubleshooting.
Sometimes having audio enhancements on can result in audio issues. Disabling them may resolve your issue.
-
Select Start > Settings > Sound.
-
In the Output section, select the audio device you’re using (e.g., your speakers or headphones).
-
On the page that opens, scroll to Advanced settings,then set Audio enhancements to Off from the dropdown menu.
If turning off audio enhancements doesn’t help, see the next sections for additional troubleshooting.
-
Select Start > Settings > System.
-
Scroll down and select Troubleshoot > Other troubleshooters.
-
Go to Audio section and click the Run button to start the audio troubleshooter.
Check to make sure your audio devices aren’t muted and haven’t been disabled.
-
Select and hold (or right-click) the Speakers icon on the taskbar.
-
Next, select the arrow to the right of the speaker volume slider to open a list of audio devices connected to your computer. The tool tip should display as Select a sound output when hovering over the arrow.
Note: If you don’t see Speakers displayed, it may be in the overflow area. Select Show hidden icons to check there.
-
Select settings icon to the right of the Volume mixer slider to open Volume mixer settings. The tool tip should display as More mixer settings when hovering over the settings icon.
-
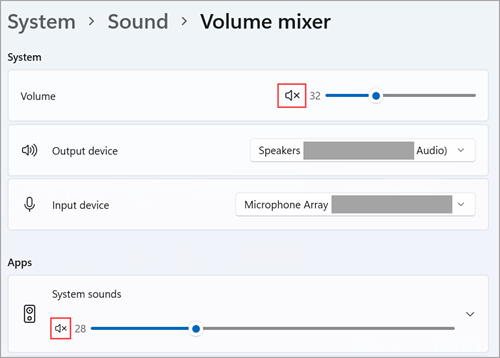
You’ll see a set of volume controls for your devices. Make sure none of them are muted. If any of them are muted, you’ll see an «x» next to the volume control . To unmute do one of the following:
-
Select the volume control and adjust to the desired volume level.
-
Select the Unmute speakers icon .

-
-
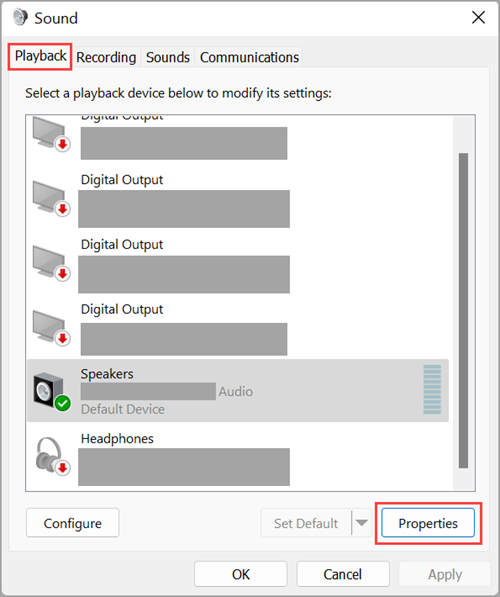
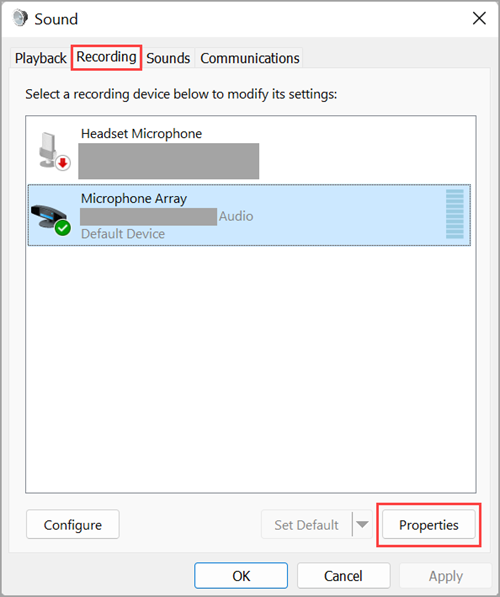
Check your device properties to make sure that your devices have not been disabled by mistake. Select Start > Settings > System > Sound .
-
Under Advanced, select More sound settings and select either the Playback (output) or Recording (input) tab.
-
Select your device and then select Properties.
-
Next to Device usage, check that Use this device (enable) is selected from the list for the output and input devices.


If that didn’t solve your problem, continue to the next tip.
If you’re connecting to an audio device—such as headphones or speakers—using USB or HDMI, you might need to set that device as the default audio device. If you’re using an external monitor that doesn’t have built-in speakers, make sure that the monitor isn’t already selected as your default output device. if it is, you won’t have any audio. You can check that when you set your default output audio device. Here’s how:
-
Select Start > Settings > System > Sound .
-
In the Output section, select the device you want to use for playback as your output device. When you select this device, you’re also setting it as the default.
If setting your audio device as the default device doesn’t help, continue to the next tip for additional troubleshooting.
To check for updates:
-
Do one of the following:
-
If the status says, «You’re up to date,» go to the next tip.
-
If the status says, «Updates are available,» select Install now.
-
-
Select the updates you want to install, then select Install.
-
Restart your PC and check if your sound is working properly.
If that didn’t solve your problem, continue to the next tip.
Many updates require you to restart your device.
To check and see if you have installed updates pending and need to restart:
-
Save your work and close all open applications.
-
Select Start > Power . If you have installed updates pending, you’ll see options to Update and restart and Update and shut down.
-
Select one of those restart options to apply the updates.
Need help with Windows Update? See Troubleshoot problems updating Windows.
If restarting doesn’t help, see the next section for additional troubleshooting.
Hardware problems can be caused by outdated or malfunctioning drivers. Make sure your audio driver is up to date and update it if needed. If that doesn’t work, try uninstalling the audio driver (it will reinstall automatically). If that doesn’t work, try using the generic audio driver that comes with Windows. If you’re having audio issues after installing updates, try rolling back your audio driver.
To update your audio driver automatically:
-
In the search box on the taskbar, type device manager, then select it from the results.
-
Select the arrow next to Sound, video and game controllers to expand it.
-
Select and hold (or right-click) the listing for your sound card or audio device, such as headphones or speakers, select Update driver, then select Search automatically for drivers. Follow the instructions to complete the update.


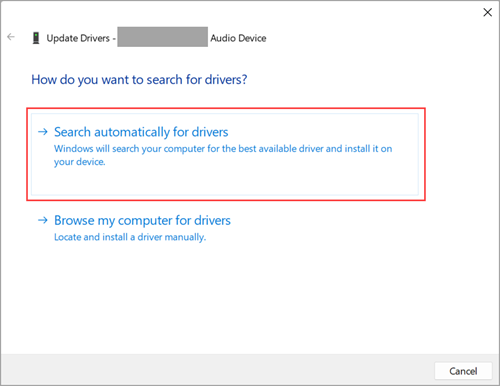
If Windows doesn’t find a new driver, look for one on the device manufacturer’s website and follow those instructions. If that doesn’t work, try uninstalling your audio driver.
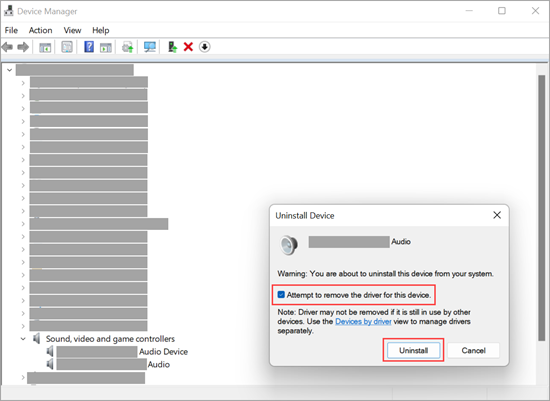
To uninstall your audio driver:
-
In the search box on the taskbar, type device manager, then select it from the results.
-
Select the arrow next to Sound, video and game controllers to expand it.
-
Select and hold (or right-click) the listing for your sound card or audio device, select Uninstall device, select the Attempt to remove the driver for this device check box, and then select Uninstall.

-
Restart your PC.
Note: Be sure to save your documents and any other current work before you restart.
-
This restart will automatically prompt your PC to reinstall your audio driver.
-
To restart, select Start > Power > Restart .
-
If those options didn’t work, try using the generic audio driver that comes with Windows.
To use the generic audio driver that comes with Windows:
-
In the search box on the taskbar, type device manager, then select it from the results.
-
Select the arrow next to Sound, video and game controllers to expand it.
-
Select and hold (or right-click) the listing for your sound card or audio device, then select Update driver > Browse my computer for drivers > Let me pick from a list of available drivers on my computer.
-
Select the audio device whose driver you want to update, select Next, and then follow the instructions to install it.
If these steps didn’t solve your audio issue, visit your device manufacturer’s website and install the most recent audio/sound drivers for your device. The following is an example of a driver download page for a sound device manufacturer.
If you have audio issues after installing updates
If your audio was working before you ran Windows Update and now isn’t working, try rolling back your audio driver.
To roll back your audio driver:
-
In the search box on the taskbar, type device manager, then select it from the results.
-
Select the arrow next to Sound, video and game controllers to expand it.
-
Select and hold (or right-click) the listing for your sound card or audio device, then select Properties.
-
Select the Driver tab, then select Roll Back Driver.
-
Read and follow the instructions and then select Yes if you want to roll back your audio driver.
If rolling back your audio driver didn’t work or wasn’t an option, you can try to restore your PC from a system restore point.
Restore your PC from a system restore point:
When Microsoft installs updates on your system, we create a system restore point in case problems arise. Try restoring from that point and see if that fixes your sound problems. For more info, see «Restore from a system restore point» in Recovery options in Windows.
Some audio problems might be caused by an issue with the audio system’s IDT High Definition Audio CODEC. This can be fixed with a manual driver update which allows you to choose the sound driver you want to use.
Note: Not all systems will have an IDT High Definition Audio CODEC.
To check and see if you have one, and to manually update the driver:
-
In the search box on the taskbar, type device manager, then select it from the results.
-
Select the arrow next to Sound, video and game controllers to expand it.
-
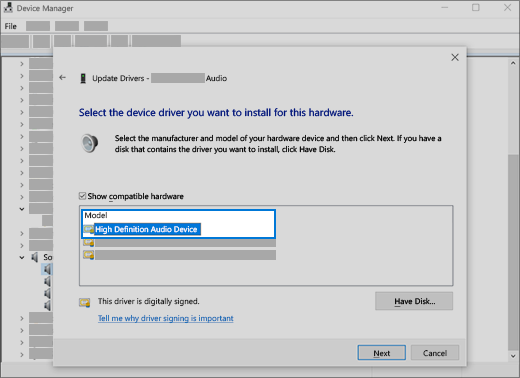
Look for IDT High Definition Audio CODEC. If it’s listed, select and hold (or right-click) it and select Update driver, then select Browse my computer for drivers > Let me pick from a list of available drivers on my computer.
-
You’ll see a list of pre-installed drivers. Select High Definition Audio Device, and then select Next.
-
In the search box on the taskbar, type control panel, and then select it from the results.
-
Select Hardware and Sound from the Control Panel, and then select Sound.
-
On the Playback tab, select and hold (or right-click) Default Device, and then select Properties.
-
On the Advanced tab, under Default Format, change the setting, select OK, and then test your audio device. If that doesn’t work, try changing the setting again.
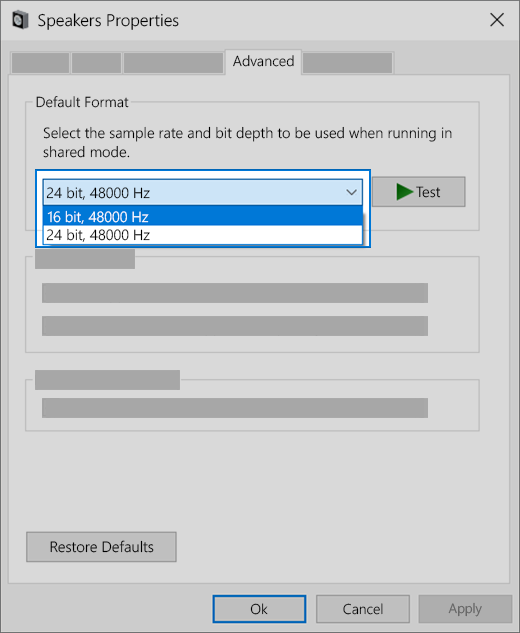
If trying different audio formats doesn’t help, see the next sections for additional troubleshooting.
-
In the search box on the taskbar, type services, then select it from the results.
-
Select each of the following services, select and hold (or right-click), select Restart, and then select Yes:
-
Windows Audio
-
Windows Audio Endpoint Builder
-
Remote Procedure Call (RPC)
-
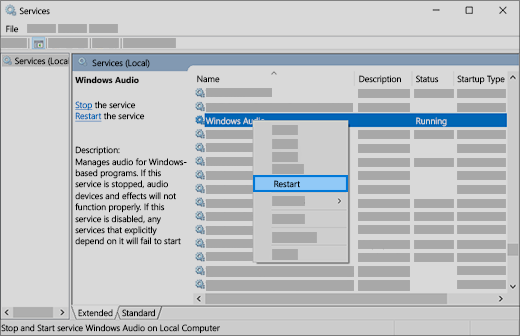
If restarting these services doesn’t resolve your issue, see the next sections for more troubleshooting.
-
Select Start > Settings > Privacy & security.
-
Under App permissions, select Microphone.
-
Make sure that the Microphone access and Let apps access your microphone toggles are turned On.
-
If you’re having this issue with a specific app, scroll down under Let apps access your microphone and make sure that the toggle next to that specific app is turned On as well.
“How do i fix generic audio driver detected?”
“I encountered audio issues with external devices, followed by a “generic audio driver detected” message during
troubleshooting in Windows 10. While audio is generally okay now, I still get this message, with minor delays
and a ‘base’ effect at times. I couldn’t find a clear solution online. Is this something to worry about?”
While Windows has a built-in troubleshooter to identify and fix common bugs and errors, including those related to
audio, it may not always be able to resolve all issues, especially if they are more complex or if the issue lies
with specific drivers. If you are getting the message that says “Generic audio driver detected» when you try the
sound troubleshooter, there’s no need to fret. In this article, we’ve shared four tried-and-true fixes to eliminate
that message for good. Plus, if your audio file isn’t working at all, we also have a solution for that. Let’s get
your sound back on track!
Part 1. What Does Generic Audio Driver Detected Mean?
Generic audio driver problem detected means your computer has a major issue with its audio system. This happens
when your sound devices aren’t working properly and can’t follow your PC’s commands. The main reasons for this
error include issues with Windows services, software conflicts, problems with Windows updates, and faulty audio
devices or drivers.
The message “Generic Audio Driver Detected” sent by the Windows Audio Troubleshooter indicates that your computer
system has identified and is currently using a generic audio driver for your sound hardware. Generic drivers can
enable basic audio playback, but they may not fully utilize the advanced features specific to your audio
hardware. That’s why you may have sound or audio problems. When you see this message, consider updating your
audio drive or installing a dedicate one for your hardware, etc.
Part 2. How to Fix Generic Audio Driver Detected in Windows 10/11
To troubleshoot generic audio driver detected error in Windows 10/11, try the four fixes given below:
Fix 1. Restart Windows Audio Services
Windows Audio Service controls and manages all sound devices on your computer. When you come across the “problem
found generic audio driver” error, the first thing to do is restarting audio services, which will help to fix
audio issues. Here’s how you can do it:
- Type “services” in Windows search bar and select the Services app from the results.
- In the pop up windows, move down to the “Windows Audio” and “Windows Audio Endpoint Builder” services.
-
Right-click on each service and hit Restart.
- Afterwards, double click on the same services to launch the Properties window.
-
Set the Startup Type to “Automatic” to ensure that Windows Audio starts when you turn on the computer.
Restart your computer and check if the sound problem has been resolved.
Fix 2. Update Your Audio Driver
The second generic audio driver detected fix is to update your audio driver, as outdated or missing drivers on
your Windows can also cause this issue. Here’s what to do:
- Press the “Windows + X” keys. Select Device Manager from the result.
-
Expand the “Sound, Video, and Game Controllers” section, right-click on the outdated driver, and
select “Update driver.” -
Choose your preferred method to search for drivers and follow the on-screen instructions to complete
the update. - Finally, restart your PC to check if the error is gone.
Fix 3. Uninstall and Reinstall Audio Driver
If updating the drivers did not work and the Windows Troubleshooter continues to give you the “Generic audio
driver detected” message, try reinstalling the audio drivers. This will ensure that all the necessary files are
configured properly.
- Press the “Windows + X” keys. Select and open “Device Manager.”
- Double click on the “Sound, video, game controllers” section to expand it.
-
3. Right-click on the driver, and choose “Uninstall Device.” Confirm by clicking “Uninstall.”
-
Restart your PC, reopen “Device Manager,” and right-click on your PC’s name. Select “Scan for hardware
changes,” and it will automatically complete the reinstallation.
Fix 4. Disable Audio Enhancements
Audio enhancements are supposed to make sound cards work better, but they can sometimes cause problems with audio
and sound. If you are still encounter generic audio driver problem in Windows 10/11, try disabling audio
enhancements.
Here’s how:
- Right-click on the Sound icon at the task bar and select Sounds.
-
Click the Playback tab, right-click on the default sound device and choose “Properties.”
-
Head to the “Enhancements” tab and tick the “Disable all Sound effects” box. Click “OK.”
Once enhancements have been disabled, run the Windows Troubleshooter again and check if this method works for
you.
Part 3. How to Fix Windows 10/11 Audio Not Working
Above, we discussed how to fix the generic audio driver detected issue. But what if the error is bone but you are
still having some issues in playing audio files? Then, that could be because of file corruption or damage.
If your corrupted audio files are one of a kind and can’t be downloaded again, consider using 4DDiG Audio Repair
tool. It can fix various audio issues, like out-of-sync audio, background noises, scratches, etc. Here’s what
more this tool offers:
- Repair damaged or unplayable audio and video files.
- Remove noise, audio dropouts, sound distortion and pops, and improve audio quality effortlessly.
- Batch repair multiple audio files of different formats without manual intervention.
- Works with different recording devices and downloaded sources.
- Compatible with various audio formats like M4A, MP3, FLAC, AAC, and WAV.
- Preview recovered audio files before saving.
Follow the instructions below to fix Windows 10/11 audio not working with this tool:
-
Add Unplayable Audio Files
Download and open 4DDiG File Repair on your PC. Choose “Audio
Repair” and click “Add Audio” to add your unplayable audio files. -
Repair Unplayable Audio Files
Hit “Start Repair,” and the tool will use smart algorithms to fix
any sound problems in your audio files. Once done, click “View Results” to see repaired audio files.
Play them to ensure it worked. -
Save Repaired Audio Files
Select the fixed sound files, click “Export Selected,” and pick where
to save them on your PC.
Generic Audio Driver FAQs
Q1: What is the problem of generic audio driver?
A generic audio driver error can cause problems like audio glitches, crackling, static, or poorer sound quality
because it doesn’t reproduce sound accurately. On Windows 10/11, this error can even make your sound and related
components suddenly stop working.
Q2: Is it safe to uninstall audio drivers?
It’s usually okay to uninstall the audio drivers. But remember a couple of things. If you uninstall them before
unplugging your device, your operating system might rediscover and reinstall drivers during that time. Moreover,
the audio device will stop working unless you install its audio drivers.
Q3: Does audio driver affect sound quality?
Yes, a good audio driver delivers accurate and efficient sound, minimizes delays, and supports advanced audio
features. Conversely, a bad audio driver can lead to problems like glitches, crackling, static, or lower sound
quality due to inaccurate sound reproduction.
Wrap Up
We’ve shared four effective fixes to tackle the persistent “Generic audio driver detected” issue in Windows
10/11. Try them one by one until you find the fix that works. However, if you’re facing sound problems in your
saved audio files, we recommend using 4DDiG Audio Repair to resolve a variety of audio glitches and errors and
restore the sound quality.
William Bollson (senior editor)
William Bollson, the editor-in-chief of 4DDiG, devotes to providing the best solutions for Windows and Mac related issues, including data recovery, repair, error fixes.
No sound after updating Windows! Don’t be upset; follow the best fixes listed below & troubleshoot Realtek HD audio manager problems.
For Windows users, encountering audio issues is not new. After each Windows update, some or the other user faces audio-related issues. This leaves users with no sound; if you can relate to it and are looking for ways to fix the Realtek audio driver problem, you are right.
Quick Tip- When manually downloading the latest Realtek audio driver from the official website, ensure your operating system’s correct name and version is selected. Realtek high-definition audio comes preinstalled on Windows 11 and 10, but this doesn’t mean Realtek audio is not working issue cannot be encountered. If you are facing the issue, here are the best ways to fix sound and not working issues.
Common Realtek Audio Issues
- Missing Audio Manager Icon
- Conflicts with preinstalled Microsoft Drivers
- Windows 11, 10, no audio devices are installed
- The audio service is not responding
- No sound
Besides, there are other sound problems that Windows users face. This troubleshooting guide will cover all this and the best ways to fix these issues.
Download and Install Advanced Driver Updater.
Why is there a Realtek High Definition Audio on My PC?
The Realtek HD Definition Audio is the popular sound driver for Windows. It helps choose the audio configuration for the speaker system, and the software also allows adjusting the volume for individual speakers.
However, due to certain reasons, you may face issues with Realtek High Definition Audio.
6 Common Reasons That Cause Realtek Audio Problems
1. Outdated Realtek audio driver.
2. There is a conflict between installed Microsoft and Realtek audio drivers.
3. Audio service is either not running or responding.
4. Misconfigured audio settings.
5. Incorrect output device for audio is selected.
6. Disable audio service.
How to Fix Realtek Audio Issues in Windows 11, 10
Whether you face audio problem issues after installing the latest Windows update or uninstalling a driver, try these 8 ways to troubleshoot the issue.
Basic Troubleshooting
You should always check the device and cable connections before updating the drivers and trying other technical fixes.
- Check the output audio device whether working or not.
- Ensure the output device is receiving power.
- Correct output should be selected on Windows 11 and 10.
- Use the volume controls to ensure the sound is not muted.
- Disconnect and reconnect the output device, and also use the alternate port to ensure the connection is proper.
After following these steps, try the following methods if the audio is still not there.
1. Update Realtek High-Definition Audio on Windows 11 and 10
Common sound problems on Windows are outdated, corrupt, or missing drivers. To fix this issue, downloading and installing the latest driver is recommended. This can be done either manually or automatically.
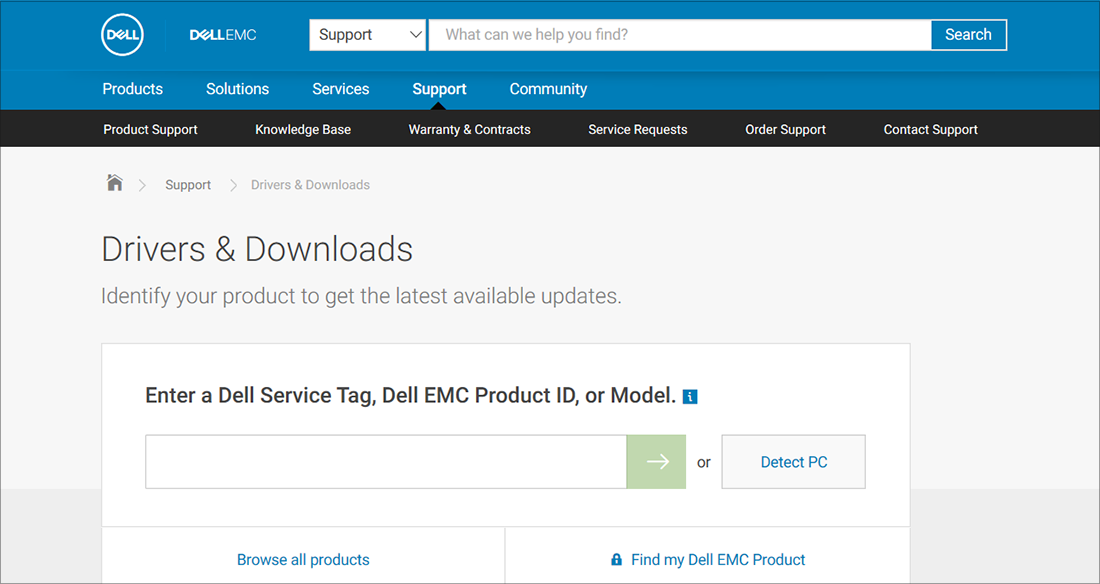
To download and update the latest driver manually, visit the sound card manufacturer and look for the right driver download. Before this, you must collect information about the operating system’s version, your motherboard’s model, or the sound card. Once you have, only then can you download the correct driver.
Update Audio Drivers using Manufacturer website –
- Search for the audio driver’s manufacturer website on a browser. Click on it.
- Enter your device’s serial number.
- Click the ‘Detect’ button for automatic identification.
- Select your product manually from the list.
- Browse products for general information or resources.
- Download the audio driver on your computer.
Update Audio Drivers using Device Manager –
Another way to update drivers on your computer is to use the Device Manger.
- Open Device Manager.
- Right click on the device, in this case, audio device.
- Select ‘Update Driver’.
- Choose “ Search automatically for updated driver software”.
- Now follow the on-screen instructions to complete the update.
Suppose this sounds like too much work, or you don’t have the technical expertise to collect all this information. In that case, you can try Advanced Driver Updater, a third-party driver updating utility.
This tool lets you download and install compatible drivers without collecting system or device information. Not only this, but Advanced Driver Updaters also keep a backup of old drivers for security reasons. It is easier to use as you have to click Start Scan Now, wait for the scanning to finish, and update the driver.
Also Read: Advanced Driver Updater Review
Here are the detailed steps on how to use Advanced Driver Updater
1. Download and install Advanced Driver Updater

2. Run the professional tool and click Start Scan Now to perform the scanning for outdated Realtek sound drivers.

3. Wait for the scanning to finish.

4. After that, click the Update driver option and update the driver.
Note : If you are using a trial version of the product, you will have to update each driver by clicking the Update driver option. However, if you want to update all drivers in a go, you need to upgrade to the Pro version as it offers an Update All feature. Not only this, but the excellent driver updating utility also comes with a money-back guarantee.
Read more at the official website
5. After updating the driver, restart the system to apply changes.
Now try to play a video or song; the Realtek sound not working issues should not be fixed.
See This- How To Update And Download Realtek 802.11 N WLAN Adapter Driver- Windows 11, 10
Method 2. Disable Audio Enhancement
Changes made to Audio Enhancements might conflict with sound on Windows 11 and 10. Therefore, it is recommended to disable audio enhancement. To do so, follow the steps below:
1. Right-click the Volume icon present in System Tray.
2. Select Open Sound settings > Device properties > Additional device properties.
3. This will open a new window; click the Enhancements tab and uncheck the box next to Disable all enhancements > Apply > Ok

This should troubleshoot Realtek audio problems on your PC.
3. Enable/ Restart Windows Audio Service
Ensure Windows Audio service is enabled to fix high-definition audio devices not working. To do so, follow the steps below:
1. Press Windows + R to open the Run window
2. Type services.msc > Ok
3. Look for Windows Audio service > right-click > Properties

4. Click the down arrow next to Startup type and select Automatic > Start > Apply > Ok
Note: If the service is already running and set to Automatic, you need to restart it. To do so, look for Windows Audio service > right-click > Restart.

Now try to play the sound; this should fix Realtek audio speakers’ not working issues.
Also, Read- How To Update Realtek Bluetooth Driver – Windows 11,10
Method 4. Disable Microsoft UAA Bus Driver
Usually, when two high-definition audio drivers run on the system, a conflict occurs. Therefore, to fix the issues with Realtek audio speakers not working, we must disable Microsoft UAA Bus Driver. To do so, follow the steps below:
1. In the Windows search bar, type Device Manager
2. Look for System Devices > double click to expand it
3. Select Microsoft UAA Bus Driver for High Definition Audio.
Note: If it is not on the list, it is already disabled. This means you can skip this step and move to the next one.
4. If you see it > right-click > Disable device.
5. Restart the system to apply changes; now, try to play the sound. Realtek audio driver issues should be fixed.
Method 5. Use a Generic high-definition Audio Device Driver
You can fix Realtek audio driver issues by switching to a generic driver. To learn how to do that, follow the steps below:
1. In the Windows search bar, type Device Manager
2. Search for Audio inputs and outputs
3. Double-click to expand all the audio drivers
4. Right-click the Realtek audio device > select Update driver from the list
5. Next, select Browse my computer for driver software

6. After that, choose Let me pick from a list of available drivers on my computer

7. Select High Definition Audio driver from the list > Next > follow on-screen instructions.
This will load the default sound driver, and the problem with the Realtek audio driver will be solved.
Check This- How to Download Realtek Ethernet Controller Driver
Method 6. Change Default Sound Format
By altering the default sound format, you can fix high-definition audio devices not working. To do so, follow the steps below:
1. Right-click the sound icon present in the system tray.
2. Select Open Sound settings
3. In the new window that opens, click Device Properties.

4. Click the Additional device properties option

5. This will open a new pop-up window here; click the Advanced tab
6. Next, click the down arrow and select the following depending on the speaker configuration:
24bit/44100 Hz
24bit/192000Hz
7. Click Apply > Ok to save changes.
This should fix Realtek audio speakers not working problems. If this doesn’t work, let’s move to the next step.
Method 7. Reinstall Sound Driver
1. Type Device Manager in the Windows search bar
2. Look for audio inputs and outputs. Double-click to expand it.
3. Right-click the sound driver > select Uninstall device from the context menu

4. Once done, click the computer icon with lens (Scan for hardware changes)

5. Now, restart the system. Windows will automatically install the default driver.
This should fix the issue, and the speaker Realtek audio not working problem should be resolved.
Method 8. Select the Correct Output Device
When an incorrect output device is selected, you might face Realtek audio driver problems. We need to switch to the correct output device to fix it. To do so, follow the steps below:
1. Right-click the volume icon present in System Tray.

2. Select Open Sound settings from the context menu.
3. Set Speakers or Headphones as the output device

Now, check your system, the Realtek audio speakers are not working, and the problem should be resolved. If you still face the issue, try updating Windows. If you are using an older version, there are chances that you are facing the issue due to some bug. Updating Windows will help resolve it. Press Windows + I to open Windows Settings > Click Windows Update > Check for updates > Download & Install and restart the PC.
See Also-How to Fix Microsoft Teredo Tunneling Adapter Missing
Frequently Asked Questions
Q1. How do I fix Realtek’s no sound?
To fix Realtek’s no sound issue, set the speakers as default. To do so, follow these steps:
1. Press Windows + R and open the Run window.
2. Type mmsys.cpl > press enter.
3. Click the Playback tab > right-click Speakers > Set as Default Device > Apply > Ok.
4. Exit the Sound Settings window and reboot the PC.
Now check you should not face an audio issue.
If this doesn’t help, automatically update the Realtek Audio driver using Advanced Driver Updater.
Q2. How do I repair and fix Realtek audio driver Windows 10?
To repair and fix Realtek Audio Driver try the following fixes:
1. Check cables, volume, speaker, and headphone connections
2. Update Realtek High-Definition Audio.
3. Disable Audio Enhancement.
4. Enable/Restart Windows Audio Service.
5. Disable Microsoft UAA Bus Driver.
6. Use a Generic High-Definition Audio Device Driver.
7. Change Default Sound Format.
8. Reinstall Sound Driver.
9. Select Correct Output Device.
10. Run the Audio Troubleshooter.
Q3. How do I get my sound back on Windows 10?
Use a generic driver to get the sound back and fix Realtek audio driver issues.
1. Right-click the Windows Start icon,> select Device Manager
2. Go to Audio inputs and outputs> double-click on it.
3. Right-click the Realtek audio device > select Update driver from the list
5. Choose the second option, “Browse my computer for driver software.”
6. Select, “Let me pick from a list of available drivers on my computer.”
7. Select High Definition Audio driver from the list > and follow on-screen instructions.
Q4. Why is there no sound on my Windows 10?
There are chances that the audio device is muted, has been disabled, or the driver is outdated. To fix the problem, unmute the audio device, enable it and update the driver through Device Manager or Advanced Driver Updater.
Q5. How do I fix a corrupted Realtek driver?
The easiest way to fix a corrupted Realtek driver is to reinstall and update the driver. You can do it manually through Device Manager or use Advanced Driver Updater, a driver updating tool, to update corrupt and problematic drivers.
Q6. How do I fix my Realtek audio?
To fix issues with Realtek audio, you can try the following techniques:
1. Update Realtek driver
2. Disable Audio-Enhancement
3. Restart Windows Audio Service
4. Disable Microsoft UAA Bus Driver
5. Modify Default Sound Format
Fix – Realtek Audio Driver Problems
You can quickly troubleshoot Realtek audio problems on your system using these fixes. Alongside these fixes, we suggest checking whether the speakers are correctly connected. Also, ensure that the speaker is not muted. This will help resolve Realtek speakers not working.
We hope using these steps, you can fix the problem with sound. To keep drivers updated and avoid facing such issues in the future, use Advanced Driver Updater, the best driver updater to update outdated drivers in a go. We’d love to hear from you; please share your feedback in the comments section. If you have any product-related queries, contact the support team.
Recommended :
12 Best (Free & Paid) Driver Updater Software To Fix Driver Issues on Windows
How to Download & Update Realtek PCIe GbE Family Controller Driver
How To Download & Update Realtek Audio Driver on Windows 11/10
Table of contents
- What Does ‘Generic Audio Driver Detected’ Mean?
- How to Resolve the ‘Generic Audio Driver Detected’ Issue
- First solution: Make sure audio services are enabled
- Second solution: Disable and enable the audio device
- Third solution: Roll back the audio driver if you started experiencing the problem after an update
- Fourth solution: Update the audio driver
- Use Windows Update
- Use the Device Manager
- Update your audio driver automatically
- These steps will show you how to use the tool:
- Fifth solution: Turn off audio enhancements
- Sixth solution: Use generic audio drivers
- Conclusion
Sound is an integral part of any PC. Whether your computer doubles as a media device or you primarily use it for work, you still need your speakers to function. Since errors and glitches are inevitable, it isn’t out of the ordinary for your system to experience sound problems once in a while.
Audio problems raise their ugly heads on Windows PCs when you least expect them, although the activities that happened prior to a sound problem might explain why it occurred. Audio issues can happen after a major Windows update or upgrade. They could be the results of audio driver glitches, audio device issues, software conflicts, or malfunctioning Windows services.
When your system’s sound becomes faulty, one of the first steps to take is running the audio troubleshooter. The troubleshooter looks for common bugs that are known to affect audio output. Once it finds these glitches, it will attempt to fix them.
That said, the tool doesn’t have a fix for every problem. One of those untreated issues is the Generic Audio Driver problem, which the tool reports to be “detected” after running its scan.
The troubleshooter will only report the problem in this case. You won’t find any option to resolve it in the dialog window. The only options available are “Give feedback on this troubleshooter”, “Close the troubleshooter”, and “View detailed information”.
In this article, we’ll show you how to get rid of the problem and get your audio device to work again.
What Does ‘Generic Audio Driver Detected’ Mean?
The error message is an indication that something has gone wrong with the audio driver. The present driver may be corrupt or missing, or some of the services required for the driver to work properly aren’t running.
How to Resolve the ‘Generic Audio Driver Detected’ Issue
We’ll be walking you through the main troubleshooting techniques that are known to resolve this particular problem. Make sure you apply the fixes in this article in the order that they are arranged.
First solution: Make sure audio services are enabled
There are different audio services that manage audio output on your system. They make sure the audio device responds to the commands that your computer executes. If these services are turned off, the audio device won’t work.
The troubleshooter may be reporting the error because your audio services have been disabled. Head over to the Services application and make sure the services are running as they should.
The following steps will guide you:
- Launch the Run dialog box by right-clicking the Windows logo in the taskbar and selecting Run once the Power User menu appears.
- Pressing the
Win keyboard button and Rtogether is another way to launch the Run dialog box. - After Run opens, type
services.mscinto the text box, and then press theEnterkeyboard button. - When the Services application opens, head to the Windows Audio service and click on it. If it’s running, go to the left side of the screen and click on Stop. Once the service is stopped, click on Start.
- Repeat Step 4 for the Windows Audio Endpoint Builder and the Multimedia Class Scheduler services.
Second solution: Disable and enable the audio device
Restarting the audio device may fix any glitch that’s caused by application conflicts. As you know, the audio device can be used by different applications. If more than one program requests audio output at the same time, the driver may suffer a malfunction. When you disable and enable the audio device, the backlog of problems will be cleared.
Follow these steps:
- Launch the Run dialog box by right-clicking the Windows logo in the taskbar and selecting Run once the Power User menu appears. Pressing the
Win keyboard button and Rtogether is another way to launch the Run dialog box. - After Run appears, type
devmgmt.msc, and then press theEnterkeyboard button. - Once the Device Manager opens, locate “Sound, video and game controllers” and click on the arrow beside it.
- Your audio device(s) will now appear.
- Right-click your active audio device and click on Disable Device in the context menu. Do the same if you have other audio device entries in the menu.
- Now, right-click on the device again and, this time, select Enable Device from the context menu. Remember to do the same for the other audio devices.
- Once you’ve done that, reboot your PC, then check if the problem has been resolved.
Third solution: Roll back the audio driver if you started experiencing the problem after an update
If the issue started occurring after you updated your system, a driver update may be the cause. With the Device Manager, you can easily reverse the damage by removing the problematic driver and installing the previous driver.
The steps below will show you what to do:
- Launch the Run dialog box by right-clicking the Windows logo in the taskbar and selecting Run once the Power User menu appears. Pressing the
Win and Rkeyboard buttons together is another way to launch the Run dialog box. - After Run appears, type
devmgmt.mscand then press theEnterkeyboard button. - Once the Device Manager opens, locate “Sound, video and game controllers” and click on the arrow beside it.
- Your audio devices will now appear.
- Right-click on your main speaker and click on Properties.
- After the Properties dialog window opens, head to the Driver tab.
- Under the Driver tab, click on the Roll Back Driver button.
- Carefully follow the subsequent instructions that pop up, and then click on the Yes button.
- Once the process is complete, reboot your computer.
Sometimes, the Roll Back Driver button under the Driver tab won’t be active. This could be because the previous driver has been deleted. If that’s the case or if rolling back the driver doesn’t work, you can restore your system to a previous state when the issue wasn’t present.
Follow these steps:
- Right-click on the Windows logo in the taskbar and click on File Explorer when you see the Power User menu. You can also tap the
Windows and Ekeyboard buttons together to launch the program. - After the File Explorer opens, go to the left side of the window and right-click This PC.
- Click on Properties in the context menu.
- Once the System window opens, go to the left pane and click on the System Protection link.
- The System Protection tab of the System Properties dialog window will now appear.
- Click on the System Restore button.
- On the first page of the System Restore wizard (where you see “Restore system files and settings”), click on Next.
- Choose a restore point on the next page, and then click on “Scan for affected programs” to find out what applications will no longer be available once you restore the system.
- Once you’ve perused the list of affected programs, click on Close.
- After that, click on the Next button.
- Click on Finish.
Fourth solution: Update the audio driver
The audio driver is one of the main reasons you’re seeing the error. As you know, the driver is the program that transfers instructions from the operating system to the audio device. This means the device will malfunction or not respond properly if the driver has an issue.
To get rid of the error, in this case, you have to make sure the program is running properly. Your first step should be to make sure it’s up to date.
You can use different methods to update your audio driver. Going to the manufacturer’s website is one way to go about it; however, you can use the Windows Update troubleshooter, the Device Manager, or a third-party program to get things done.
Use Windows Update
Windows Update downloads and installs different types of updates when they’re available for your PC. These updates include driver updates for devices, such as the audio adapter and speaker.
Normally, the utility only downloads and installs driver updates for devices that are supported by Microsoft. Your system’s main audio device should be able to run on Microsoft’s driver.
Also, other software updates that are critical to audio-related services can be downloaded via Windows Update.
These steps will show you how to manually start the update process:
- Go to the taskbar and right-click on the Start button.
- Once you see the Power User menu above the Start button, select Settings.
- This should open the Settings application. You can also use the
Windows + Ikeyboard shortcut to summon Settings. - After the home page of Settings is displayed on your screen, click on the icon for Update & Security.
- On the Update & Security page, click on the Check for Updates button.
- Allow the utility to check for any available updates and download them.
- Once the updates have been downloaded, click on the Restart Now button.
- Your PC will reboot and install the updates.
- After the process completes, check for the audio problem.
Use the Device Manager
Using the Device Manager is another way to download and install a compatible audio driver for your audio device. You can use the program to specifically search for the device’s driver update.
These steps will show you how to use the program:
- Launch the Run dialog box by right-clicking the Windows logo in the taskbar and selecting Run once the Power User menu appears. Pressing the
Win and Rkeyboard buttons together is another way to launch the Run dialog box. - After Run appears, type
devmgmt.msc, and then press theEnterkeyboard button. - Once the Device Manager opens, locate “Sound, video and game controllers” and click on the arrow beside it.
- Your audio devices will now appear.
- Right-click on your main speaker and click on Update Driver in the context menu.
- After the Update Driver window opens, click on “Search automatically for updated driver software”.
- Allow the Device Manager to search the internet for the right driver update and install it.
- If the process is successful, the issue should be resolved.
Update your audio driver automatically
There are different third-party programs designed to find and install driver updates. One of the best out there is Auslogics Driver Updater. With this tool, you won’t have to check for the right driver yourself and future updates will be handled with ease.
The program performs routine checks to flush out driver-related issues. It finds device drivers that are out of date, missing, or corrupt and then installs their manufacturer-approved updates. It can also save backup copies of previous driver versions, which will be used whenever updates act up.
These steps will show you how to use the tool:
Download Auslogics Driver Updater
Prevent hardware errors and ensure problem-free device operation with this advanced tool that detects outdated drivers and safely gets them updated.
- Head to Auslogics Driver Updater’s download page.
- After the page opens, click on the button that says, Download Now.
- Next, click on Today’s Price to purchase a license key. Make sure you fill in the necessary information and make your payment to get the license key.
- Once the download is complete, run the setup wizard.
- Next, select the language you want.
- Choose an installation location.
- You’ll see boxes that say, “Create a desktop icon”, “Launch program at Windows startup”, and “Send anonymous info to help improve our service”.
- After making your selections, click on “Click to install and check drivers”.
- Allow the program time to load.
- After the last installation window appears, tick the box for “Launch Driver Updater and scan PC drivers”, and then click Finish.
- Once you’ve done that, the tool will start scanning your PC.
- Once the scan is over, Auslogics Driver Updater will display the outdated drivers and their descriptions. Tick the ones that you’d like to update, and then click on Update drivers.
- The tool will now automatically back up the previous versions of the drivers. This way, you can easily restore them if the latest updates encounter problems.
- The program will start to install the latest official versions of the drivers.
If updating the driver fails to resolve the problem, try reinstalling it. Here’s you what you should do:
- Launch the Run dialog box by right-clicking the Windows logo in the taskbar and selecting Run once the Power User menu appears. Pressing the
Win keyboard button and Rtogether is another way to launch the Run dialog box. - After Run appears, type
devmgmt.msc, and then press theEnterkeyboard button. - Once the Device Manager opens, locate “Sound, video and game controllers” and click on the arrow beside it.
- Your audio devices will now appear.
- Right-click on your main speaker and click on Uninstall Device in the context menu.
- Once the Uninstall Device confirmation box opens, check the box beside “Delete the driver software for this device”.
- Click on the OK button.
- Now, restart your system.
After restarting your system, Windows will try to automatically reinstall the driver. If it doesn’t, follow the steps above to install its updates. If you have Auslogics Driver Updater, run it.
Fifth solution: Turn off audio enhancements
Audio enhancements are designed to improve the sound quality and performance of audio devices. However, they end up causing many problems in certain cases. Audio enhancements could be the reason you see the “Generic audio driver” message whenever you run the troubleshooter to resolve your audio output problems.
Try turning off the ‘audio enhancements’ feature for your device and check if the issue is resolved. The steps below will show you what to do:
- Launch the Run dialog box by right-clicking the Windows logo in the taskbar and selecting Run once the Power User menu appears. Pressing the
Win keyboard button and Rtogether is another way to launch the Run dialog box. - After Run appears, type
control panel, and then press theEnterkeyboard button. - Once the Control Panel opens, make sure Category is selected in the “View by” drop-down menu in the top-right corner of the screen.
- Click on Hardware and Sound.
- On the Hardware and Sound page, click on Manage Audio Devices under Sound.
- Once the Sound dialog window appears, stay in the Playback tab and right-click your main audio device.
- Click on Properties in the context menu.
- When the Properties dialog box for the device opens, go to the Enhancements tab.
- Now, check the box beside “Disable all sound effects” or “Disable all enhancements” (depending on the option that’s there) under System Effects Configuration.
Sixth solution: Use generic audio drivers
If none of the above solutions worked, try using Windows’ native sound drivers. These are basic drivers that ship with Windows 10. They tend to work in situations where manufacturer drivers fail to deliver.
The following guide will show you how to find generic audio drivers in Windows 10 and install them:
- Launch the Run dialog box by right-clicking the Windows logo in the taskbar and selecting Run once the Power User menu appears. Pressing the
Win and Rkeyboard buttons together is another way to launch the Run dialog box. - After Run appears, type
devmgmt.mscand then press theEnterkeyboard button. - Once the Device Manager opens, locate “Sound, video and game controllers” and click on the arrow beside it.
- Your audio devices will now appear.
- Right-click on your main speaker and click on Update Driver in the context menu.
- After the Update Driver window opens, click on “Browse my computer for driver software”.
- On the next page, select “Let me pick from a list of device drivers on my computer”, and then click on the Next button.
- Click on “High Definition Audio Device”, then click Next.
- If a dialog warning comes up, click on Yes.
- Once the operation is complete, restart your system and try checking for the problem.
Conclusion
We believe that your system can now play sounds without issues. There’s a comments section below where you can send us your thoughts about the problem or share your experiences. You’re welcome to use it.
Do not panic if you are experiencing issues like sound or Windows 11/Windows 10 Realtek audio driver not working. All these problems are easily fixable with the 9 effective solutions shared in this article.
Imagining a soundless computer is nearly impossible. We all need sound on our computers for various purposes, like gaming, calls through the webcam, and so on. However, recently many users reported an annoying issue where Realtek audio is not working.
If you are also facing similar issues, firstly, do not panic as the Windows 1 1/Windows 10 Realtek sound not working is effortlessly fixable. All you require is the quick and easy fixes shared in this article to drive this problem away.
However, before discussing how to fix the Realtek audio issues, it is crucial to know why the sound is not working in the first place. If you understand what caused the problem, fixing it becomes easy as pie.
Why Is Realtek Audio Not Working
The following are the reasons Windows 11/Windows 10 Realtek sound stopped working.
- Outdated Realtek audio driver
- Active audio enhancement
- Windows audio service not working correctly
- Conflicts with the Microsoft UAA Bus Driver
- Issues with the current sound format
- Improperly installed/incorrect sound driver
- Incorrect output device
Above were some causes behind Windows 11/Windows 10 Realtek audio problems. Let us now discuss how to fix these issues.
Fixes for the Realtek Audio Not Working Problem [2022 Guide]
You may try the following solutions to get rid of the Realtek sound not working issues on Windows 10/11.
Fix 1: Turn off audio enhancements
Audio enhancement changes may interfere with Realtek audio, causing issues like the Realtek audio not working on Windows 11/10. Therefore, it is better to disable audio enhancements. Below are the step-by-step directions to do it.
Also Read: Realtek Gaming GBE Family Controller Download and Update
Fix 2: Start the Windows audio service again
Windows 10 Realtek sound stopped working issue may be a result of an improperly functioning or disabled Windows audio service. Hence, restarting or enabling it may solve the problem. You may restart or enable the Windows audio service through these steps.
Also Read: Realtek HD Audio Manager Download for Windows
Fix 3: Disable the Microsoft UAA Bus Driver
Conflict may occur if two high-definition drivers coexist on a computer. Hence, you should try disabling the Microsoft UAA Bus Driver if the Realtek audio driver on Windows 10 is not working. Below are the directions to do it.
Also Read: How to Fix Realtek Audio Stuttering on Windows
Fix 4: Update the Realtek audio driver (Recommended)
Outdated drivers are the most problematic for your computer. They lead to many issues like the one you are experiencing, i.e., Realtek speakers not working on Windows 10/11.
Therefore, updating the Realtek audio driver is the strongly recommended solution to the Windows 10 Realtek audio problems. You may update the driver hassle-freely using automatic software like Bit Driver Updater.
The Bit Driver Updater software updates all problematic drivers with just a click. Moreover, it also boasts many benefits like driver backup and restore, scheduling of scans, acceleration of driver download pace, and many more.
Below is the link to download and try Bit Driver Updater.
Once you get the software on your computer, it takes only a few seconds to display all the outdated drivers. After you have all the out-of-date drivers listed on the screen, you may select the option to Update All.

There is also an option, called Update Now, to update only the Realtek audio driver. However, we are in favor of updating each driver to ensure top-notch computer performance.
Fix 5: Try changing the sound format
Your current sound format may also be the reason Realtek audio is not working on Windows 10/11. Hence, you should change the default sound format to fix the issue. Here are the steps to do it.
Also Read: How to Fix Install Realtek HD Audio Driver Failure in Windows
Fix 6: Reinstall the audio driver
Improperly installed or incorrect audio drivers may also lead to Windows 10/ Windows 11 Realtek audio not working issues. Hence, you may uninstall the audio driver and install it again to solve the problem. Below is the process to do it.
Also Read: Download Realtek High Definition Audio Drivers for Windows
Fix 7: Select the correct output device
Incorrect audio output selection may also cause Windows 10 Realtek audio problems. Hence, you may select the right output device to fix the problem. Below given are the steps to do it.
- Right-click the volume icon located in the System Tray.
- Choose the open sound settings option.

- Select Speakers/Headphones as your output device.
- Now, confirm whether the issue is fixed or still Realtek audio is not working.

Fix 8: Ensure speakers are properly connected
Connecting speakers to an incorrect port on the computer may also be a reason your Realtek speakers are not working on Windows 10. Hence, you should make sure that the speakers are connected correctly to the right port on the PC. Moreover, the power supply cable should be properly secured to ensure proper speaker functioning.
Also Read: Ways to Reinstall Realtek HD Audio Manager For Windows
Fix 9: Ensure speakers are not muted
It may seem that Windows 10 speakers are not working if they are muted. Therefore, you should check and unmute them to get the sound. Here is the step-by-step process to do it.
Above, we discussed how to fix the sound and Windows 10 Realtek audio driver not working issues. Now, let us answer some commonly asked questions to clear doubts if any.
Frequently Asked Questions
Below you will find answers to almost every question you may have about the Windows 10/Windows 11 Realtek audio not working issue.
Q1. How do I fix the Windows 10 Realtek audio driver not working problem?
Updating drivers is the best way to fix the Realtek audio driver issues. You may update the driver hassle-freely and automatically with the most recommended driver updater, i.e., Bit Driver Updater.
Q2. How do I get my Realtek audio back?
The above guide shared multiple ways to fix the issues and get the Realtek audio back. You may refer to it to find the best possible solution in your case.
Q3. Why does my speaker work but the mic doesn’t?
If the speaker is working but the mic is not, there are chances that the mic is muted or its volume is too low. Moreover, other causes of the problem may include updating the speaker driver but keeping the microphone driver outdated and accumulating dust in the mic.
Q4. Why is Windows 11 Realtek audio not working?
In addition to the causes mentioned at the beginning of this article, Realtek audio may not work after updating to Windows 11 for reasons like corrupted Windows registry or OS incompatibility.
Also Read: Download and Update Gigabyte Realtek Audio Driver on Windows PC
Realtek Audio Not Working: Fixed
Above was a comprehensive guide to fixing the Windows 11/Windows 10 Realtek audio driver not working issue. You may follow the fixes shared in this article one by one to find the most suitable solution.
However, if you wish to save time and effort, you may directly update outdated drivers using Bit Driver Updater. It instantly fixed the problem for many users. Hence, you may also try it.
Lastly, do not hesitate to drop us a comment if you have any questions or concerns regarding this write-up.