
Пользователи Windows 11/10 могут столкнуться со следующей ситуацией: время от времени при обращении к диску SSD он «зависает», а если в этот момент наблюдать нагрузку на диск в диспетчере задач, она подскакивает до 100%, что не совсем типично для твердотельных накопителей.
В этой инструкции о том, чем может быть вызвана проблема и способах исправить ситуацию.
Драйверы, прошивка и состояние диска
Прежде чем приступать к способам решения, предполагающим изменение параметров Windows 11/10, рекомендую озаботиться установкой оригинальных драйверов, особенно если проблема появилась после свежей установки ОС (Windows устанавливает совместимые драйверы, но не всегда самые подходящие) а при наличии — обновлением прошивки диска:
- С официального сайта производителя материнской платы ПК или вашего ноутбука скачайте все драйверы из раздела «Чипсет» (Chipset) и установите их. Драйверы обычно находятся в разделе поддержки соответствующего продукта.
- Используйте утилиту от производителя вашего SSD для проверки наличия новой прошивки (Firmware), при наличии, выполните его установку. Эта же утилита покажет, если что-то не так с состоянием самого диска (в этом случае, вероятнее всего, дальнейшие действия могут не привести к эффекту), проверку состояния можно выполнить и в сторонних программах для SSD.
- В редких случаях SSD может требовать какого-то специфичного драйвера для своей правильной работы, в этом случае вы можете найти его на странице поддержки вашей модели накопителя.
Может сработать и обновление БИОС/UEFI вашей материнской платы или ноутбука: если вы прибегнете к этому методу, внимательно следуйте указаниям производителя, так как обновление не всегда может проходить гладко, а при наличии проблем с оборудованием риски возрастают.
Отключение прерываний Message-Signaled в реестре
Этот способ срабатывает в большинстве случаев при появлении проблемы со 100% нагрузки на диск в диспетчере задач, при этом работает не только для SSD (перед использованием способа рекомендую создать точку восстановления системы):
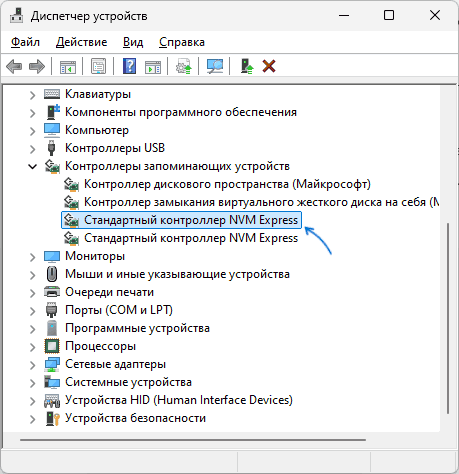
- Откройте диспетчер устройств, для этого можно нажать правой кнопкой мыши по кнопке «Пуск» и выбрать соответствующий пункт контекстного меню.
- Перейдите в раздел «Контроллеры запоминающих устройств» («Контроллеры IDE ATA / ATAPI), дважды нажмите по «Стандартный контроллер SATA AHCI», «Стандартный контроллер NVM Express» или иному, к которому подключен диск.

- На вкладке «Сведения» выберите значение «Путь к экземпляру устройства» и скопируйте его в буфер обмена, нажав по значению правой кнопкой мыши и выбрав соответствующий пункт контекстного меню.

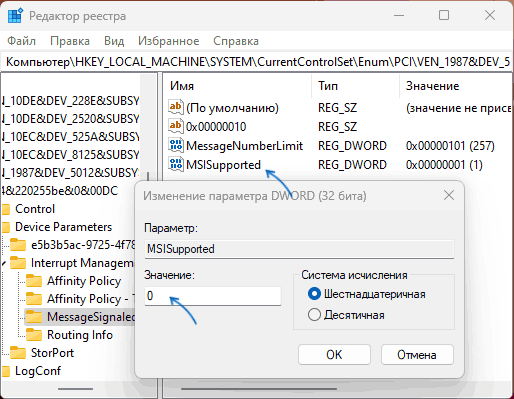
- Запустите редактор реестра (Win+R — regedit) и перейдите к разделу
HKEY_LOCAL_MACHINE\System\CurrentControlSet\Enum
- В адресной строке редактора реестра добавьте «\» справа от Enum, затем вставьте путь, скопированный на 3-м шаге.

- Перейдите в подраздел
Device Parameters\InterruptManagement\MessageSignaledInterruptProperties
- Дважды нажмите по параметру с именем MSISupported и измените его значение на 0, примените настройки и закройте редактор реестра.

- Перезагрузите компьютер.


После этого останется лишь наблюдать, появится ли проблема в дальнейшем.
Параметры управления электропитанием диска SSD (LPM)
По умолчанию для SSD дисков включены функции управления питанием LPM (Link Power Management), обычно — в режиме HIPM (Host Initiated Link Power Management), отключающие диск при отсутствии запросов ввода-вывода, относится это и к SSD.
В случаях, когда проблема с зависанием SSD не вызвана проблемами с самим диском, можно попробовать сделать так, чтобы диск не отключался — это может решить проблему.
Шаги будут следующими (важная деталь — в случае ноутбука это негативно повлияет на время автономной работы, учитывайте этот момент):
- Запустите редактор реестра, для этого можно нажать правой кнопкой мыши по кнопке «Пуск», выбрать пункт «Выполнить», ввести regedit и нажать Enter.
- Перейдите к разделу реестра
HKEY_LOCAL_MACHINE\SYSTEM\CurrentControlSet\Control\Power\PowerSettings\0012ee47-9041-4b5d-9b77-535fba8b1442\0b2d69d7-a2a1-449c-9680-f91c70521c60
дважды нажмите по параметру с именем Attributes и измените его значение с 1 на 2 — это добавит новый пункт в дополнительные параметры электропитания.

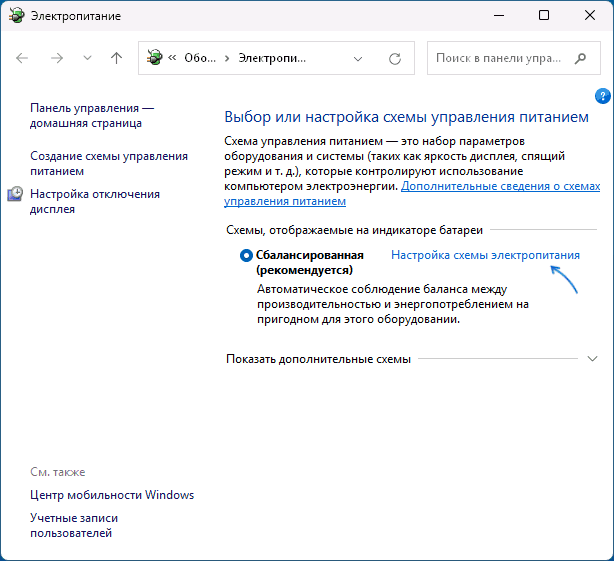
- Нажмите клавиши Win+R на клавиатуре, либо нажмите правой кнопкой мыши по кнопке «Пуск», введите powercfg.cpl и нажмите Enter
- В открывшемся окне нажмите по пункту «Настройка схемы электропитания» справа от текущей схемы.

- Нажмите «Изменить дополнительные параметры питания».
- В разделе «Жесткий диск» — «AHCI Link Power Management – HIPM/DIPM» установите значение «Active».

- При наличии параметра «AHCI Link Power Management – Adaptive», измените значения на 0.
- Примените настройки и закройте параметры электропитания.


После этого можно наблюдать, была ли исправлена проблема. Если это помогло, можно также поэкспериментировать с другими значениями — DIPM или HIPM+DIPM, иногда они также помогают, при этом обеспечивают значительно лучшую экономию энергии.
Некоторые дополнительные нюансы и подходы к решению, на которые следует обратить внимание, если вы столкнулись с зависаниями вашего SSD:
- Некоторые пользователи устанавливают систему на SSD на одном компьютере, после чего подключают этот же диск на другом ПК или ноутбуке. Обычно всё проходит успешно, но не всегда, особенно при значительных отличиях в оборудовании. Настоятельно рекомендую выполнять установку ОС на том же оборудовании, где планируется её использование.
- Одна из особенностей работы SSD — чувствительность к свободному месту на диске. Если на накопителе остаются единицы Гб свободного пространства, именно это может вызвать его неадекватную работу. Решение — позаботиться о наличии свободного места: желательно не менее 10% от общего пространства диска.
- Если речь идёт о SATA SSD, проверьте подключение кабелей как со стороны самого диска, так и со стороны материнской платы. Ещё лучше — заменить SATA-кабели на новые.
- При наличии нескольких физических дисков в системе возможен следующий сценарий: один из дисков имеет аппаратные проблемы, а тот для которого решается проблема — полностью исправен, но при обращении к нему происходят зависания. Простой способ проверки: оставить подключенным только тот диск, проблему с которым мы хотим решить и проверить, решило ли это проблему. Для SATA накопителей и наличии нескольких SATA-контроллеров на материнской плате может помочь подключение дисков к отдельным контроллерам.
- Перегрев контроллера SSD (особенно для моделей с высоким энергопотреблением) может приводить к рассматриваемым эффектам. Решение — использование радиаторов, термопрокладок.
- На ПК причиной проблемы могут оказаться износ или неполадки блока питания, а на ноутбуке — работа от батареи (особенно в случае её износа) и высокая общая нагрузка при этом, чаще — при наличии SSD с высоким энергопотреблением (например, Pro-серий Samsung).
- Работа некоторых вирусов и майнеров может приводить к похожим проблемам, может иметь смысл выполнить проверку компьютера на их наличие.
- Если проблема появляется только после завершения работы с последующим включением, но исчезает после перезагрузки компьютера или ноутбука, попробуйте отключить быстрый запуск Windows.
- Редко: к похожему поведению могут приводить проблемы со стабильностью работы оперативной памяти сами по себе или в сочетании с включенными в фирменном ПО SSD функциями ускорения за счет использования оперативной памяти.
Возможно, ваш сценарий зависания SSD и скачков нагрузки на него до 100% отличается от предложенных в инструкции — в этом случае вы можете поделиться предысторией, наблюдаемыми закономерностями и любыми другими деталями в комментариях ниже, не исключено, что решение найдётся.
Ваш SSD-накопитель не видится в диспетчере устройств? Не паникуйте! Если ваш новый твердотельный накопитель не отображается в вашей системе. К вашему удивлению, существует 6 способов исправить Windows, не видит SSD, и вы можете сделать это даже самостоятельно. Независимо от того, новый у вас твердотельный накопитель или старый, в этой статье описываются все проблемы, которые могут возникнуть, и их пошаговые решения, а также иллюстрируются картинками. Есть несколько причин, из-за которых вы можете столкнуться с этой проблемой. Соответствующие решения для не видит ssd Windows 10/11, приведены ниже, вы можете любезно просмотреть все части, чтобы определить и устранить проблему.
Часть 1: Почему не видит SSD?
Ниже приведены основные причины, по которым Windows не распознает SSD.
- Новый SSD, который еще не инициализирован.
- Драйвер не обновлен.
- Отсутствует буква диска раздела SSD.
- Прерванное подключение кабеля передачи данных.
- SSD не вставлен и не подключен должным образом.
- Драйверы материнской платы SATA загружены неправильно.
- Привод не включен в BIOS.
- SSD скорее всего сломался.
Часть 2: Как исправить не видит SSD в Windows 10/11?
Сейчас, когда мы узнали причину, давайте перейдем к исправлениям проблем, связанных с тем, что SSD не видит в Windows 10/11.
Исправление 1: Исправьте неисправное оборудование
Вы должны проверить соединение, чтобы убедиться, что вы правильно подключили USB-кабель SSD. Убедитесь, что кабель правильно вставлен и вставлен в порт. Проверьте, плотно ли он прилегает, а также проверьте кабель, чтобы убедиться, что он не поврежден. Если вы сделали это, но компьютер по-прежнему не видит SSD, попробуйте исправить неисправное оборудование, которое может быть повреждено.
Используйте интеллектуальную командную строку для ремонта оборудования. SMART — это встроенный инструмент в Windows 10/11, который проверяет и контролирует параметры вашего SSD-накопителя. Быстро просматривайте ошибки. Что они отражают?
-
Нажмите Windows и букву S одновременно.
-
Введите командную строку.
-
Щелкните правой кнопкой мыши на окне командной строки.
-
Выберите Запуск от имени администратора.
-
Введите wmic diskdrive get status в командной строке.
Если вы видите, что результаты выглядят как на рисунке ниже, переходите к следующему шагу. -
Снова запустите «командную строку».
-
Введите: CHKDSK [volume [[path] filename]] [/F] [/V] [/R] [/X] [/C] [: size]] и введите.
-
Одновременно нажмите клавиши «Windows» + буква E.
-
Перейдите к своему твердотельному накопителю и щелкните по нему правой кнопкой мыши. Выберите «Свойства» > «Инструменты» > «Проверить».
-
Перезагрузите компьютер по завершении.
Неужели ничего не случилось? Хорошо! Последнее прибежище:
Исправление 2: Настройка параметров BIOS
Чтобы исправить ошибку, при которой SSD не видит в BIOS Windows 10/11, настройте параметры SSD в BIOS следующим образом:
-
Перезагрузите свой компьютер.
-
Нажмите клавишу F2.
-
Нажмите клавишу Enter.
-
Выберите Serial ATA.
-
Нажмите Enter.
-
Сохраните внесенные изменения в параметр режима контроллера SATA.
-
Перезагрузите компьютер, чтобы войти в BIOS.
Исправление 3: Обновление драйверов SSD
Ещё одним допустимым условием отсутствия SSD-накопителя является то, что он работает с устаревшими драйверами. Попробуйте обновить драйвер SSD, чтобы проверить, помогает ли это устранить проблему.
-
Введите «Диспетчер устройств» в поле поиска меню «Пуск».
-
Нажмите на «Ввод», чтобы запустить его.
-
Перейдите к дисководам.
-
Щелкните правой кнопкой мыши на каждом элементе под ним.
-
Нажмите на кнопку «Обновить драйвер».
-
Перезагрузите свой компьютер.
Исправление 4: Инициализация нового SSD-накопителя
Выполните следующие действия, чтобы инициализировать SSD, который не видит в Windows 10/11, с помощью команд Diskpart,
-
Удерживайте нажатой клавишу «WIN +R.»
-
Введите «cmd».
-
Введите слово «diskpart» в открывшемся приглашении.
-
Нажмите клавишу Enter.
-
Перечислите все диски в вашей Windows 10.
-
Выберите диск, который вы хотите инициализировать.
-
Очистите атрибуты, чтобы перейти к следующему шагу.
-
Включите диск, выполнив команду, если он отображается в автономном режиме.
-
Конвертируйте формат MBR или GPT в зависимости от ваших требований.
Исправление 5: Восстановление с помощью управления дисками
Выполните следующие действия, чтобы восстановить SSD, который не видит в Windows 10 с помощью управления дисками
-
Перейдите в раздел «Управление дисками».
-
Проверьте, является ли объем вашего SSD необработанным или свободным.
-
Отформатируйте диск, если это так.
Исправление 6: Назначьте или измените букву SSD-диска
Обычно Windows 10/11 не может распознать твердотельный накопитель, поскольку буква диска твердотельного накопителя отсутствует или конфликтует с другим диском. Выполните следующие действия, чтобы назначить твердотельному накопителю новую букву диска:
-
Щелкните правой кнопкой мыши на «Этом компьютере».
-
Выберите «Управление».
-
В разделе «Хранилище» нажмите «Управление дисками».
-
Щелкните правой кнопкой мыши на разделе SSD.
-
Выберите «Изменить букву диска и пути к нему.
-
Нажмите кнопку «Изменить».
-
Выберите букву диска из списка.
-
Нажмите кнопку ОК.
Часть 3: Как восстановить данные с SSD не видит?
Если вышеуказанные решения не могут исправить не видит SSD-накопителя в Windows, необходимо извлечь из него данные. Возможно ли восстановить данные с необнаруженной SD-карты? Конечно! 4DDiG может восстанавливать данные с SSD-накопителя, которые не видит в Windows 10/11, или извлекать данные даже после их форматирования. Это бесплатно, быстро и удобно для пользователя. Установите, чтобы запустить инструмент 4DDiG Data Recovery в любое время, когда вам это понадобится.
-
Выберите местоположение
После загрузки и установки 4DDiG на свой компьютер и подключения устройства выберите SSD не видит Windows, и нажмите «Начать», чтобы продолжить.
-
Просканируйте диск на наличие файлов
4DDiG выполнит сканирование, чтобы проверить потерянные данные. Существует индикатор выполнения, с помощью которого вы можете приостановить или остановить сканирование в любое время. Вы увидите потерянные файлы, показанные на рисунке ниже.
-
Восстановление данных с нераспознанного SSD
Выберите целевые файлы и нажмите «Восстановить«, чтобы сохранить их в определенном месте.
Часть 4: Как избежать того, чтобы не видит SSD в будущем?
Проблема с тем, что SSD-карта не работает или не видится, возникает время от времени, и нам полезно знать советы о том, как избежать того, чтобы SSD-карта не обнаруживалась в будущем.
- Будьте внимательны, чтобы избежать экстремальных температур. Разместите свой компьютер с твердотельным накопителем там, где он не должен подвергаться сильной жаре или холоду.
- Перебои в подаче электроэнергии — это тихие убийцы аппаратного обеспечения. Подключите свой компьютер к более надежному источнику питания.
- Всегда оставляйте немного свободного места на вашем твердотельном накопителе. Старайтесь не заполнять более 75% вашего SSD.
- Ограничьте частоту записи SSD. Чем меньше вы его форматируете или стираете с него данные, тем дольше он сохраняется.
- Дефрагментация может сократить срок службы SSD.
Часть 5: Часто задаваемые вопросы о SSD
1. Как я могу исправить не видит SSD в BIOS?
Вам нужно нажать F2 сразу после перезагрузки системы и следовать подсказкам, пока не появится опция режима контроллера SATA.
2. Как будет видить мой новый SSD-накопитель?
Скорее всего, вы не инициализировали его в Windows Disk Management. Немедленно инициализируйте его, процедура приведена выше в исправлениях.
3. Как мне исправить не видит SSD при установке Windows?
Вам необходимо переустановить драйвер SSD во время установки windows, если SSD обнаружен, но не отображается на моем компьютере.
Заключение:
Твердотельный накопитель — это самое тонкое и долговечное устройство, которое будет использоваться в Windows 10. Однако, поскольку это гаджет и он уязвим для многих опасностей, иногда он может не отображаться. Независимо от того, не видит ли SSD SanDisk или не видит SSD Samsung, процедура их исправления будет одинаковой. Все исправления, приведенные выше, могут помочь вам устранить проблемы, связанные с тем, что SSD не видит в Windows 10. Если твердотельный накопитель поврежден, и вам нужно извлечь потерянные данные. Это поможет, если у вас есть надежный инструмент восстановления данных для этого. Программное обеспечение для восстановления данных Tenorshare 4DDiG — лучшее для этого. Он быстро восстановит данные на твердотельном накопителе, которые не будут обнаружены, даже если вы отформатировали их ранее. Установите его сегодня и снова распрощайтесь с потерей данных.
Александр Кокин (старший редактор)
Александр Кокин, главный редактор 4DDiG, занимается предоставлением наилучших решений для проблем, связанных с Windows и Mac, включая восстановление данных, ремонт, исправление ошибок.
Last updated on April 22, 2024
What should you do when your SSD freezes on Windows 10/11? Can changing cluster size without formatting fix the issue? Do you know why an SSD can freeze? There are four common factors that may lead to this problem. It could be that you connected the SSD to the wrong SATA port, since your PC has multiple different SATA ports. Another reason is that AHCI mode is not enabled. The third one is unaligned 4K, and besides, physical damage to the SSD can also cause freezing. In this post, tools Software will show you 4 methods to unfreeze and fix the SSD.
< a id=»1″ name=»1″>4 Ways to Fix SSD Freezing in Windows 10
In this section, we will present four distinct solutions to help you address the issue of an SSD freezing error on your Windows 10/11 system. Each method offers detailed steps tailored to a specific aspect of the problem, ensuring a customized solution for your SSD’s predicament.
Solution 1: Check if the SSD is connected to the correct port
SATA ports are used for data transfer and come in three types: SATA I, SATA II, and SATA III. To fully leverage the high-speed performance of an SSD, it should be connected to a SATA III port, which allows for data transfer rates of up to 600 MB/s. Connecting an SSD to an incompatible port, such as SATA II, can lead to speed issues and malfunctions. To address the «SSD freezing» problem, ensure that the SSD is correctly connected to the appropriate port.

Read more:
Solution 2: Enable AHCI mode
AHCI is a modern mode for interfacing with memory devices that unlocks the benefits of SATA, such as faster data exchange with SSDs and HDDs and hot-plugging. Enabling AHCI can significantly increase file access speeds and overall PC performance.
Please enable AHCI mode by following these steps:
1. Open the Registry Editor. Type “regedit” into the Run window, then press “Enter.”
Step 2. Click “OK” when you see the pop-up window.
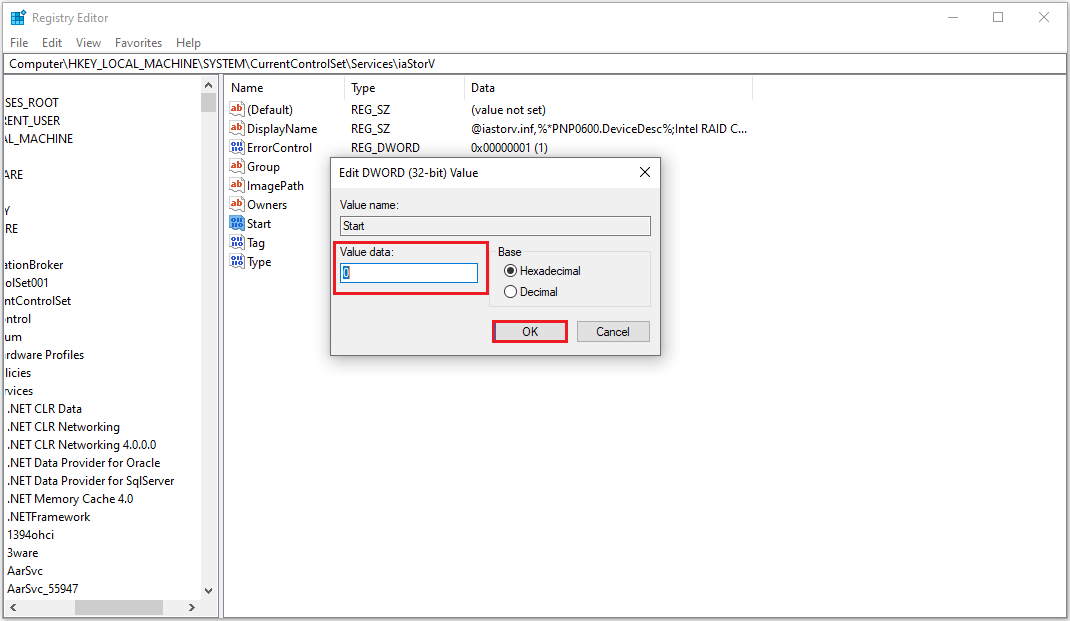
Step 3: Navigate to “HKEY_LOCAL_MACHINE\SYSTEM\CurrentControlSet\Services\iaStorV”. Once you’re in the “iaStorV” section, double-click on “Start” and change its value to 0.
4. Navigate to HKEY_LOCAL_MACHINE\SYSTEM\CurrentControlSet\Services\iaStorAV\StartOverride and open the “0” entry, then change its value to 0.
Step 5: Navigate to HKEY_LOCAL_MACHINE\SYSTEM\CurrentControlSet\Services\storahci, and edit the Start entry, changing its value to 0.
Step 6: In the HKEY_LOCAL_MACHINE\SYSTEM\CurrentControlSet\Services\storahci\StartOverride section, open the 0 entry and set its value to 0.

Step 7. Exit the Registry Editor, restart your computer, and enter BIOS. You might want to boot Windows in Safe Mode for the first restart.
Step 8. In the BIOS, find the SATA settings and look for the disk mode. Change this setting to AHCI, save the changes, and restart your computer.
Step 9. After the restart, Windows will begin installing the SATA drivers. Once this is done, you’ll be prompted to restart again. Upon completing this step, AHCI mode will be enabled on your Windows installation.
Solution 3: Align SSD to 4K
Without 4K alignment, an SSD may also get stuck. In this part, we will help you check whether your SSD is 4K aligned. If not, we will provide tools and guides on how to align SSD with 4K.
Step 1: Check if the SSD is 4K-aligned
You need to check if the SSD is 4K aligned. If the SSD is not properly aligned to the 4K standard, its performance might be affected, which could lead to freezing issues with the SSD.
Follow the steps:
1. Hold down the Windows key and press R to open the «Run» dialog box. Type in «msinfo32» and press Enter.

Step 2: Under the «System Overview» menu, click on «Components.» In the sub-menu, click on «Storage,» then select «Disks.»
Step 3: Check the value under «Partition Start Offset«. If it can be divided by 4096 without any remainder, then your disk is 4K-aligned.
If you discover that your SSD is not aligned, refer to the second method for a fix.
Step 2: Run 4K alignment
Welcome to the crucial stage of 4K alignment, which can significantly boost your SSD performance. Let’s introduce you to the powerful tool called Partition Master, which provides essential support for effortless 4K alignment. With its user-friendly interface and excellent compatibility, it ensures a smooth experience for users of all levels, whether you’re a novice or an expert. The interface is designed to guide you seamlessly through the alignment process.
So, download the tool Partition Master and proceed as follows:
Step 1: Click on «Toolbox» and then choose «4K Alignment».
Step 2: Select the disk that you want to align. Click the Start button.
This is an embed code for a YouTube video that displays a full-screen player with permissions for accelerometer, autoplay, clipboard-write, encrypted media, gyroscope, and picture-in-picture. The video ID is «JRAoYrNzlgo», and the player has a width of 700 pixels and a height of 410 pixels. It also has the attribute «allowfullscreen» set, and the frameborder is set to «0».
Solution 4: Replace the SSD with a new one
Unfortunately, if all the solutions fail, or your SSD is physically damaged, there is no other option but to get a new SSD. So, after getting a new SSD, the first thing you would worry about is saving your data and programs. Don’t worry, in this case, the Partition Master tool can help you replace the frozen SSD with a new one without losing any data. Because the Partition Master tool has the disk cloning feature that can save all the data on your old SSD/HDD and transfer it to the new disk, injecting new life into your system.
Let’s explore how to use this essential tool and its cloning feature to clone a disk:
Step 1: Select the source disk.
- From the left menu, click «Clone.» Choose «Clone system disk» or «Clone data disk,» then click «Next.»
Select the source disk, then click «Next.»
Step 2: Select the target disk.
- Select the desired HDD/SSD as the target disk and click “Next” to proceed.
Read the warning message and confirm by clicking the “Yes” button.
Step 3: Look at the disk layout and edit the target disk partition sizes.
When prompted that all data on the target disk will be erased, click “Continue” (make sure to back up any important data on the target disk beforehand).
Here, you can choose to “Automatically adjust the disk size,” “Clone as the source disk,” or “Edit disk layout.” (If you want to allocate more space for C drive, choose the last option.)
Click “Start” to begin cloning the disk.
This tool has other features. See the list below:
- Check SSD health status and temperature
- Clone SSD to a larger SSD
- Clone an SSD with bad sectors
- Upgrade HDD to SSD
- Test SSD read/write speed
Don’t hesitate to download this tool to check your SSD’s performance and take good care of your SSD.
Why Does a Solid State Drive Cause Windows 10 to Freeze?
If you’re experiencing SSD freezing issues while using Windows 10/11, understanding the root cause can help you find an effective solution. In this section, we’ll explore the possible reasons behind this mysterious problem:
SATA connection error: Freezes can occur if your SSD is connected to the wrong SATA port.
AHCI mode not enabled: SSD performance might be reduced if AHCI mode is not enabled.
Your SSD is not 4K-aligned: If your SSD is not properly aligned with 4K sectors, it might also cause freezing.
Physically Damaged SSD: Physical damage can also lead to awful freezing issues.
And please share this article with others to help them quickly get rid of this frustrating and annoying problem.
The Chinese character » » translates to «Non-breaking space» or «Solidus» in English. In web encoding and text editing, it is used to insert an invisible space that prevents words or characters from breaking onto a new line.
Conclusion
When you encounter SSD freezing issues on Windows 10/11, try the four methods above to unfreeze your SSD. It’s also crucial to understand the reasons behind the freezing to apply the right and relevant solutions. With the help of this article, you now know the causes of SSD freezing and how to fix them. Share this article with others as it can help them resolve the issue as well.
«Frequently Asked Questions about SSD Freezing Issues»
An SSD freezing can be frustrating, especially when you’re in the middle of a project or game. If you have more questions about why your SSD might be freezing, check out the FAQ below.
Why does my solid state drive frequently freeze?
Your SSD might freeze due to an incorrect SATA connection, disabled AHCI mode, or improper 4K alignment. Identifying the root cause is crucial for applying the right solution.
< strong > 2. Can a faulty SSD cause a computer to freeze?
Yes, a malfunctioning SSD, whether due to physical damage or internal issues, can cause freezing problems with your computer.
3. How to fix my SSD drive crash issue?
First, identify the underlying issue. It could be a 4K alignment problem, an AHCI mode issue, or a faulty connection causing the SSD crash. Follow the steps in our guide to apply the corresponding solutions.
Many users migrate their Windows OS to SSD in pursuit of high-speed performance. Although SSD is very fast, it is inevitable to encounter the SSD freeze-up issue sometimes. Don’t worry, this article from Partition Magic shows you four ways to resolve SSD freezes.
Why Does SSD Freeze-up on Windows 10/11
Solid state drives (SSD) and hard disk drives (HDD) are both data storage devices. SSDs store data in flash memory, while HDDs store data in magnetic disks.
Compared to HDD, SSD is a newer technology. It uses integrated circuit assemblies as memory to store data, with many advantages, including faster speeds, lower power consumption, and better gaming experience. Therefore, nowadays, more and more people choose to install or migrate their OS to SSD to improve the performance of their PCs.
However, some people complain that their SSD keeps freezing Windows 10/11. Why does this happen? Listed below are 4 reasons that may cause SSD freeze.
- Misplaced SATA connection: There are 3 types of SATA ports for SSD and different ports have different data transfer ability. If your SSD is connected to the wrong SATA port, it can lead to freezing up.
- AHCI mode is not enabled: AHCI is the newest mode for storage devices. If the AHCI mode is not enabled, your SSD performance may slow down.
- SSD is not 4K aligned: 4K alignment refers to aligning the physical disk partition with the PC logical partition to ensure the read and write efficiency of the hard drive. If your SSD is not 4K aligned, the SSD freezes for a few seconds.
- SSD physical damage: If your SSD disk is physically damaged, it may also cause the SSD lock up.
The following are 4 effective ways to solve the “SSD freezes for a few seconds” problem. You can try them one by one until the issue gets solved.
Way 1: Check If the SSD Is Connected Right Port
SATA ports are designed for data transfer. There are 3 types of SATA ports, called SATA I, SATA II, and SATA III. Different ports have different data transfer capabilities. The upper limit of SATA I is 150 MB/s, the upper limit of SATA II is 300 MB/s, and the upper limit of SATA III is 600 MB/s. Since SSDs have fast write and read speeds, they need to be connected via SATA III ports.
If the SSD is connected to a SATA II port, there is a high chance that the read and write speeds will be reduced and the SSD will not be able to reach its potential, which may cause the SSD to freeze.
So, when you encounter the SSD freeze problem, the first thing to do is to check if the SSD is connected to the right port.
Way 2: Enable the AHCI Mode
AHCI (Advanced Host Controller Interface) is a new modern mode for memory devices. In this mode, computers can take advantage of SATA, such as faster data exchange with SSDs and HDDs and hot swapping of hard disks. Enabling AHCI can significantly improve file access speed and overall PC performance.
Currently, AHCI mode is basically enabled by default on mainstream motherboards. However, for a few motherboards and previous old motherboards, the default is to manually change to the AHCI option through BIOS settings.
To enable AHCI, you can enable it somewhere in the BIOS setup. If you do not enable AHCI mode, your SSD may freeze-up. That is to say, you may not have enabled AHCI mode before installing the operating system to the SSD. Therefore, it is recommended that you enable this mode before installing the operating system.
If you don’t know that your PC has AHCI mode enabled, don’t worry. The steps below will tell you how to know which mode your computer’s controller is using.
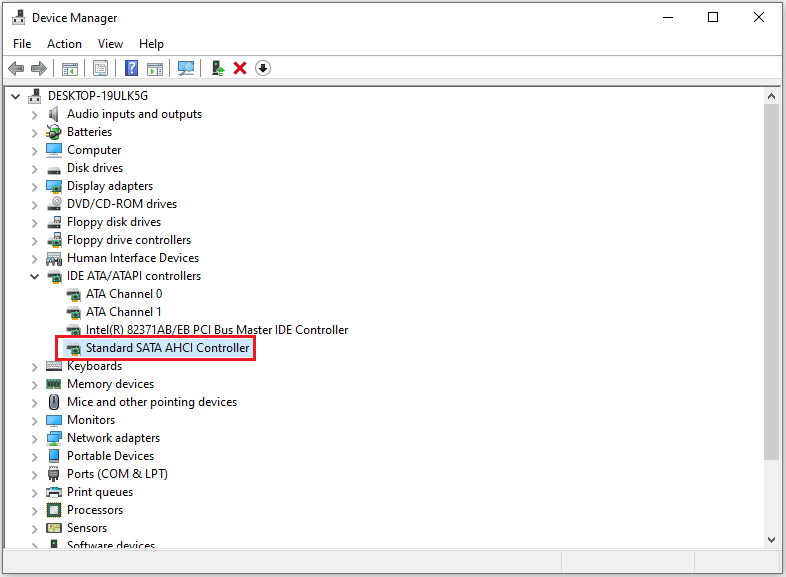
Step 1: Press the Win + X key to open the Device Manager.
Step 2: Click the section IDE ATA/ATAPI controllers.
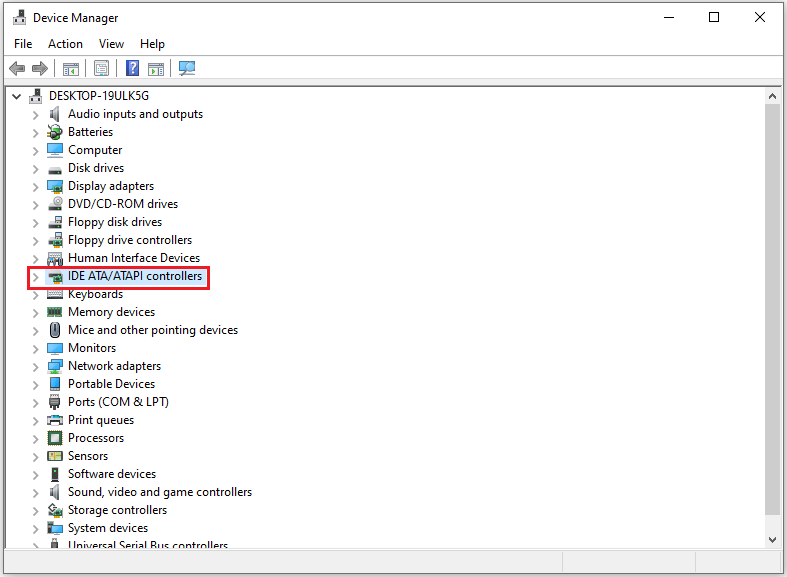
Step 3: As shown in the figure below, if a device contains AHCI in its name, it means that AHCI mode is being used in this computer.
Note:
It is recommended that you enable AHCI mode before installing Windows. If you enable AHCI mode in the BIOS setup after Windows installation, your system may refuse to boot, getting stuck in a series of reboots.
If you forget to enable AHCI mode for SATA on a computer with Windows installed, you can enable AHCI by following the steps below. Windows will work normally and the SSD will not freeze again.
However, you’d better back up important files and data before the operation to avoid any unexpected errors during the operation that may lead to data loss. Let’s take a look at how to do it step by step.
Step 1: Press the Win + R key to open the Run Window. Then type in the command regedit and press Enter to open Registry Editor.
Step 2: Go to the path HKEY_LOCAL_MACHINE\SYSTEM\CurrentControlSet\Services\iaStorV.
Step 3: Double-click on the Start element and set its Value data to 0 (zero).
Step 4: Go to the path HKEY_LOCAL_MACHINE\SYSTEM\CurrentControlSet\Services\iaStorV\StartOverride and set the zero Value data for the 0 element.
Step 5: Go to the path HKEY_LOCAL_MACHINE\SYSTEM\CurrentControlSet\Services\storahci. Then double-click the Start element and set the Value data to 0 (zero).
Step 6: In the subsection, HKEY_LOCAL_MACHINE\SYSTEM\CurrentControlSet\Services\storahci\StartOverride set the zero Value data for the 0 element. You may see nothing if you have enabled AHCI. But if AHCI has not been enabled yet, you will see it.
Step 7: Close Registry Editor.
Step 8: Restart your computer and enter UEFI or BIOS. In UEFI or BIOS setup, find SATA to select the mode of memory devices. Switch them to AHCI, save the settings, and restart your computer.
Step 9: When Windows finishes installing the SATA drivers, it will ask you to reboot again. Doing this will enable AHCI mode in Windows.
Way 3: 4K Align SSD
4K alignment is one of the important factors that affect the read and write speed of SSD. If the SSD is not 4K aligned, the speed of the SSD will be seriously affected and cause problems such as SSD freezing.
When you migrate the Windows operating system from a mechanical hard drive to a solid-state drive, the partition may not be aligned correctly. This may be the reason for the SSD freezing, which will affect the computer’s running speed, performance, etc. But don’t worry, it is very simple to 4K align the SSD using the third-party software MiniTool Partition Wizard.
MiniTool Partition Wizard is a free disk partition software specially designed to manage partitions and disk usage without causing any damage to the original data. It provides the Align All Partitions function to fix SSD lock up. What’s more, it can handle various disk and partition jobs, such as convert MBR to GPT, format SD card FAT32, hard drive clone, etc.
To 4K align your SSD and resolve SSD freezing Windows 10/11 with MiniTool Partition Wizard, refer to the following content. First click the button below to get this free partition manager, and install it on your PC.
MiniTool Partition Wizard FreeClick to Download100%Clean & Safe
Step 1: Run MiniTool Partition Wizard to its main interface. Right-click on the SSD that needs to be aligned and select Align All Partitions. Alternatively, you can select the disk you want to align and click the Align All Partitions feature in the left pane.
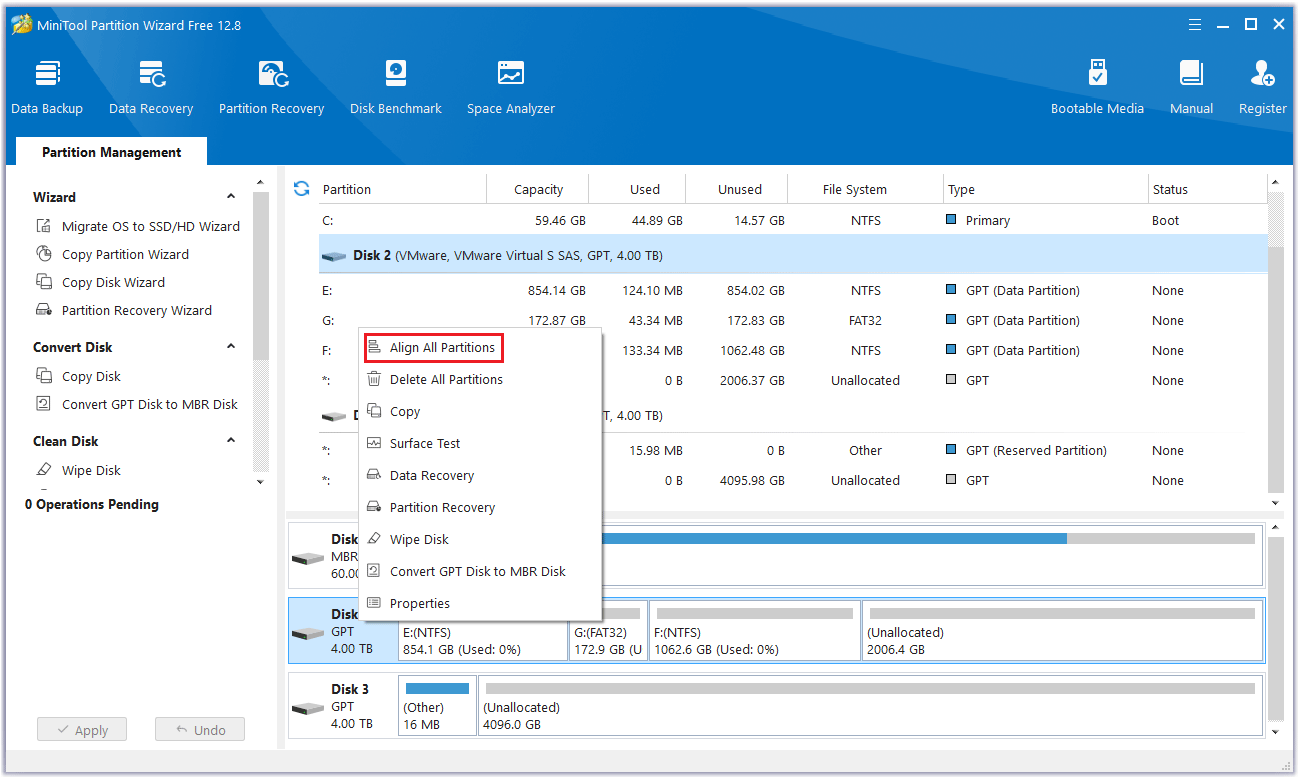
Step 2: MiniTool Partition Wizard will tell you how many partitions you need to align. Click Yes to continue.
Step 3: Finally, click Apply to make the operation effective. If the partitions on your disk are aligned, you may see the “This disk does not need to change partition alignment. All partitions are already aligned” message pop-up.
Way 4: Replace Your Computer with a New SSD
As mentioned above, your SSD may be physically damaged if it freezes from time to time. In this case, a feasible solution to the problem is to replace the damaged SSD with a new one.
You can do this by using the Copy Disk feature with MiniTool Partition Wizard. Fortunately, this feature can transfer the entire data from the damaged disk to the new one without having to perform a Windows installation from scratch. This will save you a lot of time and keep your operating system and files the same as in the original location.
MiniTool Partition Wizard DemoClick to Download100%Clean & Safe
Now, you can follow the steps below to copy everything on the problematic disk to the new SSD.
Note:
Before cloning a new SSD, you need to pay attention to two things:
1. The target disk does not store any important data because the cloning process will delete all data on the target disk.
2. The free space on the new disk should be greater than or equal to the used disk space on the old disk.
Step 1: Connect your new SSD to your computer (via SATA for desktops or USB to SATA adapter cable for laptops).
Step 2: Run MiniTool Partition Wizard to its main interface. To clone SSD, right-click on the disk that needs to be cloned and select Copy.
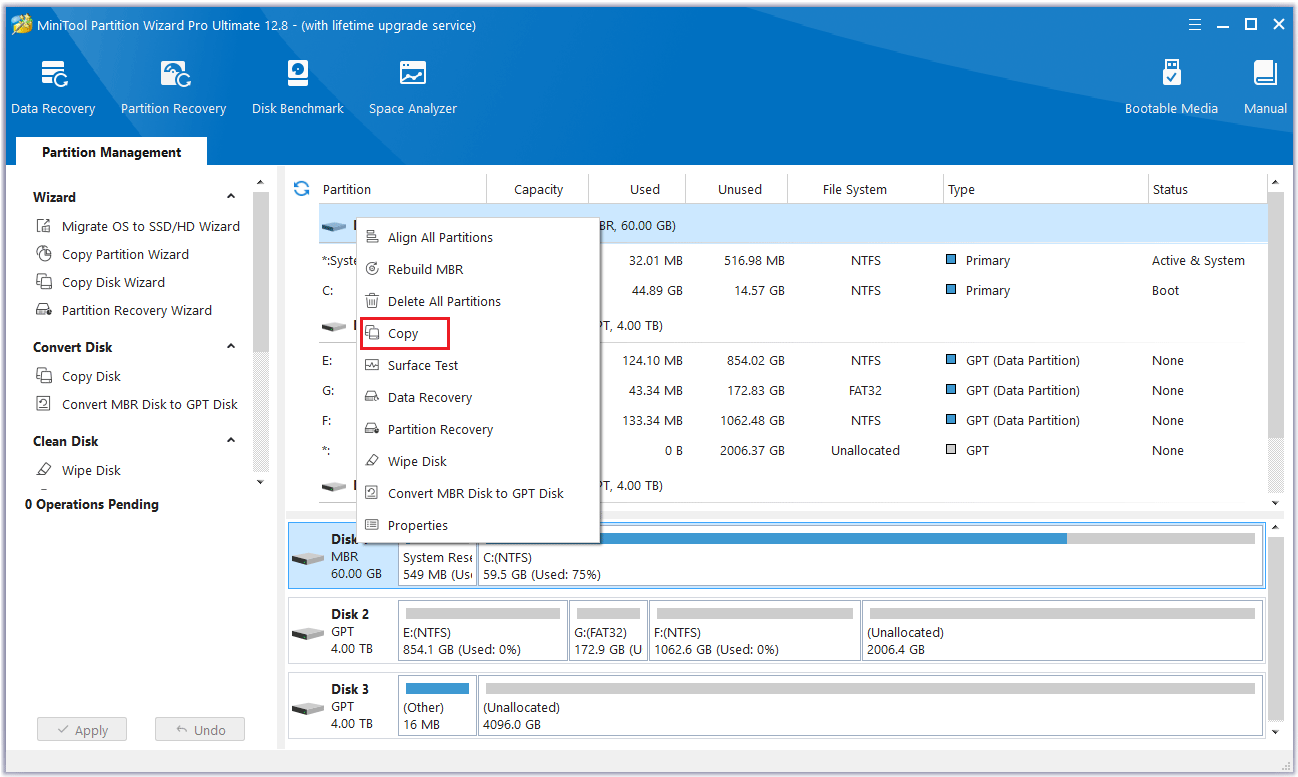
Step 3: In the new pop-up window, select the target disk where the copied data will be saved. Then click the Next button.

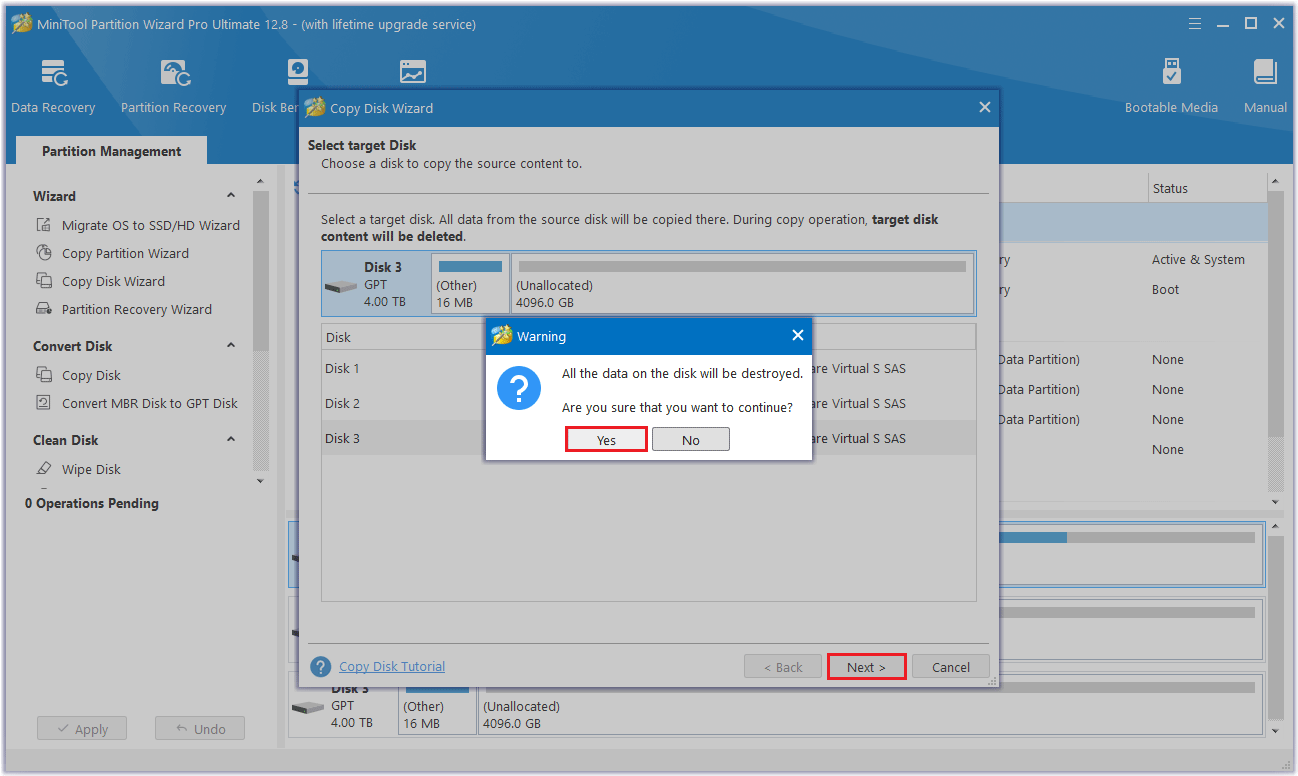
Step 4: In this interface, a warning will appear telling you all the data on the disk will be destroyed. To perform the cloning operation successfully, click the Yes button.
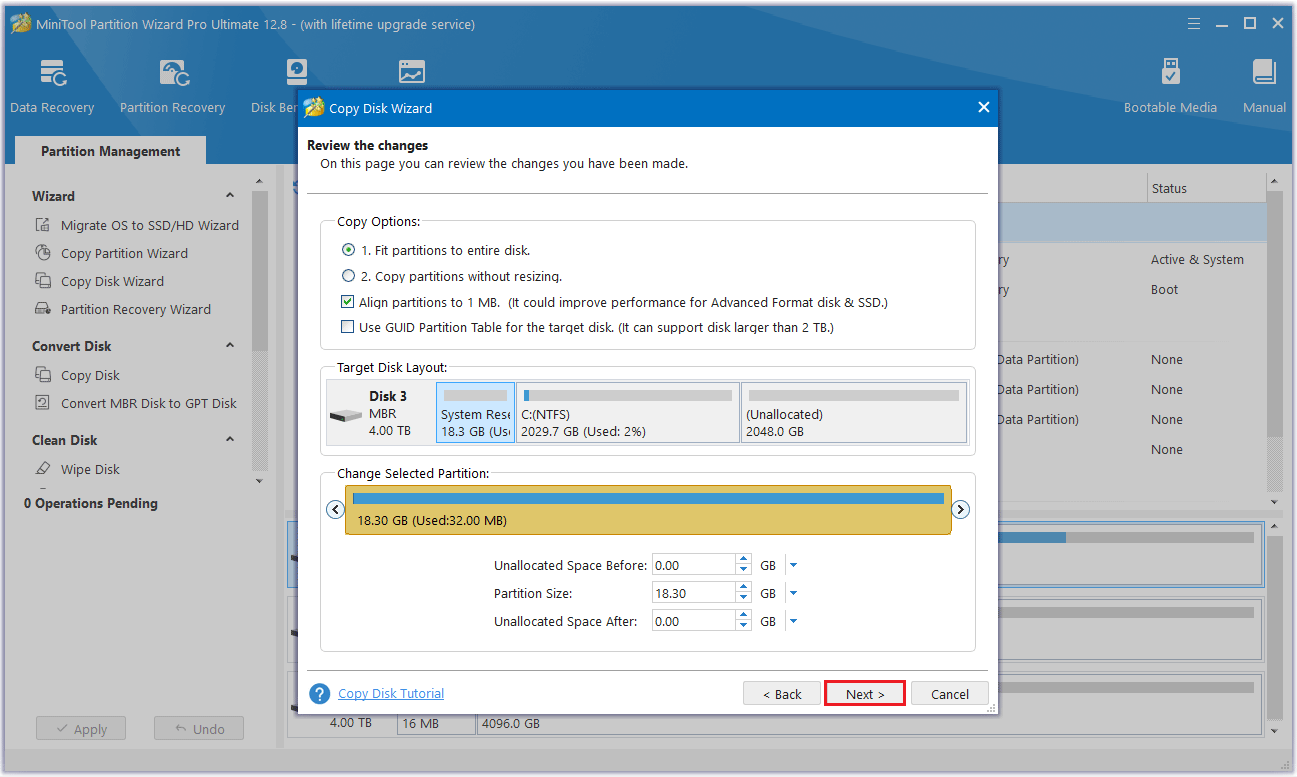
Step 5: Select a copy option and click Next.
- Fit partitions to entire disk: Fill all disk space on the target disk in proportion to the partition size.
- Copy partitions without resizing: Keep original partition size. Available only if the destination disk is not smaller than the source disk.
- Align partitions to 1MB: This can improve the performance of the target disk if it is an SSD.
- Use GUID Partition Table: It can support disk larger than 2TB.
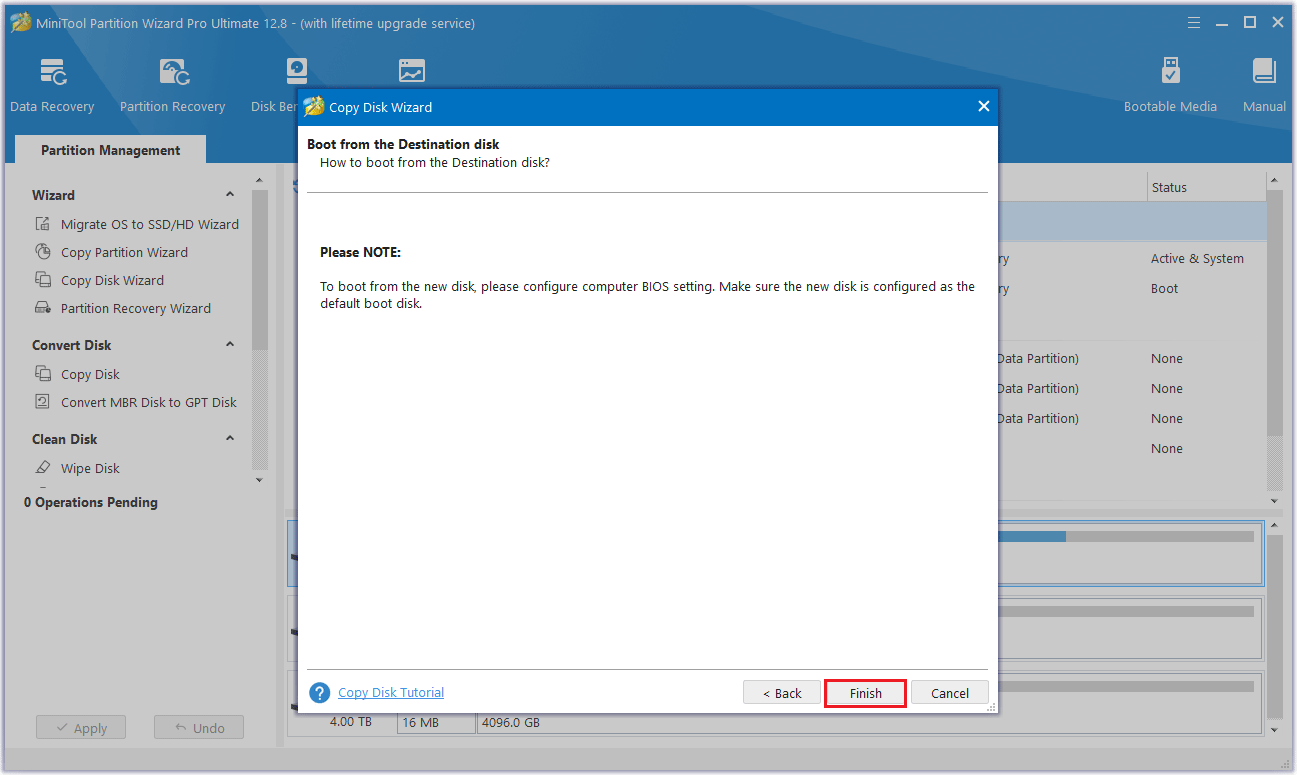
Step 6: Read the note carefully which shows how to boot from the target disk, and click Finish to go back to the main interface.
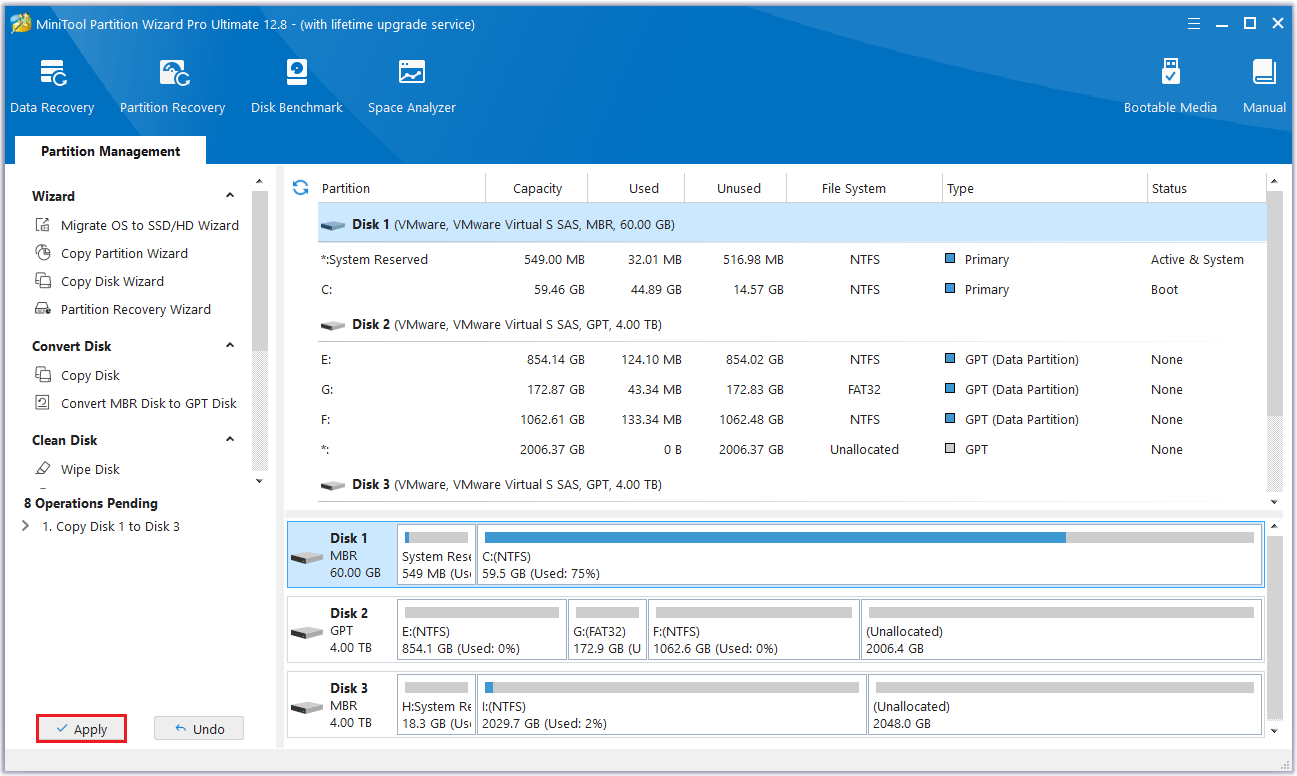
Step 7: MiniTool Partition Wizard will return to its main interface. Here you can preview all the changes you want to clone a new SSD. Click Apply to make the operation effective.
I have some troubles with my SSD. Thanks to this article, 4 methods are introduced to solve the problem of SSD keeps freezing. If you also want to solve the problem of SSD freeze-up without losing data, you can also read this article, which is very helpful to you.Click to Tweet
Bottom Line
This is the end of the article. When you encounter SSD freezing Windows 10/11, you can take the above methods to solve it. If you have tried the first three methods in this article and they don’t work, the most direct way is to replace your computer with a new SSD.
Don’t worry about data loss and other issues when replacing your computer with a new SSD. You can copy everything including Windows 10 to your new SSD by using MiniTool Partition Wizard. This software is very convenient and powerful.
If you have any questions or suggestions while using MiniTool Partition Wizard, you can contact us via [email protected] to get a quick reply.
SSD Freeze-up FAQ
1. Why does my SSD keep freezing?
Your SSD can be frozen due to incorrect SATA connections, disabled AHCI mode, or improper 4K alignment.
2. Will a faulty SSD still freeze?
Yes, a faulty SSD (whether due to physical damage or internal problems) can cause freezing issues.
Many users are slowly migrating from using HDDs to SSDs, the reason is simple – SSDs start up a Windows 11/10 computer quickly. But slow SSD read/write speed problems are very much real.
If your device contains a Solid-State Drive (SSD), you may have perhaps noticed that as it fills up, its performance falls dramatically. You will notice that opening applications and copying files will take longer than usual, and sometimes, this will also cause freezing issues, making your device tougher to use.
SSD is the short form for a solid-state drive; it is a storage device that has gained immense popularity in recent times. It adopts integrated circuit assemblies to help people store data for good. However, several factors can be responsible for the slow SSD read or write speed on Windows 11/10 or other operating systems. These include:
- Low Space
- TRIM command is disabled or doesn’t exist
- AHCI mode is disabled
- The Boot sequence is incorrectly configured
- Computer or SSD is infected with viruses
- BIOS/firmware is outdated
- Something is wrong with the SATA port or cable
- Low RAM.
These were the most common reasons for the SSD’s decline in speed and performance.
TIP: Test your Read-Write speeds using CrystalDiskMark or Parkdale.
It can be hard to pinpoint the exact problem your system may be facing. We will list some tips that will hopefully get your SSD up and running again.
- Free up space to improve performance
- Make sure the TRIM command is running
- Enable AHCI mode
- Choose high-performance mode
- Optimize your SSD
- Update Firmware of the SSD
- Configure correct Boot order
- Check your SATA port
- Check your SATA cable.
Let us look at these solutions in more detail.
1] Free up space to improve performance
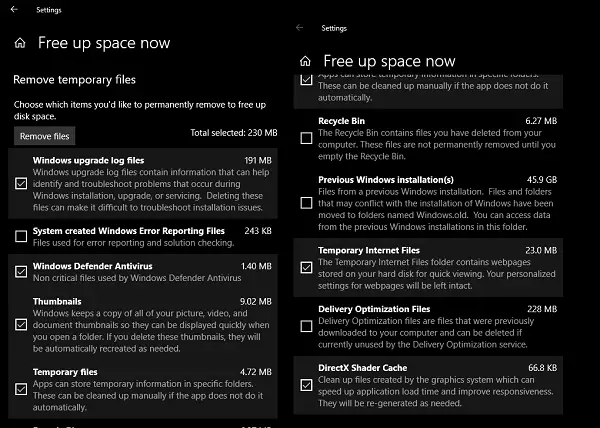
The less space on your SSD, the slower it will perform. If your SSD is at 90 percent capacity or higher, and you notice some performance issues, at this point you should first try and clear up some space. The most obvious thing that you can try is to start deleting unnecessary files and folders from SSD that may be occupying the space.
Another idea that works is to disable hibernation, as this could free up a lot of disk space for you. Follow these steps:
- Open ‘Command Prompt’ from ‘Windows Search’.
- Type ‘cmd’
- Right-click on the top search result and choose command prompt with administrative rights i.e., select the option ‘Run as administrator’
- Type
powercfg -h off - Hit ‘Enter’
Once you followed the steps mentioned above to clear off some space in your SSD. Check if there have been any improvements in the SSD read/write speed. If it didn’t work, move on to the next solution.
Related: How to protect Solid State Drive and extend SSD life.
2] Make sure the TRIM command is running

An SSD drive will run slow if the TRIM command is not running. Follow these steps to make sure the TRIM is enabled.
- Click ‘Start’ and type ‘cmd’
- Right-click ‘Command Prompt’ and hit ‘Open as Administrator’
- Copy and paste the command –
fsutil behavior query DisableDeleteNotify - Press ‘Enter’
- Now, if you get ‘0’ as the result, it means TRIM is enabled and if you get ‘1’ it means disabled. Move on to the next step if you get ‘1’ in the result.
- Type
fsutil behavior set DisableDeleteNotify 0 - Hit Enter.
This will enable TRIM command on your system.
NOTE: If you run the command now in Windows 11, you will see it displayed as follows – but it means the same thing.
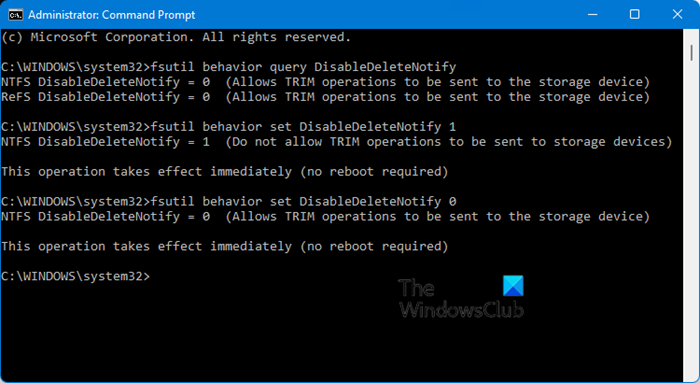
The value 0 has been described as Allows TRIM operations to be sent to the storage device.
3] Enable AHCI mode
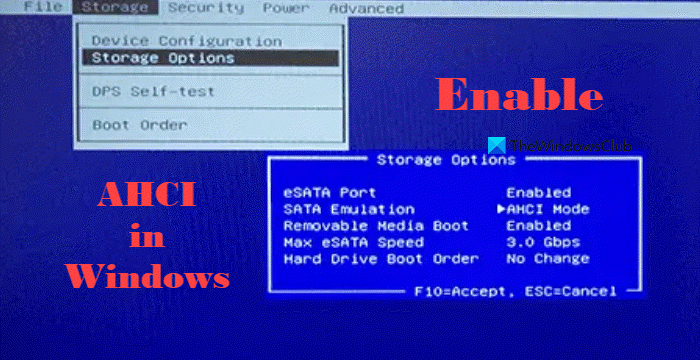
The Advanced Host Controller Interface (AHCI) specifies the operation of Serial ATA (SATA) host controllers in a non-implementation-specific manner in its motherboard chipsets. The specification describes a system memory structure for computer hardware vendors to exchange data between host system memory and attached storage devices. This mode is very crucial for you to get the best out of the SSD; if it’s not enabled, your SSD will run slow. You can easily enable AHCI in Windows.
4] Choose the Power high-performance mode
This is a quick potential fix. Try changing to the Power high-performance mode by following the steps below:
1] Search for ‘Power & Sleep settings’ in the ‘Start’ menu
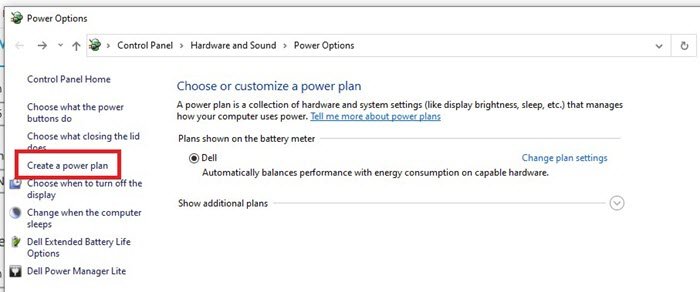
2] Scroll down the right-side options and click on ‘Additional power settings’ under ‘related settings’
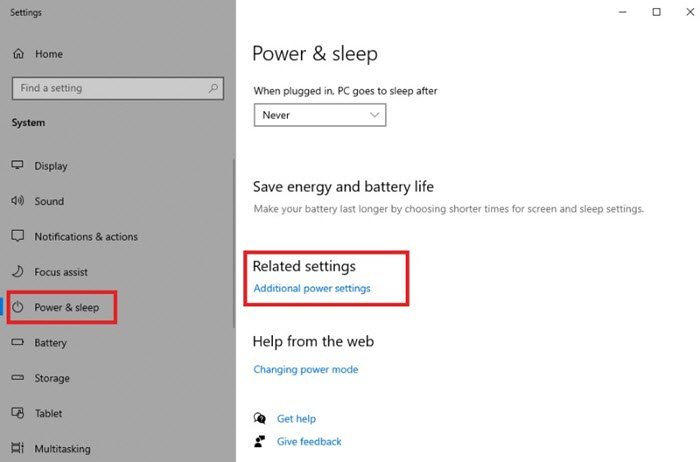
3] In the ‘Power Options’ window click on ‘Create a power plan’ appearing on the left-side menu
4] Now select ‘High Performance’ and click ‘Next’
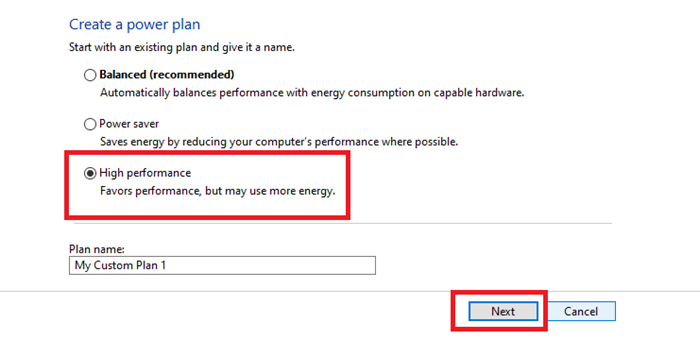
In Balanced Power Plan, your SSD doesn’t receive the full power it needs to run at its best capacity, on the other hand, the High-performance plan favors performance.
Read: Do you need to defrag SSD?
5] Optimize your SSD
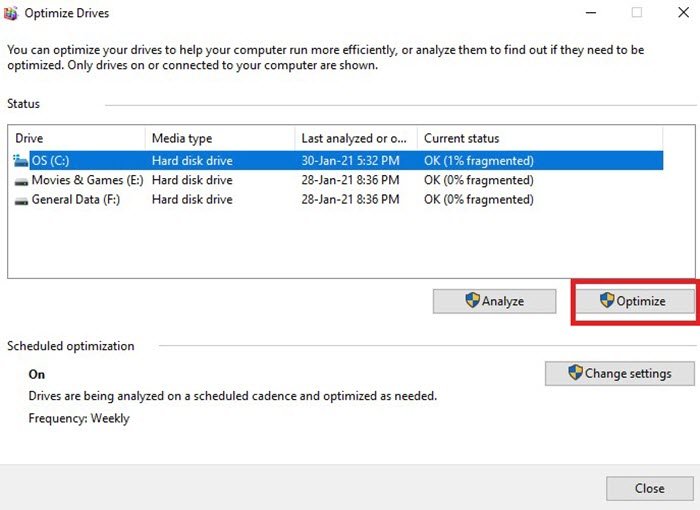
After some time of using an SSD, especially after installing many applications, it is recommended to optimize SSD. Follow these steps:
- Search for ‘Defrag’ in the ‘Start menu’
- Select Defragment and Optimize Drive
- Select the SSD drive and click ‘Optimize’
Optimizing it from time to time helps bring it back to its original state.
Read: Optimize and speed up your SSD drive using Tweak-SSD.
6] Update Firmware of the SSD
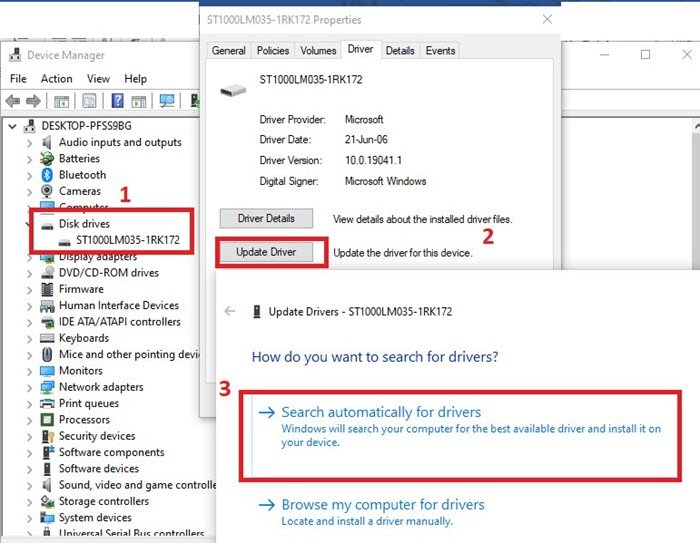
Just like other hardware, SSD manufacturers release patches and updates periodically for SSDs too. The firmware of SSDs is essential for running them smoothly and efficiently, so remember to keep checking for a firmware update. To update your SSD, follow these steps:
- Press ‘Win + R’ keys to open the ‘Run’ dialog box.
- In the ‘Run’ dialog, type ‘devmgmt.msc’
- Hit ‘Enter’
- In the ‘Device Manager’ windows locate ‘Disk drives’ and click on the arrow and expand it.
- Right-click on the SSD and click ‘Update Drivers’
- You will be prompted for options on ‘How do you want to search for drivers?’ Click on ‘Search automatically for drivers’.
Windows will now search for any new updates available for your SSD and install them. Once the process is completed. check if your issue is resolved.
Read: SSD Optimization Tips for better performance.
7] Configure correct Boot order
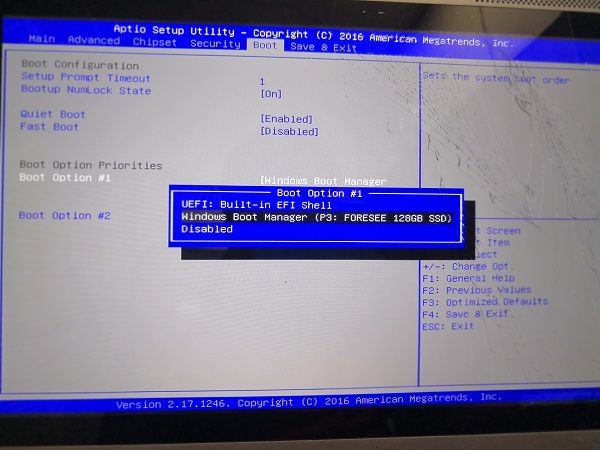
Another reason an SSD drive is slow could be that the boot sequence is wrongly configured. If the first priority is given to the hard drive, instead of SSD, the computer will run slow. This Windows guide will show how you can boot into Windows 10 firmware settings (UEFI/BIOS), and change the boot order easily.
8] Check your SATA port
These days, most motherboards contain SATA 3Gbps/ SATA 6Gbps ports. The speed of the port depends heavily on the SSD’s performance. It can be difficult to identify the SATA Port; hence, you must refer to the motherboard’s manual to determine it correctly. Typically, motherboards made on Intel chipsets contain an Intel SATA controller. This controller has the highest speed, so the boot device should be connected to this one only.
Read: Increase Data Transfer Speed in External Hard Drive
9] Check your SATA cable
One more reason for poor SSD performance is a poor-quality or defective SATA cable. So, check to confirm if the state of the cable is fine. Also, it is advised that you purchase a SATA cable only from a well-known manufacturer.
Along with the above, you could try increasing your RAM or completely formatting your SSD—these tricks also help fix slow SSD read or write speed on Windows 10.
Your SSD can become slow for various reasons, but when that happens act immediately and rescue your data because the SSD may corrupt at any time and you may lose all your valuable data.
Related read: How to increase Hard Drive speed & improve performance.